12" Base Cabinet Door/Drawer Combo (Momplex White Kitchen)

Difficulty
Intermediate
| Print this plan

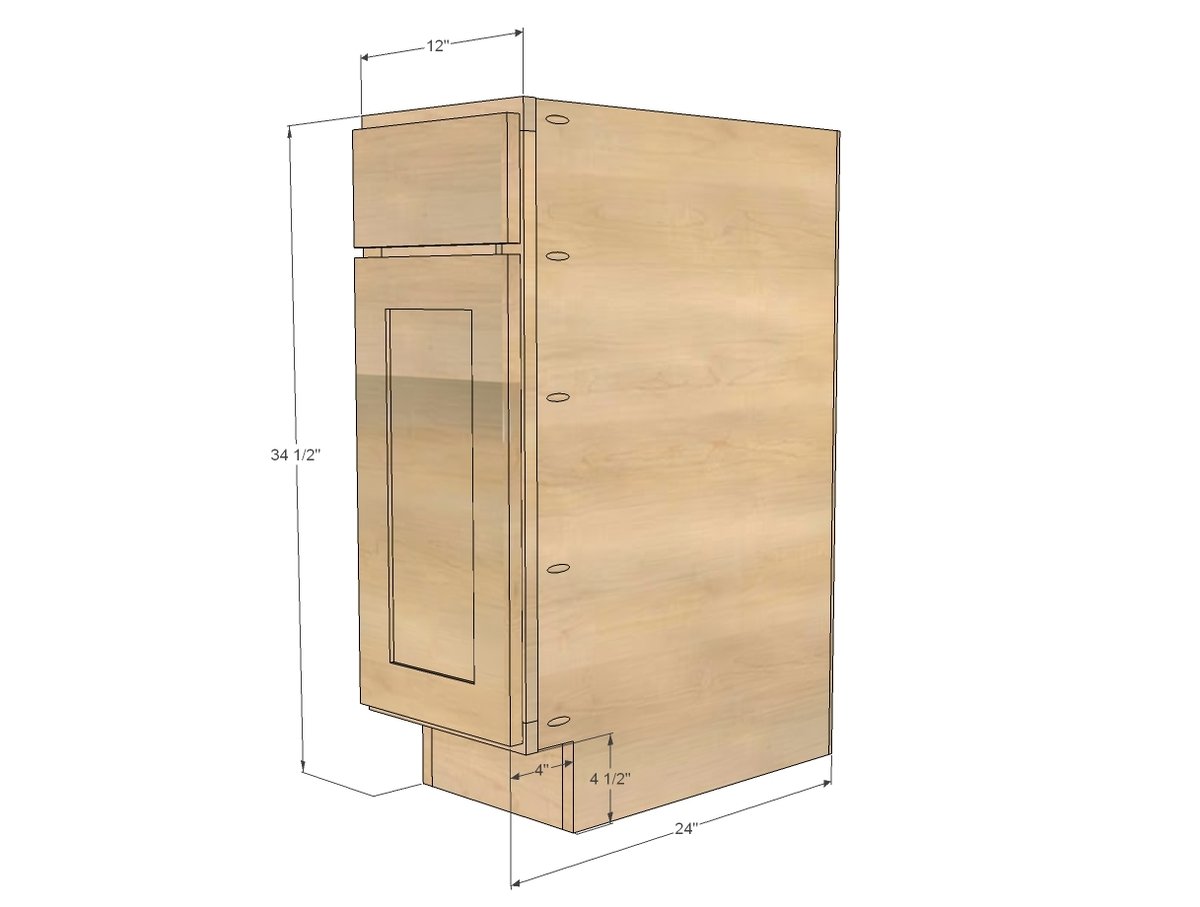
12" base cabinet full overlay door plans - Momplex White kitchen cabients.

I think one of the things that suprised us the most about building the Momplex kitchen cabinets was really how easy they were.  

Granted, there were two of us (the hubs and I) and we do have a tablesaw (that really helps), but still, in constrast to building other pieces of furniture, we both agreed that these cabinets were actually pretty simple and quick to build.

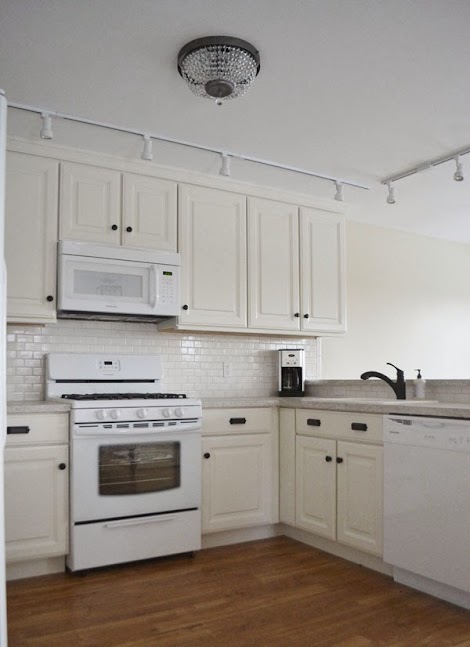
Once we got a process down, it was really like an assembly line of cabinetry construction.  And although it looks like there's quite a few cabinets, when it actually came down to it, there's only six base cabinets in this kitchen. I bet the same is true of your kitchen - once you add in dishwasher, stove, fridge ... what's left to build get's a lot less!

One thing we didn't do for our cabinets was draw out each and every plan.  That costed us a ton of time, because we were never on the same "page" - it's really nice to have a printed out plan to follow for each and every cabinet, even if they are just scaled versions of each other - so it's easy to work with someone and you don't have to spend time figuring or second guessing yourself.  Or worse, redoing a mistake.

So over the next bit - as long as it takes - I'll be filling in between posts with kitchen cabinet plans in specific, standard sizes.  That way you can just print and get building!

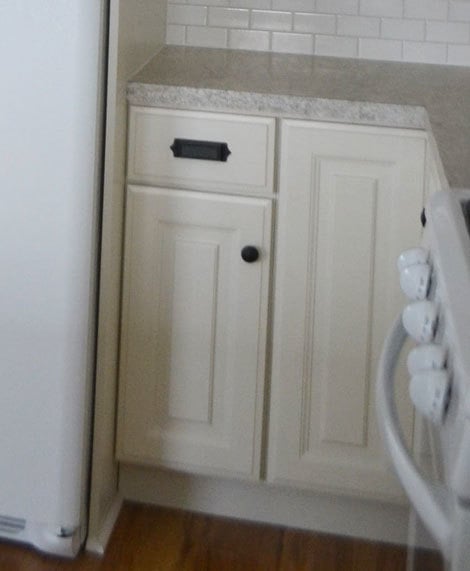
Today, I thought we'd start with the 12" base that we built in this post.

IMPORTANT: Please read through these posts before building, as I show you step by step in pictures how we built these cabinets.

Planning and Layout

Base Cabinet Construction

Shelf Edge Banding

Drawer Installation (coming soon)

Base Cabinet Installation (coming soon)

Cabinet Door Installation (coming soon)

Base Cabinet Finishing - Toekick, Trim Etc (coming soon)

Dimensions
Dimensions shown above - overall finished depth with 3/4" door/drawer face is 24"

Preparation

Shopping List

3/4" plywood ripped into strips 22 1/4" long (for sides and shelves)
3/4" plywood scrap from ripping sides and shelves (for top supports)
3/4" plywood ripped into strips 5" long (for base supports - use cheaper plywood here)
1x2s for face frames
1/4" plywood (for backs)
1-1/4" pocket hole screws
3/4" finish nails
edge banding for shelves

Cut List

CARCASS
2 - 3/4" plywood @ 22 1/4" x 34 1/2" (side panels)
1 - 3/4" plywood @ 22 1/4" x 10" (bottom shelf)
2 - 3/4" plywood @ 5" x 10" (bottom supports)
2 - 3/4" plywood @ 3 1/2" (can vary) x 10" (top supports)
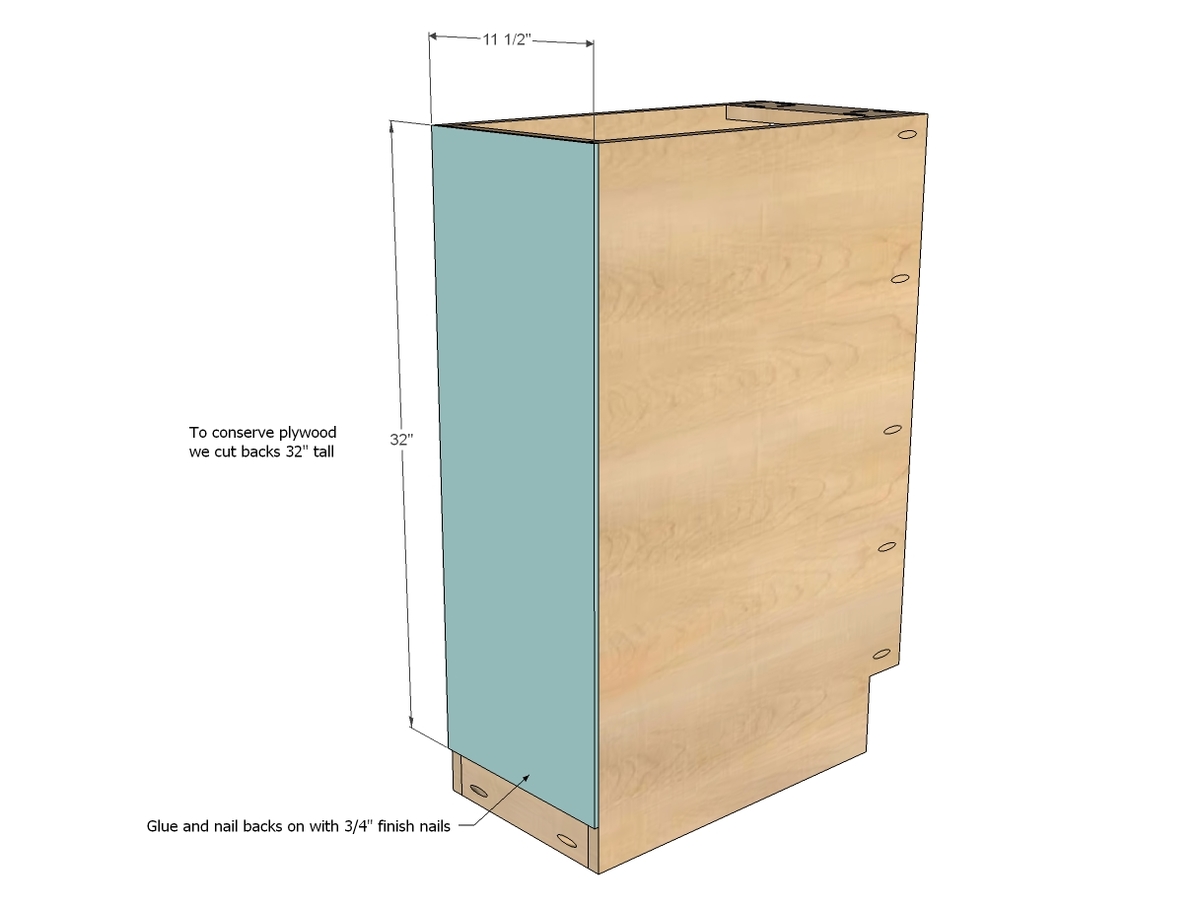
1 - 1/4" plywood @ 32" x 11 1/2" (back)

FACE FRAME
2 - 1x2 @ 27"
2 - 1x2 @ 12"
1 - 1x2 @ 9"

SHELVES
3/4" plywood @ 22" x 9 3/4" (measure and adjust to fit shelf pins)

DOOR/DRAWER FACE for FULL OVERLAY (1-1/4")
5 1/2" x 11 1/2" (drawer face)
22-1/2" x 11-1/2" (door)

Tools
Tape Measure
Speed Square
Pencil
Safety Glasses
Hearing Protection
Kreg Jig
Drill
Jigsaw
Table Saw
Brad Nailer
Power Sander
General Instructions

Please read through the entire plan and all comments before beginning this project. It is also advisable to review the Getting Started Section. Take all necessary precautions to build safely and smartly. Work on a clean level surface, free of imperfections or debris. Always use straight boards. Check for square after each step. Always predrill holes before attaching with screws. Use glue with finish nails for a stronger hold. Wipe excess glue off bare wood for stained projects, as dried glue will not take stain. Be safe, have fun, and ask for help if you need it. Good luck!

Instructions

Step 1

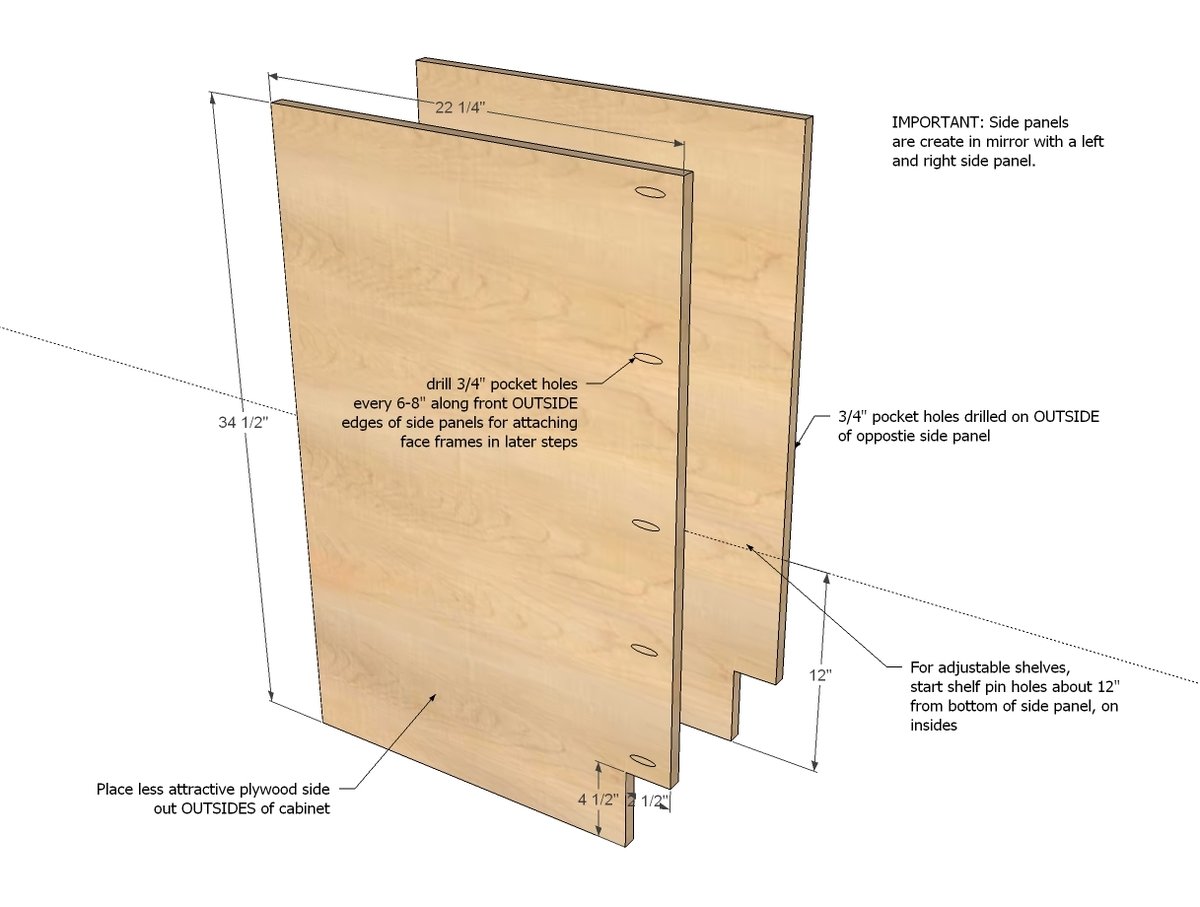
First, create the side panels - remember that the two side panels are mirrors of each other.  

Step 2

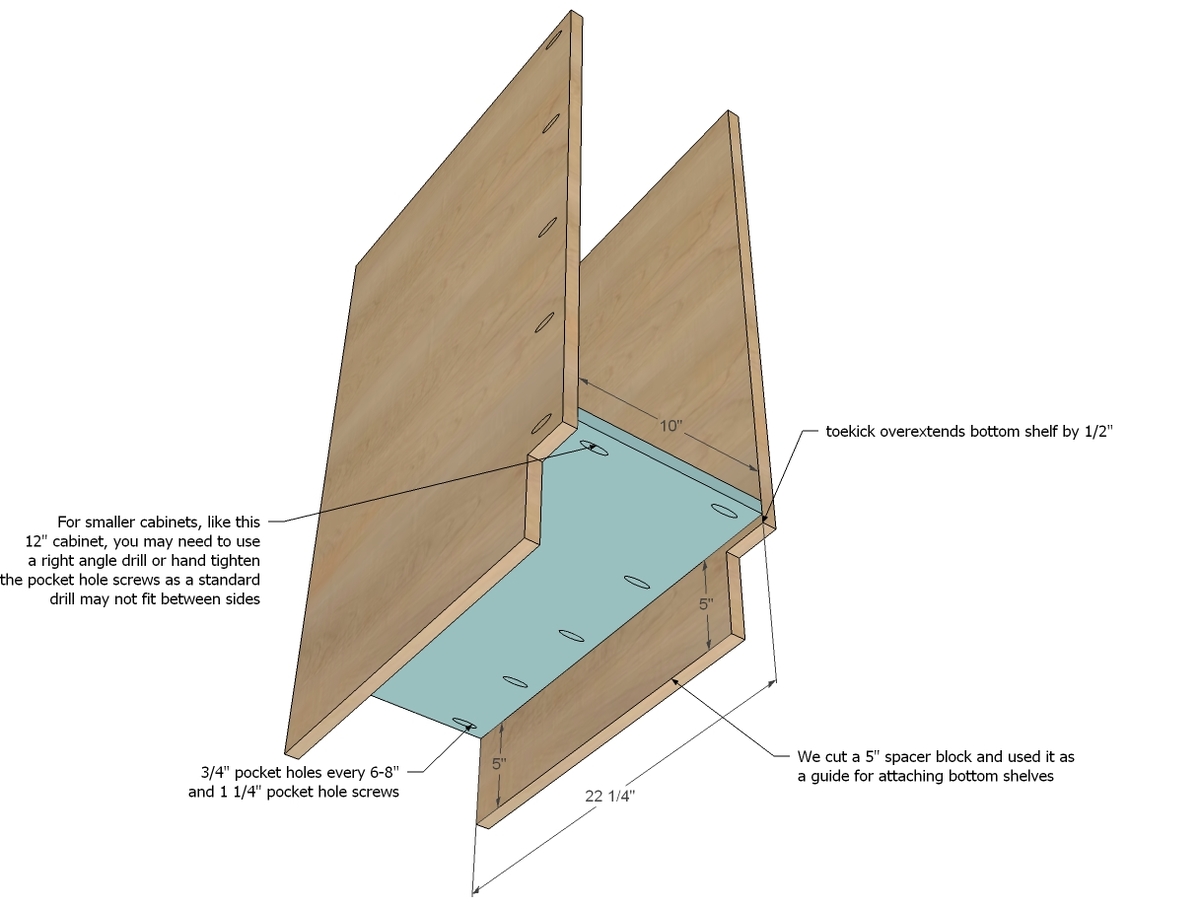
Then attach the bottom shelf to the two side panels.

Step 3

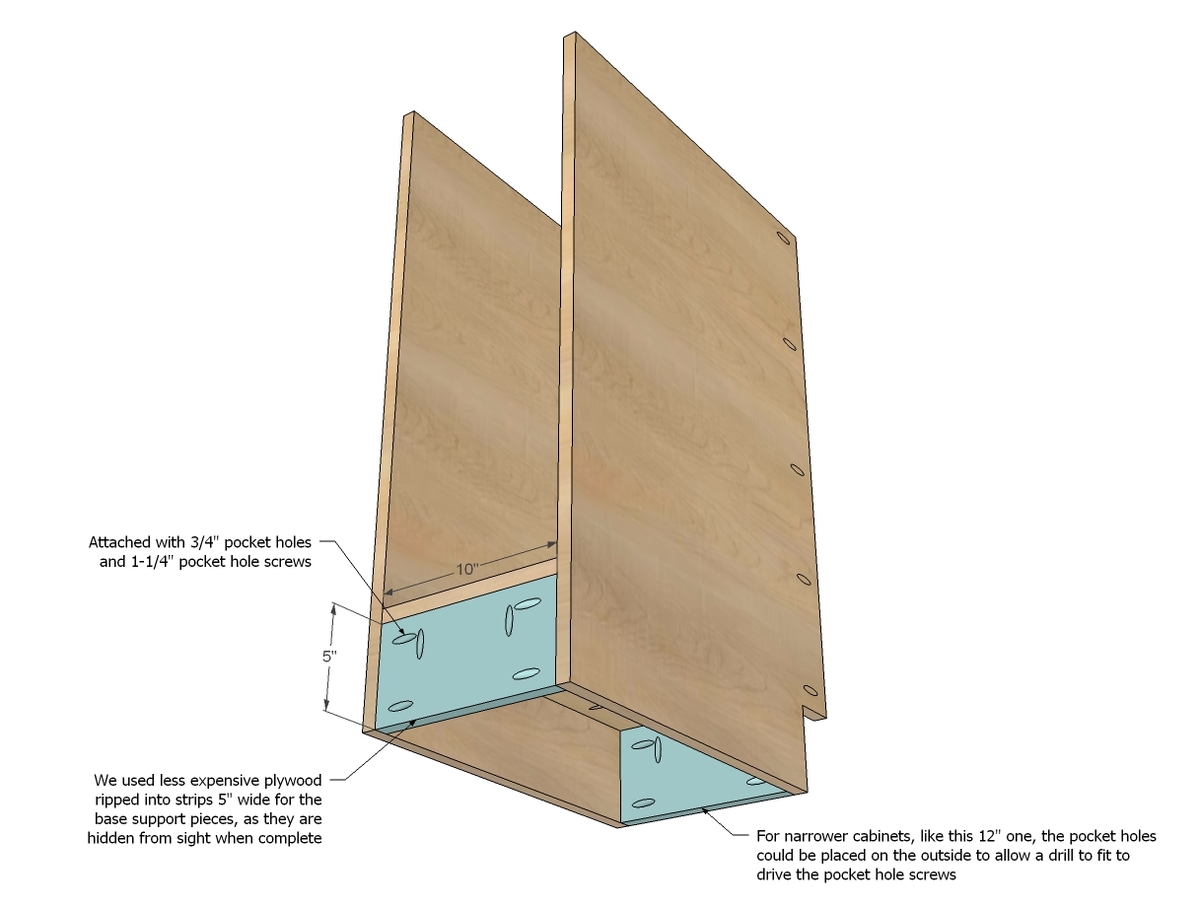
Next, attach the back and front supports underneath the bottom shelf.

Step 4

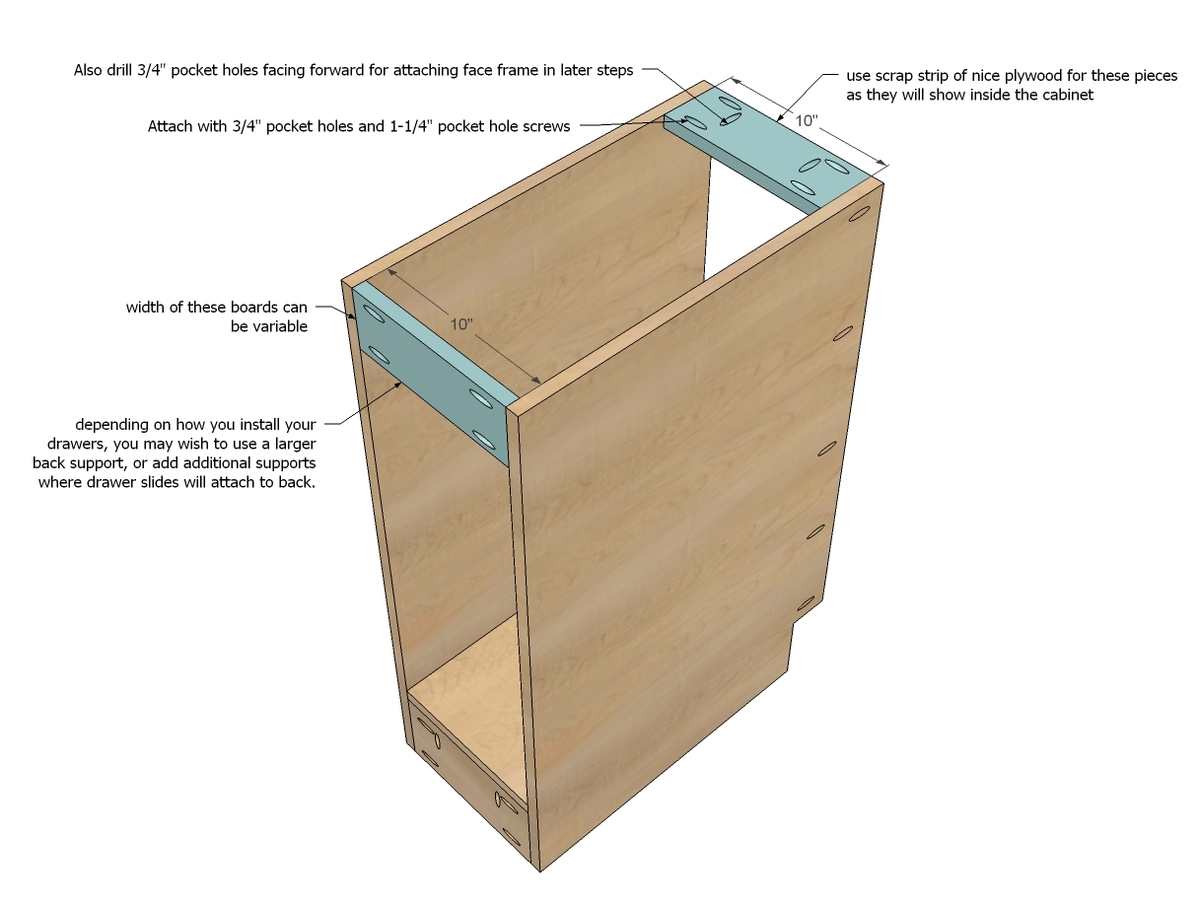
Then, attach the top supports.

Step 5

Step 6

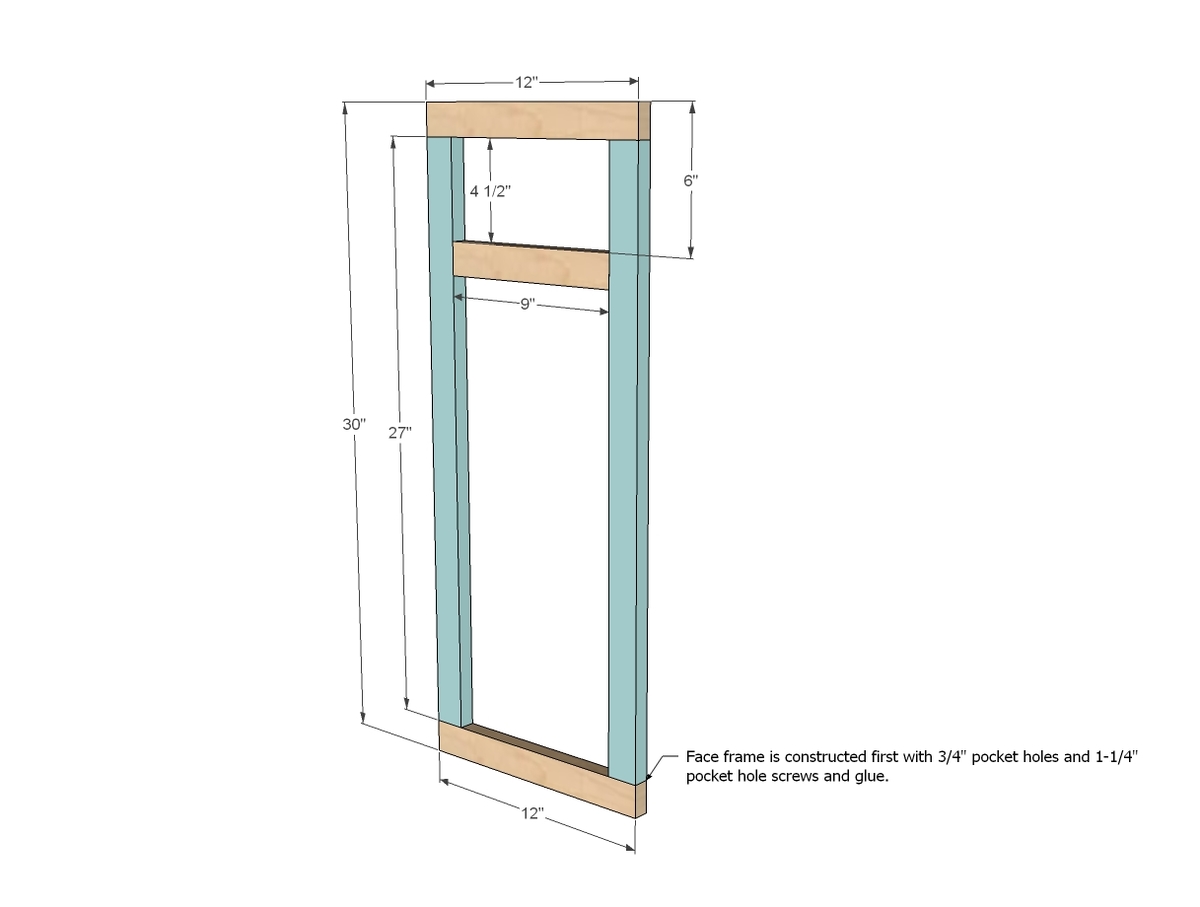
We built the face frames seperately on the table with 3/4" pocket holes and 1-1/4" pocket hole screws. Check the outside dimensions as well - it's very important that your face frames are precisely made and square.

Step 7

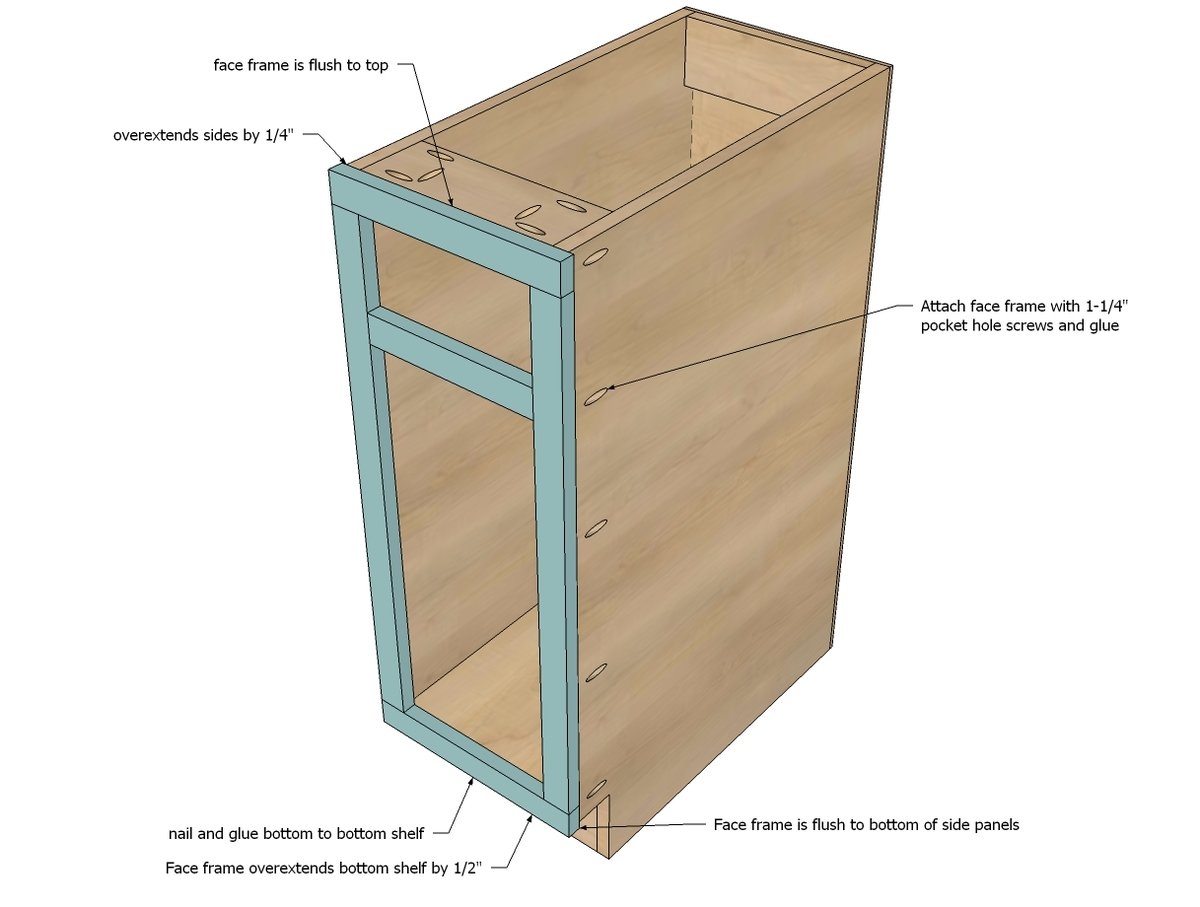
We finished the face frames seperately (painted them) and then attach the prefinished face frame to the cabinet through the predirlled pocket holes.

On the bottom, we had to attach with nails and glue because it's impossible to get a drill in there.

Step 8

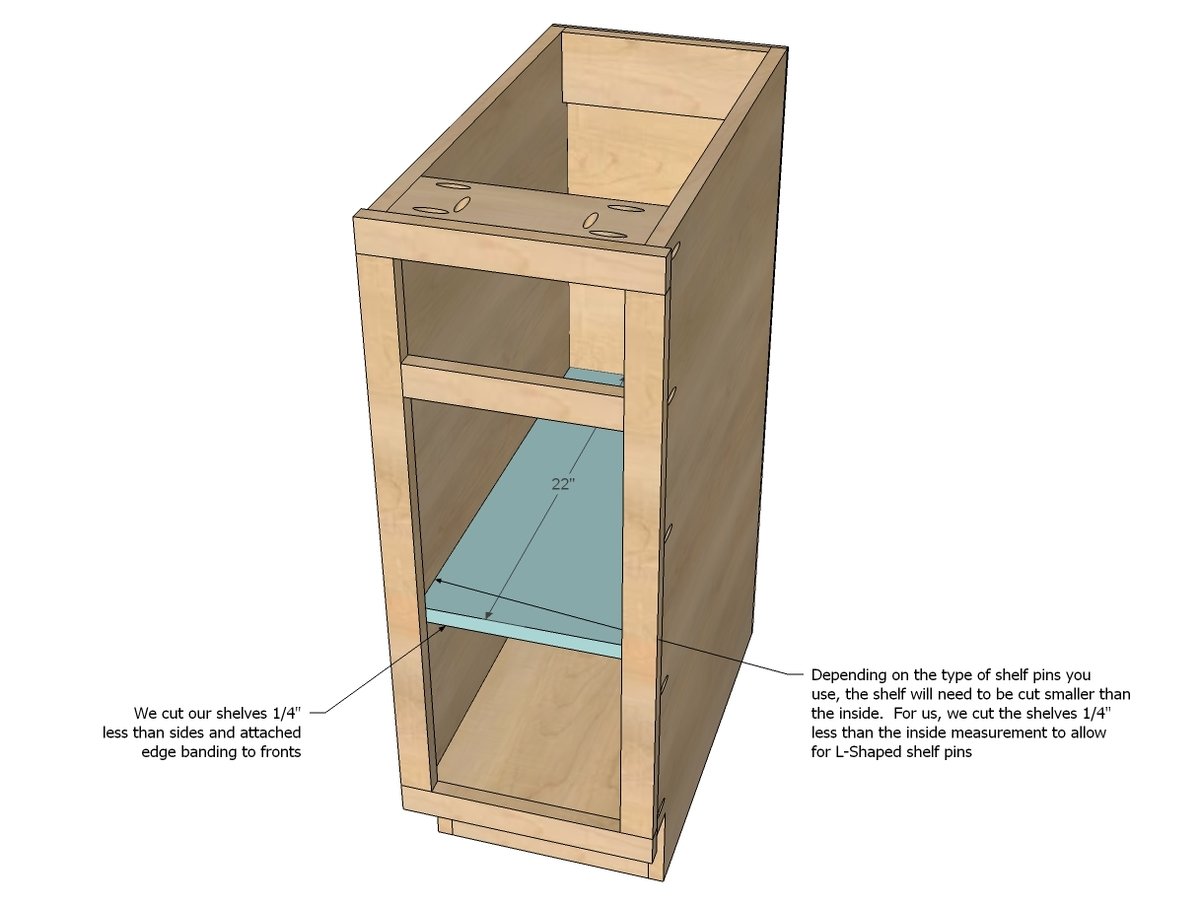
For the shelves, we basically duplicated the bottom fixed shelf, but trimmed off 1/4" in width and depth to allow for shelf pins and edge banding.

Step 9

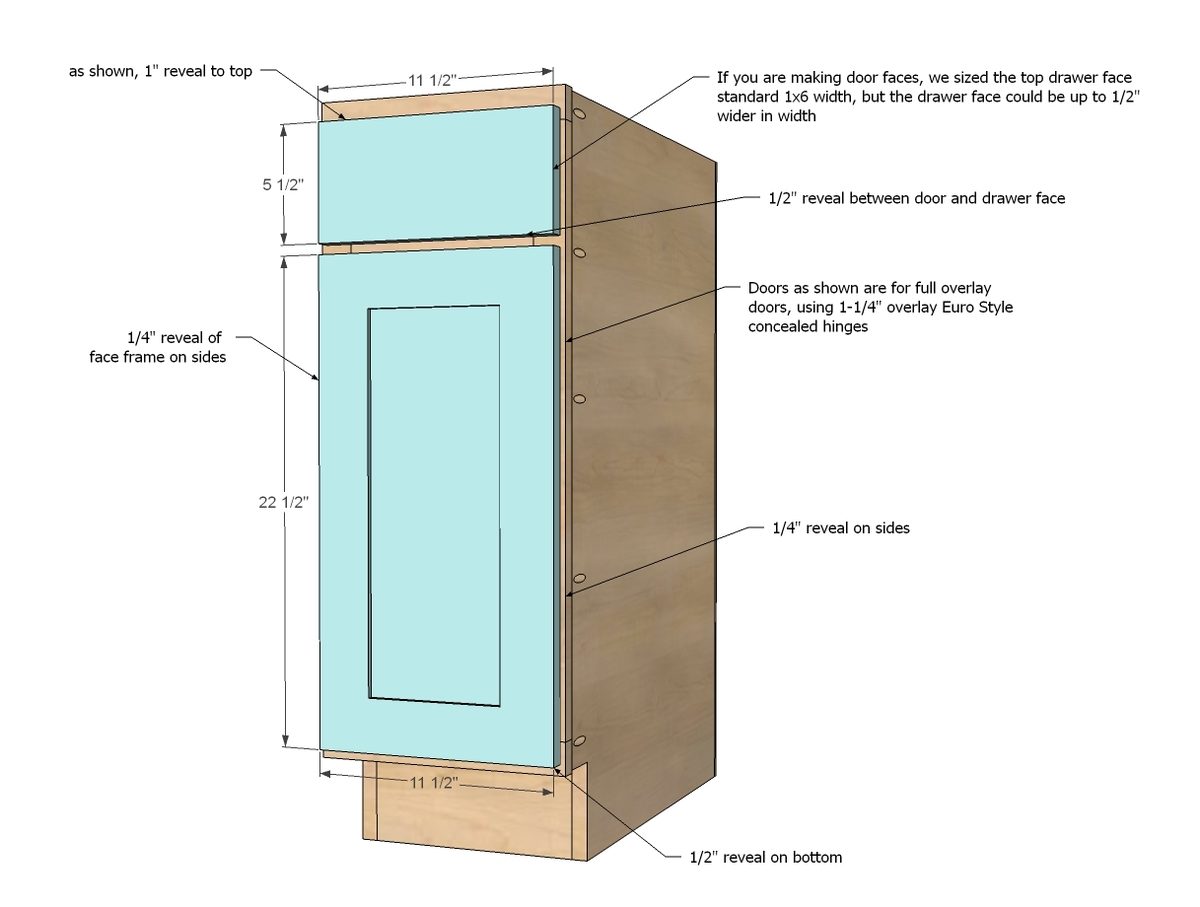
For a full overlay door, we used 1-1/4" concealed Euro hinges, and these were the measurements for the door and drawer face.

I will be adding a post on the drawer installation and the door hinge installation soon.

Step 10

Finishing Instructions
Preparation Instructions
Fill all holes with wood filler and let dry. Apply additional coats of wood filler as needed. When wood filler is completely dry, sand the project in the direction of the wood grain with 120 grit sandpaper. Vacuum sanded project to remove sanding residue. Remove all sanding residue on work surfaces as well. Wipe project clean with damp cloth.

It is always recommended to apply a test coat on a hidden area or scrap piece to ensure color evenness and adhesion. Use primer or wood conditioner as needed.

Comments

DecorSanity

Mon, 11/18/2013 - 12:06

Hi Ana! You mentioned you finished the face frame before you attached it to the front of the cabinet. Do you finish the interiors with a sealant...and if yes do you do it before assembly? Wondering if you do finish after assembly if it is super difficult to apply sealant inside a small box like that. Thanks for these instructions, they are excellent!!

Ana White

Mon, 11/18/2013 - 17:56

Hi - so sorry I didn't mention this is this post - we used Pre-Finished plywood (it's special order from PureBond) for the cabinet carcass itself, so the insides of the cabinets (with the exception of exposed front edge of shelves which we covered in edge banding) is fully finished upon completion. So the only finishing we had to do was paint the face frames - really too easy! Hope this makes sense! Thanks, Ana

DecorSanity

Tue, 11/19/2013 - 12:05

I didn't know Pre-finished plywood even existed, that is a great idea. Now if I could special-order a RAM to assist me on the assembly line, that would be great too. Hubs isn't a project lover! :-)

awomanwithahammer

Mon, 01/18/2016 - 07:35

Your graphics indicate that the grain of the plywood runs horizontally on the sides of the cabinets, but it seems that it would be more aesthetically pleasing to run it vertically where it is visible on the inside.  In addition, it would make layouts more economical on a 4x8 sheet of plywood.  Or am I misunderstanding entirely?

Frequently Asked Questions

Wood Questions

What kind of wood should I use?
Most of our plans use standard construction lumber like pine or fir. It's affordable, easy to work with, and easy to find. It's also rapidly renewing and biodegradable, so a great eco friendly choice!

Can I use hardwoods instead?
Yes—just keep in mind they're heavier, cost more, and can be tougher on tools and harder to join together and finish. I recommend not tackling a hardwood project until after you have built several softwood projects.

What if my boards are warped?
Choose the straightest boards at the store. You can often work around slight warps by cutting them into shorter pieces.

What wood should I use for outdoor furniture?
Use red-toned or pressure-treated 2x lumber for framing, and cedar or cedar fence pickets for the decking. Outdoor furniture should be built like a deck—your local home center can help recommend the right wood for your climate.

Will my wood move or warp after I build?
Potentially, especially in humid climates. Let your wood acclimate indoors before building. Once acclimated and kept in a stable environment, movement should be minimal. Remember, most houses are built using framing lumber - it's all about keeping moisture down indoors.

Cutting Questions

Do I need a miter saw?
A miter saw is great, creating fast, safe, and precise cuts, even for beginners. But most plans can be built with a circular saw and a straight edge. If using a circular saw to cut, take time to practice, and get good at making cuts, before cutting your project boards.

How do I get clean cuts with a circular saw?
Clamp your board, measure twice, cut slow, and use a sharp blade. This takes practice, so spend some time making cuts. I go through becoming proficient at freehand cutting in my course, it is worth taking if you want to master this skill.

Will the store cut my wood?
Yes—most stores will do rough cuts to help you transport your materials home. But from store to store, the quality of cuts could greatly vary.

Joinery Questions

What screws should I use?
We recommend star-head self tapping screws for framing, most common sizes are 2-1/2", 1-3/4". Pre-drill if close to the edge or you find your wood is splitting.

Do I have to use pocket holes?
Pocket holes are the cheapest, easiest and fastest way to do some joints - like edge to edge or a hidden fastener joint. There are other methods, but these can be time consuming and expensive. We recommend using pocket holes as indicated in plans for best results.

How do I keep things square?
Use a speed square and measure diagonals after each step. Always clamp joints before screwing to keep them tight and flush.

Finishing Questions

Stain or paint before or after building?
A quick sand before and a full finish after gives the best results. Pre-finish if you're doing two-tone or detailed finishes.

What type of finish?
Use oil-based or water-based stain. For paint, cabinet-grade latex or enamel works great. High use surfaces on indoor projects should get a coat of polyurethane, I recommend a Helsman or Spar or other flexible poly that won't crack or peel with wood movement. For exterior projects, use a finish suitable for exterior fences.

How to get a smooth finish?
Start with a well sanded project. Sand between coats (220 grit), wipe clean, and apply light coats with a foam brush or roller.

Plan Questions

Can I change the size?
Many people do, and that's the great thing about building your own furniture! But do keep in mind going bigger might mean more supports are required, and often plans are optimized for minimal material waste.

Are these beginner-friendly?
Yes—plans are written with simple tools and clear steps in mind, with every effort to make plans as simple as possible.

Can I sell what I build?
Absolutely! Just don’t resell or repost the plans themselves.

General Questions

What tools do I really need?
A drill, circular saw, tape measure, square, and a few clamps will get you through most projects.

Do I need a workshop?
Nope! A driveway or small patio is plenty to get started, just make sure you have a level place to work. If you find you are building several projects a year, creating a small workbench is a great way to store tools and have a dedicated workspace.

What if I mess up?
Wood filler, sanding, or flipping boards goes a long way. Mistakes are part of the process!

What can I do to make my projects look more professional?
Start with straight boards, make accurate cuts, clamp all joints, and line up everything neatly. Sand thoroughly, use a neutral finish, and apply it in light coats for a clean look.

I've never built anything before. Where should I start?
Start with a few smaller softwood projects to get hands-on experience. Or if you're tackling a big project, buy a little extra lumber and practice your cuts and joints first. If possible, work with someone who has a bit of experience.

Care & Maintenance

How long will my furniture last?
With good joinery and regular care, your DIY furniture can last for decades. I have pieces in my own home that are over 20 years old and still going strong! One of the best parts about DIY furniture is that it’s easy to repaint, refinish, or repair—so your projects can grow and adapt with you.

How should I care for outdoor furniture?
Lightly pressure wash or hose it down once or twice a year. Tighten screws and reapply finish as needed to protect it—just like a deck or fence. A little upkeep goes a long way in extending the life of your furniture.

How about indoor furniture?
Regularly dust or wipe with a damp cloth. If it starts to look worn, a light sanding and touch-up paint or stain can refresh it in no time. DIY pieces are meant to be durable and fixable—so don’t be afraid to give them some love now and then.

Want to Build with Confidence?

Check out my ebook: 12 Skills to Build Your Own Furniture
It walks you through the core skills every builder needs—measuring, cutting, joinery, and finishing—so you can build beautiful furniture that lasts.

Still Have Questions?

Email us anytime at [email protected] and we’ll be happy to help!