

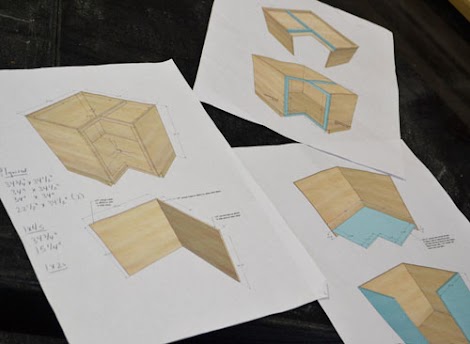
Plans for 36" base pie cut corner cabinet with lazy susan from Ana-White.com
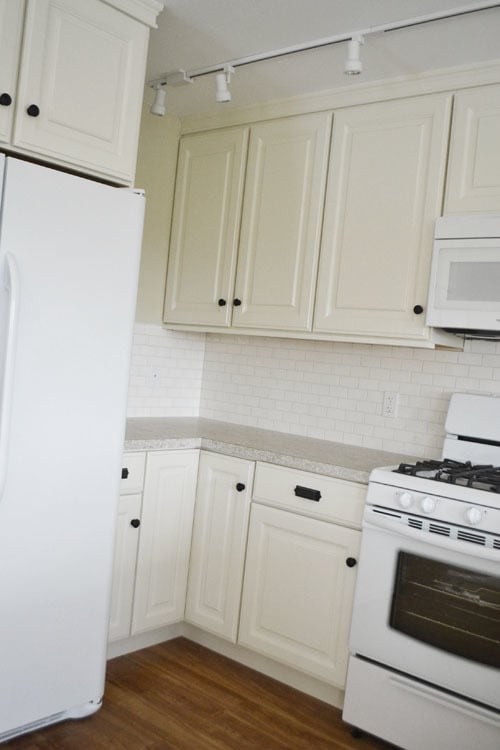
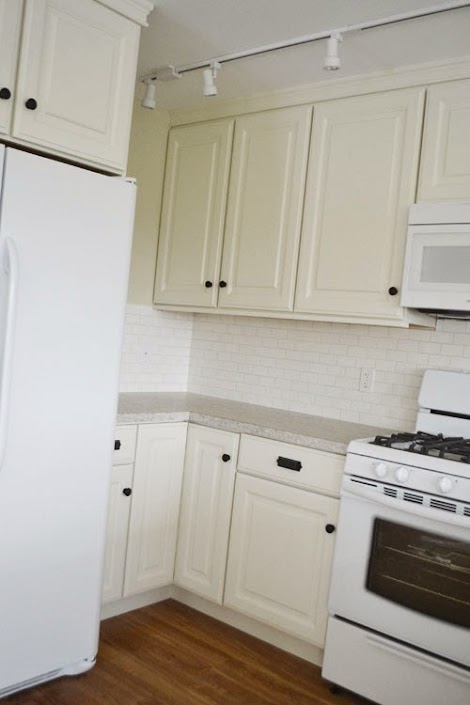
Back to kitchen cabinets today!!!
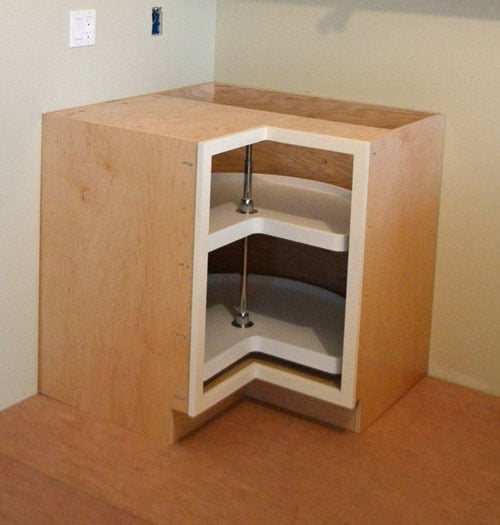
The first cabinet we actually built for the Momplex Unit Sewing Mom Kitchen was ths corner base cabinet.

So this corner cabinet is totally overbuilt.
I'm a big fan of doing something right the first time, so when I set out to build the kitchen corner cabient, I wanted to make sure it would last forever.
Well, you could probably drive a truck over it.
We once bought a corner kitchen cabinet, with a pie cut front, one of those off the shelf ones, and when I took the packaging off and realized the back was just a thick cardboard stapled around, I felt cheated. So when it came time for us to build a corner base cabinet for the first Momplex kitchen cabient, I decided to put 3/4" plywood on the back.
It's overkill - unless the cabinet is freestanding (for example, turns a corner into a peninsula) - and I'll be adding a more simplified version of this plan when we do the cabinets for the other Momplex kitchen.

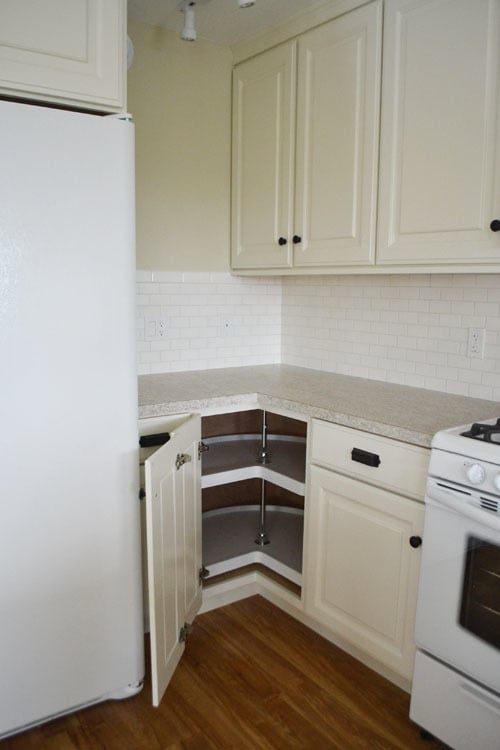
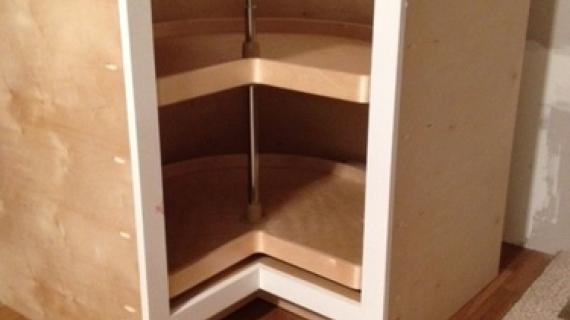
In our kitchen, we have an "easy reach" pie cut corner base, but it is anything but easy to reach in there. So I insisted this time around to put a lazy susan in.
We could definitely have DIYed a lazy susan, but these are so cheap, easy to clean, and adjustable, we ordered a kit. It was definitely the right decision.
So no shelves to be placed inside, just a giant, odd shaped box, with a pie cut piece removed from the front.
We started with two side panels, that EXACTLY matched the other base cabinets in this kitchen.

With the exception of no shelf pin holes because there are no shelves in this cabinet.
And then we just constructed the cabinet (see lots more details on building base cabinets here and also the exact plans for this cabinet are below)

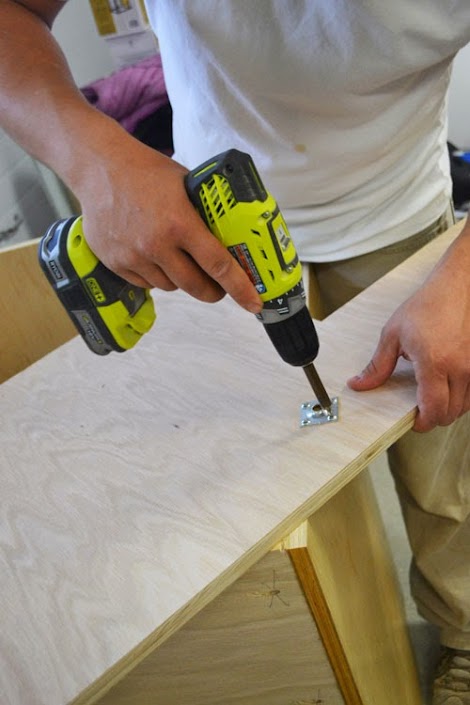
We used a Kreg Jig for all joinery, keeping pocket holes on outsides or undersides to make sure the inside of the cabinet is finished.

We cut the toekicks out with a jigsaw to match the rest of the base cabinets.

The bottom shelf height is consistent with the rest of the cabinets.

Told you I was crazy - that's the 3/4" plywood on the back.

We built the face frame out of poplar 1x2 boards, but waited until after the cabient was finished and the face frame pre-painted to attach it.

We added the lazy susan kit during construction because it's much easier to reach inside a partially done cabinet than a fully finished one.
The instructions came with a pattern that you just line up with the front pie cut of the bottom shelf,

Then you just predrill holes as directed in the pattern,
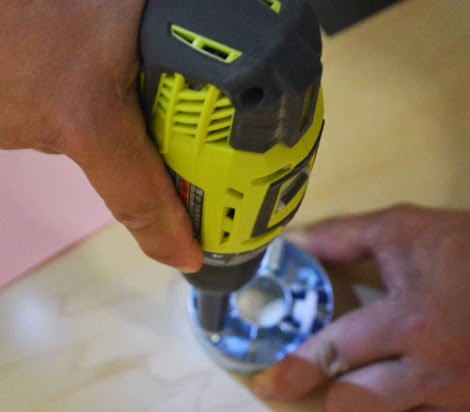
Attach the bottom hardware piece,

And then the center rod that holds the two shelves,

And then slide the two shelves on, with the top shelf hardware piece under it,
Use the pattern again to drill holes for the top and attach the top hardware piece on the underside of the top (we did this before attaching the top plywood piece)

And then it's just a matter of finishing the cabinet assembly (we actually added plywood to the top of the cabinet to support the center rod, but boards could be used as well) and securing the adjustable center rod,
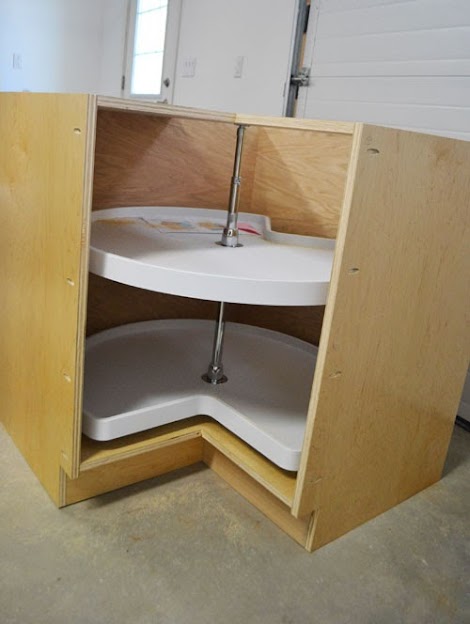
And lazy susan is in!!!

Much easier and more functional than shelves!

For the face frame (I'll do a more detailed post on how we painted our face frames and attached them in a bit), we already have the sides drilled with pocket holes, so just added some glue to the sides,
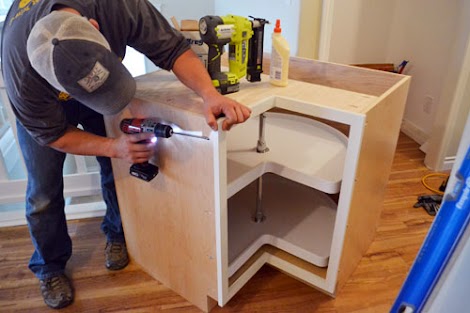
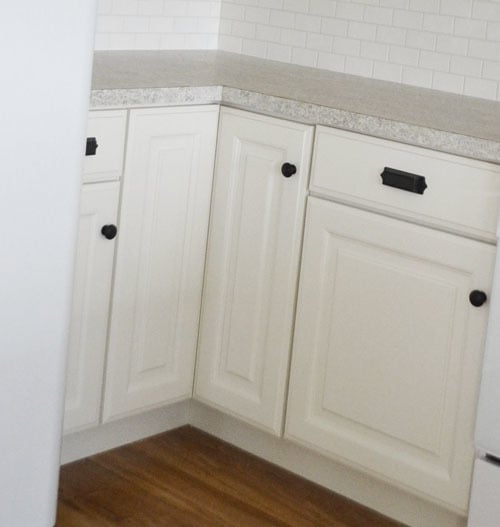
And attached the face frames to the cabinet, keeping the same 1/4" overextension as the rest of the base cabinets. For the spots where we couldn't drill pocket holes, we nailed the face frame on.

And guess what the hardest part of building this cabinet was???
Yep, getting it up the split level stairs!!! We ended up having to take it out the garage door, remove the front deck door, and barely get it in. Barely. We were within a 1/4" of having to disassemble the cabinet!
If you don't have a french door to access your kitchen - beware! You may wish to build this guy in place - it's huge!!!
I'll be adding a post on doors, and will include detailed instructions on how we installed doors on this cabinet, so stay tuned for that!
The plans follow. Happy Building! XO Ana
Preparation
2 sheets of 3/4" plywood (we used one sheet of prefinished plywood and one sheet of cheaper hardwood plywood in oak)
10 feet of hardwood 1x2s for the face frames
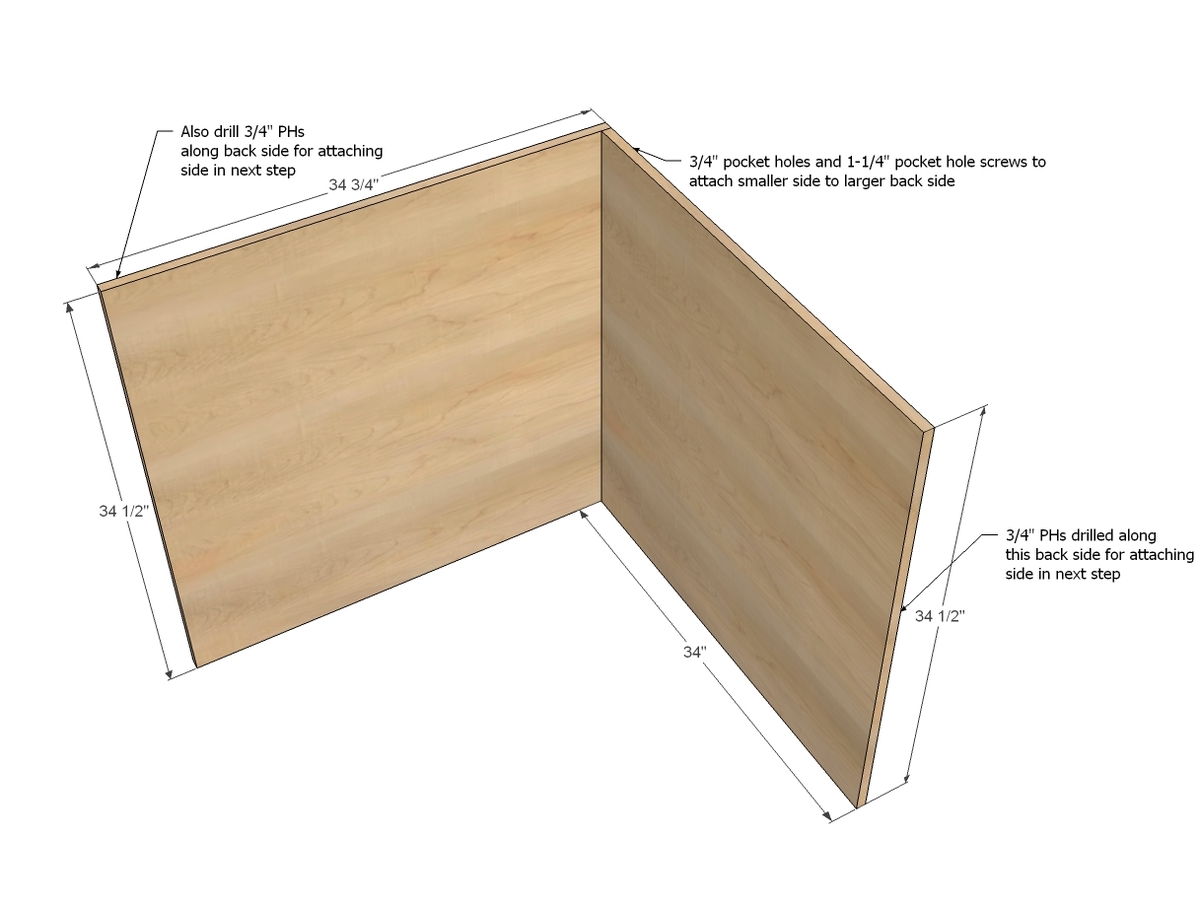
1 - 3/4" plywood @ 34-1/2" x 34-3/4" (larger back piece) (we used cheaper plywood here)
1 - 3/4" plywood @ 34 1/2" x 34" (smaller back piece) (we used cheaper plywood here)
1 - 3/4" plywood @ 34" x 34" (bottom shelf)
2 - 3/4" plywood @ 34 1/2" x 22 1/4" (sides - must match other base cabinets)
1 - 3/4" plywood @ 34" x 20" or more (top - we used cheaper plywood here)
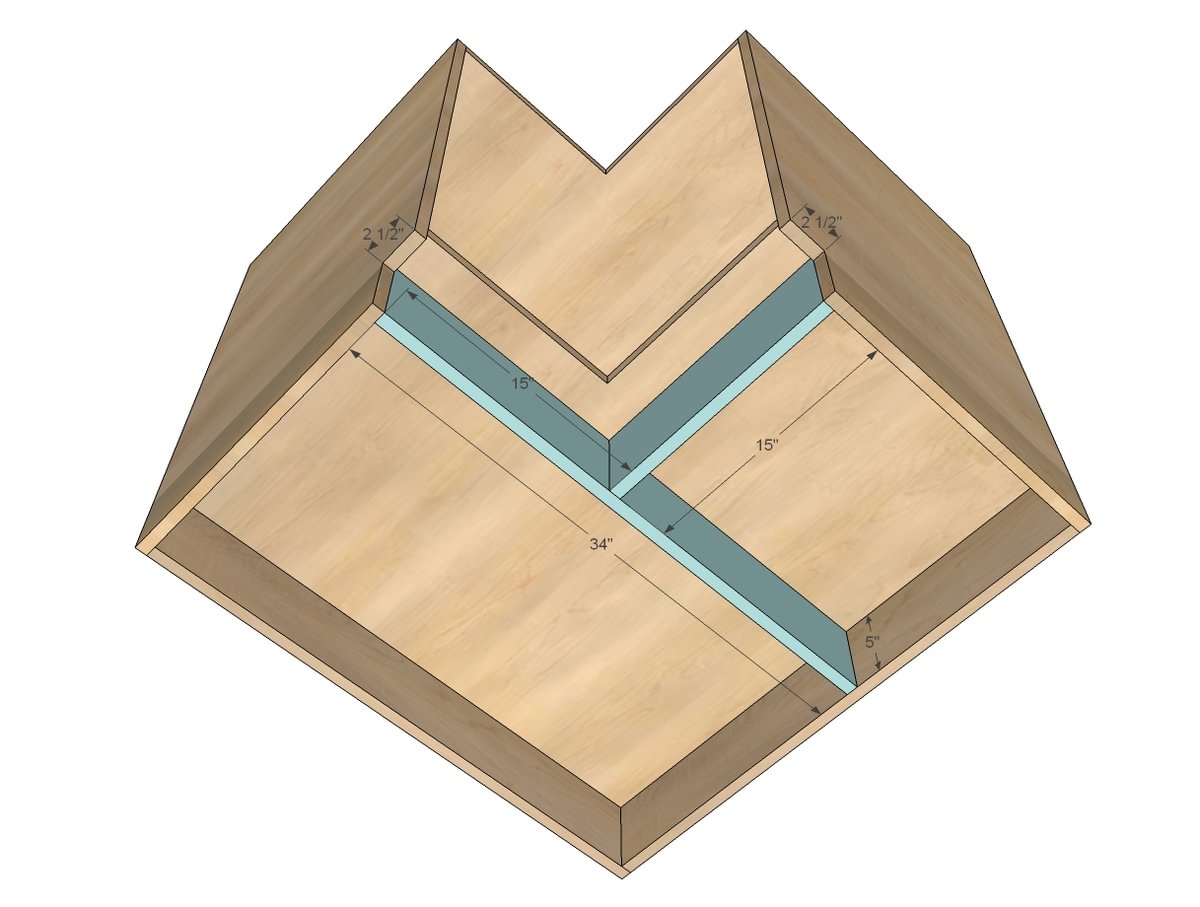
1 - 3/4" plywood @ 34" x 5" (base support, longer piece - we used cheaper plywood here)
1 - 3/4" plywood @ 15" x 5" (base support, longer piece - we used cheaper plywood here)
FACE FRAME
2 - 1x2 @ 27" (should match face frame stiles from other base cabinets)
2 - 1x2 @ 13 1/2"
2 - 1x2 @ 12 3/4"


Please read through the entire plan and all comments before beginning this project. It is also advisable to review the Getting Started Section. Take all necessary precautions to build safely and smartly. Work on a clean level surface, free of imperfections or debris. Always use straight boards. Check for square after each step. Always predrill holes before attaching with screws. Use glue with finish nails for a stronger hold. Wipe excess glue off bare wood for stained projects, as dried glue will not take stain. Be safe, have fun, and ask for help if you need it. Good luck!
Instructions
Step 1
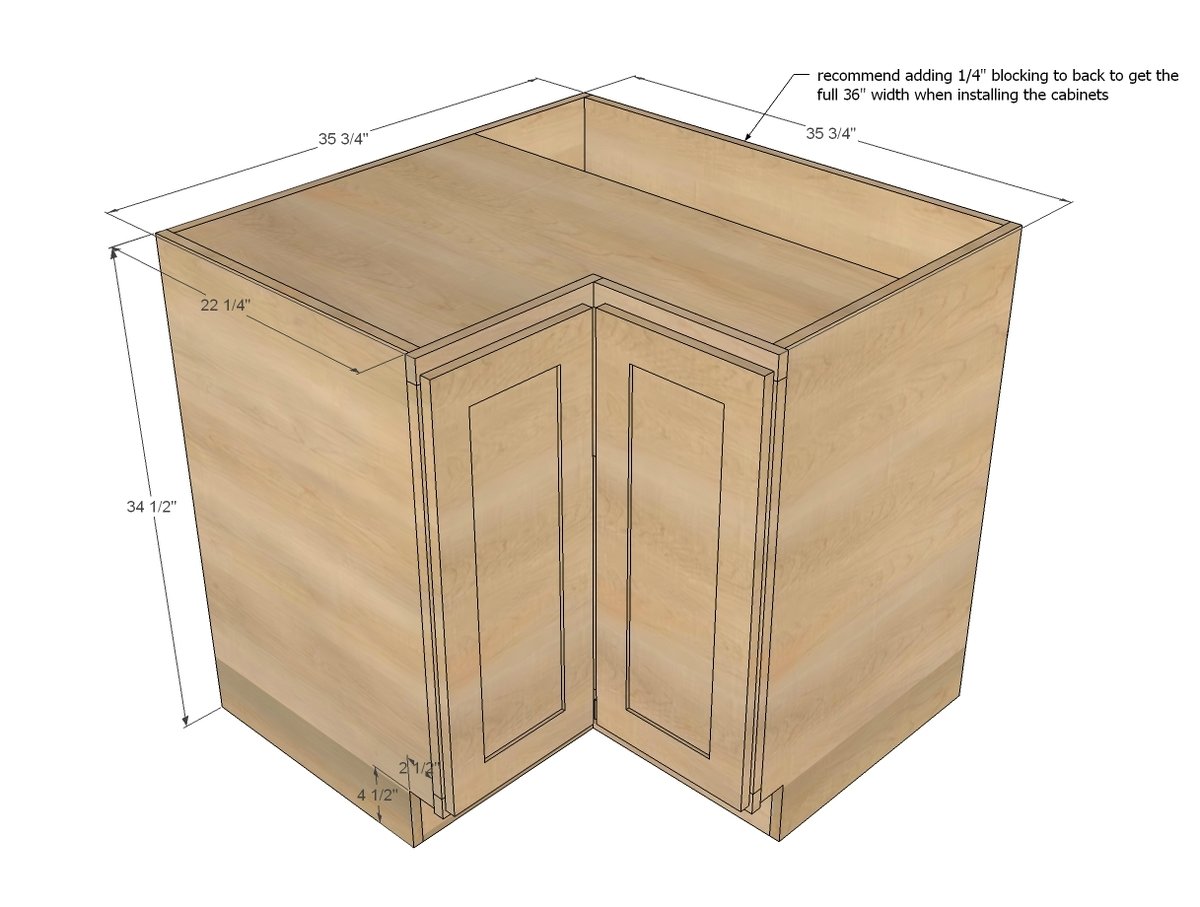
IMPORTANT!!!! There are many different kitchen cabinet plans on this site. This base cabinet is designed to work with the base cabinets built for the White Momplex Kitchen (Sewing Mom) with a side panel overall measurment of 34-1/2" tall by 22-1/4" wide, with a 4-1/2" x 2-1/2" toekick.
So this is the overkill part ....... I put 3/4" plywood on the two back sides. We did use a cheaper plywood for the backs because it's not every going to be seen.
Make sure you drill 3/4" pocket holes along the back side edges so you can attach the sides in later steps.
Step 2
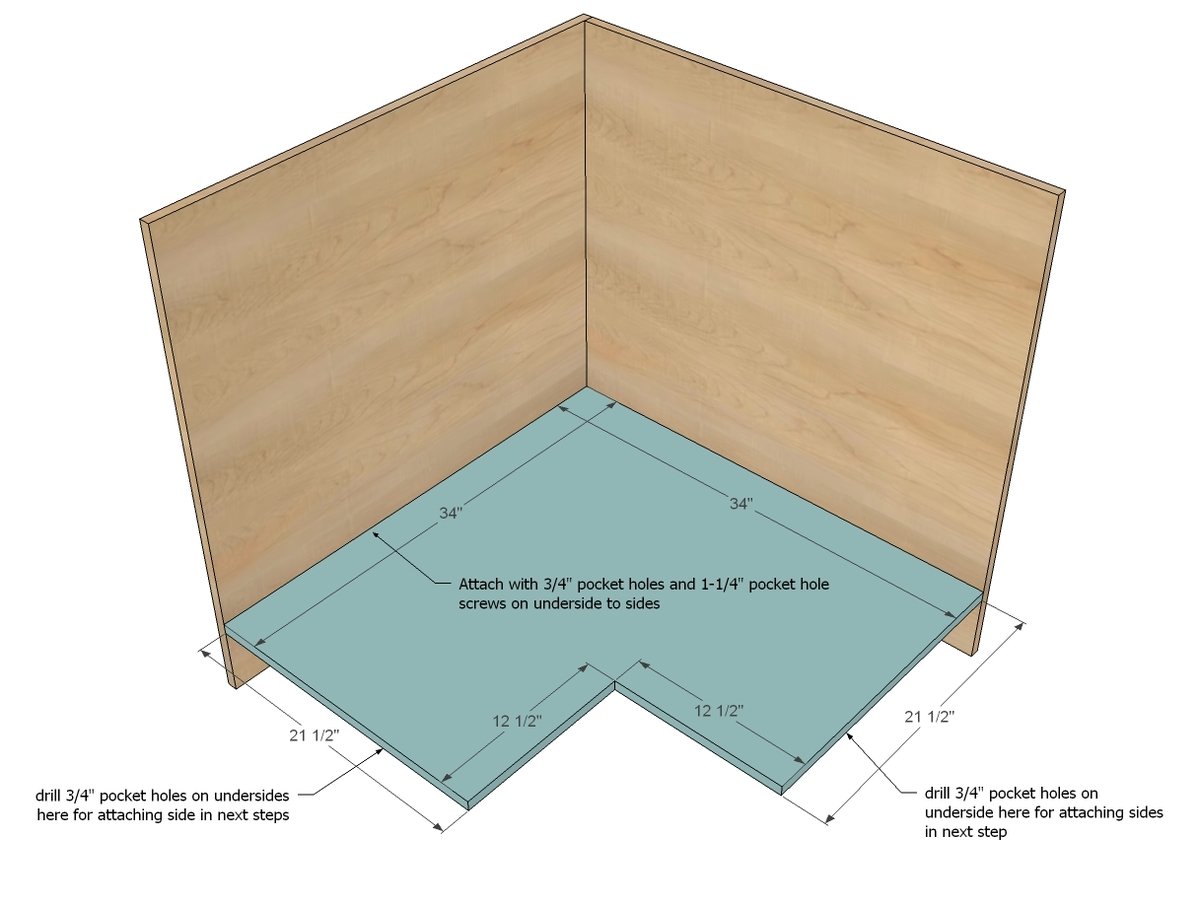
The bottom gets attached with a 5" space under the bottom shelf. Use the 5" wide plywood pieces as a spacer to help you line it up.
Remember to drill 3/4" pocket holes along the underside of the side edges for attaching the sides in the next step.
Step 3
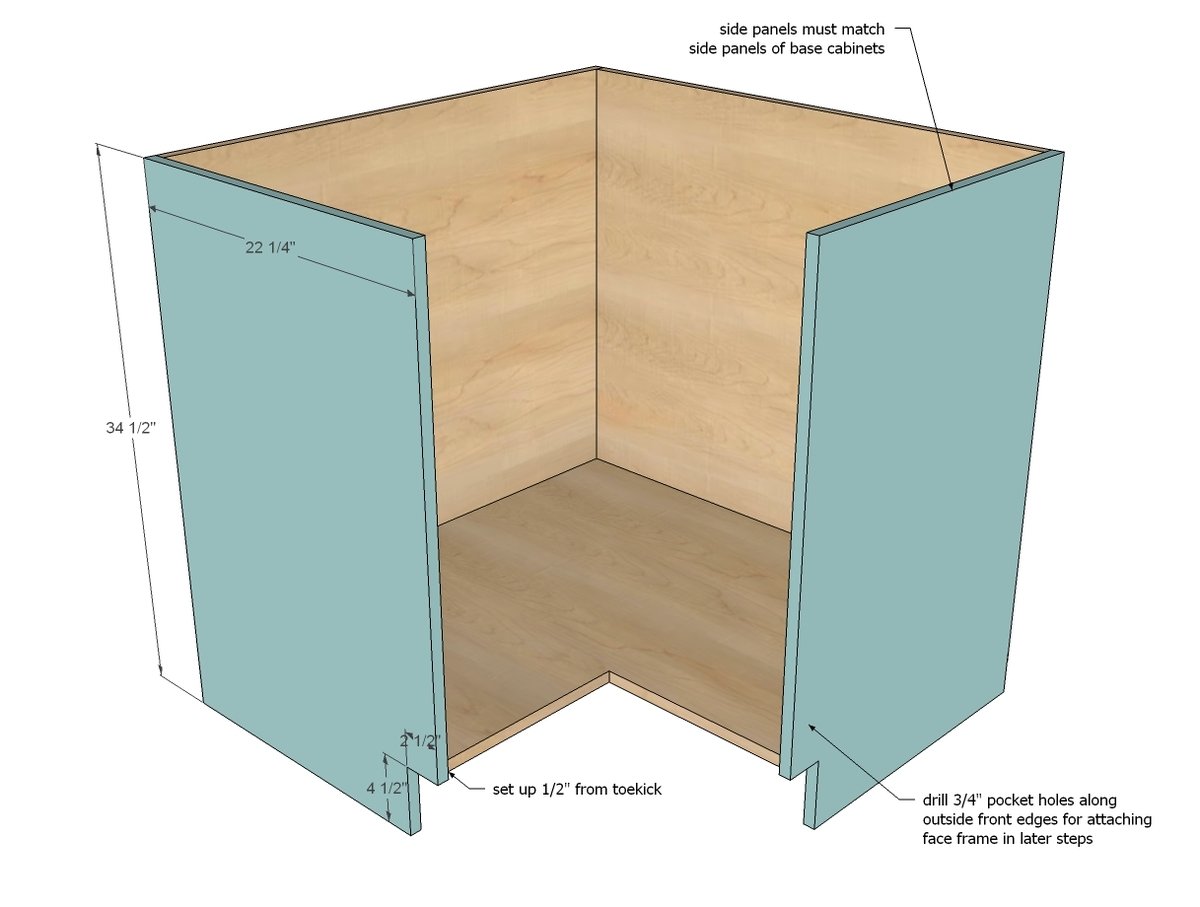
The sides are attached to the back and bottom. Make sure there is a 5" gap under the bottom shelf on the sides.
Again, remember to drill 3/4" pocket holes along the sides for attaching the face frame in later steps.
Step 4
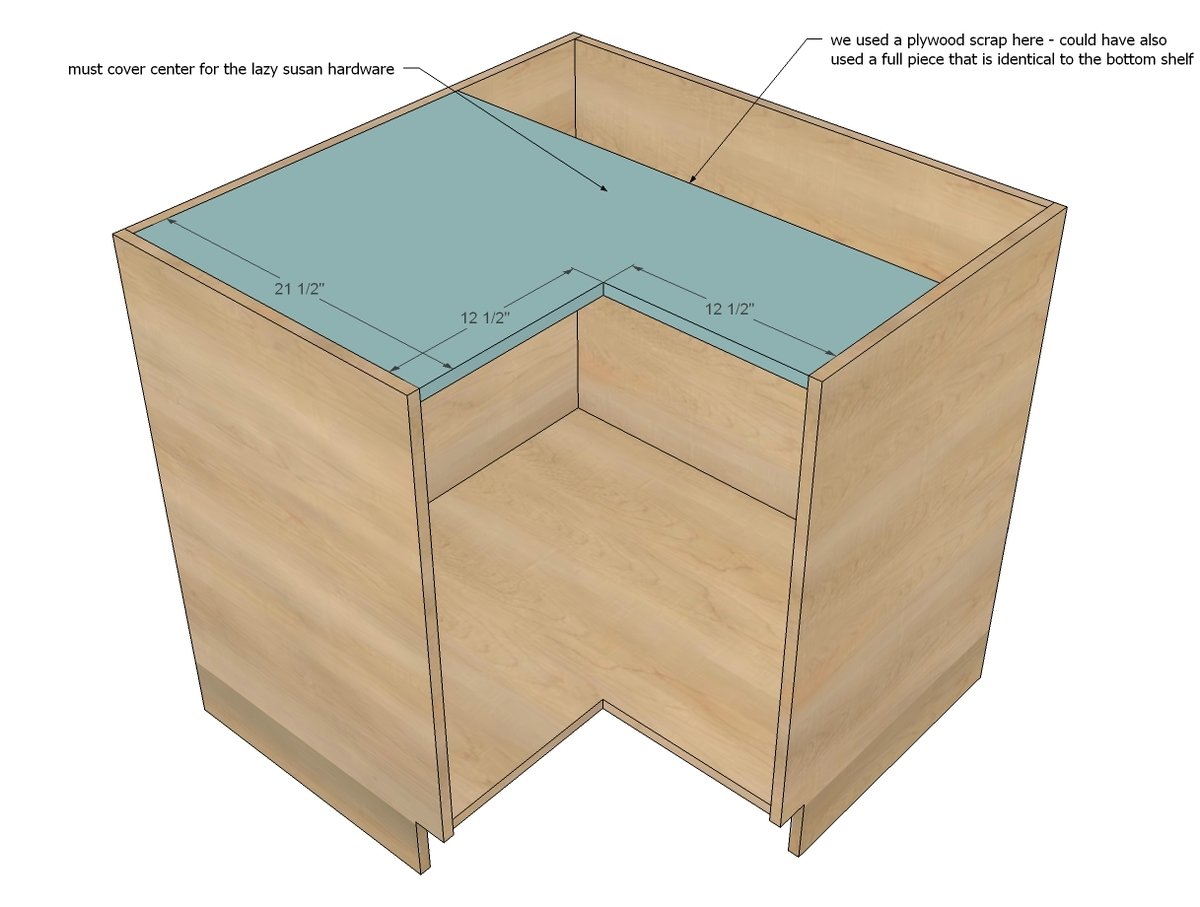
Instead of buying another sheet of plywood for the top, we used a scrap from the back to make up the top, cutting out the pie cut front from it. The plywood must be at least 34" x 20" to start with.
NOTE: Also drill 3/4" pocket holes facing forward on the front pie cut edges on top for attaching the face frame in later steps.
Step 5
Step 6
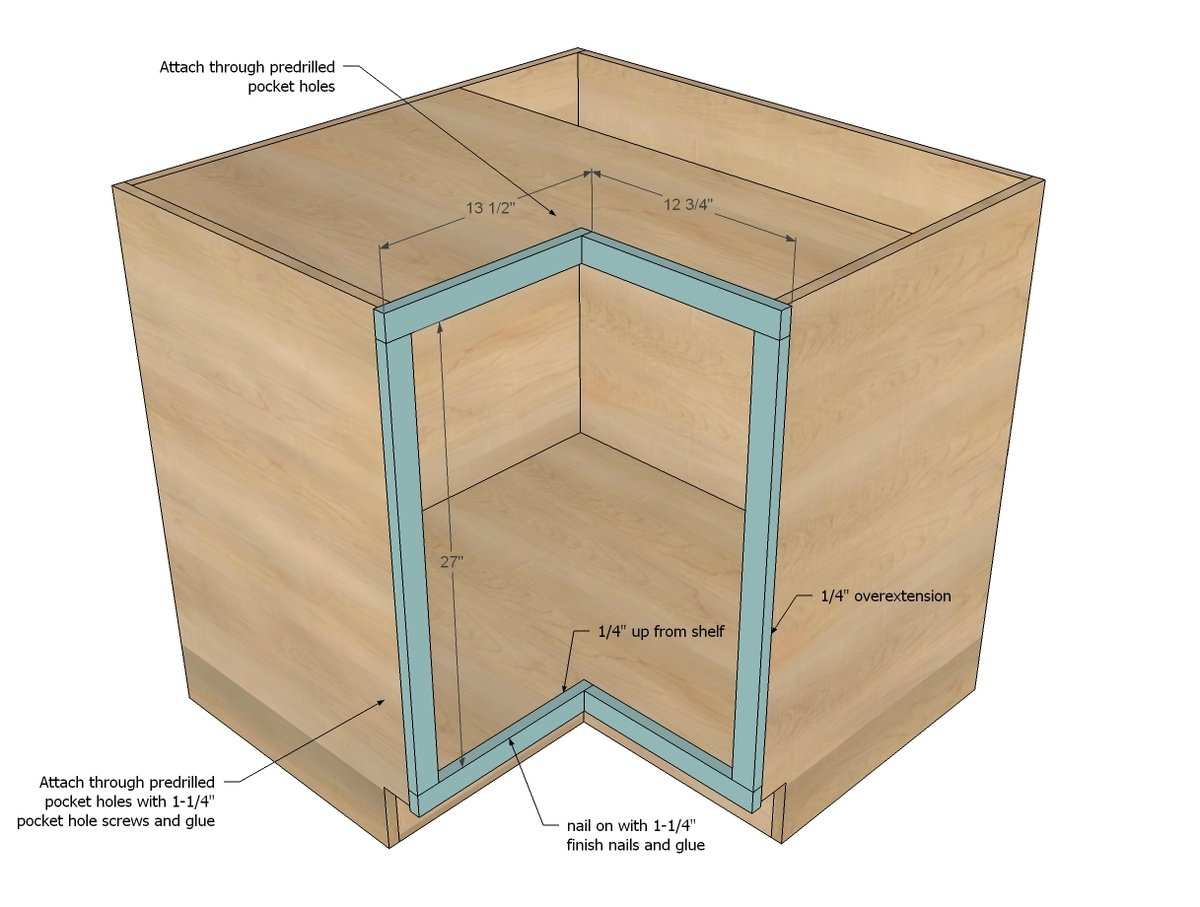
We built the face frames seperately with 3/4" pocket holes and 1-1/4" pocket hole screws and glue, and then attached though the predrilled pocket holes with 1-1/4" pocket hole screws. Face frames overextends the sides by 1/4".
Step 7
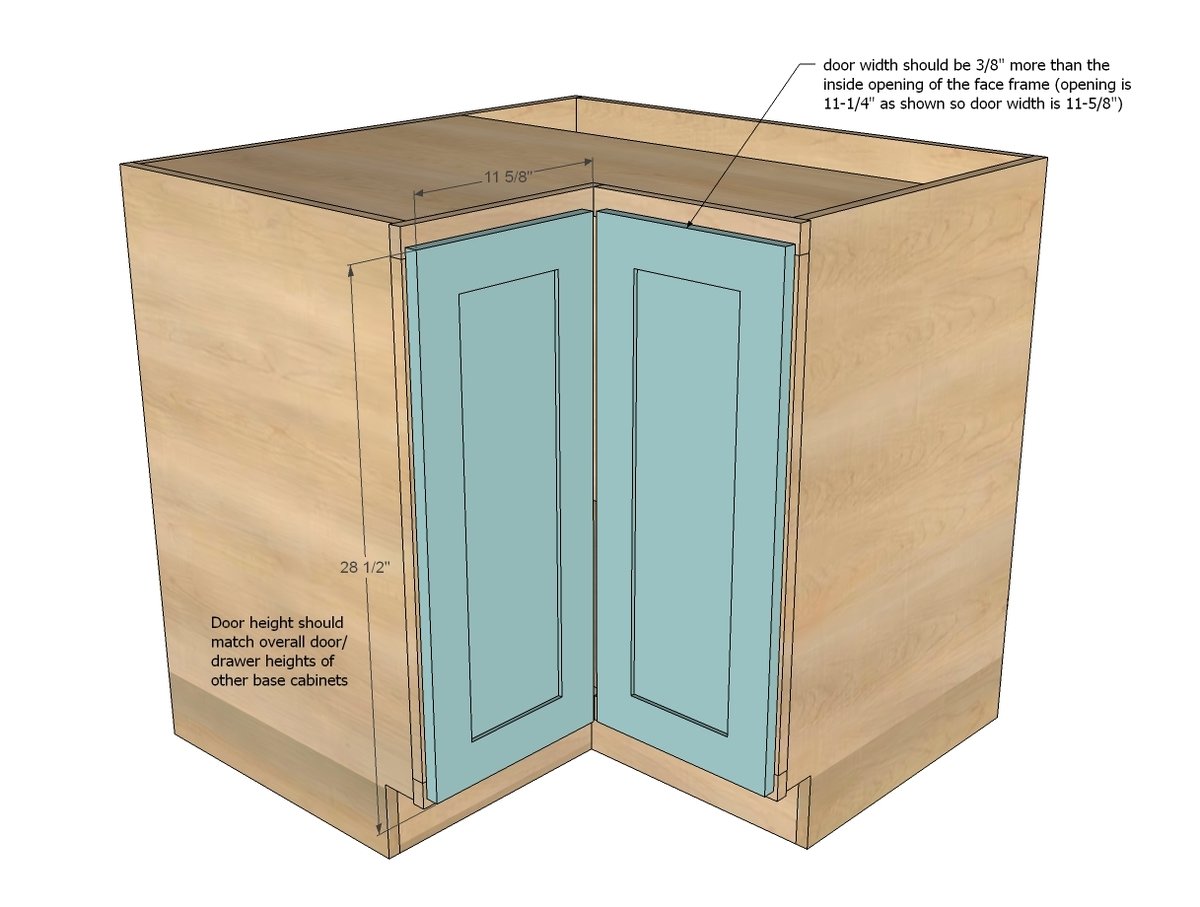
I'll be adding a post shortly on hanging doors with concealed euro style hinges. Doors should match the height of other overall base cabinets, and should be in width 3/8" wider than the inside opening of the face frame.
Step 8
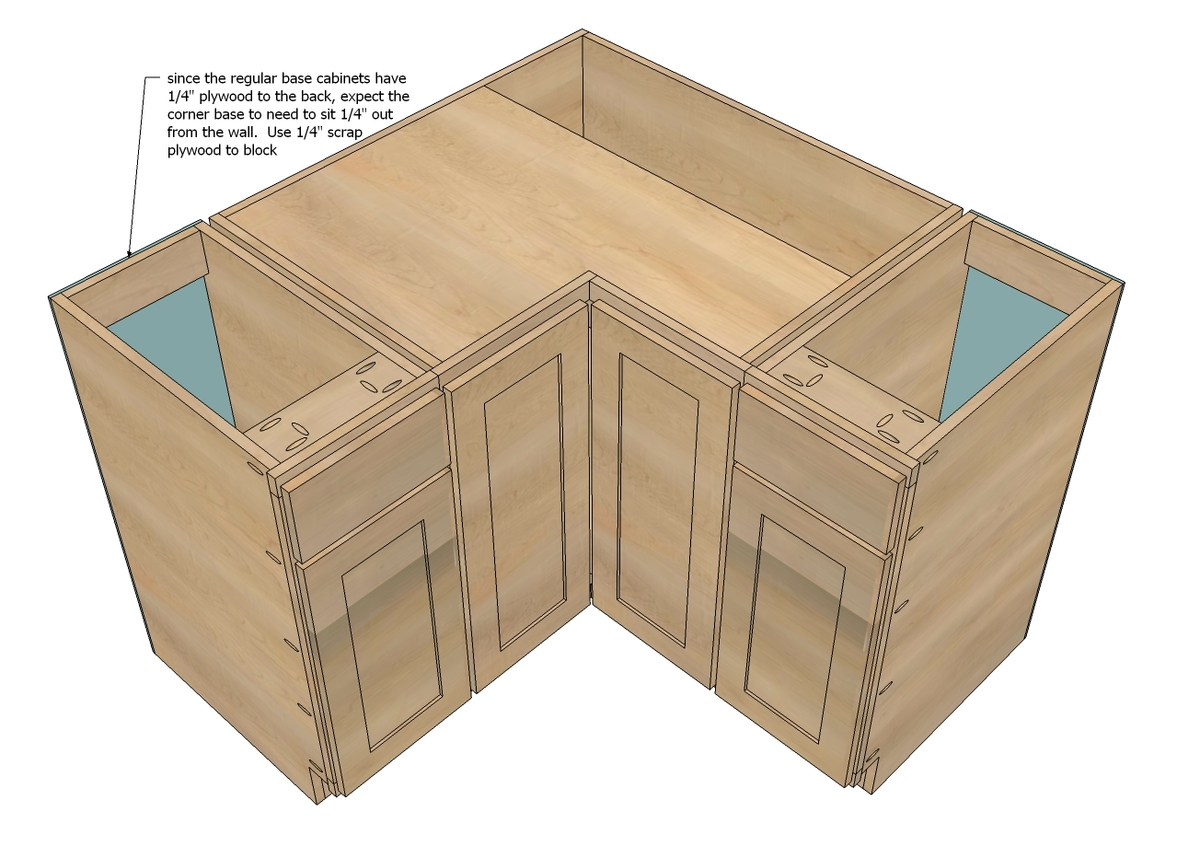
When you go to install your base cabinets, this corner does not have the same 1/4" plywood tacked to the back as the other base cabinets that we built for the Momplex white kitchen. Easy fix is to use scrap plywood to block where you attach the base cabinet to the wall.
It is always recommended to apply a test coat on a hidden area or scrap piece to ensure color evenness and adhesion. Use primer or wood conditioner as needed.

Comments
mbdarrington
Mon, 11/25/2013 - 22:00
This is perfect!
What a beautiful cabinet and just what I was looking for. I am getting ready to build this cabinet in the next month. The kitchen we are building is very small and this particular cabinet will have a sink in it. Do you have any advice on building the top so it is "sink ready"? Our sink will be something like this:
http://www.wayfair.com/Houzer-Legend-31.88-x-17-Topmount-Corner-Bowl-Ki…
Steve Hutcherson
Fri, 05/01/2015 - 15:34
INSPIRATION
Thanks so much for the inspiration. Never thought we could build our own cabinets!!
casamaia
Tue, 09/15/2015 - 08:11
paint
Hi, what type of paint did you used?
Patti312
Sat, 03/26/2016 - 08:29
36" Corner Base pie cut base cabinet
Hi Love these plans and presently building this cabinet. I have only one question:: What size lazy suzan insert is used. I am seeing that there are more than one size and I can't seem to find the size in the plans. Thanks.
gogadgo
Thu, 05/31/2018 - 09:58
Door measurement
Hi Anna,
I built this cabinet and am at a loss of how to measure door panels for ordering, what do you recommend?
Brooklyn Beer
Sun, 02/13/2022 - 06:10
size modification
I do not have 36" but 33 " of space coming out of my corner. Has anyone modified this by 3 inches?