
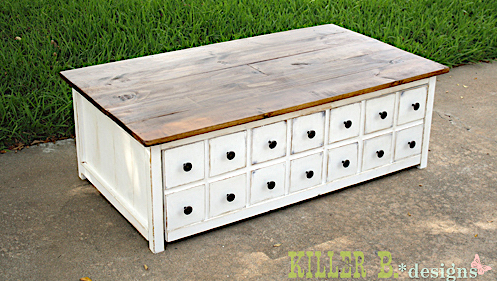

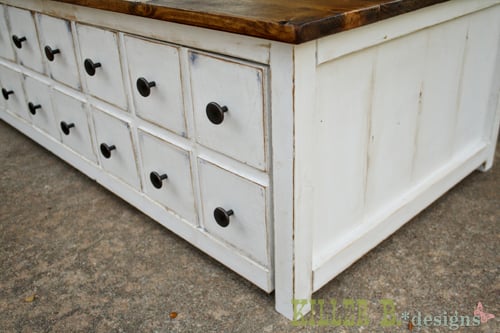
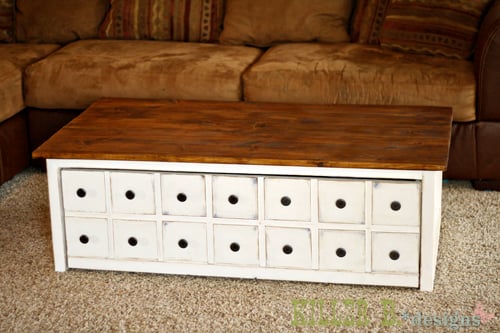
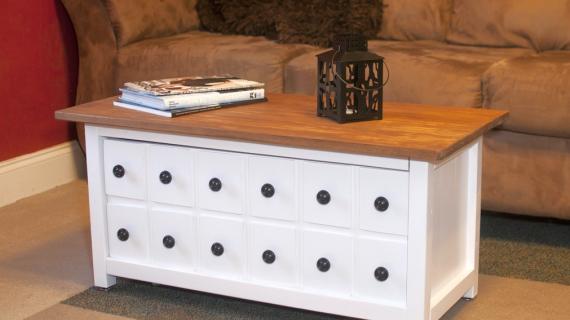
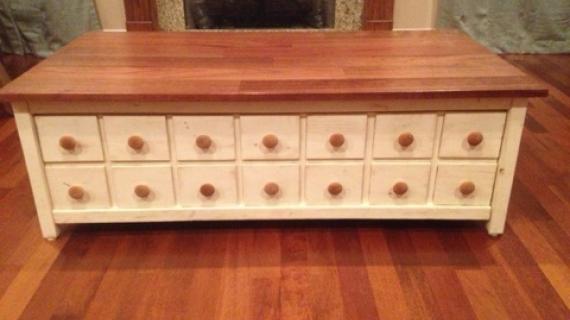
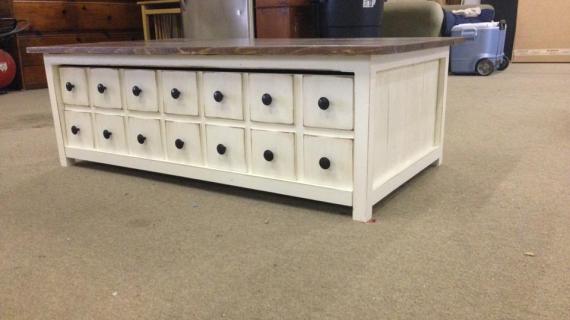
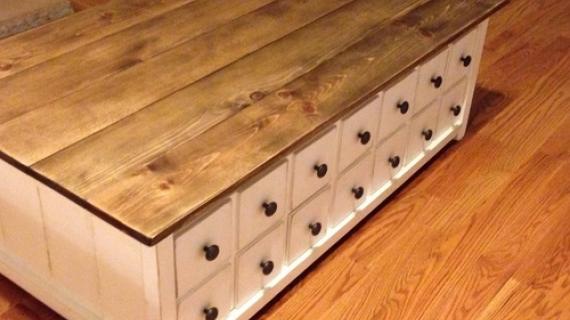
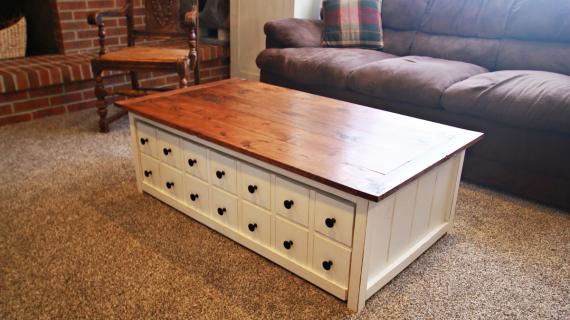
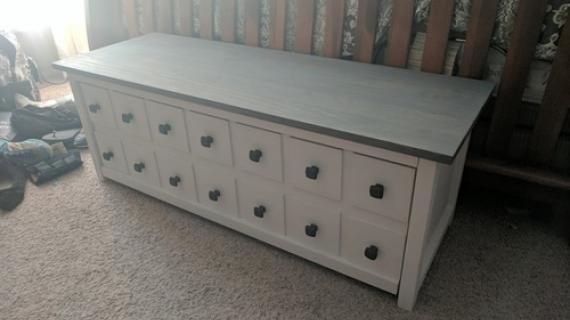
DIY this coffee table with a hidden storage trundle! Free step by step plans from Ana-White.com include diagrams, shopping and cut list and lots of user submitted photos.

Preparation
- 4 - 1x6 @ 8 feet long
- 3 - 2x2 @ 8 feet long
- 1 - 1x3 @ 6 feet long
- 1 - 1x12 @ 12 feet long
- 1 - 1x2 @ 10 feet long
- 1/4 sheet of - 1/2" plywood
- 4 - 1 1/2" caster wheels with an overall clearance of 2"
- 1 1/4 inch brad nails
- 1 1/4 inch pocket hole screws
- 1” brad nails
- 14 knobs
- Glue
COFFEE TABLE FRAME
- 4 - 2x2 @ 21 3/4" (cut to length of your leg sides)
- 2 - 2x2 @ 43 3/4"
- 5 - 1x6 @ 45 1/4" (diagrams show 46 ¼” but this will not overlap legs so I recommend shortening)
- 8 - 1x6 @ 14 1/4"
- 4 - 1x2 @ 22" (side trim - cut to fit)
- 2 - 2x2 @ 15 1/2" (for caster wheels with overall clearance of 2" - most commonly 1 1/2" diameter wheels)
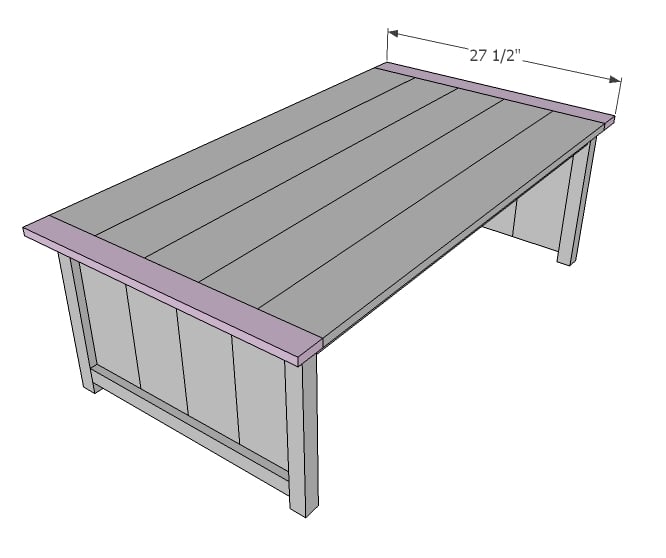
- 2 - 1x3 @ 27 1/2" (cut to width of tabletop)
TRUNDLE
- 2 - 1x12 @ 43 1/4"
- 2 - 1x12 @ 23 1/4" (1/4" less in length than the side trim)
- 2 - 1x2 @ 43 1/4"
- 14 – 5 ½” wide x ¼” thick hobby stock or ¼” plywood for false drawer fronts


Please read through the entire plan and all comments before beginning this project. It is also advisable to review the Getting Started Section. Take all necessary precautions to build safely and smartly. Work on a clean level surface, free of imperfections or debris. Always use straight boards. Check for square after each step. Always predrill holes before attaching with screws. Use glue with finish nails for a stronger hold. Wipe excess glue off bare wood for stained projects, as dried glue will not take stain. Be safe, have fun, and ask for help if you need it. Good luck!
Instructions
Step 1
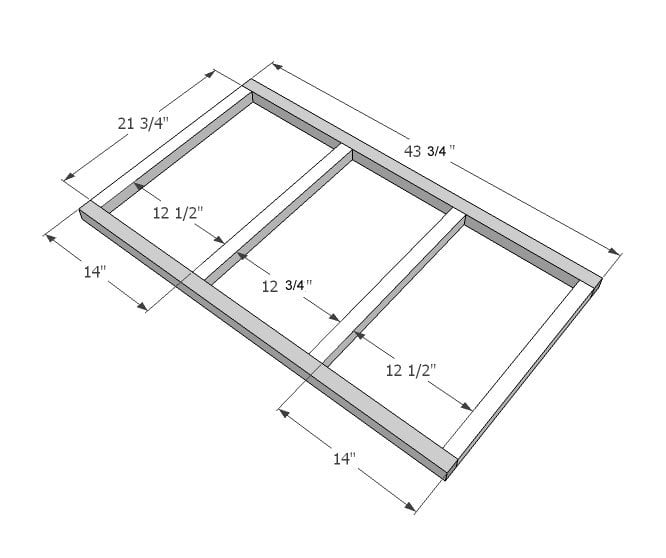
First, build the top frame.
Step 2

Then add the tabletop boards. You can build the tabletop first, then attach too. NOTE: Brooke recommends adding 5" to the tabletop boards and omitting the breadboard ends.
Step 3

Now build two of the sides. Again, you can build the side panels first, then attach side trim.
Step 4
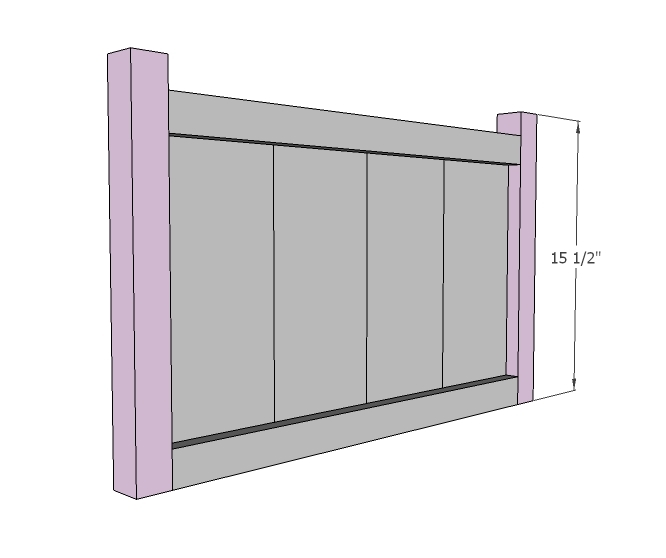
And then add the legs. Try PHs on the insides - 3/4" and 1 1/4" PH screws. NOTE: You will want your legs to fit the length of your caster wheels. This plan assumes your caster wheels have an overall clearance of 2" and your 1x12s are 11 1/4" wide.
Step 5
Step 6
If you did the breadboards ....
Step 7
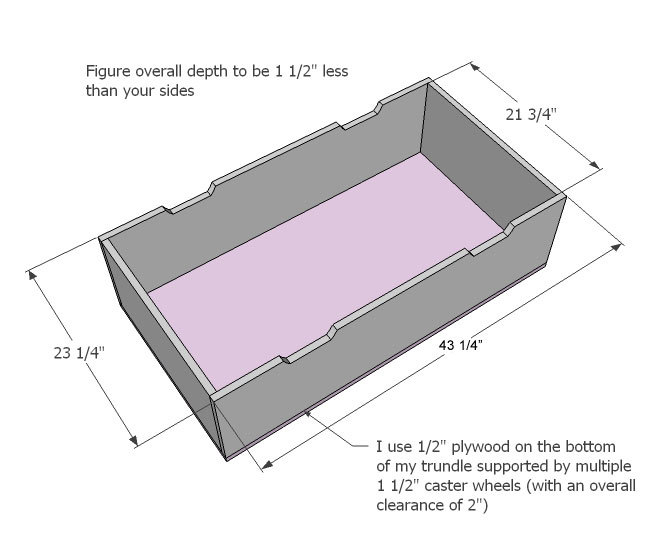
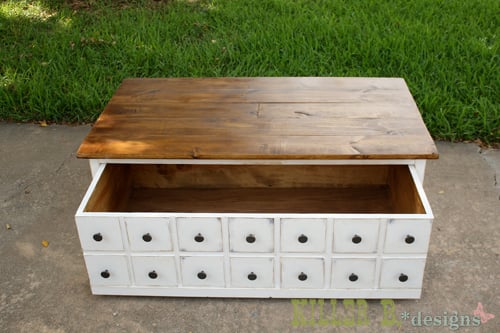
Ooops - don't notch out handles. Build the bottom box. Attach plywood to bottom.
Step 8
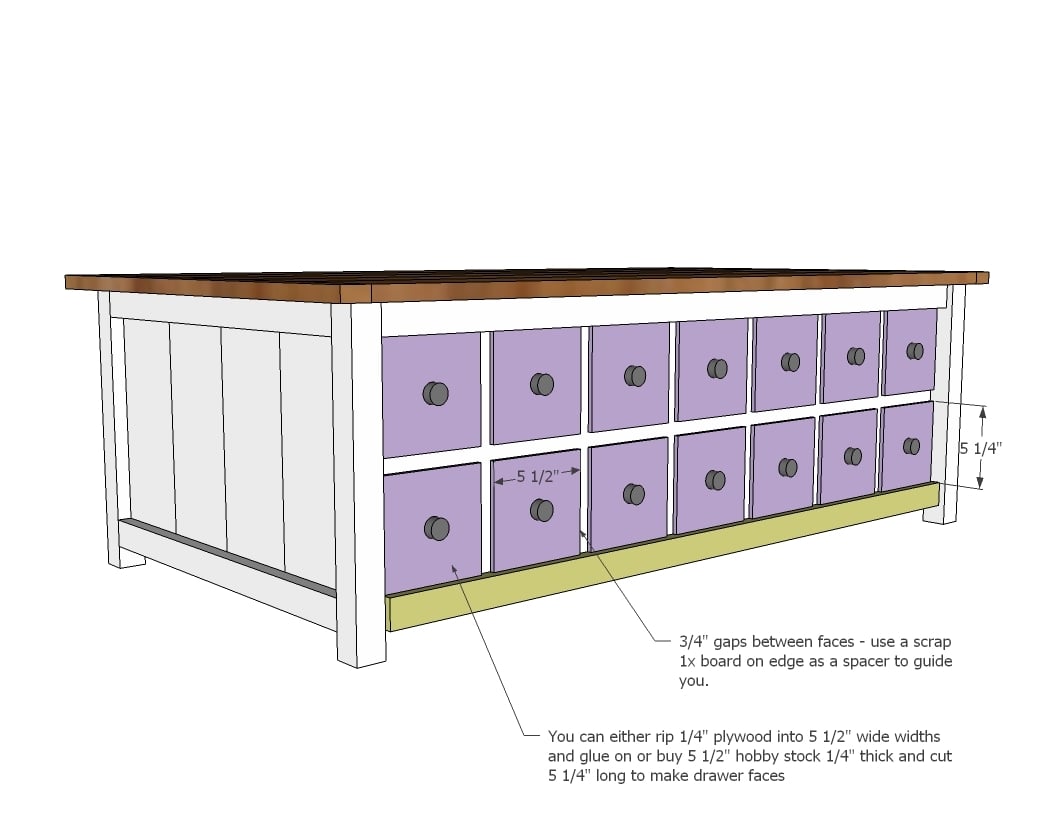
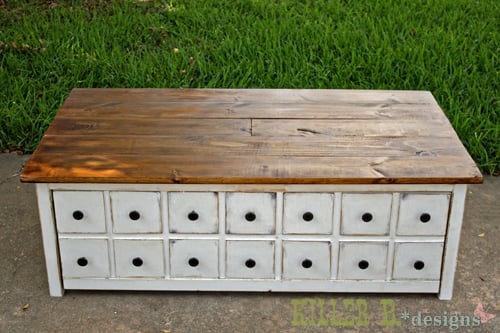
And then the little drawer faces!
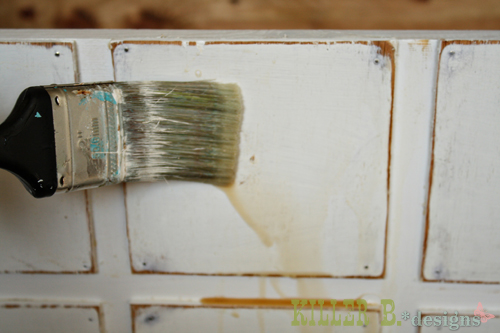
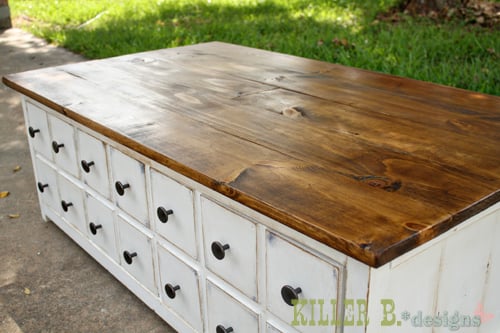
It is always recommended to apply a test coat on a hidden area or scrap piece to ensure color evenness and adhesion. Use primer or wood conditioner as needed.

Comments
dananryan
Wed, 06/20/2012 - 20:10
Beautiful!
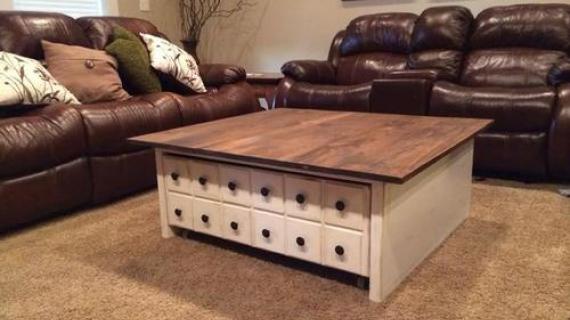
Soooo pretty! I love the finish too. I'll have to copy it on my next build. Great job Brooke! And Ana of course!
PedroAA
Thu, 06/21/2012 - 05:01
Breathtaking!
Honest, what a beautiful, 'simple' thing to do!
I know what my sister's next present will be!
Ivan (not verified)
Thu, 06/21/2012 - 09:35
metal brackets
On Step 5 Brooke mentions metal brackets. Where exactly are they placed?? Looks beautiful!
Thanks!
In reply to metal brackets by Ivan (not verified)
brookifer86
Thu, 06/21/2012 - 14:07
L-Bracket placement
They're placed on the corner where the 2x2's meet from the support frame and the legs. There's just enough clearance for the trundle
Bunnie1978
Thu, 06/21/2012 - 10:32
Well..
That looks familiar. Almost exactly the same as the one I made in my mind. :) Thanks for putting my thoughts on paper. You know what I mean.
Lucianna (not verified)
Sat, 06/23/2012 - 20:54
Trundle
The cut list says to cut the sides for the trundle at 23 1/4, but the plans show the boards at 21 1/4 - and the measurement 23 1/4 from outside the front and back board sides. Which one should I do? I had them cut at 23 1/4 for me at HD, but decided to come here and ask before I even started.
thanks a lot
Jill2 (not verified)
Mon, 06/25/2012 - 14:46
Reply to Lucianna
Hi Lucianna -
Fellow follower here, but I think the correct length might be 21 3/4" for the trundle sides. I think the cut list might have a typo. In the cut list, there is a note for the trundle sides that says to cut them 1/4" smaller than the side trim, which is listed above as 22" - this seems to jive with the diagram, which shows the boards as 21 3/4" - I hope that helps!
Jill
Katera (not verified)
Tue, 06/26/2012 - 08:04
Amazing
Our kids' toys are tossed into colorful buckets behind our couch. I was just looking at moving the furniture around but was stuck with what to do with all of their toys. This is an amazing solution!!
Susan71 (not verified)
Thu, 06/28/2012 - 09:24
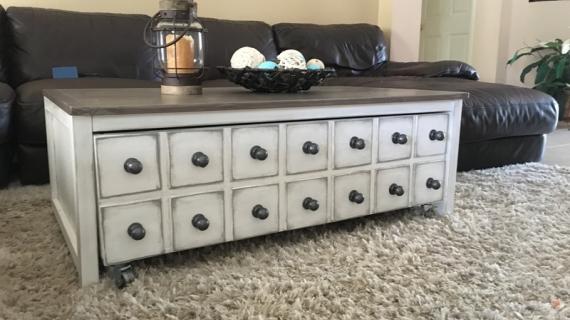
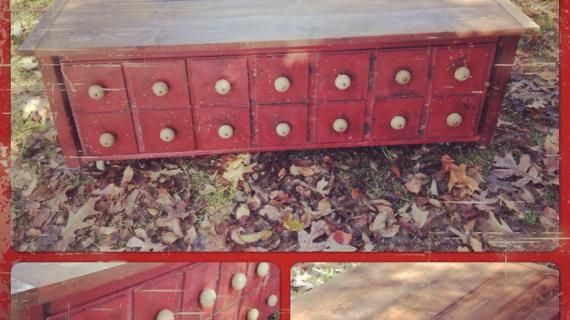
Apothecary Table
I love this table!! I have always been a huge apothecary chest fan and this is gorgeous and practical. I've been looking for an idea for a new coffee table and this is IT!! I just found your blog and there are several things I'm really interested in making in addition to this table. But, I am very new to construction and have a few questions regarding the measurements. I sincerely appreciate the effort and time you obviously put into this blog and am in no way am I trying to correct you. That being said, there are several differences in the directions and I just want to make sure I have my wood cut properly.
The finished length is shown at 27 1/2" in the initial diagram, but it says the apothecary style should be 1/4" larger. The first table, in the other post, you made is also 27 1/2" long. So should this table be 27 3/4" long? Does the body of the frame also need to be increased 1/4" or just the top? Also, in step 1 it states the width of the frame is 43 3/4" and the top in step 2 is shown at 45". But step 2 says to have 3/4" on each end, which can't work with those numbers, as there is only 1 1/4" to split between the sides. Is that enough to attach the end boards on to? I was assuming since the 45" shown isn't going to cover end to end that the boards would have to be added. The cutting list states to cut the boards 45 1/4" or 46 1/4", which neither match the diagram. The finished width is listed in the 1st diagram as 49 1/4".
I hate to ask so many questions. I'm just so new to this that I want to try and do it right the first time. Plus I can't afford to have a bunch of lumber cut at the wrong measurements lol. I would appreciate your response very much. I would also appreciate you overlooking the obvious fact that I have no idea what I'm doing! Thank you in advance and more importantly thank you for all the cool ideas!
Akim (not verified)
Sat, 06/30/2012 - 13:32
Apothecary coffee table
Hi. I am certainly going to give this project a go. But I can't figure out how to connect the box to the table. Is it that the two are separate units? Or is there a slide and a catch for the draw? I'm new at this so any pointers would really help.
Thanks
Carolyn and Duane
Thu, 01/24/2013 - 18:20
Love it!
I just finished this project and had so many silly issues with it. Because of limited space and to conserve boards I built it slightly smaller. The L-shaped brackets would not allow my drawer to operate smoothly, so I opted to use pocket holes to attach the trim for the bottom of the drawer on the back side to the legs (instead of the drawer itself). That simple change made things so much better!
saron
Sat, 02/16/2013 - 11:51
apothecary table
Absolutely beautiful! This will be something great for my hubby and I to do together.
daviskj
Wed, 07/17/2013 - 15:47
Finish on Apothecary Table
I just found your site and I've been in heaven looking at all the projects and planning on building a few of them.
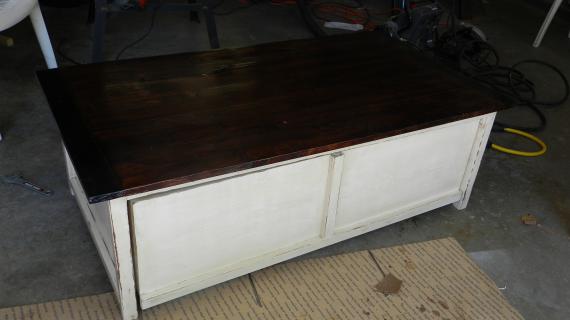
I really love the finish on this table. What stain did you use on the top? - And did you distress the top or is it reclaimed wood??
In reply to Finish on Apothecary Table by daviskj
JoanneS
Wed, 07/17/2013 - 16:59
Finish on Apothecary Table
Here's the link to the tutorial on this finish. It's so beautiful, I want to try this finish too! :)
http://ana-white.com/2012/06/coffee-stained-antique-white
mchio
Tue, 10/29/2013 - 10:22
Side Trim
Hi Ana - I'm a newbie to woodwork and you are an inspiration! Thank you.
I have a couple of questions. I've modified the plan to accommodate for a smaller table. So the 1st question is: I was thinking of using 2 locking casters to prevent the table from rolling up and down hard wood floors. But in your pictures, I cant even see the casters i. So, would it work for me to use locking casters or would it be a pain to reach under and in to lock the wheels?
The 2nd question - because I did modify the cuts, there are some gaps that I need to fill. So, my question is: do you think it would look off if I used a 1x3 instead of the 1x2 for the side trim?
The total dimensions of the table top is 30" x 17 1/2". I used five 1x4s for the tabletop and eliminated the beadboard ends as Brooke suggested. Thanks in advance!!
emilyerkmann
Sun, 07/20/2014 - 20:02
castor wheels
This may be a very basic question but that's okay. How did you attach the castor wheels? I did actually find some rigid 1 1/2" wheels which are nice, but I'm having a hard time figuring out how to attach them without the screws going all the way through. Also, is there another name for hobby stock or is it just the wood squares that they sell at Hobby Lobby, etc?
I LOVE your site by the way! I have made about 8+ different pieces, my favorite being the farmhouse bed for my daughter and the fancy farmhouse table for our screened in porch. You might say I'm slightly addicted to it. :) Thanks for your help!
Carbll
Sun, 01/18/2015 - 19:13
Pocket Holes
This is my first time working with a Kreg Jig. I used the Jig to connect the frame together. Do I use it to connect the frame to the table top as well? If so, can you explain how to place the Jig to create the pocket hole in the body of the 2x2? It makes sense to me on the ends, but I can't figure out how to make a pocket hole in the body of the 2x2.