
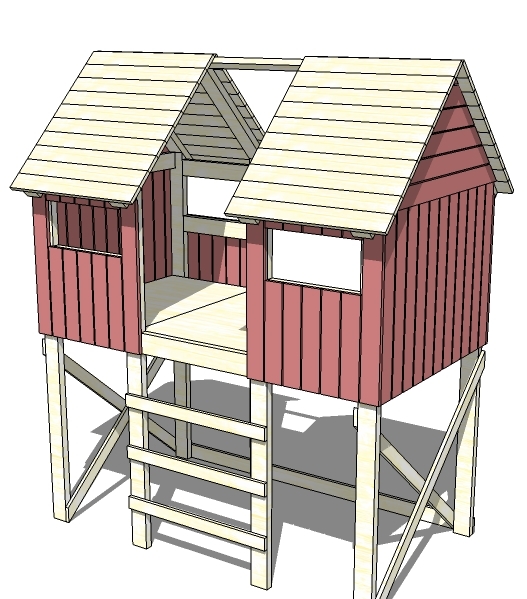

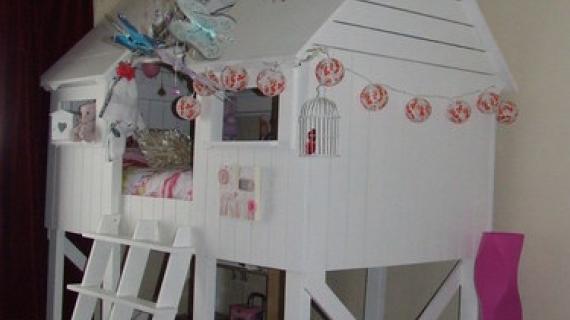
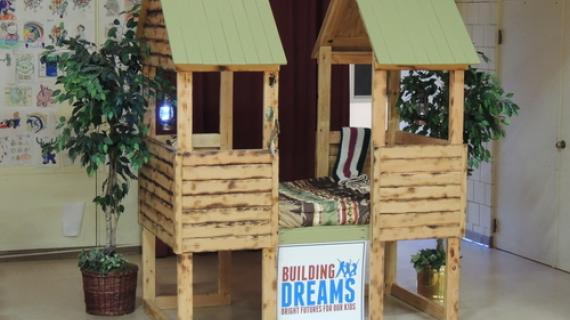
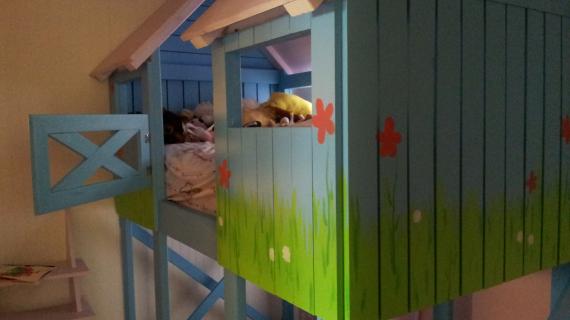
A beach hut loft bed that can be assembled in room. Features a large, wide ladder, two sides with gable roofs, and four windows.

Preparation
Before building this bed, make sure that it fits in your room, and that you can move it into the room.


Please read through the entire plan and all comments before beginning this project. It is also advisable to review the Getting Started Section. Take all necessary precautions to build safely and smartly. Work on a clean level surface, free of imperfections or debris. Always use straight boards. Check for square after each step. Always predrill holes before attaching with screws. Use glue with finish nails for a stronger hold. Wipe excess glue off bare wood for stained projects, as dried glue will not take stain. Be safe, have fun, and ask for help if you need it. Good luck!
Instructions
Step 1
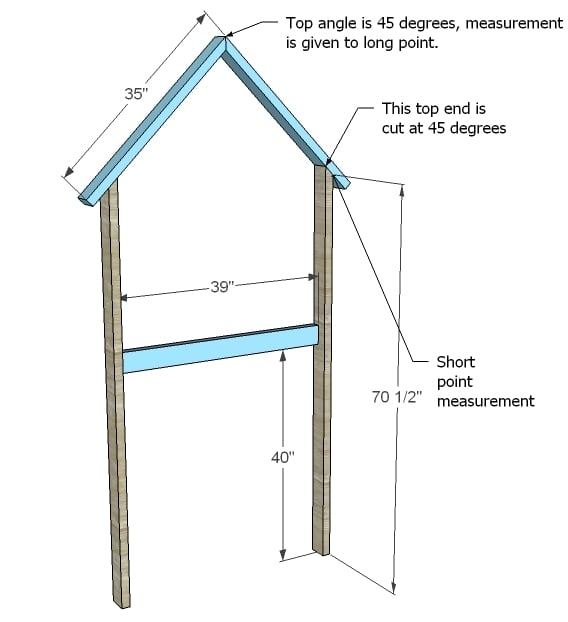
Trusses
Build four trusses exactly as shown above. Use either 2 1/2″ pocket hole screws or 3″ wood screws countersunk and glue. Make sure all trusses match exactly and are square.
Step 2
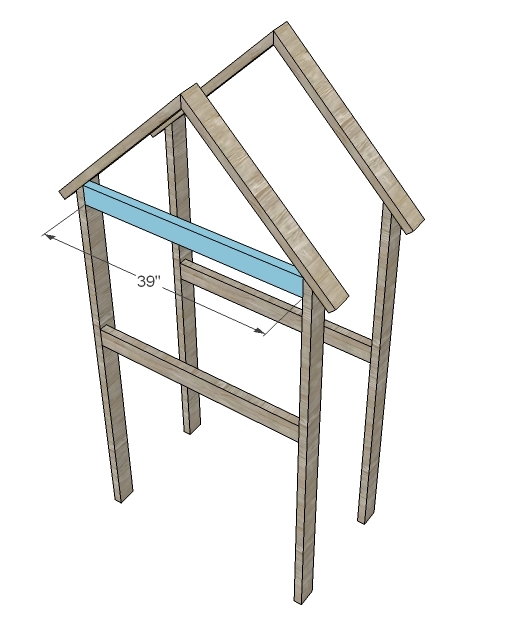
Outside Trusses
On the two outside trusses, attach another 2×4 flush to the top of the legs as shown above. Notice how the 2×4 is flush to the outside, same as the lower support? Only do this on two of the four trusses.
Step 3
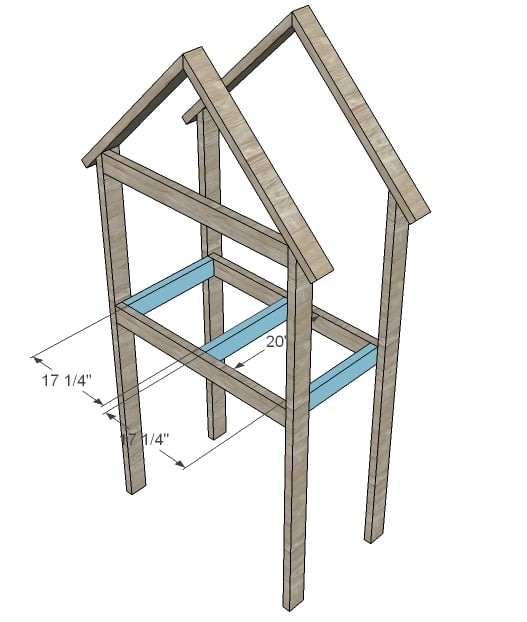
Side Huts
First things first. Make sure you can get project that is 26″ wide through your doorway. If not, you will need to assemble in place. You will need to build two hut frames as shown above buy joining the two trusses (one end truss and one open truss) as shown above. Build two identical huts as shown above.
Step 4
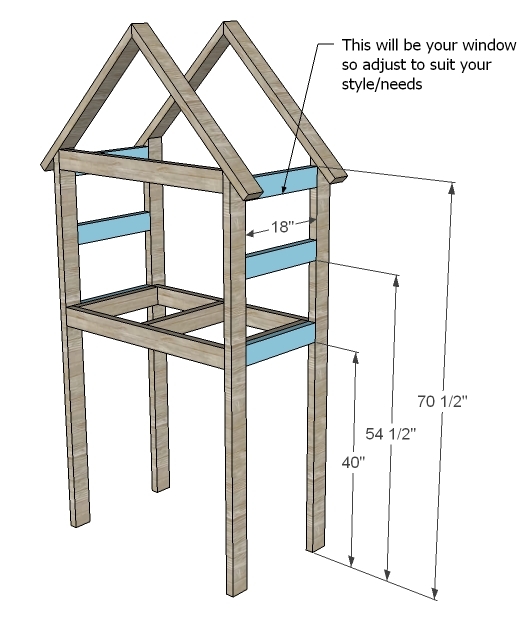
Sides
Use the Kreg Jig™ to drill holes in the side supports and attach to the trusses as shown above. The location of your windows is the top opening, so you can adjust as you see fit.
Step 5
Step 6
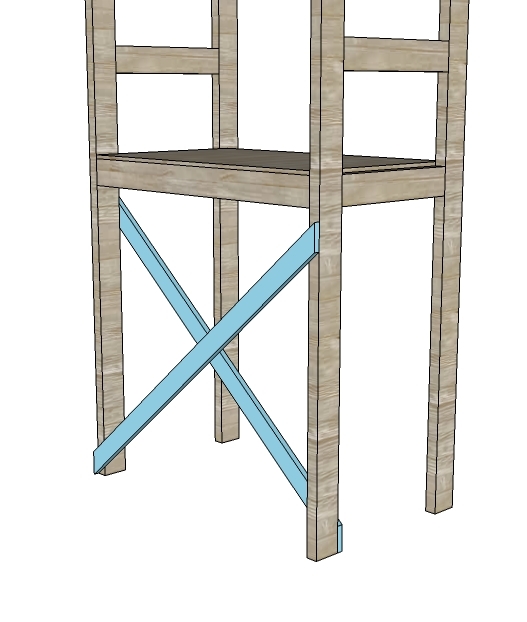
Cross Braces
Lay the cross braces over the sides of the bottom and mark. Remove and cut the ends off at an angle, so the cross braces will look as they do above. Screw down (make sure everything is very square before you screw down).
Step 7
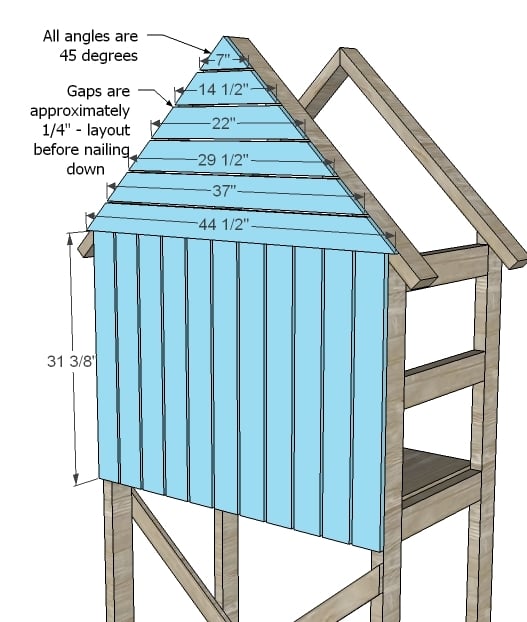
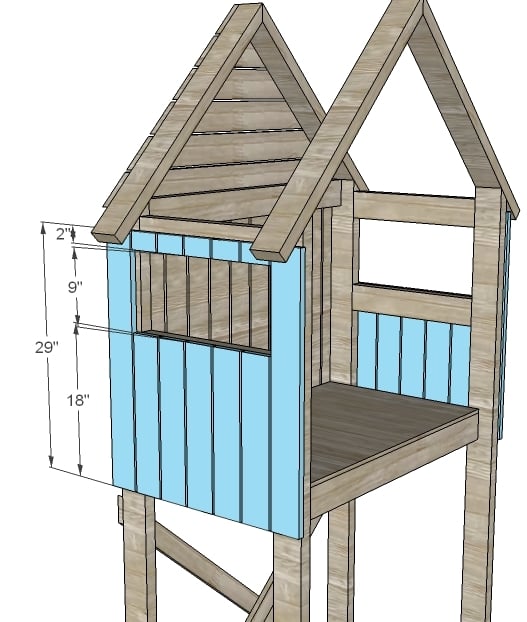
Siding
If your doorway measurements were particularly tight, you may wish to screw the siding on in place, as it does add an extra 3/4″. Layout, with approximately 1/4″ gaps between the boards. Screw down with 2″ screws (if removable) or 2″ finish nails and glue (if permanent). Make sure everything is good and square. This step should make the huts pretty stable, though very top heavy and likely to tip over. Be cautious.
Step 8
Side Siding
This part you could nail down. It will save you time now and also be easier to conceal nail holes. Use 2″ finish nails and glue.
Step 9
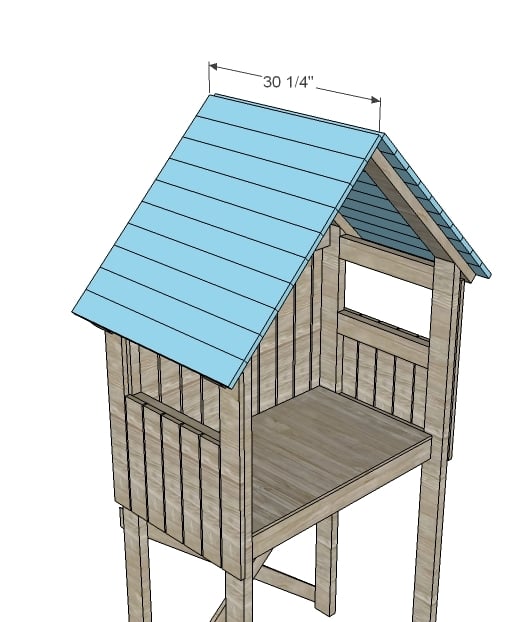
Roof
Now the roof is where things are getting wider. If your doorway (or window) can’t fit an object 30 1/4″ wide through it, save this step for finishing in the room. Start the roofing at the top and work your way down. The roofing boards are not designed to have gaps between them. And our huts are done!
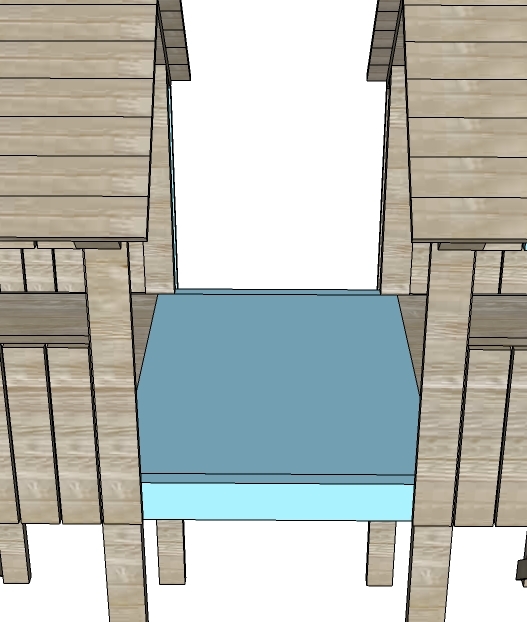
Step 10
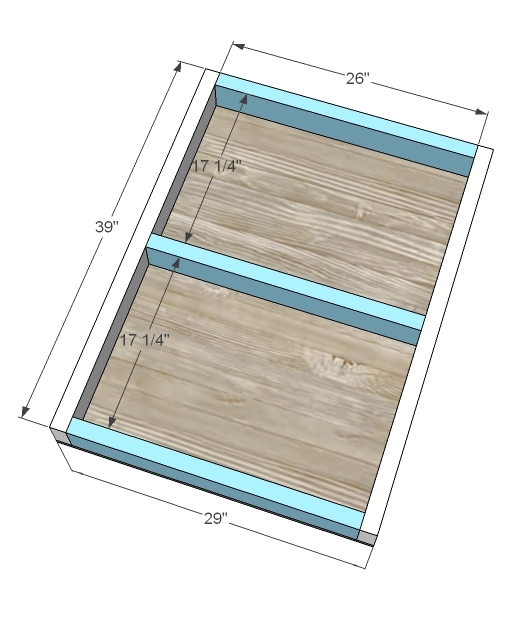
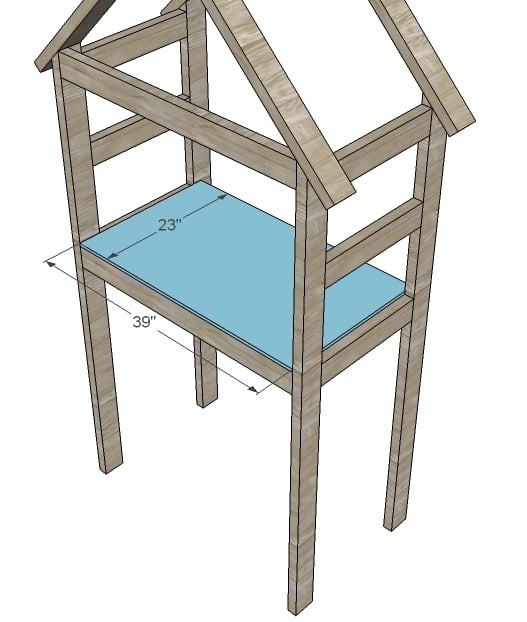
Center Floor
Construct the center floor as shown above. Use 3″ screws and glue. Adjust for square before screwing plywood to the frame.
Step 11
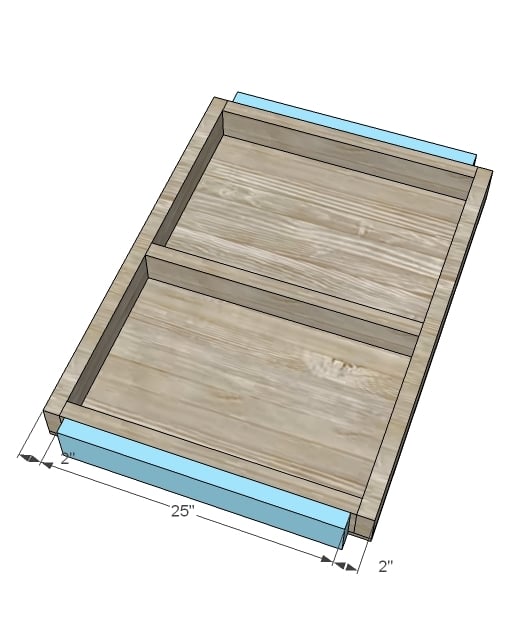
Center Trim
Attach the center trim pieces to the sides of the center as shown above. 3″ screws and glue – just three screws per board will do. Keep the 2×6 flush to the bottom, so you will have a lip to the top to keep things inside the hut.
Step 12
Assembly
With all pieces in the final room, attach the center piece to the two huts, using 4 1/2″ lag bolts with washers and nuts. You will need to predrill holes for the lag bolts. Use four bolts per side, and periodically check to make sure bolts are still tight and tighten if necessary.
Step 13
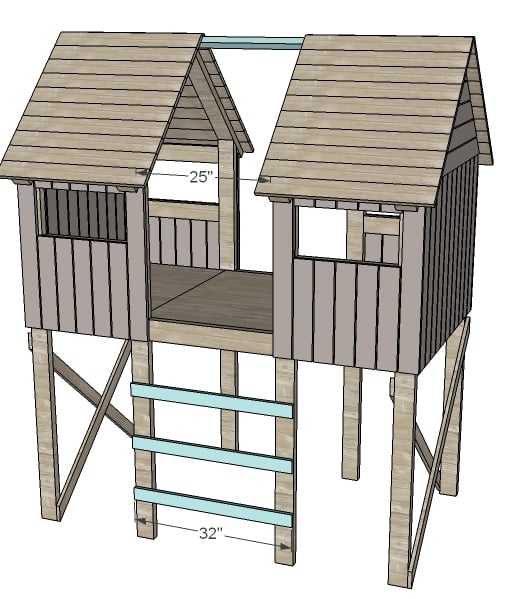
Ladder/Top
I choose to do the ladder this way because it ties in the two huts at the base. You can bolt these down or just use screws. I also put the center piece up to keep the two huts in position at the top, but the Ram had a good point . . . what little boy isn’t going to be hanging off of it? So consider beefing the top support up if you have a climber.
Step 14
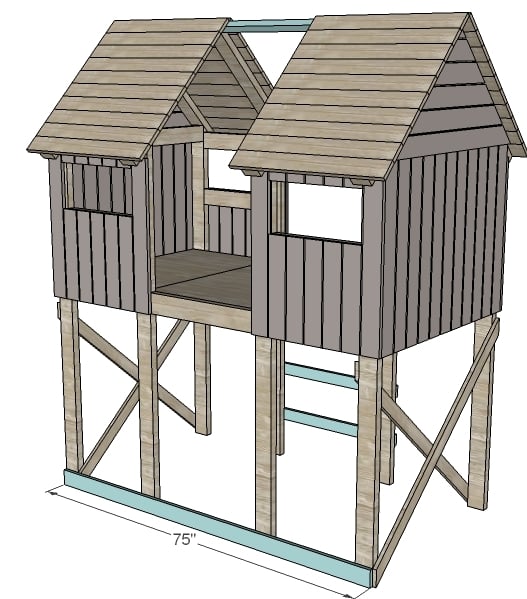
Base Support
The best way to add support to the back would be cross bracing. But a base support as shown above should do the trick. If you need to, add cross bracing (like done on the sides) to the back. That will take any wiggle out of the base.
Now the fun part. Finishing :)
Step 15

Bed is four feet tall in center, without mattress. You will need to fold mattress in half, slide through opening, and let the mattress unfold to fit it in the bed. Build and use at your own risk. Please see disclaimer in the footer below.
It is always recommended to apply a test coat on a hidden area or scrap piece to ensure color evenness and adhesion. Use primer or wood conditioner as needed.

Comments
Slateberry (not verified)
Tue, 03/29/2011 - 04:12
for the rear base support
for the rear base support shown in step 14, I'd measure the height of the baseboard in the room, which is usually 4-8", and attach the base support slightly higher than that. That way, the entire structure can sit that much closer to the wall. Also, I'd consider screwing the base support into the studs for even more stability, but that could have it's pros and cons.
Guest (not verified)
Fri, 09/16/2011 - 18:17
Beach Hut Bed
Hello Ana,
This beach hut bed is too cute! It also looks like it would be a great outdoor tree fort, (without the tree). Do you have any suggestions should someone decide to use this for outdoor purposes?
Thank you = )
Guest (not verified)
Sat, 09/17/2011 - 08:40
beach hut bed
This is a response to the guest about making this a kids fort. lots of people agreed with you. If you scroll down in the comments section of the post you should see the suggestions Ana and others have given to convert it. I think I'm going to build it too as a fort
Guest (not verified)
Sat, 09/17/2011 - 08:49
beach hut bed cont.
i just realized that was the comments section. I know i read a lot of comments about it being converted months ago when Ana originally posted it. It may have been on her Facebook page or she erased it when she converted to the new site. I would suggest asking on the Facebook page.
laurakc181 (not verified)
Fri, 12/23/2011 - 14:02
Quick question about a revision on this bed
Ana,
I see that someone else made this bed, but lowered it a bit and put the stairs at an angle for it to be a little easier for younger kids to access it. Could you possibly post a set of plans on this type of revision? I am interested in doing this, but also putting up handrails on the steps so my 2 year old could start out life in an awesome bed hehe. If not, I can see what my dad can help me to do in order to revise it ourselves :)
Thanks so much for all you do!
Wllms71
Thu, 03/14/2013 - 15:51
Lowering bed
Did you ever hear back about lowering this bed and adjusting the stairs? If so how much did it lower by and what wood cuts were different. Love this bed and am looking into making it. Thanks
Brock (not verified)
Fri, 01/06/2012 - 09:48
Cost
I am about to build this bed and I was just kinda wondering waht the cost it would be to build this bed
Guest (not verified)
Fri, 01/06/2012 - 11:45
Cost
We built this bed for Christmas and it came out around 200.00 by the time everything was finished, stained, painted, etc. That was purchasing wood at Blue and Orange stores since there isn't another option for purchasing wood around here. Hope that helps.
Brock (not verified)
Fri, 01/06/2012 - 14:33
Cost
Yes thank you. That is what I had in mind. Again thanks alot
Brock (not verified)
Fri, 01/06/2012 - 14:33
Cost
Yes thank you. That is what I had in mind. Again thanks alot
Brock (not verified)
Sat, 01/07/2012 - 09:19
Sterdy
Is it still sterdy with just the one beam in the back
Amberly D. (not verified)
Mon, 02/13/2012 - 07:11
With a slide possible?
Hi,
I love this beach hut bed for our sons Spongebob themed bedroom. But he really wants a slide like with the castle bed, but it doesn't fit with his theme. I Just wanted to know if there was anyway to put a slide in the plans somewhere, maybe at the foot of the mattress of instead of the right window near the foot. Please let me know it would be wonderful! (And space isn't an issue lol.)
Guest (not verified)
Mon, 02/13/2012 - 11:43
Slide
We built this bed for Christmas, and while we didn't put in a slide I think it would be big enough to put one. . . but instead of putting it on the window I would make one of the end panels similar to the window sides _ with cross beams in the middle and putting "siding" on the top part for additional support. The sides with the windows as pictured are actually quite narrow for putting a slide onto it - although it really would depend on the width of the slide.
Ashlee (not verified)
Sat, 06/30/2012 - 12:05
full size mattress?
My daughter is in love with this bed and we are hoping to build it for her. I assume this is a twin size mattress size in the specs, correct? Any suggestions for how to modify it to fit a full size mattress? Thanks!
Scott Curtis (not verified)
Thu, 12/13/2012 - 07:32
Mattress
So when building this, when do you put the mattress in and would a twin fit through the opening once everything has been put together? That is the only thing that is puzzling me.
Thanks
Landkmommy
Tue, 02/05/2013 - 18:33
Ike's hack
Hi I just recently bought the Ikea kura bed for my two kids and I wanted to build this beach hut on top. I just need a few revisions in the measure menta and switch the door opening to the side instead of the middle. This way I won't need to build it from the ground up. This is my first DIY project I was begging my husband to make this but he is too busy. So I said I will do it my self. But I need help!!! Can you give me a set of plans based on this and using the Ikea kura bed as a base?
Akhughes31
Wed, 10/23/2013 - 17:11
Ikea hack: beach hut
Hi Landkmommy, Im curious to know if you ever used the Ikea bed as a base for this? I want to have this beach hut built in our backyard as a tree-fort and had the same idea (using a loft bed as the base) and came across your comment while researching this. Any feedback/suggestions would be really great!
Thanks