


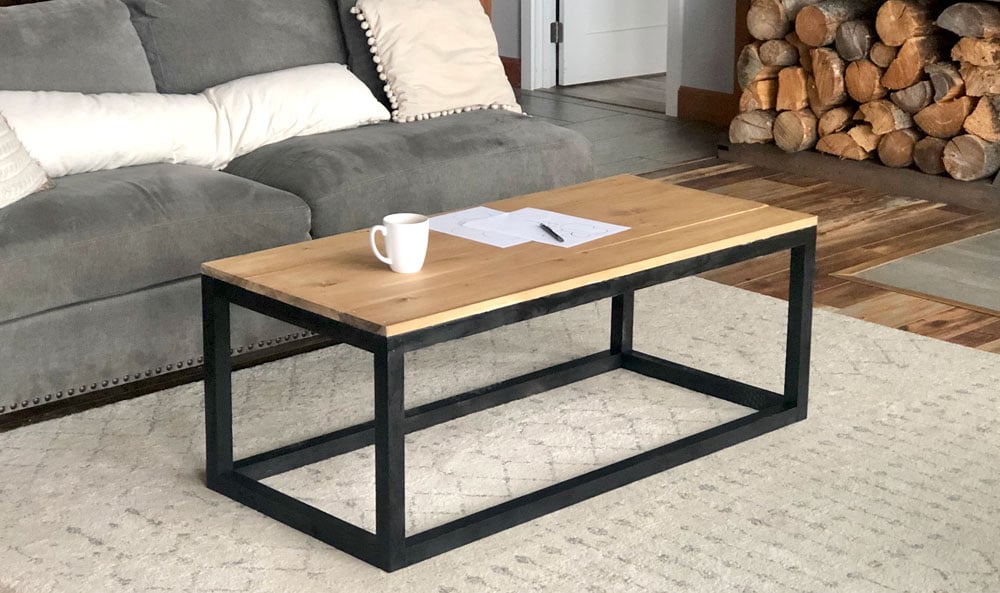
This coffee table has a lift top so you can use it as a table. This is a free, diy project plan that you can use to build your own lift top coffee table. Modify with a bottom shelf or X bracing on the ends. Free plans by Ana-White.com
Do you work from your couch, or sometimes enjoy dinner in your living room?
Maybe a lift top coffee table is the right solution for you!
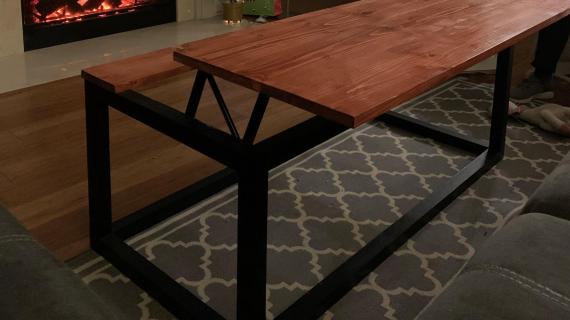
I just built this on trend coffee table for about $50
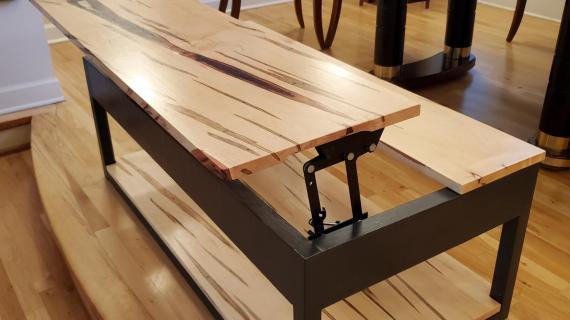
And instead of securing the top to the base, I just added a lift top hinge so it does this -
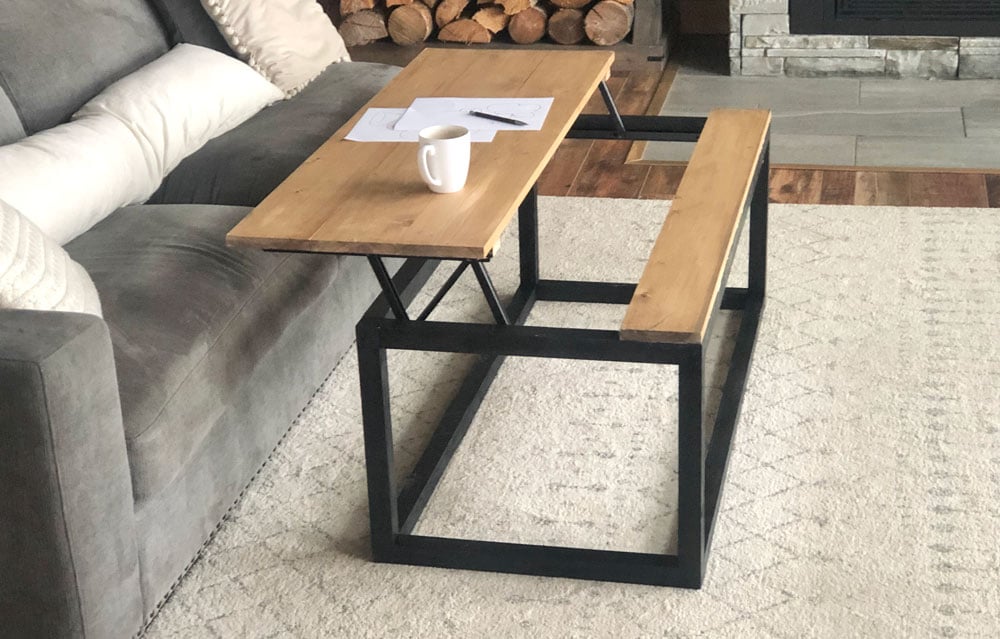
With the top up, it is very functional as a desktop or tabletop. You could easily use a laptop or set a plate on it.
Here's a video of me building this coffee table:
Lift Top Hinges
There's quite a selection available for lift top hinges. I ultimately settled on this one (affiliate link) for it's price of just under $15 bucks.
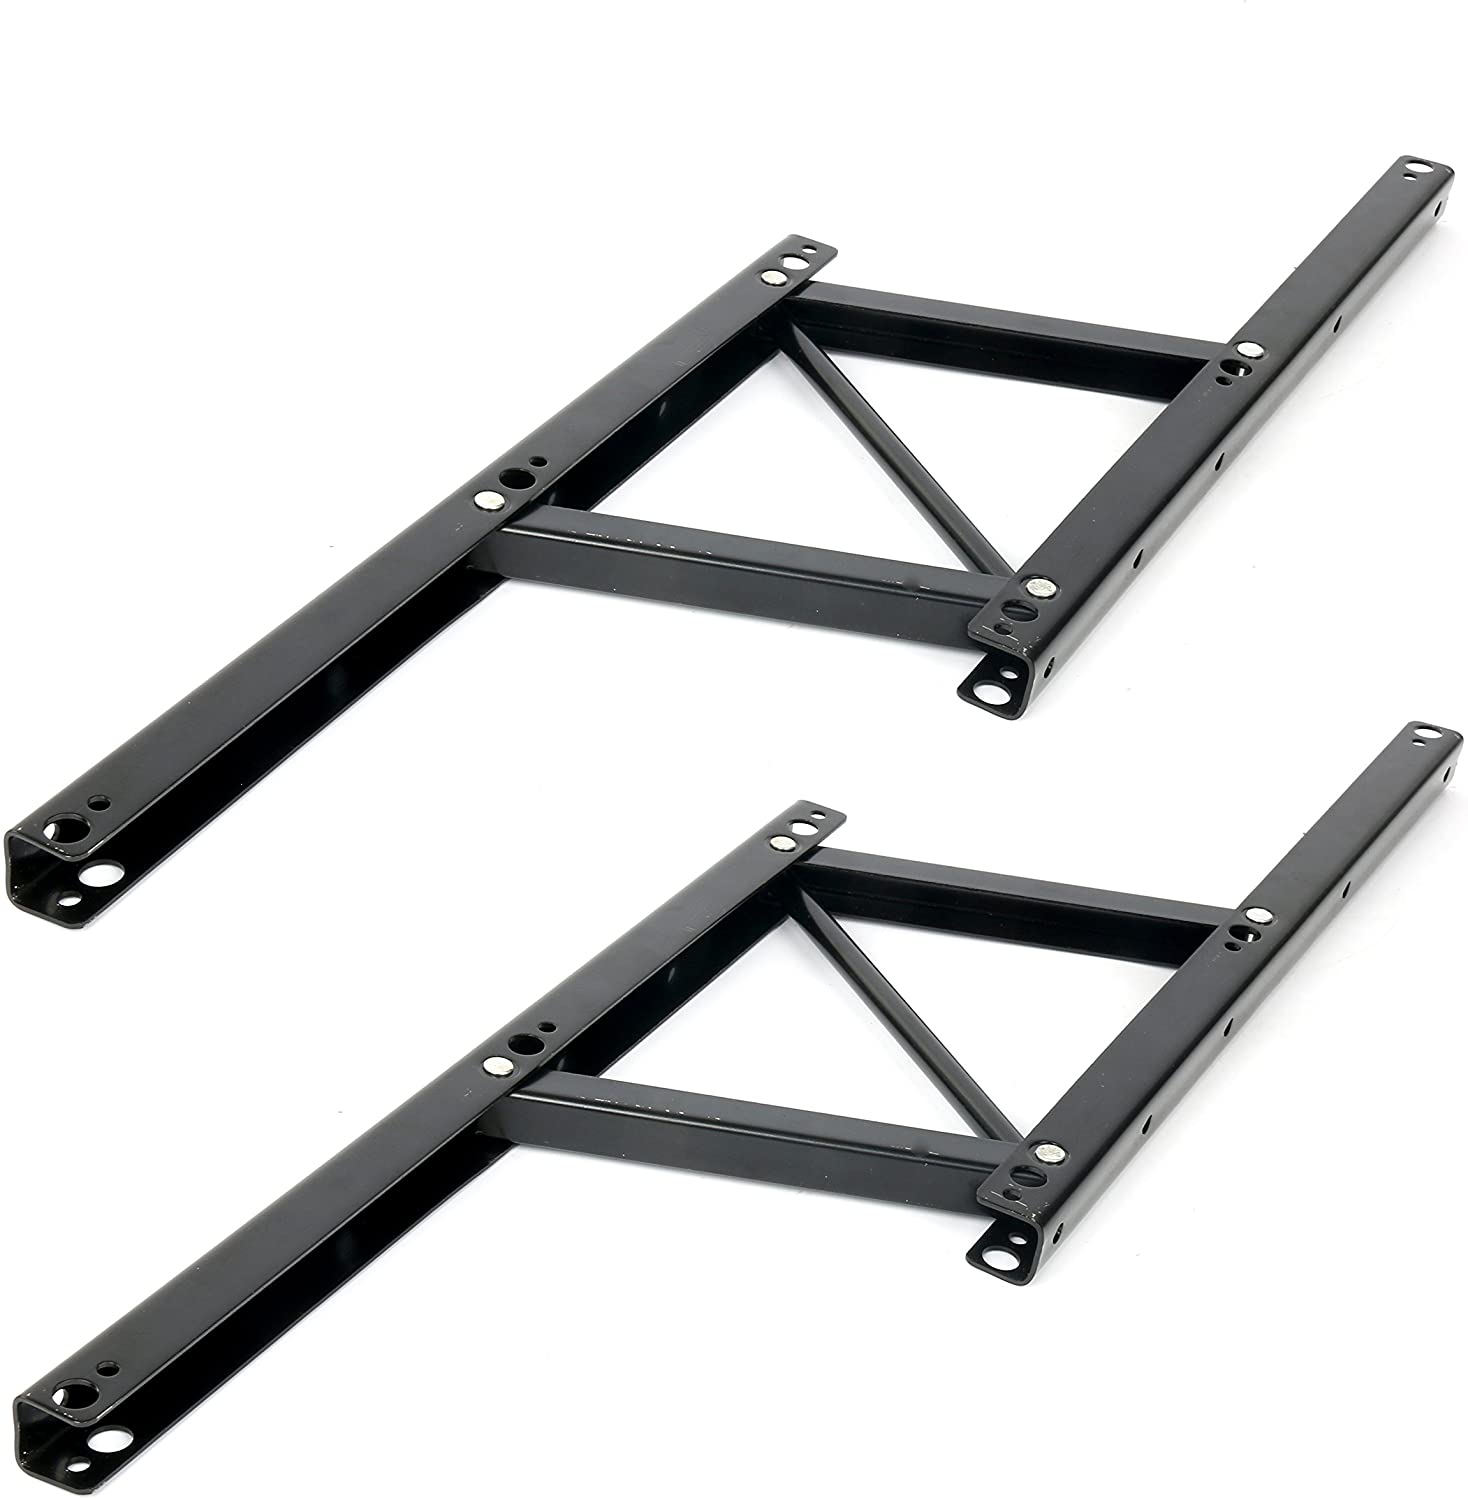
Just make sure the overall length of the hinge is less than 15" and the overall height is right at 1-1/2" - so it fits in this coffee table plan, and hides behind the 2x2s that are 1-1/2" thick.
Recommended Modifications
After building this lift top coffee table, I did feel it was a little on the light side (wanting to tip forward when I pull the top up), so wanted to offer a couple of options that might help (but will definitely change the look and the overall cost of the project).
- You can add a bottom shelf by simply adding two more 1x6x8' boards to your shopping list
- You can add X bracing on the ends by adding one more 2x2x8' to your shopping list
These modifications are shown in the plans.
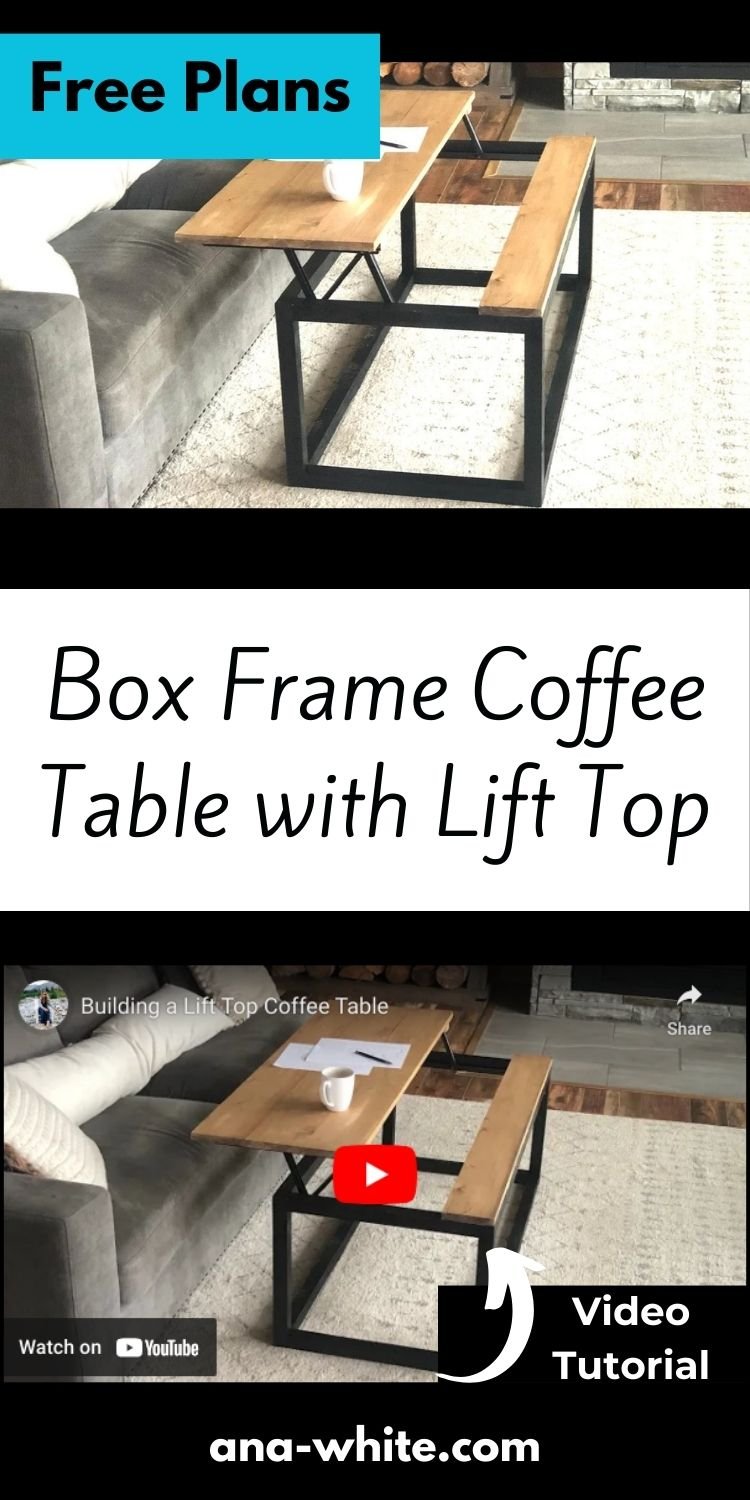
Pin For Later!
Preparation
- 2 - 1x6 @ 8 feet long
- 4 - 2x2 @ 8 feet long
- 1 - 1x2 or 1x3 @ 8 feet long
- 1 - 15" long lift top hinge like this one (affiliate link)
- 2-1/2" pocket hole screws (recommended) or 2-1/2" long self tapping star bit screws
- wood glue
- 1-1/4" brad nails or 1-1/4" long self tapping star bit wood screws
For the bottom shelf addition:
- 2 - 1x6 @ 8 feet long
For the X bracing on ends:
- 1 - 2x2 @ 8 feet long
4 - 1x6 @ 47" - tabletop
4 - 2x2 @ 17-1/4" - legs
4 - 2x2 @ 44" - long aprons
4 - 2x2 @ 19" - end aprons
4 - 1x6 @ 47" - optional bottom shelf


Instructions
Step 1
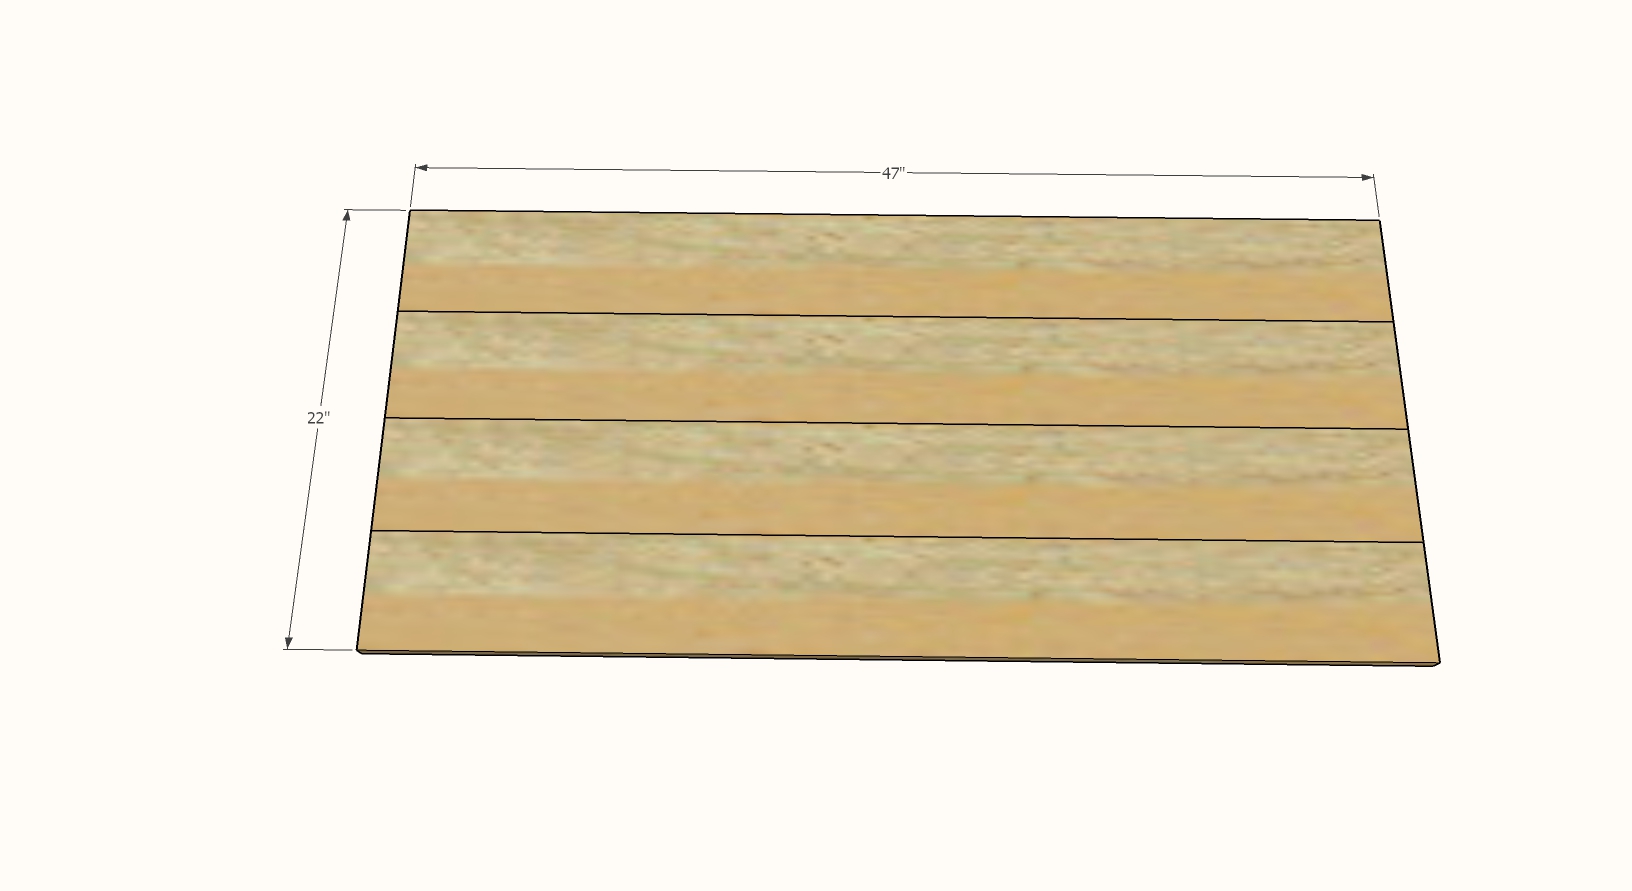
Layout the tabletop boards and check to see if they match the diagram above.
If not, adjust the end 2x2 lengths so that the end 2x2 plus two legs is equal to the width of your tabletop.
If using pocket holes, attach three of the tabletop boards together edge to edge with 3/4" pocket holes and 1-1/4" pocket hole screws, one screw about every 8".
Step 2
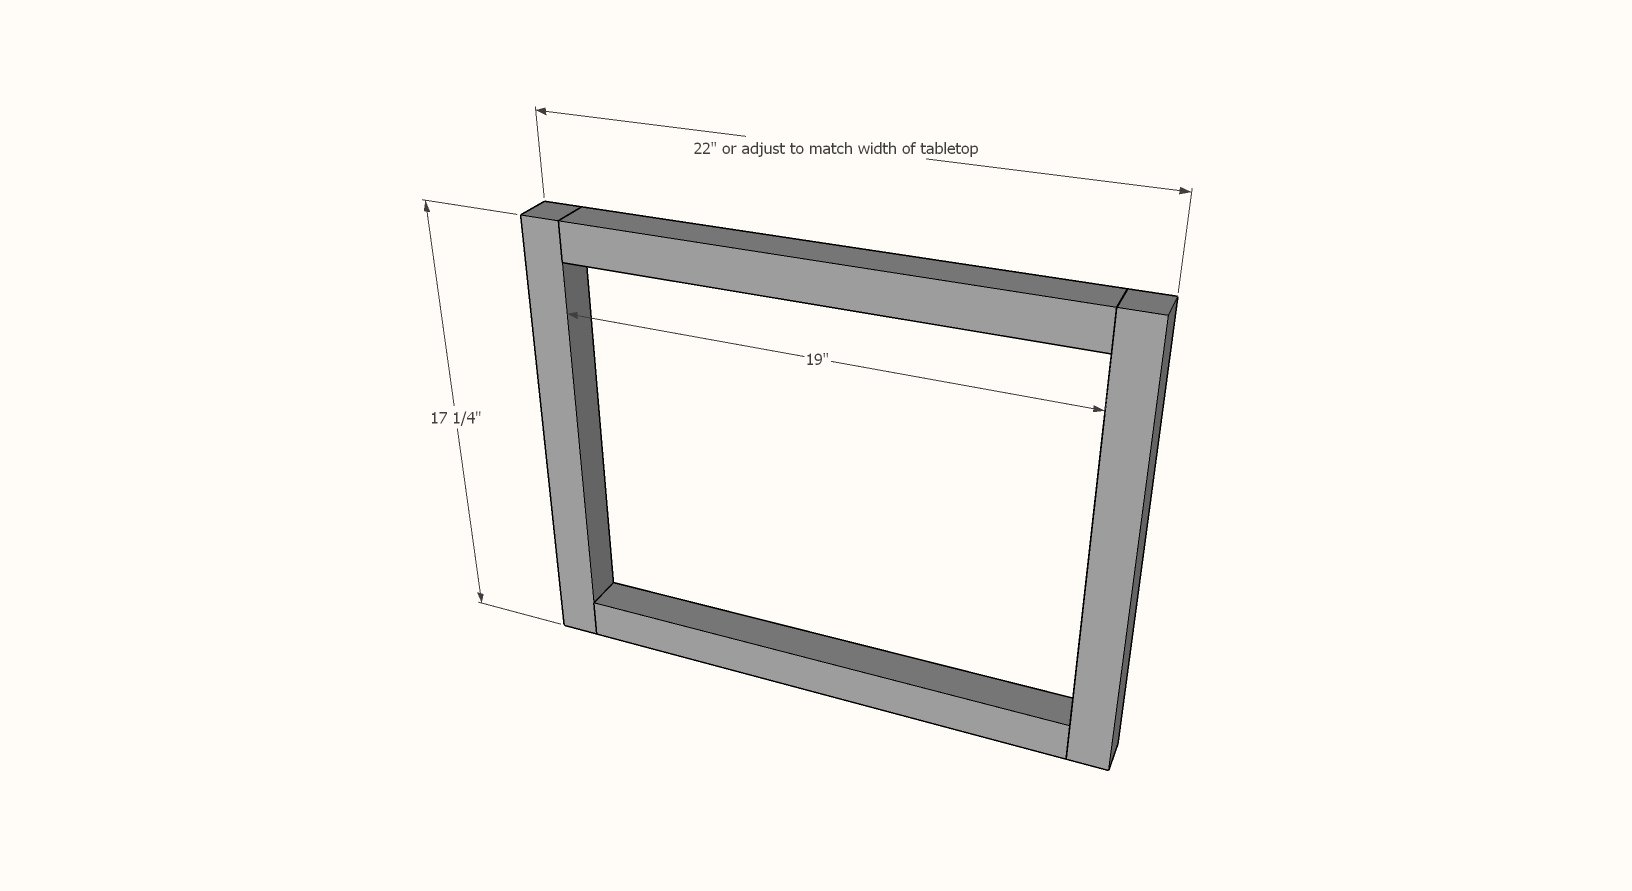
Build the end frames with 1-1/2" pocket holes and 2-1/2" pocket hole screws (recommended) on tops and bottoms or 2-1/2" self tapping screws.
Step 3
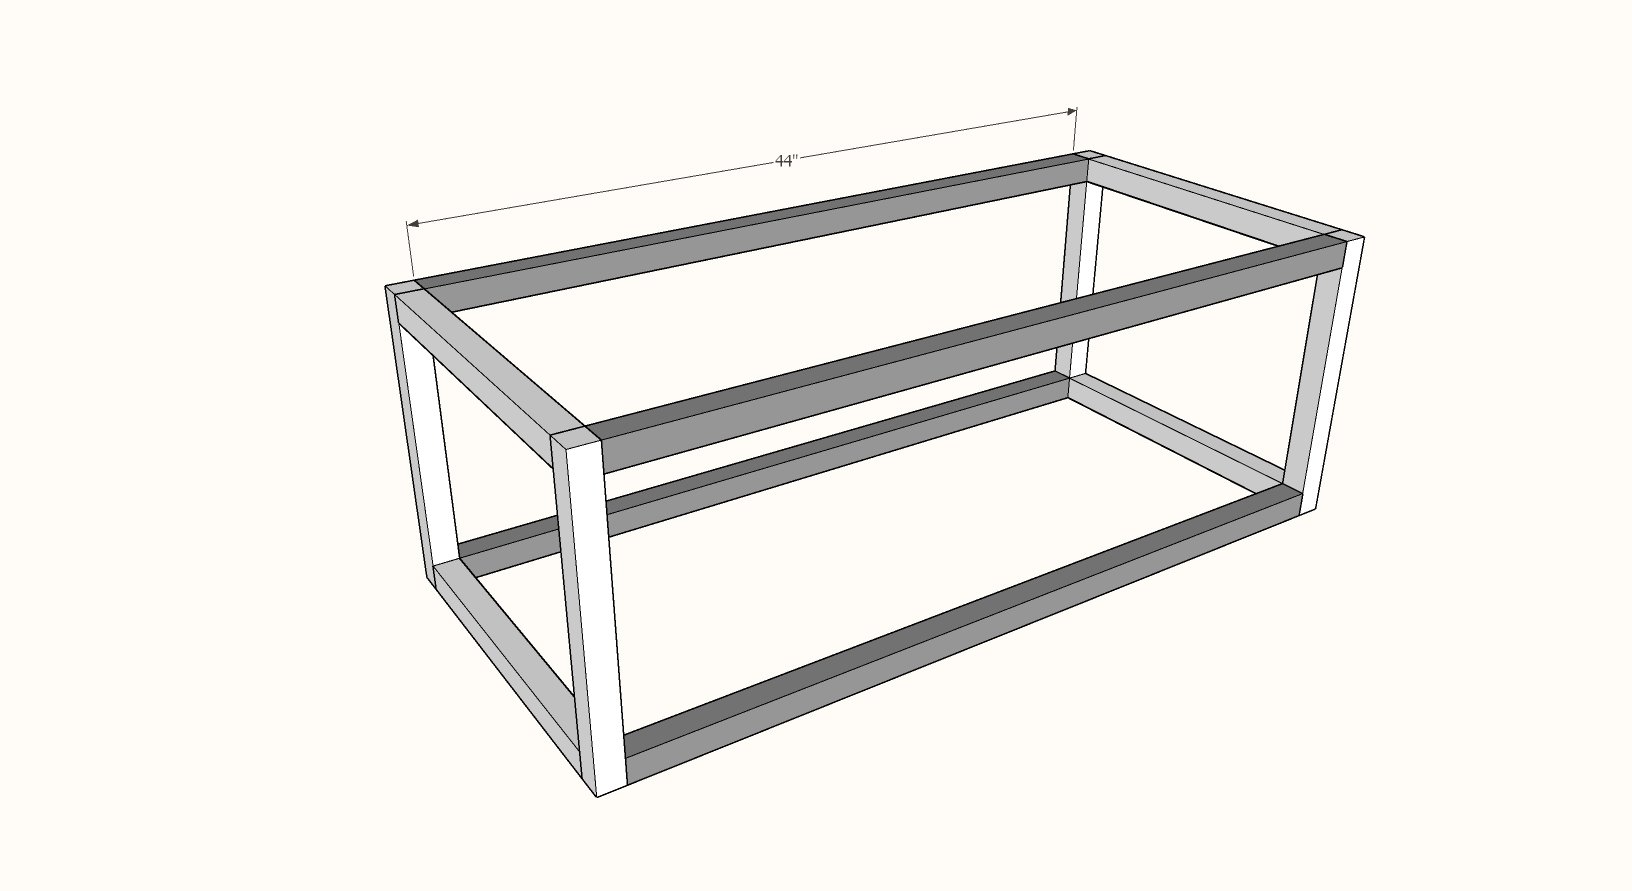
Repeat with the longer aprons to create the coffee table frame.
Step 4

Layout the tabletop boards face down and place the coffee table frame on top.
Position the hinges as shown and attach to the tabletop. Add the 1x2 or 1x3 supports with 1-1/4" brad nails and glue or 1-1/4" screws.
Make sure the frame is square.
Step 5

Make sure the frame is square.
Attach the remaining tabletop board on the frame with 1-1/4" brad nails and glue (or screws).
This board creates alot of structure for the tabletop and is very important.
Step 6
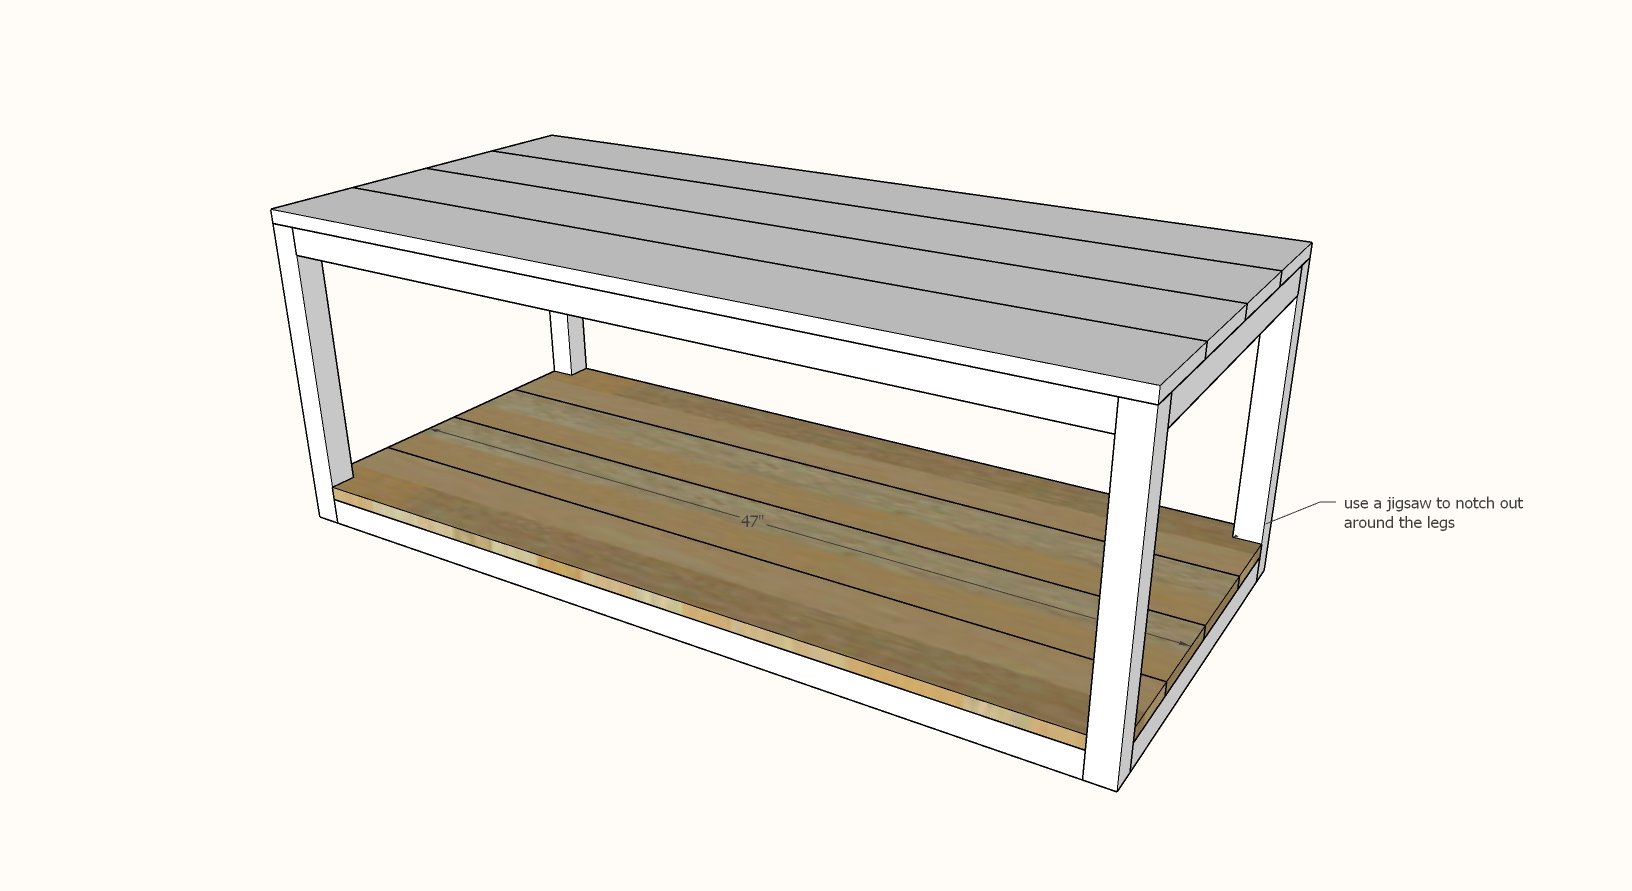
For the optional shelf, notch out the corners of the outside 1x6s with a jigsaw to fit around the legs. Fit shelf boards in the frame and glue and nail or screw down with the 1-1/4" fasteners.
Step 7
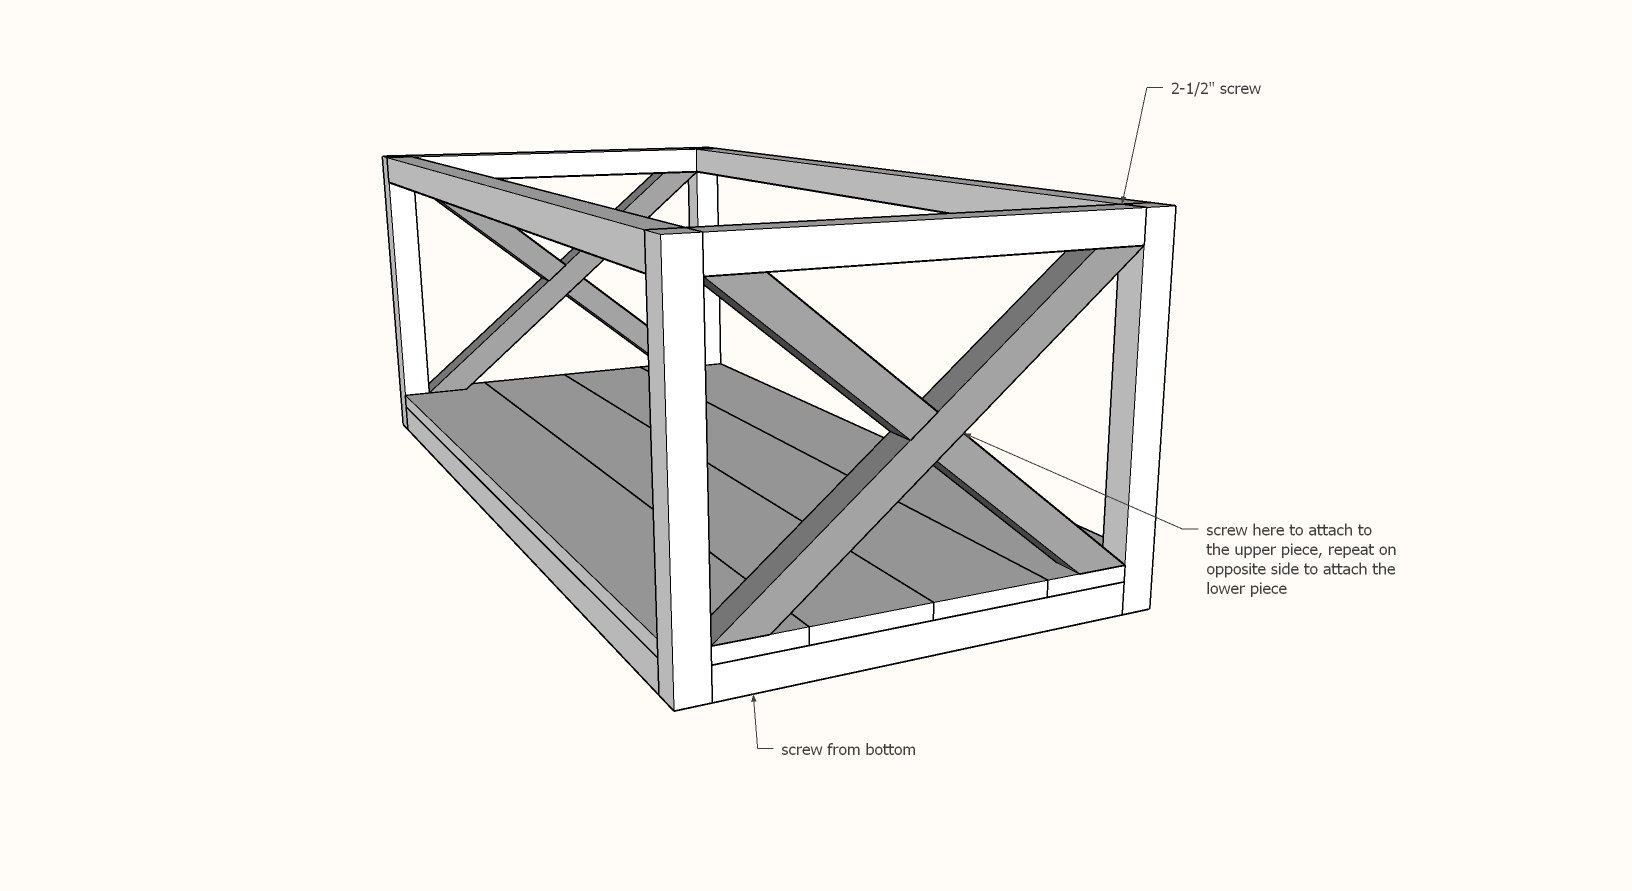
For the X detailing (can be done without the bottom shelf too), place the 2x2 alongside where you wish to attach it and pencil mark the overlap. Cut along the pencil marks. Repeat same steps to create the shorter X pieces. Attach with glue and screws.

Comments
hollyberry357
Tue, 09/08/2020 - 15:55
Love the modifications…
Love the modifications. Gives it more umph and sturdiness!
idotaz
Thu, 09/10/2020 - 09:30
Love This!!
Love this! I've been debating buying one and now I can just make it and with the modifications will be my style!!! Thank You! Bought the supplies Monday...working on it this week. It's almost complete. Just waiting on paint and clear coats to dry (I hate that part, it seems to always take forever!). I will post pic when complete :)
Iacosta
Mon, 09/14/2020 - 08:54
X instead of shelf
This is just what I was looking for, thanks for sharing!! Do you think adding an X bracing on the bottom instead of the shelf will make it stable enough? I really like the clean lines without the shelf.
Loralee
Wed, 09/16/2020 - 10:42
This plan was great to…
This plan was great to follow! I love the modifications And built the bottom shelf for stability and storage. Couldn’t be happier with cost, look and functionality! I tried to find a way to post pics of my table but can’t figure it out.