
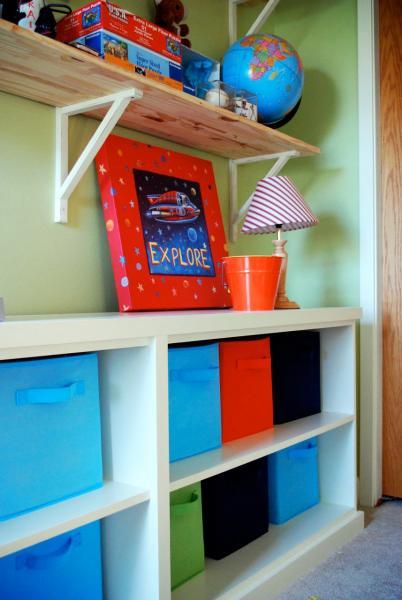

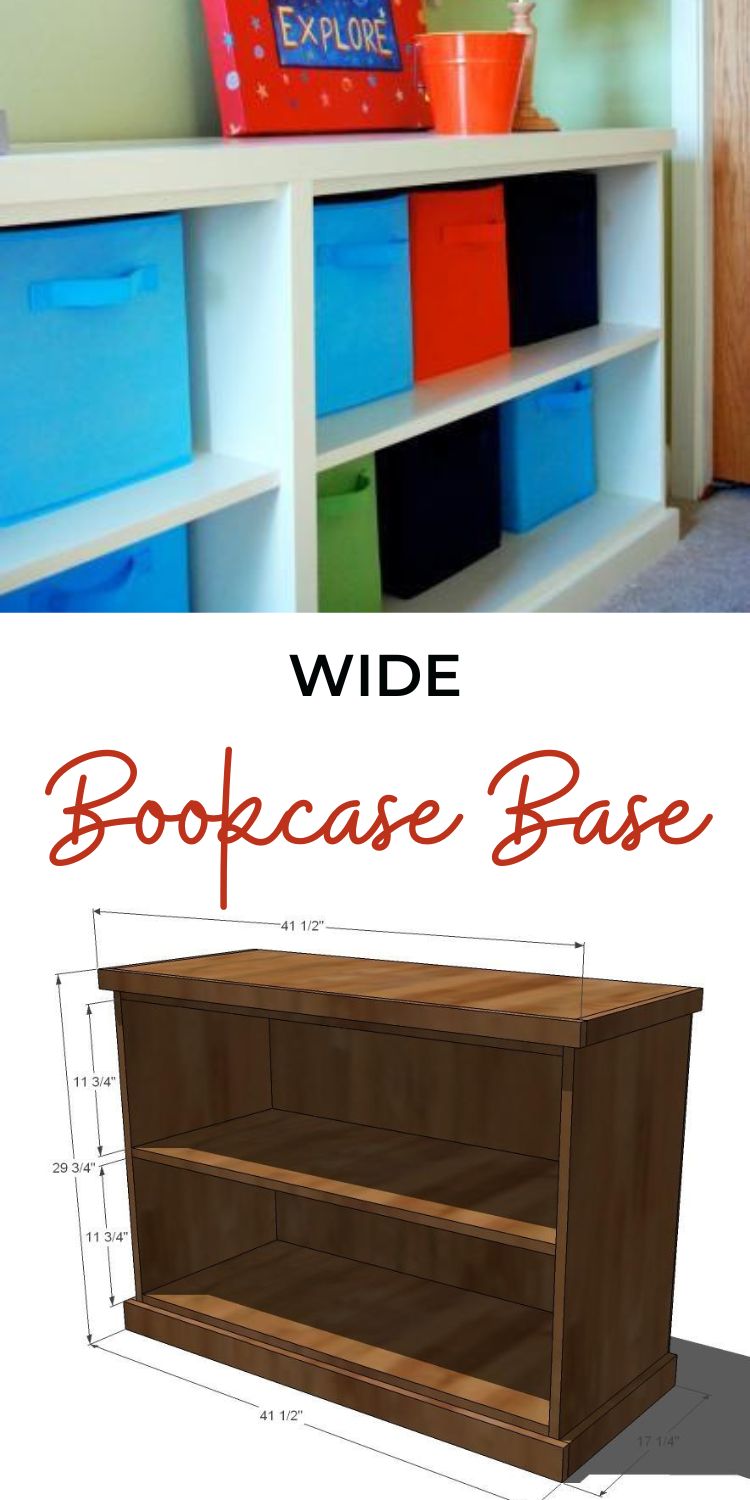
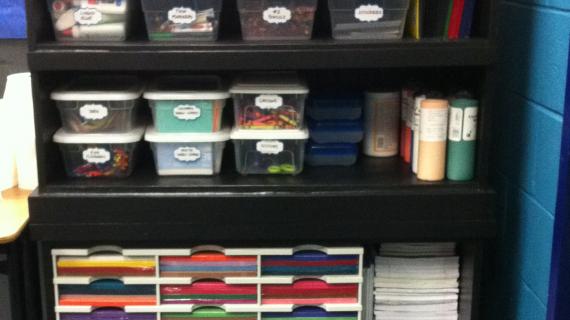
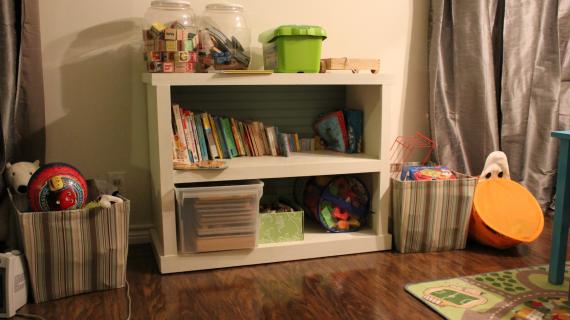
This simple sturdy and a tad deeper bookshelf plan works with the rest of the Modular Office Collection to create easy storage. You can also opt to add optional drawers or a secretary on top for even more functionality. stack for additional wall storage. See the entire Modular Office Collection here. Special thanks to Anne at Get Your Martha on for sharing her photos with us.
Pin For Later!
Preparation
- 1 – Sheet of 3/4″ MDF or A1 Plywood cut into strips 15-1/4" wide x 8 feet long
- 1 – Sheet of 1/4″ MDF or plywood (for the back)
- 2 – 1×2 Boards, 8 feet long
- 2 - 1×3 Boards, 8 feet long
- Wood Glue
- Wood Filler
- 1-1/4" brad nails
- 2" self tapping star bit wood screws (or can use 3/4" pocket holes and 1-1/4" pocket hole screws)
- Sandpaper and Finishing Supplies
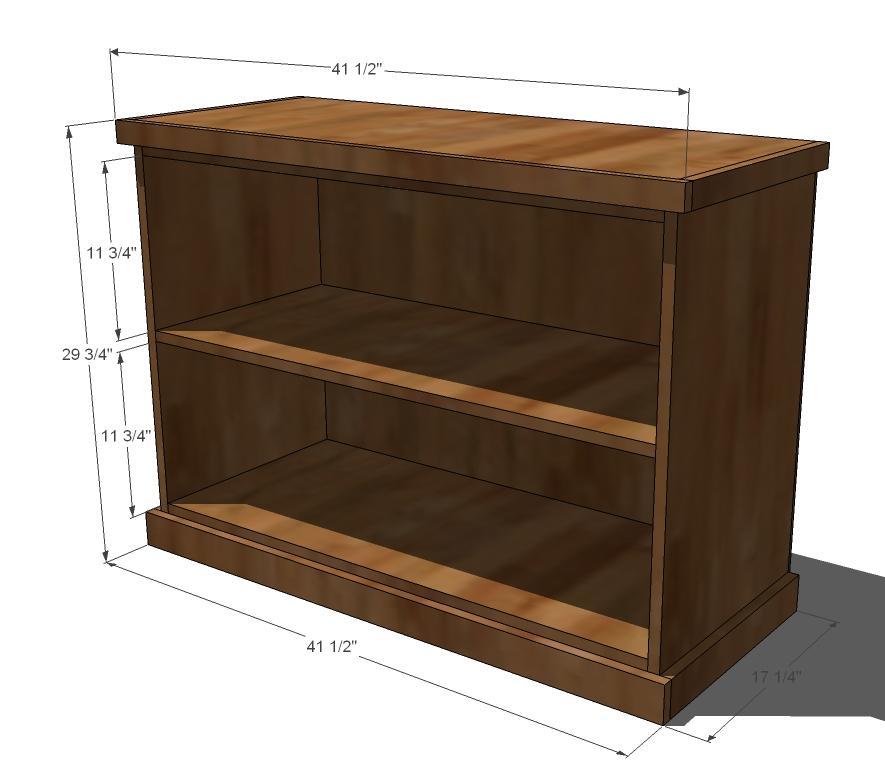
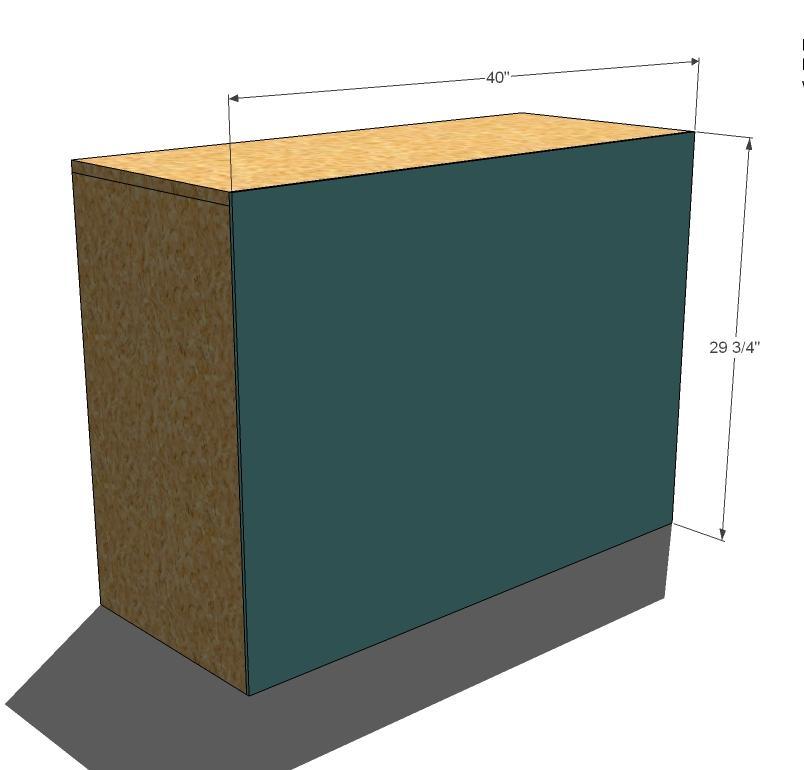
- 1 – 3/4" plywood, ripped 15-1/4" wide and crosscut @ 40″ (Top)
- 2 – 3/4" plywood, ripped 15-1/4" wide and crosscut @ 29″ (Sides)
- 2 – 3/4" plywood, ripped 15-1/4" wide and crosscut @ 38 1/2″ (Shelves)
- 1 – 1/4 Plywood @ 40″ x 29 3/4″ (Back)
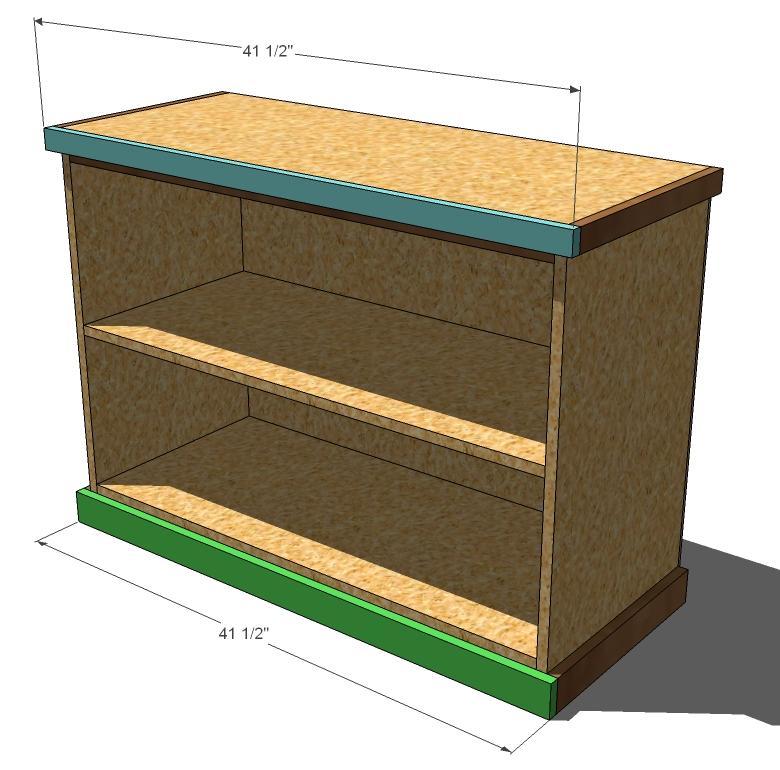
- 1 – 1×2 @ 38 1/2″ (Top Trim Piece)
- 1 – 1×3 @ 38 1/2″ (Bottom Trim Piece)
- 2 – 1×2 @ 15 1/2″ (Top Side Trim Piece)
- 2 – 1×3 @ 15 1/2″ (Bottom Side Trim Piece)
- 1 – 1×2 @ 41 1/2″ (Top Front Trim Piece)
- 1 – 1×3 @ 41 1/2″ (Bottom Front Trim Piece)


Work on a clean level surface. Always wear appropriate eye and ear protection. Always use glue. Predrill and countersink your screws. Avoid fastening MDF within 1″ of edges. Measure and mark out your joints prior to fastening. Check for square after each step. Keep outside edges flush.
Instructions
Step 1
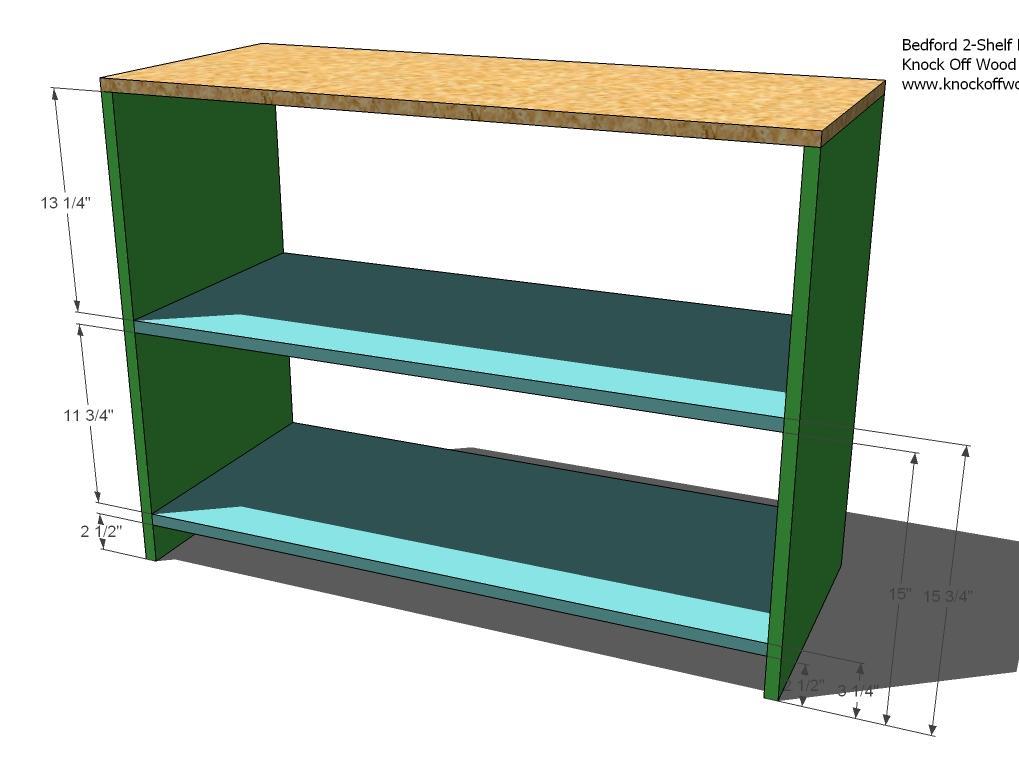
Begin by fastening the shelves to the sides, as shown above. Then fasten the top to the sides. Use the 2" self tapping screws or
Step 2
Back. Fasten the back to the bookshelf using the 1 1/4″ nails and glue.
Step 3

Inside Front Trim. Fasten the inside front trim, top and bottom, as shown above. Use the 2″ finish nailers and nail through the sides, and top shelves into the edges of the inside front trim, top and bottom pieces.
Step 4

Inside Front Trim. Fasten the inside front trim, top and bottom, as shown above. Use the 2″ finish nailers and nail through the sides, and top shelves into the edges of the inside front trim, top and bottom pieces.
Step 5

Comments
Amanda (not verified)
Thu, 02/18/2010 - 07:23
I never thought I'd say this,
I never thought I'd say this, but you need to SLOW DOWN! We can't keep up with you! I might end up permanently living in the garage with all these projects to do!
Andrea (not verified)
Thu, 02/18/2010 - 07:49
I love furniture like this,
I love furniture like this, however, we have hurky heater registers all over our house. How do I utilize such awesome furniture as this when I have to "mind the gap" between the furniture and the wall? Do you have any ideas?
Annie (not verified)
Thu, 02/18/2010 - 07:51
Wow! One Million hits?! That
Wow! One Million hits?! That is awesome! I just discovered your site a couple of weeks ago. It is perfect timing, too, because we just bought a new home and we'd love to build some of your furniture and put all the money we save into building a shop! We prefer Lowes to Home Depot. But, I gotta give Home Depot some credit for inspiring me to make up this "joke" to be said upon seeing a lady who is scantily clad in an unflattering manner: "Girl, where'd you get that outfit? Ho Depot??" I suppose it could also be "Howes??" but I think I'll stick with "Ho Depot". :)
Love love love your blog!
Life in Rehab (not verified)
Thu, 02/18/2010 - 08:16
Ana, your blog is fantastic.
Ana, your blog is fantastic. We're in the beginnings of rebuilding our house after a major fire, and I'll be pouring over your plans like a maniac when the time comes to add furniture! Thank you for sharing your gift.
Anonymous (not verified)
Thu, 02/18/2010 - 08:55
Andrea.I've read that you can
Andrea.
I've read that you can put things over cold air return vents if the vent is still able to get enough air. Although many sites recommend against it in general.
I can't find the site I found the formula for makings sure you get enough air on. But I think you needed the same area of air that the vent takes in open.
With this plan you could probably solve this by leaving off the bottom piece and if that still isn't enough raising the bottom shelf higher.
I think the best types of furniture to put over them would be something with the long legs, like the bailey console, or something that could straddle it, like the puzzle bookcase.
Another Amanda (not verified)
Thu, 02/18/2010 - 09:56
Could these be kitchen base
Could these be kitchen base cabinets? Hmmmm....
Chelsea Gifford (not verified)
Thu, 02/18/2010 - 11:18
I love that secretary desk!
I love that secretary desk! Dream come true. But it'd be better with a wide shelf above the desk. I'm too short to peek into those drawers!
Ellen (not verified)
Thu, 02/18/2010 - 14:47
Thank you thank you! Not so
Thank you thank you! Not so much for these (which like you said are pretty darn simple) but for the hope of the secretary desk. I have been dreaming of that, but not even with the pottery barn outlet nearby can I justify the price!!!!
Lorie (not verified)
Thu, 02/18/2010 - 16:36
My to do list of your
My to do list of your projects just keeps getting longer and longer. I have actually stopped bookmarking them now because I figure I want to make just about everything you post, so one bookmark to your blog pretty much says it all!
Anonymous (not verified)
Fri, 02/19/2010 - 08:13
That secretary desk is
That secretary desk is amaizing! My grandmother had one when i was growing up and I would love to have one of my own!
Heidi (not verified)
Sun, 02/21/2010 - 12:32
I have a question about
I have a question about bookcases. We have quite a few in our livingroom of the cheapo walmart variety. They are *full* of books and I find that after not too long, all the shelves are sagging in the middle. Are there any tips to making one's own bookshelves in a way to avoid that problem? (Getting rid of the books is not an option) :) Or is it just a given that it will be better because it's made from better materials?
Ana White (not verified)
Sun, 03/07/2010 - 09:36
Thanks Dustin, that is a cool
Thanks Dustin, that is a cool calculator! I had to bookmark it! Looks like we could get away with 45 lbs per shelf to be under the .09 human eye factor.
Love how this caculator will also factor in any trim or edging on the shelf! Thanks for sharing.
Heidi (not verified)
Mon, 03/08/2010 - 04:24
Thanks for the information,
Thanks for the information, Dustin. That helps a lot. :)
Bryan (not verified)
Sat, 07/23/2011 - 06:40
Typo
Hello Ana, I just wanted to tell you that the cut list has a typo. The 15 1/2" trim pieces in the cut list should be 16 12".
Thank you for you designs.
Bryan
James S.
Sun, 01/09/2022 - 05:45
Cut list has 1 mistake
Made this yesterday. Be aware the cut list measurements are wrong for the side trim pieces. On the cut list it says 15 1/2” but down in the steps the engineer schematic shows 16 1/2. Even that was too long on mine. Recommend clamping front trim on flush first then cut to fit side trim then mount front trim. Super flush that way. Also we used 1x16 glued panel instead of cutting plywood. Otherwise easy build. Kids and wife love it.