
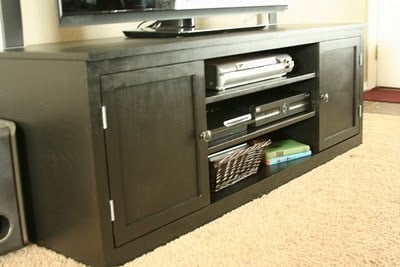

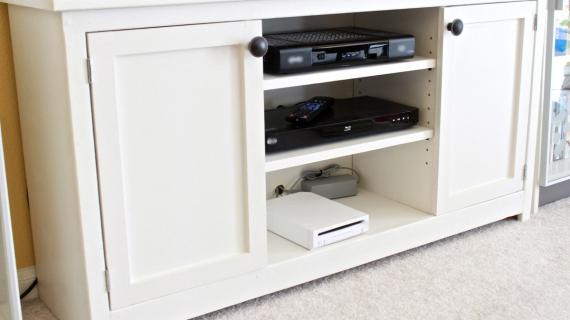
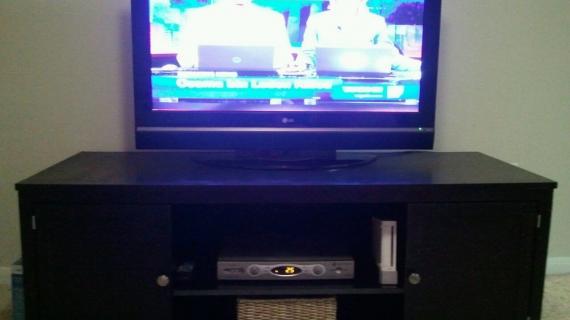
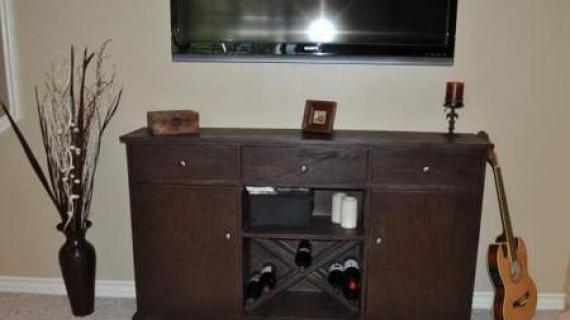
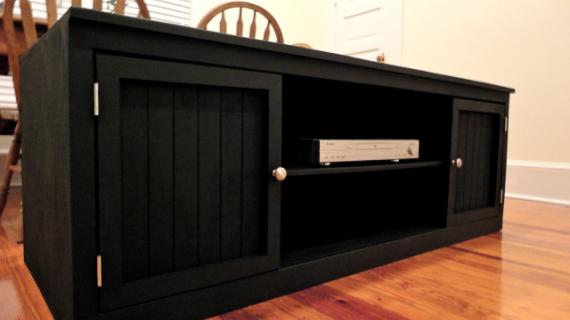
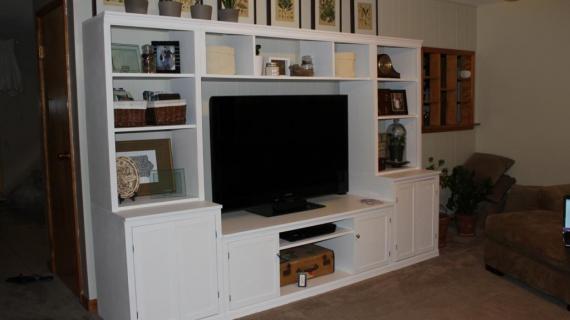
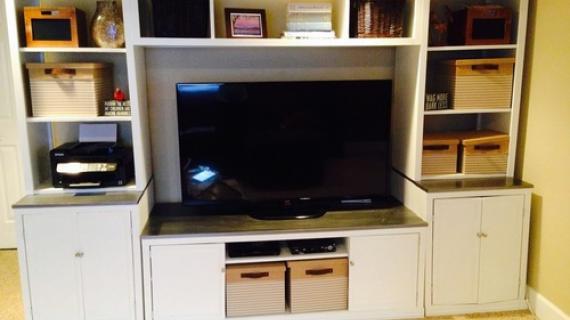
This extra wide media base is sturdy and solid, featuring ample storage. If you need more storage, simply add storage bases and hutches to create an entire media suite from other plans in the Classic Storage Collection. Special thanks to our readers for sharing their photos.
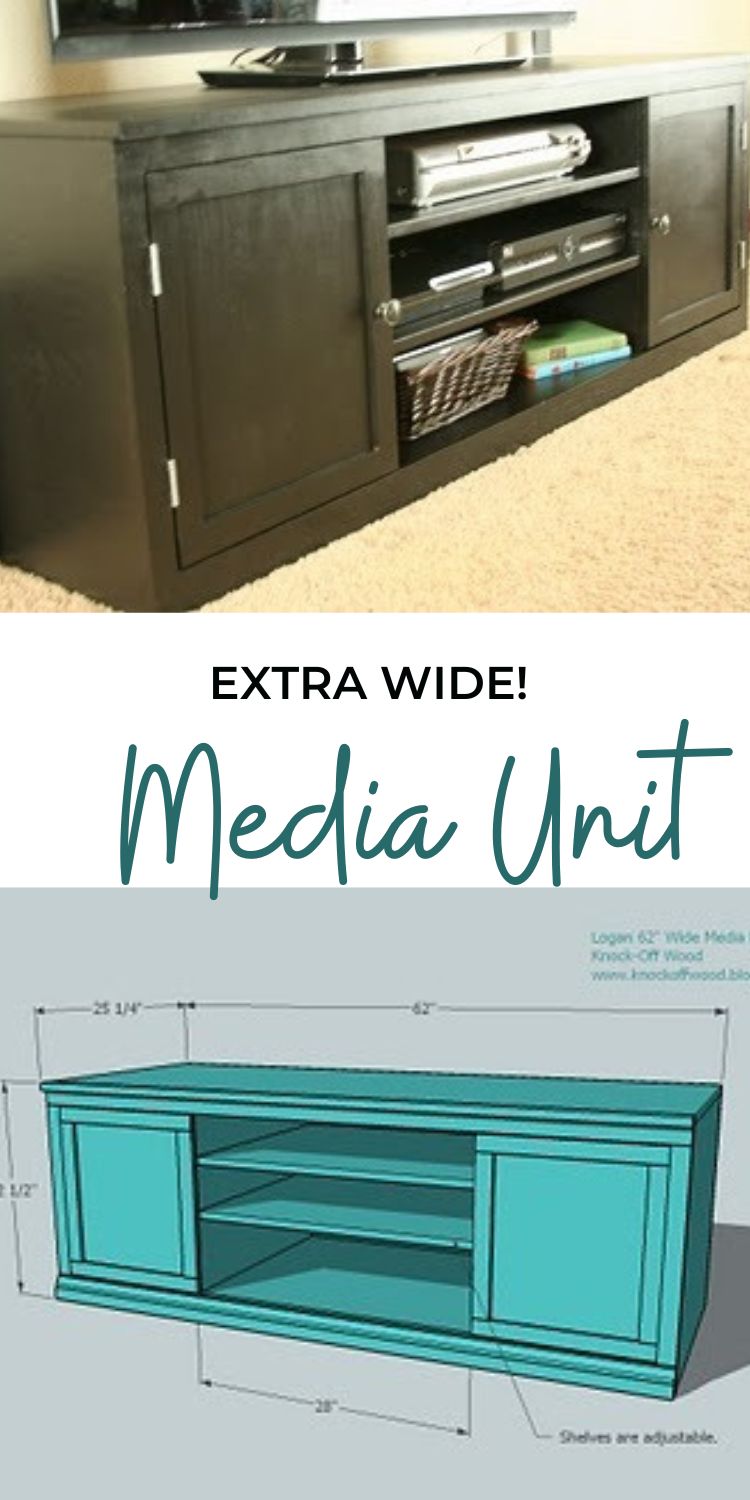
Pin For Later!
Preparation
- 2 – Sheet of 3/4″ A1 Plywood in desired Species or MDF if you are painting
- 1 – 1×3 at least 62″ Long
- 2 – 1×2
- 1 – 2 1/2 base moulding (optional)
- 1 – sheet of 3/8 Plywood or MDF (matching your A1 if you are staining the project)
- 2 – Sets of either butterfly hinges or Face Frame Euro Hinges
- 2 – Pulls or Knobs
- 8 – Shelf Pins Edge Banding (If you are staining the project)
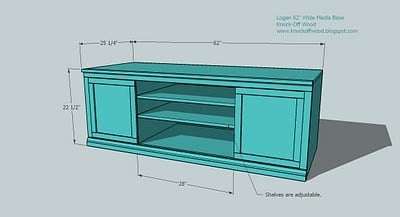
- A) 1 – 1×24 @ 60 1/2″ (Bottom)
- B) 2 – 1×24 @ 19 1/4″ (Middle Partitions)
- C) 2 – 1×24 @ 21 3/4″ (Sides)
- D) 1 – 1×24 @ 62″ (Top)
- E) 1- 3/8″ Plywood or MDF @ 62″ x 22 1/2″ (Back)
- F) 1- 1×3 @ 62″ (Bottom Trim)
- G) 2 – 1×2 @ 62″ (Top Trim and Top Edge Trim)
- H) 2 – 1×2 @ 17 3/4″ (Side Trim) Optional Base Moulding, 2 1/2″ overall height, 62″ Long 2 – 1×24 @ 28″ (Shelves) Door Cut List – Recommend measuring the opening in the drawer and building the drawer 1/4″ smaller thean the overall opening. Remember that the door will cover the middle partitions, as shown in the diagrams. These dimensions give are the ideal door dimensions.
- I) 2 – 3/8″ Plywood or MDF @ 17 1/4″ x 15 1/4″ (Backs of Doors)
- J) 4 – 3/8″ Plywood or MDF @ 1 1/2″ x 15 1/4″ (Rails on the Doors)
- K) 4 – 3/8″ Plywood or MDF @ 1 1/2″ x 14 1/4″ (Stiles on the Doors)
A 1x24 is simply 3/4" plywood ripped into 23 1/2" wide strips, 8 feet long. You can get two 1x24s out of each sheet of plywood. This system is used to ease building, creating straighter cuts, and conserve wood. Most plans on Ana-White.com use standard width boards for these reasons and more. If you cannot find 3/8″ plywood, you can use 1/2″ plywood for the backs and 1/4″ stock (for example maple 1/4″ thick x 1 1/2″ wide). Hobby stock is available at our local Blue store in a wide variety.


Cut your 3/4″ Plywood or MDF into strips 23 1/2″ wide by 8′ long. These strips become 1×24 boards. From 2 of the 1×24 boards, cut the the top and a shelf, and the bottom and a shelf. Then cut the remaining sides and middle partitions out of a third 1×24. You will have one 1×24 leftover for future projects. Work on a clean level surface. You can fasten with nails or screws, depending on your tools and the use of this piece. Screws will hold better, nails are easier. My general rule is screw anything that will be “used” like chairs and benches, and nail sedentary pieces like bookcases and hutches. I will leave this up to you. If you are screwing, make sure you predrill and countersink your screws. If you are using MDF, avoid fastening within 1″ of the edge of the MDF. Do not use wood screws on MDF. Wood screws do not have a straight shaft and will split your MDF. I have had luck with drywall screws (after all, drywall is very similar to MDF). Make sure you predrill the entire distance of the screws. It’s going to screeech, so wear hearing protection. And glue, glue, glue. My favorite option is to screw the “box” together, and then use finish nails to add the frame. That way the frame does not have blemishes, but the piece is built sturdy. Make sure you take a square of the project after each step. Measure and mark out any joints before fastening. Be safe, have fun.
Instructions
Step 1
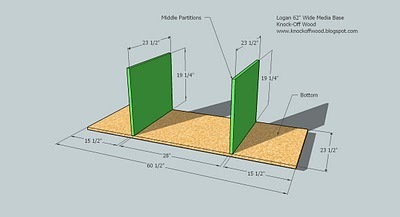
Bottom and Middle Partitions. Fasten with 2″ fasteners the bottom, A, to the middle pieces, B (green) as shown above.
Step 2

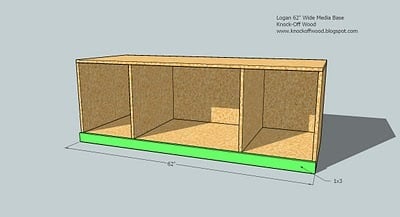
Sides. Use the 2″ fasteners to fasten the sides to the bottom as shown above. There will be a 1 3/4″ clearnance under the bottom shelf.
Step 3
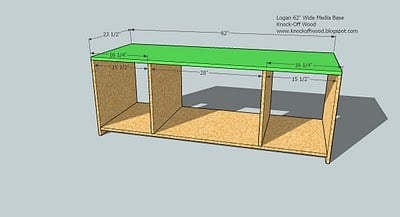
Top. Fasten the top to the sides and middle partitions, as shown above. Use the 2″ fasteners. Make sure you fasten the middle partitions to the measurements shown above.
Step 4
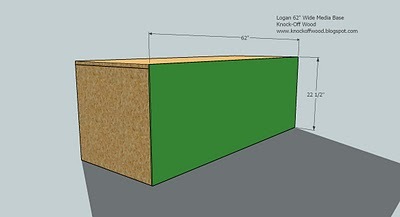
Back. Fasten the back with 1 1/4″ fasteners to the top, bottom, sides and middle partition, as shown in the above diagram.
Step 5
Step 6
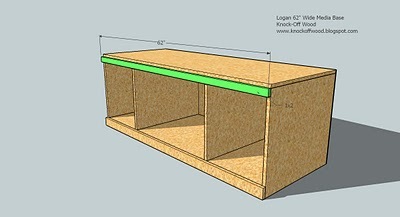
Top Trim. Fasten the top trim in place, as shown above. Be sure to fasten to the middle partitions and the sides. You will not be able to fasten to the top. See next step.
Step 7
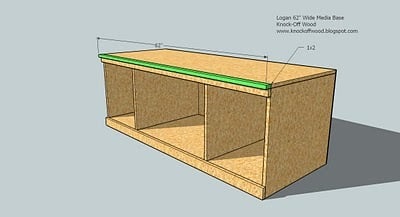
Top Edge Trim. Fasten the top edge trim in place, as shown below. Make sure you fasten through the face of the trim into the top of the project.
Step 8
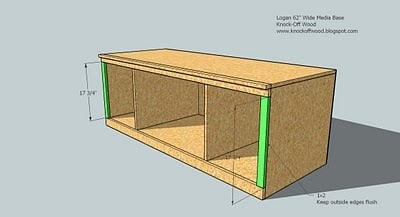
Side Trim. Fasten the side trim to the base unit, as shown above. Keep outside edges flush.
Step 9
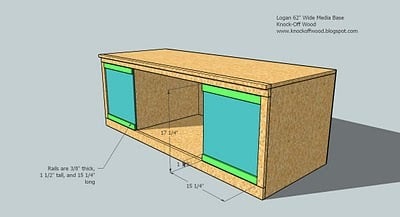
Doors. Test your backs to make sure they fit in the openings. Notice how the doors cover the middle partition. Use 5/8″ fasteners, lots of glue and clamps to fasten the rails to the back of the doors, as shown above.
Step 10

Door Stiles. Fasten the stiles, as directed in step 9, to the doors. Lay flat to dry, preferably with something heavy on top. If you are staining the project, you will need to add edge banding to the top and inside edges of the doors. This is easy and inexpensive to do (see HOW-TO section for a post on Choosing your Wood).
After you have finished the project, attach the doors to the cabinet using either butterfly hinges or euro hinges for face framed cabinets.
Step 11

Optional Base Moulding. If you would like to dress the base up, add moulding as shown above. The moulding will need to be less than 2 1/2″ in overall width.
Step 12
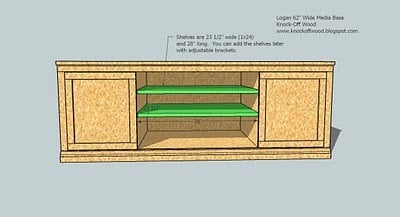
Shelves. Determine where you will place your shelves. Drill holes 1″ from the front and 1″ from the back on both middle partitions, 1/2″ deep, with a 1/4″ drill bit, where the base of the shelf will sit. Insert shelf pins and place your shelf in the base unit. If you are staining your base unit, you will need to add edge banding to the front edge of the shelves.


Comments
Marc (not verified)
Wed, 01/20/2010 - 03:04
If I want that dark brown
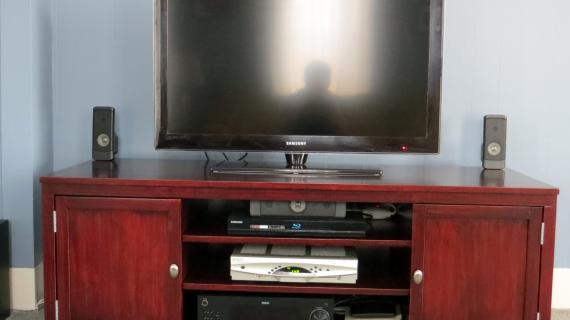
If I want that dark brown color show in the second sample picture, am I better off painting or staining? I'd like to get it close to matching the deep color of our Cost Plus coffee table. Paint v Stain is definitely an area I don't know much about.
Sheri (not verified)
Wed, 01/20/2010 - 03:07
Oh my word! How did you know
Oh my word! How did you know we need a new media center?! I am bookmarking this to show DH, I have a feeling my island will be put on hold. But it's worth it!
Debbie (not verified)
Wed, 01/20/2010 - 03:12
SOOO Excited for this
SOOO Excited for this project! I have been looking at media units since Thanksgiving. I absolutely love this one...my only problem is that I need the bottom to be off the floor at least in the front as I have floor vents along the wall that this unit would sit over. Is there a way to do that?
Jennifer (not verified)
Wed, 01/20/2010 - 04:55
I have been pouring over your
I have been pouring over your site since I found it, trying to decide what to make first...Logan might be the winner- I like it's clean lines. Not too modern, not too rustic, just right.
Crazy Girl Blond (not verified)
Wed, 01/20/2010 - 05:04
I am so excited that you have
I am so excited that you have posted this plan. I actually printed the exact same unit yesterday and knew this is exactly what I wanted! I can't wait! Thanks so much!!!
Regina (not verified)
Wed, 01/20/2010 - 05:17
This is fantastic and I (and
This is fantastic and I (and my husband) are loving your site. We're starting with the farmhouse bed tonight and will be moving along to this cabinet shortly thereafter. I am thrilled that I can follow your plans myself without much need for husband intervention. Thanks for all you do, we'll send pictures when we're done!
Leslie (not verified)
Wed, 01/20/2010 - 05:31
Gosh! I'm so in love with
Gosh! I'm so in love with this site, which I JUST found about a week ago! We're selling our home right now so my building plans are on hold. You have NO IDEA how it's killing me, looking at these plans and knowing that I have to wait. I am NOT a waiter. I have a question, though: Would you ever consider giving an "approximate cost" of the materials for your projects? I know that each project will differ with each "builder," but I love to see the "original price" -vs- the "reproduction price." Thanks so much for your willingness to share. It means alot.
Brett and Heather (not verified)
Wed, 01/20/2010 - 05:54
I discovered your blog about
I discovered your blog about a week ago and have spent hours looking and drooling. I have seriously been rearranging my days trying to find a time to start a few projects of yours. However, I saw the Logan Unit and there was a halo around it and "AHHHH" music in the background. Ding! Ding! Ding! This is exactly what I have been looking for. I am looking for something to replace the ends of a big red media until that I bought at the scratch and dent furniture store. I am stealing them from my daughters' room to go in my craft room. I didn't want to attempt painting them from red to white...too many coats of paint required. You rock!!! Can't wait to start...it is going to look Fabulous!!!
Jen Barnes (not verified)
Wed, 01/20/2010 - 06:13
I'm going to continue looking
I'm going to continue looking around your site here but I am wondering if you have a recommended list of tools somewhere. We currently have a drill, dremel, a hack saw, a random orbital sander, a hammer and some screwdrivers. I *know* we need more than these to build this entertainment center.
I LOVE YOUR PLANS! I am inspired to replace all of the IKEA junk in our house with hand-built furniture!
Erika (not verified)
Wed, 01/20/2010 - 07:16
This is it!!! We are moving
This is it!!! We are moving in March and I have been waiting for you to post a media table that is my taste, and this is it!! I just text my husband with the supply list!
jdreier (not verified)
Wed, 01/20/2010 - 07:38
I am wondering the same as
I am wondering the same as Marc on the stain vs paint....
Ana White (not verified)
Wed, 01/20/2010 - 07:49
STAIN VS PAINTPlease refer to
STAIN VS PAINT
Please refer to this post in the HOW-TO section: http://knockoffwood.blogspot.com/2009/12/how-to-choose-you-type-of-wood…
If you are wanting the stained look, you will need to use A1 plywood in maple, birch, oak or your desired hardwood. You then might as well frame the face in the matching hardwood, because there is only a few boards required for the frame. This is the more expensive route. You will also need to edge band your exposed plywood edges and the doors. This is very simple to do, and there is more information on edge banding in the link above.
On the doors, you will need to use 3/8" matching hardwood plywood, and also glue 1/2" cove base mouldings to the inside edge of the rails and stiles.
Sounds like alot, but this is going to be beautiful. The extra trim on the insides of the doors will make the piece stunning.
Plan on spending about $150. Not the 90% off that we can do on some other pieces, but a huge savings from Pottery Barn's $800 price tag.
Anonymous (not verified)
Wed, 01/20/2010 - 08:08
Thank you so much! I have
Thank you so much! I have been checking this site many times daily since I discovered it on Apartment Therapy. Your blog is amazing! I am so excited for the plans for the two side cabinets (or bases) - they look awesome!
christine grove (not verified)
Wed, 01/20/2010 - 08:41
You had me for a moment...a
You had me for a moment...a cheese grater! Ha!
Anonymous (not verified)
Wed, 01/20/2010 - 09:17
Hee hee hee - I thought that
Hee hee hee - I thought that you were going to tell me about a tool in your garage which intimidated you. But no, it was a grater. :)
Glad you figured that one out. Now you can make masterpieces in the kitchen and the workshop.
Lauren (not verified)
Thu, 01/21/2010 - 08:17
Hi Ana!We just found your
Hi Ana!
We just found your site and plan on making the media bench this weekend as our first project. I'm sooo excited! I've been drooling over these for ages. I have a quick question and pardon me if its somewhere in the blog or seems very basic or silly. I've been trying to go back and read posts, but I haven't seen anything. When you say cut list, do I get these items cut at Home Depot (which is not always exact) or do I use a saw that I rent/buy? And then if I use a saw that I rent/buy do I have to set up a special bench etc to get these cuts. I'm printing everything out so we can head to the store tommmorrow and was confused. I guess I don't understand which saw you would cut the MDF with. Thanks and love your site!
Room to Inspire (not verified)
Thu, 01/21/2010 - 20:35
I just wanted to let you know
I just wanted to let you know I stumbled upon your blog recently and I am in love! I received my very own power tools for Christmas and I have been super excited, but ever time after I visit your blog I am truly inspired. Thanks!
Chelsea
Shae (not verified)
Mon, 01/25/2010 - 09:31
I just wanted to say I have
I just wanted to say I have never been so thankful to find a blog in my life. My Dad and I work together alot on projects and I am absolutely so excited to know I can actually build this stuff. Thank you so much! You are such a talented woman! Thank you, thank you, thank you!
Christy (not verified)
Wed, 01/27/2010 - 18:24
Hi Ana,I've been working on
Hi Ana,
I've been working on this unit off an on for the past couple of days. I'm stuck on the cabinet doors. You have the measurement of the height at 7 and 1/4" for the door backs. However, when I put them on the front of the base, they're about 1/2" too short. Should they be 7 and 3/4" like the side trim? Please let me know ... I'll have to go and get some more MDF to have cut the right length if so. Thanks!
Christy (not verified)
Wed, 01/27/2010 - 18:26
Apparently, leaving comments
Apparently, leaving comments late at night is not my strong point. LOL! I meant 17 and 3/4" for the height of the door backs (not the 7 and 3/4" that I originally said). Sorry about that.
Ana White (not verified)
Thu, 01/28/2010 - 07:22
Hi Christy, the doors need to
Hi Christy, the doors need to be 1/4" less than the overall opening to allow the doors to open and close. Sometimes when you build you can get "off" a little, making the distance greater than the measurements given. Sometimes its not you, sometimes the boards that you select can be slightly narrower than they should be, making your doors get a little off. If you have yet to cut your doors, take overall measurments and then subtract 1/4" from the overall opening on the height and width. Then build your doors to these dimensions.
If you have already cut your plywood backs, you can cut your stiles slightly longer, and have your bottom rail sit over (not flush) with the bottom of the plywood. You will never see this. But make sure you keep the top edges flush.
Jeanette (not verified)
Sat, 02/06/2010 - 02:38
I enjoyed your post, but I
I enjoyed your post, but I recommend ditching the grater entirely and going with this: http://www.amazon.com/Presto-SaladShooter-Electric-Slicer-Shredder/dp/B… I use mine DAILY. It's like the difference between a hammer and a nail gun... I love your blog. Keep up the great work!
Heather (not verified)
Mon, 02/15/2010 - 09:14
I am so incredibly excited!
I am so incredibly excited! I found your site last week via apartment therapy and have been poring over it all week. My dad is so good at woodworking and I have always been intimidated. Well, he and I are going to build this together! He's going to teach me all he knows and then I plan on going on my own from there. Thank you sooooo much for this site!!
Heather (not verified)
Fri, 03/05/2010 - 09:41
Love this. I am picturing in
Love this. I am picturing in in my tv/family room. It is so beautiful, I can't wait till we come off our spending freeze (dog needed surgery).
Angela (not verified)
Tue, 05/18/2010 - 12:28
Do you have Gail's
Do you have Gail's measurements for the smaller media stand? I am only interested in the middle portion. Thanks!
vanesavesalot (not verified)
Fri, 05/28/2010 - 04:13
great great great
great great great
orange sugar (not verified)
Fri, 07/16/2010 - 17:01
Hi Ana. I'm getting ready to
Hi Ana. I'm getting ready to build this with a few modifications in dimensions and working on my cutting layout.
One thing I wanted to point out. Shelves for the sides, behind the doors, aren't included in the cut list. I'm assuming people would want shelves in there, right?
FIRST BUILD Cl… (not verified)
Mon, 01/24/2011 - 08:28
[...] in Brag Blog Put on
[...] in Brag Blog Put on my TO-DO List Save as PDF Print this PostShare/Bookmark Builder: Bonnie Blog or Website:http://sandbsimmons.blogspot.com/2011/01/tventertainment-center.html Experience Level: Absolute Beginner Estimated Cost: 90.00 Estimated Time Investment: 5 days From Plan: http://ana-white.com/2010/01/plans-logan-media-base-unit-pottery.html [...]
Brian (not verified)
Wed, 04/20/2011 - 12:10
Great furniture
I found your site looking for a cheaper alternative to buying the furniture at the store, which could cost thousands. I built a desk and two bookcases that I found here all for under $100 a piece. Thank you for helping people who don't have thousands to spend on quality furniture. This console is definitely next on the list.
Guest (not verified)
Sat, 02/04/2012 - 14:23
Awesome!
This is awesome, going to try it as my first projet. One problem..the images don't size fully so I can't see all the measurements?
cannonballs
Sat, 03/03/2012 - 08:47
Pictures
Is there any way to get bigger versions of the SketchUp example pictures? They're too small to read any of the print in them. Thanks.
Jennifer Reeher (not verified)
Sun, 12/16/2012 - 19:12
Question about adding doors in the center.
I really love this design, but my husband wants doors covering all the shelves on the media unit.
How would I go about adding doors on the middle section??
Also, how would I change the sizes of everything?
Thanks so very much. I really love all of your designs & really appreciate the work you've done to allow others to make wonderful, quality DIY pieces for the home.
-Jenn
sean calleja (not verified)
Sat, 01/05/2013 - 07:46
Kreg Jig and "Not wood screws with MDF"
So, I have a Kreg Jig and I love it. However, I have not used it with MDF yet. Do I need to use an alternate method of joining MDF because the Kreg Jig square head nails come in course and fine thread WOOD screws? The more I review the plans, the more it is less Kreg Friendly. Am I just being timid? MDF is a little pricey to just start hacking up. Thanks for the help.
Sean
seancalleja
Mon, 04/01/2013 - 06:58
All finished
Now, I just need to post the brag! Some notes that I took away from this build.
1. If Kreg makes it, you should buy it immediately.
2. When cutting your 16" strips down to make them more manageable, make sure the cut you make is straight (Kreg Rip Cut).
3. Cut shelves last...after your 10 coats of paint.
4. I used cleats to attach the bridge
5. My Paslode trim nailer made the last three pieces very easy, I should have bought this up front.
6. You can use your scrap MDF for trim instead of 1x2's.
It took me 5 weekends to complete this project and loved every minute of it.
jr91392
Thu, 01/22/2015 - 21:56
Any thoughts on the sturdiness of MDF?
I was going to make this entirely out of MDF and not use plywood (I have no preference between paint and stain), but I am worried if that would be sturdy enough for a large TV. They can be almost 100 pounds, mine is like 85. I worry that if I make it out of MDF that the top would start to sag pretty quickly. Perhaps I'll use plywood for that piece and use MDF for the rest of it.