Concealed Hinges Made Easy! Video and Illustrated Guide

concealed hinge illustrated guide
Difficulty
Intermediate
| Print this plan

Concealed hinges are the BEST way to add doors to your projects.  In this illustrated guide with video tutorial, we make it simple and straight forward to install concealed hinges on cabinets.

Why Concealed Hinges?

Concealed hinges (sometimes call Euro Hinges) are my favorite type of hinge.  

  • Hidden behind the door for a clean cabinetry look
  • Many options to get exactly what you need for your cabinet
  • Readily available at most home improvement stores
  • Reasonably priced
  • Opens without needing side clearance
  • Easy to open and close and does not need a magnetic clasp to keep closed
  • Very adjustable with just a screwdriver
  • Actually very easy to install with a little know how!

Yes, I said that!  These hinges are actually easy to install with just a little know how.  In this video, I go through the entire process of choosing and installing these cabinet hinges.

And here's more specifics as promised in the video:

Selecting the Right Hinge

Concealed hinges come in different options to help you get the right install method and overlay for your specific cabinet.  Here's the main options:

Face Frame or Frameless?

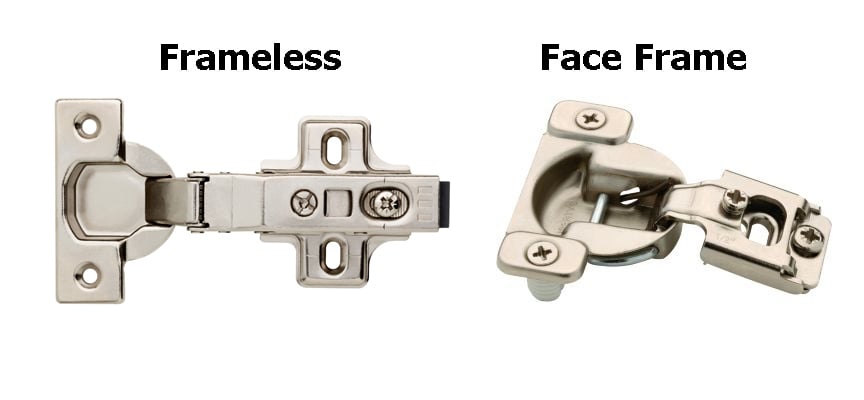
Face frame concealed hinges differ from frameless concealed hinges simply by how they are attached to the cabinet carcass.  If you cabinet is a face frame cabinet, it will have trim around the front edges of the carcass.

concealed hinges face frame or frameless

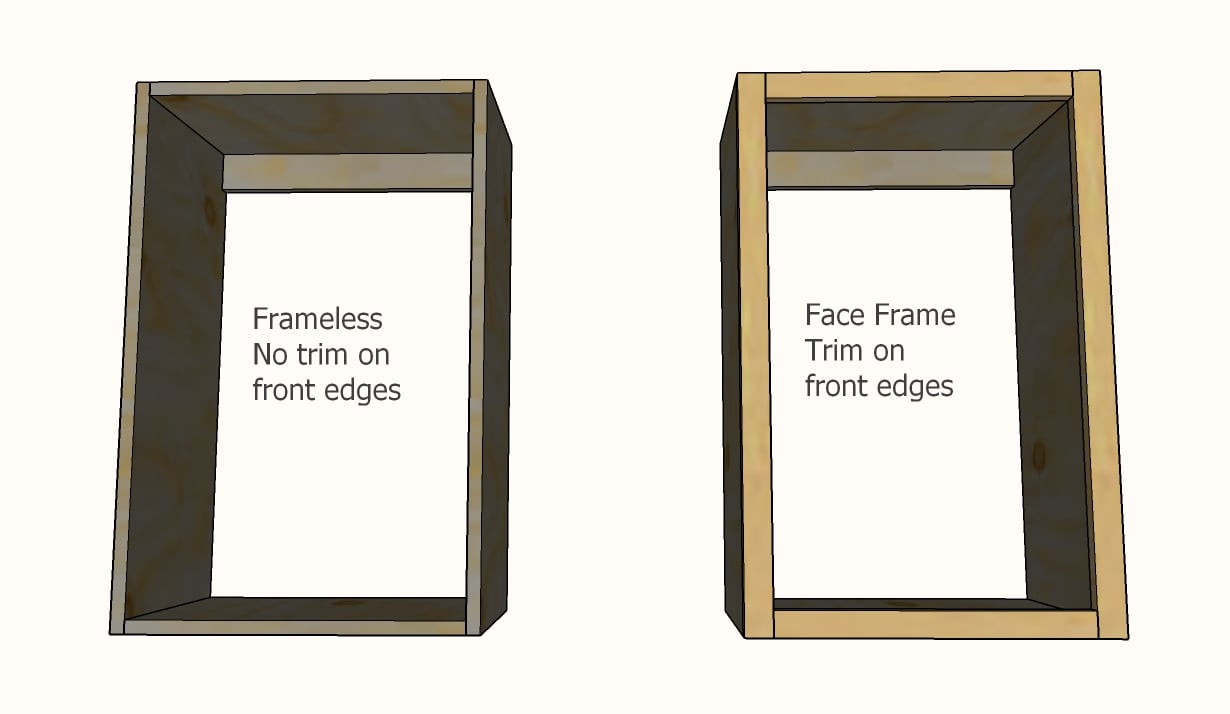
The main difference between the hinges themselves is how they mount to the cabinet. A frameless concealed hinge will have a plate, and a face frame will have a bracket that fits over the face frame.

types of concealed hinges

Frameless Overlay Options

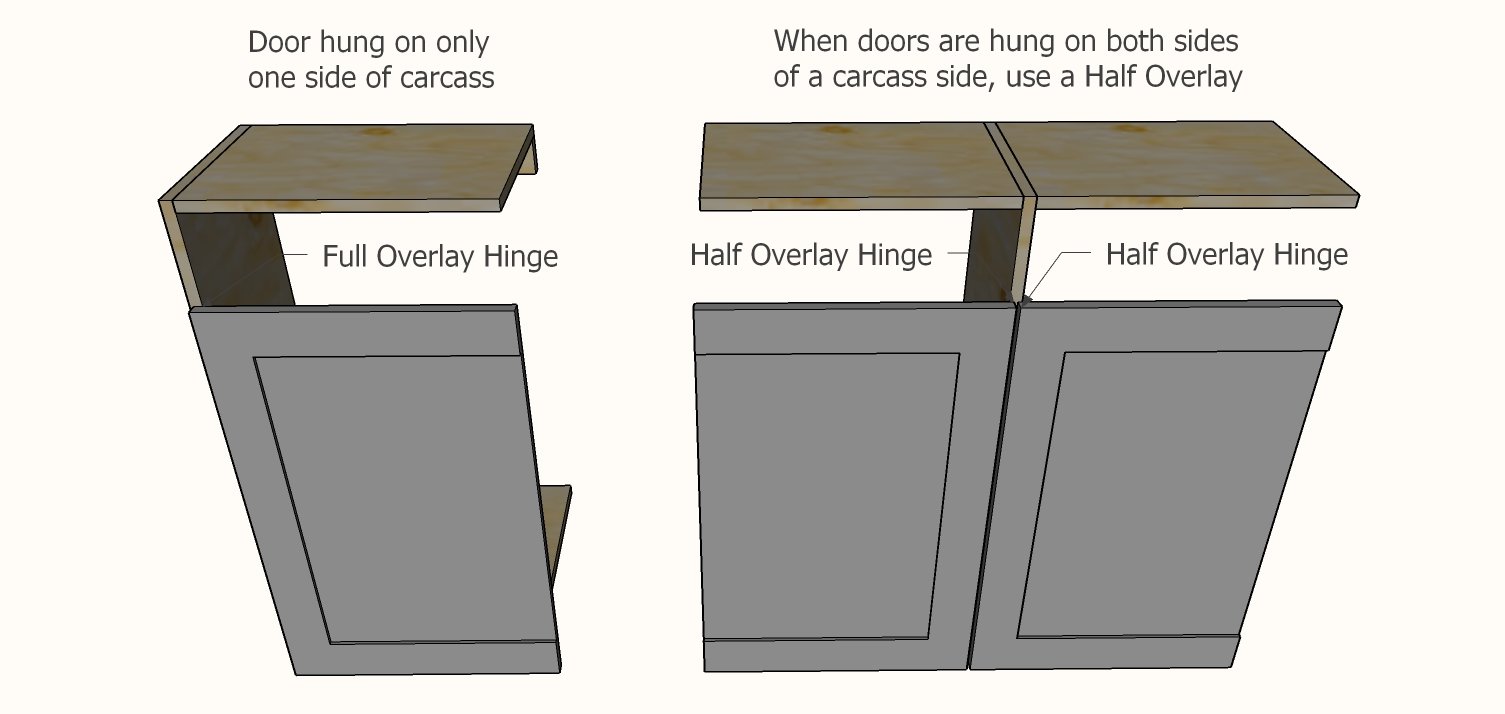
If you have a frameless cabinet, there's two standard overlay choices.

  • Frameless Full Overlay is for standalone cabinets, where there's only hinges on one side of a carcass side.  This is most common, and is usually a 5/8" or 1/2" overlay (check with your hinge brand). This includes cabinets with double doors, as long as hinges aren't attached on the same carcass side.  Here is an example of the Frameless Full Overlay Hinge.
  • Frameless Half Overlay is for situations where two doors share the same carcass side.  This isn't common, but if you are building your own cabinets all in a run, it's handy to have these hinges. Here is an example of the Frameless Half Overlay Hinge.

frameless concealed hinge overlays

Face Frame Overlay Options

A standard face frame is 1-1/2" thick.  So there's alot of options for overlays with a face frame.  Here are the most common:

  • 1-1/4" Overlay - Used for a cabinet door that almost completely covers the face frame (most common).  This will leave a 1/4" reveal around the door.
  • 1" Overlay - Door covers 1" of the face frame.  Sometimes used for end cabinets, or when more of a face frame reveal is desired.  
  • 1/2" Overlay - Can be used for when two cabinet doors are mounted on the same 1x2 face frame stile.  Can also be used for a larger reveal of the face frame.
  • 1/4" or 5/16" Overlay - Use for semi-overlays where a large amount of the face frame is revealed.

Sizing Doors

Sizing doors is simple.

  • Measure the opening
  • Add the hinge overlay amount
  • Add the desired overlay amount on the non hinge side
  • Add the overlay amount on the top and bottom

Installing the Hinges on the Doors

Regardless of the hinge mounting type (frameless or faceframe) and the overlay, installing on the cabinet door is usually consistent.  DO check with your specific hinges for a template or more specifics.  Here is the standard setting I use to bore holes in the cabinet door

drilling holes for cabinet door hinges

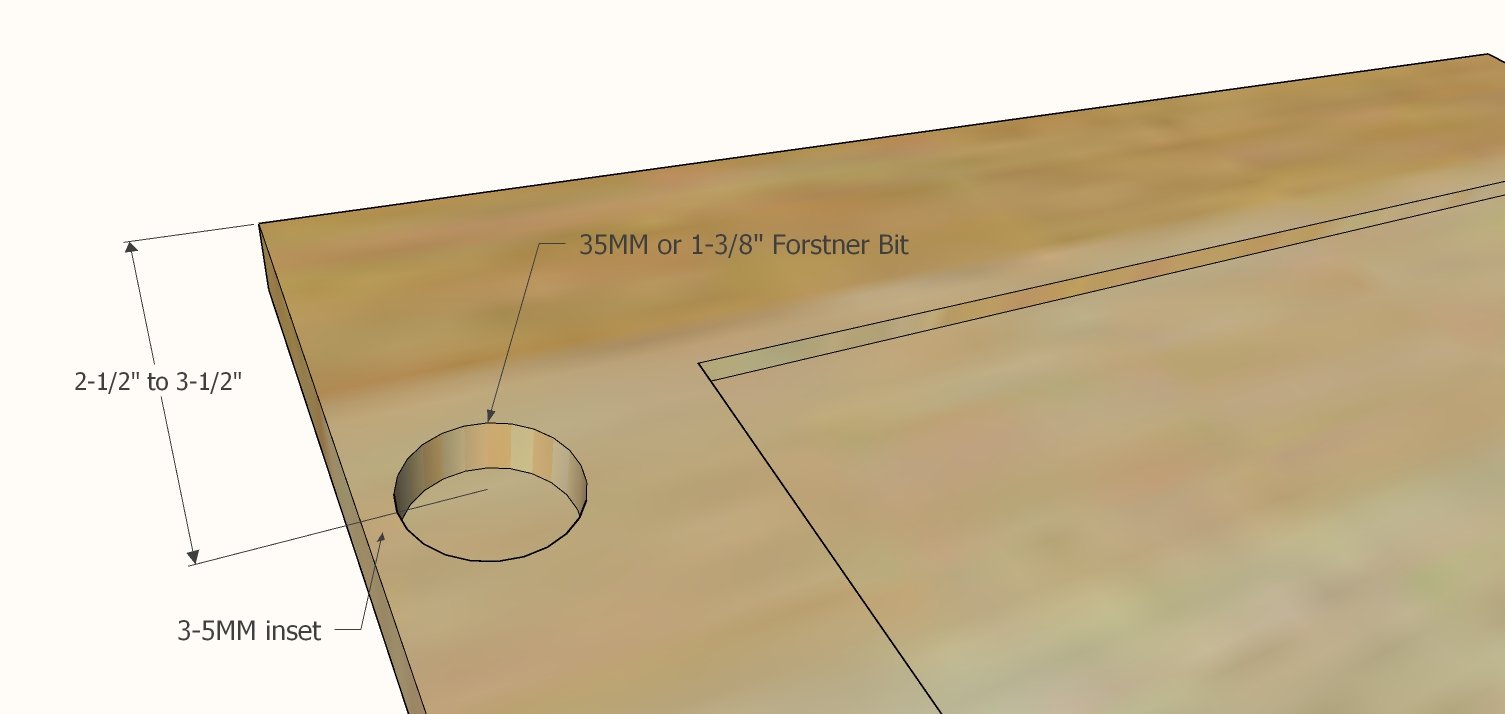
  • 35 MM Holes (standard on most jigs) or 1-3/8" Forstner Bit
  • 1/2" deep hole
  • 5 MM inset 
  • 2-1/2" to 3-1/2" from top or bottom of door, if third hinge for taller doors, third hinge is centered on door.

Once you have the holes bored for the concealed hinges, simply place the hinge in the hole and square it up with a square or a straight edge on two hinges.  Then predrill holes using a self-centering bit and finish with screws.

Installing Concealed Hinges on Face Frames Cabinets

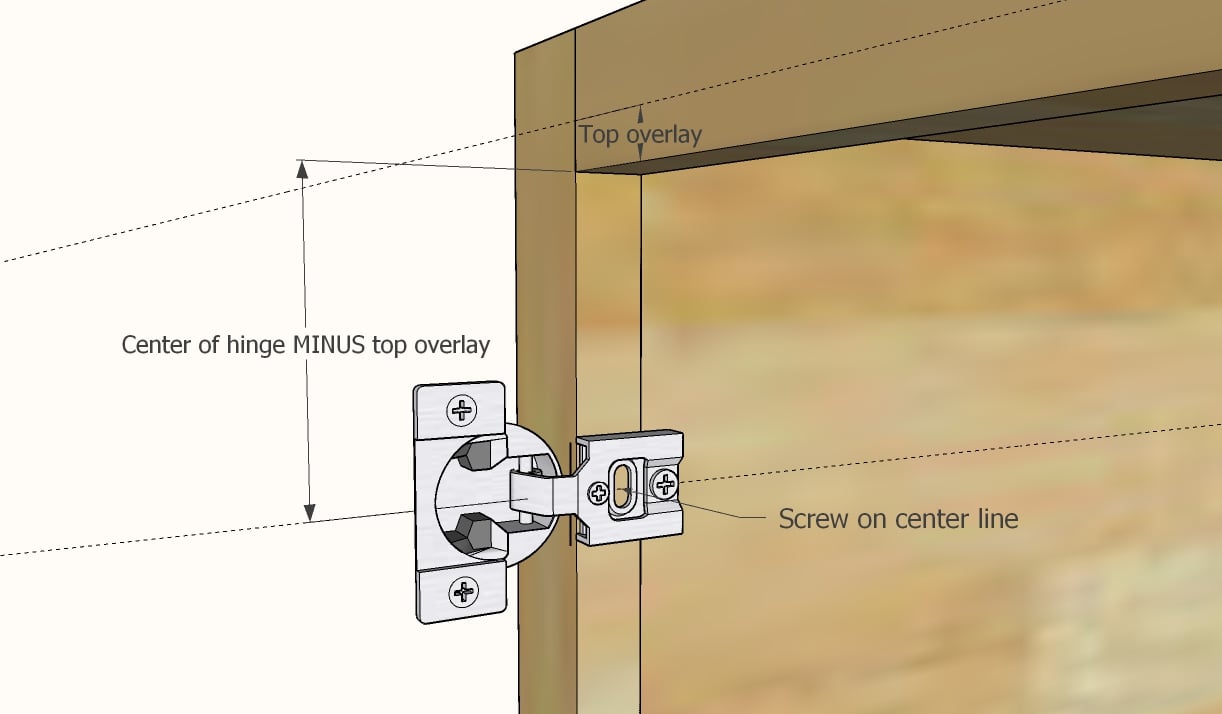
Face frame installation of concealed hinges is very easy, since the hinge bracket will cup the face frame.  The only fitting will be up or down.  To install

  • Measure the center point of the hinge to the top of the door.  (Should be between 2-1/2" to 3-1/2" depending on where you bored your holes)
  • Subtract the desired top overlay from this measurement. 
  • Mark the cabinet face frame down from the top edge this distance and make a horizontal line on the inside edge of the face frame. 
  • Attach the hinge bracket with the screw centered on your line.
  • On concealed hinges, there is usually up and down adjustment as well to get your doors perfectly lined up.

installing hinges on frameless cabinets

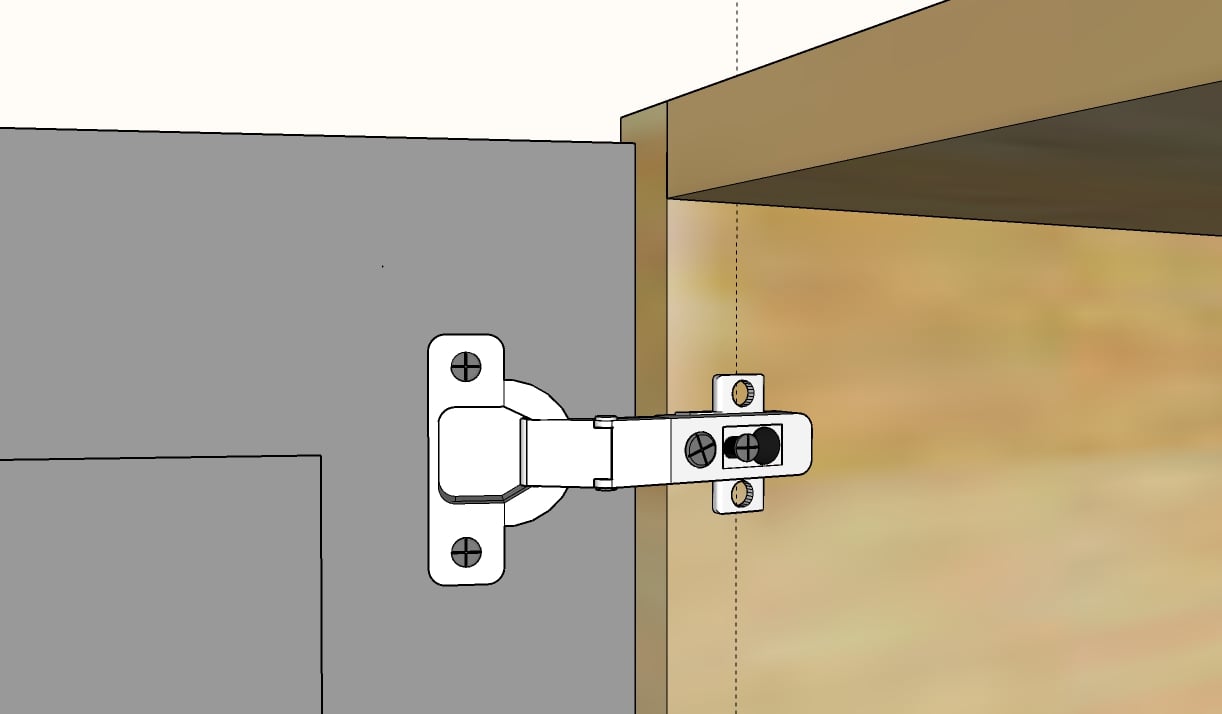
Installing Concealed Hinges on Frameless Cabinets

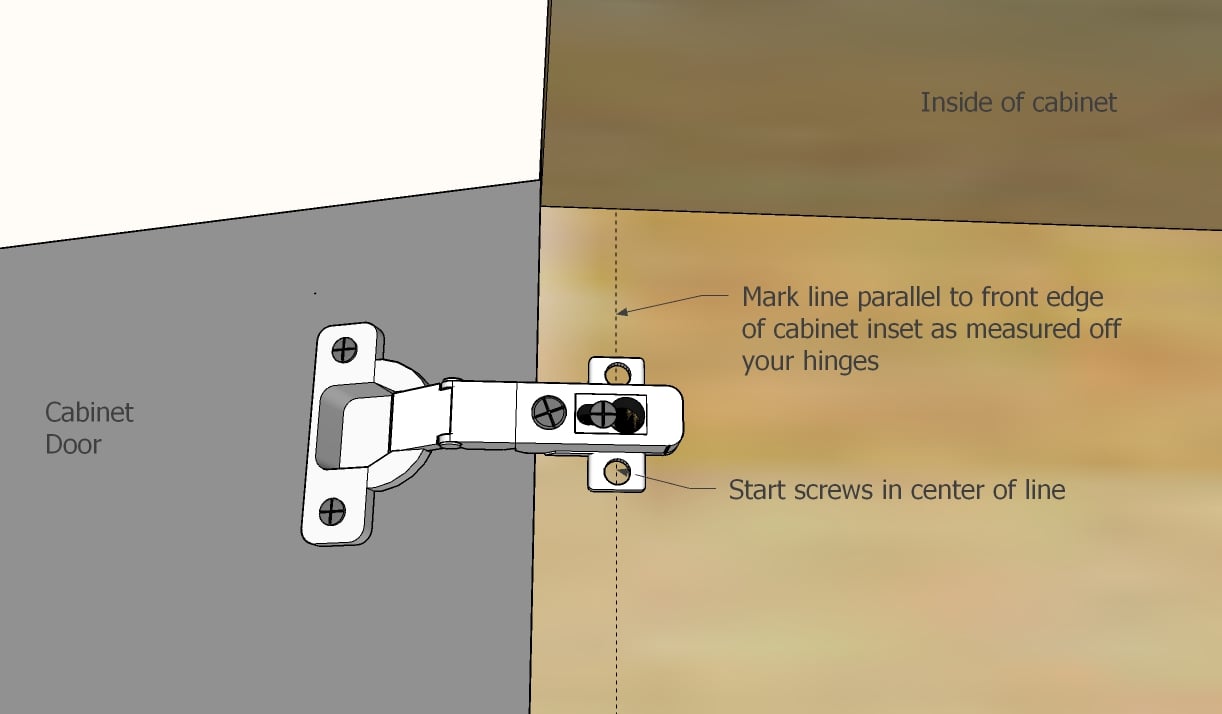
First, check to see if your hinges come with a template.  If not, we have a simple way of doing this (as shown in my video tutorial)

  • Measure your hinges how far back the screw holes are set
  • Draw a line on the inside of the cabinet this distance inset, parallel to the front edge of the cabinet
  • Start your screws on the line

concealed hinges frameless installation


Pin For Later!

Concealed Hinges Made Easy! Video and Illustrated Guide


Preparation

Tools
Tape Measure
Speed Square
Pencil
Drill
Project Type
Room

Frequently Asked Questions

Wood Questions

What kind of wood should I use?
Most of our plans use standard construction lumber like pine or fir. It's affordable, easy to work with, and easy to find. It's also rapidly renewing and biodegradable, so a great eco friendly choice!

Can I use hardwoods instead?
Yes—just keep in mind they're heavier, cost more, and can be tougher on tools and harder to join together and finish. I recommend not tackling a hardwood project until after you have built several softwood projects.

What if my boards are warped?
Choose the straightest boards at the store. You can often work around slight warps by cutting them into shorter pieces.

What wood should I use for outdoor furniture?
Use red-toned or pressure-treated 2x lumber for framing, and cedar or cedar fence pickets for the decking. Outdoor furniture should be built like a deck—your local home center can help recommend the right wood for your climate.

Will my wood move or warp after I build?
Potentially, especially in humid climates. Let your wood acclimate indoors before building. Once acclimated and kept in a stable environment, movement should be minimal. Remember, most houses are built using framing lumber - it's all about keeping moisture down indoors.

Cutting Questions

Do I need a miter saw?
A miter saw is great, creating fast, safe, and precise cuts, even for beginners. But most plans can be built with a circular saw and a straight edge. If using a circular saw to cut, take time to practice, and get good at making cuts, before cutting your project boards.

How do I get clean cuts with a circular saw?
Clamp your board, measure twice, cut slow, and use a sharp blade. This takes practice, so spend some time making cuts. I go through becoming proficient at freehand cutting in my course, it is worth taking if you want to master this skill.

Will the store cut my wood?
Yes—most stores will do rough cuts to help you transport your materials home. But from store to store, the quality of cuts could greatly vary.

Joinery Questions

What screws should I use?
We recommend star-head self tapping screws for framing, most common sizes are 2-1/2", 1-3/4". Pre-drill if close to the edge or you find your wood is splitting.

Do I have to use pocket holes?
Pocket holes are the cheapest, easiest and fastest way to do some joints - like edge to edge or a hidden fastener joint. There are other methods, but these can be time consuming and expensive. We recommend using pocket holes as indicated in plans for best results.

How do I keep things square?
Use a speed square and measure diagonals after each step. Always clamp joints before screwing to keep them tight and flush.

Finishing Questions

Stain or paint before or after building?
A quick sand before and a full finish after gives the best results. Pre-finish if you're doing two-tone or detailed finishes.

What type of finish?
Use oil-based or water-based stain. For paint, cabinet-grade latex or enamel works great. High use surfaces on indoor projects should get a coat of polyurethane, I recommend a Helsman or Spar or other flexible poly that won't crack or peel with wood movement. For exterior projects, use a finish suitable for exterior fences.

How to get a smooth finish?
Start with a well sanded project. Sand between coats (220 grit), wipe clean, and apply light coats with a foam brush or roller.

Plan Questions

Can I change the size?
Many people do, and that's the great thing about building your own furniture! But do keep in mind going bigger might mean more supports are required, and often plans are optimized for minimal material waste.

Are these beginner-friendly?
Yes—plans are written with simple tools and clear steps in mind, with every effort to make plans as simple as possible.

Can I sell what I build?
Absolutely! Just don’t resell or repost the plans themselves.

General Questions

What tools do I really need?
A drill, circular saw, tape measure, square, and a few clamps will get you through most projects.

Do I need a workshop?
Nope! A driveway or small patio is plenty to get started, just make sure you have a level place to work. If you find you are building several projects a year, creating a small workbench is a great way to store tools and have a dedicated workspace.

What if I mess up?
Wood filler, sanding, or flipping boards goes a long way. Mistakes are part of the process!

What can I do to make my projects look more professional?
Start with straight boards, make accurate cuts, clamp all joints, and line up everything neatly. Sand thoroughly, use a neutral finish, and apply it in light coats for a clean look.

I've never built anything before. Where should I start?
Start with a few smaller softwood projects to get hands-on experience. Or if you're tackling a big project, buy a little extra lumber and practice your cuts and joints first. If possible, work with someone who has a bit of experience.

Care & Maintenance

How long will my furniture last?
With good joinery and regular care, your DIY furniture can last for decades. I have pieces in my own home that are over 20 years old and still going strong! One of the best parts about DIY furniture is that it’s easy to repaint, refinish, or repair—so your projects can grow and adapt with you.

How should I care for outdoor furniture?
Lightly pressure wash or hose it down once or twice a year. Tighten screws and reapply finish as needed to protect it—just like a deck or fence. A little upkeep goes a long way in extending the life of your furniture.

How about indoor furniture?
Regularly dust or wipe with a damp cloth. If it starts to look worn, a light sanding and touch-up paint or stain can refresh it in no time. DIY pieces are meant to be durable and fixable—so don’t be afraid to give them some love now and then.

Want to Build with Confidence?

Check out my ebook: 12 Skills to Build Your Own Furniture
It walks you through the core skills every builder needs—measuring, cutting, joinery, and finishing—so you can build beautiful furniture that lasts.

Still Have Questions?

Email us anytime at [email protected] and we’ll be happy to help!