
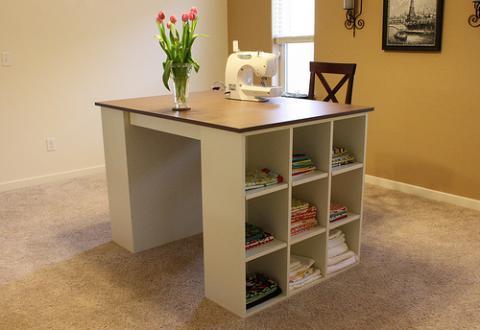

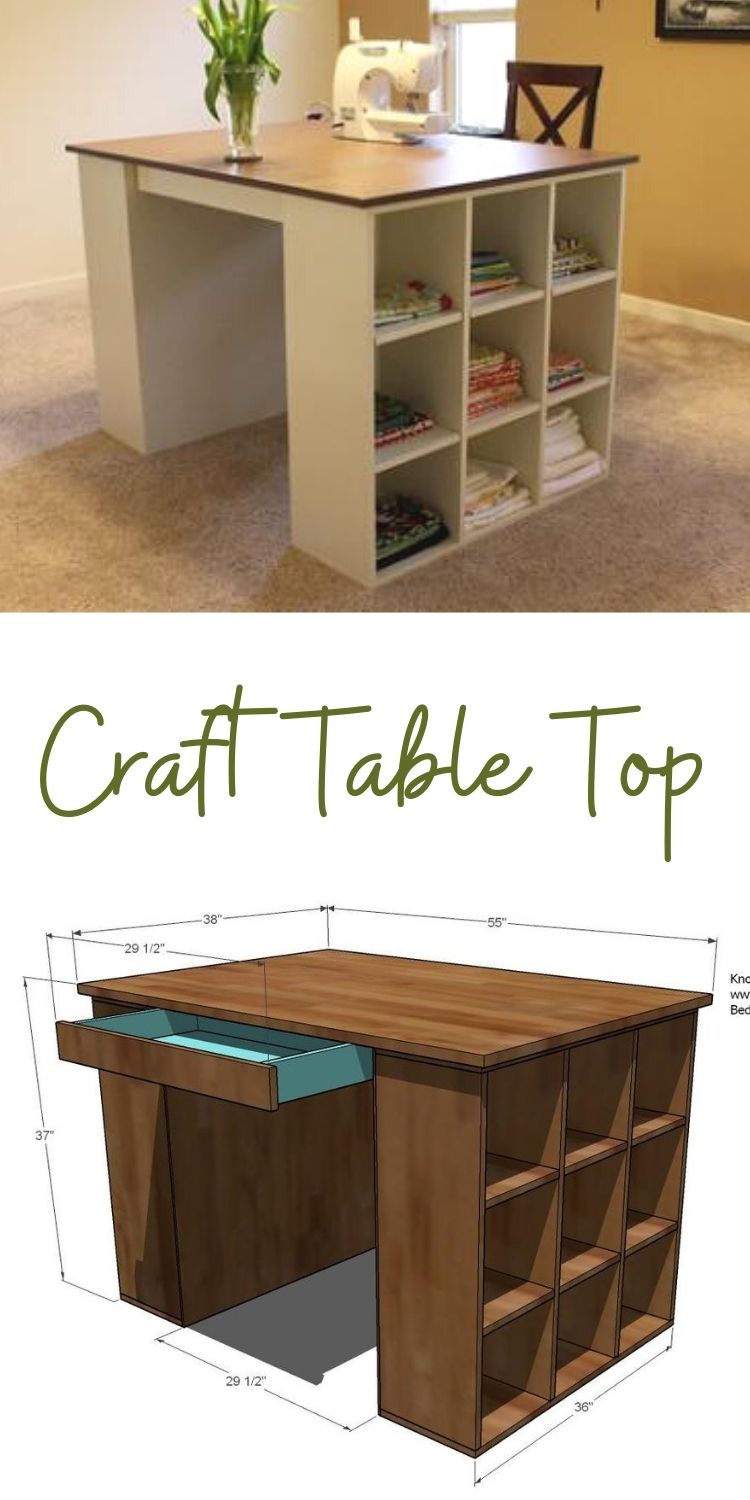
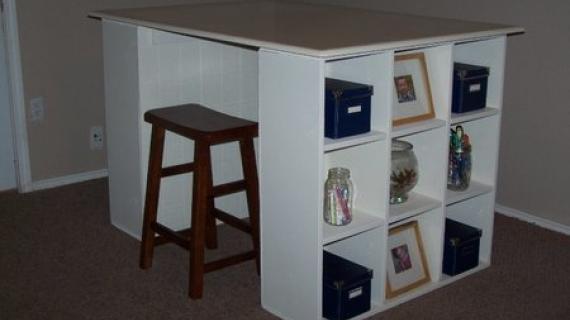
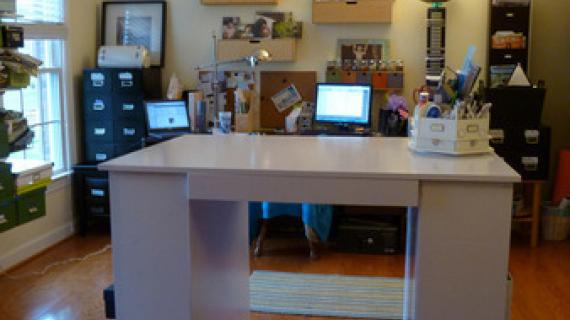
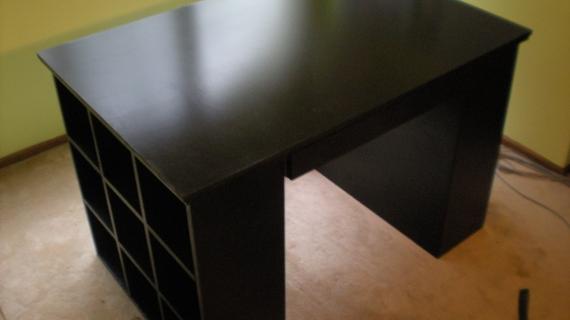
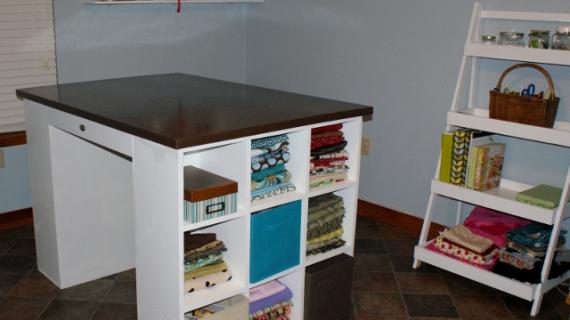
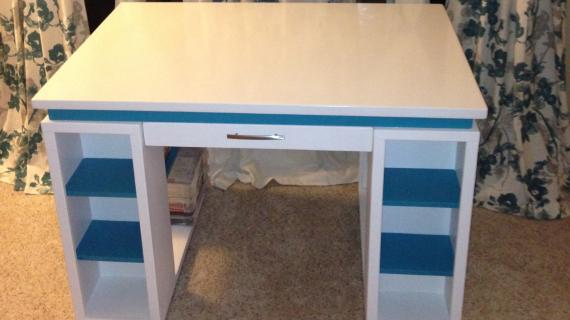
This counter height project table features two drawers and 18 cubbies to keep all of your crafting supplies handy. By simply building two of the cubby bookcases from the Modular Offfice Collection and adding a desktop, voila! we've got a stylish, simple project table.
Pin For Later!

Preparation
1 Sheet of MDF or A1 Plywood 2 – 1×4 Boards, 8′ Long 2- 15″ Drawer Slides
1 – 3/4″ MDF or A1 @ 55″ x 38″ (Top) 2 – 1×4 @ 31 1/2″ (Sides of Drawer Housing) 1 – 1×4 @ 28″ (Center of Drawer Housing) 2 – 3/4″ MDF or A1 Plywood @ 25 1/2″ x 14 1/4″ 2 – 1×4 @ 25 1/2″ (Backs of Drawers) 4 – 1×4 @ 15″ (Sides of Drawers) 2 – 1×4 @ 29 1/2″ (Measure to fit, Drawer Face)


Make sure you cut your plywood perfectly straight. Use your square. Predrill and countersink your screws. Use wood glue. Work on a clean level surface.
Instructions
Step 1
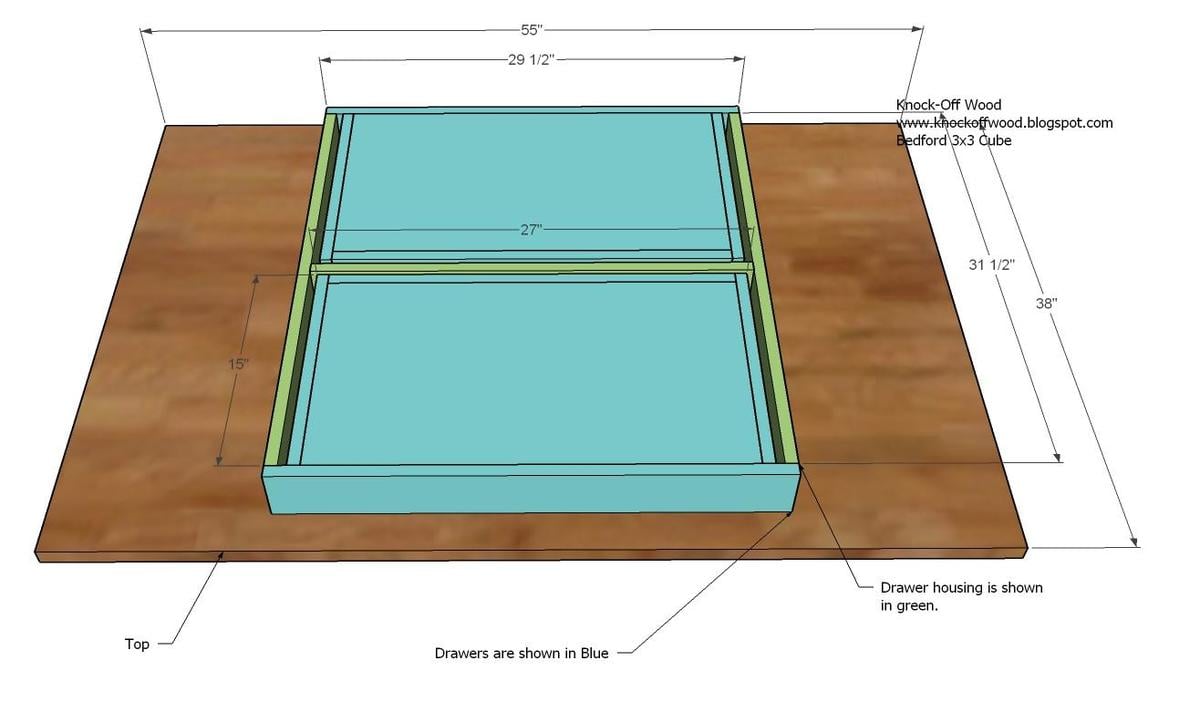
Dimensions for the Tabletop with drawers is shown above.
Step 2

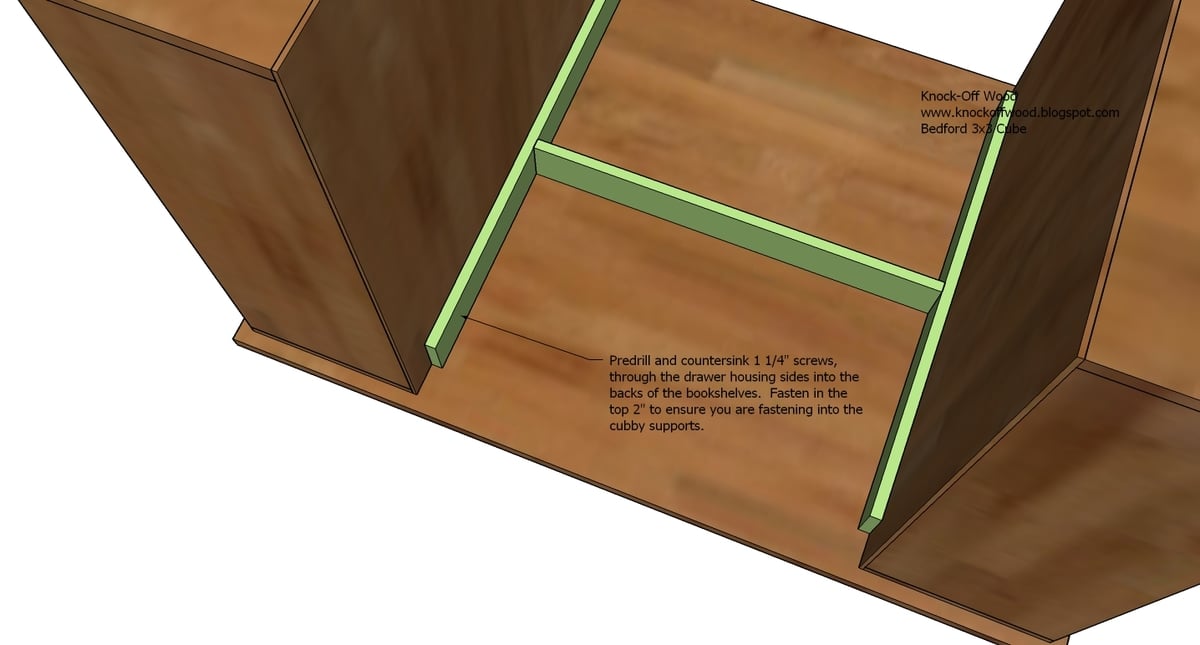
Drawer Housing. Measure and mark out the sides of the drawer housing as shown above. Fasten the center to the sides, using 2″ screws and glue. You will need to predrill and countersink your screws. You will need to be perfect in your building, as the drawers will not slide right if you do not build perfectly square.
Step 3

Drawer Housing to Top. Fasten the drawer housing to the top, using the measurements above. Again, you must be perfectly square. Predrill and countersink your screws 2″ deep (the screw head will be 2″ inset into the 1×4 boards) and fasten the 1x4s to the top. This will also hide any screws from showing on the tabletop.
Step 4

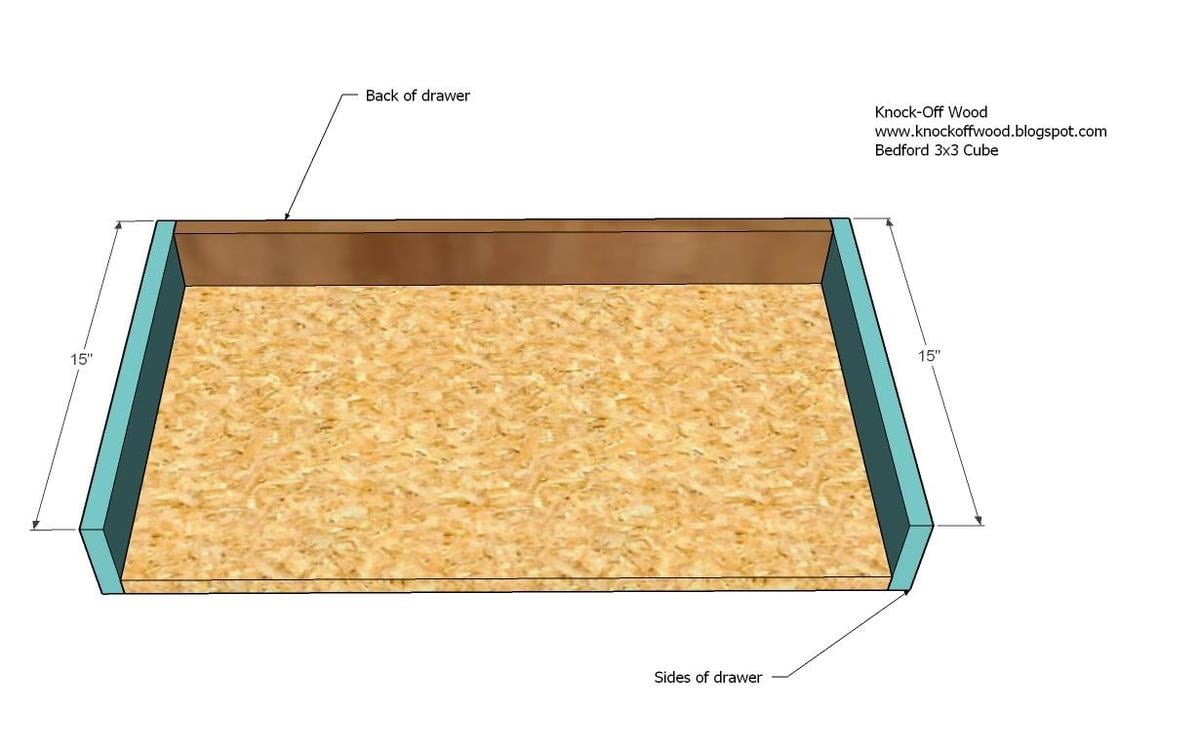
Drawer Backs. Fasten the drawer back to the drawer bottom. Use the 2″ screws and glue.
Step 5
Step 6
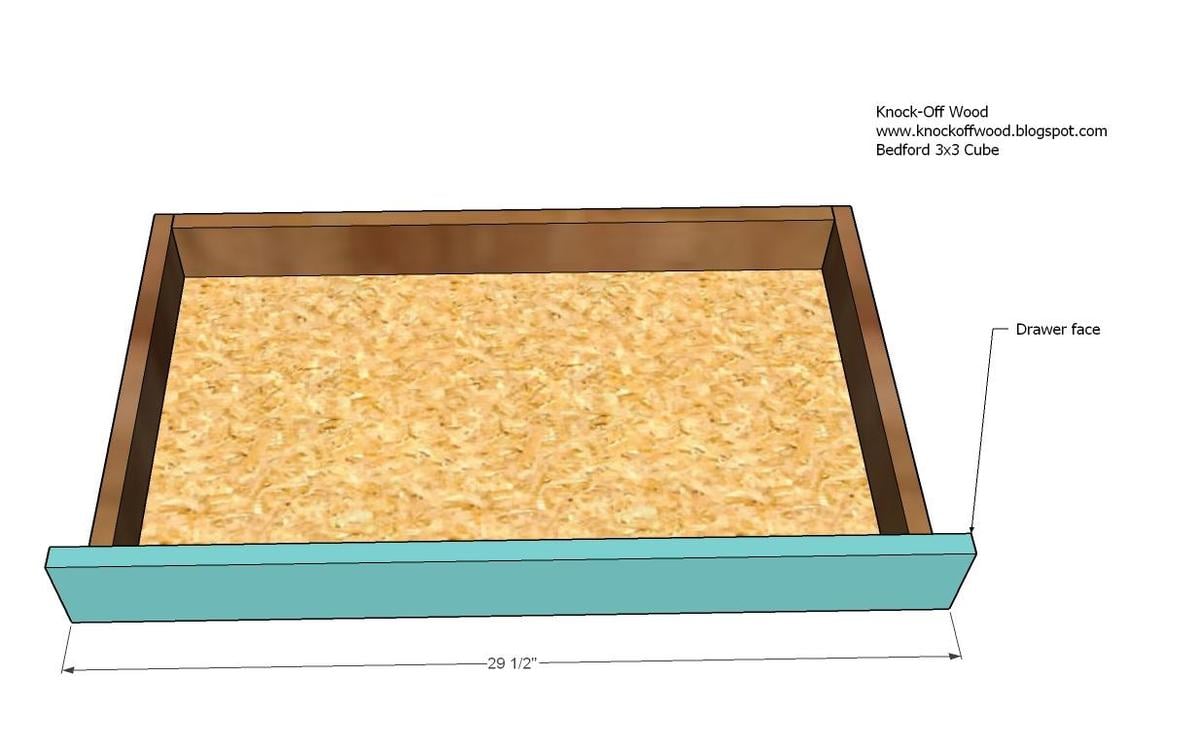
Drawer Face. Measure the opening from the outside of the drawer housing to the opposite outside. The distance should be about 29 1/2″. Subtract 1/4″. Cut your drawer face from a 1×4 to this measurement. After you have inserted the drawer into the slides, line the drawer face up with the drawer and fasten in place.
Step 7
Putting it all together. Fasten the top to the bookcases, as shown above. Follow the directions above. Do not use glue. This will enable you to take apart the project table easily.
Step 8

Insert the Drawers. Insert the drawers into the slides. If you would like, you can add hardware to the faces of the drawers.


Comments
Tammy James (not verified)
Wed, 02/17/2010 - 00:09
This is amazing I love it!
This is amazing I love it!
Kathy V (not verified)
Wed, 02/17/2010 - 01:43
I love this. The funny thing
I love this. The funny thing is, when I looked at the PB pics when you put up the 3X3 plans, I remember thinking "What desk wouldn't have any type of drawer??"
This will be perfect for my yet-to-be drywalled crafting room! :P
bifty489 (not verified)
Wed, 02/17/2010 - 04:29
SO glad you gave us plans for
SO glad you gave us plans for this project! I have the less expensive Grandinroad version of the Pottery Barn Bedford system and also felt the need for drawers. I think I have read the instructions completely but I didn't see where or how the slides are installed. Am I missing something??
Sara W (not verified)
Wed, 02/17/2010 - 04:45
Oh my gosh, last night my
Oh my gosh, last night my husband was trying to figure out how to make this with a drawer. And looky here! Its like you know all of us too well!!! Thanks again.
TheLegacyLady (not verified)
Wed, 02/17/2010 - 05:42
Thank you, thank you, thank
Thank you, thank you, thank you. My husband and i have been eyeing this table for years - he always said he could build it - and now we have plans thanks to you. Tweeted and Facebooked this one! :)
Stefanie (not verified)
Wed, 02/17/2010 - 05:52
Where are the plans for the
Where are the plans for the top and the drawer for this? I don't have a twitter account and when I click on read more it takes me there. help!
Tara M (not verified)
Wed, 02/17/2010 - 06:20
Love love love! You are
Love love love! You are incredible! I wake in the night thinking about what you will post today! That is so weird!
The Harris Family (not verified)
Wed, 02/17/2010 - 06:30
I am so excited about this
I am so excited about this desk. Thank you!!!
Wendy (not verified)
Wed, 02/17/2010 - 06:41
I am going to get my husband
I am going to get my husband to give this a try soon (perfect for my card-making stuff) and I will let you know how it goes.
jchaas (not verified)
Wed, 02/17/2010 - 06:51
awesome, thanks SO much for
awesome, thanks SO much for sharing, you are truly inspiring!
Fab Free Fun (not verified)
Wed, 02/17/2010 - 06:57
My next decision will be
My next decision will be WHERE to set-up shop!!! THIS IS AMAZING!! I went to Home Depot this weekend to "practice" spending my tax return on projects to make for my house!!! THANK YOU!!
Anonymous (not verified)
Wed, 02/17/2010 - 08:28
Do you have a suggestion/idea
Do you have a suggestion/idea on how you could do something like this htp://www.ikea.com/us/en/catalog/products/10115760 with this system.
Misty (not verified)
Wed, 02/17/2010 - 08:48
I should prob. start with a
I should prob. start with a smaller project first, but I love this. If I can do this project I would like to use it as a kitchen island...somewhere for my son to "help" me cook! ;)
Laurie (not verified)
Wed, 02/17/2010 - 09:28
I have been lusting over that
I have been lusting over that project table for a very long time...thank you thank you!
Chantelle - Th… (not verified)
Wed, 02/17/2010 - 10:58
Once again, I am so
Once again, I am so impressed. In a couple of years we are building a new country home and, believe me, with all these fabulous plans, you can bet a lot of our furniture will be handmade, thanks to your instructions! Keep them coming!!
Petit Debutant (not verified)
Wed, 02/17/2010 - 11:05
Thank you, thank you, thank
Thank you, thank you, thank you!!!
I just about peed in my pants when I saw these plans! I've been drooling over this system for quite some time. I'm a quilter and this will be perfect for use as a cutting table and craft table. Right now we are building the Brady system so when we are done with that this is going to find it's way to the top of the list!
Jennifer (not verified)
Wed, 02/17/2010 - 11:26
THANK YOU, thank you, thank
THANK YOU, thank you, thank you! I've been wanting this project table for YEARS. I love that you added a drawer! This is #3 on my list of things to make from your plans. I'm working on #1 now - the PB Hyde Console table. When it's finished I will send you pictures (may be a while because it needs to get warmer here before I can stain it). Oh, and I ordered my first tool today! A Hitachi Finish Nailer. Woot!
Thanks again for all you do.
sewlively (not verified)
Wed, 02/17/2010 - 13:48
I have been looking for the
I have been looking for the perfect table for my sewing room. This will make one Bad A** cutting table. This Rocks!!
AutumnBrooke (not verified)
Wed, 02/17/2010 - 16:36
OMG, I HAVE to make this.
OMG, I HAVE to make this. Thank you so much for the plans. :D
The Fickle Hobbyist
Coral (not verified)
Thu, 02/18/2010 - 15:47
Thank you!!! My husband and I
Thank you!!! My husband and I have wanted this system forever. We can now build it, thanks to you!
urban artifaks (not verified)
Sun, 02/28/2010 - 22:45
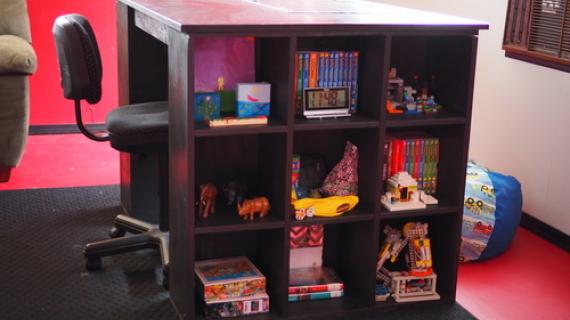
i'm planning this one but
i'm planning this one but want to tweak it a bit to match the size of my cutting table-that way, i can put them together for working on large quilts. that makes the shelf units large enough to hold a good part of my fabric stash!
I'm also thinking of taking out the drawer on one side and cutting a hole to put my machine into-that will eliminate my separate sewing cabinet, and i can replace the cover for hole to have a flush top. just thinking...
OR, maybe just make another top that would hinge down on the back to make a cutting table and eliminate that piece of furniture entirely...
ana, you are fantastic!! i've always wanted to make furniture but kept putting it off-now i think i'm ready!
jackie
Anonymous (not verified)
Sun, 03/28/2010 - 14:39
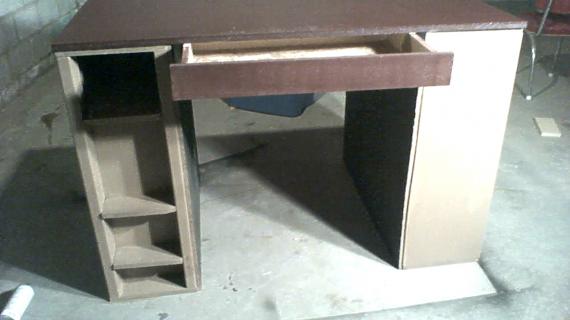
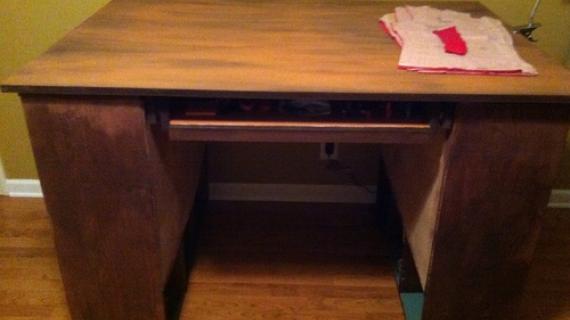
I have two of these desk but
I have two of these desk but they are black, not white. One of mine came from World Market, it has a drawer and the other came from Pier One and it does not have a drawer.
I've had them a couple of years, there are better options that the PB prices, esp if you don't have acces to equipment to build one. I love love love mine. One has my sew machines and serger, the other has my cricut and emb machine. I actually scrap on a third table. Lord help me.
Cyndi
Anonymous (not verified)
Sun, 03/28/2010 - 14:41
Oh and one of mine cost $299,
Oh and one of mine cost $299, the one with the drawer,and I got the second one from Pier One for $99. It was the display and one back corner had a ding on it.
Cyndi
lorimu (not verified)
Mon, 03/29/2010 - 05:34
I love this table! It will
I love this table! It will be a perfect replacement for my rickety cutting table. Any ideas on how Jerilyn made her table top look so thick? It's really nice!
Ursula (not verified)
Mon, 04/12/2010 - 15:00
Just about finished with my
Just about finished with my bookcases and have the materials bought for the drawers and counter top.
Total Lumber Cost:
2 Bookcase Sides: $90
Couter top (3/4" MDF) + Drawers: $40
I believe her counter is probably the 3/4" MDF or something similar. It ends up looking that thick and matches the thickness of the rest of the desk.
So far my project looks GREAT!! I cannot wait to put on the top tomorrow and paint. I will post my photos once I finish. :)
Natty (not verified)
Mon, 05/10/2010 - 09:42
I have the same question as
I have the same question as lorimu. I really like the top a bit heftier as well and noticed that it seems to be more like 1 1/2" rather than 3/4". Would you achieve this by doubling up with two sheets and edge banding or using 1-3/4" sheet and then trimming out the edges? Help! I love the heavier top! Oh, and anyone have any tips on how to paint this to achieve the same finish as the "antique white" on the PB website? Thanks to anyone that can assist. We are moving into a new place that's 3 times larger and I can't wait to build some furniture to fill the space!!
Ana White (not verified)
Mon, 05/10/2010 - 12:55
The best way to get a
The best way to get a "heavier" top is to trim the edges out in 1x2s on edge, which equal a 1 1/2" thickness. You could double up boards, but the top would be extremely heavy. Also, by using 1x2 trim, you do not need to add edge banding and can distress away.
Natty (not verified)
Tue, 05/11/2010 - 03:57
Sorry for all the questions
Sorry for all the questions but just want to make sure I'm clear before I start this! Would the edging then interfere with the drawers opening and closing? I was planning on doing this in mdf as I plan to paint it white like the one on you-know-who's site. Any ideas on what finish of paint to use?
Ana White (not verified)
Tue, 05/11/2010 - 08:13
If you choose to paint, you
If you choose to paint, you won't need to use edge banding.
Natty (not verified)
Thu, 05/13/2010 - 07:16
I think I already asked but
I think I already asked but it got lost in my comment: If I use an 1 1/2" strip to trim out the top, giving the illusion of a heavier top (like the PB one) won't this interfere with the drawer front opening and closing? How do I get around this?
Ana White (not verified)
Fri, 05/14/2010 - 07:10
There are numerous ways you
There are numerous ways you could get the drawer to open, but still have the desktop appear thicker. You could make your drawer out of 1x3s instead of 1x4s. You could add 3/4" plywood to the middle section, dropping the drawer down 3/4".
Genelle (not verified)
Sat, 05/22/2010 - 18:00
Awesome! I have been drooling
Awesome! I have been drooling over this project table for years! As soon as we buy a bigger home (in the works) I'll be able to get this made! Can't wait! Thank you!
mikelynn (not verified)
Tue, 06/29/2010 - 08:16
This is my fourth project. I
This is my fourth project. I love your site and your plans. I did notice that there is an error on the shopping list. It calls for 2 1x4s at 8'. When I started cutting I realized quickly there wouldn't be enough. This isn't a big deal for me as the local blue and orange stores are only 15 minutes away. All total three 8' boards should be enough. I get 21.75' needed.
Toymaker (not verified)
Mon, 09/13/2010 - 16:40
This is amazing. In my new
This is amazing. In my new (old) house, this will be the first piece of furniture I make. Your site is awesome.
Craft Table-Ta… (not verified)
Tue, 09/14/2010 - 16:13
[...] Just as a forewarning,
[...] Just as a forewarning, I thought this part of the project was much more difficult that the bookcases. Ana modified the tabletop plan to include drawers. It is a great idea and the drawers are a nice addition, but there is a slight problem we discovered after we built and attached them to the tabletop. The drawer front is actually inset several inches back from the edge of the tabletop, not flush with the tabletop. When you think about a typical drawer, the drawer front is usually at the very front of the piece of furniture, not inset. Because of this inset, when the drawer opens completely, there is still about 4 inches of drawer that is hidden by the tabletop. Also, precision is important when building the housing for the drawers, as well as the drawers themselves. As with the bookcases, follow Ana’s instructions for building the tabletop and drawers, which can be found here: http://ana-white.com/2010/02/plans-bedford-project-table-top-with.html. [...]
Chelsea (not verified)
Mon, 10/18/2010 - 18:49
Has anyone had trouble with
Has anyone had trouble with screwing the drawer housing to the table top? My counter sink bit won't go 2" deep so I have drilled down 2" deep and used a 3" screw to try and attach the top but I can't seem to get the screw in deep enough for it to stay and not pop off. Any suggestions???
Must Have Ikea… (not verified)
Thu, 11/04/2010 - 05:06
[...] Desk My son-in-law
[...] Desk My son-in-law built it! He's very talented!! Love that kid! There are plans on Ana White for the desk....or if you live nearby..Doug could make one for you too! :: The very best time to be [...]
Jen (not verified)
Thu, 11/18/2010 - 11:53
Chelsea, I'm just about to
Chelsea, I'm just about to fasten the drawer housing to the table top. I think I'm going to use Figure-8's to do it. Google 'em (like me!)...you need to have a Forstner bit to drill 1/8" into the to top of the drawer housing (the part that will connect to the table top). The large loop of the Figure-8 will rest in the recess. The small loop is what you screw through, right into the tabletop. I'm going to use 1/2" screws, since the tabletop is 3/4" thick. I've read that these are pretty secure and allow for expansion/contraction. I'll let you know how it goes (if you haven't already attached...I just saw that you posted a month ago!).
This is my very first woodworking project, BTW. I LOVE it! Since it was my first project, the table would live in the basement craft room, etc., I went with El Cheapo pine boards. Not the best for accuracy. Even a little bend in the wood renders the shelves out of whack to a large degree. I wound up shaving off 1/8" to 1/4" from each shelf to force them to fit. Only one or two fit perfectly.
To drill the holes for the adjustable shelves, use a template. Grab a leftover piece of wood (or a yardstick, if you're new to this and don't have much leftover wood at this point!). Figure out how far apart you want to space your holes, and drill them along the center line of the scrap wood. Lay the template along your board, and drill away! Wrap a piece of tape around your drill bit to mark where you need to stop so you don't drill straight through your boards.
Lastly, I have an MDF tabletop. I'm OK with a bit of an "industrial" look, and I won't feel so bad when I abuse it. :) I didn't leave it Plain Jane, though...I used Minwax gel stain in Hickory. LOVE that stuff! Then I sealed with two coats of polyurethane. The first coat always looks rather rough...sand with fine sandpaper and lay on the second coat. It's FABULOUS! You can stick see the fibers, but it's a neat texture (to me!).
THANK YOU, Ana, for the plans! My daughter and I are looking forward to lots of bonding sitting on our stools across from each other, with all that space and having everything at our fingertips.
P.S. Don't mind me if you see me in the alley scrounging for pallets. :) That's my next thing...
Where I Blog |… (not verified)
Sat, 11/20/2010 - 17:41
[...] Someday I hope to have
[...] Someday I hope to have this kind of table that you can find the plans for over at Ana-White.com [...]
grins88 (not verified)
Mon, 05/30/2011 - 06:00
Just finished the build
My Dad and I made this project this weekend, and we just finished all the building yesterday (minus actually doing the final attachment to the bookcases, as I need to transport). It turned out GREAT! I am so pleased with it, and I cannot wait to post photos. We did make a couple of alterations to the bookcases to have more flexibility with the shelves, but otherwise everything went fairly smoothly. Just an important note...this plan only calls for 2 1x4x8s, but you will definitely need 3. I wish I would have done the math on the cuts when buying my lumber...had to make another run to the hardware store.
chadnicolletti
Thu, 12/15/2011 - 07:48
error in material list
Hello I love the plan but when i bought all the materials and was making the cuts I noticed that the plan calls for 2 1x4x8's when actually that isnt enough. You need 3 1x4x8's to complete the project. Maybe someone can update the list to save people time in the future so they can get everything at once.
Guest (not verified)
Wed, 01/04/2012 - 22:01
Type of material for project desk
Ana,
Can you tell me what type of wood is used for this project?
Thanks
claydowling
Thu, 01/05/2012 - 06:04
Wood in materials list
The first item in the materials list is the wood she used. Either MDF or A1 plywood. A1 plywood will cost you more, but it will be both lighter and stronger than the MDF. In my book it's worth the price.
A1 plywood is a very fine grade, with two sanded presentation quality sides that are suitable for stain, paint or even a clear finish like polyurethane.
MDF is a sheet material similar to plywood composed of sawdust and glue. It is very dense and does not warp, making it an ideal base material for counter and table tops. Unfortunately it doesn't have a lot of strength, so it is bad at holding screws. It's not a good choice for structural components like the sides of a case. It also looks like cardboard (which is what it is), so you need to paint it unless you're willing to settle for a very utilitarian look.
june.young16
Wed, 02/08/2012 - 19:58
Top of the table
I am making this table and I was wondering what you did for the top because you can't stain the MDF wood? Thanks!
claydowling
Thu, 02/09/2012 - 04:28
Paint
MDF needs to be painted, or sealed with a hard finish like polyurethane. If you choose polyurethane, I recommend a thinned oil-based poly. It penetrates the MDF slightly and will darken and seal it. A water bourne polyurethane will leave it the light color, which isn't as appealing.
Guest (not verified)
Tue, 02/21/2012 - 10:32
Where to purchase the bookshelves?
Where did you purchase the bookshelves at? I can not find any in the dimensions that you have listed. Ikea's are to short.
kongk
Tue, 05/21/2013 - 06:21
I appreciate everything you
I appreciate everything you have added to my knowledge base.Admiring the time and effort you put into your blog and detailed information you offer.Thanks.
A1 Direct Casket Website
Papito820
Wed, 03/18/2015 - 21:55
Giving it a shot
I'm giving this project a shot this weekend took up building stuff for my home once I realized I can build things I just needed sence of direction thank you
cjewell
Wed, 04/03/2019 - 08:24
large size craft desk
I saw the post on FB by someone who used your Craft Desk plans to make a greatly enlarged version of it which I absolutely love. Can you include plans to make this larger version?