

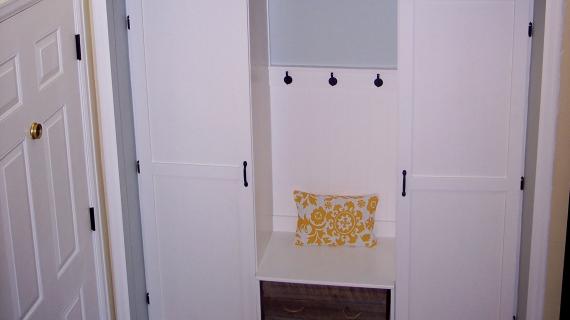
Inspired by the cutest mudroom from Better Homes and Gardens, make your own from scratch with this free, step by step DIY tutorial.
On Sunday, I went shopping for a new mudroom.

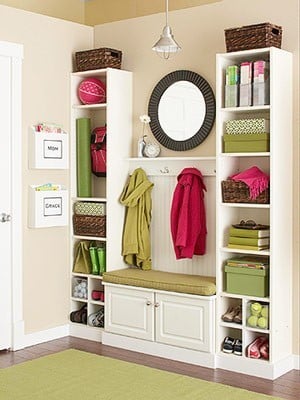
I absolutely adored this one from Better Homes and Gardens. So pretty, and loved the lower cubbies for the children. Ultimately nixed it because we needed an open base for access to our crawl space from our mudroom. Well, it's about to become a mudroom.

Source: houseofturquoise.com via Mandy on Pinterest

And this one from Better Homes and Gardens seemed to be the most popular. I just kept coming back to it. But ultimately, we nixed this one too because there's just not enough hooks for this Alaska family. That, and the closed bottom. *Sign*

When you go to assemble, screw together the base and towers with 1 1/4" screws in hidden spots. Also attach to walls to keep from tipping forward.
Preparation
3 - Sheets of 3/4" Plywood, MDF or Particle Board cut into 15 3/4" x 8 foot long strips
1 - sheet 1/4" plywood or hardboard
1 - 7' long piece 3 1/4" base moulding
1 - 36" long piece 3/4" edge moulding
2 Knobs or Handles
2 Sets of Hinges
Towers (for 2 Towers)
4 - 1x16 @ 72"
14 - 1x16 @ 16"
4 - 1x16 @ 7 5/8"
2 - 1/4" Plywood @ 17 1/2" x 72"
2 - 3 1/4" Base Moulding @ 17 1/2"
Bench
1 - 1x16 @ 36"
1 - 1x16 @ 34 1/2"
2 - 1x16 @ 17 1/4"
1 - 3 1/4" Base Moulding @ 36"
1 - 3/4" Edge Moulding @ 36"
1 - 1/4" Plywood @ 18" x 36"
Doors cut to Fit
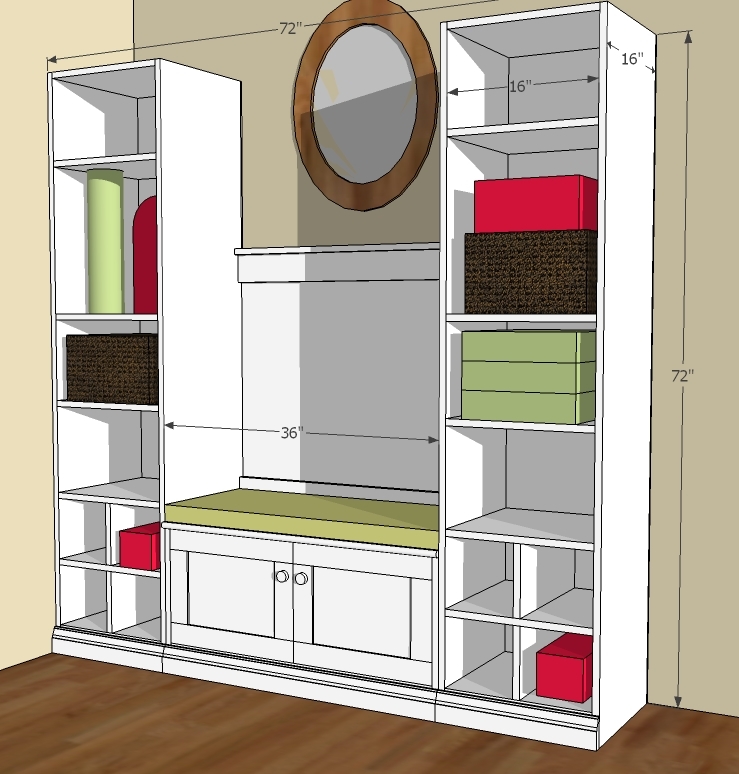
I thought a 16" depth is better for a mudroom because it's more storage and a wider width bench for sitting on with coats behind you. But of course you could simply use all 12" width boards instead. For the 16" widths, simply have your home improvement store rip your plywood into strips 8 feet long and 15 3/4" wide. We'll call these 1x16s throughout the plan.


Please read through the entire plan and all comments before beginning this project. It is also advisable to review the Getting Started Section. Take all necessary precautions to build safely and smartly. Work on a clean level surface, free of imperfections or debris. Always use straight boards. Check for square after each step. Always predrill holes before attaching with screws. Use glue with finish nails for a stronger hold. Wipe excess glue off bare wood for stained projects, as dried glue will not take stain. Be safe, have fun, and ask for help if you need it. Good luck!
Instructions
Step 1
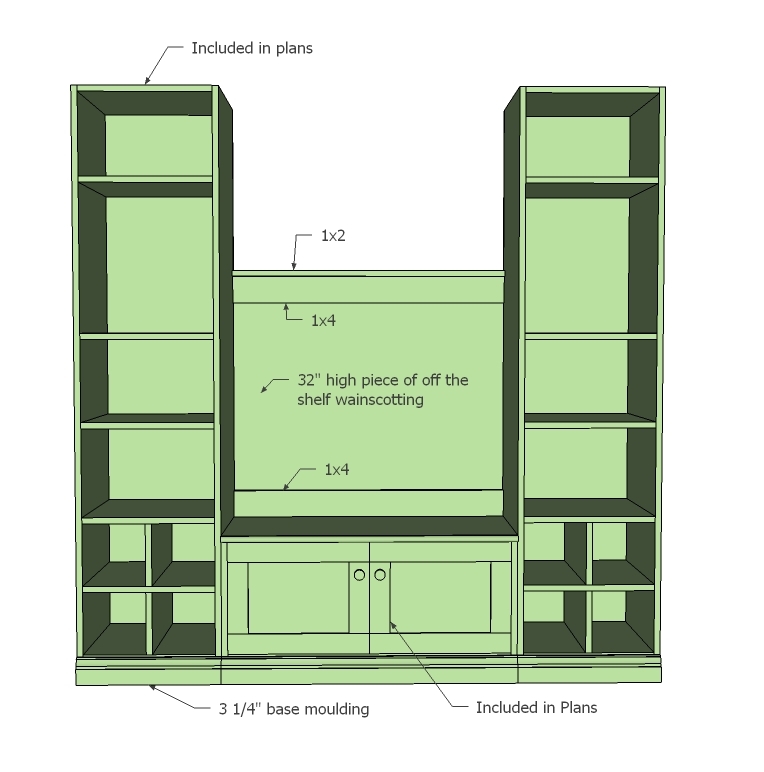
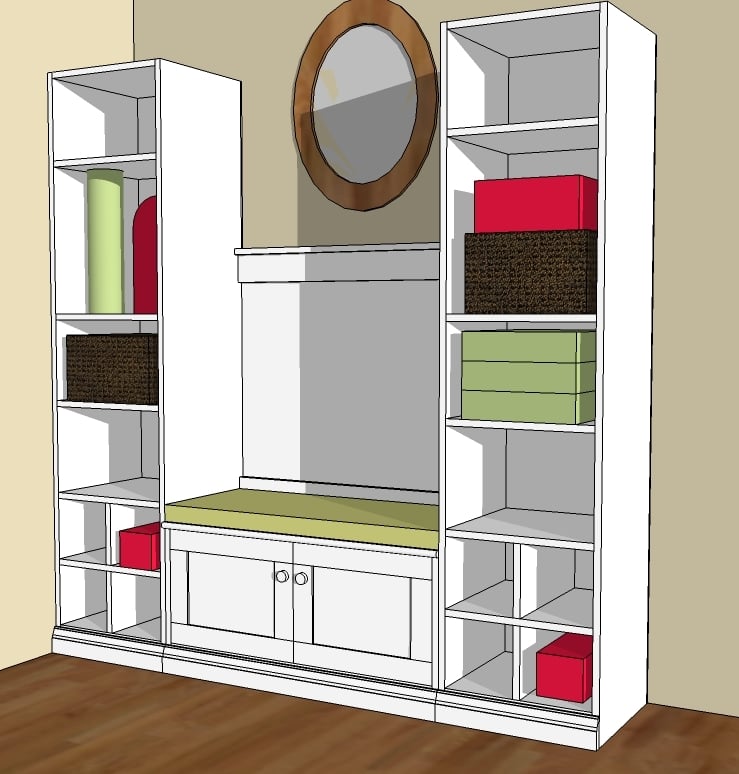
We'll just be going through the plans for the bookshelves and the seat base, but wanted to give you a quick diagram on the other components. You could also do a quick Board and Batten Wall Treatment on the back to save time and money.
Step 2
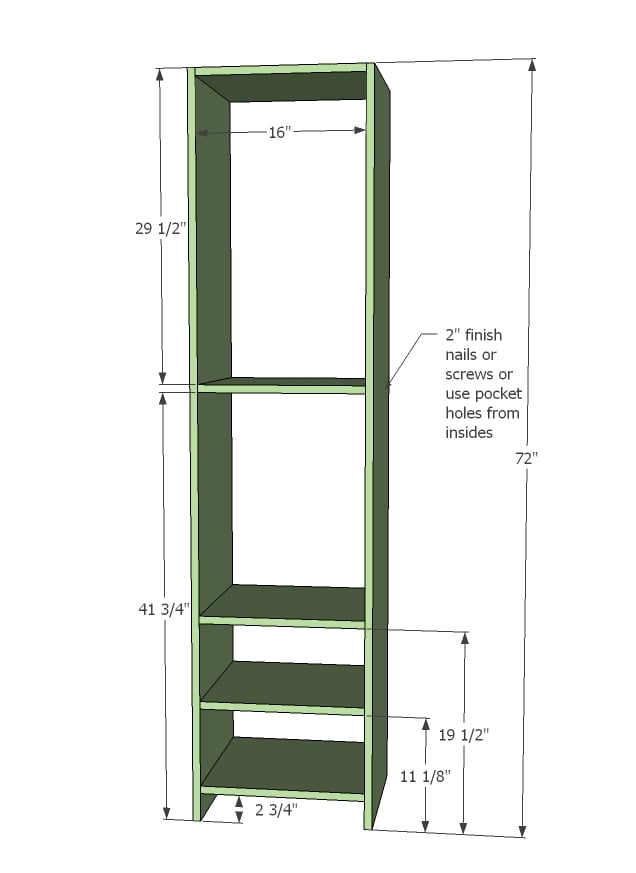
Build the towers as shown above. You are going to want some fixed shelves because it keeps the towers sturdy - at least one in the center. But by all means, you could simply use shelf pins to make all other shelves adjustable.
Step 3

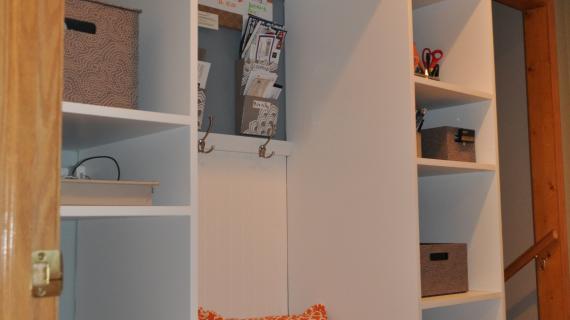
I have cubbies in my closet and love them for shoe storage, so took the time to make the extra step to show you how to do that. For those of you who have a Kreg Jig, you could simply build the + and slide it in so it's removeable.
Step 4
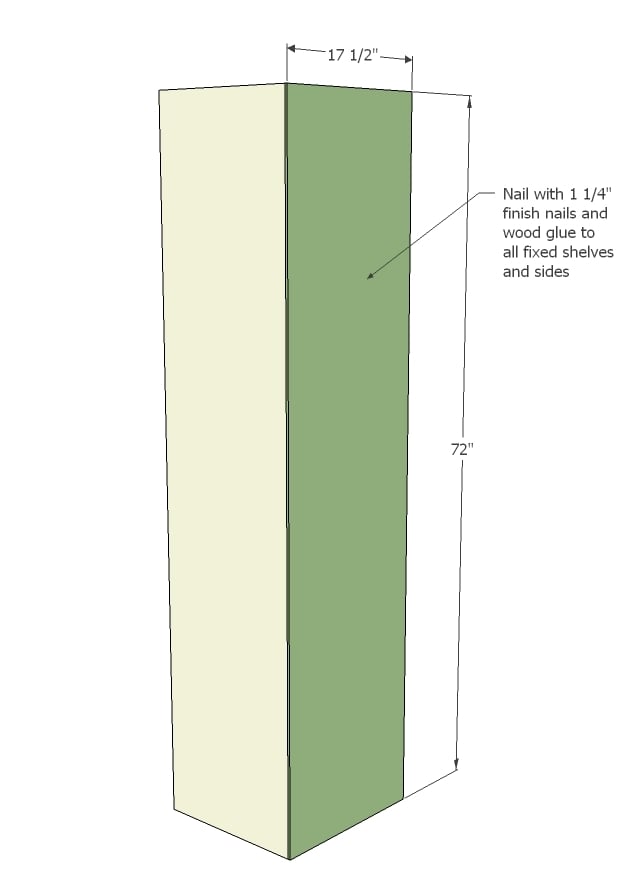
Now add a back. I highly encourage you to back your towers because it will keep them square, as these towers are frameless.
Step 5

Step 6

Now the bench is really simple too, but a word of warning . . . don't go any wider without some center partitions on the bench to avoid sagging. Build your box, you can use pocket holes or 2" screws or nails.
Step 7
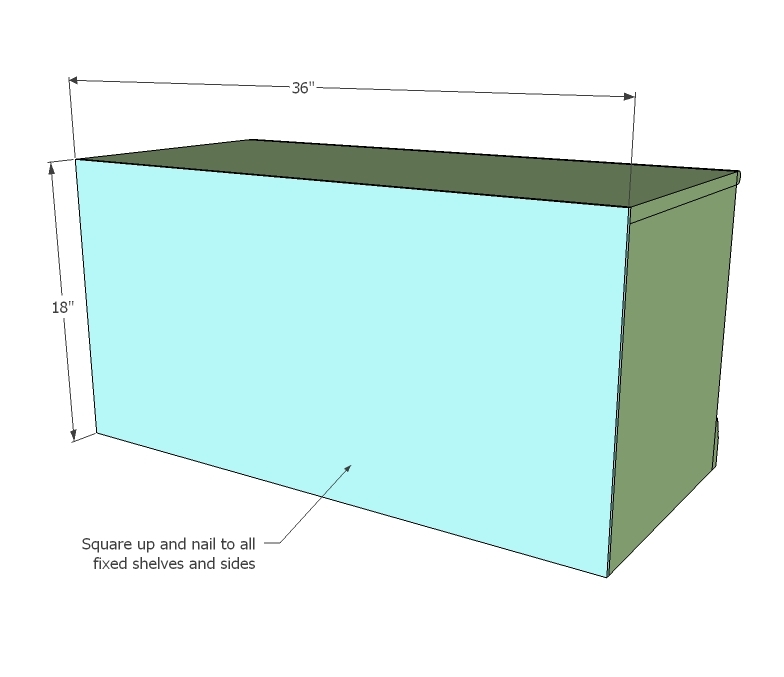
Add a back. This is really important because the back will keep it all square.
Step 8
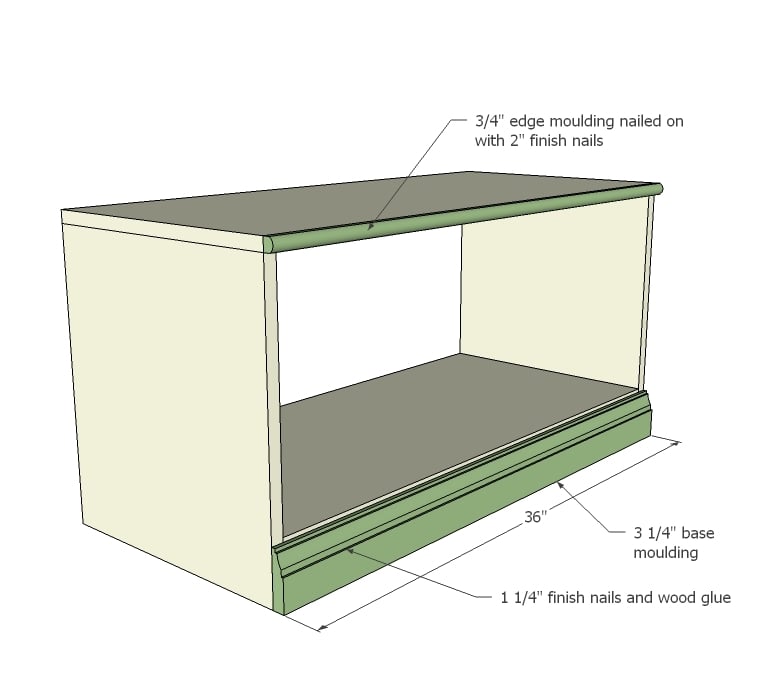
Now the base moulding. I personally would ad edge moulding as shown (as opposed to edge banding) because this is a high wear area.
Step 9
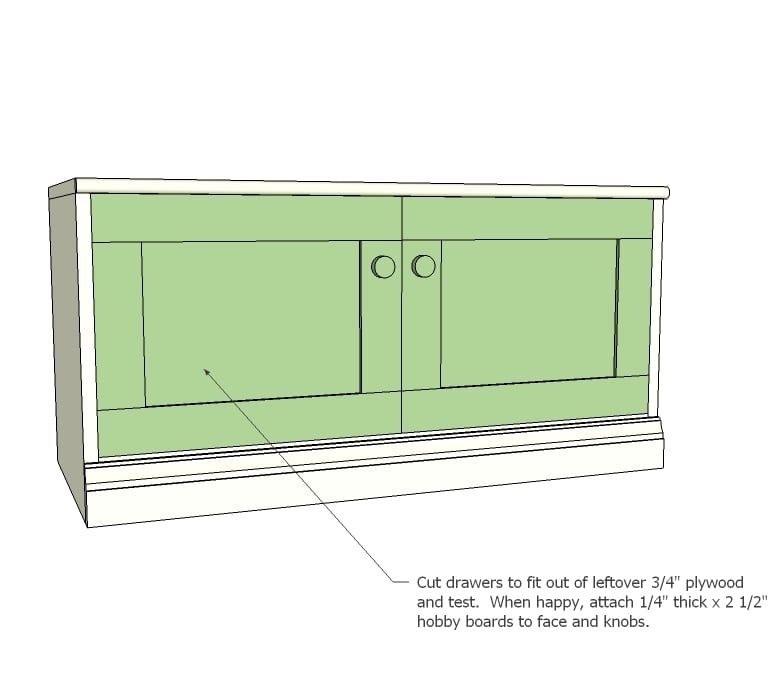
And now doors. Simply take some leftover 1x16 material and cut down to size for doors. Fit in the openings, leaving 1/8" gaps all the way around. When you are happy with the fit, add some decorative 1/4" x 2 1/2" hobby stock to dress up the doors and some pretty knobs.
Step 10
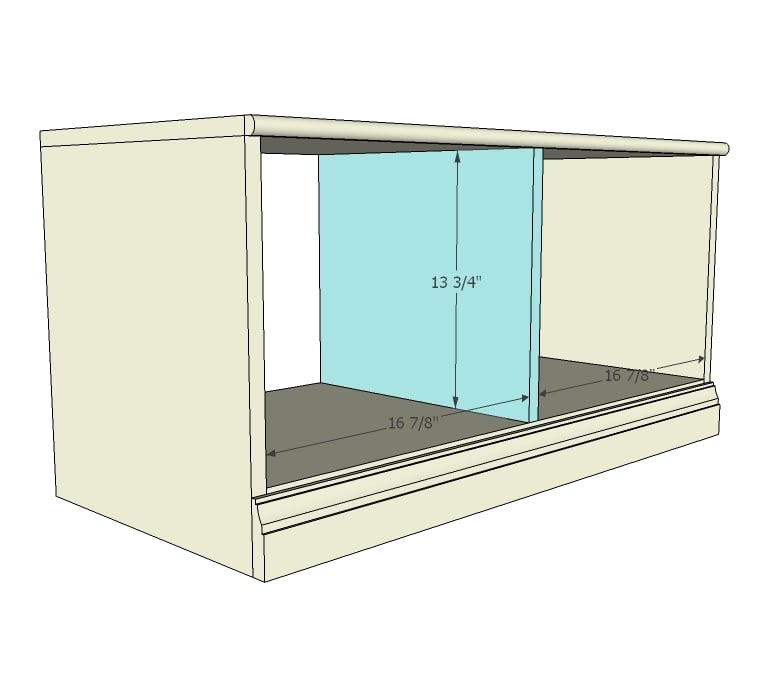
But if doors intimidate you (or cubbies are your preference) simply place a center divider in there with 2" finish nails and wood glue.
It is always recommended to apply a test coat on a hidden area or scrap piece to ensure color evenness and adhesion. Use primer or wood conditioner as needed.

Comments
Ari Z (not verified)
Mon, 08/15/2011 - 12:51
Who says a mudroom has to be
Who says a mudroom has to be unorganized and cramped? I applaud you for taking on the daunting task of organizing your family's "catch all" room. I think every home could stand to have a few more shelves and hooks!
Guest (not verified)
Mon, 08/15/2011 - 13:54
Absolutely adored
I was wondering if you could show the plans for the mud room that you showed that you "absolutely adored". This is exactly what I am shopping for too and I love that one. Thanks!
Guest (not verified)
Tue, 08/16/2011 - 07:36
I think that just such places
I think that just such places in mudrooms for coats and shoes and boots like any of the above are amazing. Directly across from my back door when walking into my mud room, I have a 48" wide space into which I will be designing just such a organizational space. When the time comes, I will post pics. Thanks for showing inspirational pics Ana!
Guest (not verified)
Thu, 08/25/2011 - 11:16
I keep trying to download PDF
I keep trying to download PDF of the "Cutest Mudroom" and keep getting:
TCPDF ERROR: [Image] Unable to get image: file:///home/anawhite/public_html/dev/acquia-drupal-1.2.33/sites/default/files/bhg%20mudroom%202.jpg?1313424674
Are others having this problem or is it my computer?
townsean
Sun, 08/28/2011 - 17:54
Super cute
I really wished I had mud room in my home. I'd love to make this!
Ksenia (not verified)
Tue, 09/27/2011 - 19:25
Hobby Stock on Doors
You referred to Hobby Stock to dress up the doors. What is that exactly and where does one buy it?
Guest (not verified)
Mon, 10/24/2011 - 22:34
How would you attach the
How would you attach the wainscotting and such to the rest of the furniture pieces? And how could I make it to where it would be easy to disassemble for moving? Thank you! Looks amazing!
Guest (not verified)
Mon, 10/24/2011 - 22:34
How would you attach the
How would you attach the wainscotting and such to the rest of the furniture pieces? And how could I make it to where it would be easy to disassemble for moving? Thank you! Looks amazing!
tracysmith
Mon, 10/24/2011 - 23:59
You're not the only one!
I see the same error message when I try the link and it's not the only plan with that issue. However, not all the plans do have it.
BobR (not verified)
Sun, 11/20/2011 - 16:51
MDF - a poor choice?
I've started prepping to build this project. There are several firsts for me in this project - first time using a router, first time (buying/)using a Kreg Jig, and a first time working with MDF (3/4"). I have some questions.
1) I used the router to create a notch along the inside edges of the back of the towers so the backing would be recessed (flush actually) and the towers could be flush against the wall. I hate seeing furniture with a backing where the unfinished edge of the backing is showing. I guess this isn't really a question, but more of a thought for others thinking about doing this project.
2) I'm using 3/4" MDF. The front edges of the towers(vertical members and horizontal shelves) are going to have exposed edges. I've tried sanding/sealing and sanding/sealing again to try to create nice edge, but it doesn't seem to want to hold a nice, smooth edge. Is there a trick? Or do I need to use screen bead or something on the edges?
3) I'm playing with the Kreg Jig, experimenting some. I was thinking I would use it to create pocket holes to attach the shelves and to build the box for the center. But, I've been having trouble with the MDF splitting (on the side with the pocket hole) when I put the screw in. The scrap I'm using to test with is about 1.5" wide...maybe that's too narrow for pocket hole in MDF?
4) Along the same lines, I was thinking I would use the pocket hole inserts to cover the holes. Try as I might, however, I can't seem to get them to seat all the way. Is there a trick? Or do you just sand them down the last 1/16"? (And should glue be used to hold them in?)
I appreciate any responses!
Bob
BobR (not verified)
Sun, 11/20/2011 - 19:49
Even finish nails split the MDF
As a follow up to my last comment, I did a test mimicking how the shelves would be finish-nailed to the verticals in the tower (if not screwed via pocket hole). Even finish nails as small as 1" brads cause the MDF to start to split. ?? Maybe it's just that I am nailing into the end of a piece that is only 1.5" wide?
Thanks!
Bob
In reply to MDF - a poor choice? by BobR (not verified)
claydowling
Sun, 11/20/2011 - 20:00
Definitely a poor choice
MDF has many wonderful properties, but as a structural material it stinks. It's heavy and doesn't hold fasteners well (as you're finding). It makes an awesome table top or counter top though, and it's really good for building lots of shop jigs to help with building other things. You should try to check out David Marks on You Tube for some great examples of using MDF in the shop.
This project will be a lot easier with plywood for the case, and gluing a strip of 1x2 or 1x3 to the front end to give it a nice finished look. As long as you don't put nails into it, you can route the solid wood if that's what your preference is, or you can simple leave the solid wood as is. That's actually how the nicer custom cabinets are made.
As far as buying plywood goes, skip both Lowes and Home Depot. The plywood they sell is barely sufficient for boarding up windows. Find a lumber yard, and inspect how they're storing it before you accept delivery. It needs to be stored on a flat surface. It can't be stored on two or three forks, the way you see it in the big box stores. And all of the pieces in the stack need to lay completely flat on each other, without gaps. If it doesn't, the wood is warped and will make your life miserable.
As for the kreg hole plugs, I wouldn't bother. Buy a dowel of the right size, glue it in, and cut it flat with a flush cut saw (all of the big box stores sell them, generally with the Japanese saws). You'll have to sand or plane to get it perfectly flush, but you won't have to sand or plane much.
BobR (not verified)
Sun, 11/20/2011 - 20:40
A follow-up question
Thanks for you response, Clay. A quick follow-up question. You mention using 1x2 or 1x3 to the front end of the case. Do you just mean the bench or to the towers, too? Since I've already purchased the MDF (and had it cut to width...in other words, can't return it), do you think I could at least use it for the verticals? None of the vertical pieces have to have the pocket holes put in them (putting the screw into the pocket hole is what was splitting). So, I could use plywood for the shelves and use the MDF for the vertical pieces with 1x2 or 1x3 around the outside edges (assuming that's what you meant). The plywood certainly will hold the pocket-hole screw without issue. And, for the edge on the front of the plywood shelves, I could put a screen bead or something on the front and make the front edge line up with the edge of the 1x2 or 1x3. Any thoughts?
I appreciate your help.
Bob
monicacaptri (not verified)
Tue, 07/03/2012 - 09:01
This article has some great
This article has some great and useful information about this subject. Thank you for sharing it in an easy to read and understandable format.
http://www.britecarpetcleaners.com/carpet_cleaning_Santa_Monica.html
claydowling
Mon, 11/21/2011 - 06:05
MDF
I wouldn't do it, but you can try if you like, just be prepared to redo it in a few years if it starts to fail.
It would be fine for things like the bench seating. Flat and well supported surfaces are where mdf really shines, because it's good at staying flat.
As far as trimming out the shelves (which really should be out of solid wood or plywood), your life is made easier if you trim them out with the same material you use to trim the cabinet. But if you have some other moulding you like better, it's your project, so I'd recommend going with what makes you happiest. You're the one who has to look at it every day, so my opinion should count for less.
BobR
Mon, 11/21/2011 - 06:28
Thanks
Okay, points taken. Thanks for your help!
Bown
Thu, 01/12/2012 - 07:43
PDF!
I love love LOVE this plan!! I am having trouble with the PDF Link. It won't open for me in PDF! I like to print the plans in PDF to keep them all consistent in my little DIY folder. :) Is anyone else having trouble with it?
Guest (not verified)
Wed, 02/22/2012 - 08:44
mudroom lockers
Can you post a link to what you ultimately "bought"? Thank you.
Mary - Scentsy… (not verified)
Tue, 02/28/2012 - 14:55
How do I add support if I make it longer?
If I wanted to make this 48" (with a 12" depth) to go between cabinets I already have in place. How should I go about adding support for the long board? Do I just add vertical supports and make it more compartment-like with more doors?
Thanks to whoever can answer. I am new to this and trying to figure it all out.
Jennifer Adams (not verified)
Wed, 01/02/2013 - 18:28
mudroom
I would love to have the plans for houseofturquoise.com. Please if you could help? Thanks
MelanieE
Mon, 06/24/2013 - 05:32
Need Help!
I am a beginner. I got the Ikea bookcases, wall cabinet (and built a box underneath to raise it up 3 3/4 inch. Got a piece of wainscotting and the finishing pieces (2) 1x4, (1) 1x2 all in the correct sizes. All painted and ready to go. But how to assemble everything? In what order? Should I secure wall cabinet to wall, then put wainscotting & finishing pieces, then end with the bookcases? Also, do you put the finishing pieces sitting right above and below wainscotting or do you position them on top of it? What materials do you recommend to attach the wainscotting and finishing pieces (nailer?), construction adhesive? Will finish off with baseboard to give it the built in look. Would love some advice please. I have come so far! Thank you.
dragons49
Wed, 06/04/2014 - 23:04
Pdf won't show up
Pdf won't show up