Eco Office Large Bookshelf - Made with PureBond Formaldehyde Free Plywood

Difficulty
Beginner Projects
| Print this plan

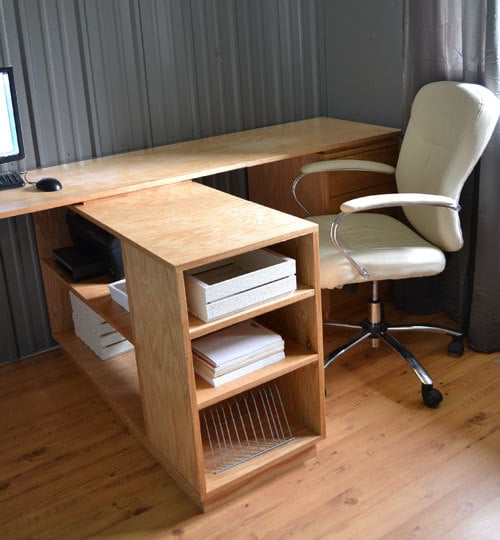
Free woodworking plans to build a large contemporary style bookcase for a modern home office. Featuring step by step diagrams, cut list and shopping list, these beginning do it yourself furniture plans are designed for anyone to build with simple tools and off the shelf materials.

Work smarter, not harder.
Some great words of advice one of our readers once commented right here on this very blog.  And those words have stuck with me, encouraging me to improve not just what I do, but how I do things.  
So as we went to build two desks in one tiny 8x8 office, I really wanted to create not just a double desk, but a desk system that enables us to work just as hard, but smarter, getting more done in the same amount of time.  And that means making things easier to use and easier to find and store.  
Top of the list, I wanted a permanent but accessible place for the printer.  And then some good storage for things you sometimes use, like copy paper, magazines I'm not ready to recycle, and certain craft supplies, and then additional storage for those things that we always use - things like envelopes, my jar of treasures (random hardware, screws and other life necessities for any DIYer), and current magazines.

And then of course, what team doesn't need some community space?
So we built the Double Bookcase component of our office, designed to separate the two desks, and provide shared storage and desktop space.  That way my clutter and random piles of notes stay on my side, and the Ram doesn't get too frustrated with me . . . hey I'm a creative type, I'm think best when I'm messy . . . yeah okay.
And like the rest of my new office, this double bookshelf is made of PureBond Formaldehyde Free plywood, available at the Home Depot.  It's made with soy based glue, so I'm comforted to know not only is the wood beautiful and comparable in cost, but our health and indoor air quality isn't being compromised by my new desk.

Special thanks to Columbia Forest Products and their beautiful Formaldahyde Free PureBond Plywood for supplying the wood for this project.

Dimensions
Dimensions are shown above.

Preparation

Shopping List

1 - Sheet 3/4" PureBond Hardwood Plywood (available at The Home Depot) 

2 - 1x2 @ 6 feet long (optional, see step 6) 
3 - 25' long rolls Edge Banding, in matching wood grain
Common Materials
Cut List

2 - 1x17 @ 48" (Top/Bottom)
1 - 1x17 @ 34 1/2" (Shelf)
2 - 1x17 @ 25" (Ends)
2 - 1x12 @ 25" (Small Bookshelf Sides)
1 - 1x12 @ 12" (Small Bookshelf Shelf)
2 - 1x2 @ 45"
2 - 1x2 @ 15 1/2"

Tools
Tape Measure
Speed Square
Pencil
Safety Glasses
Hearing Protection
Kreg Jig
Drill
Circular Saw
Power Sander
Drill Bit Set
General Instructions

Please read through the entire plan and all comments before beginning this project. It is also advisable to review the Getting Started Section. Take all necessary precautions to build safely and smartly. Work on a clean level surface, free of imperfections or debris. Always use straight boards. Check for square after each step. Always predrill holes before attaching with screws. Use glue with finish nails for a stronger hold. Wipe excess glue off bare wood for stained projects, as dried glue will not take stain. Be safe, have fun, and ask for help if you need it. Good luck!

Instructions

Step 1

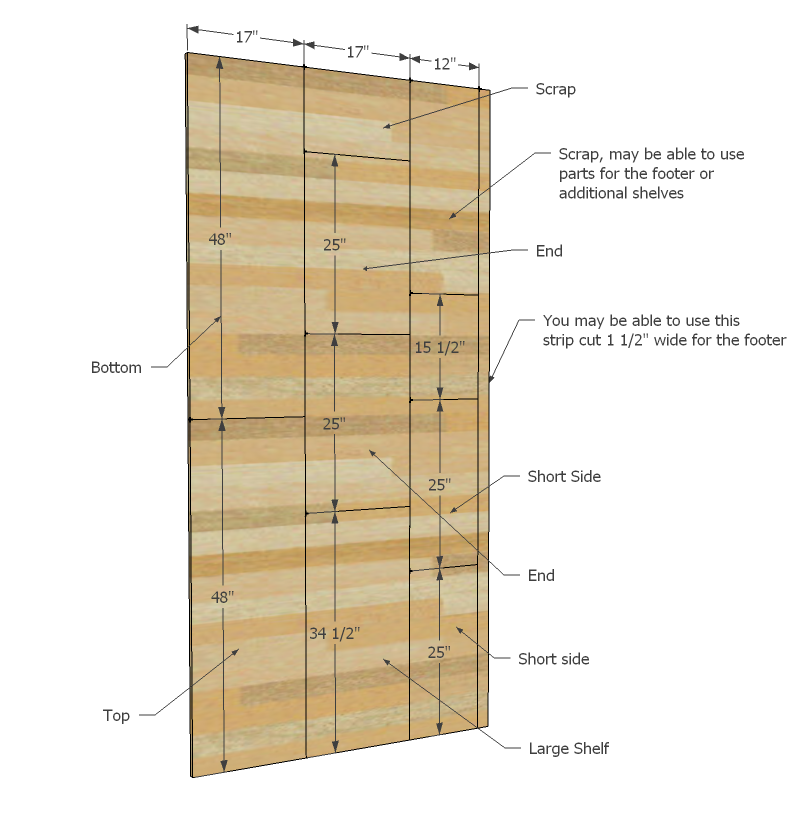
As mentioned with the Open Bookshelf Base it is important to cut your plywood square and with the grain of the plywood, also taking into account how a circular saw works, and the easiest method to cut. Have your Home Depot cut the plywood into 3 strips, 17" wide, and one strip 12" wide. Save the scrap strip - you may be able to use it for the footer if it's square and 1 1/2" wide. Once your strips are cut, you can use them like boards - I will refer to the strips as 1x17 and 1x12, although the strips are not true 1xs.

Step 2

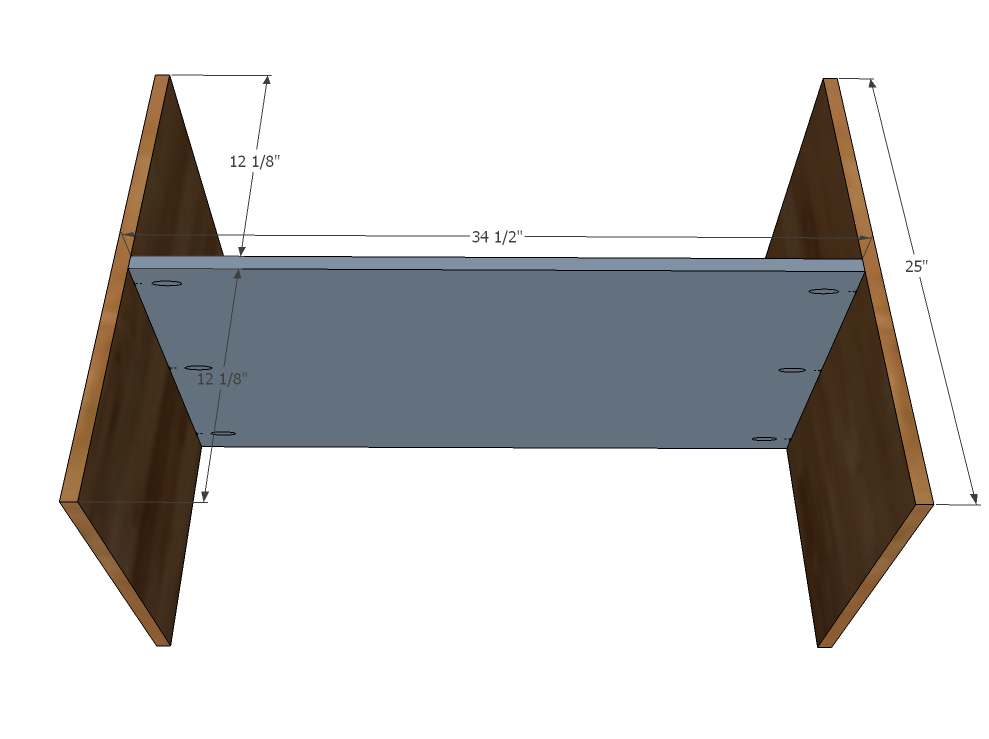
I've included in the diagrams pocket holes for Kreg Jig users.  For those of you without, you can countersink 2" screws from the outside for joints with glue.  Attach shelf to ends as shown above.

Step 3

Now add top and bottom as shown above. Adjust for square.

Step 4

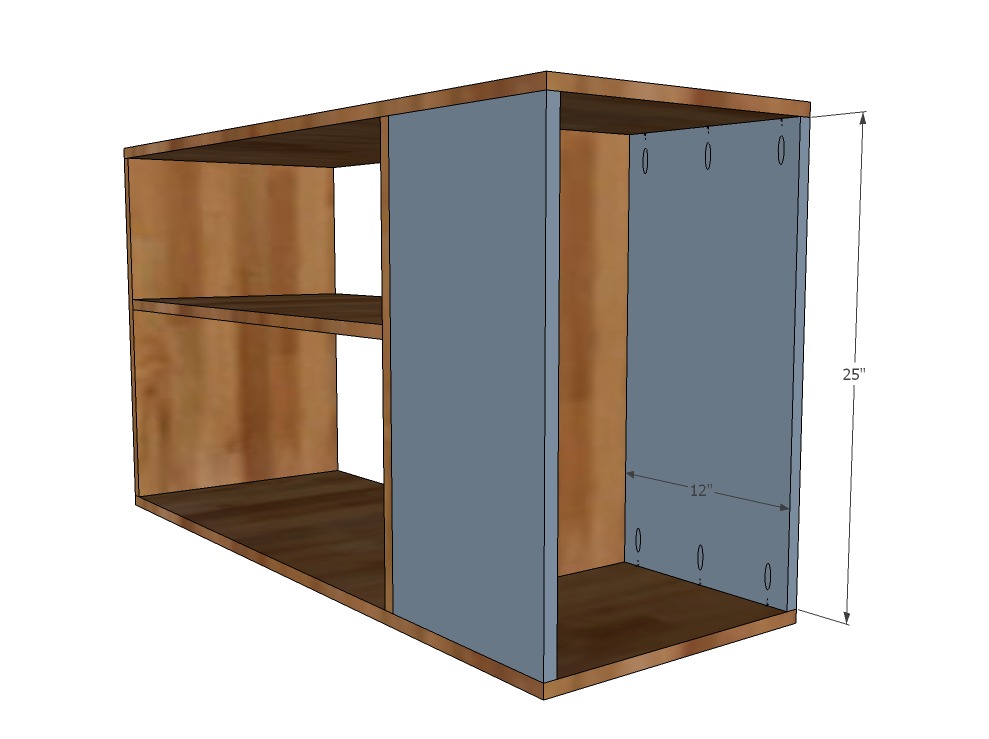
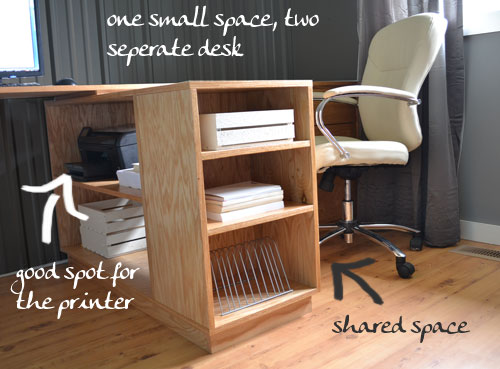
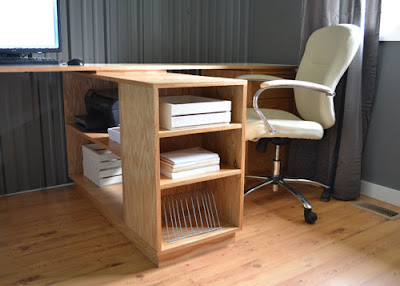
And now the small bookshelf sides - also attach from the back.

Step 5

Step 6

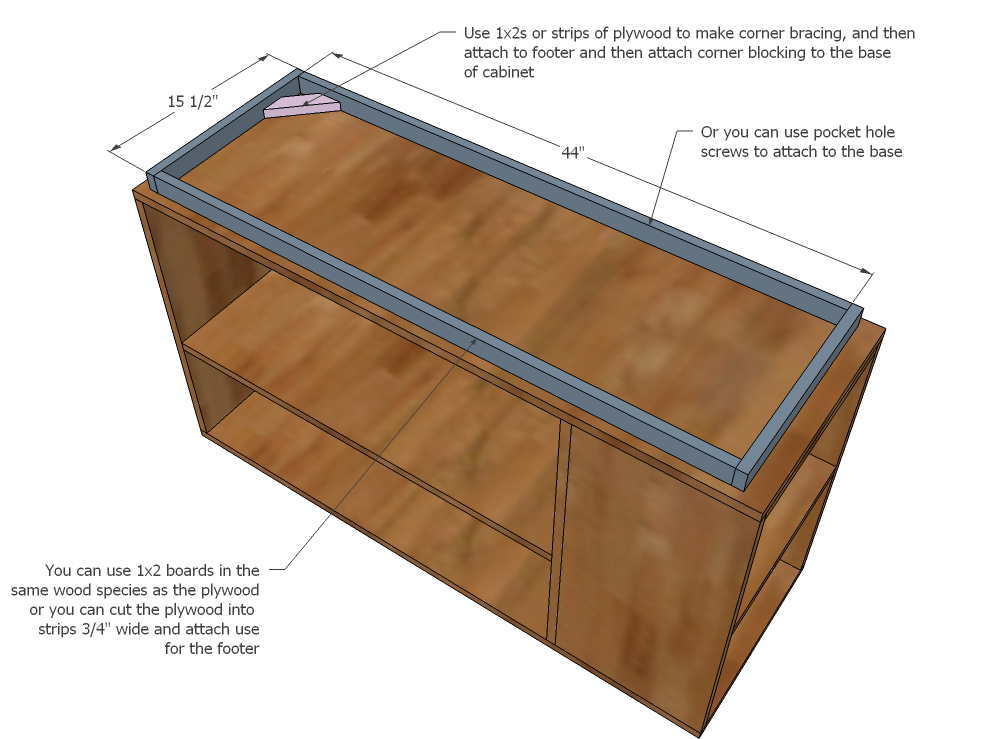
Finally, build your footer, and attach. I used pocket holes to attach mine, but if you don't have a pocket hole jig, you can cut corner bracing at 45 degree angles on both sides, and then attach as shown in the diagram above.

Step 7

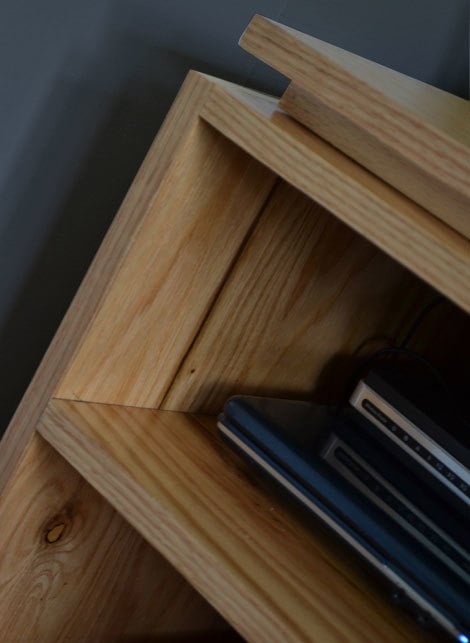
Apply edge banding to all exposed plywood edges as recommended by the manufacturer. The edge banding we used was iron on, and it's very simple to do. We trimmed the excess off with a utility knife and then sanded outside corners for a smooth joint. Results? You can't tell what's the original plywood and what we ironed on!

Finishing Instructions
Preparation Instructions
Fill all holes with wood filler and let dry. Apply additional coats of wood filler as needed. When wood filler is completely dry, sand the project in the direction of the wood grain with 120 grit sandpaper. Vacuum sanded project to remove sanding residue. Remove all sanding residue on work surfaces as well. Wipe project clean with damp cloth.

It is always recommended to apply a test coat on a hidden area or scrap piece to ensure color evenness and adhesion. Use primer or wood conditioner as needed.

Comments

Erica Havey (not verified)

Thu, 06/30/2011 - 14:16

How much did this cost you Ana? Or maybe how much did the whole desk cost if you don't know each individual piece?

Ana White

Thu, 06/30/2011 - 14:25

Hi Erica, for the entire office with desktop (so one bookshelf base, one double bookshelf "fence", and one drawer/file base (plans not yet published and desktop) requires about 3 sheets of plywood. I used PureBond, which runs in the neighborhood of $50 a sheet. Add in varnish, drawer slides, 1x2s (if you used them and not plywood) and hardware, we estimate the entire office to be in the $200 range. That's a steal, considering it's made of hardwood 3/4" plywood, and the plywood is uses soy based glue and is formaldehyde free.

Hunter (not verified)

Mon, 07/04/2011 - 17:38

I am so excited to build this for my office! Do you know when you will be posting the drawer/file base plans?

Beth Mosier (not verified)

Thu, 06/30/2011 - 16:54

I love this. I am trying to make a table/desk for my sewing machine. This is great for this end. What plans would be best for making the other end for a single desk?

Beth

Pam the Goatherd

Fri, 07/01/2011 - 11:04

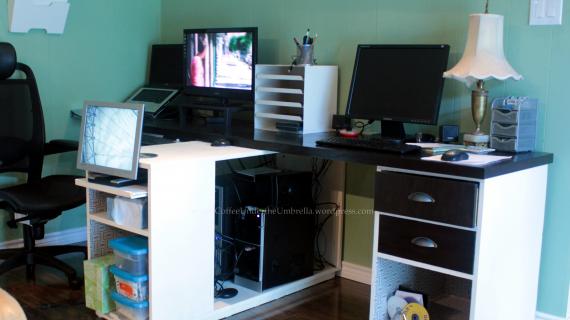
I have been trying to adapt one of your other plans to build this very thing as my media console! I'm glad now that I waited to build it until I finished a couple other projects first. I'm going to make it 24" deep instead of the 17" so it will hold our clunky old-fashioned tv which we use for watching DVDs and ancient VHS videos. The bookcase end will hold my husband's "to go" stuff that he takes out of his pockets when he gets home after work as well as his briefcase. I'm also planning on adding at least one more shelf to each section so we can store all our CDS/DVDs/VHS right under the tv and will also use a shelf as a charging station where we will have ALL of our battery, phone, etc. chargers in one place. I can't wait to get it built and get things organized. Heading to Big Blue next week to buy the wood.

tootspyrus

Fri, 07/01/2011 - 17:29

That is beautiful ! I was trying to draw some plan to make my own working desk at home, but honesty, you rock ! That's what is going to be in my computer room ! Thank you so much

Frequently Asked Questions

Wood Questions

What kind of wood should I use?
Most of our plans use standard construction lumber like pine or fir. It's affordable, easy to work with, and easy to find. It's also rapidly renewing and biodegradable, so a great eco friendly choice!

Can I use hardwoods instead?
Yes—just keep in mind they're heavier, cost more, and can be tougher on tools and harder to join together and finish. I recommend not tackling a hardwood project until after you have built several softwood projects.

What if my boards are warped?
Choose the straightest boards at the store. You can often work around slight warps by cutting them into shorter pieces.

What wood should I use for outdoor furniture?
Use red-toned or pressure-treated 2x lumber for framing, and cedar or cedar fence pickets for the decking. Outdoor furniture should be built like a deck—your local home center can help recommend the right wood for your climate.

Will my wood move or warp after I build?
Potentially, especially in humid climates. Let your wood acclimate indoors before building. Once acclimated and kept in a stable environment, movement should be minimal. Remember, most houses are built using framing lumber - it's all about keeping moisture down indoors.

Cutting Questions

Do I need a miter saw?
A miter saw is great, creating fast, safe, and precise cuts, even for beginners. But most plans can be built with a circular saw and a straight edge. If using a circular saw to cut, take time to practice, and get good at making cuts, before cutting your project boards.

How do I get clean cuts with a circular saw?
Clamp your board, measure twice, cut slow, and use a sharp blade. This takes practice, so spend some time making cuts. I go through becoming proficient at freehand cutting in my course, it is worth taking if you want to master this skill.

Will the store cut my wood?
Yes—most stores will do rough cuts to help you transport your materials home. But from store to store, the quality of cuts could greatly vary.

Joinery Questions

What screws should I use?
We recommend star-head self tapping screws for framing, most common sizes are 2-1/2", 1-3/4". Pre-drill if close to the edge or you find your wood is splitting.

Do I have to use pocket holes?
Pocket holes are the cheapest, easiest and fastest way to do some joints - like edge to edge or a hidden fastener joint. There are other methods, but these can be time consuming and expensive. We recommend using pocket holes as indicated in plans for best results.

How do I keep things square?
Use a speed square and measure diagonals after each step. Always clamp joints before screwing to keep them tight and flush.

Finishing Questions

Stain or paint before or after building?
A quick sand before and a full finish after gives the best results. Pre-finish if you're doing two-tone or detailed finishes.

What type of finish?
Use oil-based or water-based stain. For paint, cabinet-grade latex or enamel works great. High use surfaces on indoor projects should get a coat of polyurethane, I recommend a Helsman or Spar or other flexible poly that won't crack or peel with wood movement. For exterior projects, use a finish suitable for exterior fences.

How to get a smooth finish?
Start with a well sanded project. Sand between coats (220 grit), wipe clean, and apply light coats with a foam brush or roller.

Plan Questions

Can I change the size?
Many people do, and that's the great thing about building your own furniture! But do keep in mind going bigger might mean more supports are required, and often plans are optimized for minimal material waste.

Are these beginner-friendly?
Yes—plans are written with simple tools and clear steps in mind, with every effort to make plans as simple as possible.

Can I sell what I build?
Absolutely! Just don’t resell or repost the plans themselves.

General Questions

What tools do I really need?
A drill, circular saw, tape measure, square, and a few clamps will get you through most projects.

Do I need a workshop?
Nope! A driveway or small patio is plenty to get started, just make sure you have a level place to work. If you find you are building several projects a year, creating a small workbench is a great way to store tools and have a dedicated workspace.

What if I mess up?
Wood filler, sanding, or flipping boards goes a long way. Mistakes are part of the process!

What can I do to make my projects look more professional?
Start with straight boards, make accurate cuts, clamp all joints, and line up everything neatly. Sand thoroughly, use a neutral finish, and apply it in light coats for a clean look.

I've never built anything before. Where should I start?
Start with a few smaller softwood projects to get hands-on experience. Or if you're tackling a big project, buy a little extra lumber and practice your cuts and joints first. If possible, work with someone who has a bit of experience.

Care & Maintenance

How long will my furniture last?
With good joinery and regular care, your DIY furniture can last for decades. I have pieces in my own home that are over 20 years old and still going strong! One of the best parts about DIY furniture is that it’s easy to repaint, refinish, or repair—so your projects can grow and adapt with you.

How should I care for outdoor furniture?
Lightly pressure wash or hose it down once or twice a year. Tighten screws and reapply finish as needed to protect it—just like a deck or fence. A little upkeep goes a long way in extending the life of your furniture.

How about indoor furniture?
Regularly dust or wipe with a damp cloth. If it starts to look worn, a light sanding and touch-up paint or stain can refresh it in no time. DIY pieces are meant to be durable and fixable—so don’t be afraid to give them some love now and then.

Want to Build with Confidence?

Check out my ebook: 12 Skills to Build Your Own Furniture
It walks you through the core skills every builder needs—measuring, cutting, joinery, and finishing—so you can build beautiful furniture that lasts.

Still Have Questions?

Email us anytime at [email protected] and we’ll be happy to help!