

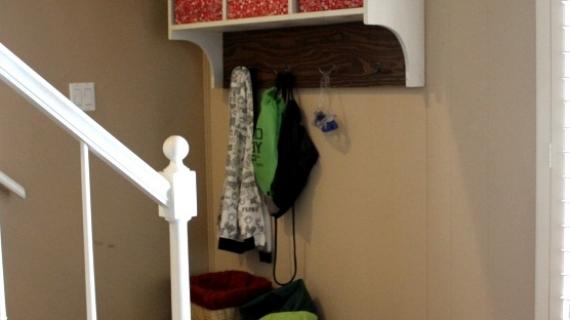
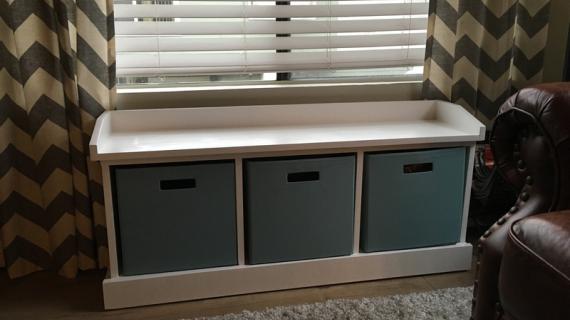
Simple entryway organizer bench and shelf with hooks set - Free plans by ANA-WHITE.com
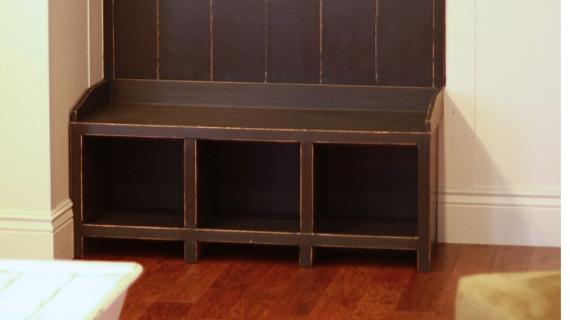
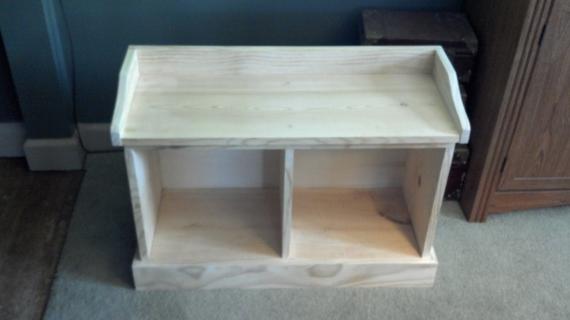
Big solution for a small space! This entryway shelf and bench combo is a favorite because it stores so much, looks beautiful, and is an easy build!
All 1x material - so no ripping plywood. And no Kreg Jig required (although you can use yours if you have one!)
Free plans follow. Please share a photo via brag post if you build.
Thanks so much, Ana
NOTE: This plan has been updated. If you need the old version of this plan, it is available here.
Preparation
Shopping List for the Bench
1 - 1x12 @ 8 feet long - cut the 46-1/2" and 48" pieces from this
1 - 1x12 @ 6 feet long
2 - 1x4 @ 8 feet long
Shelf Shopping List
1 - 1x8 @ 8 feet long - cut the two 46-1/2" pieces from this
1 - 1x8 @ 10 feet long
1 - 1x2 @ 6 feet long
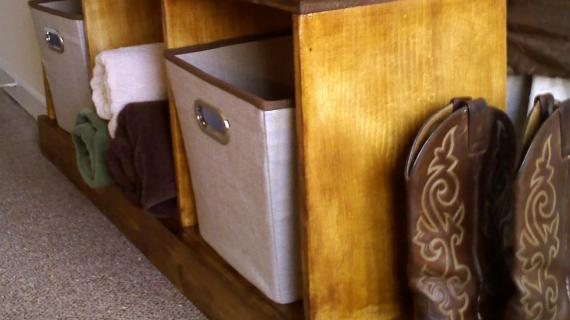
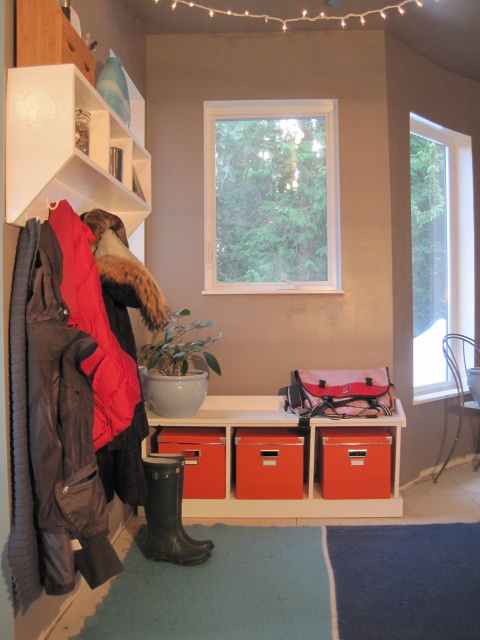
Backs for both shelf and bench
1 - 1/4" plywood @ 48" x 24"
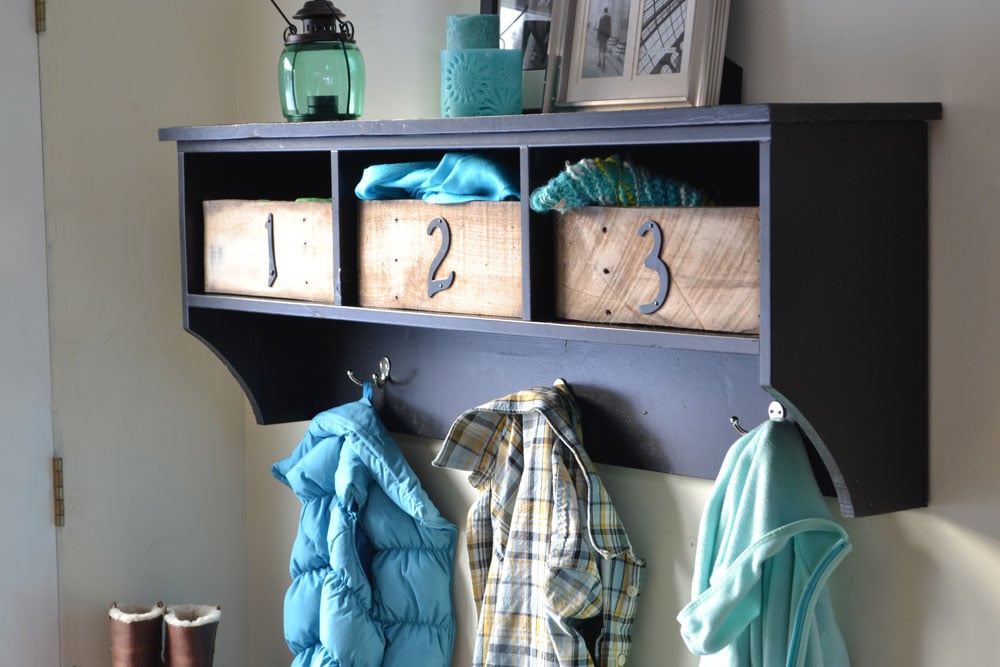
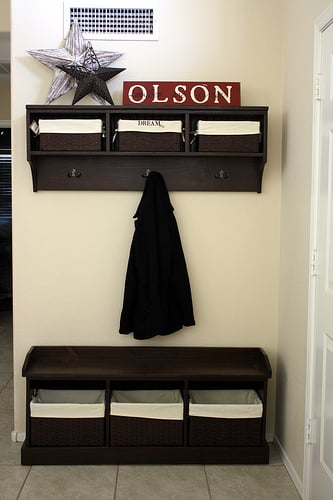
3 Double Hooks
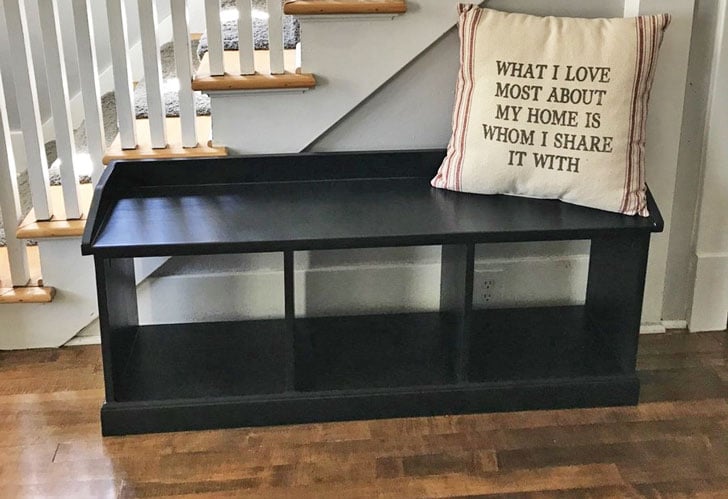
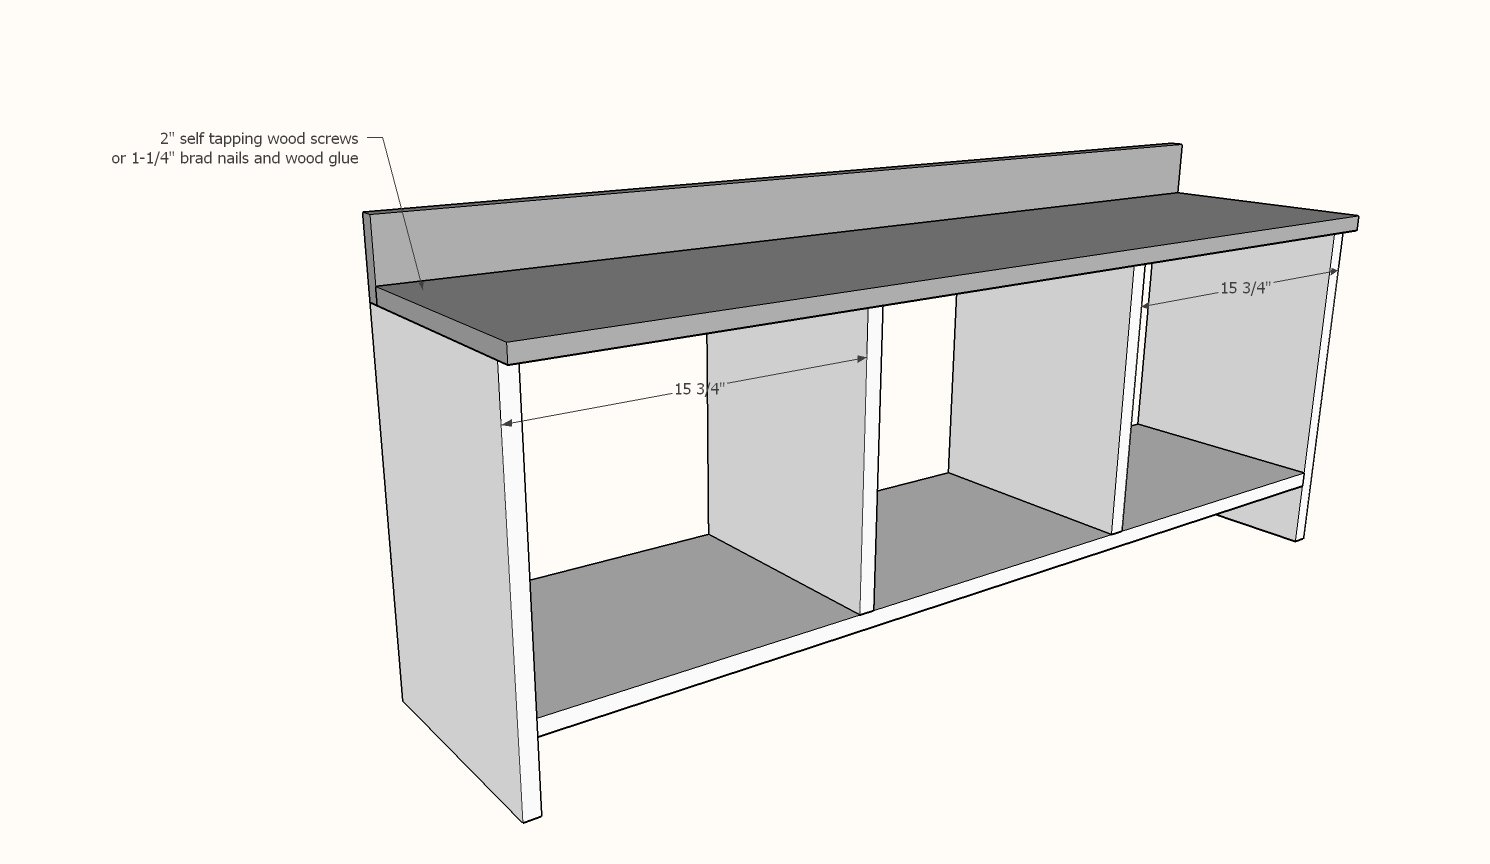
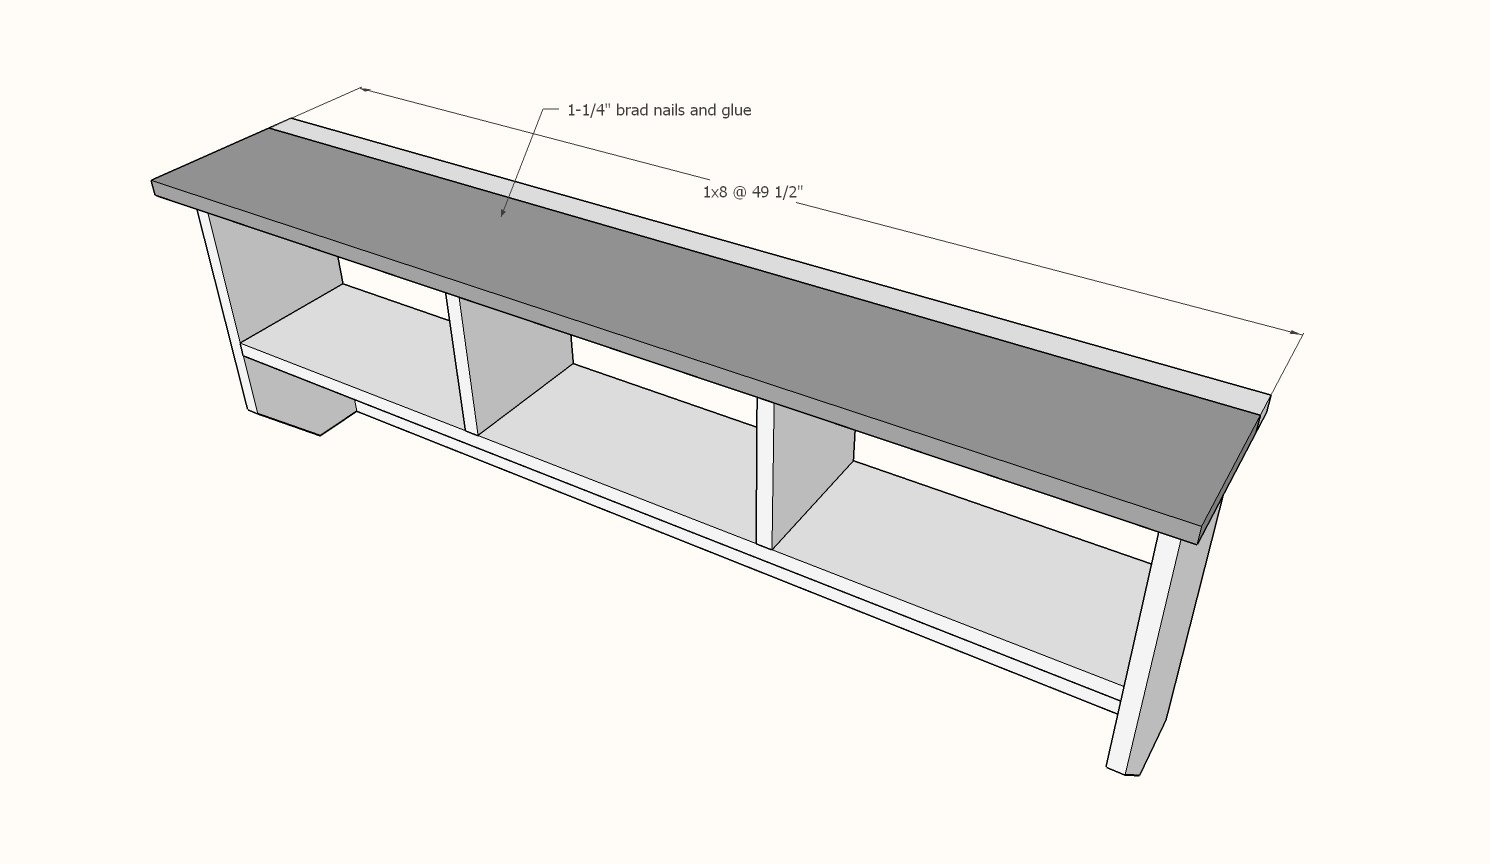
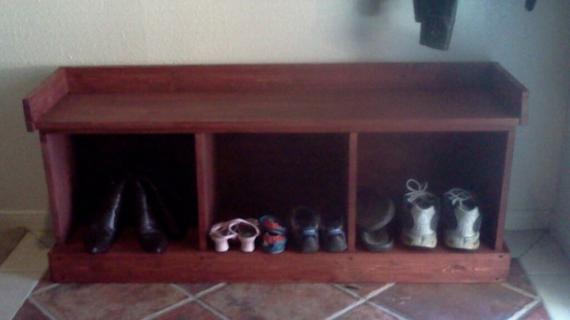
BENCH
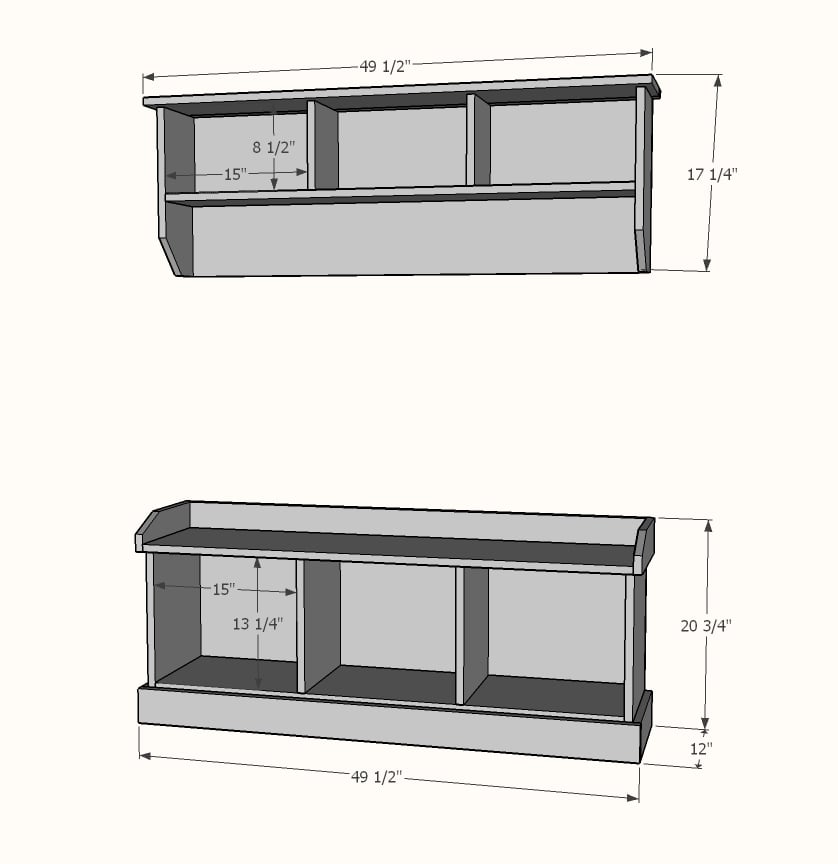
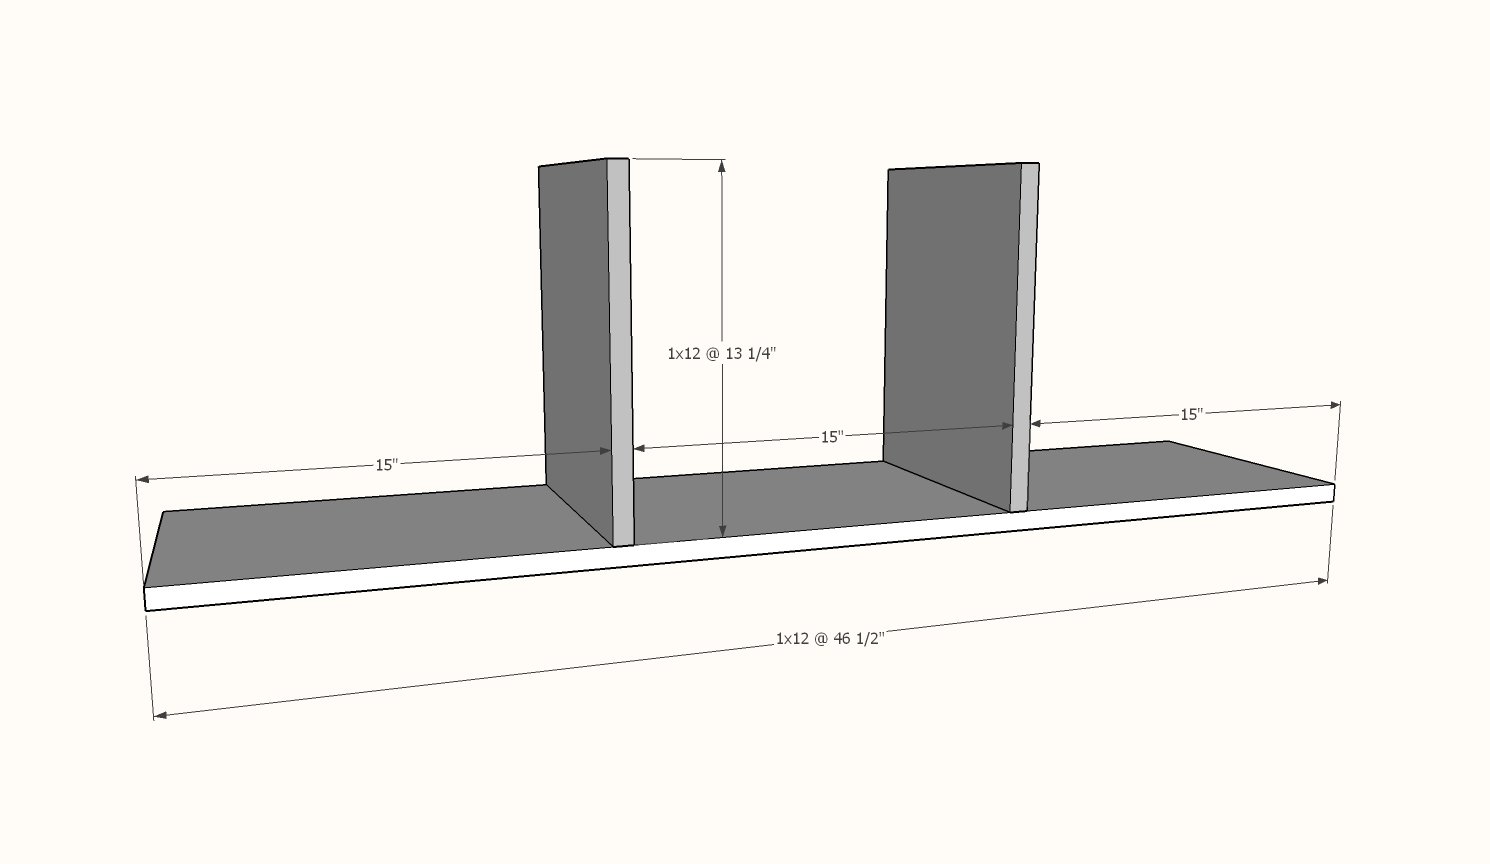
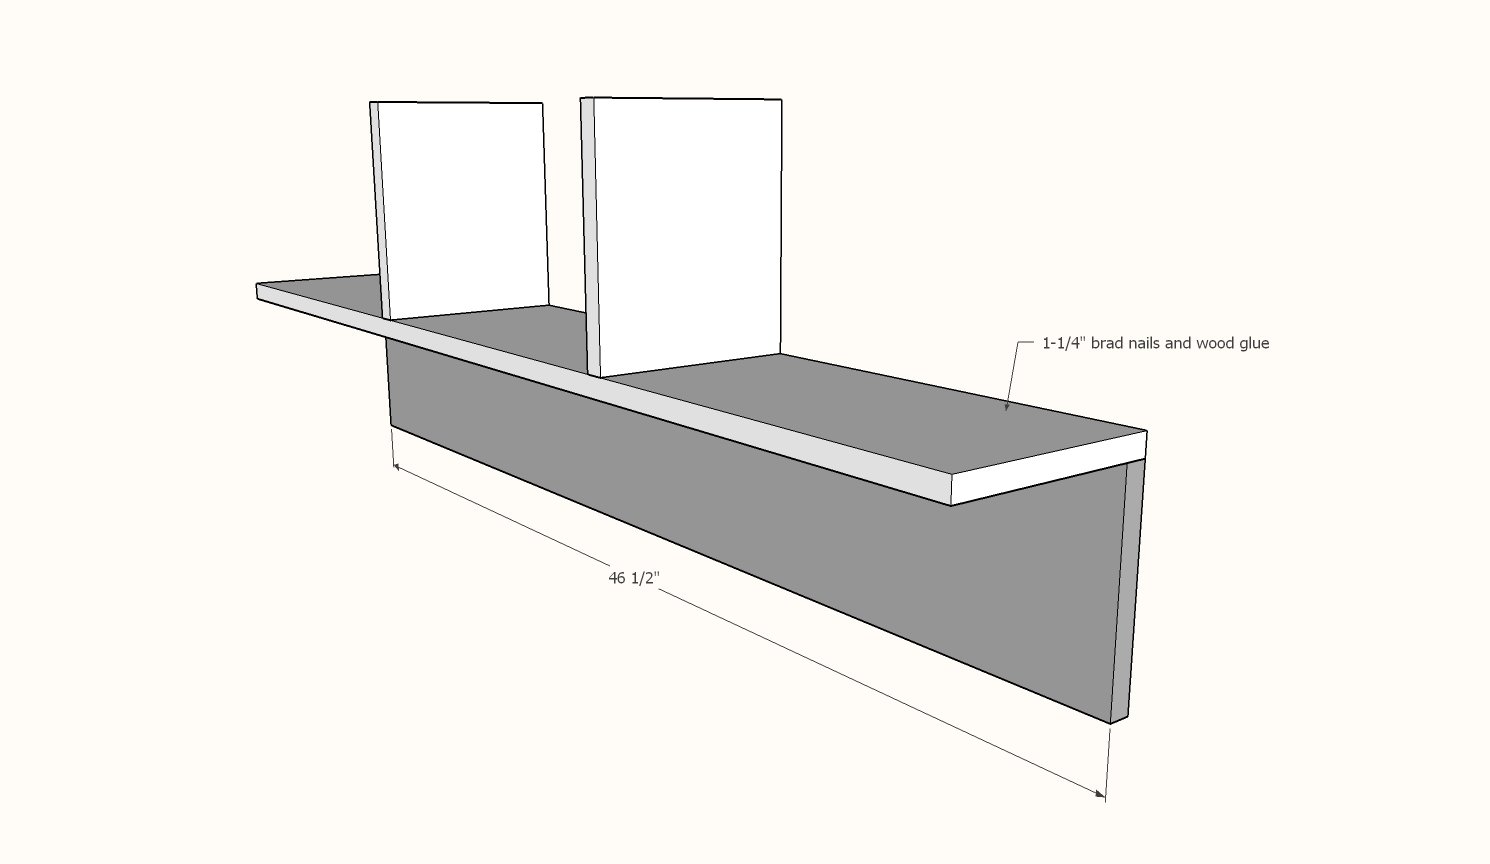
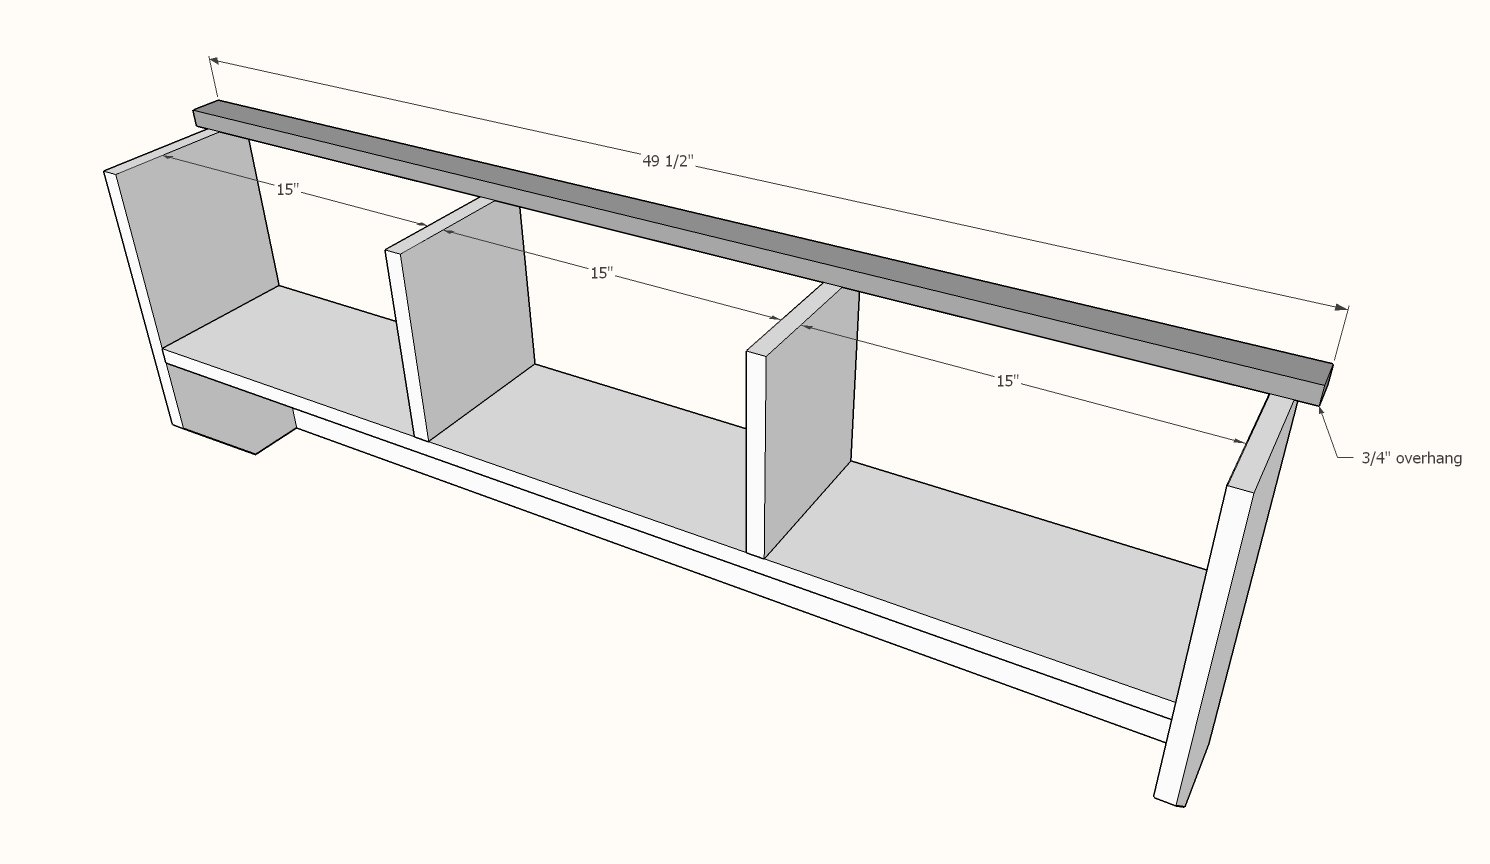
1 - 1x12* @ 46-1/2" - bottom
2 - 1x12* @ 13-1/4" - dividers
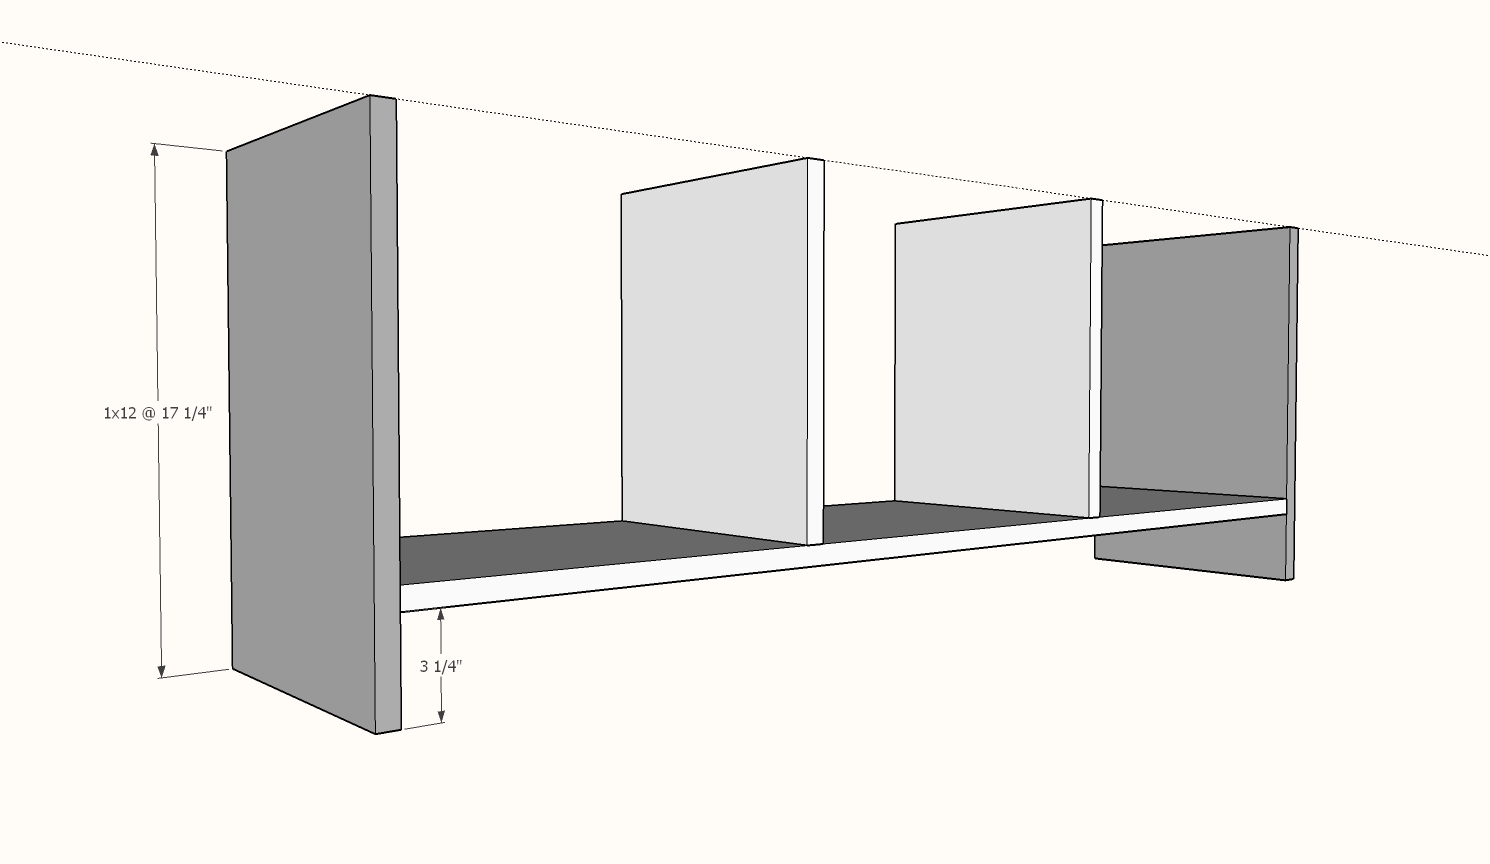
2 - 1x12* @ 17-1/4" - sides
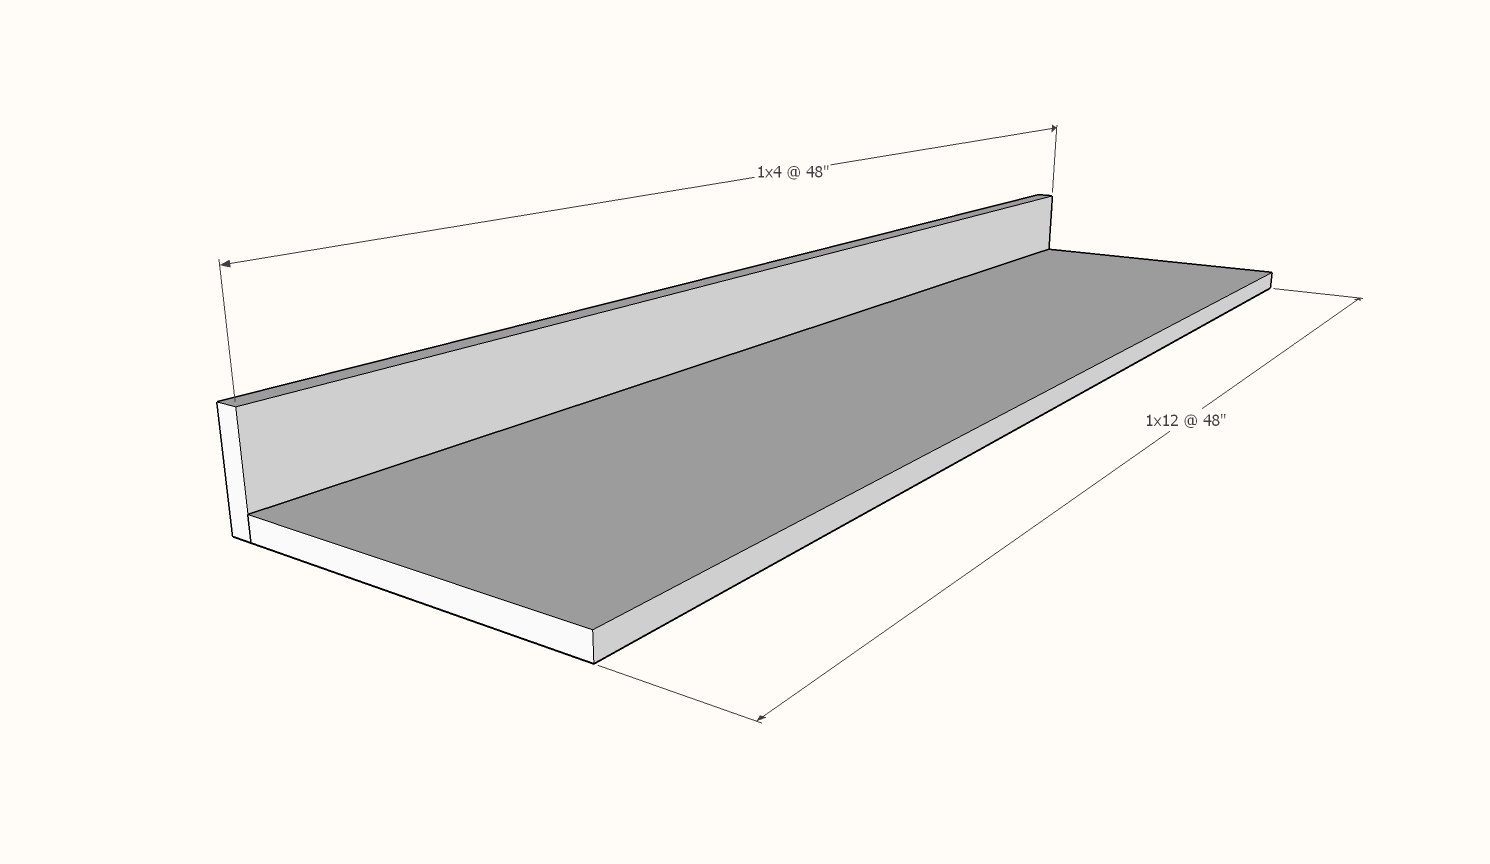
1 - 1x12* @ 48" - top
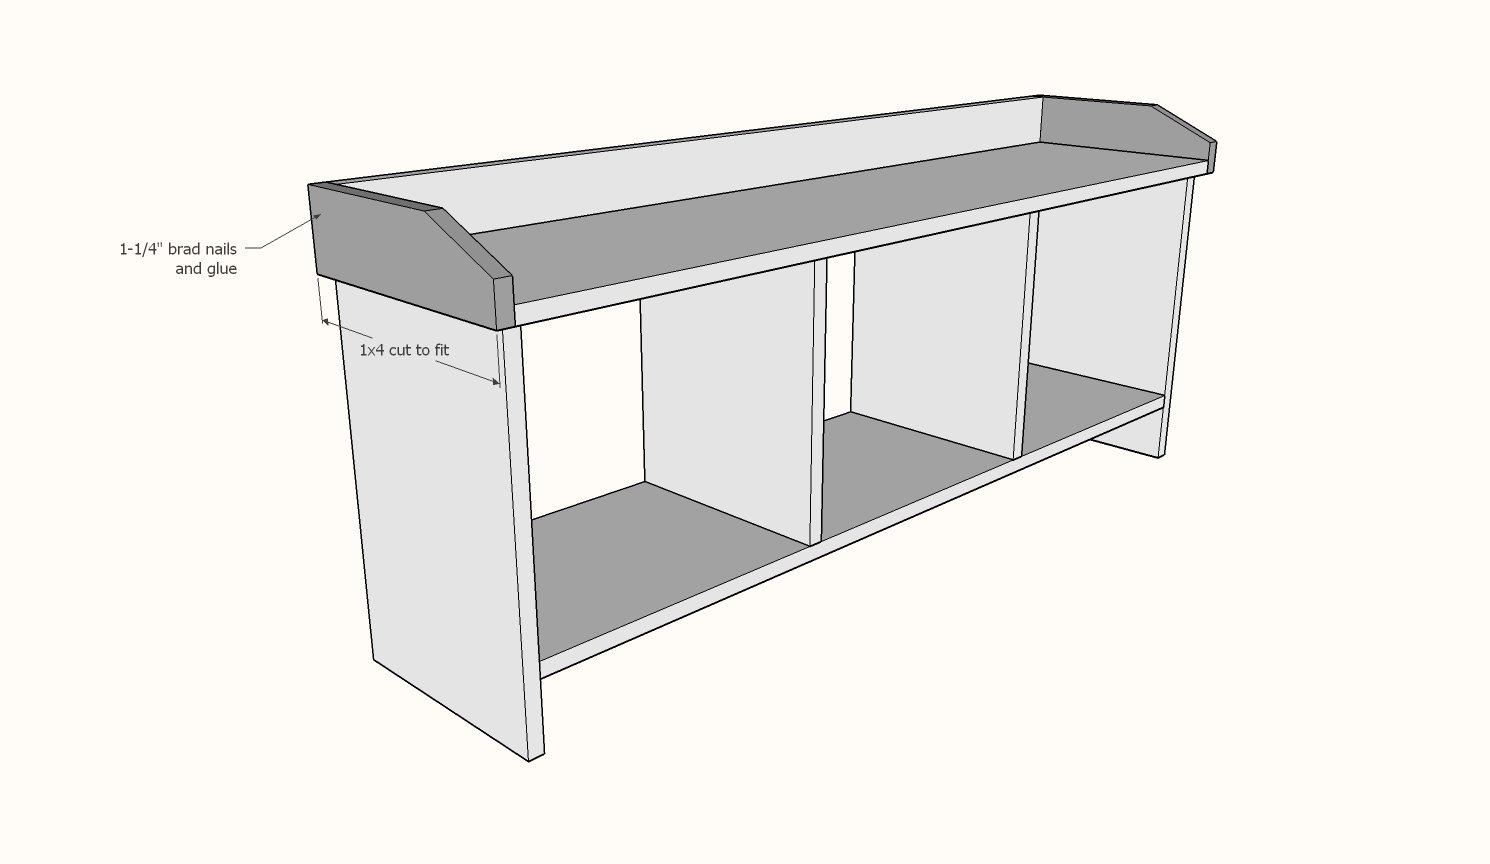
1 - 1x4 @ 48" - top back
2 - 1x4 @ ~12" - top sides - CUT TO FIT
2 - 1x4 @ ~ 11-1/4" - footer sides - CUT TO FIT
1 - 1x4 @ 49-1/2" - footer front - CUT TO FIT
1 - 1/4" plywood @ 14" x 48" - back
*The bench built with 1x12s will be pretty narrow. You can easily make the bench deeper by substituting a wider width board for all the 1x12s, for example a 16" wide project panel. Just substitute all the boards with the *
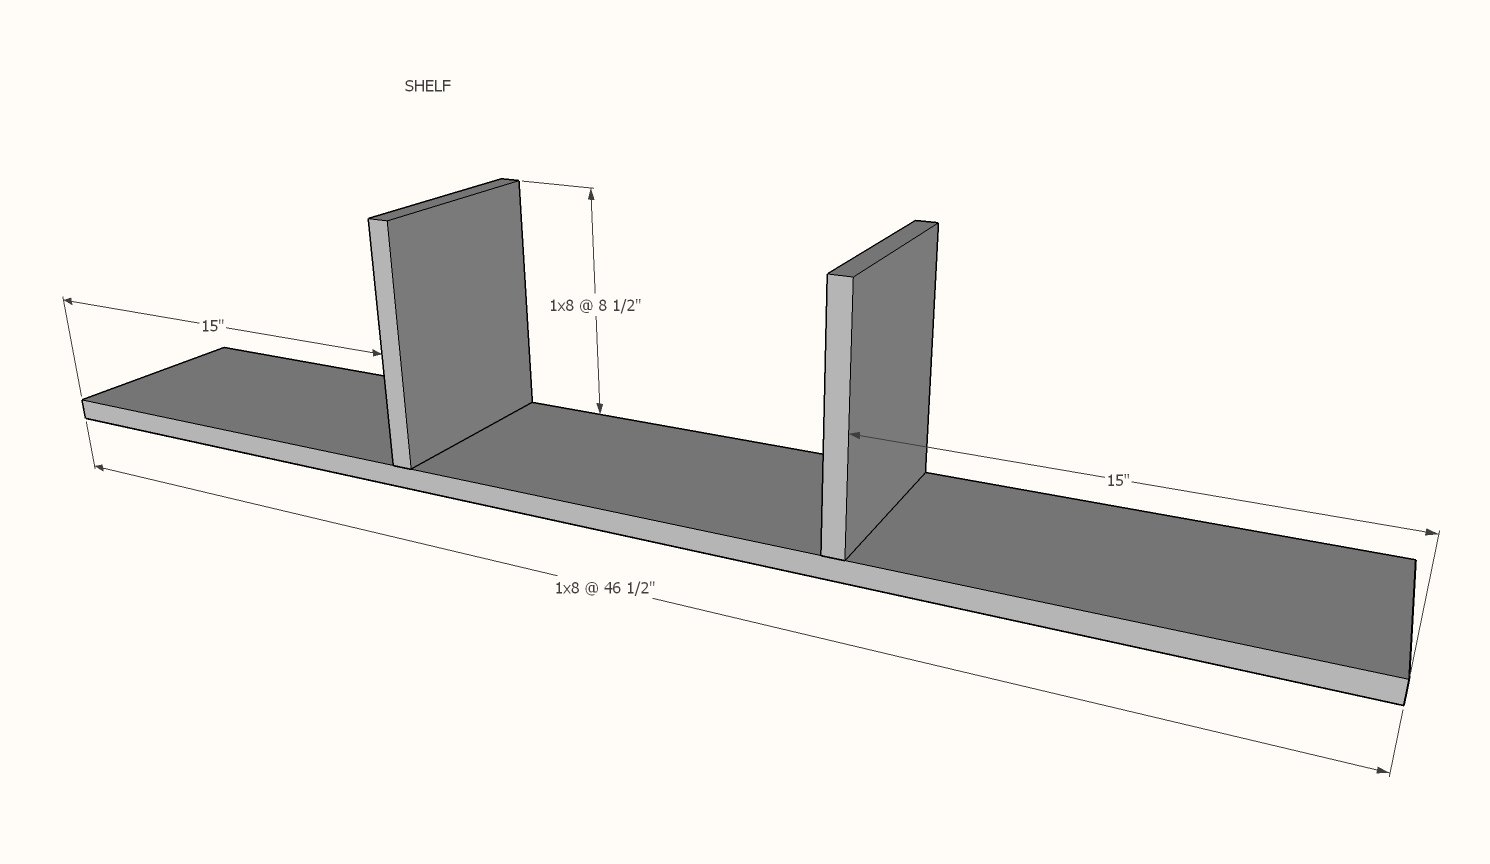
SHELF
2 - 1x8 @ 46-1/2" - main shelf/back
2 - 1x8 @ 8-1/2" - dividers
2 - 1x8 @ 16-1/2" - sides
1 - 1x2 @ 49-1/2" - top back
1 - 1x8 @ 49-1/2" - top front
1 - 1/4" plywood @ 10" x 48" - back


Instructions
Step 1
BENCH: Since people will be sitting on the bench, I recommend attaching the main boards (the 1x12s) with either 2" self tapping wood screws or 1-1/4" pocket hole screws (drill holes on the 3/4" setting) and glue.
The trim boards (the 1x4s) can be added with 1-1/4" brad nails and wood glue)
Measure and mark out the dividers and attach.
Step 2
Attach sides to the bottom.
Step 3
1-1/4" nails to attach 1x4 to back of seat.
Step 4
Attach seat to the base with 2" screws or pocket holes.
Step 5
Measure and cut to fit the 1x4 trim boards.
Attach all with 1-1/4" brad nails and glue.
Step 6
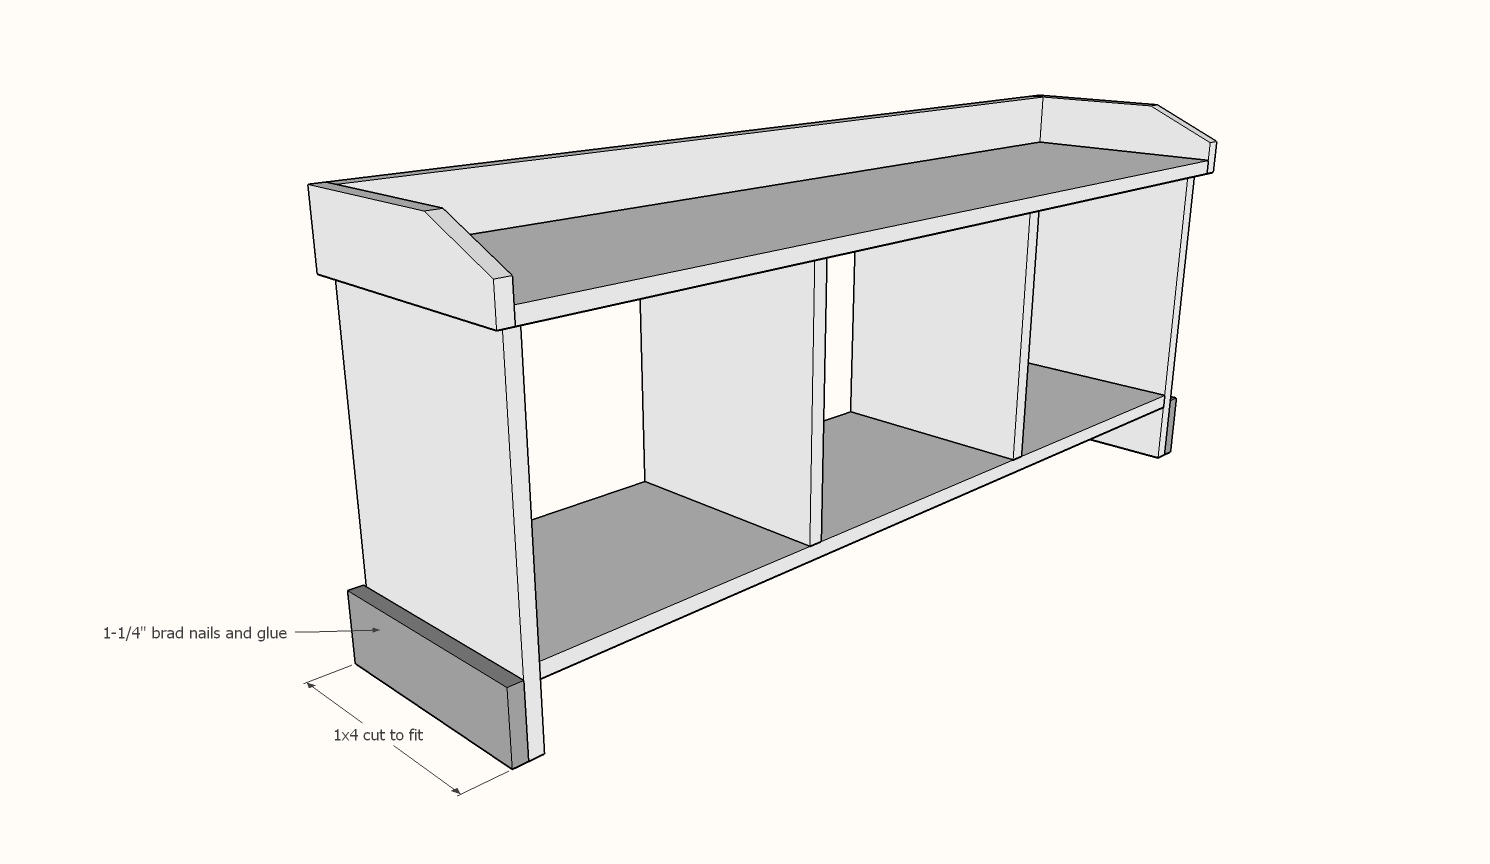
Measure and cut the sides.
Step 7
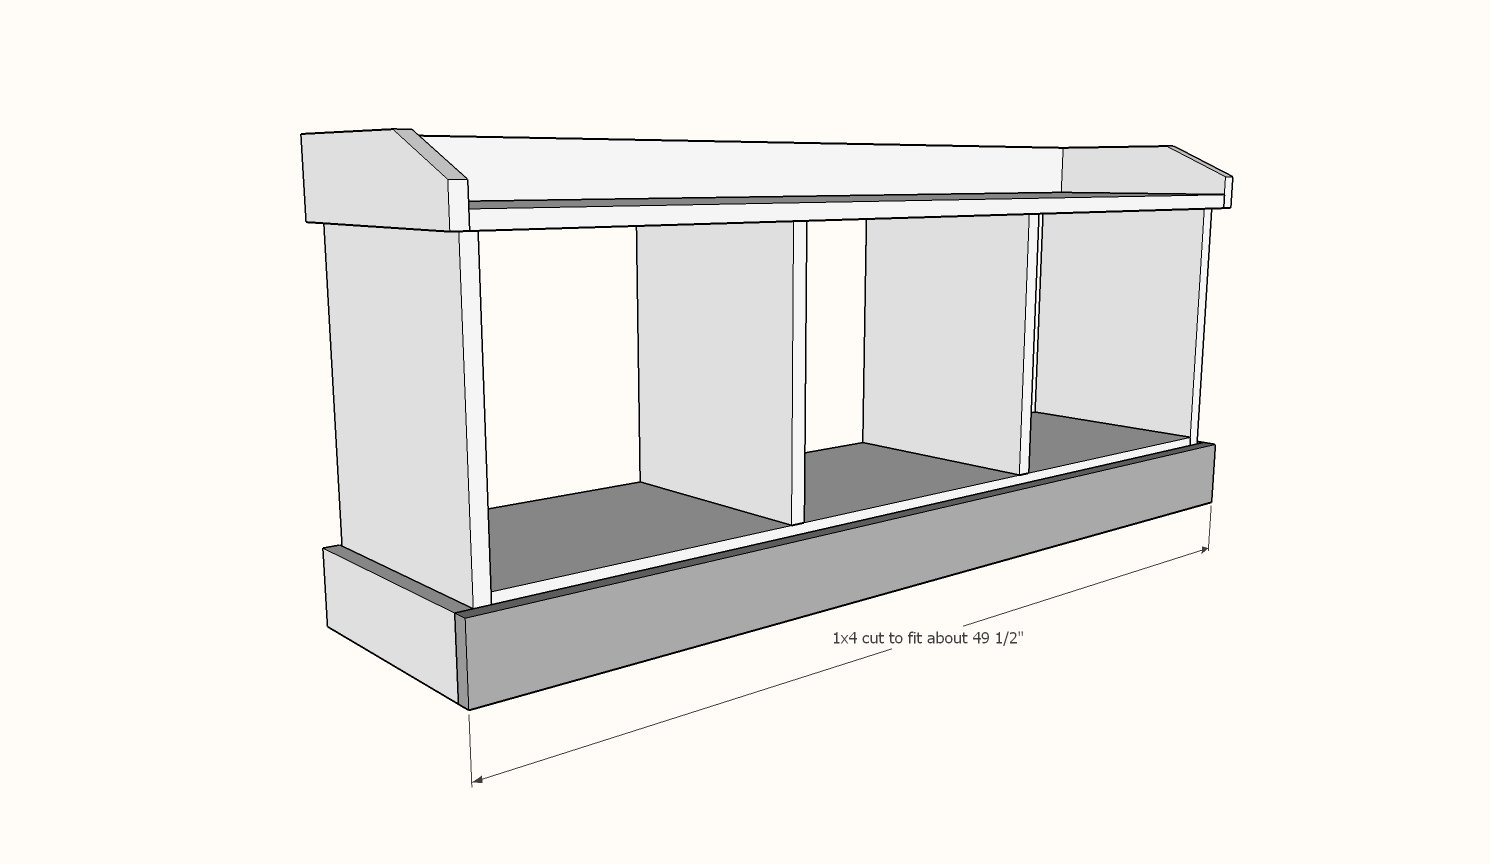
Repeat for the front footer.
NOTE: If you are having trouble attaching the footer in the center to the bottom 1x12 you can simply add a scrap 1x4 block, flat nailed to the underside of the bottom shelf, flush to the front edge. You don't need the 1x4 all the way down, just in the center area.
Step 8
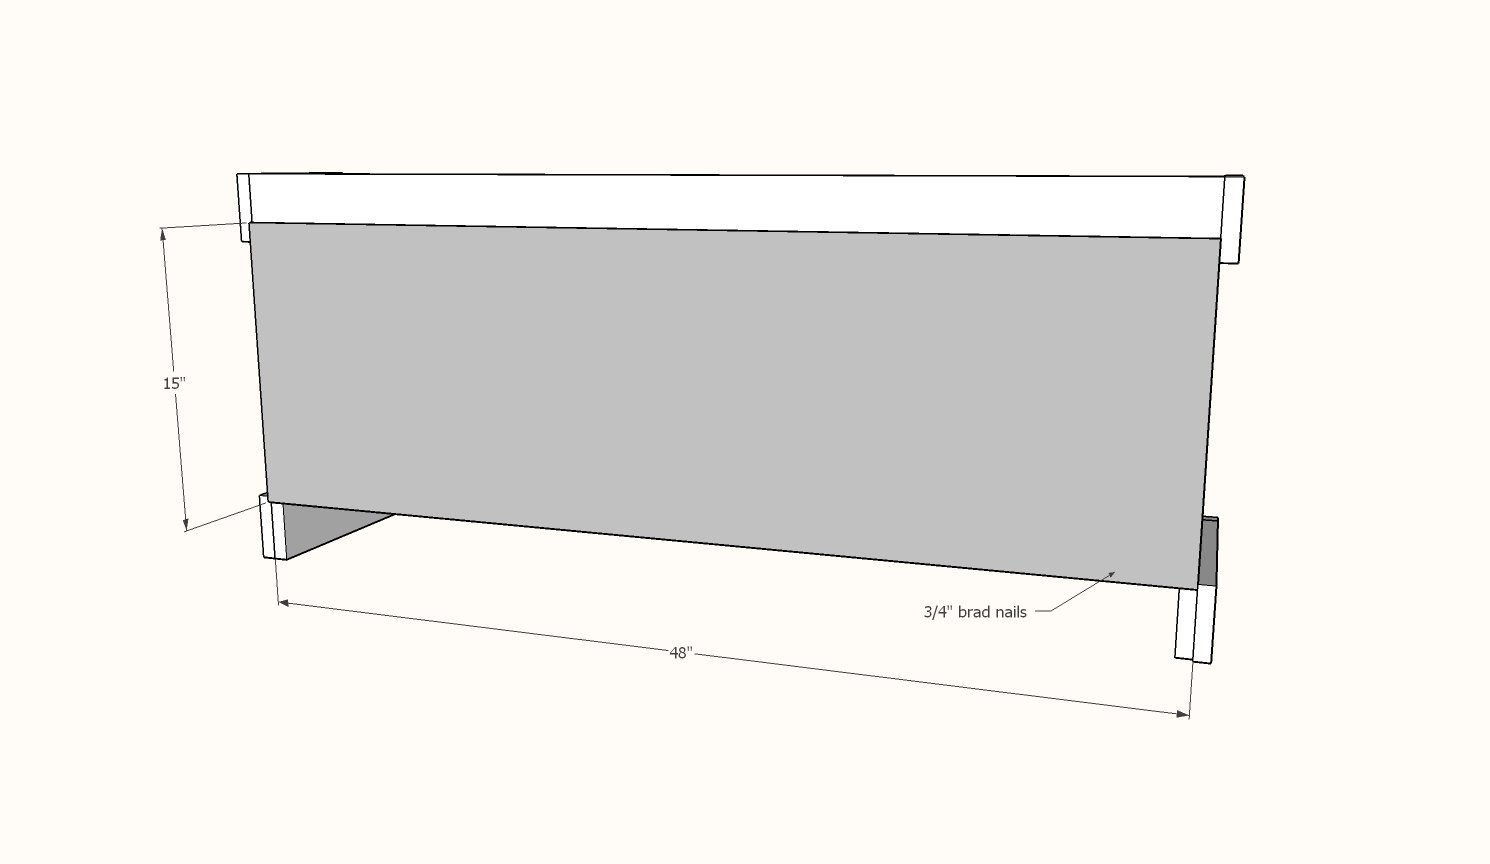
Cut back with circular saw. Save scrap for the shelf back.
Use 3/4" brad nails to attach back.
Step 9
The shelf can be nailed together. Use glue and 1-1/4" brad nails.
Step 10
Nail and glue together.
Step 11
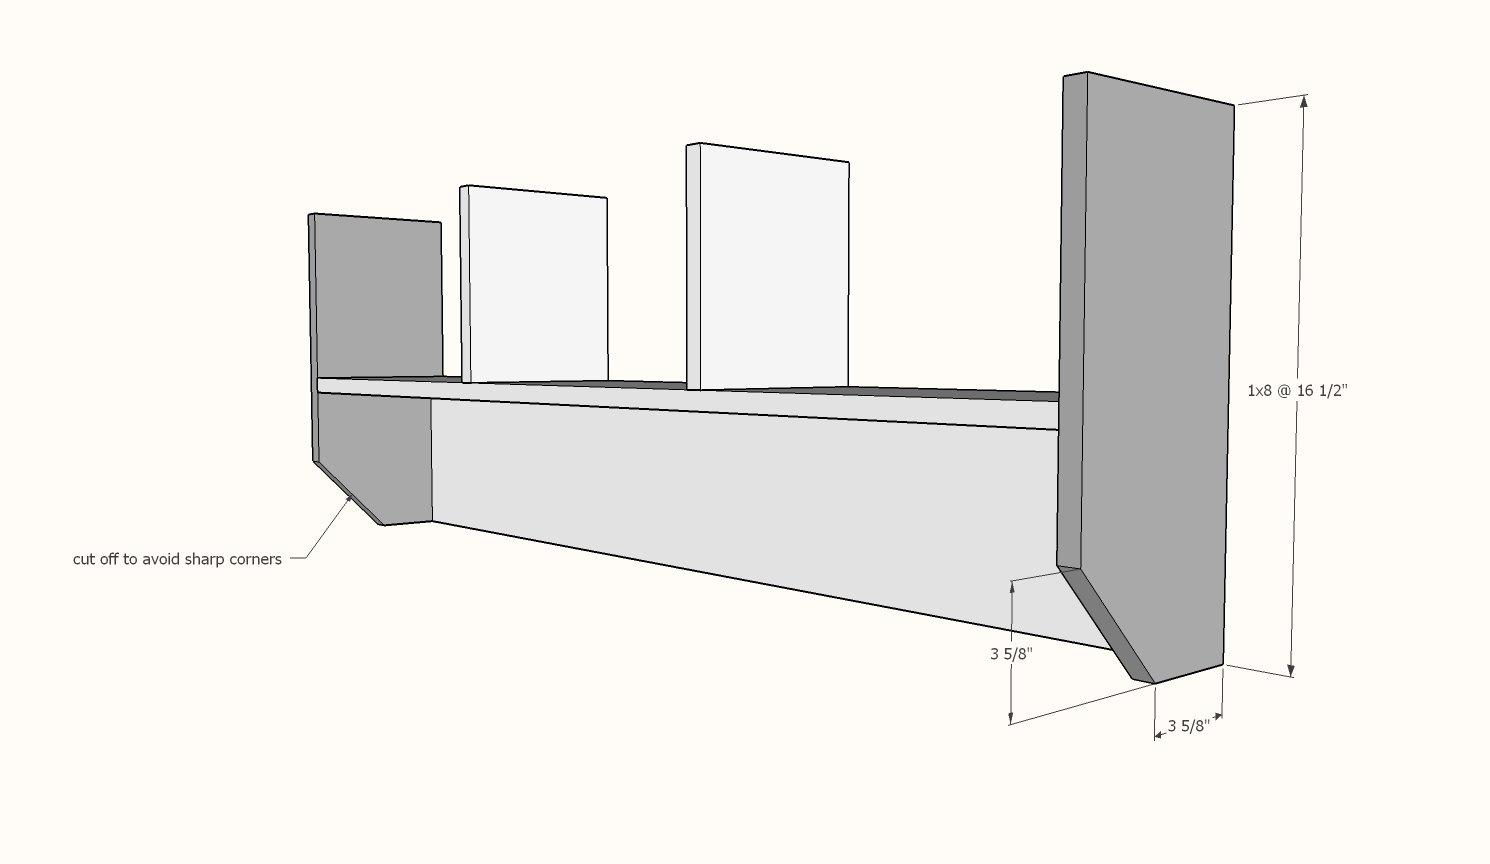
Cut sides off with circular saw at an angle to prevent a sharp corner at eye level. Attach to the project with nails and glue.
Step 12
Attach top back with 1-1/4" brad nails and wood glue.
Step 13
Repeat for the front of the top.
Step 14
Attach back with 3/4" brad nails and wood glue.
Attach hooks to the hook board.
To hang the shelf, locate a stud in the wall and screw through the 1x8 hook board into the stud in the wall. You can hide the hanging hole with wood filler and paint/stain.


Comments
Natalie (not verified)
Fri, 01/08/2010 - 11:24
I can not believe this....I
I can not believe this....I just sent this same photo of this bench and shelf to my dad to make for me. I was giddy that I found the plans on your site! Thank you! Thank you!
Casey (not verified)
Fri, 01/22/2010 - 05:00
Thank you so mcuh for these
Thank you so mcuh for these plans. I have been looking all over. I cannot wait to get started and I love your site! I recently got some new tools from my husband for Christmas and can't wait to use them.
Nancy (not verified)
Sat, 01/23/2010 - 10:10
Am headed to Lowe's this
Am headed to Lowe's this weekend to purchase some wood. Will post the results here! Thx for sharing your plan!
Nancy
Karen (not verified)
Sat, 01/23/2010 - 21:42
Hi Ana, I'm preparing a cut
Hi Ana, I'm preparing a cut plan for the bench and wonder about the 2x12 for the sides and vertical dividers. In the pic they sure don't look 2". Can you clarify?
catcar
Sat, 09/24/2016 - 14:36
Not sure where you're seeing 2x boards - they're all 1x boards
Hello. They're all 1x boards. There's an extra board at the end of the cut list that isn't needed/used. Please note that 1x boards are actually 3/4" thickness.
catcar
Sat, 09/24/2016 - 15:04
I see the plans were updated...this was an old post
Hi. After I replied to a post, I kept reading on (the replies aren't always indented under the original questions) and noticed the plan used to mention 2" boards. This has been fixed a long time ago. Sorry for any confusion.
Ana White (not verified)
Thu, 01/28/2010 - 07:57
Let me check on this, but the
Let me check on this, but the bench is made of only 1x12 sides, no 2x boards. You are correct.
Bill H (not verified)
Wed, 02/10/2010 - 13:22
jdreier, looking at the cut
jdreier, looking at the cut list the bench is going to be around 50" long, maybe a little more.
the michalski's (not verified)
Wed, 02/10/2010 - 15:08
i am so excited to find your
i am so excited to find your blog and these plans! i have been wanting this storage bench for a LONG time. i have a couple questions though...first, what kind of wood did you use to make the bench? second, i see it notes to use plywood on the back, but from the pictures i see beadboard on the inside of the cubbies. did you nail that to the plywood and then attach to the back? thanks so much for the help! i can't wait to make one of my own!!
Ana White (not verified)
Wed, 02/10/2010 - 18:43
The bench measures
The bench measures approximately 49" wide.
I did use beadboard on the back, 1/4" thick. You can usually interchange plywood beadboard with beadboard. My bench is made of simple pine boards.
Anonymous (not verified)
Thu, 02/18/2010 - 06:33
This is fantastic we need a
This is fantastic we need a bench and shelf/coat rack for our front hallway. I am going to be daring and try to build this without my husband.
I see you have a cut list for both but do you have a buy list?
It may be a silly question, sorry new to the whole built it myself:)
the michalski's (not verified)
Thu, 02/18/2010 - 17:56
ana, i have another question.
ana, i have another question. what kind of hardware did you use to assemble the bench? screws, nails, wood glue? thanks so much for the tips, i am trying to convince the husband i can do this by myself!!
Ana White (not verified)
Thu, 02/18/2010 - 18:49
Hi, I used wood glue and
Hi, I used wood glue and finish nails, 2" long. The piece has been in my entry way for several years, and we have hand no structural problems. You could also predrill and screw if you do not have a pnematic nailer. I will try to get to a materials list at some point.
Wade & Nikese (not verified)
Sun, 02/28/2010 - 06:43
LOVE the site! Bought the
LOVE the site! Bought the wood yesterday to build the bench. A few comments to fellow builders. Karen is right, the online instructions call for 1x12 boards but when you print them it lists 2x12 boards; I bought 1x12's. Also the wood for the project cost me $95.63 before tax from Lowe's so fellow builders have an idea on the cost. Great thing about Lowe's is that you can purchase the wood online and it will be ready for pickup within 30 minutes! This was my wood purchase list: 1-1x4x6, 2-1x12x8, 1-1x4x8, 1-1x12x4, and one piece of plywood (didn't know what type so bought the best looking for the cheapest price; cost $10.47). All pine boards as Ana has indicated. Hope this helps someone else out!
Ana White (not verified)
Sun, 02/28/2010 - 07:53
Hi all not sure where the
Hi all not sure where the 2x12 comes in (did fix a typo earlier) but this bench and shelf is made of only 1x boards. Thanks for catching this, Ana
Jo (not verified)
Mon, 03/01/2010 - 07:29
HI Ana,My husband and I made
HI Ana,
My husband and I made this yesterday!!! Will share pics soon but I have a question, how did you notch out that curved part of the shelf?
Thanks!
Ana White (not verified)
Mon, 03/01/2010 - 08:23
I use a jigsaw to cut out the
I use a jigsaw to cut out the arches in the bottom bench and the shelf sides. Just get a round object or a protractor and trace out your desired pattern and cut. I like to cut one, then use the scrap as a pattern to cut the other.
Danielle (not verified)
Tue, 03/09/2010 - 19:25
Hey Ana! I love your blog and
Hey Ana! I love your blog and plan on building a bunch of different things when I finally move in a few months.
I want to build a window seat/bench and I was thinking I could use this plan if I alter it enough. I'm not sure on the width off the top of my head, but it's 6-7 feet long.
Do you have any advice on altering this to work as a window seat?
This is the space I'm hoping to use it in.
http://www.facebook.com/photo.php?pid=31048798&l=580881afe5&id=14815684…
Chatty Chassee (not verified)
Sun, 03/14/2010 - 09:46
I know that I need to hang
I know that I need to hang the shelf from studs on the wall,but is there directions or an easy way where to drill the holes in the shelf to hang it? I looked at previous readers pictures and did not physically see any screw holes, but wanted to know where I should put them. Thanks & I just love your blog!
Kathy (not verified)
Thu, 03/18/2010 - 03:46
I printed the instructions
I printed the instructions for this bench a couple of weeks ago and told my husband that I wanted one for our entry, which we are in the process of redoing. He never made any comment about it then, but when I got home from work last night, there it was, sitting in the entry with a vase of daffodils sitting on it! Now I just have to decide what color to paint it, get it painted and send you a picture! It is perfect!
Gotta print off some more instructions . . .
Blessings.
Ana White (not verified)
Thu, 03/18/2010 - 09:33
Two ways of securing to the
Two ways of securing to the wall would be to hang heavy duty picture hanging hooks on the back and secure the hooks to screws into the studs. Another method is to screw at the bottom of the cubbies, where you will not be able to see, directly into the studs in the wall. Or screw under the hooks where the hook hardware would hide your screws.
Lu (not verified)
Thu, 03/25/2010 - 09:12
I am dying to make this
I am dying to make this bench, but I'm concerned about the cost, this will be the first thing I have ever tried to build. Is there any way to make the wood more affordable, can I use something other than pine with the same results. I plan on finishing it in a dark cherry.
Kara (not verified)
Mon, 04/26/2010 - 02:50
Hi Ana!I am a newbie to your
Hi Ana!
I am a newbie to your site, and finished building my first piece, this bench, this past weekend. It was seriously simple!! I did not post step by step instructions in my blog because there's no way I could've made it any easier or more detailed than you did.
I did make a few minor mistakes, but in looking back through the instructions, I'm not sure where I got off track. My edges for the top of the bench were off by 1/4th inch. No biggie, I just trimmed them down and sanded!
Because I can't figure out how to upload a picture or send you an email (I'm not a morning person, I'll blame it on that), I'm just going to send you a link to my blog for pics. It's here: http://mekhart.blogspot.com/2010/04/bench.html
Thank you so much for posting all these plans. I'm hoping to make the stratton storage daybed this weekend.
To Lu: I bought pine wood at Home Depot for this project for $50. Make sure you're smart with what size pieces (longer ones typically cost less and can just be divided) and it shouldn't cost that much!
Thanks again Ana! You're awesome!
Chatty Chassee (not verified)
Fri, 05/07/2010 - 18:42
I made this shelf and bench
I made this shelf and bench and am wondering where you all get your baskets that fit? I am looking for light tan colored baskets and am having a heck of a time trying to find ones that all match and fit! I have tried Michaels, hobby lobby, big lots, target, walmart and even searched online, but I refuse to pay the amount that pottery barn sells them for!
Jo (not verified)
Sat, 05/08/2010 - 04:07
@Chatty I had the SAME
@Chatty I had the SAME problem. I finally found these containers to fit so I just got them even though I would've liked baskets instead.
http://www.containerstore.com/shop/closet/drawerOrganizers?productId=10…
Paul Rosenthal (not verified)
Mon, 05/10/2010 - 18:39
These look great. There are
These look great. There are two pieces of the same collection made to fit into a corner. Any ideas on where i could find plans for that?
Rob (not verified)
Wed, 07/14/2010 - 12:39
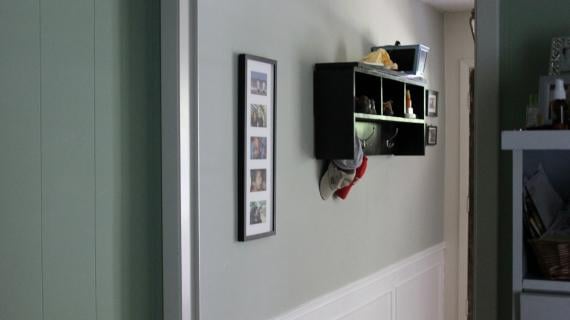
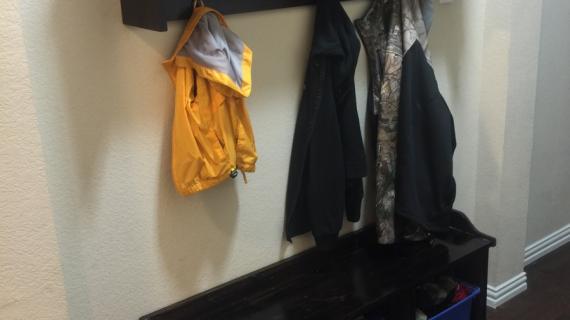
Hi everyone. The backing of
Hi everyone. The backing of the second photo does not look like it's just plywood. It looks like a number of single boards.
Ana, can you please tell me how to finish is like that?
Thanks.
Ana White (not verified)
Wed, 07/14/2010 - 12:45
Rob, use beadboard, it's a
Rob, use beadboard, it's a type of plywood that has the grooves. Good luck! Ana
Lisa (not verified)
Sat, 07/24/2010 - 05:29
I posted about wanting
I posted about wanting something similar on fb but as one peice and with 5 compartments. How could I do that? add a plywood back and large supports on the sides with smaller center supports? Can this be expanded to say 4.5 or 5 feet? thanks!
Rob (not verified)
Fri, 08/06/2010 - 09:47
Thanks Ana. Last question,
Thanks Ana. Last question, do you know what type of wood was used on the first picture (with the last name Olson)?
Thanks again.
Shanker (not verified)
Sat, 08/14/2010 - 10:51
I really want to make this
I really want to make this bench. But Im really new to building and its 14in to long.
can I cut it down in size or will I mess everything up?
thanks
Q
chelsea (not verified)
Wed, 09/01/2010 - 08:11
christmas tree shop has a
christmas tree shop has a large selection of sizes, and if they do not have the color you want you could paint them.
Melissa (not verified)
Wed, 09/01/2010 - 16:06
Hi Ana! Thanks again for
Hi Ana!
Thanks again for your plans/ideas! Do u have the depth and height of the shelf? You mentioned the width was 49". Any other shelves than "floating" straight shelves on your site? I am looking for something in my mudroom that is informal... Thanks!
Melissa
Ana White (not verified)
Wed, 09/01/2010 - 16:54
Melissa, the depth of the
Melissa, the depth of the base should be right at 12 1/4". If you find this too shallow, you can simply build the base from 1x16s or 1x24s (3/4" plywood ripped to 15 1/2" widths or 23 1/2" widths). The width is right at 49 1/2". The shelf is 8 1/2" deep. I loved this system so much, ended up gifting it to a friend because in Alaska, there were so many coats stacked on it, you couldn't find it . . . and then missing it terribly!
I am working on a super easy shelf tutorial. Expect plans very very soon . . . the paint is drying!
Entryway Stora… (not verified)
Fri, 09/10/2010 - 03:00
[...] Build an Entryway
[...] Build an Entryway Bench/Shelf System — Ana White So I built this and it was in my house for forever. And I loved it. The only problem was in the winter, there were so many coats piled on it . so I gave it to one. [...]
Vikki (not verified)
Fri, 10/29/2010 - 17:13
Hi Anna I love your site but
Hi Anna I love your site but have not yet been brave enough to tackle any larger projects. I have finally worked up the nerve to build this bench/shelf for my entry way but I have a smaller space than 49'', would it be possible to give me the list for a 45" space? I would greatly appreciate it! Thanks for all your help and great ideas!
Vikki
Paula Davis (not verified)
Tue, 11/09/2010 - 12:10
Ana, All these plans are
Ana,
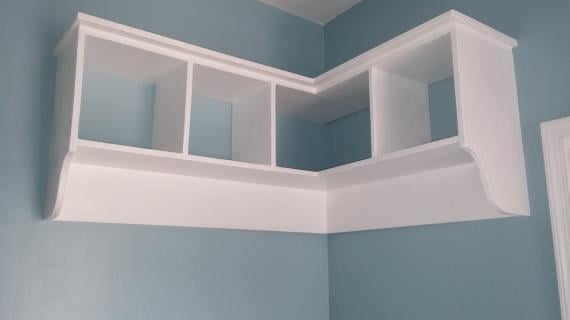
All these plans are awesome!! Thanks for sharing your gift with others! I love this entryway bench/shelf system, but by the back door of my home (of course the most frequently used entrance, but "miles" away from the coat closet) there is no room for a bench, however a small corner seat would fit. As I was searching for examples I came across the "Nantucket Corner Storage Bench" sold by Hayneedle (http://www.hayneedleshopping.com/indoor-benches/cubbie-benches/nantucke…). Not only is it around $100, but it is also sold out! I would just, love, love, love to create this corner bench seat to match your shelf system. Please consider designing one, not only would I love it but so would my family! Thanks again for sharing your talent!
Laura (not verified)
Fri, 12/03/2010 - 08:03
Ana, I love this bench. I
Ana,
I love this bench. I have always wanted to build things but have not had the courage. I want the same bench and shelf\hooks with 5 cubbies and hooks. Anyway you can help me change the cut list and plans?
Tiffany (not verified)
Mon, 12/20/2010 - 08:41
Love, love, LOVE this bench!
Love, love, LOVE this bench! I want to combine the plans with the coffee table/storage bench with the hinged seat so that there is a tad bit more storage. I think I can figure it out with the help of my handy and loving husband, however, do you have any advice on doing that? I'm thinking of just raising it the few inches on the top. Would that be too high?
30 before 30 (… (not verified)
Wed, 12/22/2010 - 08:26
[...] a storage bench for the
[...] a storage bench for the entryway in our house (hey, Dad… you might have to help me with this [...]
bea (not verified)
Wed, 12/29/2010 - 06:12
Wow! I've had this picture
Wow! I've had this picture cut out of a magazine for three years, waiting for my husband to figure out how to build it. A friend told me about your sit and here it is!!!!
I can't wait until spring so I can give it a try. Thanks for your hard work and commitment.
Meggan (not verified)
Thu, 12/30/2010 - 03:54
We made this bench one
We made this bench one weekend and its been great! My daughter loves that she has a cubbie to put her shoes in and my husband loves that the shoes are always picked up! Thanks for the plan! I really like your website its full of great ideas!
Kimberly Ganir (not verified)
Thu, 12/30/2010 - 14:19
I made the bench and am now
I made the bench and am now working on the top part! It is so fun, I can't wait to put the pictures up when they are both finished!
ottimostyle (not verified)
Wed, 01/05/2011 - 13:41
Here's my version of the
Here's my version of the system. I had to modify the measurements to fit my entryway. I used Benjamin Moore Chantilly Lace in gloss.
You can find details here, too --> http://www.bryceandangie.com/2011/01/entryway-system.html
Jenny (not verified)
Fri, 01/07/2011 - 05:13
Beautiful, Ottimo! I never
Beautiful, Ottimo! I never would have thought to split them up - but what a great solution for your space. I've been thinking if making these in white, and your photo has convinced me!
Oh sweet Ana, thank you so much for sharing your gift. I made up my own plans based on a Crate and Barrel entry bench three years ago using MDF which I have been so proud of - but your plan is so much more intuitive then my earlier design! And cheaper! And easier! And includes the shelf! Your site is incredibly empowering and inspiring, and has enabled me to have a beautiful, functional home without sacrificing our family budget. My most sincere thanks.
Jenny
tmackfam (not verified)
Fri, 01/07/2011 - 09:09
I am building this Saturday,
I am building this Saturday, but modified for 4 cubbies and hooks!! I have 4 kiddos Pictures to come...............
ottimostyle (not verified)
Mon, 01/10/2011 - 11:15
Thanks, Jenny! Yes, I split
Thanks, Jenny! Yes, I split them because it's a pretty big corner in my entry and I thought the bench looked so lovely under the window. :) I used a gloss white.
Angie
Cottage Bench … (not verified)
Mon, 01/10/2011 - 21:32
[...] did have an Entryway
[...] did have an Entryway Shelf System on the wall in front of the laundry room/closet, but there was nothing to force traffic to use it. [...]
Entryway/Mudro… (not verified)
Sun, 01/23/2011 - 20:21
[...] used her plans for the
[...] used her plans for the Entryway Bench/Shelf System and modified both a bit to fit our space. Because there is no natural light coming into this room, [...]
The Making Of … (not verified)
Mon, 02/14/2011 - 20:22
[...] First, as I mentioned
[...] First, as I mentioned in my original post, here, I got the original plans for this system from Ana White. I used these plans, but then tweaked them a bit for our space. I needed to make my bench a [...]