Essential Drawer Bed or Daybed

bed with drawers diy plans
Difficulty
Intermediate
| Print this plan

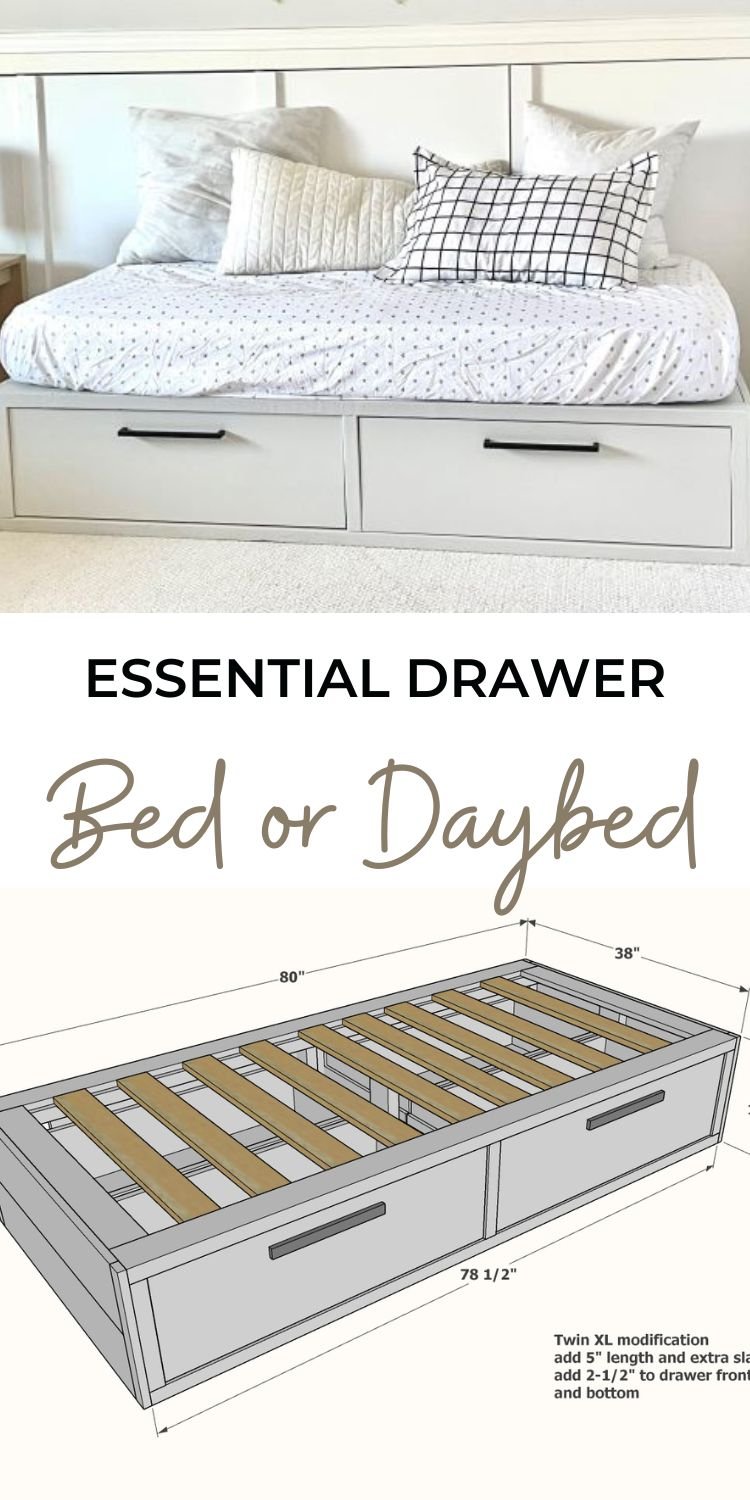
Easy to build bed with drawers using basic tools and materials.  Free step by step plans with diagrams, video tutorial, shopping and cut list from Ana-White.com

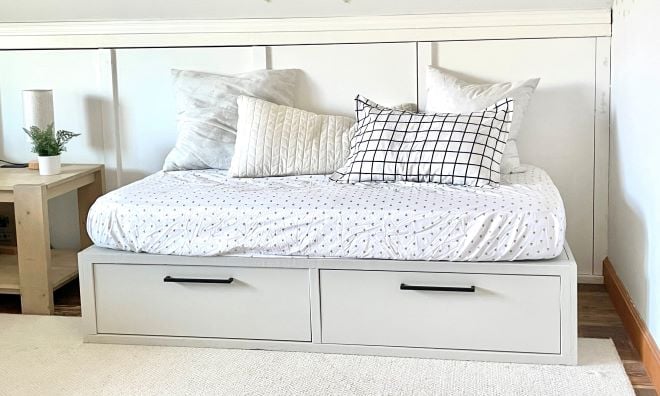
Want to add some more storage to a bedroom, without taking up any more space?  Have you considered a bed with drawers or a captain's bed?  

Storage beds can be expensive to buy - especially a quality one that is sturdy and can be moved.

The good news is with just a few basic tools and some lumber, you can build this diy drawer bed!

bed with drawers free plans


Video Tutorial for Building a Drawer Bed

The steps for building this bed are pretty simple - build two 2x4 frames, add the ends, then the drawers and slat system.  Watch me create this bed in this video:


Easy Flip Down Storage Option

Are you interested in just the flip down version? 

diy storage bed

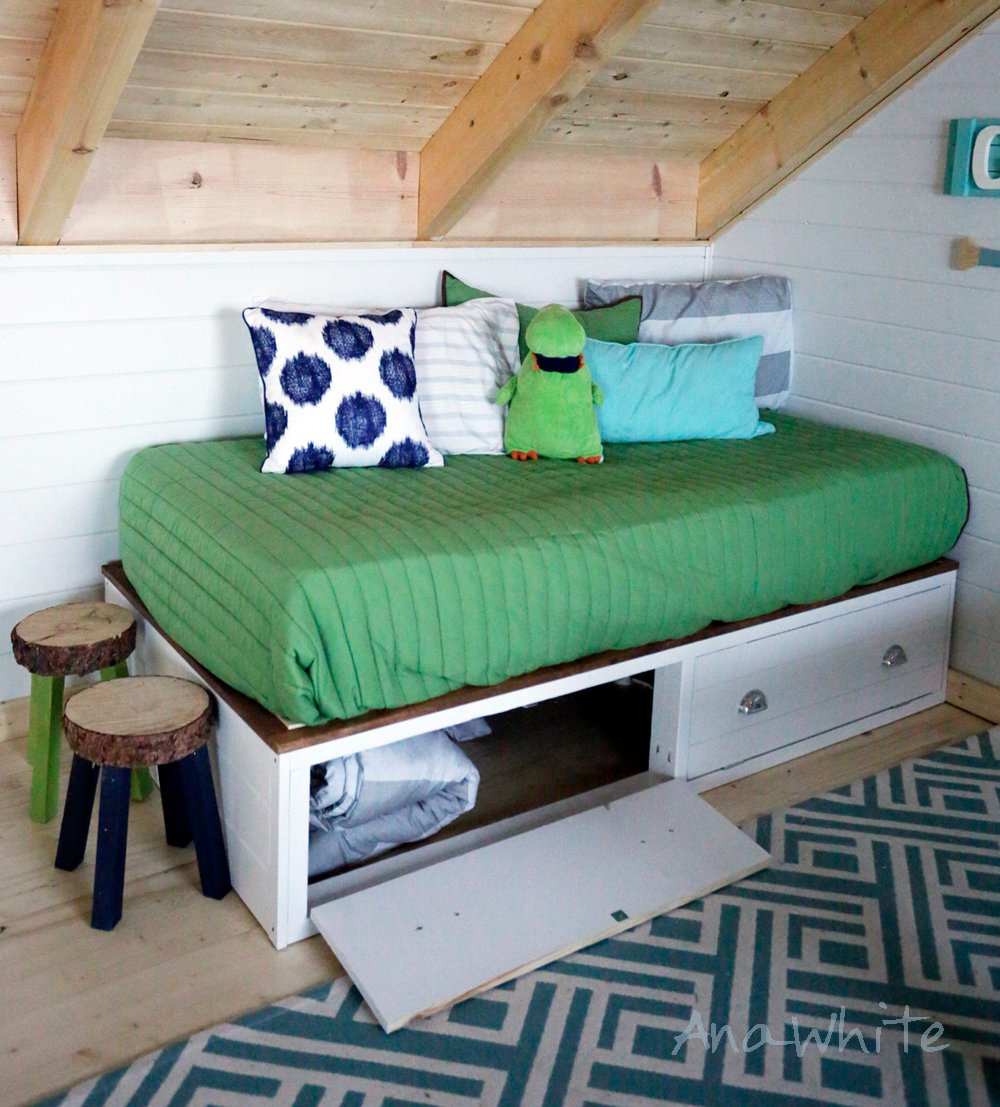
Those plans are here and are much easier.  And you can always add drawers later, like I did!


Can I add a Different Headboard or Footboard?

Yes!  Just build, and attach the headboard and footboard afterwards.  You could even leave the ends open (use 1x3s or 1x4s instead of the 1x8s on the ends) to save some money.


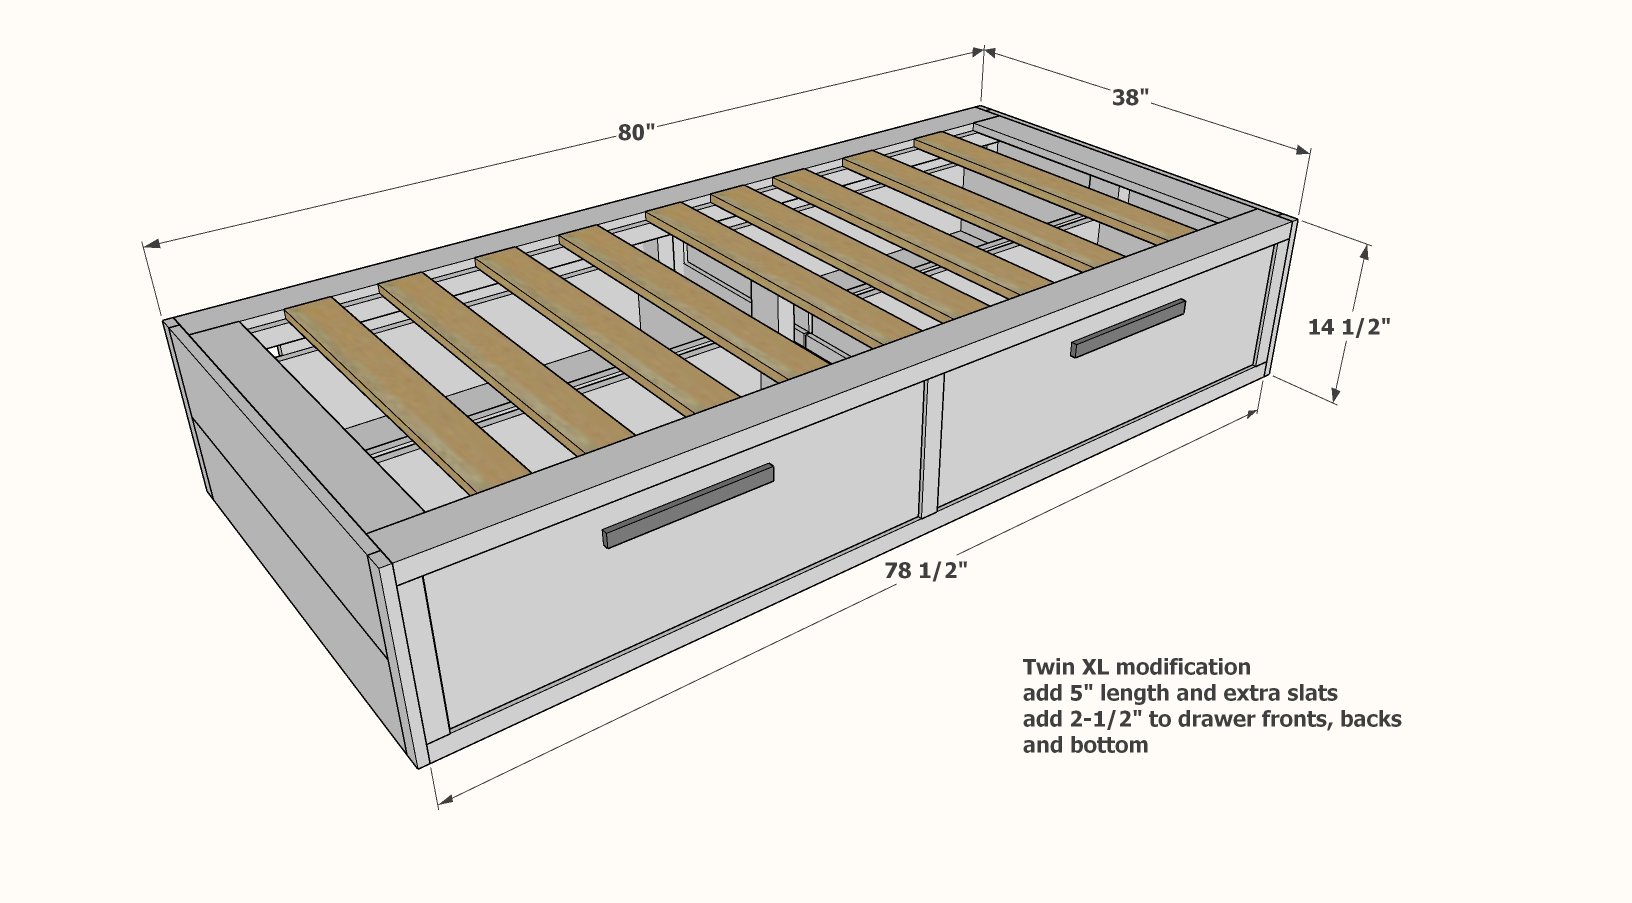
Can I Make this a Twin XL Storage Bed?

Yes! The twin XL modification is easy.  Just add 5" to the overall length.

twin xl storage bed


Can I Make this a King?

Yes!  A standard king is just two twin XL beds but together.  Only build drawers for the two outsides (and you can make the drawers deeper for more storage.

standard king captains bed

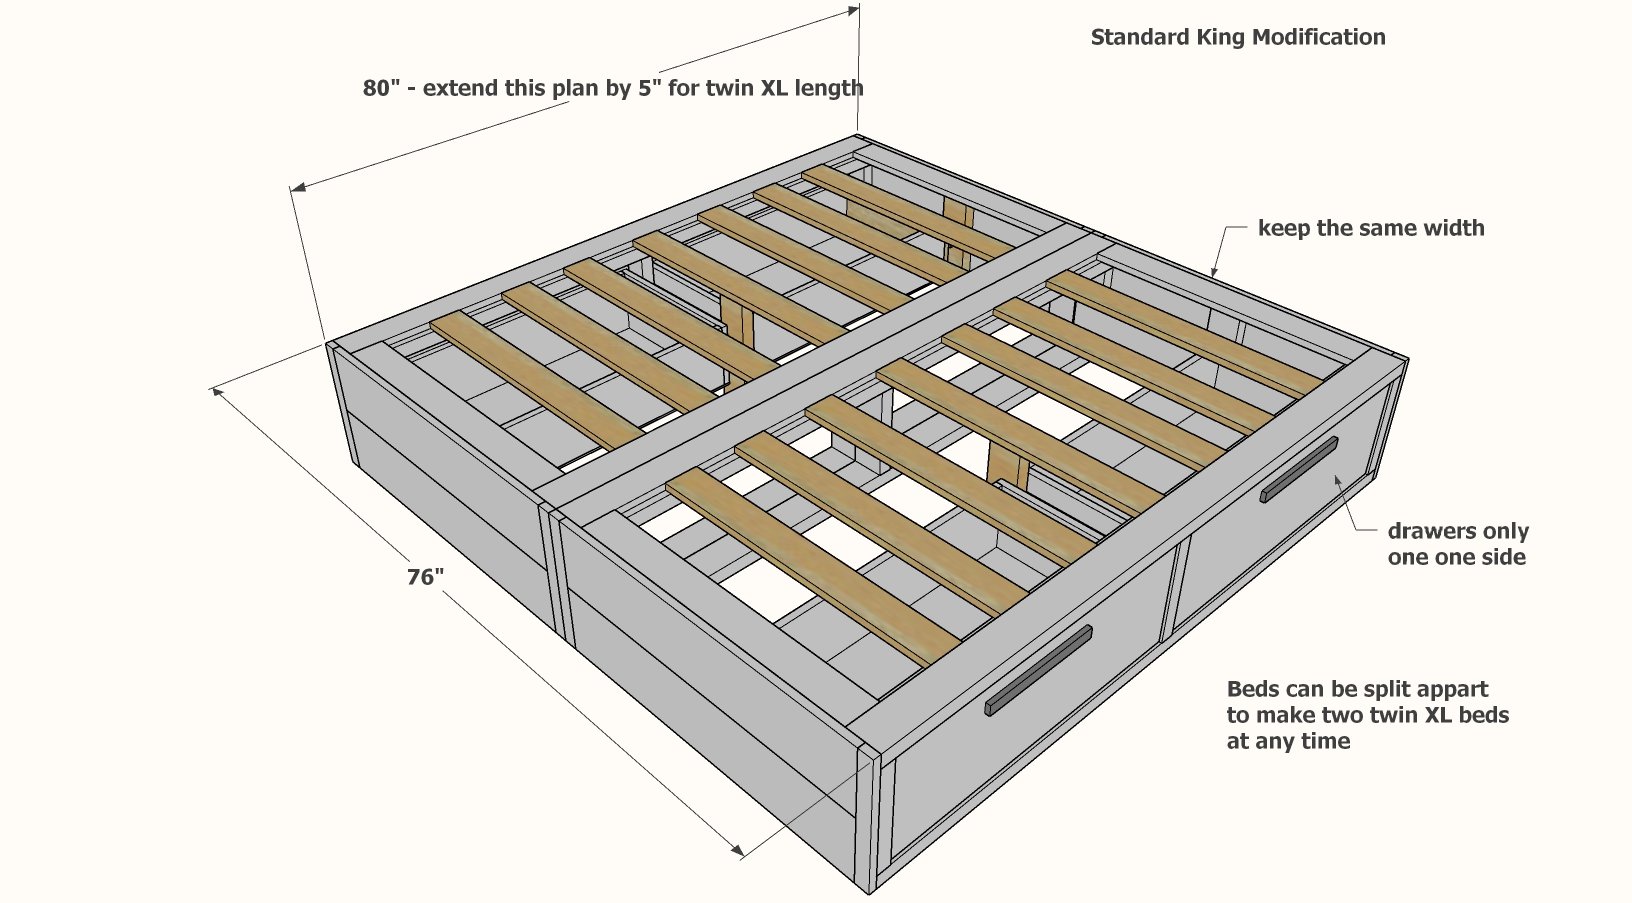
The king is the best bang for your buck if you are wanting to build a bigger bed, and the twin XL option makes them always valuable for kids rooms too.

What About a Full or Queen?

Yes, you can do this, I would recommend the two bed method like the standard king, so you can move the beds into the room and the center is supported.  

Pin For Later!

Essential Drawer Bed or Daybed

Dimensions
twin storage bed dimensions
Standard twin size, dimensions shown in diagram

Preparation

Shopping List
  • 5 - 2x4 @ 8 feet long
  • 3 - 1x4 @ 8 feet long
  • 3 - 1x2 @ 8 feet long
  • 5 - 1x8 @ 6 feet long
  • 1 - 1x12 @ 6 feet long 
  • 2 - 18" full extension drawer slides
  • 1/2 sheet of 1/4" thick plywood or underlayment for drawer bottoms
  • 2 handles or knobs
  • (24) 2-1/2" long self tapping star bit screws (can also be 2-3/4" length
  • (72) 1-1/2" long self tapping star bit screws (can also be 1-5/8" or 1-3/4" length)
  • 5/8" brad nails
  • 1-1/4" brad nails
  • wood glue

For drawers on both sides (4 total), you'll also need

  • 2 more 18" full extension drawer slides
  • 9 more feet of 1x8 boards
  • 1 more 1x12 @ 6 feet long
  • 1/2 sheet of 1/4" thick plywood or underlayment
  • 2 more handles or knobs
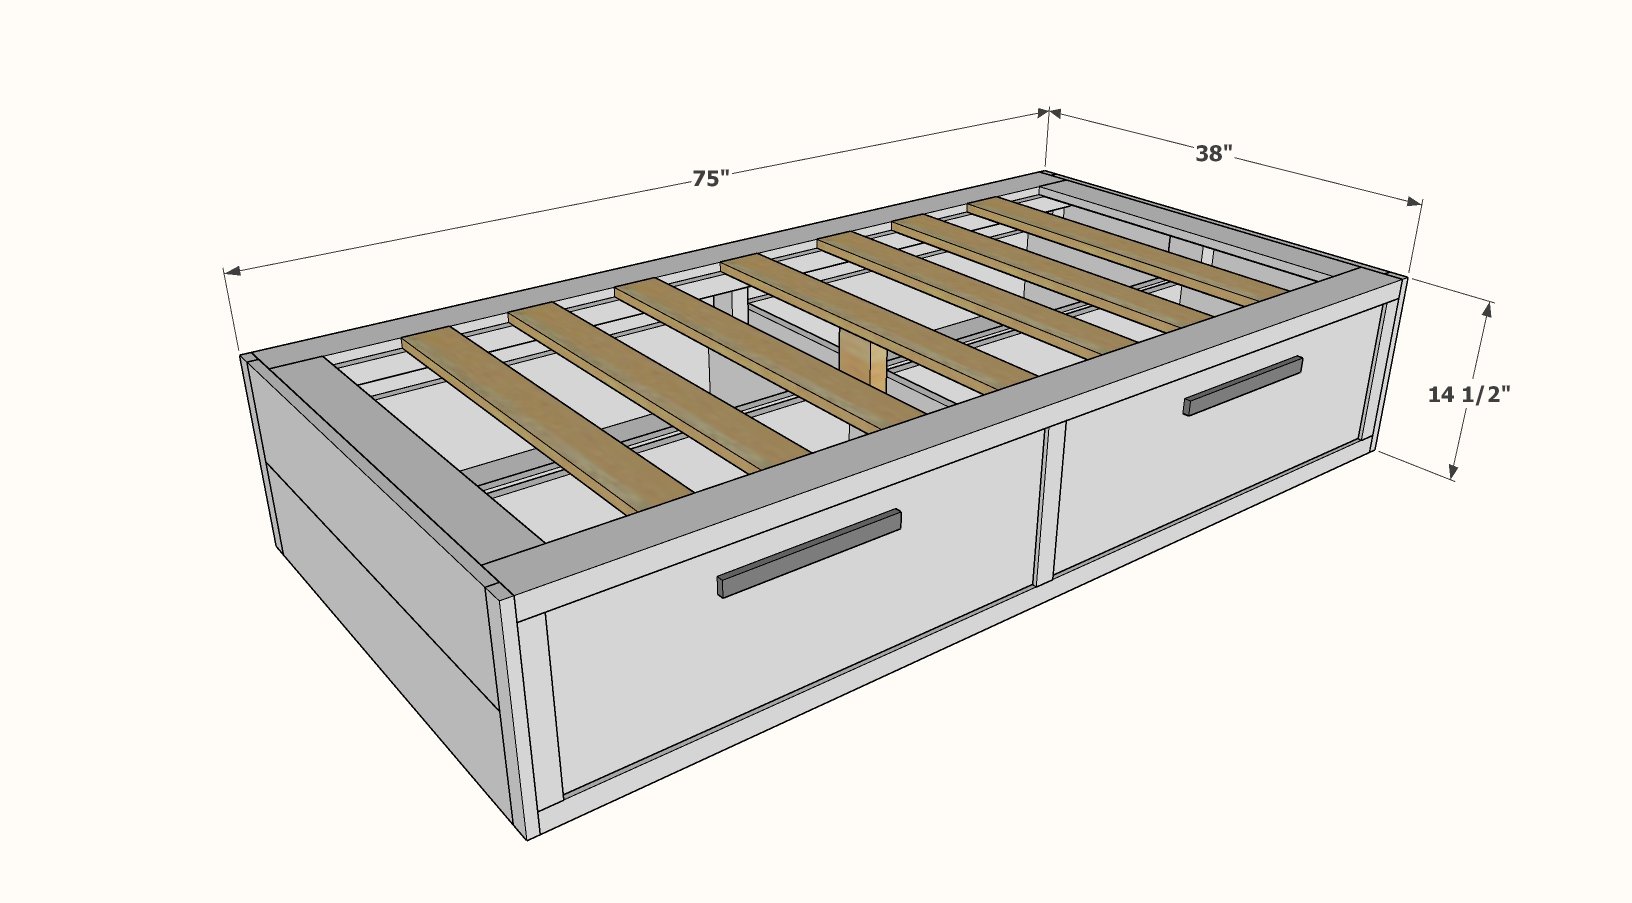
 

Cut List

Bed Frame

  • 4 - 2x4 @ 73-1/2" - 2x4 frame top and bottom
  • 6 - 2x4 @ 11-1/2" - 2x4 frame verticals
  • 2 - 1x2 @ 73-1/2" - cleats
  • 9 - 1x4 @ 31" - slats
  • 3 - 2x4 @ 13-3/4" - center leg and drawer slide furring 

Footboard/Headboard 

  • 4 - 1x2 @ 14-1/2"
  • 4 - 1x8 @ 35"

Drawers (for two drawers daybed style, double the cut list for four drawers, drawers on both sides of bed)

  • 4 - 1x8 @ 17-3/4" - drawer sides
  • 4 - 1x8 @ about 32" - drawer front and back, measure and cut to fit
  • 2 - 1/4" plywood @ 17-3/4" x 33-1/2" - drawer bottoms
  • 2 - 1x12 @ 34-1/2" - drawer faces
Cutting Instructions

Precise cuts are necessary for drawers to slide smoothly.  Use a compound miter saw or chop saw.

Tools
Tape Measure
Speed Square
Safety Glasses
Drill
Circular Saw
Miter Saw
Brad Nailer
Power Sander

Instructions

Step 1

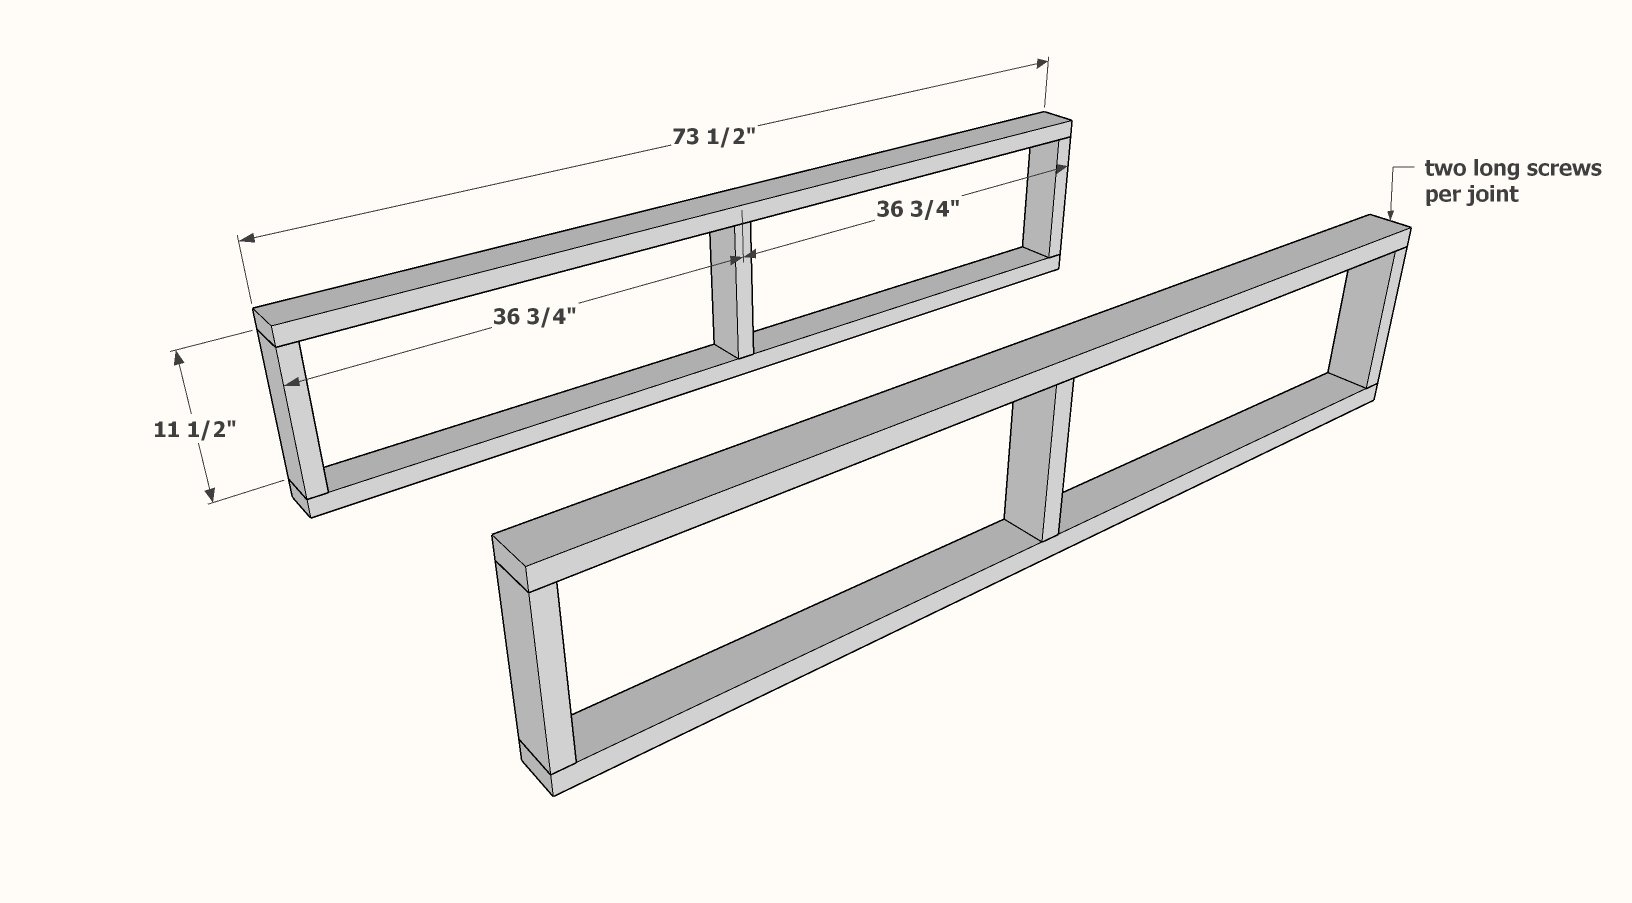
Build two of the 2x4 frames, identical, using the longer screws and glue.

Adjust the frames for square before glue dries (see next step).

Step 2

Adjust the frames for square, and then secure with glue and screws the inside cleat.  This cleat will hold the mattress slats later on and also keeps the 2x4 frames square.

Step 3

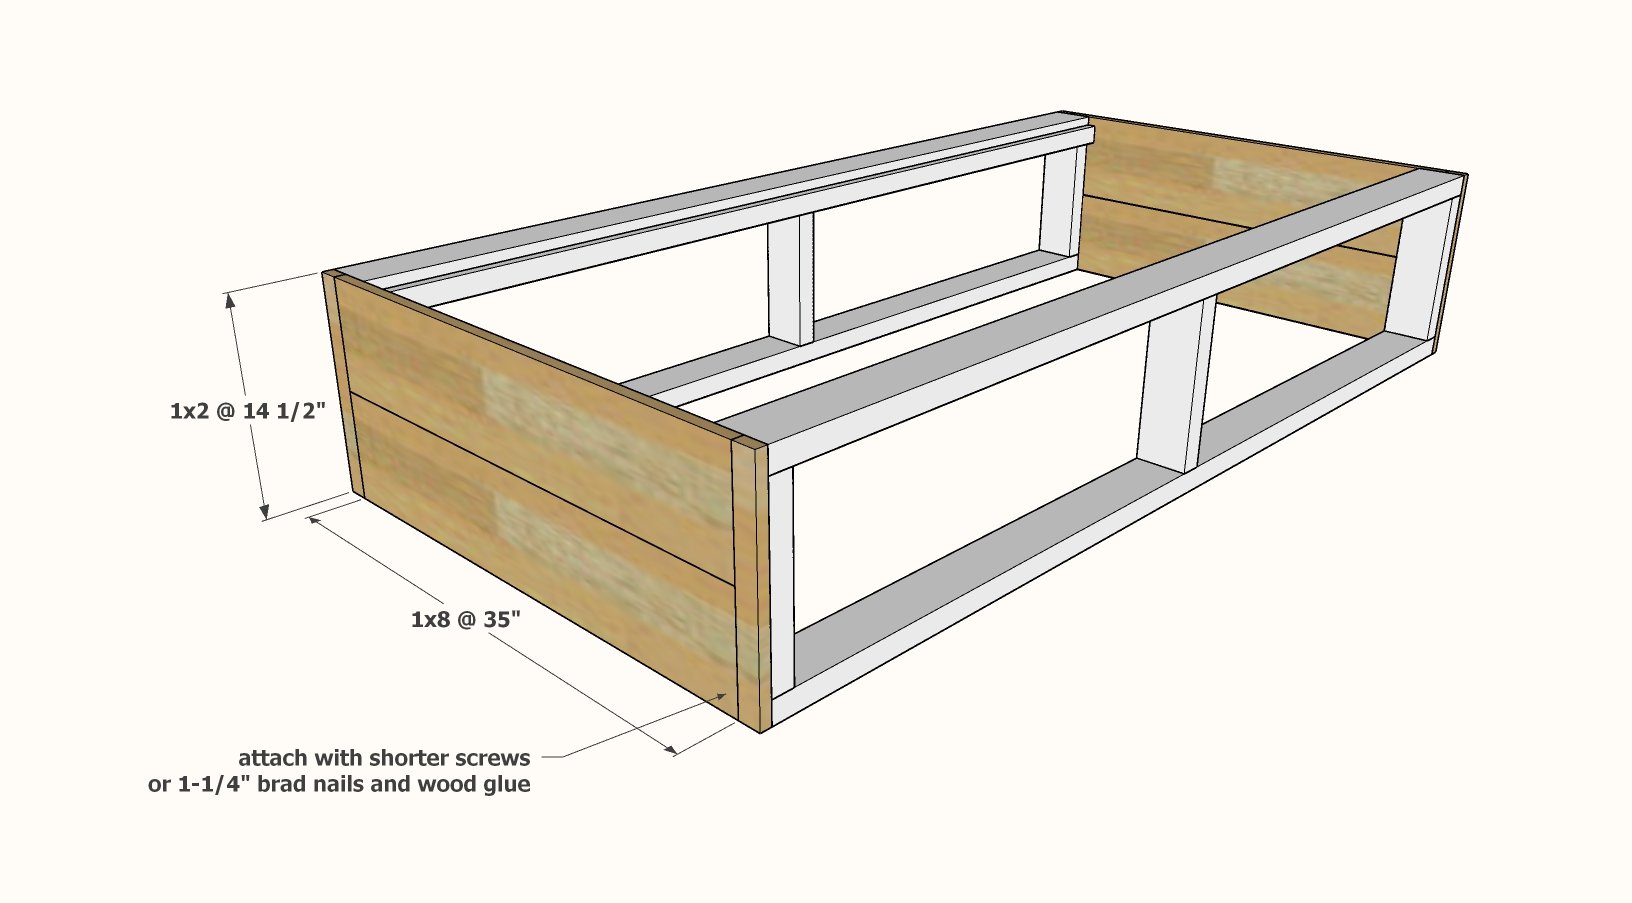
Attach the 1x2s to the outside edges of the frames with 1-1/4" brad nails and glue.

Then add the 1x8 pieces, I recommend screws and glue.

You can use other materials for the headboard/footboards if you are wanting to burn up scraps.

The headboard can also not be completely filled in if against the wall and you are wanting to buy less 1x8s - you could use a 1x3 or 1x4 at the top and bottom as done in the video.

Step 4

Adjust the bed for square as shown, until the two diagonals match.

Secure the slats on the ends as shown with screws and glue.

Double check the diagonals for square before glue dries.

Step 5

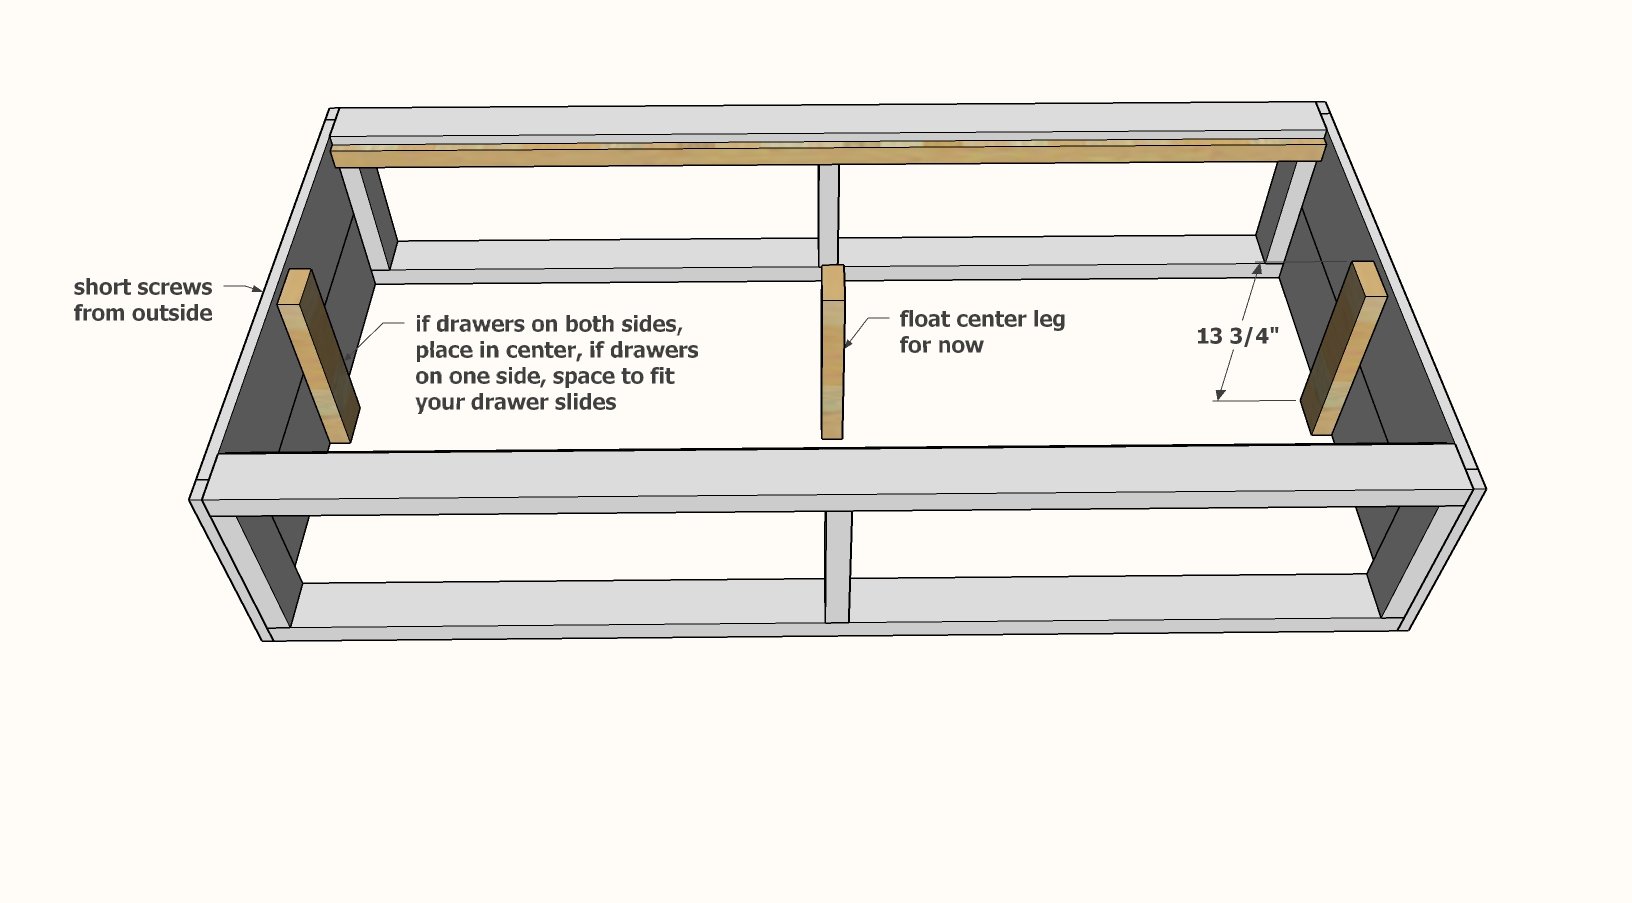
Attach the 2x4 blocking inside the bed for the drawer slides.  The center leg does not get attached at this step.

Step 6

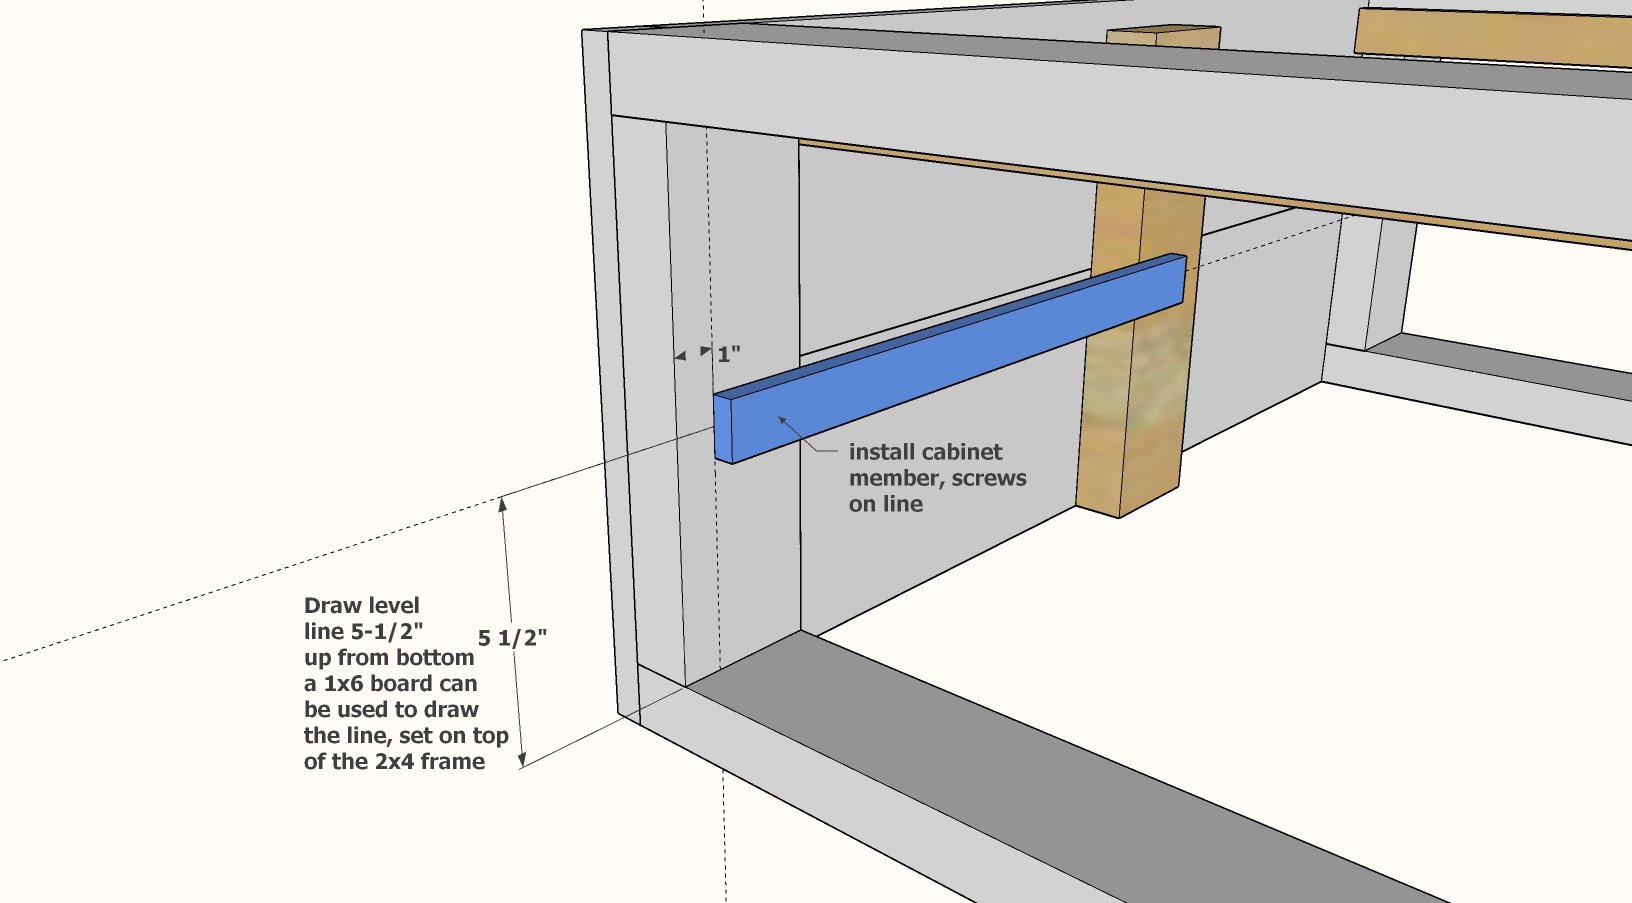
Draw a line horizontal as shown, on the vertical 2x4s.

Draw a line inset 1" from the front of the 2x4s.

Separate out the drawer slides into the cabinet member and the drawer member.

Attach the drawer slide cabinet member to the 2x4s, with the screws centered on the line.

TIP: I like to use the holes with the vertical adjustment so I have the ability to adjust the slide up or down even after starting my screws.

Step 7

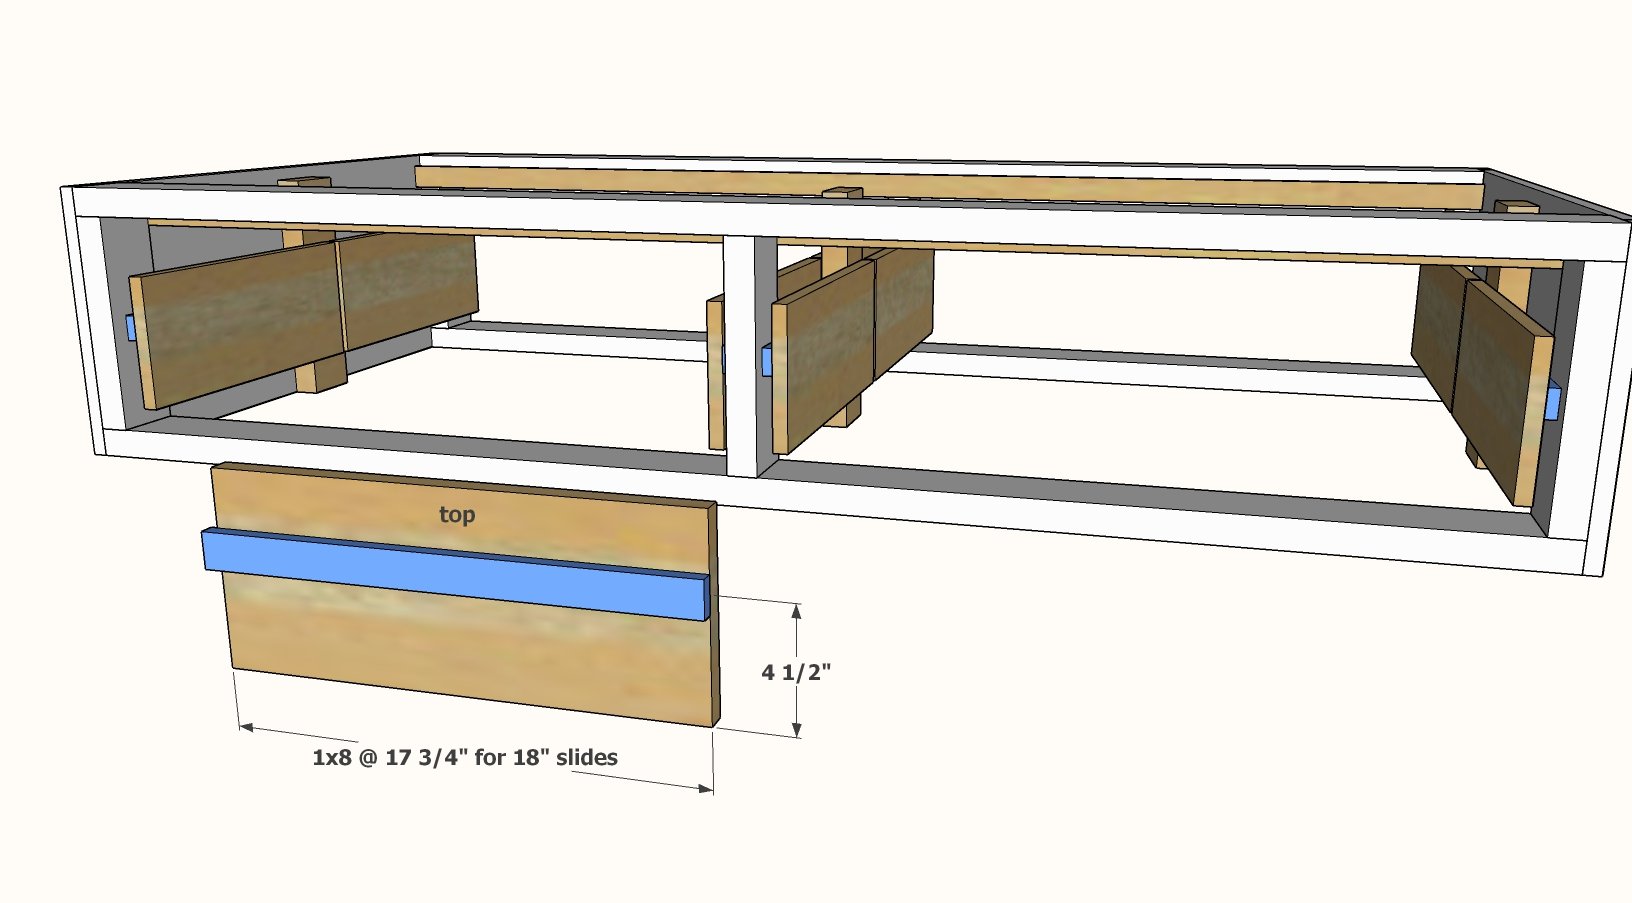
Mark the wood drawer sides 4-1/2" up from the bottom and draw a line parallel to the bottom edge.

Attach the drawer slides with the screws on this line. 

The front edge of the drawer member should be flush to the front edge of the wood drawer side.

Remember to attach the drawer slide on the other side in mirror.

Install all drawer sides into the drawer slides.

Step 8

Measure and cut the fronts and back for the drawers.  Attach with shorter screws from the outsides.

Test the drawers.

Step 9

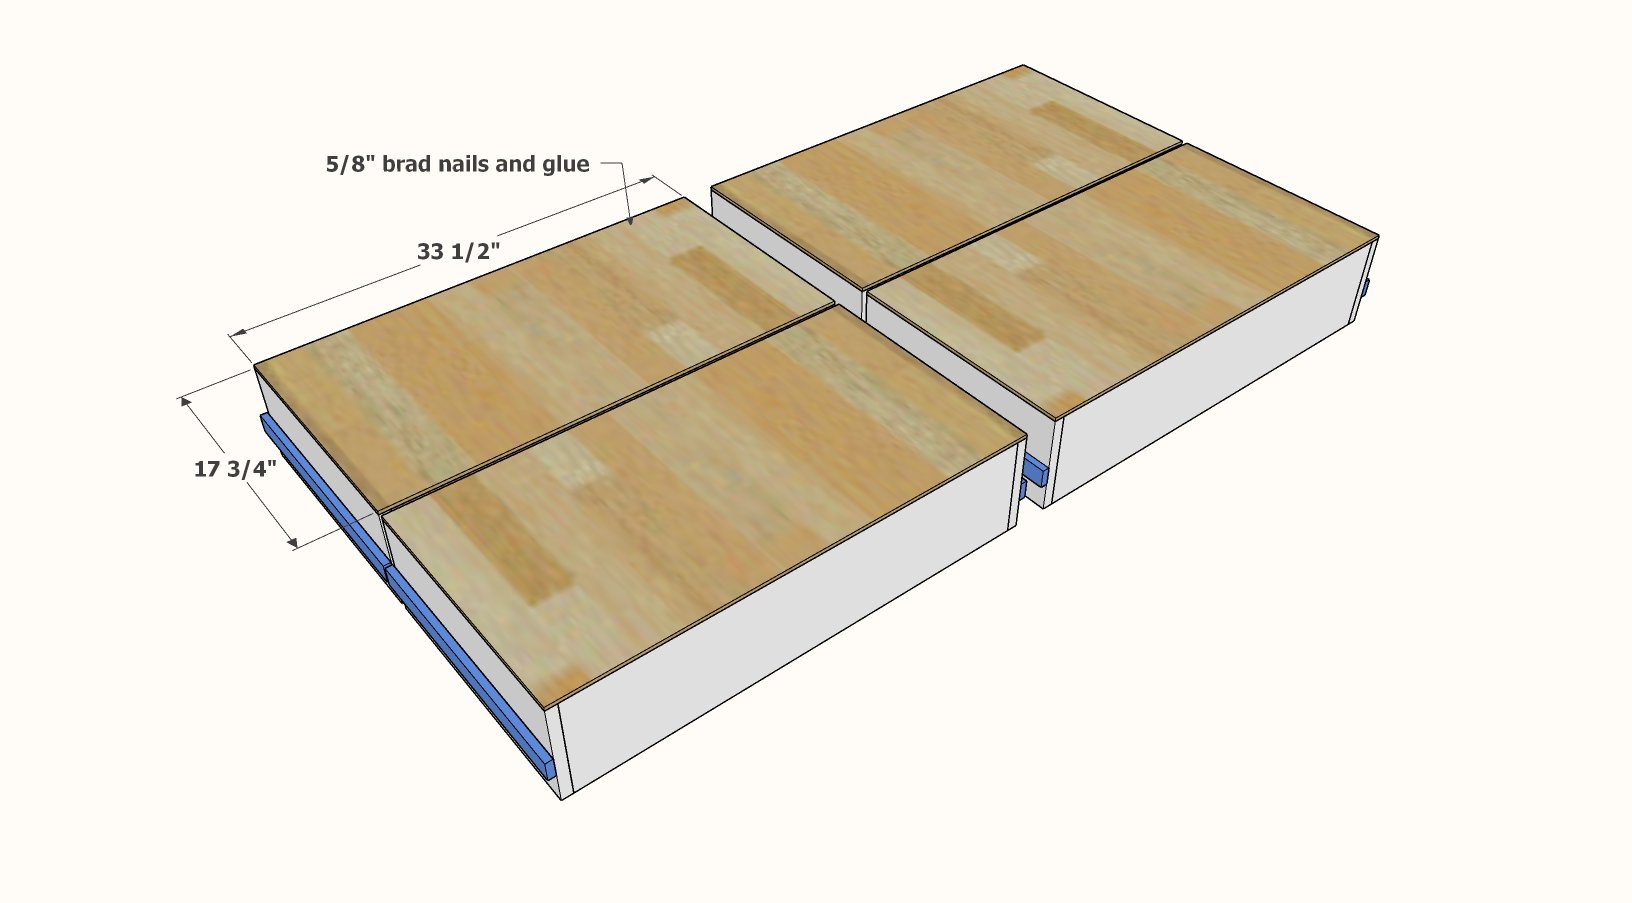
Measure and cut plywood for the bottom of the drawers.

Attach with glue and 5/8" brad nails.

Test the drawers before the glue dries.  Refit if necessary - the drawers should slide very smoothly.

Step 10

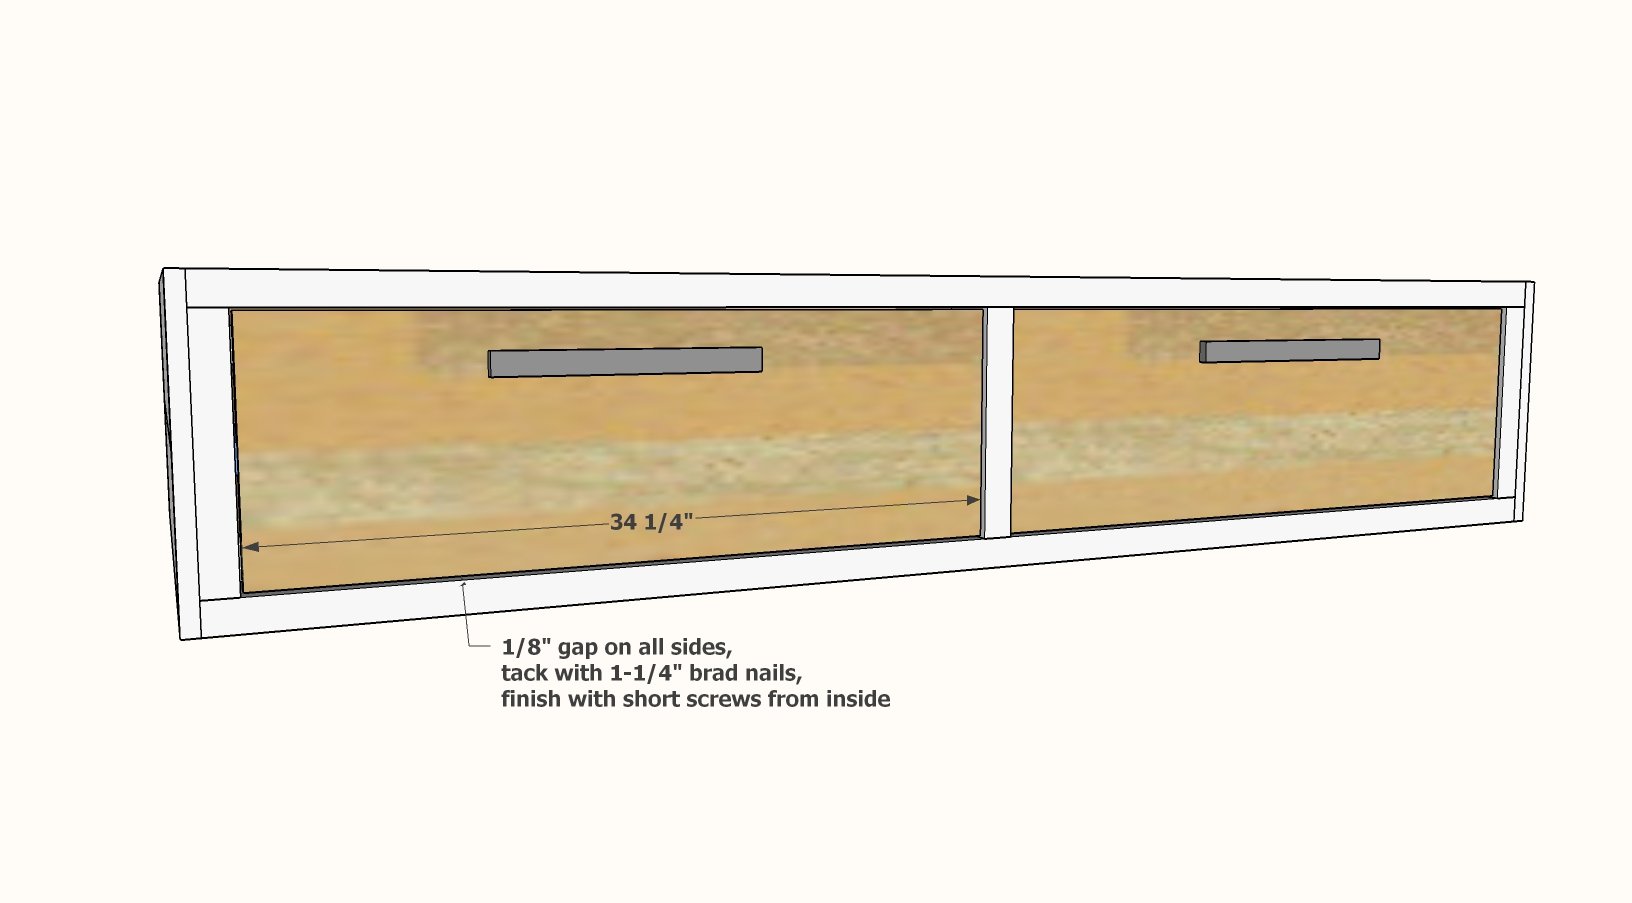
Insert drawers into bed and place faces on top.

With an even 1/8" gap on all sides, tack drawer face to drawer box with 1-1/4" brad nails.

Open the drawer and further attach with the shorter screws (6 per drawer) from the insides.

Step 11

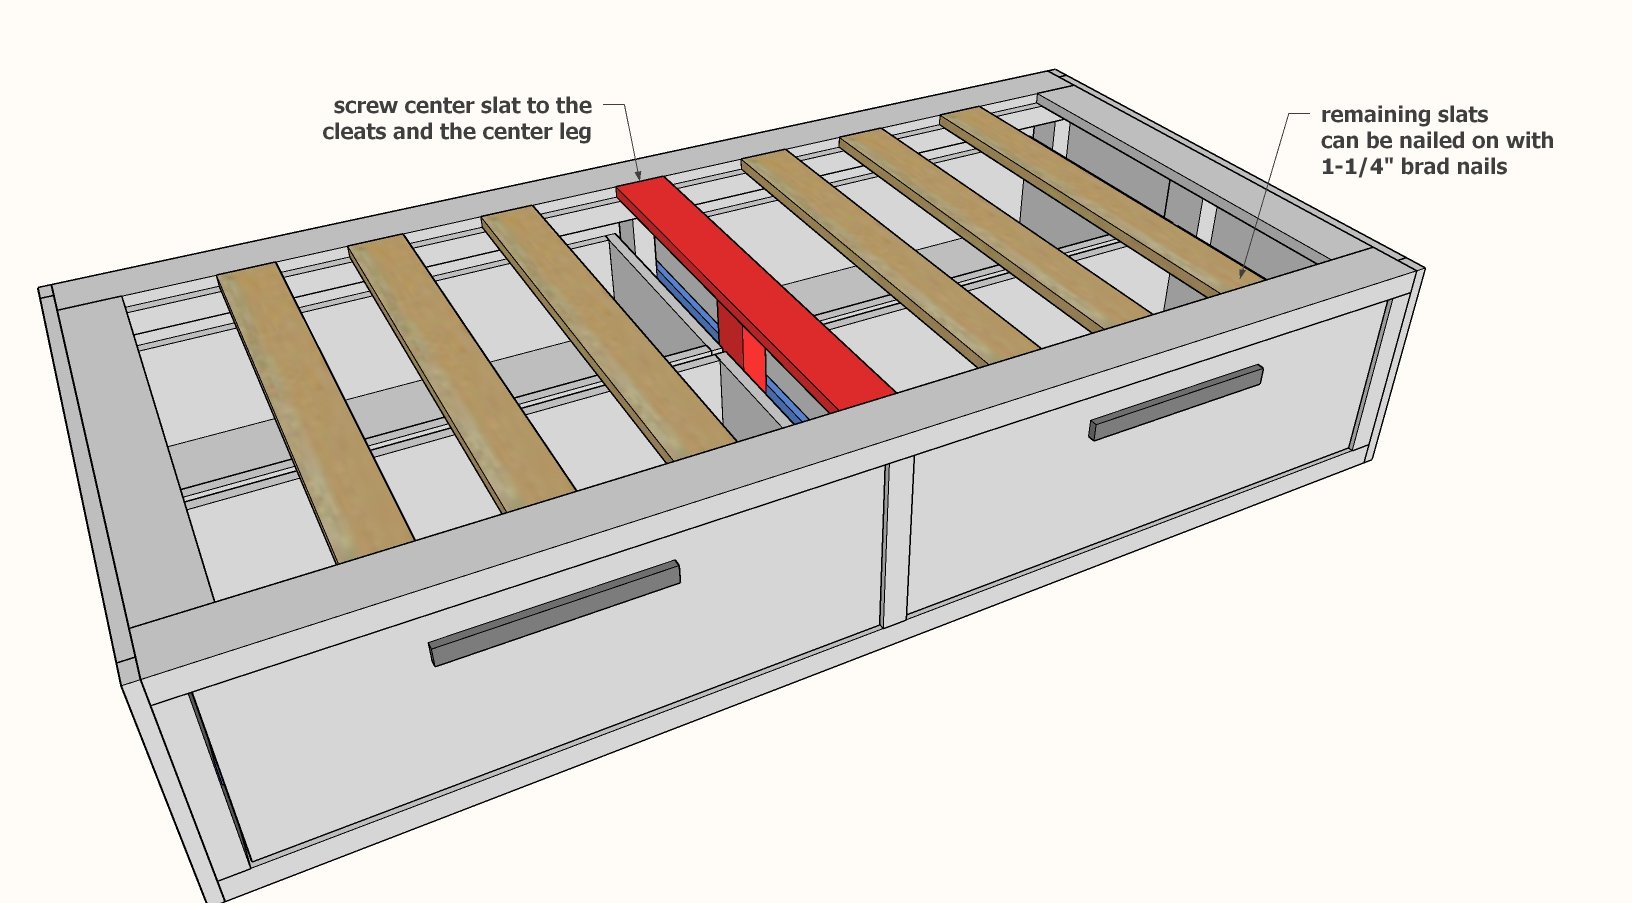
Lay the remaining slats inside the bed.  Attach the center slat with screws.

Test the drawers to make sure they are still sliding.  When satisfied, screw the center slat to the center leg.

Finishing Instructions
Preparation Instructions
Fill all nail or screw holes with wood filler. Let dry and sand smooth. If needed, add a second coat of wood filler and repeat.

Vacuum the sawdust and wipe clean with a just damp cloth.

Prime and paint, or stain and finish with a clear coat.
Finish Used
I used a semigloss from Sherwinn Williams - the color is Repose Gray. Ask for a paint suitable for trim, doors or cabinets.

Frequently Asked Questions

Wood Questions

What kind of wood should I use?
Most of our plans use standard construction lumber like pine or fir. It's affordable, easy to work with, and easy to find. It's also rapidly renewing and biodegradable, so a great eco friendly choice!

Can I use hardwoods instead?
Yes—just keep in mind they're heavier, cost more, and can be tougher on tools and harder to join together and finish. I recommend not tackling a hardwood project until after you have built several softwood projects.

What if my boards are warped?
Choose the straightest boards at the store. You can often work around slight warps by cutting them into shorter pieces.

What wood should I use for outdoor furniture?
Use red-toned or pressure-treated 2x lumber for framing, and cedar or cedar fence pickets for the decking. Outdoor furniture should be built like a deck—your local home center can help recommend the right wood for your climate.

Will my wood move or warp after I build?
Potentially, especially in humid climates. Let your wood acclimate indoors before building. Once acclimated and kept in a stable environment, movement should be minimal. Remember, most houses are built using framing lumber - it's all about keeping moisture down indoors.

Cutting Questions

Do I need a miter saw?
A miter saw is great, creating fast, safe, and precise cuts, even for beginners. But most plans can be built with a circular saw and a straight edge. If using a circular saw to cut, take time to practice, and get good at making cuts, before cutting your project boards.

How do I get clean cuts with a circular saw?
Clamp your board, measure twice, cut slow, and use a sharp blade. This takes practice, so spend some time making cuts. I go through becoming proficient at freehand cutting in my course, it is worth taking if you want to master this skill.

Will the store cut my wood?
Yes—most stores will do rough cuts to help you transport your materials home. But from store to store, the quality of cuts could greatly vary.

Joinery Questions

What screws should I use?
We recommend star-head self tapping screws for framing, most common sizes are 2-1/2", 1-3/4". Pre-drill if close to the edge or you find your wood is splitting.

Do I have to use pocket holes?
Pocket holes are the cheapest, easiest and fastest way to do some joints - like edge to edge or a hidden fastener joint. There are other methods, but these can be time consuming and expensive. We recommend using pocket holes as indicated in plans for best results.

How do I keep things square?
Use a speed square and measure diagonals after each step. Always clamp joints before screwing to keep them tight and flush.

Finishing Questions

Stain or paint before or after building?
A quick sand before and a full finish after gives the best results. Pre-finish if you're doing two-tone or detailed finishes.

What type of finish?
Use oil-based or water-based stain. For paint, cabinet-grade latex or enamel works great. High use surfaces on indoor projects should get a coat of polyurethane, I recommend a Helsman or Spar or other flexible poly that won't crack or peel with wood movement. For exterior projects, use a finish suitable for exterior fences.

How to get a smooth finish?
Start with a well sanded project. Sand between coats (220 grit), wipe clean, and apply light coats with a foam brush or roller.

Plan Questions

Can I change the size?
Many people do, and that's the great thing about building your own furniture! But do keep in mind going bigger might mean more supports are required, and often plans are optimized for minimal material waste.

Are these beginner-friendly?
Yes—plans are written with simple tools and clear steps in mind, with every effort to make plans as simple as possible.

Can I sell what I build?
Absolutely! Just don’t resell or repost the plans themselves.

General Questions

What tools do I really need?
A drill, circular saw, tape measure, square, and a few clamps will get you through most projects.

Do I need a workshop?
Nope! A driveway or small patio is plenty to get started, just make sure you have a level place to work. If you find you are building several projects a year, creating a small workbench is a great way to store tools and have a dedicated workspace.

What if I mess up?
Wood filler, sanding, or flipping boards goes a long way. Mistakes are part of the process!

What can I do to make my projects look more professional?
Start with straight boards, make accurate cuts, clamp all joints, and line up everything neatly. Sand thoroughly, use a neutral finish, and apply it in light coats for a clean look.

I've never built anything before. Where should I start?
Start with a few smaller softwood projects to get hands-on experience. Or if you're tackling a big project, buy a little extra lumber and practice your cuts and joints first. If possible, work with someone who has a bit of experience.

Care & Maintenance

How long will my furniture last?
With good joinery and regular care, your DIY furniture can last for decades. I have pieces in my own home that are over 20 years old and still going strong! One of the best parts about DIY furniture is that it’s easy to repaint, refinish, or repair—so your projects can grow and adapt with you.

How should I care for outdoor furniture?
Lightly pressure wash or hose it down once or twice a year. Tighten screws and reapply finish as needed to protect it—just like a deck or fence. A little upkeep goes a long way in extending the life of your furniture.

How about indoor furniture?
Regularly dust or wipe with a damp cloth. If it starts to look worn, a light sanding and touch-up paint or stain can refresh it in no time. DIY pieces are meant to be durable and fixable—so don’t be afraid to give them some love now and then.

Want to Build with Confidence?

Check out my ebook: 12 Skills to Build Your Own Furniture
It walks you through the core skills every builder needs—measuring, cutting, joinery, and finishing—so you can build beautiful furniture that lasts.

Still Have Questions?

Email us anytime at [email protected] and we’ll be happy to help!