


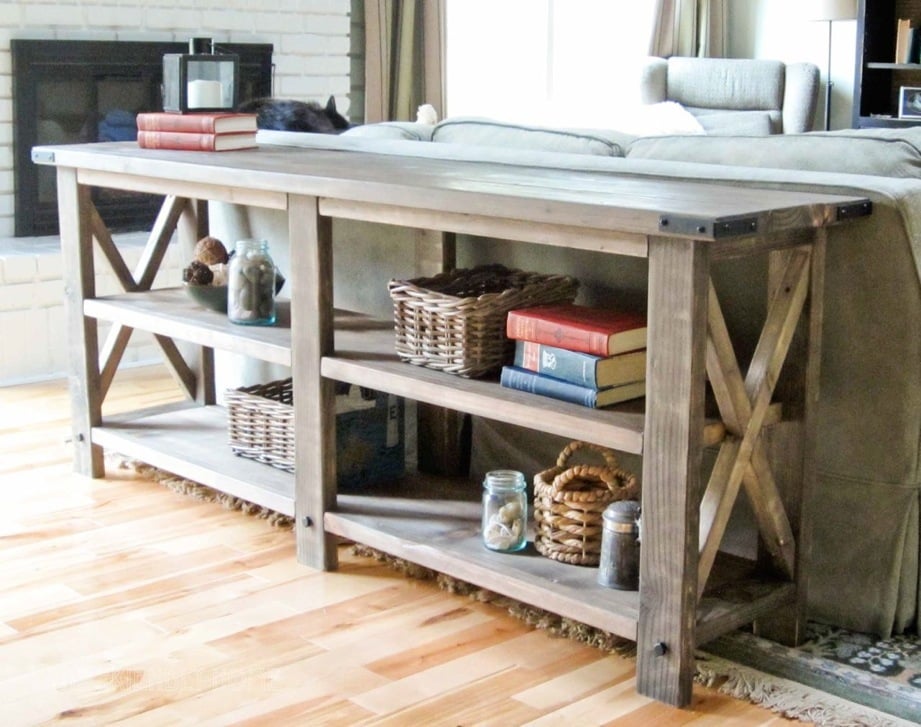
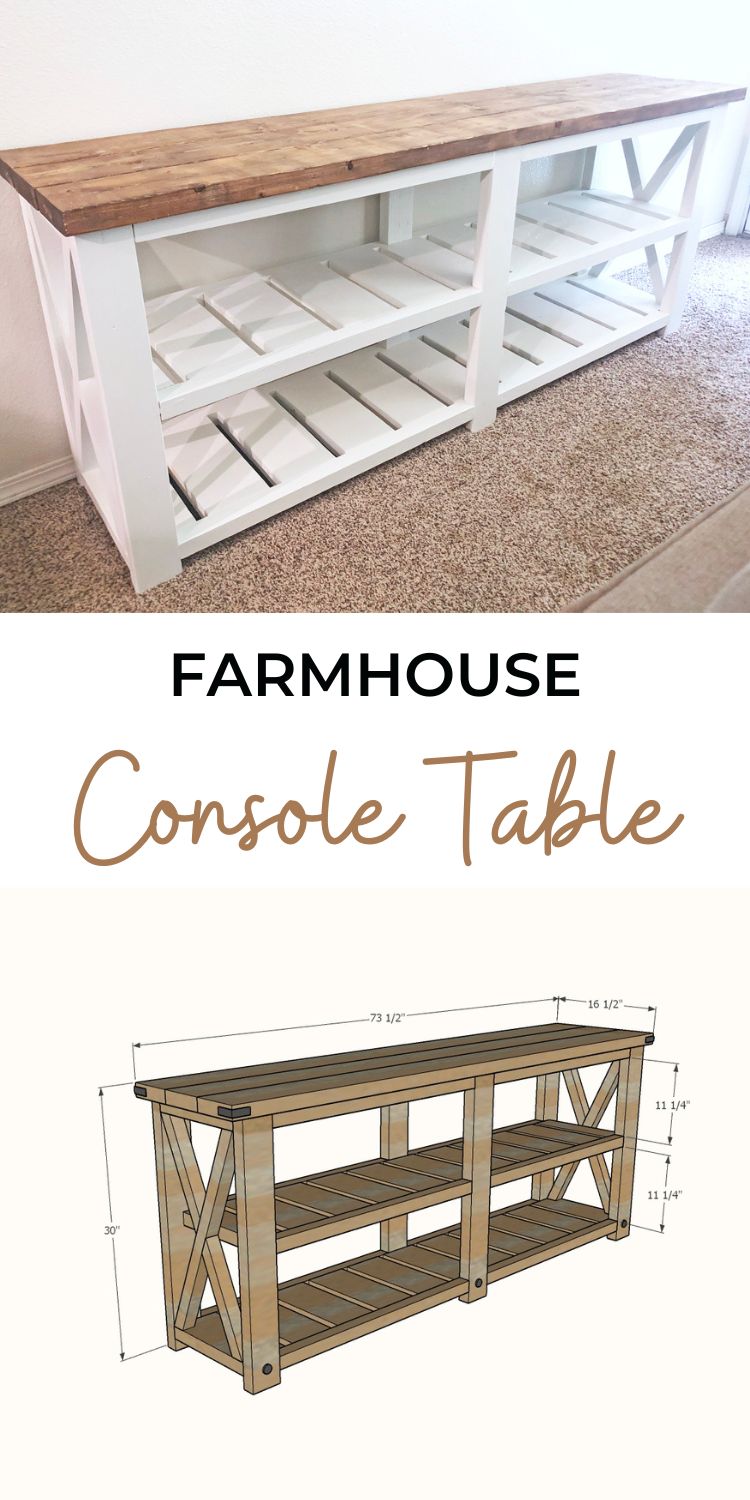
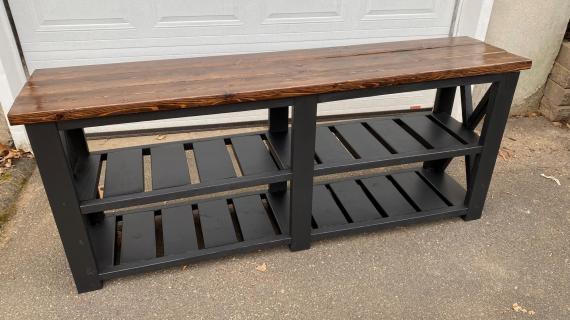
Build your own Farmhouse Console Table for about $50 in lumber and screws. This is a beginner friendly project plan designed for the novice builder with limited tools.
Farmhouse Console Table Features
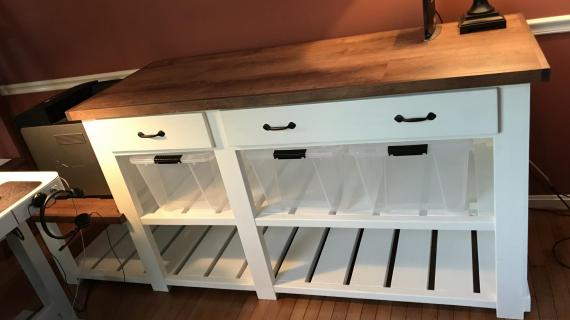
- Outdoor friendly with slatted design and solid 2x construction
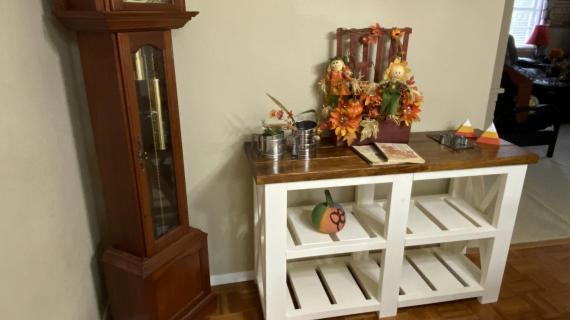
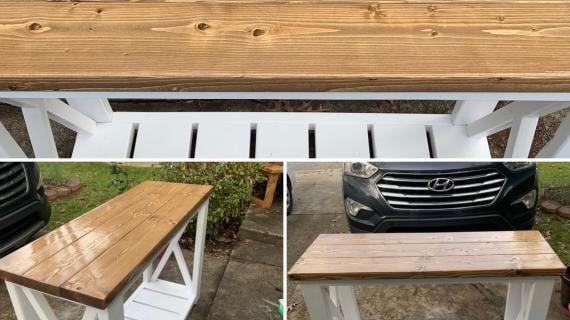
- Solid wood design accepts stain beautifully
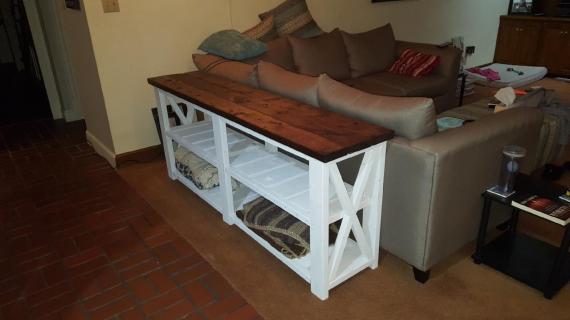
- Extra long design fits behind sofas, sectionals, halls, and under TVs
- Two good sized shelves fit standard off the shelf bins and baskets
- Perfect to store and display
We've taken one of our most popular plans, the Rustic X Console, and made it outdoor friendly and NOT require a pocket hole jig!
How is the Farmhouse Console Table different than the Rustic X?
- Faster and easier to build - just screw together. No pocket holes required.
- A little less expensive to build since no 1x12s are used
- Very easy to modify the size
- Slatted shelves
- Will have exposed screw holes (Rustic X uses pocket holes so all screw holes are hidden)
- Will be slightly heavier overall (both are solid wood so quite heavy)
Video of Matching Coffee Table Build
To see how this console table is put together, please watch our video on the matching Farmhouse Coffee Table. The construction techniques are the same. This video is especially helpful for cutting the X on the end.
The plans for the matching Farmhouse Coffee Table are here.
Is there a matching End Table Plan too?
Yes! We posted plans for the matching end table in two size options here.
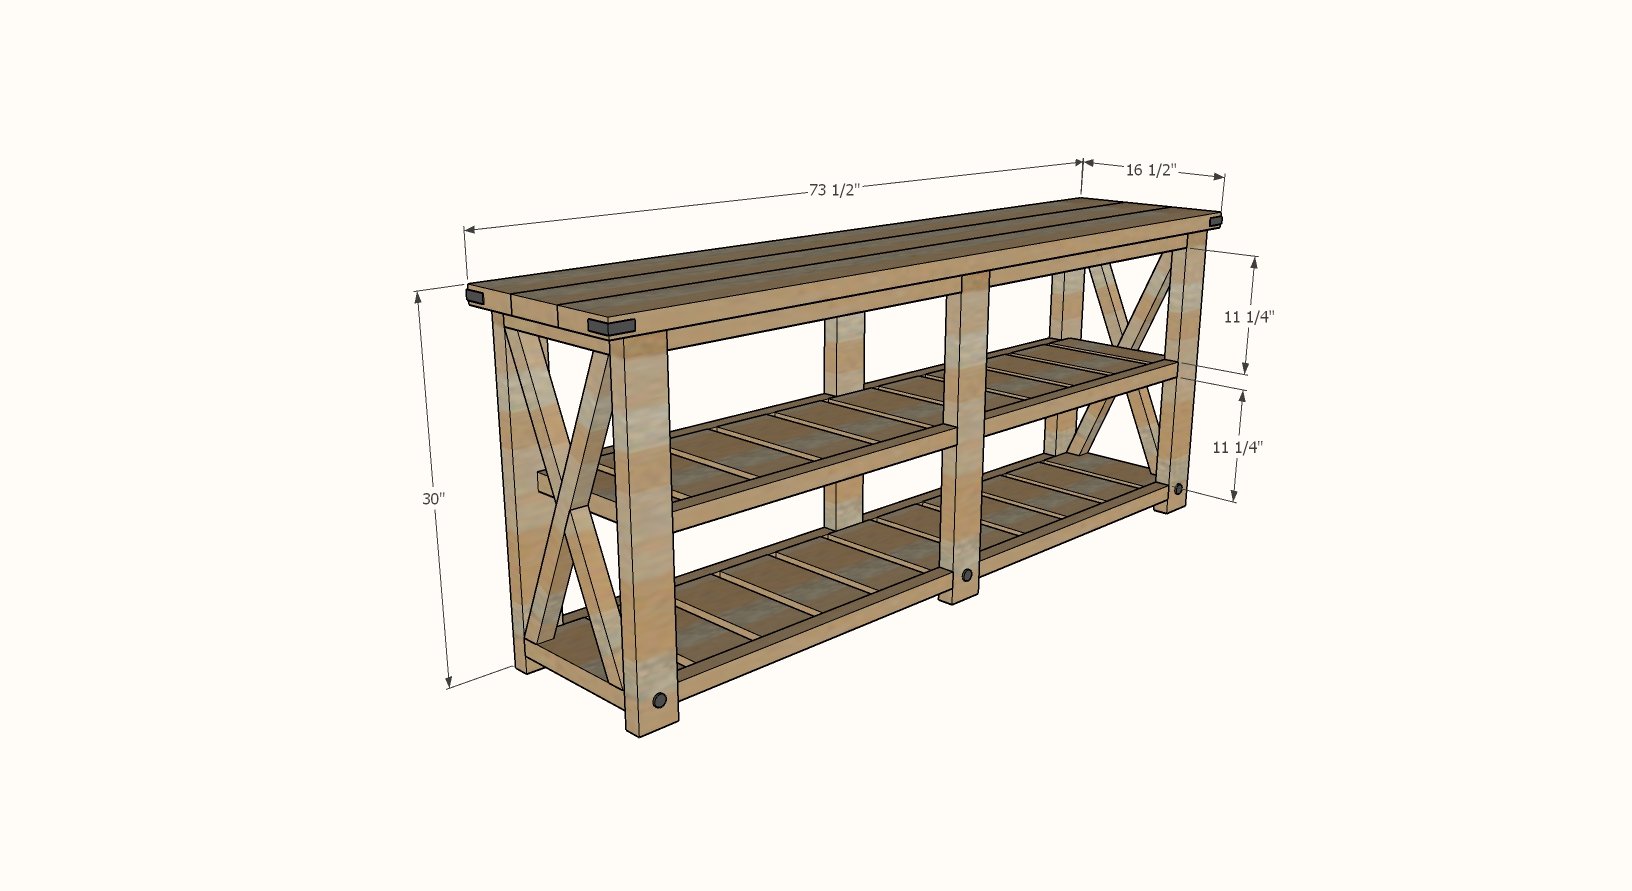
Farmhouse Console Table Plans
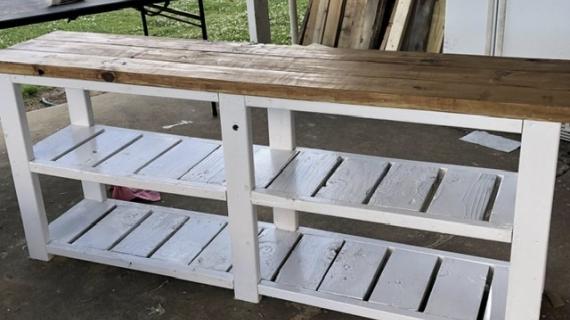
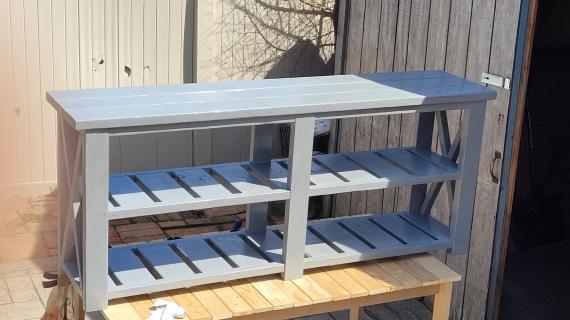
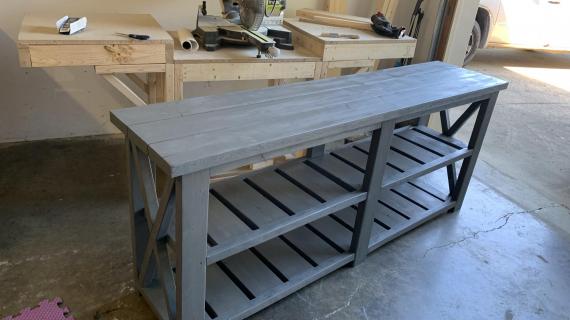
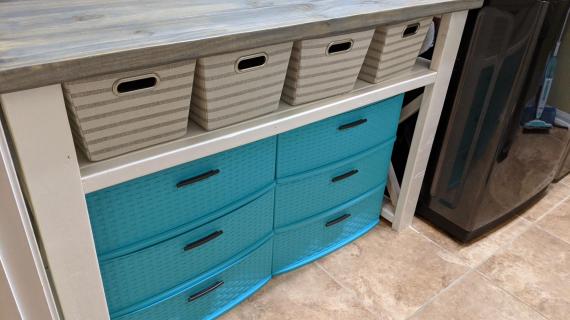
One of our readers, Jessica, was kind enough to build and photograph this project for you! Jessica did say the many shelf pieces were a little tedious to add (there's alot of them!) but she had alot of fun building it and did an amazing job!
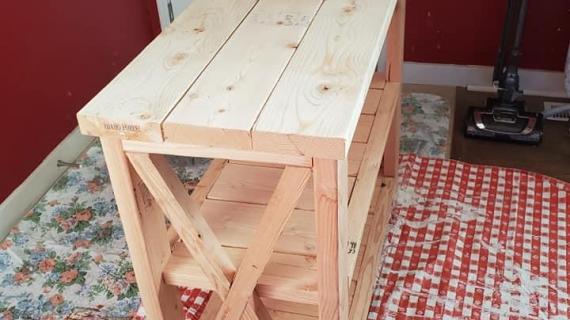
First, she built the legs. Notice how the top and bottom horizontal pieces over extend past the leg?
That is so it's easy to connect to the other legs! Then, just flip it over and attach the top -
This is nice because there's no screw holes in the top.
She opted to use pocket holes (optional) for attaching the bottom shelf boards.
There is alot of shelf boards, so this will be the most time consuming part. Just hang in there and get it done!
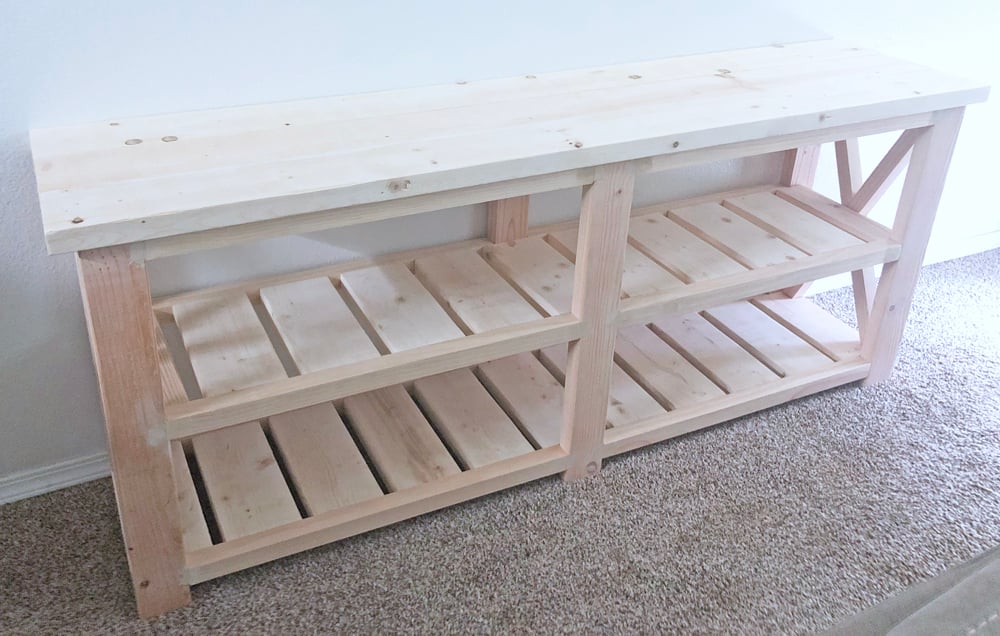
Here it is unfinished.
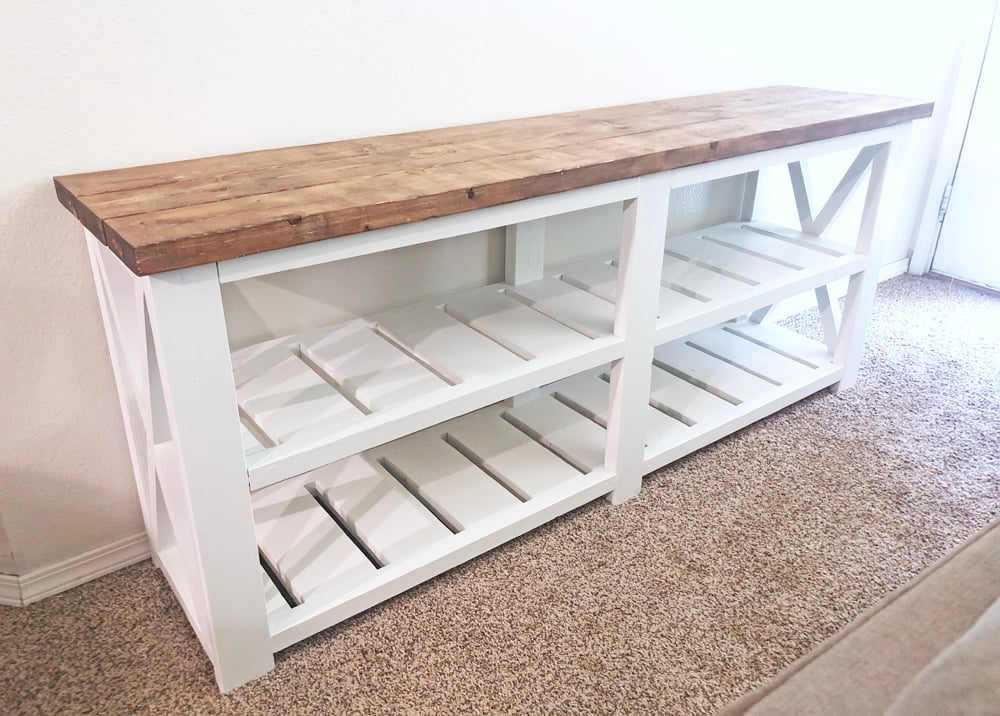
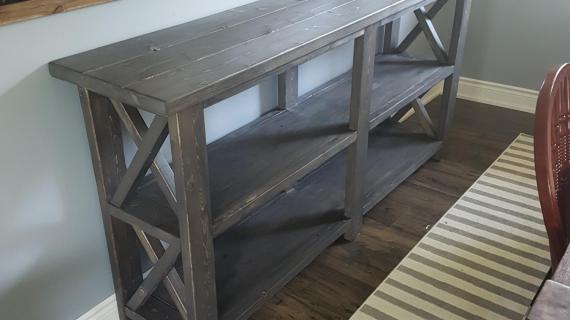
We love the two tone finish that Jessica did. This piece is beautiful!
Your turn now! The free plans are below, enjoy!
Pin For Later!
Preparation
- 6 - 2x2 @ 8 feet long (yes, you can use 2x2 furring strips)
- 6 - 2x6 @ stud length or 8'
- 2 - 2x4 @ 104-5/8"
- 100 - 2-1/2" self tapping trim screws like these
- 6 - 2x4 @ 28-1/2"
- 23 - 2x6 @ 12-1/2" (Since you are cutting SO many of these, consider clamping a stop block to your saw so you can speed up the cutting and keep the cuts consistent)
- 4 - 2x2 @ 26-1/4" - long point to short point, both ends cut at 24 degrees off square, end ARE parallel (this is the X pieces - you can cut to fit if you adjust the plans at all)
- 2 - 2x4 @ 12-1/2"
- 12 - 2x2 @ 30"
- 3 - 2x6 @ 73-1/2"


Instructions
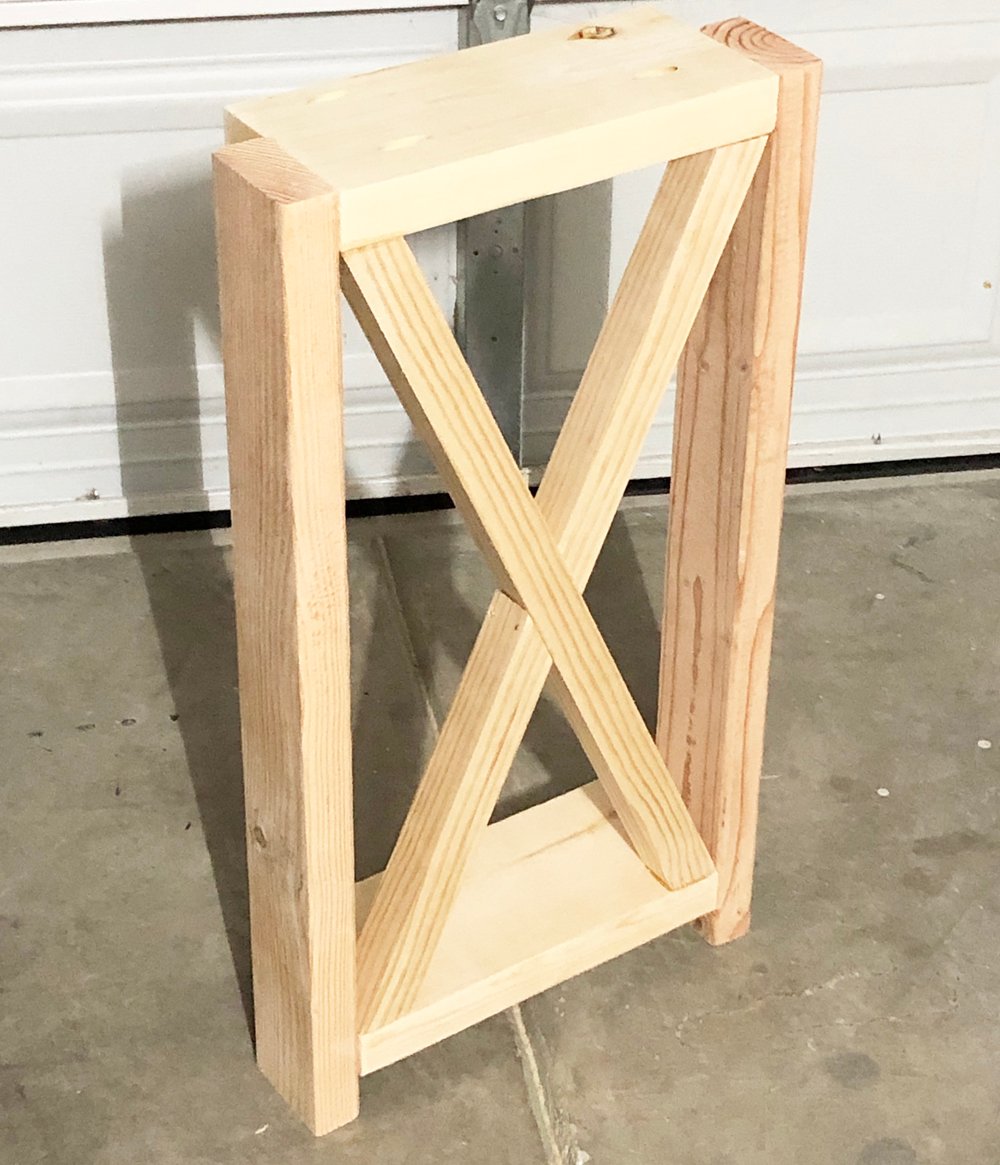
Step 1
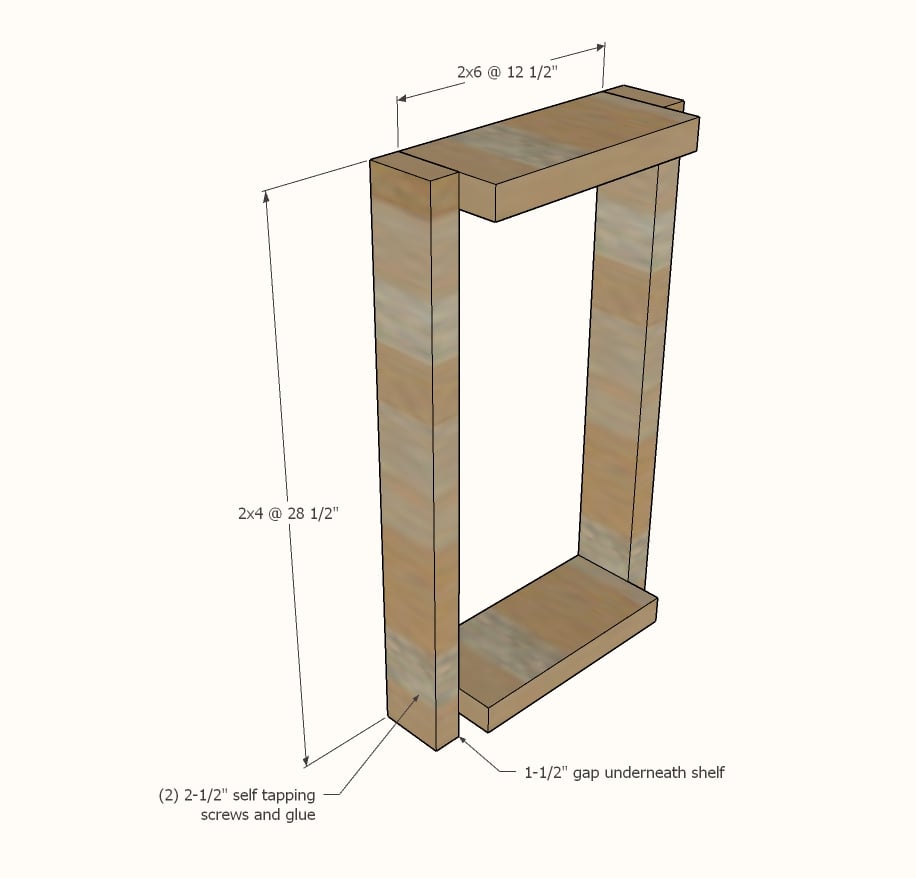
Build TWO end leg sets as shown below.
You can use a 2x2 block under the bottom shelf to help with getting the height right as you assemble.
Step 2
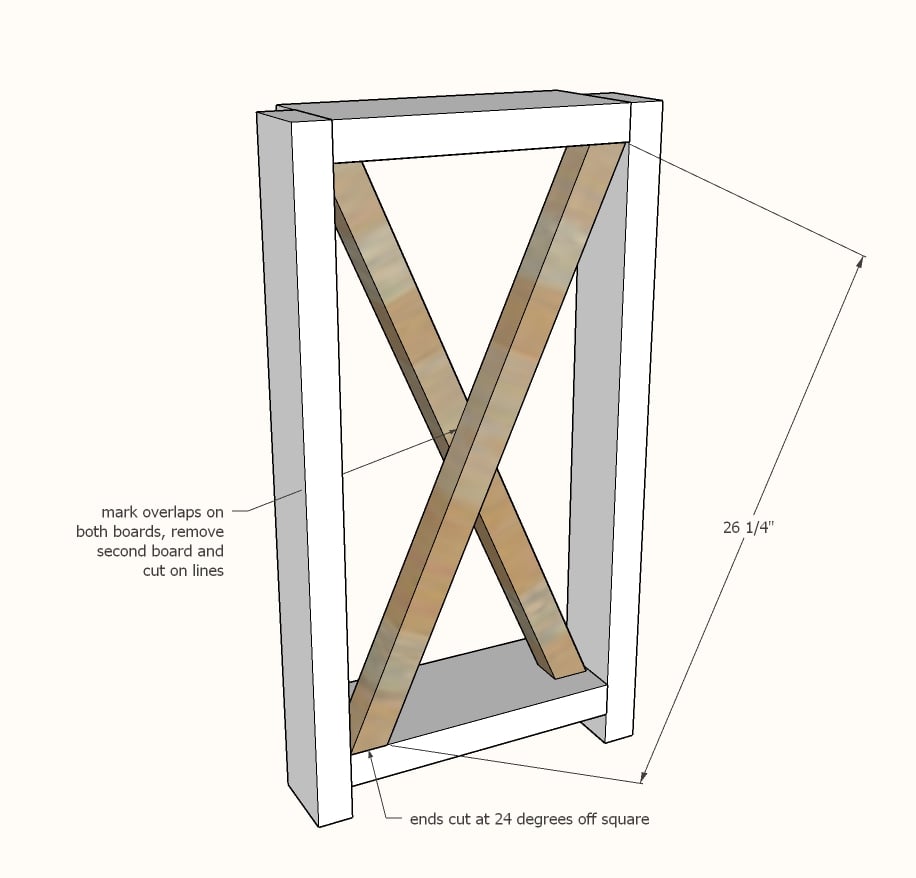
Dry fit the two X pieces inside the legs.
Trace overlaps with a pencil on BOTH pieces.
Cut only one of the 2x2s on the pencil lines.
TIP: In the matching Farmhouse Coffee Table video, we go through this process in detail.
Step 3
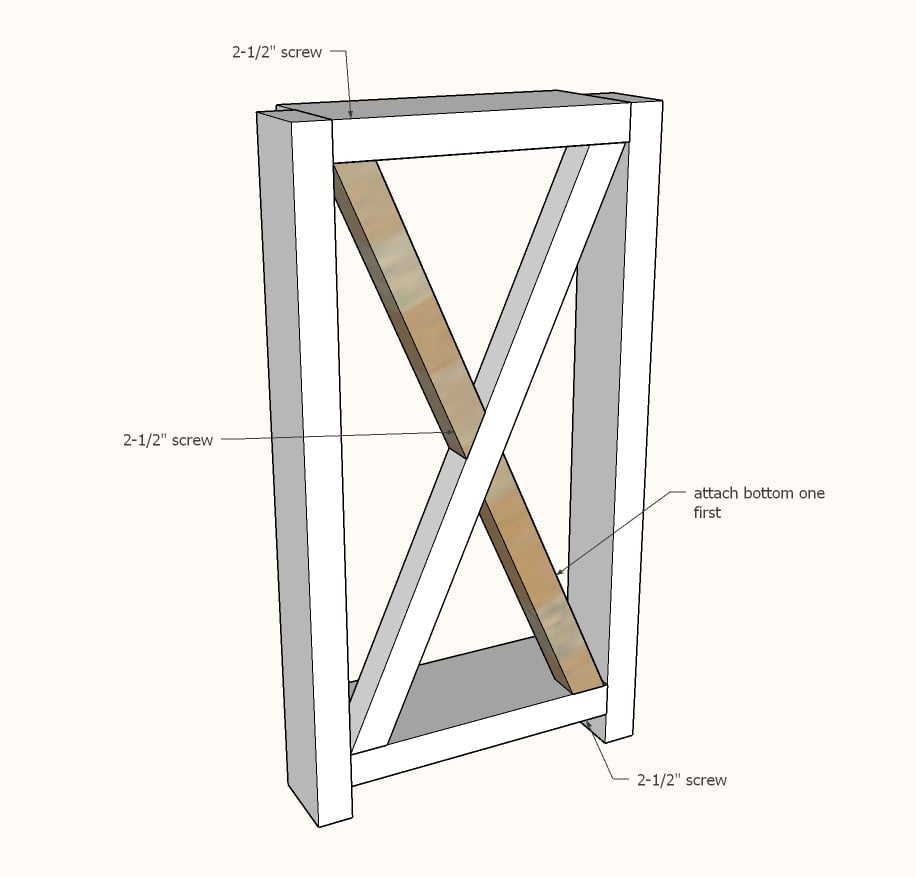
Attach the full 2x2 first inside the leg.
Then attach the lower shorter 2x2, matching the pencil lines traced on the full length 2x2.
Attach upper. You'll need to screw at a slight angle to get the second board in (or you can just glue and clamp since the 2x4 in the next step will hold in in place as well).
Step 4
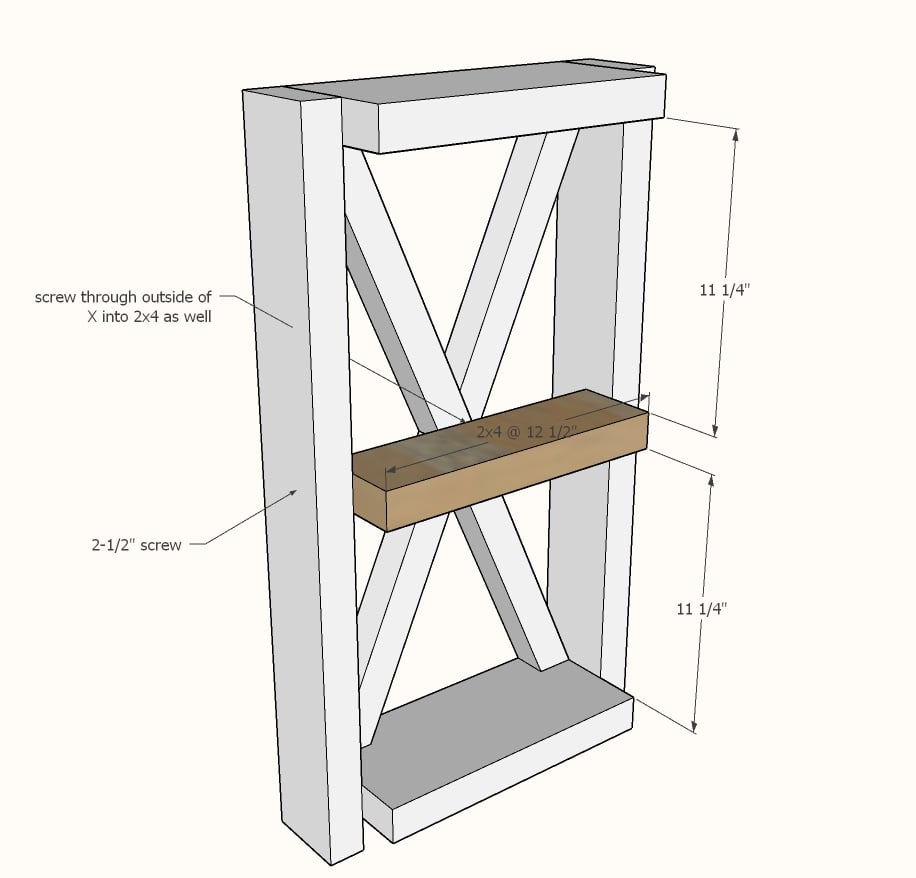
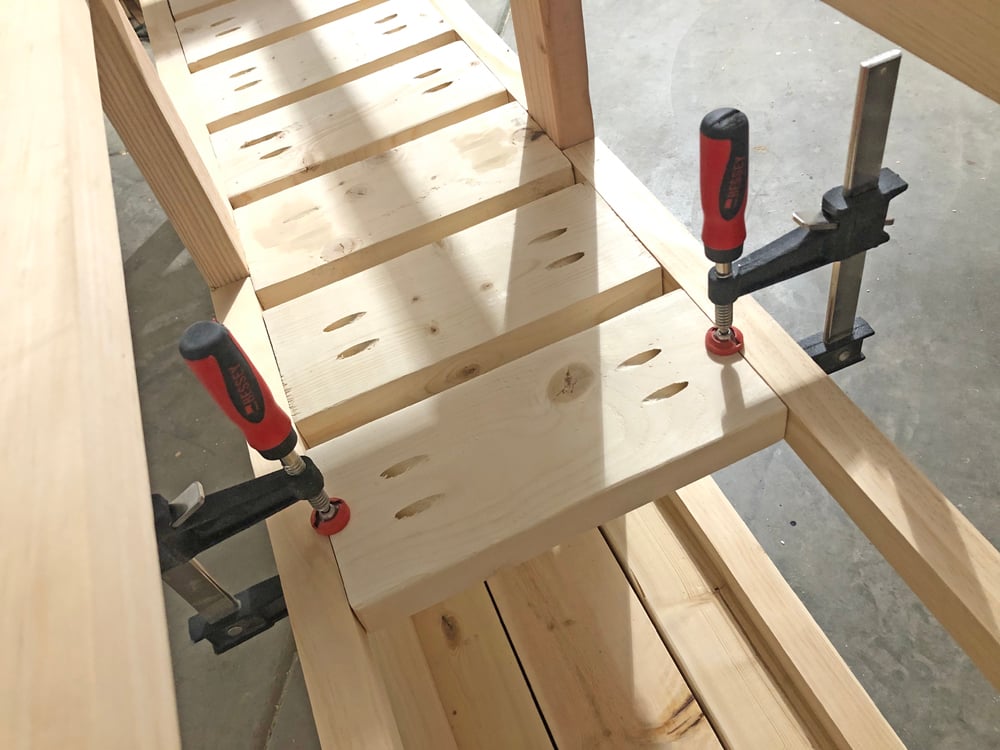
Attach shelf 2x4 as shown, screw also to the X from outside.
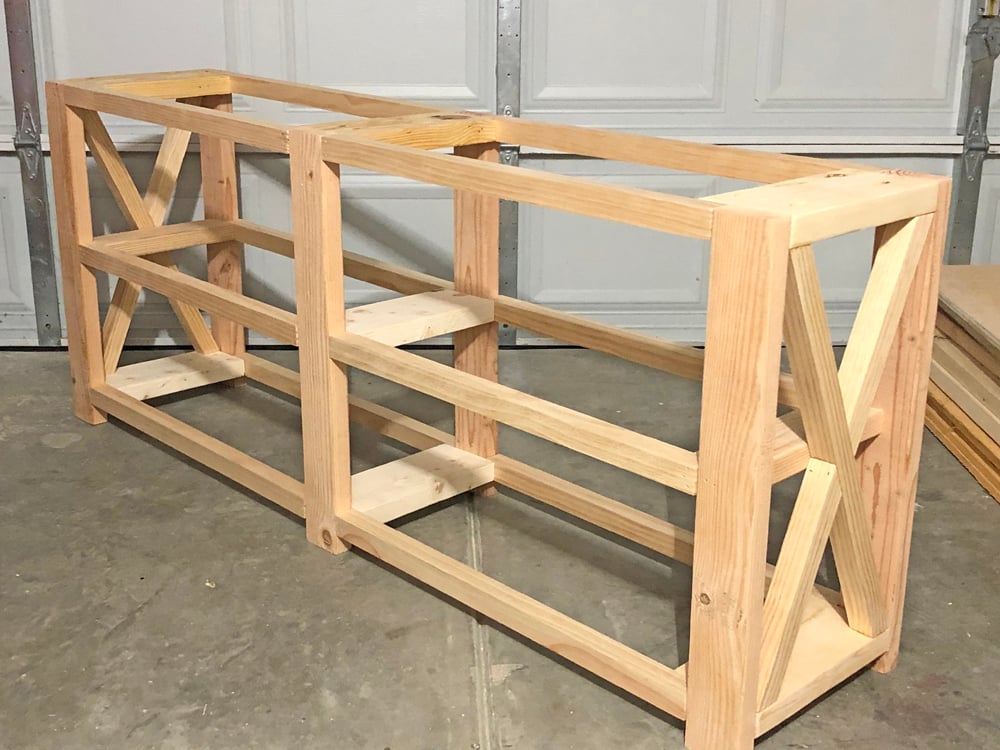
Step 5
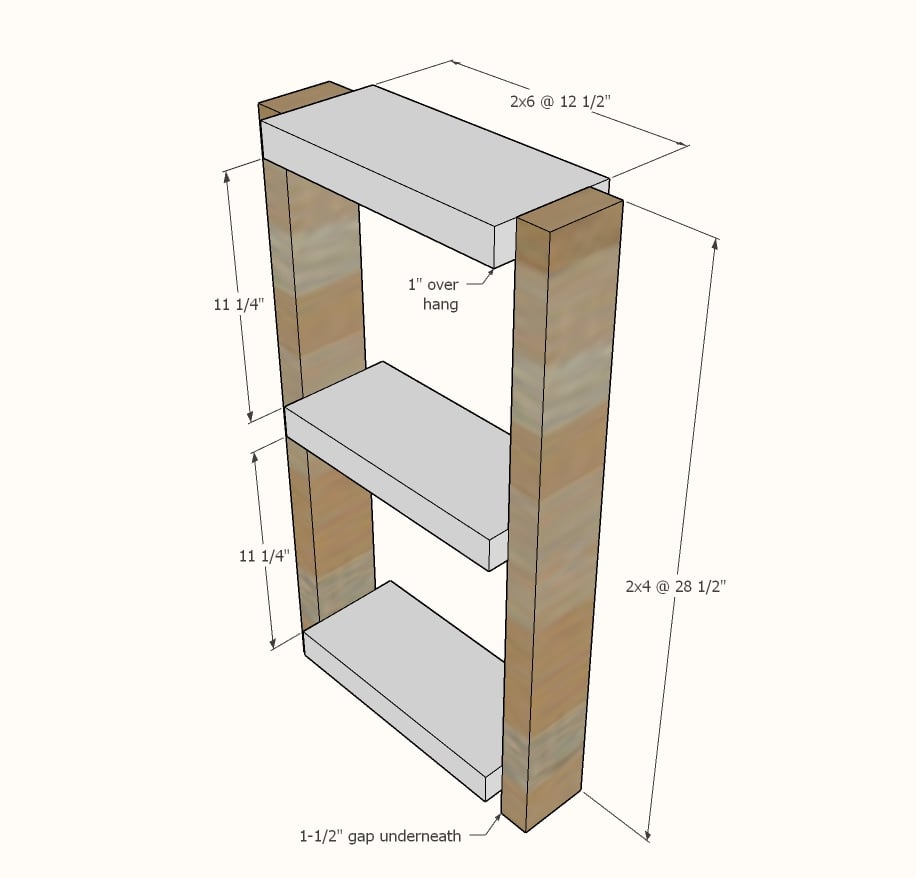
CENTER LEG
Build one center leg as shown.
First, attach the legs to the top 2x6, all top edges flush (work upside down).
Then, flip right side up, and add the lowest shelf, supporting underneath with a scrap piece of 2x material to elevate up 1-1/2"
Now, turn on side, position the middle shelf and attach. Make sure you attach the 2x6 so it is perpendicular to the legs so you don't end up with a crooked shelf.
Step 6
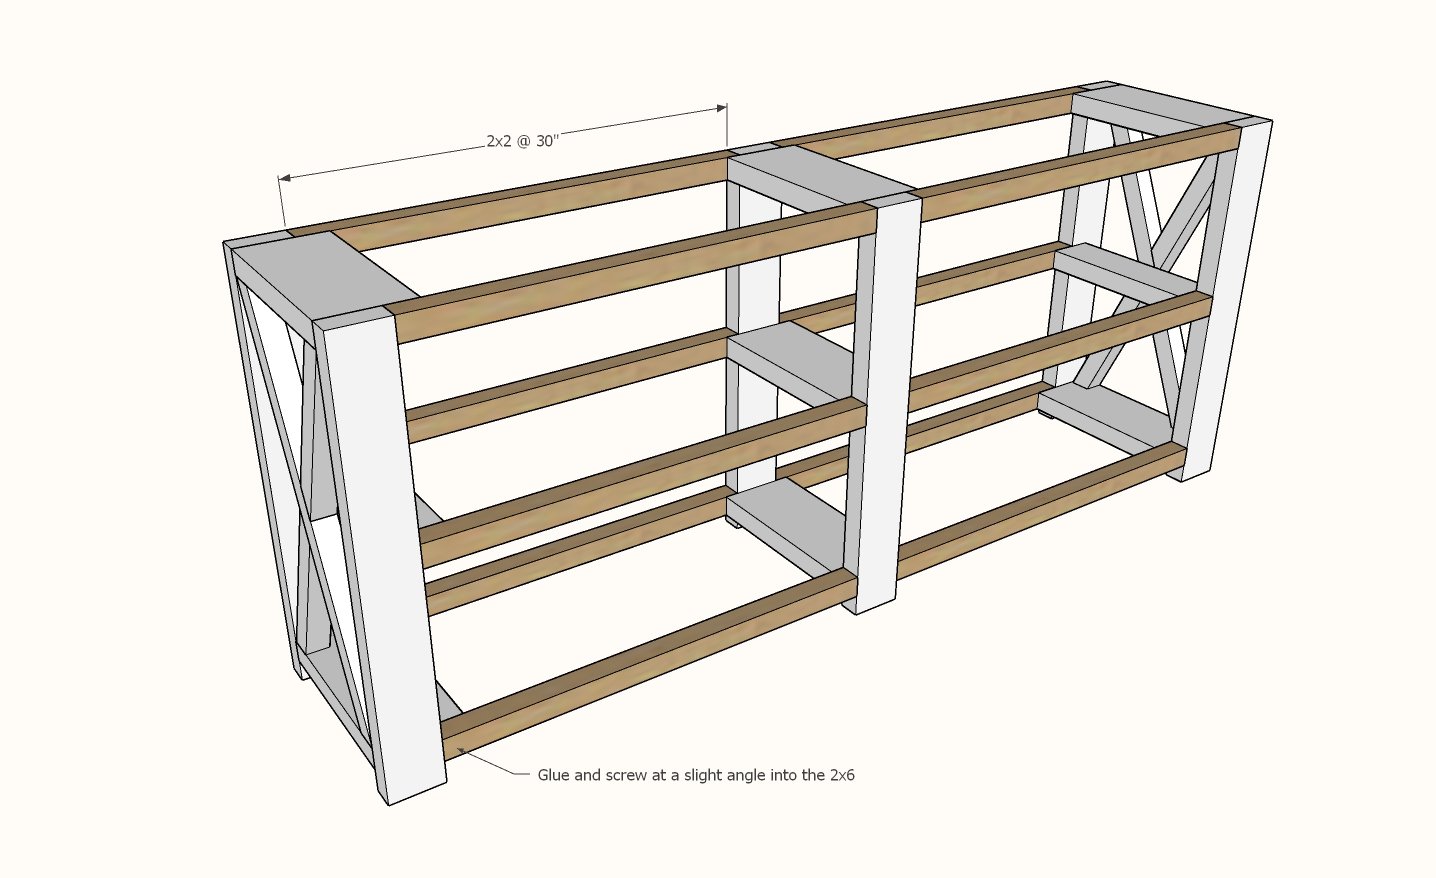
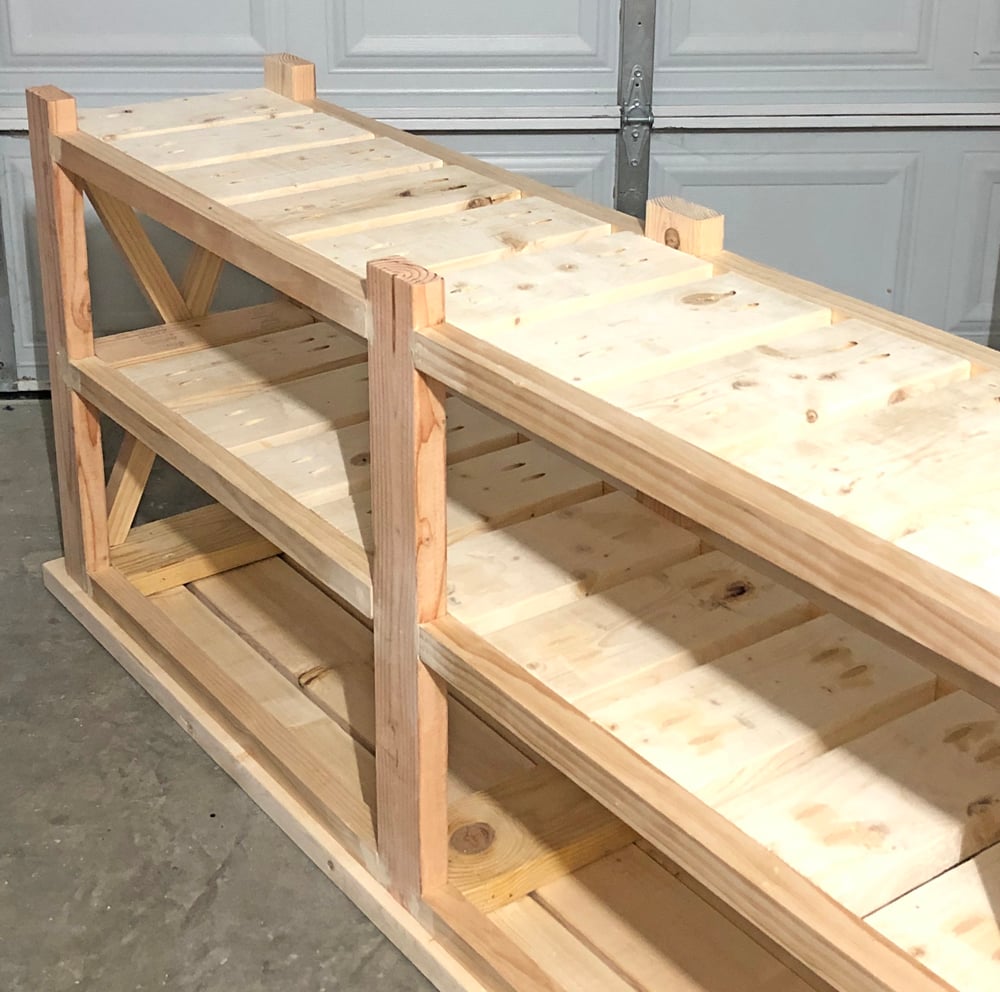
Place all the legs on a flat, level surface, about 30" apart (a second hand might be very helpful here).
Attach legs together with the 2x2s.
Screw at a slight angle, so the screws act as hooks into the wood and not pivot points. Use ample glue at all joints.
NOTE: Be cautious of assembling this step on garage floors as they often slope to a drain.
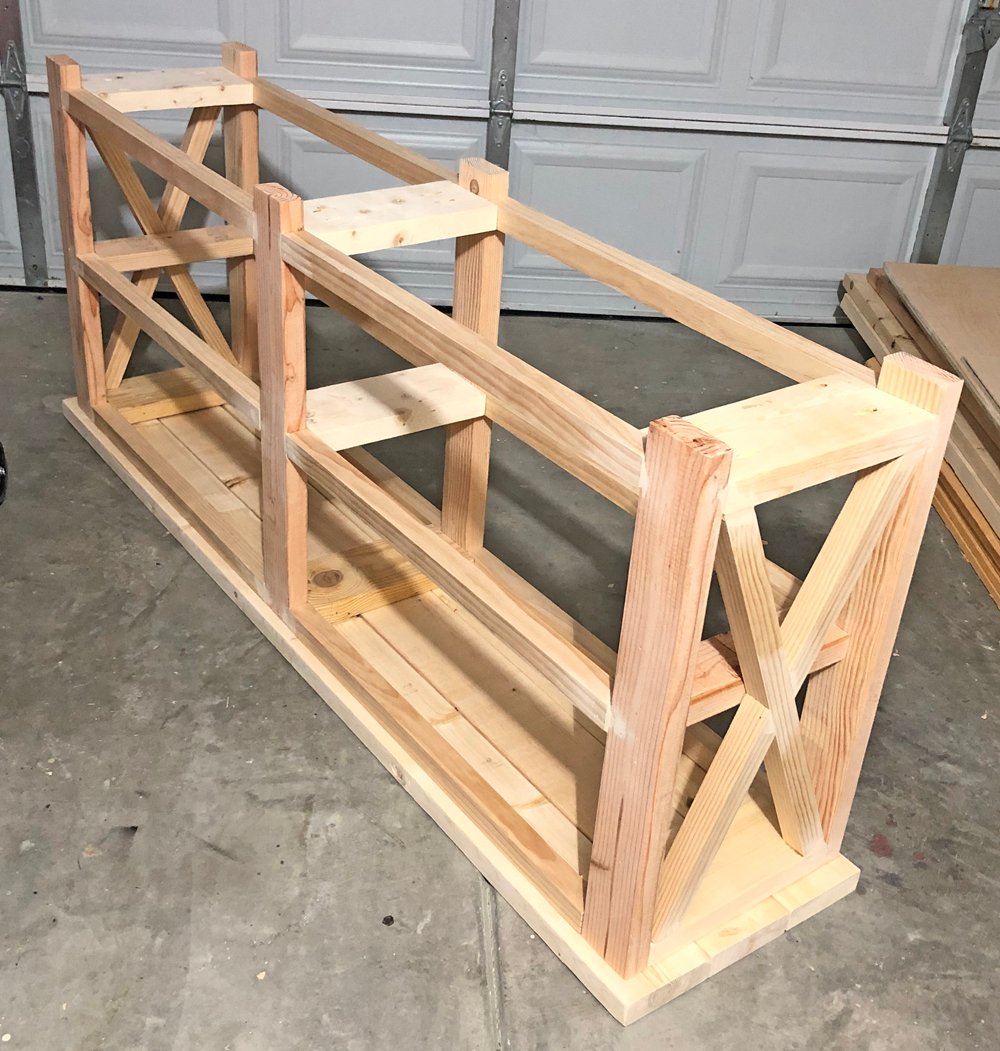
Step 7

If you have a Kreg Jig, first attach the tabletop boards together. If not, no biggie.
Lay the tabletop boards down on a flat, level surface.
Place console table frame centered on the tabletop boards.
Attach from underneath with 2-1/2" screws.
Step 8

Add shelf boards with a 1" gap in between to the shelves, two screws per joint.


Comments
annab3
Fri, 12/27/2019 - 11:15
Bolts at the base
Where did you find the decorative bolts that are attached at the base? I love how it looks more refined with the bolts and wanted to try and match your example.
Ericav720
Sun, 03/29/2020 - 17:47
Half size
Love this! How can I make this table, but half the size lengthwise? Which items and dimensions on the shopping list need adjustments? Thanks in advance!
anniebutler6
Wed, 05/20/2020 - 04:59
I"m wondering the same…
I"m wondering the same. Would we need the middle support structure?
Lisa_ Patrick18
Sun, 05/24/2020 - 17:12
I'd like to know also. I…
I'd like to know also. I only want mine 60" long. Trying to figire out how to work it.
Snaxxtrax
Sat, 06/27/2020 - 13:59
Half Size
Did you ever get a response on this? Did you build this yet? I'm about to take this one on and intend to make it 1/2 the size as well...lengthwise. No middle "beam"....possibly squatier as well as I need it to put a TV on in the basement to create a little workout space. LMK? Curious. Thanks (this would be my first AW project. :) )
KristyGlassick
Tue, 09/08/2020 - 08:59
Half-Size Modified Plans
Hey there,
I modified the plans for this table recently, and it worked out perfectly. Here's what I did:
Tabletop
Reduced length of 2x6s to 37 1/2" - this allowed for a 1" overhang
Ends
I set the Xs 1/2" into the end structures so the middle shelf would line up with the top and bottom (1/2" inset + 1 1/2" X + 3 1/2" 2x4 = 5 1/2" like the top and bottom)
Shelves
I cut the 2x2s at 28 1/2". I used 4 of the 2x6 "slats" across the middle and bottom shelves in between the two ends (no need for that middle support piece - I just had the two ends). All said and done, the base structure should be 35 1/2" lengthwise
Cuts:
4 - 2x4 @ 28 1/2" (legs)
2 - 2x4 @ 12 1/2" (middle shelf support)
12 - 2x6 @ 12 1/2" (top and bottom support, slats for shelves)
4 - 2x2 @ 26 1/2" (Xs)
6 - 2x2 @ 28 1/2" (shelves)
3 - 2x6 @ 37 1/2" (tabletop)
This doesn't affect the above, but fwiw I used pocket holes, which worked out great.
Wish I could upload a diagram for clarity, but I hope this helps!
Kristy
KristyGlassick
Tue, 09/08/2020 - 09:06
Sorry, one mistake there -…
Sorry, one mistake there - it was 26 1/4" for the Xs, I didn't modify that in any way. :)
09cydney
Thu, 09/24/2020 - 12:14
This is so helpful! If you…
This is so helpful! If you have a project plan, I’d love to check it out. I plan to follow your instructions for this half size.
HilliaryBeck
Sat, 11/07/2020 - 13:53
Hi there, I was just…
Hi there, I was just wondering how many pieces and sizes of wood that you purchased? I assume it'll be quite a bit less than Ana's list! I was wanting to make mine the same size as yours!
Thank you :)
Chris_Colonna
Mon, 05/10/2021 - 11:27
I just finished this half…
I just finished this half sized table and for what it's worth, here is my supply and cut list. Note that I ripped my own 2x2s out of 2x4s so there are some notes relative to that. Hope this helps.
Also, read the note about the X pieces needing to be longer than 26 1/4" so you don't waste wood like it did.
Purchase list:
2 - 2x4x8'
4 - 2x2x8' (2 - 2x4x8')
3 - 2x6x8'
Cuts:
3 - 2x6 @ 37 1/2" (tabletop)
12 - 2x6 @ 12 1/2" (top and bottom support, slats for shelves)
4 - 2x4 @ 28 1/2" (legs)
2 - 2x4 @ 12 1/2" (middle shelf support)
4 - 2x2 @ 26 1/4" (Xs) cut longer to allow for miter
6 - 2x2 @ 28 1/2" (shelves)
Cuts per 8' piece:
2x6 - 37.5, 37.5, 12.5
2x6 - 37.5, 4 12.5
2x6 - 7 12.5
2x4 - 3 28.5
2x4 - 1 28.5, 2 12.5
2x2 - 3 28.5
2x2 - 3 28.5
2x2 - 3 26.25
2x2 - 1 26.25
rhitzy45
Sat, 09/26/2020 - 17:11
Awesome plans. We just built…
Awesome plans. We just built a 9 foot buffet table based on this design. We used 6x2s on the ends. I'm not sure how to post our photos of it, but we would love to share the progress.