
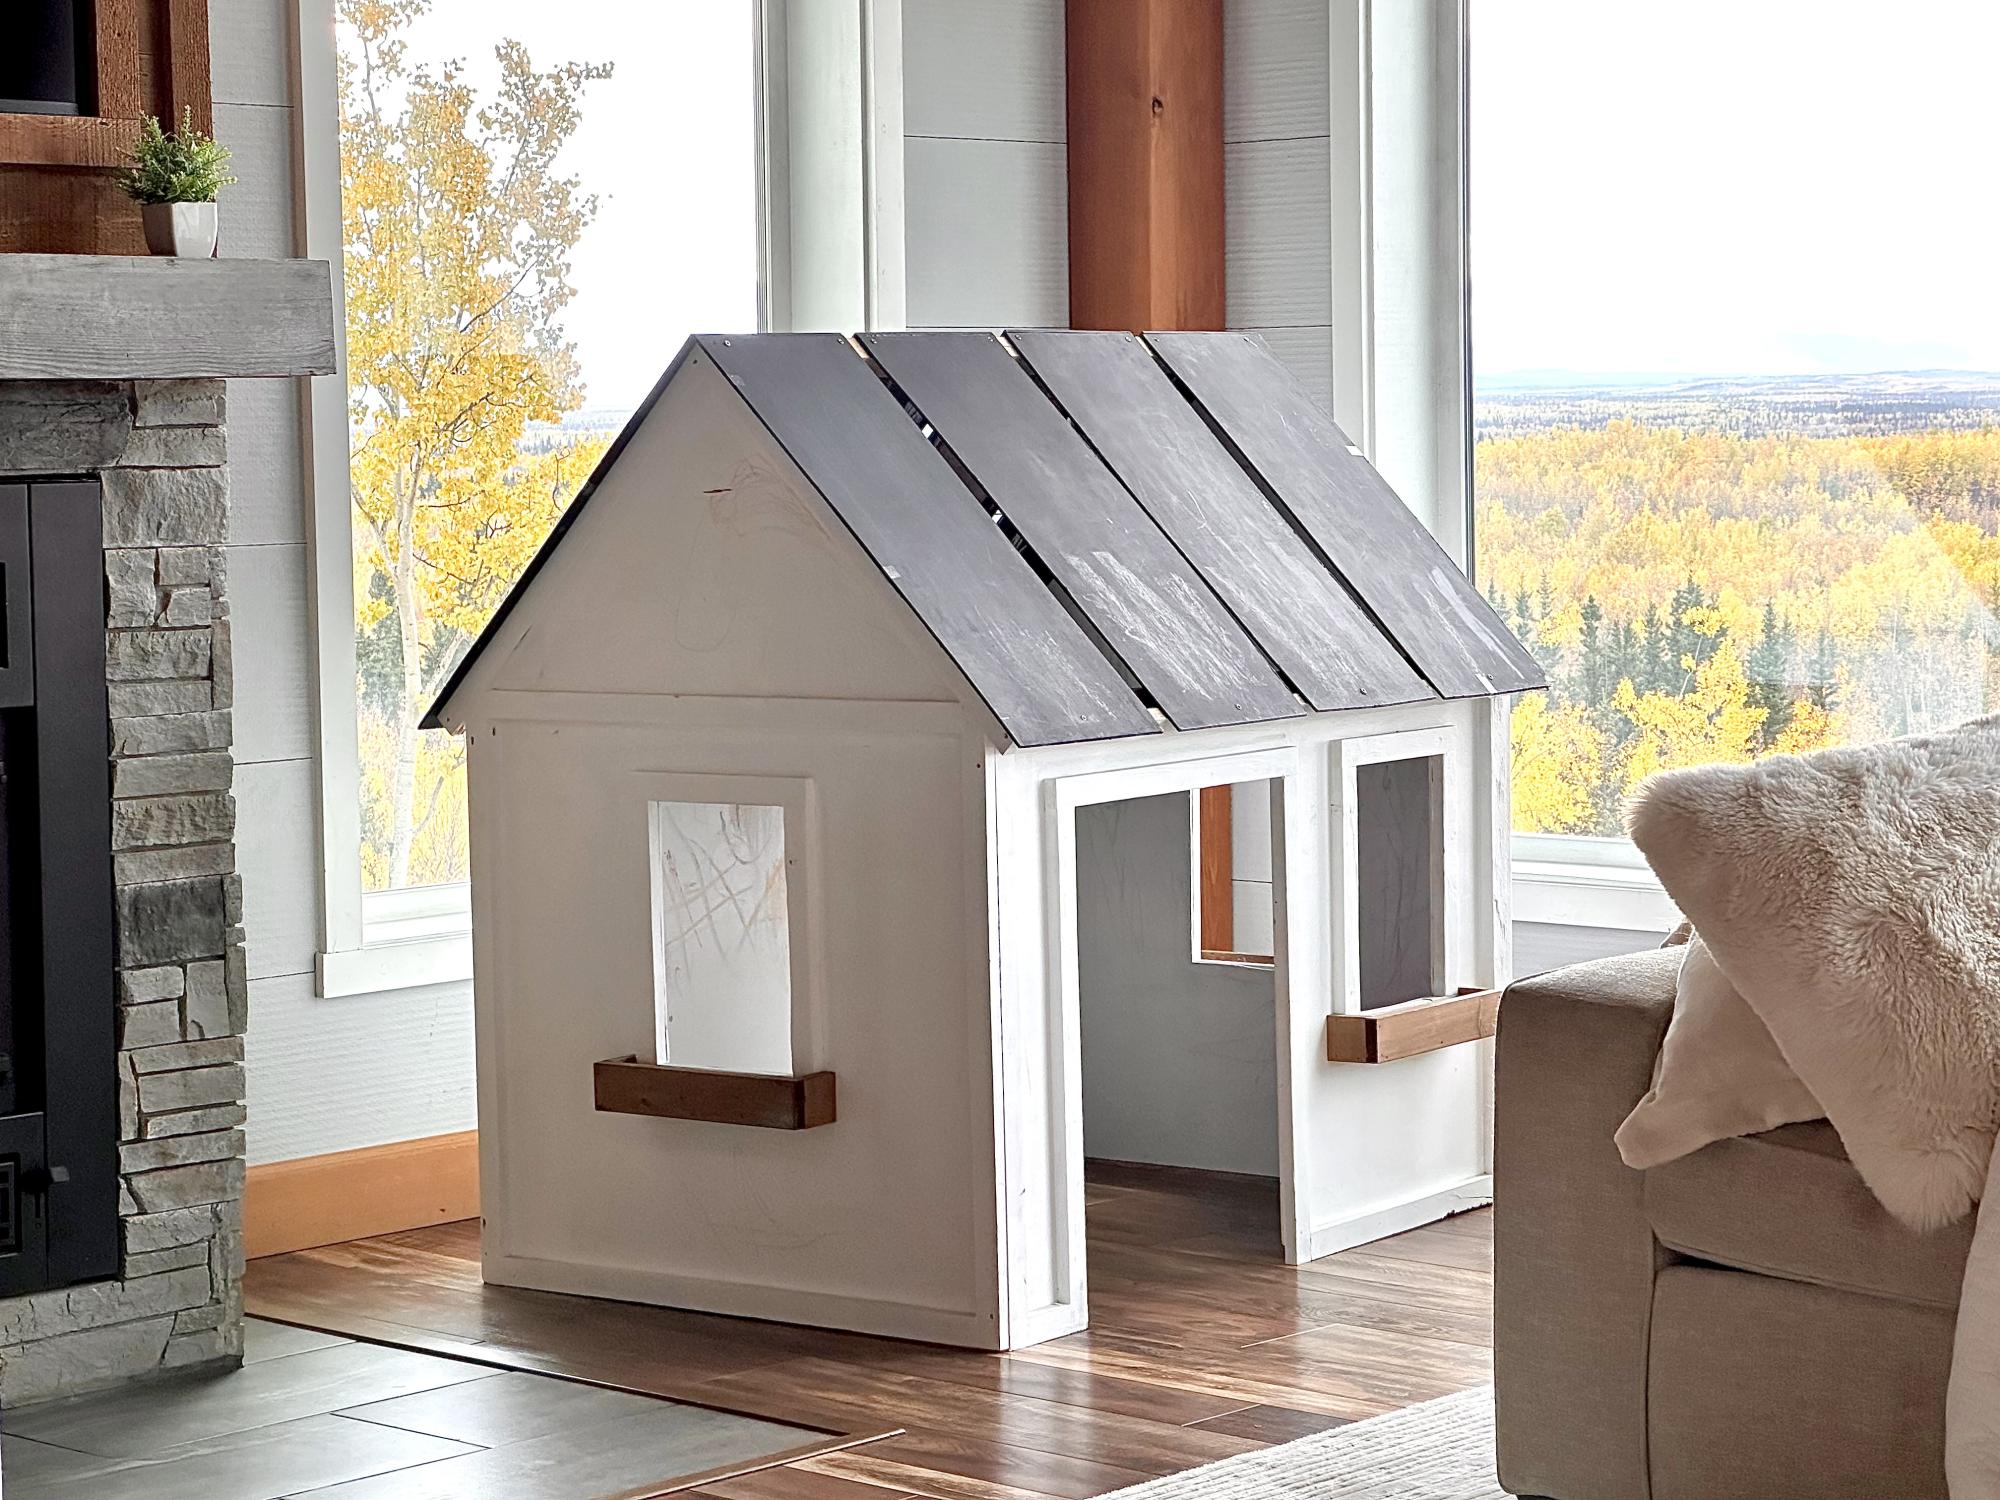

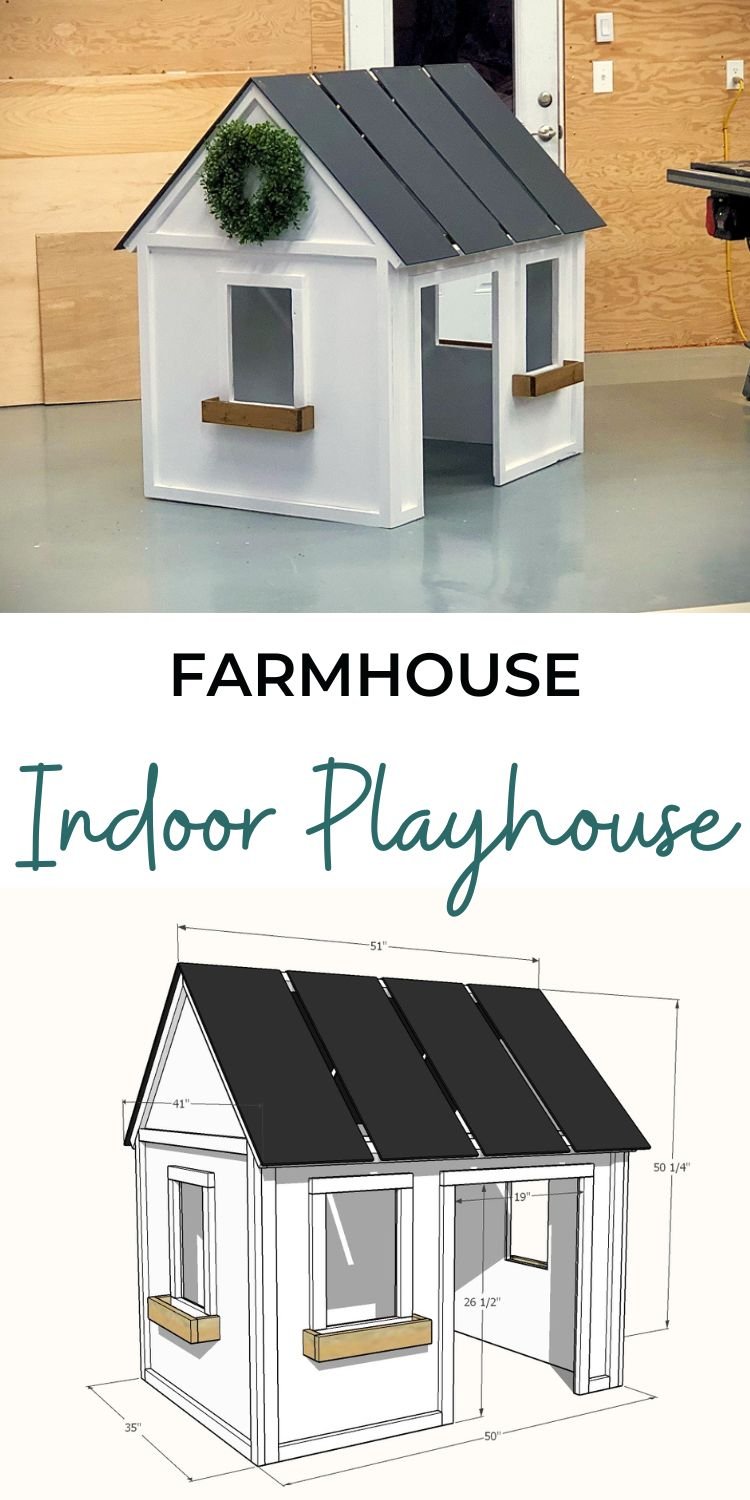
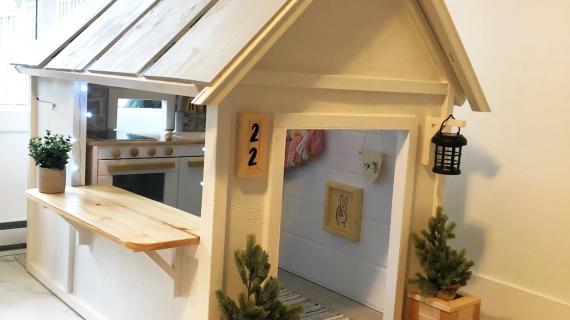
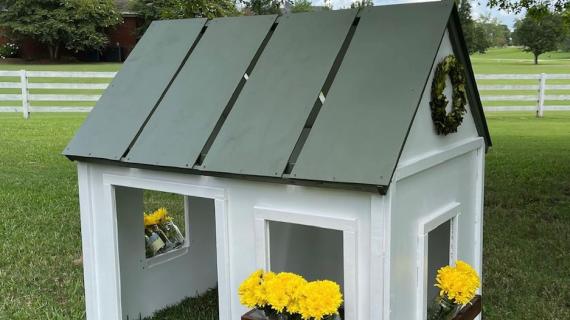
Free plans to build your own indoor playhouse! Sized similar to play tents, so it fits anywhere, but won't break and feels more like a playhouse. This well thought out plan maximizes material use. About $50-$100 to build (depending on local lumber prices).
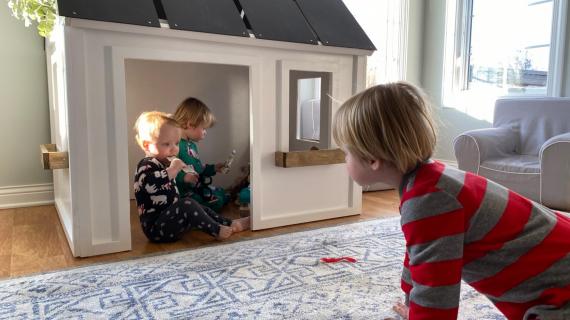
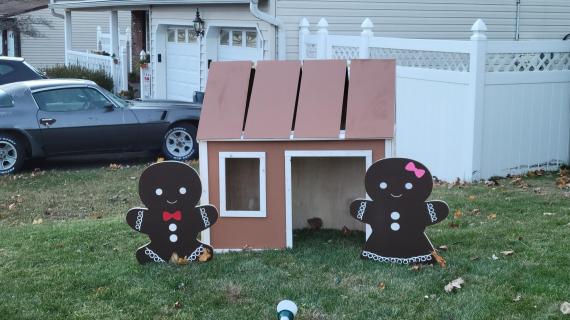
UPDATE: After many years of use, kids climbing on the roof, "decorating" with crayons, the playhouse is still in good condition and used all the time! This is a great plan that my kids have loved for years, has held up well, and looks pretty in my living room (although could use a new paint job).
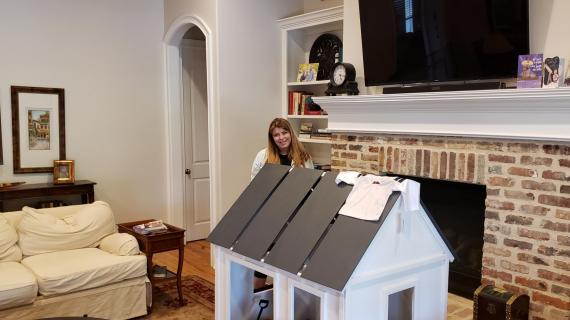
I just built my toddler daughter this adorable little indoor playhouse, and it turned out so cute, I am beyond excited for her to see it on Christmas morning!
The Back Story
For my toddler daughter's Christmas gift, I was going to buy her a play tent that looks like a playhouse for the living room. But after shopping around, the play tents suitable to stay up in the main living room cost about $200! Yes, $200 for a kids play tent. Like this one sold out from Pottery Barn Kids. Or this one from Scandiborn. Or this one from Target - so cute, right?
At that price point, I thought I could design and build her something out of wood for less money overall, but higher quality and last longer.
Indoor Playhouse Features
- Portable, so can be set up almost anywhere and doesn't have to be framed into your house
- Small size, will fit in most rooms
- Easy to break down into panels for storage (since you'll want to keep this one around for grandchildren someday!)
- Perfect size for preschoolers
- Sturdy and solid walls - not fabric walls!
- Can be repaired, repainted, reused, and is biodegradable
Free Plans to Build Your Own Indoor Playhouse
Want to build your own indoor playhouse? First, watch the video tutorial -
Then use the free step by step plans below to get your materials and get it built!
Pin For Later!
Preparation
2 - sheets of 1/4" thick underlayment or similar
12 - 1x2s measuring 1-1/2" wide x 3/4" thick x 8 feet long (I used furring strips that were $1.50 each)
1 - 1x3 @ 8 feet long
1 - 2x2 @ 6 feet long
50 pack of 1-1/4" pocket hole screws (coarse thread recommended if using the furring strips)
3/4" and 1-1/4" brad nails
20 - 2" long self tapping wood screws (SPAX or GRK brands) for assembling the playhouse in the room
32 - 1-1/4" long self tapping wood screws (SPAX or GRK brands or similar) for attach roof pieces to frame
wood glue
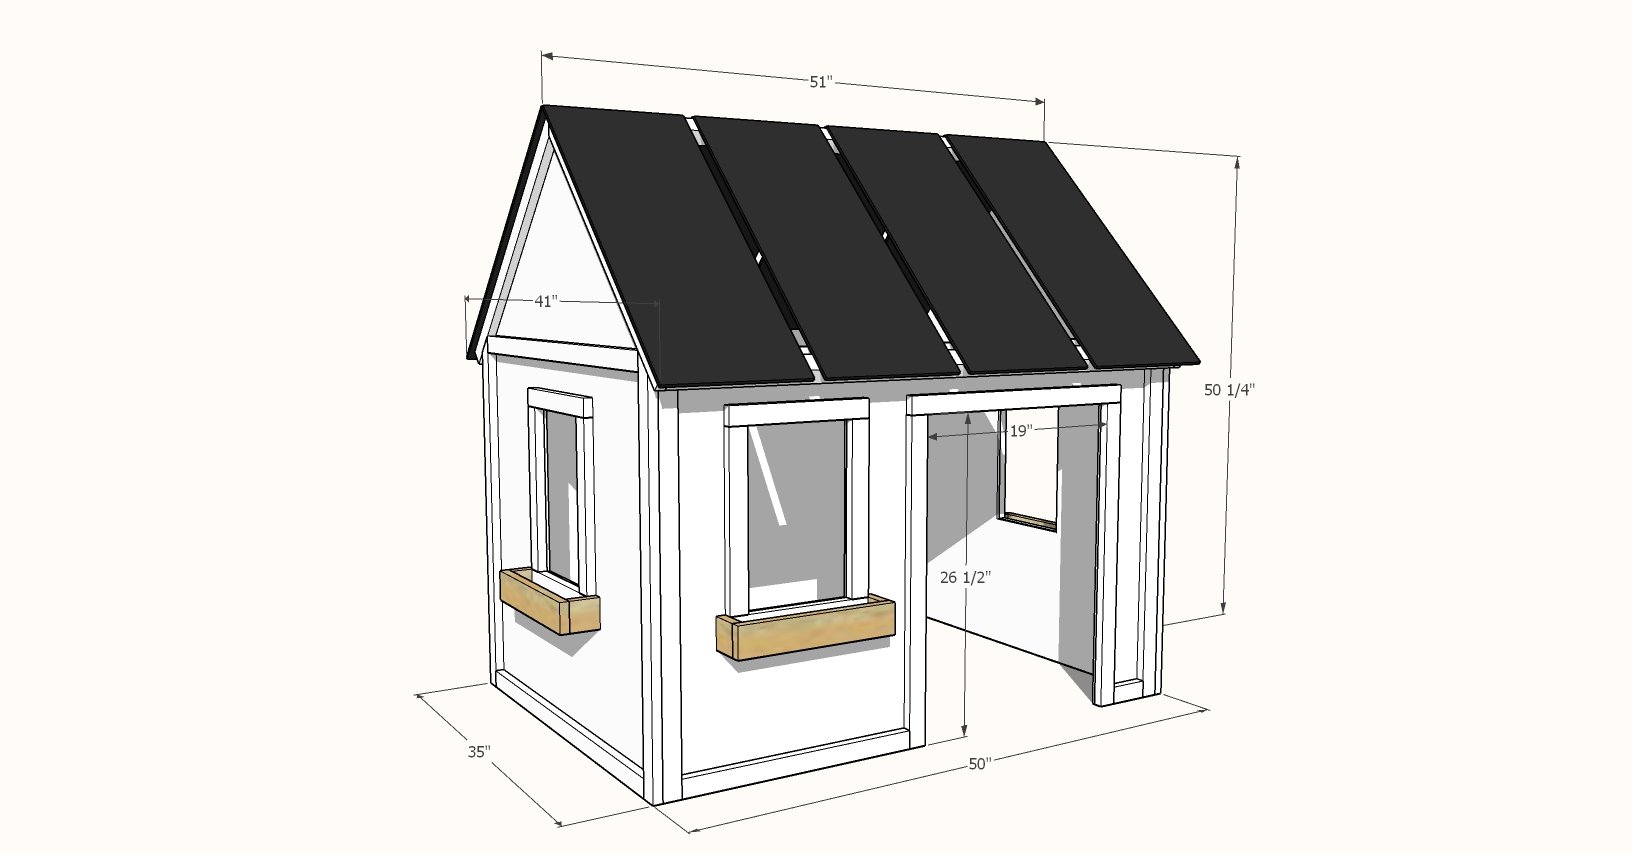
Plywood Panels (cut one from each panel, see step 1)
- 2 - 1/4" plywood @ 33-1/2" x 48" - gable walls
- 2 - 1/4" plywood @ 32" x 48" - front and back walls
- 8 - 1/4" plywood @ 12" x 28" - roof panels
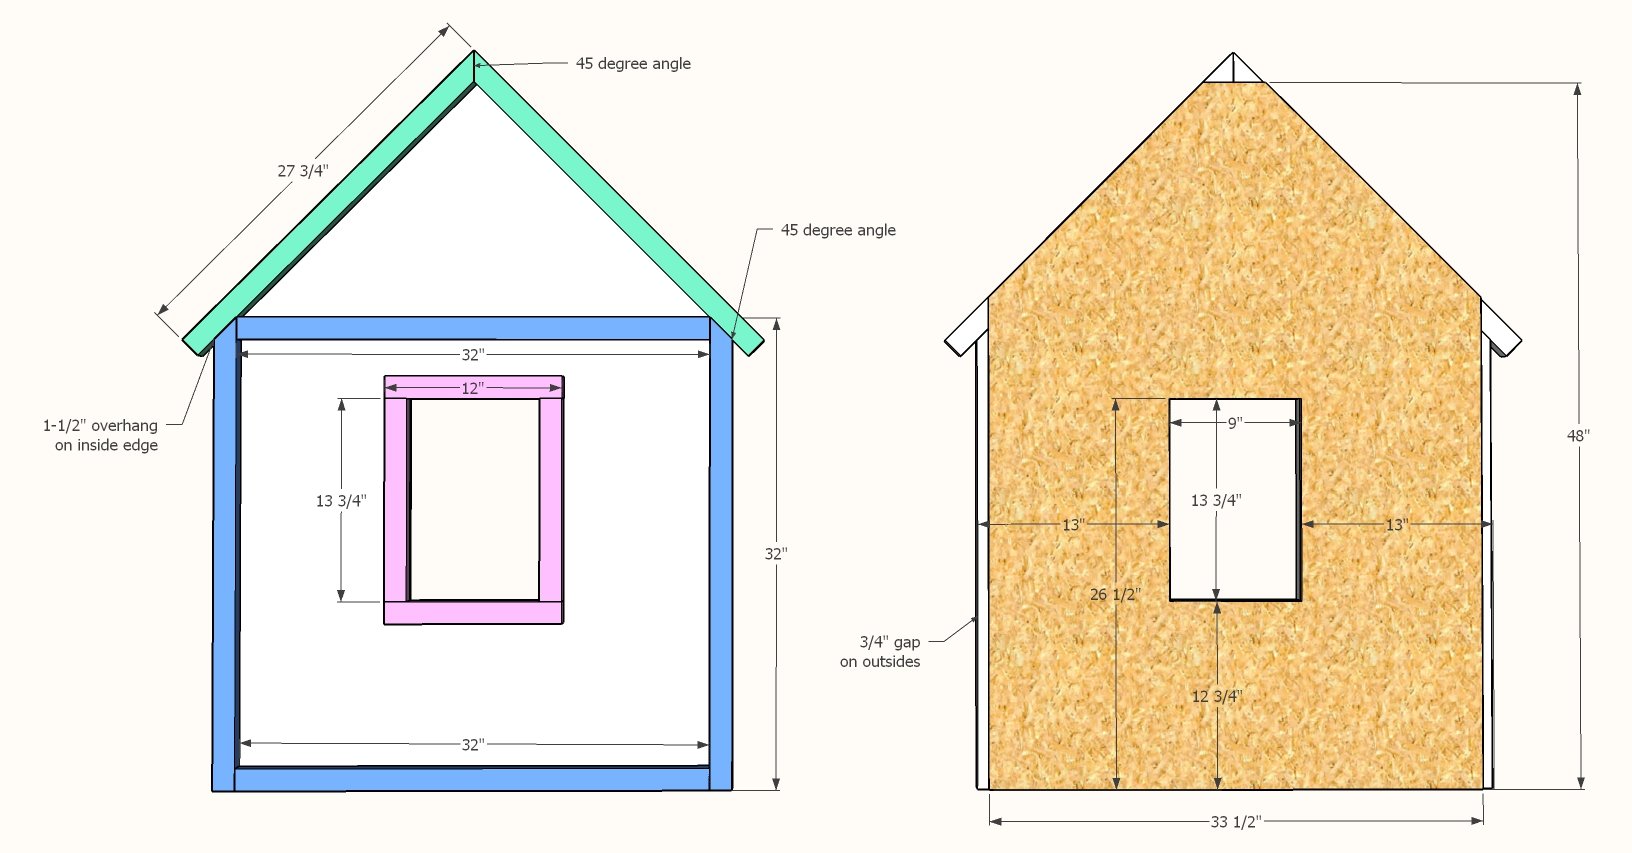
Gable Walls (Sides)
- 4 - 1x2 @ 27-3/4" - longest point measurement, cut one end at 45 degree angle (roof rafters)
- 4 - 1x2 @ 32" - longest point measurement, cut one end at 45 degree angle (corners)
- 4 - 1x2 @ 32" (horizontal trim)
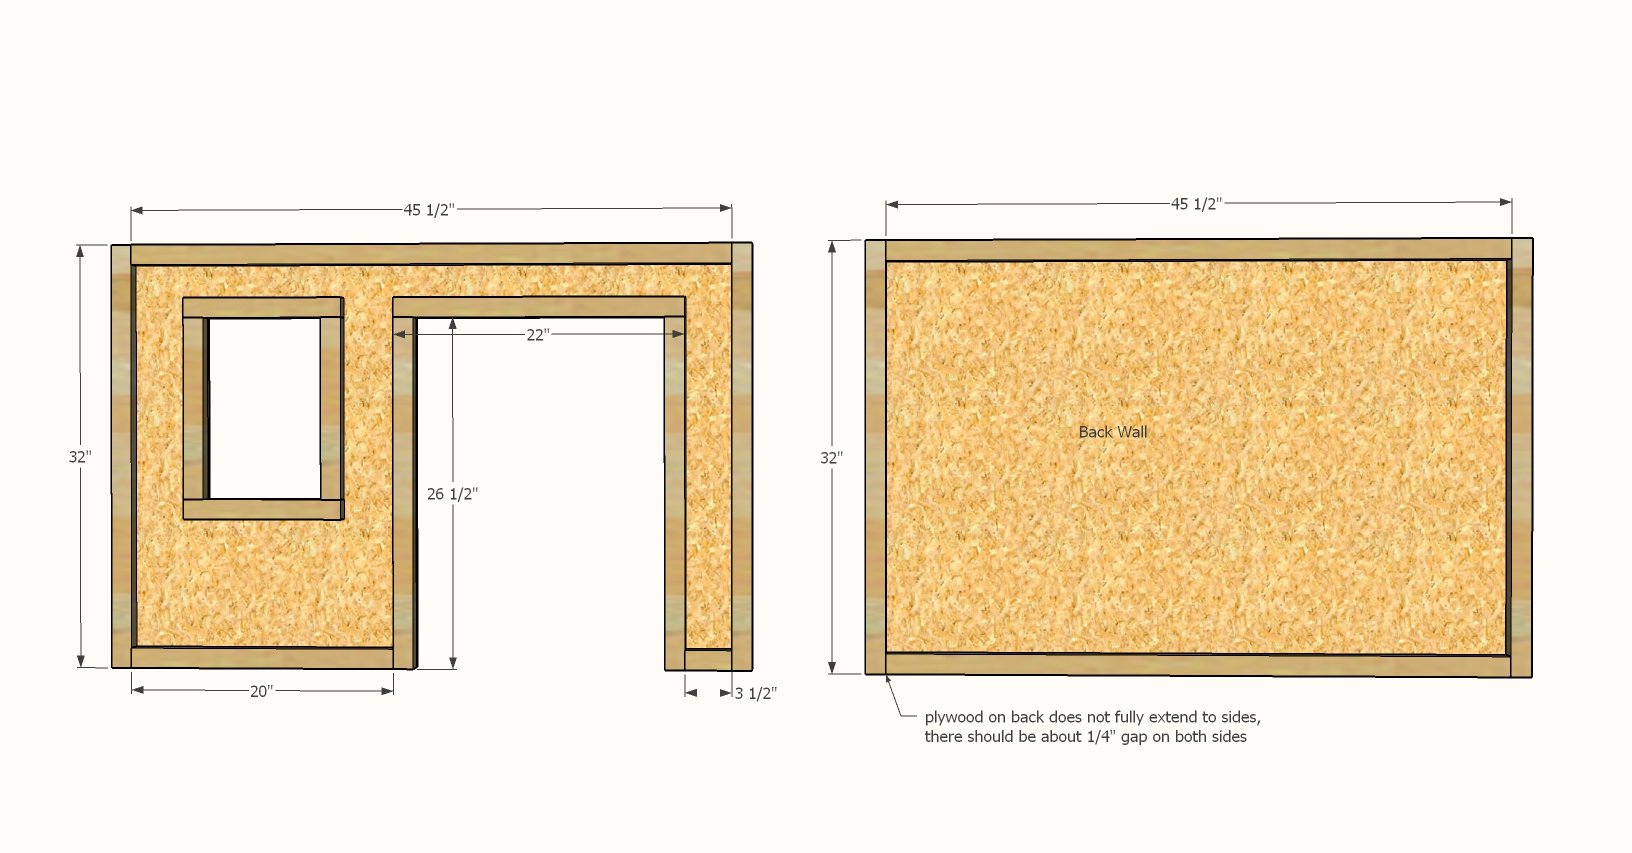
Back Wall
- 2 - 1x2 @ 45-1/2" (top and bottom plate)
- 2 - 1x2 @ 32" (corners)
Front Wall
- 1 - 1x2 @ 45-1/2" (top plate)
- 2 - 1x2 @ 32" (corners)
- 2 - 1x2 @ 26-1/2" (door sides)
- 1 - 1x2 @ 22" (door top)
- 1 - 1x2 @ 20" (bottom plate)
- 1 - 1x2 @ 3-1/2" (bottom plate)
Roof
- 1 - 2x2 @ 48-1/2" (ridge)
- 2 - 1x2 @ 48-1/2" (eaves)
Windows
- 6 - 1x2 @ 12"
- 6 - 1x2 @ 13-3/4"
Window Boxes
- 3 - 1x3 @ 12"
- 3 - 1x3 @ 13-1/2"
- 6 - 1x3 @ 2-1/2" - cut first so you don't have to hold on to a tiny piece while cutting
For the 1x2s, cut the longest pieces first to get all the pieces on the 1x2s.


Instructions
Step 1

Lay the 1/4" plywood panel down on 1x2s and set circular saw blade to depth just past the thickness of the material.
Cut 33-1/2" x 48" pieces. Then measure and mark, and cut the 32" x 48" piece. Then measure and mark and cut the 28" x 48" pieces.
Then cut the 28" x 48" piece down into four ~12 wide panels to make up the roof pieces.
Repeat for the second sheet of 1/4" plywood.
NOTE: The saw blade takes up about 1/8" space, so you can't just lay all the cuts out and cut. You have to make one cut, then measure and mark and make the next cut. On the roof panels, if one panel ends up being a little smaller, it won't matter.
Step 2
Cut the 1x2 pieces out according to the cut list, making the longest cuts first. Save the shorter cuts (window trim pieces) for the end to use up your scraps.
First, lay out all the pieces and mark locations of pocket holes. Drill pocket holes, only one needed per joint, on the 3/4" setting.
Then, build the blue section, attaching with 1-1/4" pocket hole screws and wood glue.
Then attach the two roof rafter pieces together, with one pocket hole at the top.
Then attach the roof pieces to the blue section.
Place the 33-1/2" x 48" plywood panel on top of the frame, so it is flush to the bottom, but a 3/4" gap in on both sides, and gap on the top. Attach with glue and 3/4" brad nails or staples.
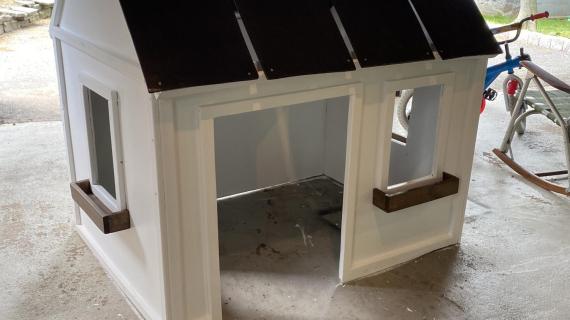
Cut off the top triangular pieces to create the house shape.
Cut out the window as shown (jigsaw is recommended).
Build the window trim with a single 3/4" pocket hole and 1-1/4" pocket hole screws and attach to the plywood panel with glue and 3/4" brad nails.
Step 3
Repeat the steps to build the front and back walls.
On the front and back wall panels, the 1/4" plywood will be 1/4" short on side edges. Build the back panel first.
On the front panel, the doorway may move the framing inward or outward, use the plywood to square it up, keeping that 1/4" gap on the side edges.
Step 4

We recommend painting or staining at this point. Wait to assemble in the room, as the finished product is most likely too big to fit through doorways.
To assemble, use three screws per corner. I used 2" long self tapping trim screws.
Step 5
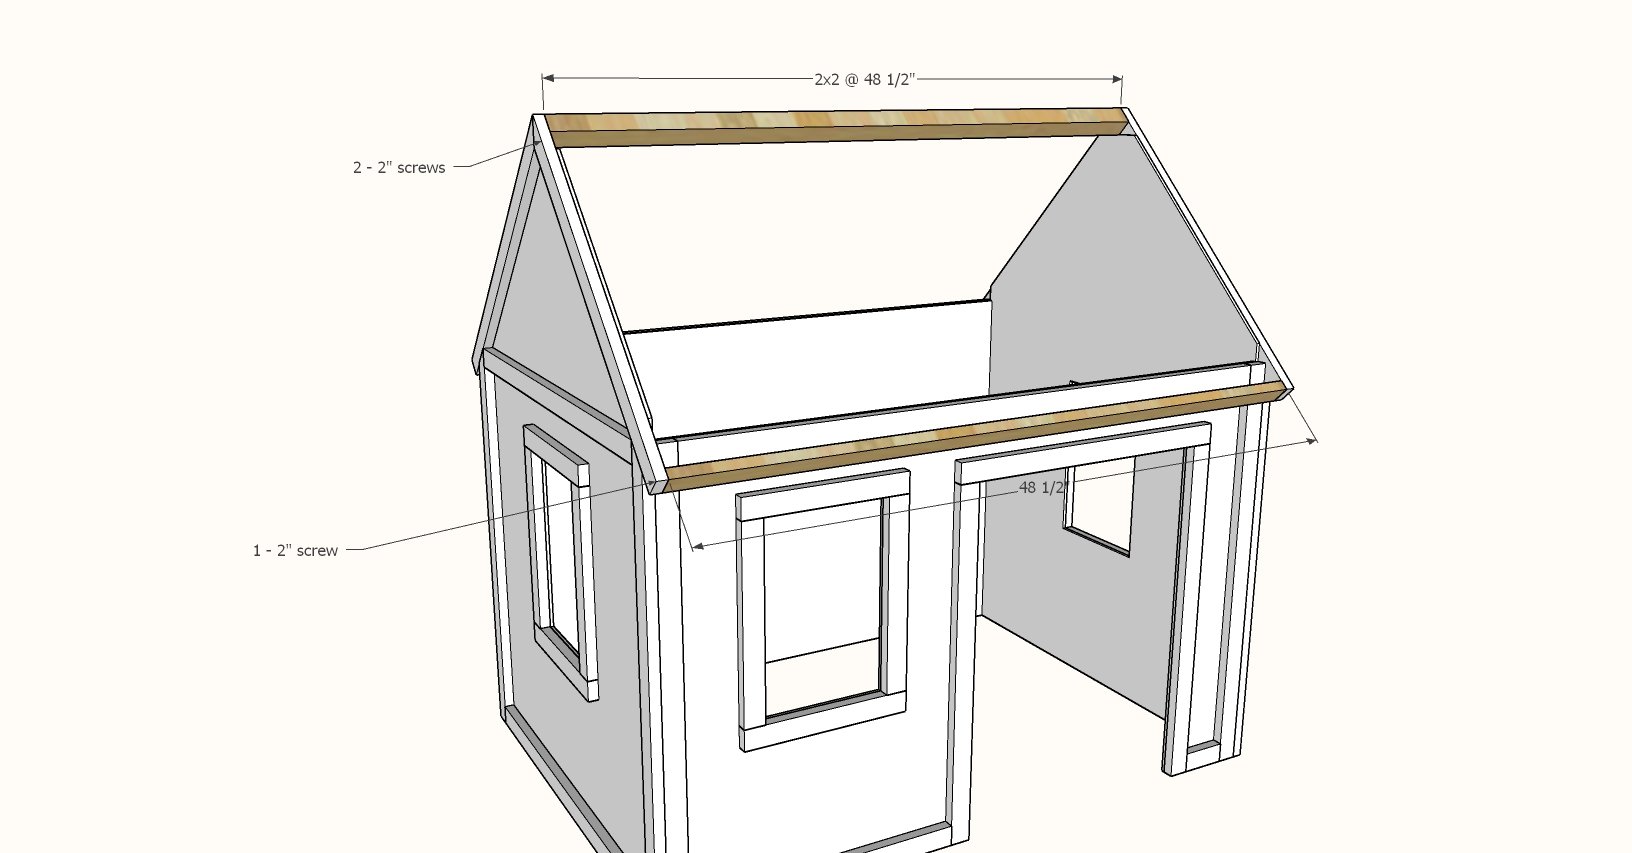
Attach the ridge to the top, so the outside edges of the ridge are flush to the outside edges of the gable wall tops.
Add the eave 1x2s with screws.
Do not glue these boards, as you may want to disassemble at a later time.
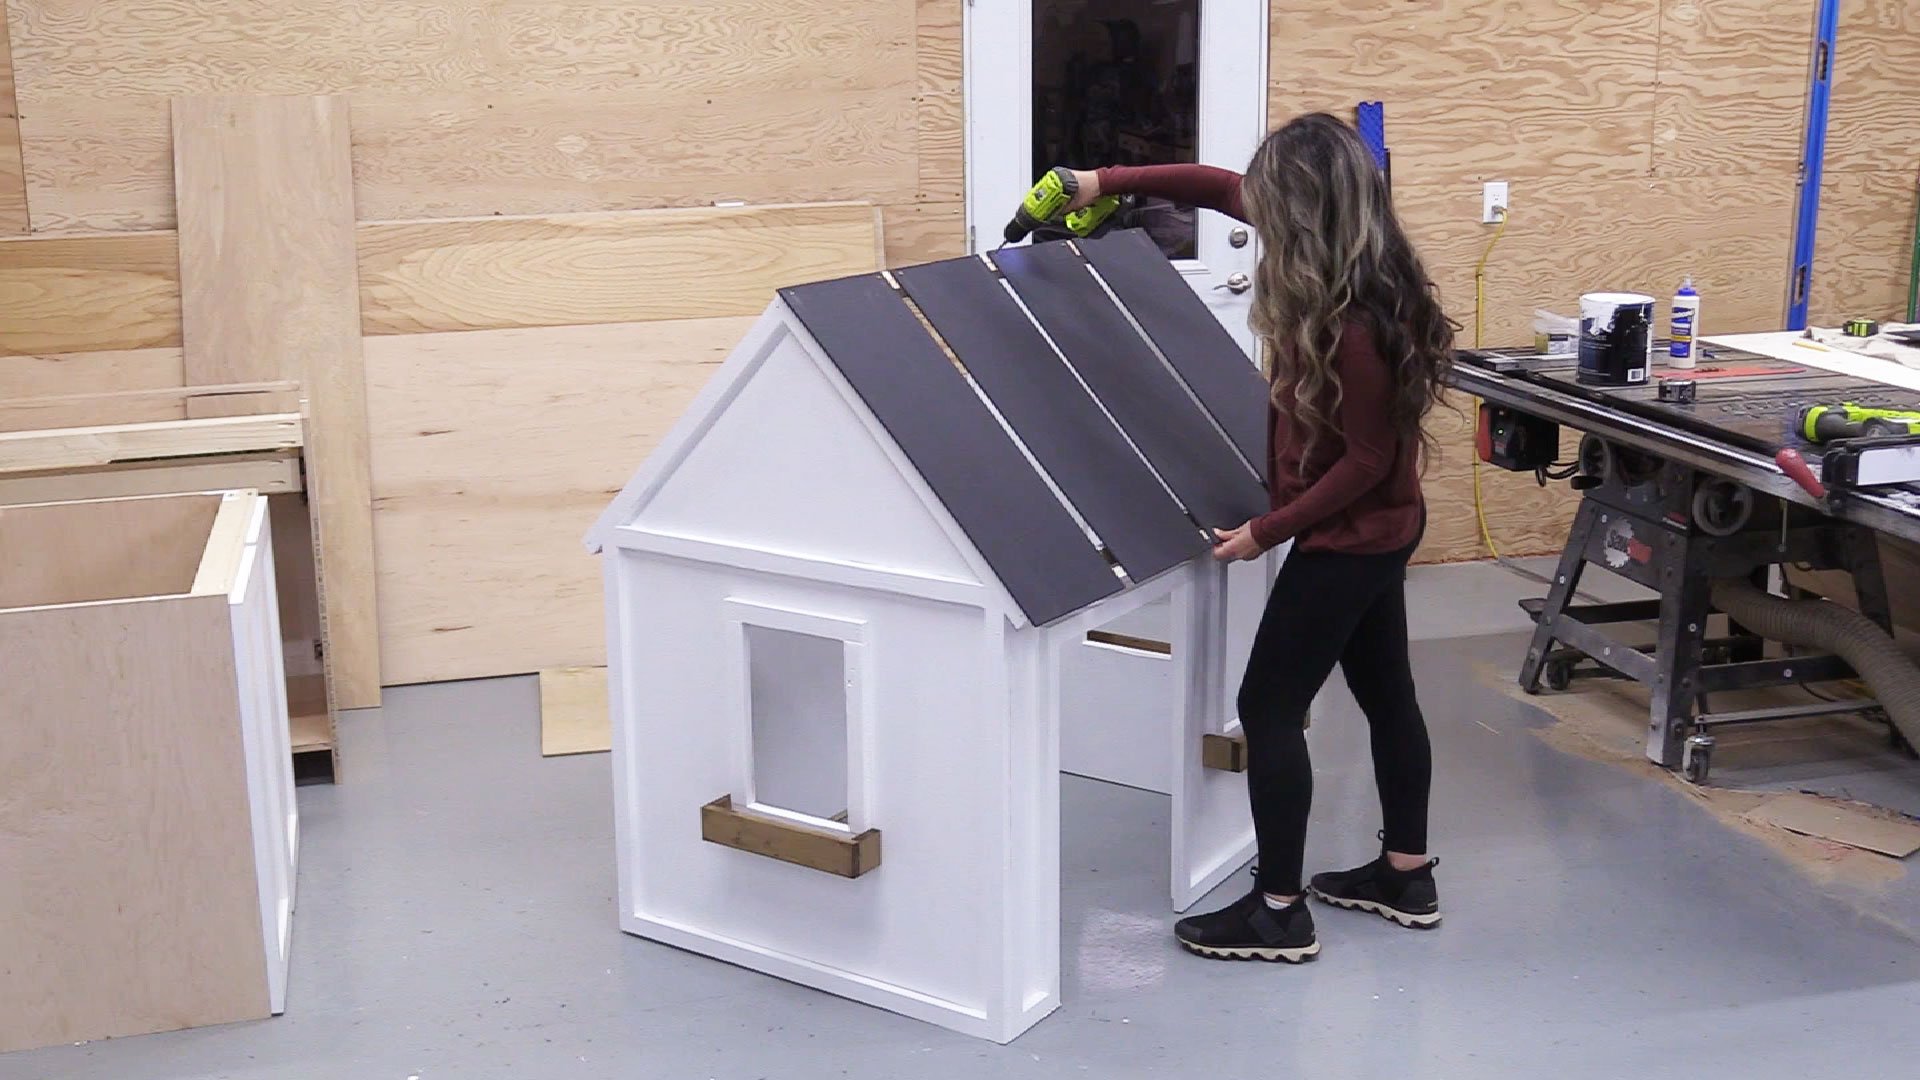
Step 6
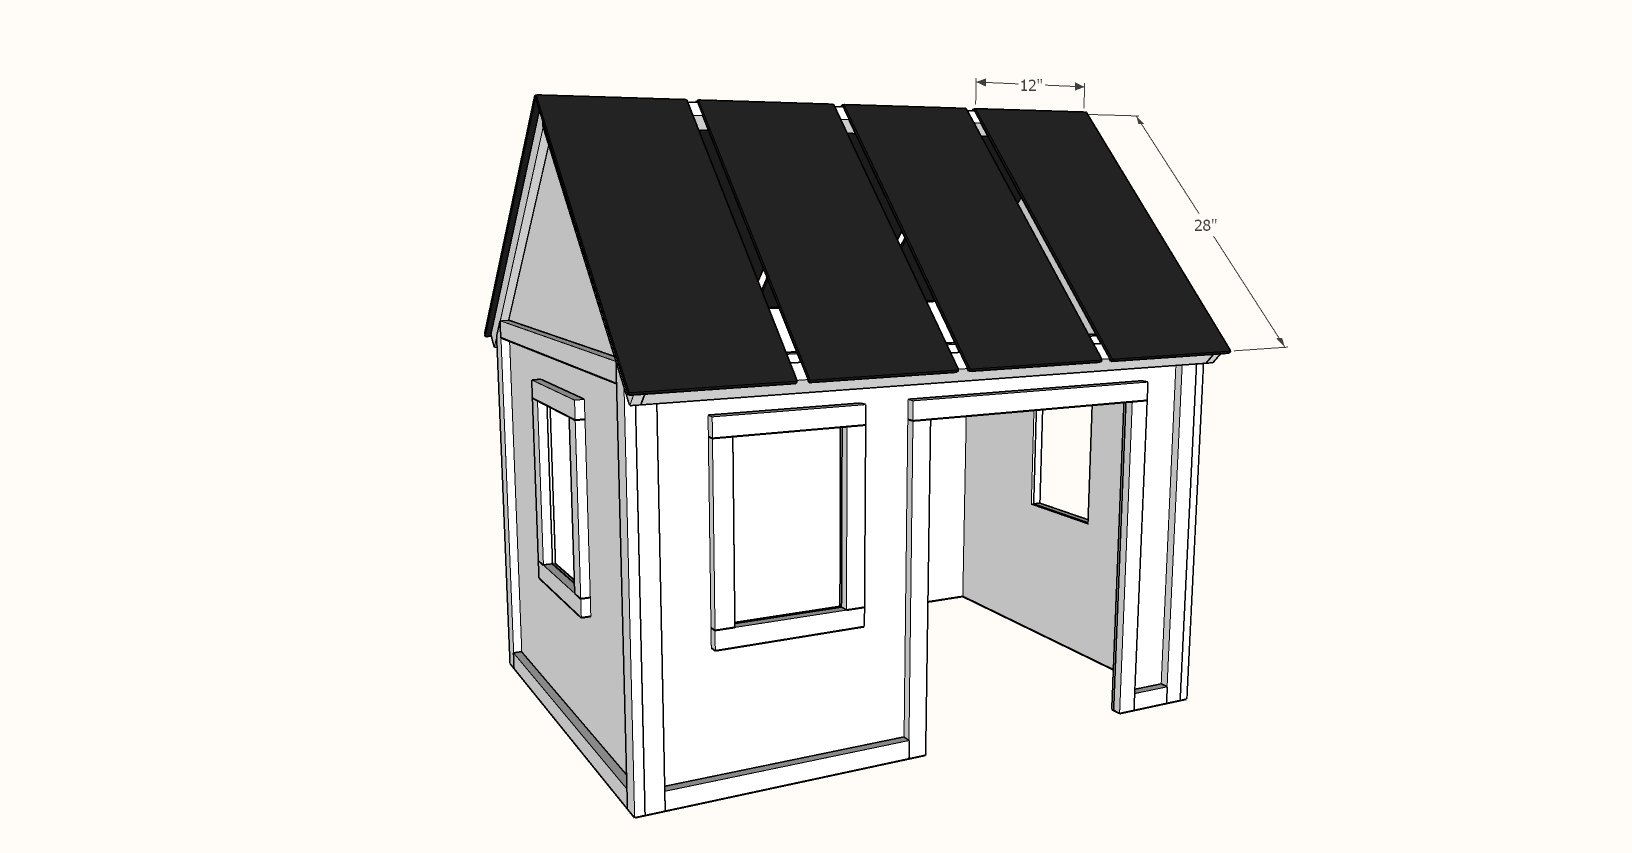
Place the outside roof panels up first, with about a 1/2" overhang to the outsides. Top edge is flush. Once the two outermost roof panels are up, simply eyeball the placement of the two inner panels. I used 1-1/4" screws to attach, four per panel.
Step 7
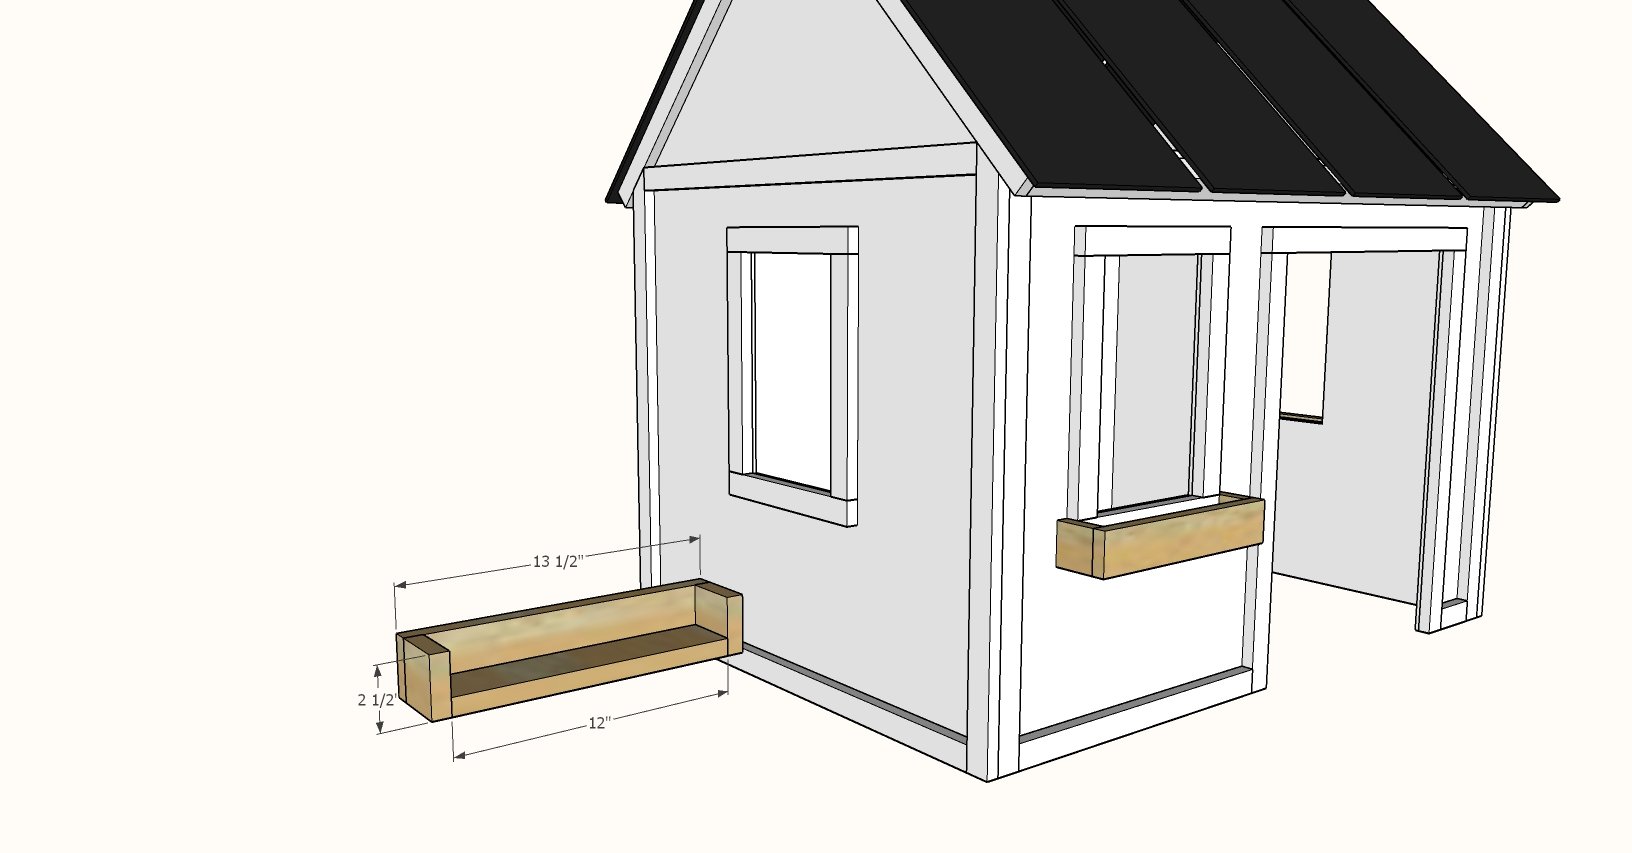
Build the three window boxes with 1-1/4" brad nails and glue. Stain.
Attach to the window trim with 1-1/4" brad nails or the screws, I did three nails per end, and then three on the underside.
For the roof, I used Chalked in Charcoal
For the walls, I used an off the shelf white paint in semigloss

Comments
akkaaraaus
Sun, 12/13/2020 - 23:39
The playhouse looks really…
The playhouse looks really awesome......looking forwards to make one for my kids!!!!
jcranda12
Mon, 12/14/2020 - 12:27
Question
Looks great. If I wanted to make it outdoor friendly, would I just use exterior grade plywood and set it on treated lumber?
vans
Tue, 03/30/2021 - 02:44
I'm building the playhouse…
I'm building the playhouse for my two granddaughters, it's so cool.
I used a flush trim bit to cut openings and gable end's, also 1/8" round over on all trim.
This was a good opportunity for me to use up some leftover 1X material I have.
Thanks for your hard work, I know two kids that will be happy :)