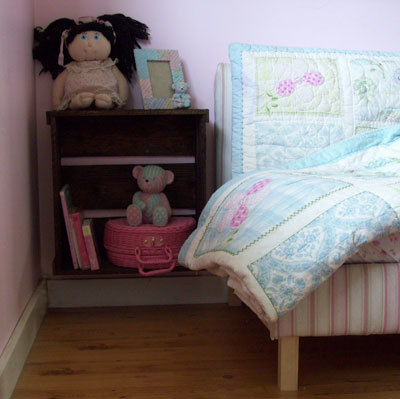
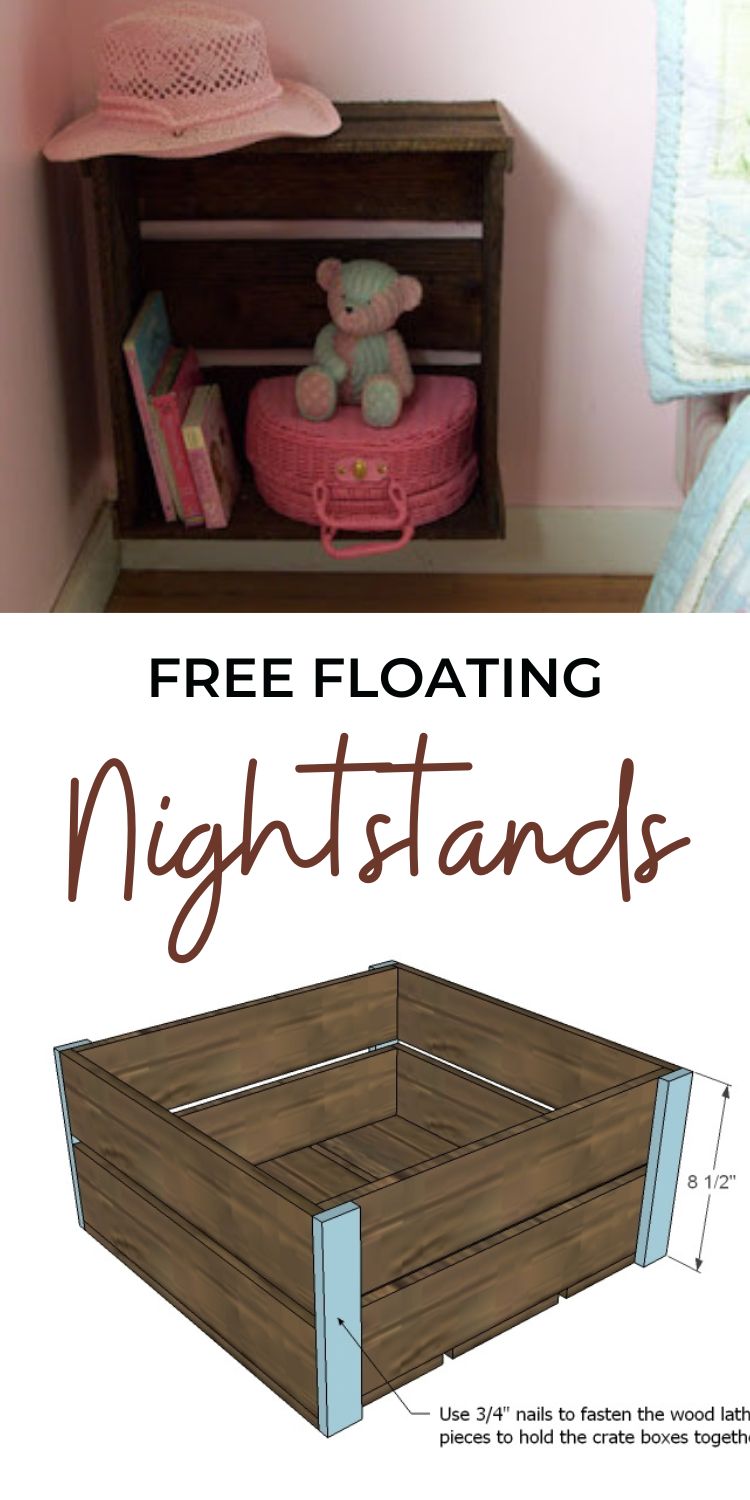
Use a pallet to create a floating nightstand. Also can be used as shelving or as a storage crate.
Well, let me revise that. Pretty much free. You may have to shell out a few bucks for screws or paint or stain if you don't have some already. But this floating nightstand was pretty much free for me.
And you are going to have to come up with a spare pallet and cut it up. You can actually get two floating nightstands out of one pallet. You could also purchase boards, but getting boards with this kindof rustic appeal only comes salvaged.
I've been wanting to give you all a floating nightstand, and it's wonderful to give give it to you - not just the information, but the supplies should be free if you know where to look.
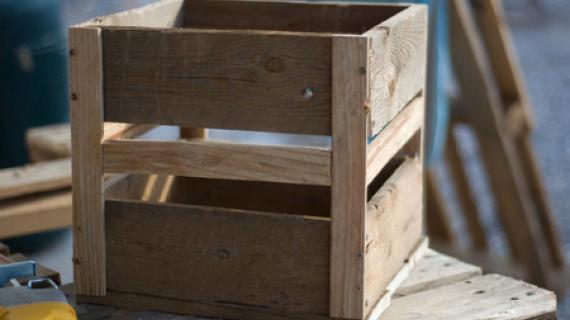
It's also wonderful to give you not just a floating nightstand, but a wall shelf, an end table, a storage box . . . a crate. I really loved these crates from Pottery Barn, and feel we've hit the nail on the head (no pun intended) with our crate.
First step - you gotta score a pallet. Look for them at landfills, on the sides of the road with the trash pickups, at your favorite stores, at shipping companies, pallets can turn up anywhere. Be careful - some pallets might be treated, so the food safe pallets are best. If you are unsure of the treatment of your pallet, you can seal it with a thick varnish.
After you claim your pallet, you gotta reclaim the boards in the pallet. Slightly off subject, but someone just told me most pallets are made of solid OAK! Back to building . . . I was able to reclaim a pallet with a jigsaw in about fifteen minutes. Just go slow, be careful, examine the pallet first for nails or other things that could get your jigsaw blade caught. Wear safety glasses (I'm wearing them in this video, and my husband looked at me and said, whoa, at least you have a great personality! to me, so you gotta wear a pair too). And hearing protection. Cut the pallet deck boards as close to the supports as possible, not attempting to salvage the 2x4 boards. It's the 1x4s (we'll talk about this in a second) and 1x6s that you want for this project.
Here's a video that I was reluctant to post because of the quality, but I thought it would help YOU understand what I'm talking about. So I'm putting my vanity aside and making my debut in massive plastic safety glasses. You can buy them anywhere for around two bucks, and they even fit over your regular glasses :) All in the name of giving you a free floating nightstand.
There are lots of other techniques to reclaim the boards on a pallet, but this is the fastest and easiest method for me. One drawback is the boards you reclaim will all be about 18" long at the most (fine for this project, but might not work for other projects)
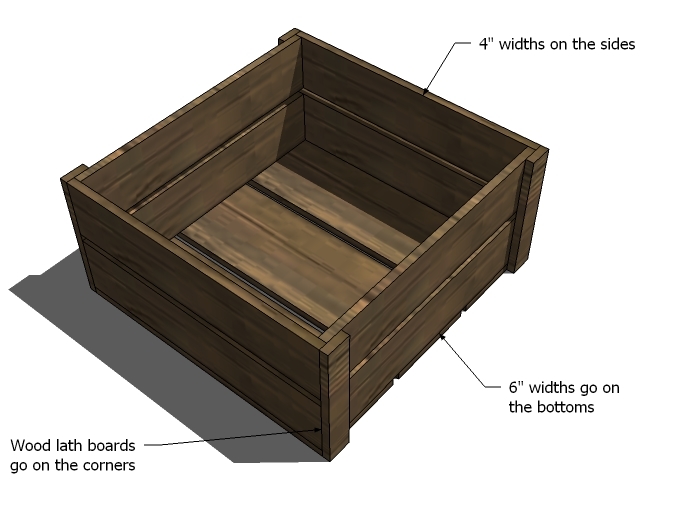
From a standard pallet, you should get 1/2" x 3 3/4" boards and 1/2" x 5 1/2" boards. We'll call these the 4" widths and the 6" widths. You should get many more 4" widths than 6" widths. For this project, I used the 6" widths for the bottoms, and the 4" widths for the sides. In addition, I bought for $12 a bundle of 4 foot wood laths from Lowes (50 of them) - otherwise known as stakes. You only need one, so that puts you back a quarter. PS Save the rest, I'll show you how to make a different kind of equally adorable crate out of them too.
Pin For Later!
Preparation
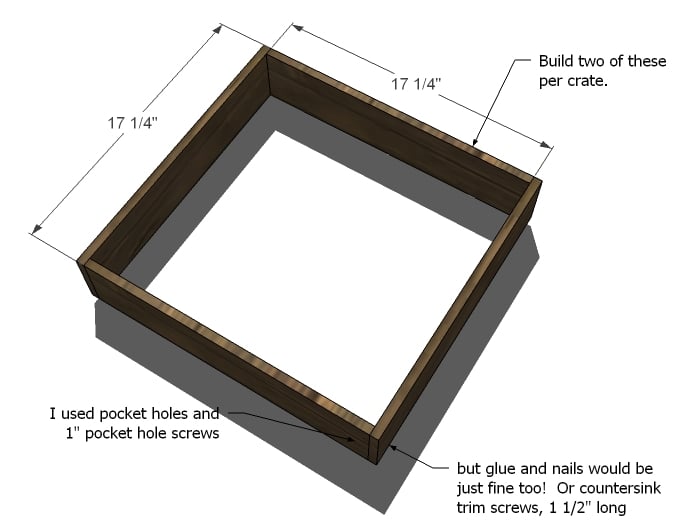
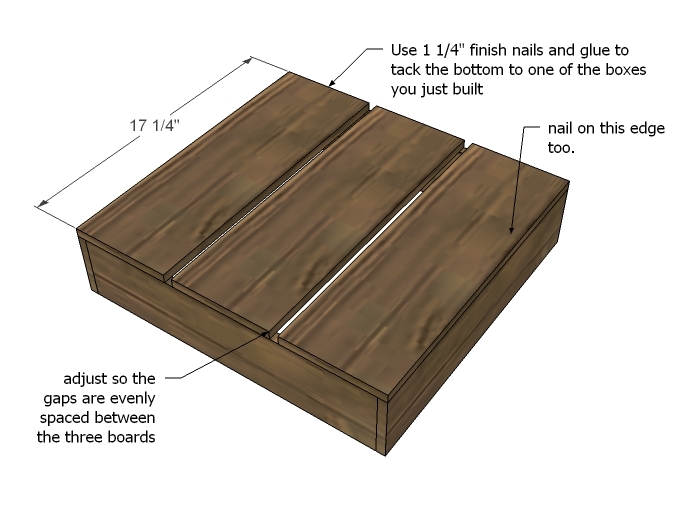
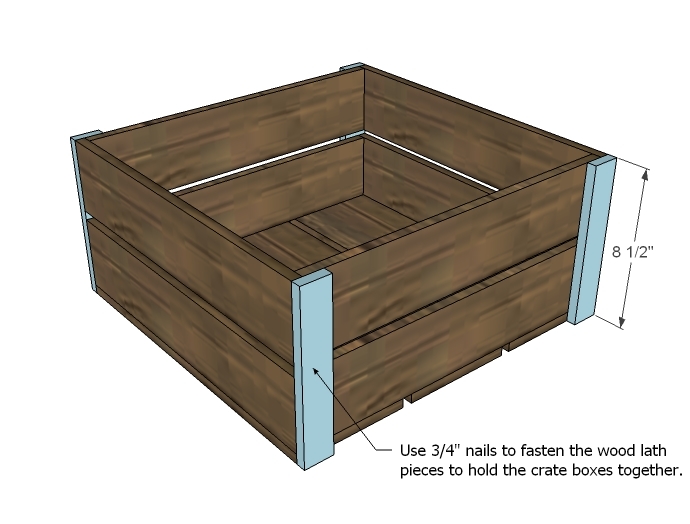
As I did in the video, square up the ends of all the reclaimed boards. Then cut 8 of the 4″ widths at 17 1/4″ long, and 3 of the 6″ widths at 171/4″ long. Also cut 4 pieces of the wood lath at 8 1/2″ long.
Instructions
Step 2
Use up all the 4″ widths by building basic boxes as I did above. I used my Kreg Jig™ to build boxes, adjusting the jig for 1/2″ thick stock, but there is no reason why you couldn’t build the crate like people have for hundreds of years with nails. Just don’t forget the glue.
Step 3
Step 4
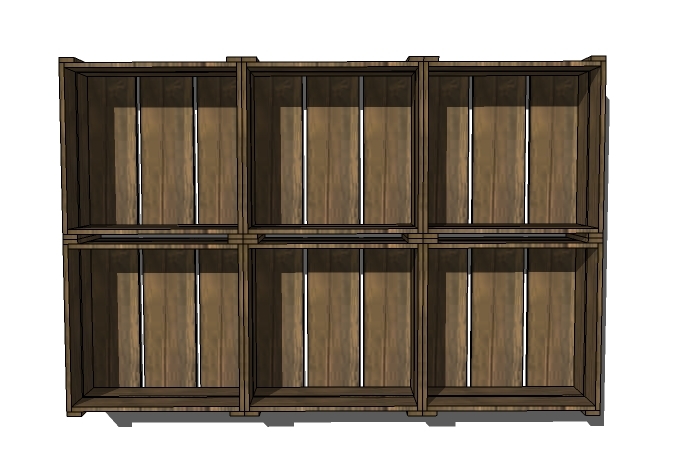
And then use the wood laths to join the two boxes together as shown above. I used glue and my nailer. I then brushed on Early American stain/finish stuff from minwax. And it’s beautiful. I just screwed it right to a stud in the wall and had an instant floating nightstand. Of course, you could use it as an end table, stack them for a coffee table, arrange a few of them as a wall storage unit . . .



Comments
Lianna (not verified)
Tue, 08/31/2010 - 02:32
Ana! The new website is
Ana! The new website is BEAUTIFUL! Love the crates too!
Sharon L (not verified)
Tue, 08/31/2010 - 03:50
Love these! Simple and cute,
Love these! Simple and cute, and best of all free!
Jeannine (not verified)
Tue, 08/31/2010 - 04:08
LOVE This!
LOVE This!
Heather C (not verified)
Tue, 08/31/2010 - 04:34
These are awesome! Can't wait
These are awesome! Can't wait to try it.
jess (not verified)
Tue, 08/31/2010 - 04:37
Too Funny Ana, I was just
Too Funny Ana,
I was just thinking that I wanted to make some crates to go in the mud room to hold shoes etc. Now I just have to follow instructions instead of actually thinking.
Thanks & Love the new site.
Jess
Sheri (not verified)
Tue, 08/31/2010 - 04:47
OK, I love the look of all
OK, I love the look of all the things you've made with the pallets (Ok, all the stuff you make in general, but my question is about the pallet things), but I'm just wondering how friendly they are. Most of the pallets I've seen are pretty rough - aren't the shelves slivery, or do you do a lot of sanding to make them smooth? I don't think my daughter would appreciate it if her nightstand gives her slivers!
Thanks so much for all your plans. I haven't had much chance to get building, but I"m definitely inspired to get going be all your wonderful projects!
Robin (not verified)
Tue, 08/31/2010 - 04:55
I love these!! They are
I love these!! They are building a house across the street and are throwing the pallets away...I asked my husband last night to go get them cause we have a couple projects on our hands. The best part is they are free and the pallets look brand new!!!
Kev (not verified)
Tue, 08/31/2010 - 05:44
Would hammering in the nails
Would hammering in the nails allow you to reclaim longer pieces?
Krista (not verified)
Tue, 08/31/2010 - 06:48
Those are so neat! Love it
Those are so neat! Love it next tour your girlies pretty things.
Oak? Huh, wow. That must be why they are so hard to break.
We roughed up about 10 or so pallets several years ago to make a graveyard fence for halloween & boy were they hard to break up. We store them outside which adds to the weathering & put them up every yr in our front yard with stakes :) It looks awesome.
Desiree (not verified)
Tue, 08/31/2010 - 06:52
I'm doing this for sure!!!
I'm doing this for sure!!!
ana (not verified)
Tue, 08/31/2010 - 07:25
Kev, if you wanted to pull
Kev, if you wanted to pull the boards out, definitely, you could get longer pieces from the pallet. But for these crates, all we are going to need is less than 18", so this worked great! And fast and easy!
ana (not verified)
Tue, 08/31/2010 - 07:26
Yay! You just scored free
Yay! You just scored free pallets, I'm so excited for you!
ana (not verified)
Tue, 08/31/2010 - 07:29
Hi Sheri, it really depends
Hi Sheri, it really depends on the pallet. After I added the finish, the wood is pretty smooth. But like all the projects I post online, you have the ability to make them your own. You can sand the boards down, you can buy dimensional lumber and build crates, or you can cherish the rustic reclaimed look - it's all up to you! You are very welcome, and I can't wait to see what you build!
ana (not verified)
Tue, 08/31/2010 - 07:29
Thanks Jess!
Thanks Jess!
ana (not verified)
Tue, 08/31/2010 - 07:30
Thanks Lianna!
Thanks Lianna!
Tanjia (not verified)
Tue, 08/31/2010 - 07:40
Ana - I've wanted to build
Ana - I've wanted to build myself crates like this since I was about 16 years old! Thank you for the plans and for being so generous, talented and wonderful!!! Can't wait to get some more pallets to build these!
Leslie (not verified)
Tue, 08/31/2010 - 09:00
Oh my gosh, I totally love
Oh my gosh, I totally love this! I drive by a pile a free pallets every day. I think I need to definitely stop now!
Jessica Harris (not verified)
Tue, 08/31/2010 - 09:47
I love these! Especially the
I love these! Especially the wall sytem! The video was cool too! You should do one of a simple project from start to finish so we can get basic tips on building. I always question myself about things like where and how many screws or how to position things on sawhorse or ground while building! The website is amazing and you are even more amazing!
Nicky Hurt (not verified)
Tue, 08/31/2010 - 17:59
This is fabulous! I love the
This is fabulous! I love the storage photo at the bottom- I'm SO going to make these! They sound pretty easy, too! And Free?! Who can beat that?!
Vanessa (not verified)
Wed, 09/01/2010 - 04:55
In the Living Etc option, I
In the Living Etc option, I notice they didn't use the laths on the outside, rather it looks like they used 2x2s they cut on the bias (bevel). Do you think that is the best way to connect the top and bottom to make it a more sturdy bookcase (using 2x2s, I mean)? Also, do you think the "Blue or Orange" would cut the 2x2s for me, or would it be better to do it myself?
Ana White (not verified)
Wed, 09/01/2010 - 08:01
Hi Vanessa, the corner braces
Hi Vanessa, the corner braces is simply a different look. You definitely could go this route. But you are going to need a table saw :( to cut your boards at a 45 degree bevel. I would first check your trim aisle for a trim board that is similar. If you can't find it, you will need to cut your own. Some circular saws will cut at a bevel (mine does) but it is very difficult to get a good straight long cut. We have a small tablesaw from Craftsman that costed $89 and would work for cutting these boards at a bevel, and you could use the table saw for a zillion other projects.
Ana White (not verified)
Wed, 09/01/2010 - 17:13
And check back, I've got a
And check back, I've got a different method to build crates coming soon!
Lindsey (not verified)
Thu, 09/02/2010 - 01:54
Love the site, thanks so much
Love the site, thanks so much for all the plans and inspiration. I found some pallets yesterday and started working with them today using your techniques, which were very easy! We were going to use some of the broken extra pieces for firewood, but then someone told me that some pallets are treated with chemicals which might dangerous (for weatherproofing the pallet). My friend told me if the wood has a green tinge to it, then it has probably been treated and shouldn't be burned. Do you know if that applies to using it for projects like this too? I love the look of it, but I don't want to bring something full of chemicals into my home!
Ana White (not verified)
Thu, 09/02/2010 - 08:04
Lindsey, with all reclaimed
Lindsey, with all reclaimed wood, there is no guarantee of what that wood could be potentially treated with :( . However, I have (and many readers) done a considerable amount of research on using treated lumber indoors (decking) and if you properly seal the boards, it is supposed to seal all the yuck stuff inside the wood. I like to look for pallets that come with food - because those are regulated differently than say pallets use to transfer fuel barrels. Good luck with your projects!
Mindy (not verified)
Thu, 09/02/2010 - 16:29
Oh, this is exactly what I've
Oh, this is exactly what I've been searching for the last couple weeks. Plans for a crate. Thanks!!!
jenifer (aka z… (not verified)
Fri, 09/03/2010 - 18:57
i love pallet-based projects.
i love pallet-based projects. i'm so new to woodworking, but i have no fear messing up with pallets. we can get so many here. it's crazy how many. so if i mess up a crate now and again, who cares?
my husband is in love with this idea, and wants them for the home. i want to make a set for our yoga studio's cubbies. I think it will *rock*. i'm also going to figure out how to make something to store our yoga props. and make bigger lockers, because we need concerted storage for the massage chairs.
oh yes, i am inspired by you! and looking forward to getting started!
Marlene (not verified)
Mon, 09/06/2010 - 02:44
It is almost as though you
It is almost as though you can read my mind, Ana. I am finishing up my lockers and wanted to place crates below for my kids to "chuck" their shoes into. I have a few apple crates but was going to actually build the 4 I needed to make them all match and VOILA there are plans for the floating shelf.
You totally ROCK!
Thanks so much.
DIY Reclaimed … (not verified)
Mon, 09/13/2010 - 16:34
[...] You just gotta make
[...] You just gotta make your own! If you don’t have a pallet to reclaim, you can use 1x6s and 1x4s, but don’t expect the character to be as fabulous when you use new materials. You can watch a video on how to reclaim boards on a pallet here. [...]
Deb Weyrich-Cody (not verified)
Tue, 12/21/2010 - 03:44
Hi Ana, Just thinking that
Hi Ana, Just thinking that adding a simple triangular piece to the outside of each corner (glued and screwed) would take up less space inside the cube and still add the extra support of a corner brace... Another use for tiny scraps of board or plywood and decorative too. What do you think?
Shelly (not verified)
Wed, 12/22/2010 - 11:07
LOVE this website! Found out
LOVE this website! Found out about it by reading a comment written on someone else's facebook wall. I can not wait to get started! Great, creative, fun, ingenious! I just can say enough!
Ana White (not verified)
Wed, 12/22/2010 - 11:08
Thank you, and welcome!
Thank you, and welcome!
Almost Free Re… (not verified)
Sat, 01/08/2011 - 09:55
[...] Experience Level: Some
[...] Experience Level: Some Experience Estimated Cost: $0 Estimated Time Investment: 1-3 hours From Plan: http://ana-white.com/2010/08/free-floating-nightstands.html [...]
KarenRuth (not verified)
Sun, 12/25/2011 - 22:00
This was my first wood
This was my first wood project and I ran into some issues. By making the two boxes first, mine didn't all line up together, which meant the connecting pieces were even not lined up at all. The second attempt, we joined the side walls together first, then created one big box before adding the back pieces. Our crate fit much better together the second time and looks so much nicer!