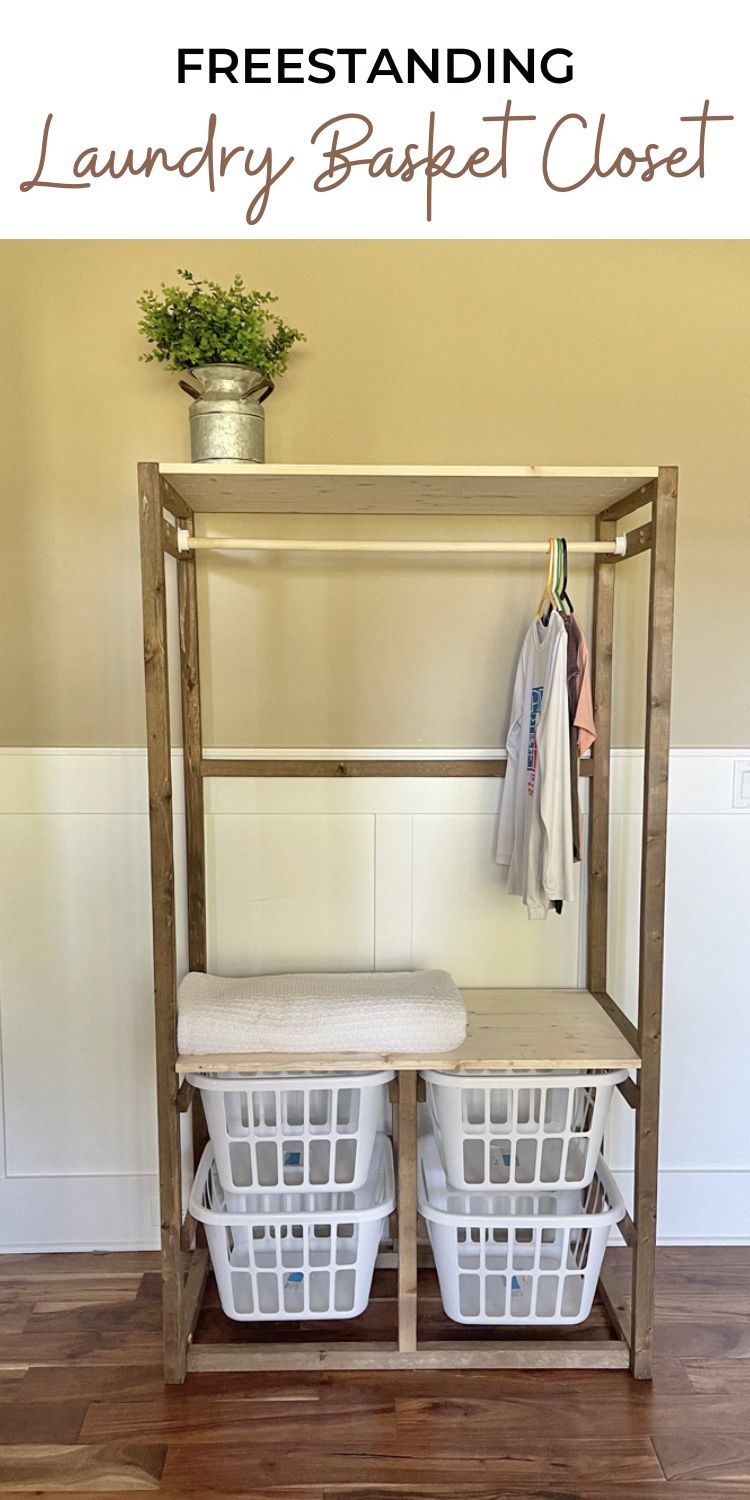
Does your laundry room need some quick organization? For about $75 total, you can make your own laundry sorter towers with hanging rods! Free plans from Ana-White.com
We have a special treat for you today! My friend Jen who also helps with video editing and keeping the website going, built from her own design this amazing freestanding laundry basket tower! She has very generously offered to share plans! Thank you Jen!
From Jen:
Hi I'm Jen, a friend of Ana's, we've also worked together for the past 10 years, she is very inspiring in my life and build projects!
My 3 children and I are in a temporary living situation and the room we are staying in needs a closet, so I came up with this design based around Ana's laundry basket dresser and her pallirondack plans.
I built 2 units, I had to figure the first one out as I went, with the laundry baskets I pre purchased.
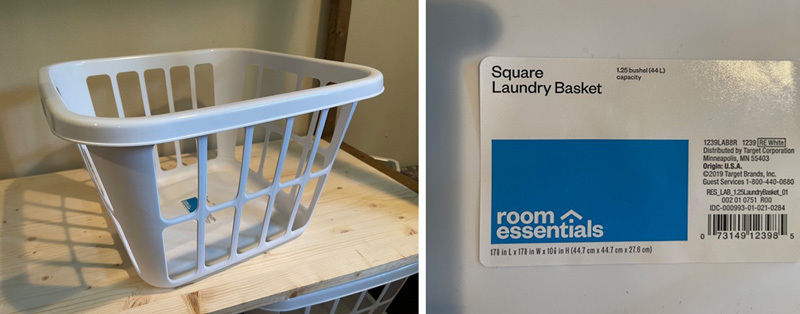
I found these laundry baskets for $2 each at Target.
How Much Did This Cost to Build?
With the cost of lumber, I wanted to use basic materials and not spend a ton of money. I built 2 for about $150.
Besides purchasing the laundry baskets prior to the build, I had also purchased 4 project panels that were 20" x 36" for $16 each, so I knew I needed to incorporate those into the overall plan. You of course could build your own panel with 1 by material and Pocket Holes.
Do You Have to Use Pocket Holes?
No, you can build either way!
The first unit I built, I used 2 1/2" screws, countersunk, wood puttied the holes and stained once assembled.
Once I had the first one built I wanted to work smarter not harder, so I decided to pre-sand and stain all of my boards and use pocket hole construction on the second unit and it worked so much better once I had all the measurements figured out.
The beauty is, it can be done either way!
On Wheels?
Finally, once I saw it assembled, I thought, "How cool would this be in the laundry room with that lower shelf at folding height and some casters!" Have fun with this one!
Let's get into the build!
I've included a video with some tips and tricks I learned during the build to help, when you build it!
CHECK OUT THE VIDEO TUTORIAL!
Pin For Later!
Dimensions
Preparation
Shopping List
7 - 2x2
2 - 1x2
2 - project panels 20x36
1 - 36" dowel
2 - dowel holders
4 - Laundry Baskets
Cut List
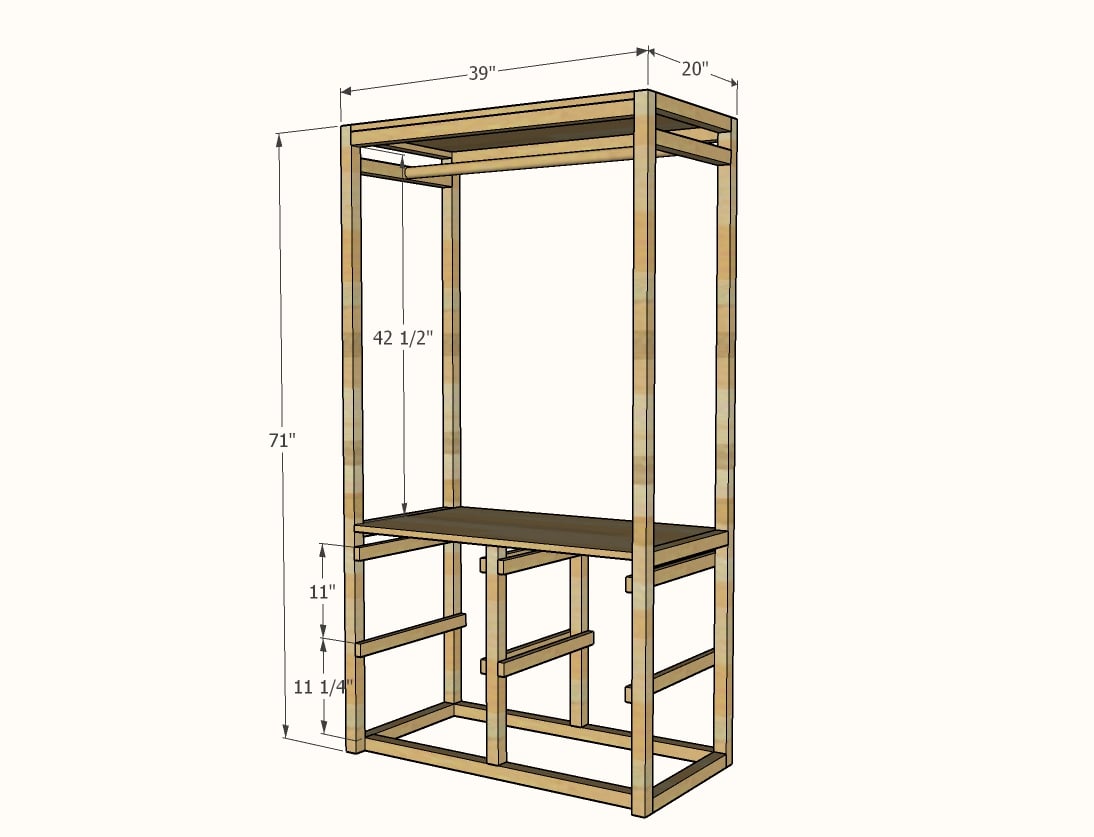
2x2 - 4 @71"Legs for ladder
2x2 - 3@ 36" Bottom and back Supports
2x2 - 8@17" All side ladder supports
2x2 - 2@24" Front and back support of laundry basket section (I cut to fit, because there was a little variance where middle shelf was pocket holed and attached)
1x2 - 4 @20" (outside cleats)
1x2 - 4@18-1/2" (inside cleats)
3' dowel
4 laundry baskets (will need to adjust and preplan for your laundry baskets if different)
2 project panels 20"x 36"
Tools
General Instructions
This project can be built using either torq screws (star bit self drilling wood construction screws) or with pocket holes. In either case, you will need both 1-1/4" and 2-1/2" lengths.
Instructions
Step 1
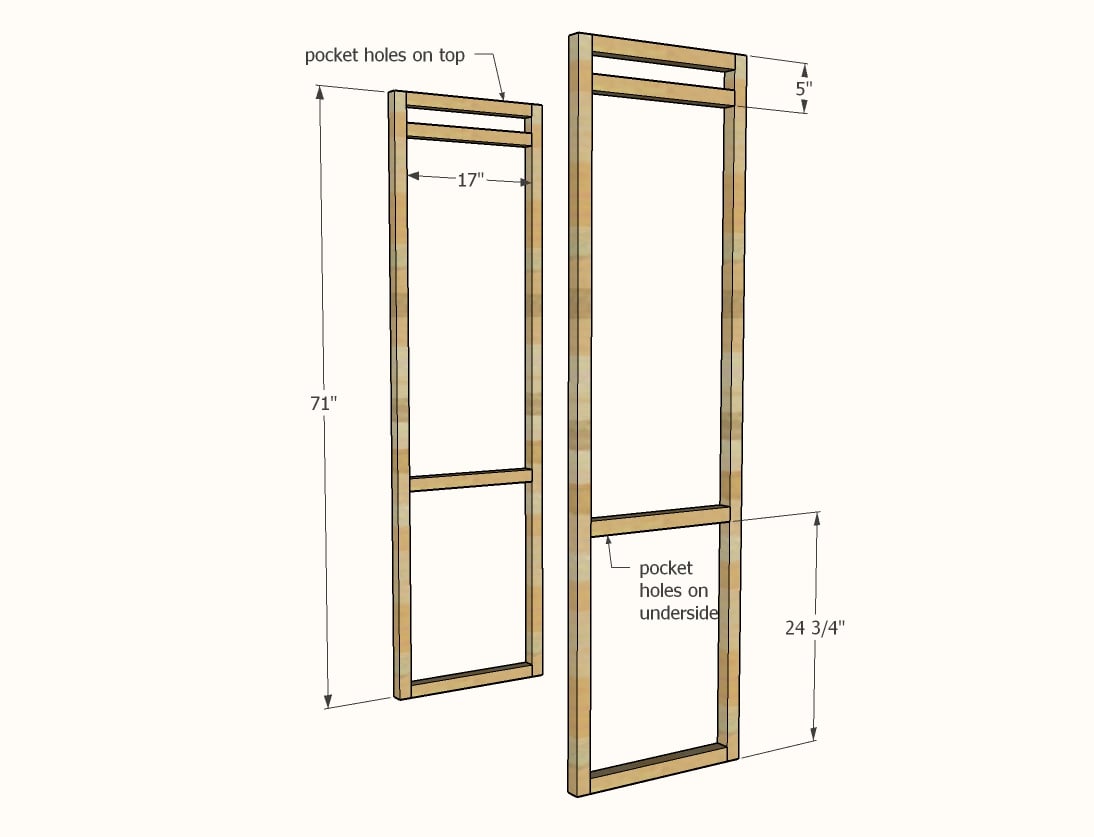
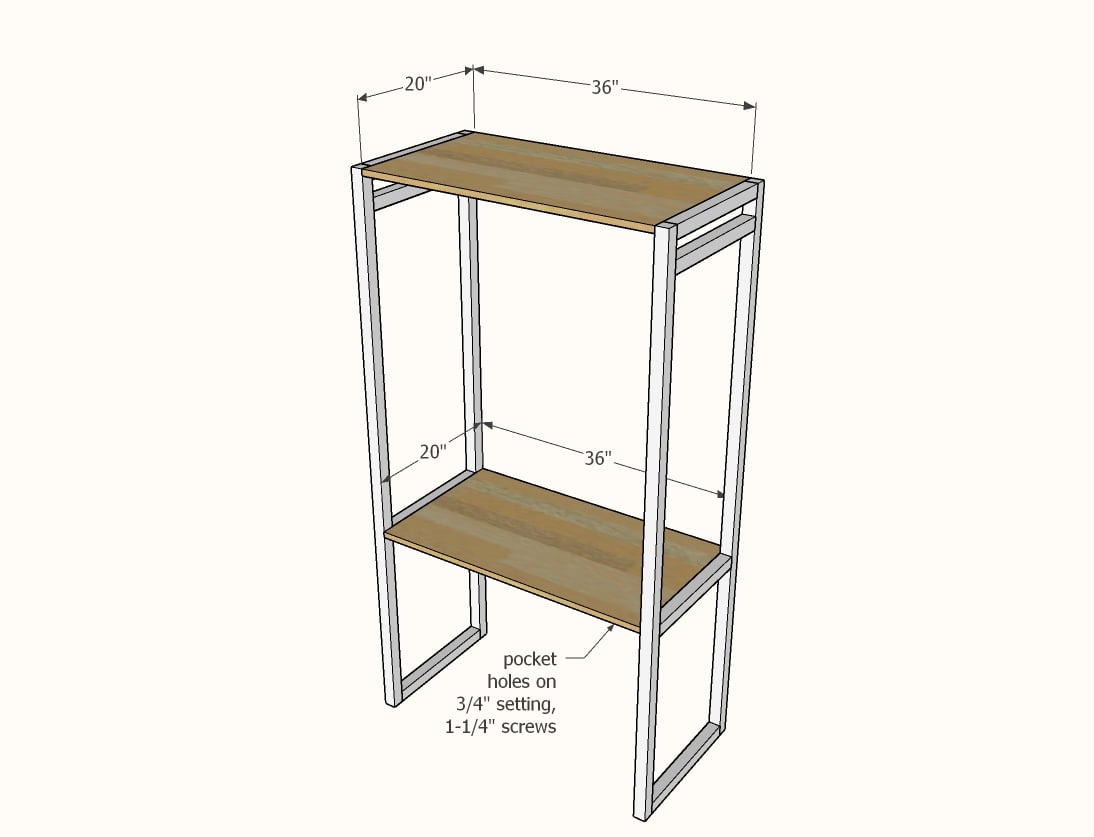
Build two of the side frames as shown.
If using screws, just attach with screws and glue.
If using pocket holes, drill on the 1-1/2" setting and attach to the legs with 2-1/2" screws. Place pocket holes facing upward or downward, to keep out of line of sight.
Step 2
Drill 3/4" pocket holes on ends of project panels. Attach to the side frames with 1-1/4" pocket hole screws. On top shelf, place pocket holes facing upward where they won't be seen.
Step 3
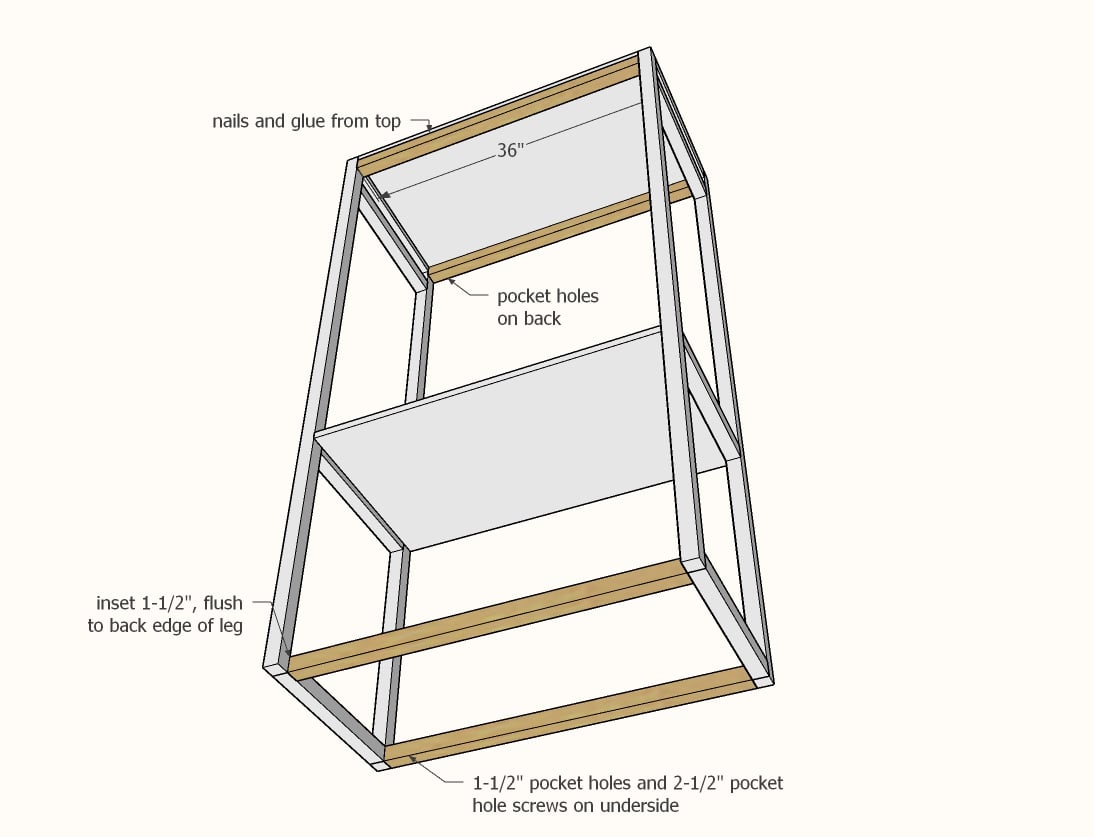
Attach 2x2s to the sides, using the longer screws. If using pocket holes, use the 1-1/2" setting.
Step 4
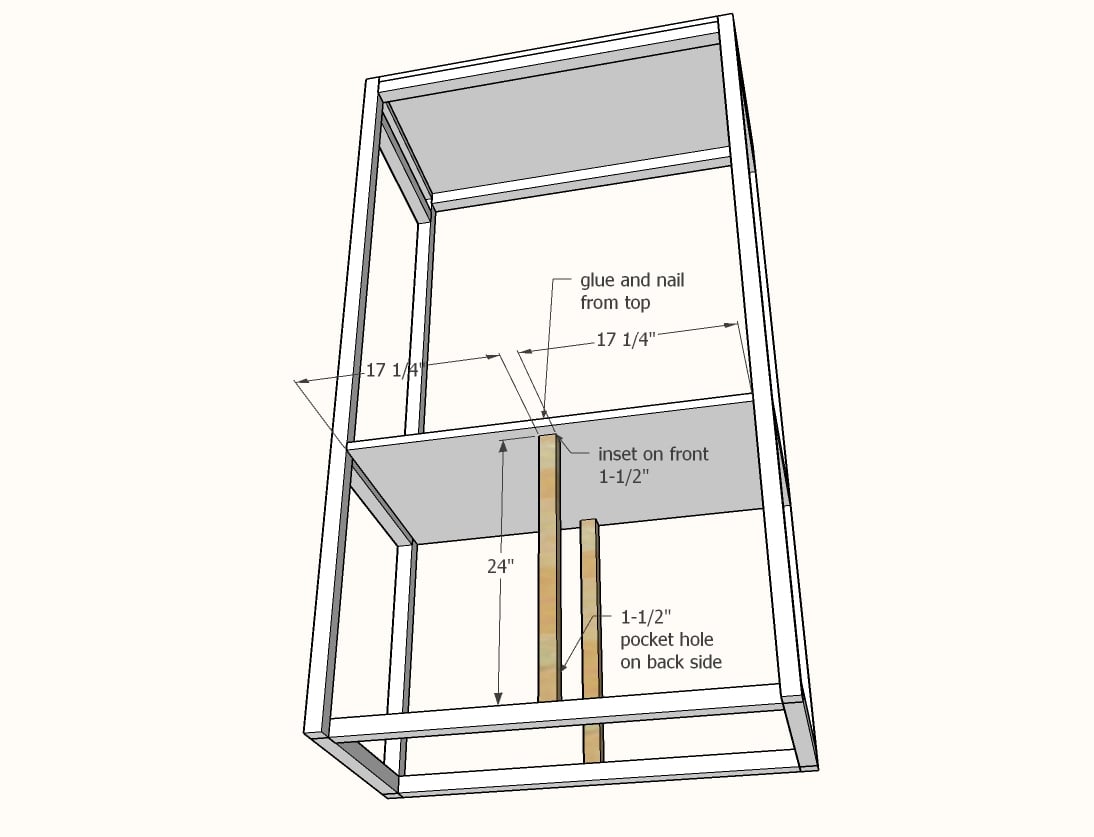
Attach center legs. At the top, you can attach from the top.
If using pocket holes, drill with the 3/4" setting and attach with 1-1/4" pocket hole screws.
Step 5
Attach cleats with 1-1/4" fasteners to the insides.
Step 6
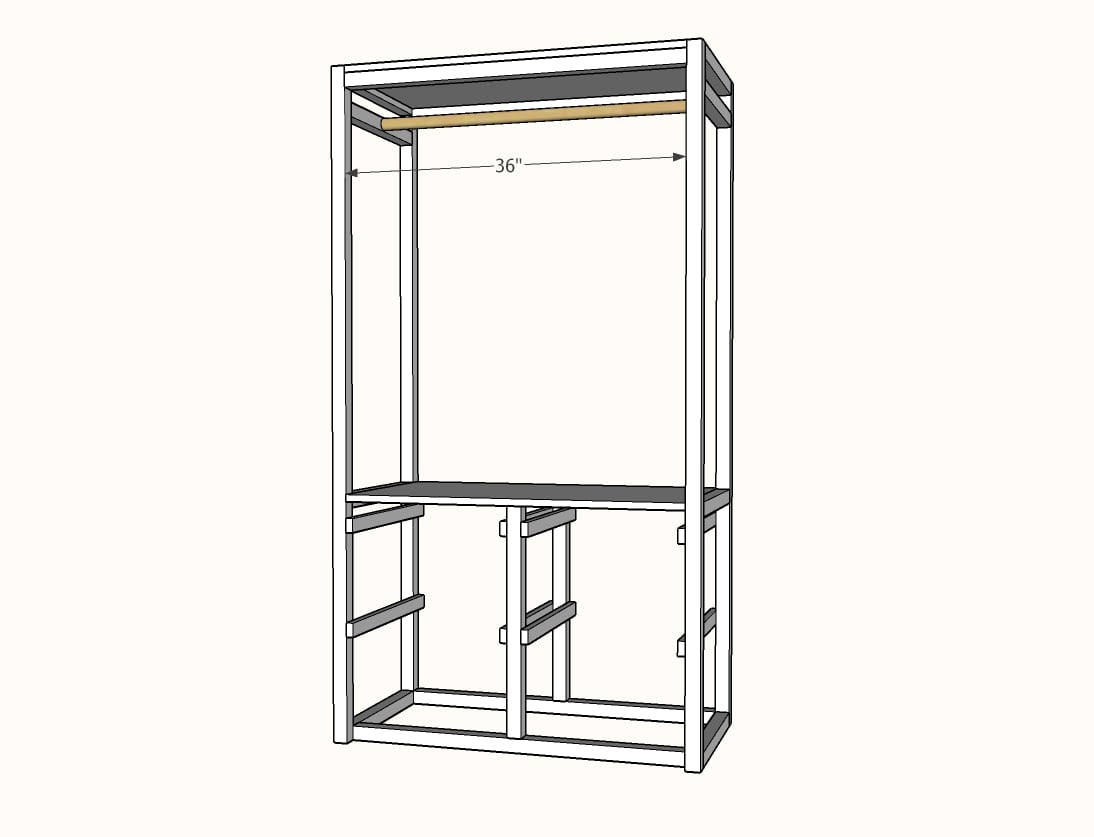
Attach dowel with the closet rod sockets. Cut the dowel to fit.
What kind of wood should I use?
Most of our plans use standard construction lumber like pine or fir. It's affordable, easy to work with, and easy to find. It's also rapidly renewing and biodegradable, so a great eco friendly choice!
Can I use hardwoods instead?
Yes—just keep in mind they're heavier, cost more, and can be tougher on tools and harder to join together and finish. I recommend not tackling a hardwood project until after you have built several softwood projects.
What if my boards are warped?
Choose the straightest boards at the store. You can often work around slight warps by cutting them into shorter pieces.
What wood should I use for outdoor furniture?
Use red-toned or pressure-treated 2x lumber for framing, and cedar or cedar fence pickets for the decking. Outdoor furniture should be built like a deck—your local home center can help recommend the right wood for your climate.
Will my wood move or warp after I build?
Potentially, especially in humid climates. Let your wood acclimate indoors before building. Once acclimated and kept in a stable environment, movement should be minimal. Remember, most houses are built using framing lumber - it's all about keeping moisture down indoors.
Cutting Questions
Do I need a miter saw?
A miter saw is great, creating fast, safe, and precise cuts, even for beginners. But most plans can be built with a circular saw and a straight edge. If using a circular saw to cut, take time to practice, and get good at making cuts, before cutting your project boards.
How do I get clean cuts with a circular saw?
Clamp your board, measure twice, cut slow, and use a sharp blade. This takes practice, so spend some time making cuts. I go through becoming proficient at freehand cutting in my course, it is worth taking if you want to master this skill.
Will the store cut my wood?
Yes—most stores will do rough cuts to help you transport your materials home. But from store to store, the quality of cuts could greatly vary.
Joinery Questions
What screws should I use?
We recommend star-head self tapping screws for framing, most common sizes are 2-1/2", 1-3/4". Pre-drill if close to the edge or you find your wood is splitting.
Do I have to use pocket holes?
Pocket holes are the cheapest, easiest and fastest way to do some joints - like edge to edge or a hidden fastener joint. There are other methods, but these can be time consuming and expensive. We recommend using pocket holes as indicated in plans for best results.
How do I keep things square?
Use a speed square and measure diagonals after each step. Always clamp joints before screwing to keep them tight and flush.
Finishing Questions
Stain or paint before or after building?
A quick sand before and a full finish after gives the best results. Pre-finish if you're doing two-tone or detailed finishes.
What type of finish?
Use oil-based or water-based stain. For paint, cabinet-grade latex or enamel works great. High use surfaces on indoor projects should get a coat of polyurethane, I recommend a Helsman or Spar or other flexible poly that won't crack or peel with wood movement. For exterior projects, use a finish suitable for exterior fences.
How to get a smooth finish?
Start with a well sanded project. Sand between coats (220 grit), wipe clean, and apply light coats with a foam brush or roller.
Plan Questions
Can I change the size?
Many people do, and that's the great thing about building your own furniture! But do keep in mind going bigger might mean more supports are required, and often plans are optimized for minimal material waste.
Are these beginner-friendly?
Yes—plans are written with simple tools and clear steps in mind, with every effort to make plans as simple as possible.
Can I sell what I build?
Absolutely! Just don’t resell or repost the plans themselves.
General Questions
What tools do I really need?
A drill, circular saw, tape measure, square, and a few clamps will get you through most projects.
Do I need a workshop?
Nope! A driveway or small patio is plenty to get started, just make sure you have a level place to work. If you find you are building several projects a year, creating a small workbench is a great way to store tools and have a dedicated workspace.
What if I mess up?
Wood filler, sanding, or flipping boards goes a long way. Mistakes are part of the process!
What can I do to make my projects look more professional?
Start with straight boards, make accurate cuts, clamp all joints, and line up everything neatly. Sand thoroughly, use a neutral finish, and apply it in light coats for a clean look.
I've never built anything before. Where should I start?
Start with a few smaller softwood projects to get hands-on experience. Or if you're tackling a big project, buy a little extra lumber and practice your cuts and joints first. If possible, work with someone who has a bit of experience.
Care & Maintenance
How long will my furniture last?
With good joinery and regular care, your DIY furniture can last for decades. I have pieces in my own home that are over 20 years old and still going strong! One of the best parts about DIY furniture is that it’s easy to repaint, refinish, or repair—so your projects can grow and adapt with you.
How should I care for outdoor furniture?
Lightly pressure wash or hose it down once or twice a year. Tighten screws and reapply finish as needed to protect it—just like a deck or fence. A little upkeep goes a long way in extending the life of your furniture.
How about indoor furniture?
Regularly dust or wipe with a damp cloth. If it starts to look worn, a light sanding and touch-up paint or stain can refresh it in no time. DIY pieces are meant to be durable and fixable—so don’t be afraid to give them some love now and then.
Want to Build with Confidence?
Check out my ebook: 12 Skills to Build Your Own Furniture
It walks you through the core skills every builder needs—measuring, cutting, joinery, and finishing—so you can build beautiful furniture that lasts.