
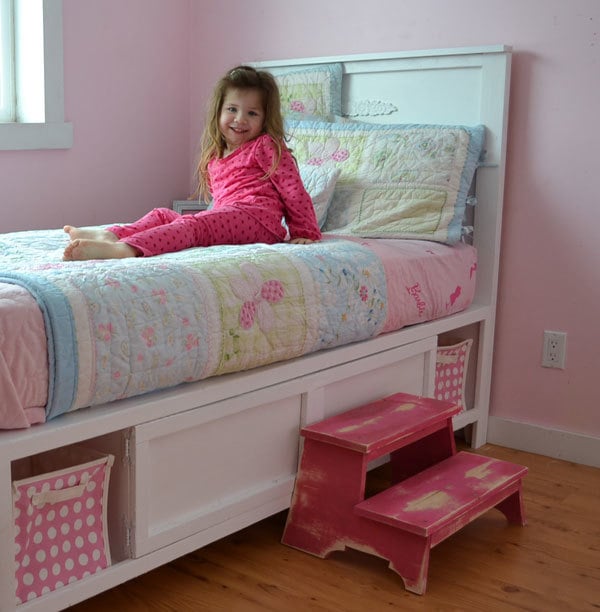

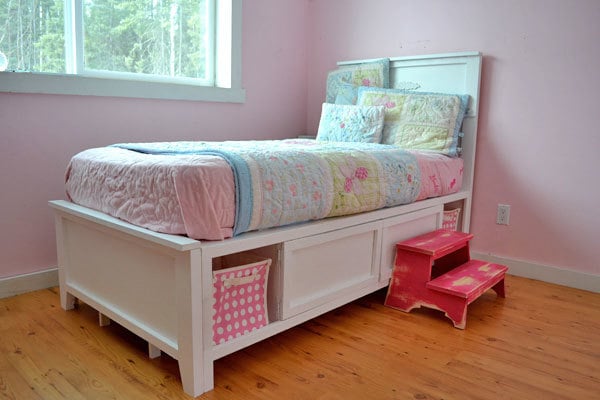
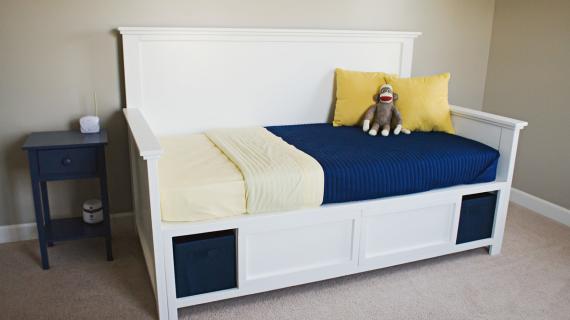
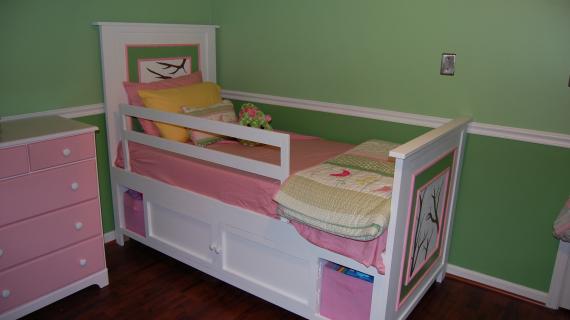
storage bed
Do you have a project sitting in the garage, that has been sitting there for quite some time?
And for those of you who do not like the exposed bench feet under the bed, I encourage you to take a better look at this bed . . . the things you notice when you DIY :) I plan to add an upholstered bench to the foot of the bed.

Preparation
4 - 1x12 @ 8 feet long OR 1 sheet of 3/4" plywood or MDF ripped into 11 1/2" wide strips, 8 feet long
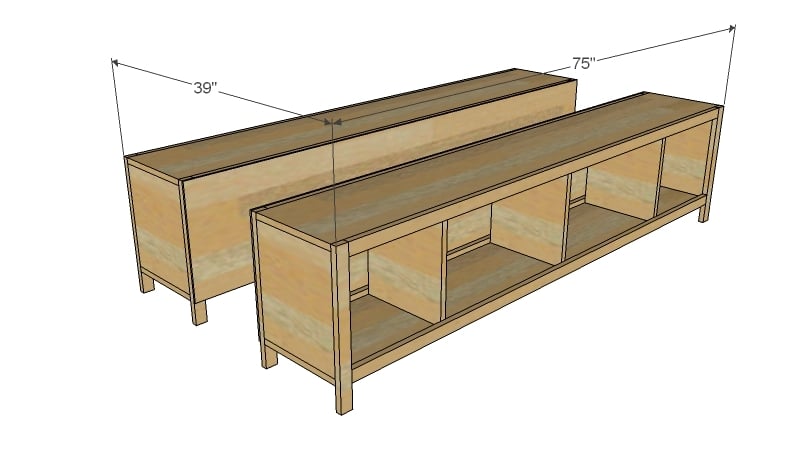
4 - 1x12 @ 75" (Bench Top/Bottom)


Please read through the entire plan and all comments before beginning this project. It is also advisable to review the Getting Started Section. Take all necessary precautions to build safely and smartly. Work on a clean level surface, free of imperfections or debris. Always use straight boards. Check for square after each step. Always predrill holes before attaching with screws. Use glue with finish nails for a stronger hold. Wipe excess glue off bare wood for stained projects, as dried glue will not take stain. Be safe, have fun, and ask for help if you need it. Good luck!
Instructions
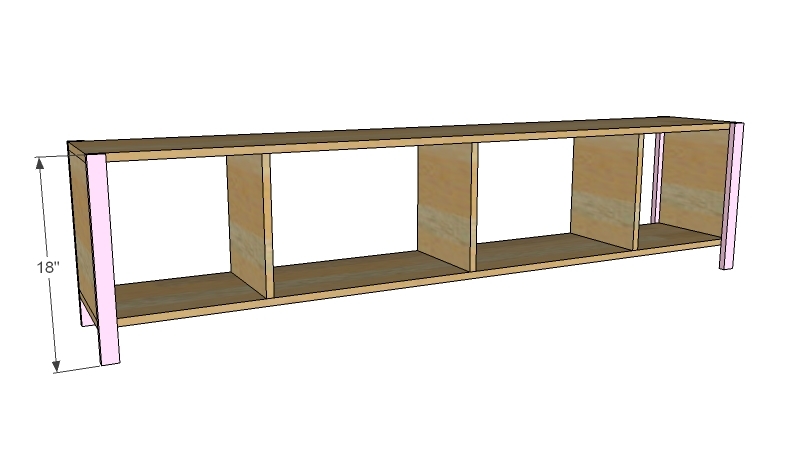
Step 1

Start by building a simple box out of 1x12 boards as shown above. You can place the cubbies at any spacing, just try to keep the middle cubby in the center. I built one bench with pocket holes, one with 2 inch finish nails and glue - and either way works just fine.
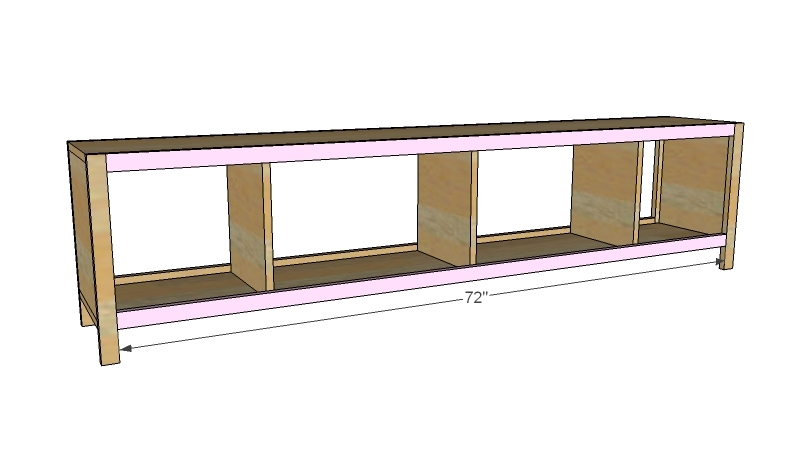
Step 2
Then add the legs as shown here. Again, use either finish nails or pocket holes. Tops and outsides are flush.
Step 3
Now trim out the tops and bottoms. It's a good idea to also secure the top/bottom trim to the cubbies as well.
Step 4

And then tack some 1/4" plywood to the backs. Use 1 1/4" finish nails and glue.
Step 5
Step 6
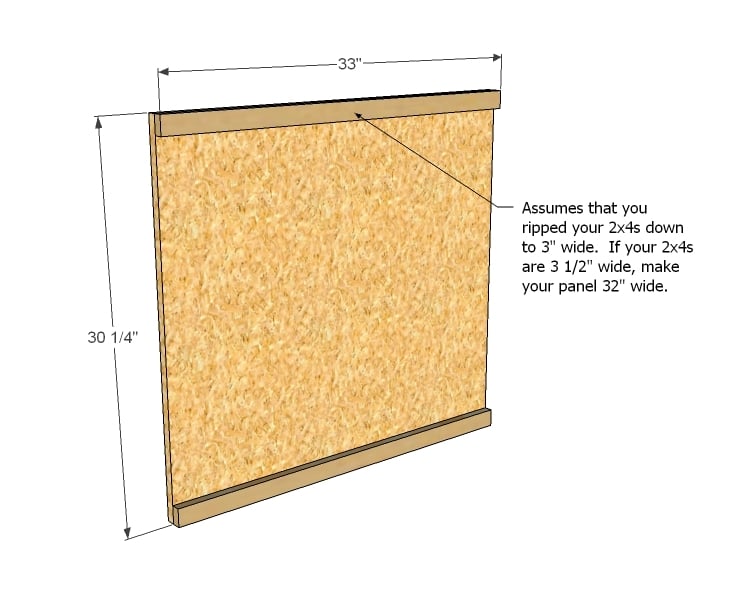
Now it's time to build the headboard. First we must make a decision. If you have a table saw, rip 1/4" off each side of your 2x4 boards so that the total width of your 2x4s are 3". Also, this will give you a nice square edge to your 2x4s. I ripped mine, and all dimensions given are for ripped 2x4s. If you do not have a tablesaw, it's really okay. You will just need to subtract an inch from the headboard/footboard panels and trim. This is noted in the diagram. Once you have decided on your leg widths, cut your particle board panel to the correct width, and the trim. Attach the trim with 1 1/4" finish nails and glue.
Step 7
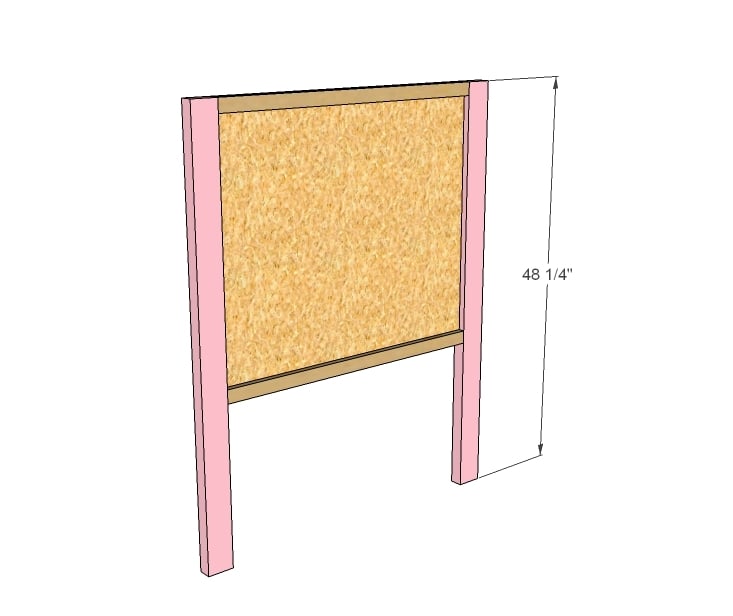
Now the legs. On Grace's bed, we tapered the legs slightly. Taper the footboard first, to match the clearance under the benches. The headboard is really not necessary, as you can barely see this.
Step 8
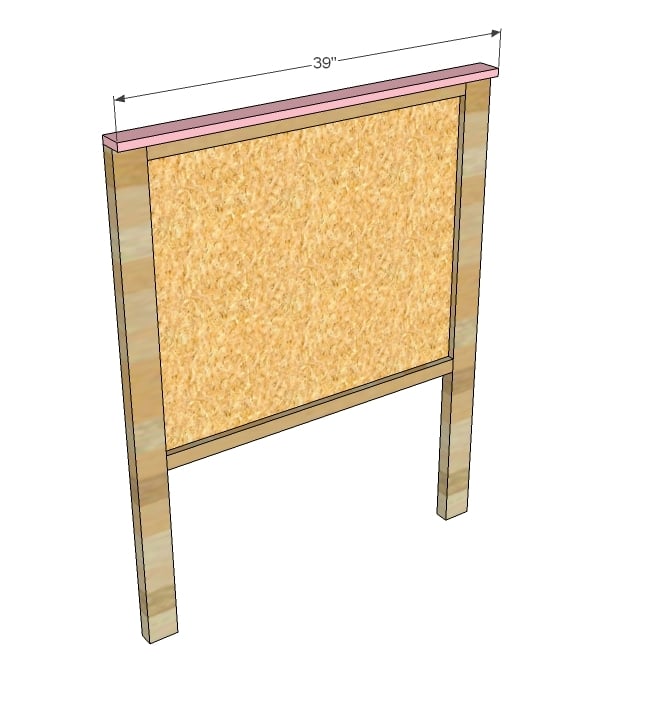
Use 2" finish nails and glue to attach the headers to the bed. On Grace's bed, we glued a flower applique for an added touch of girly to the headboard.
Step 9

Build the footboard in the same manner as the headboard.
Step 10
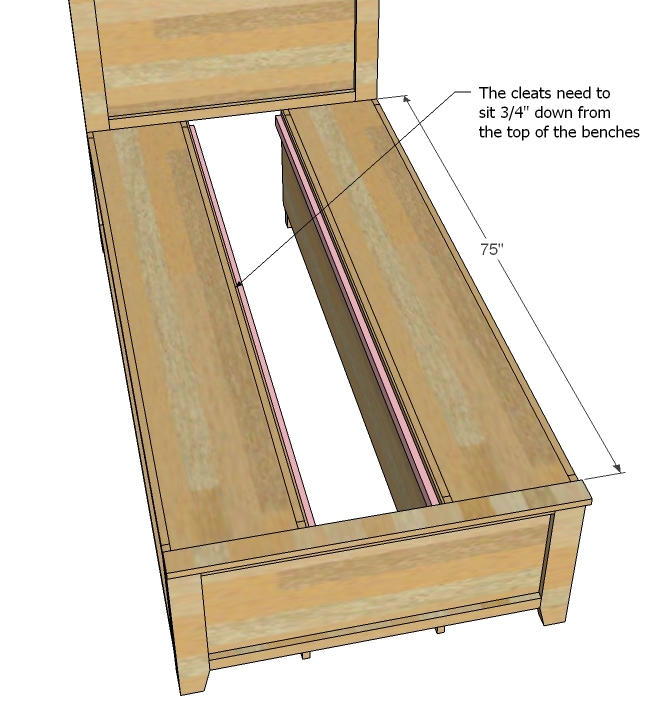
As we go to assemble the beds, we will need to do something about the gap in between. I wanted the mattress to be able to breathe, as children can have accidents. So I choose a slatted system. To begin, use 1 1/4" finish nails and glue (on the top edge of the cleat so you don't poke through) to attach cleats 3/4" down from the bench tops.
Step 11
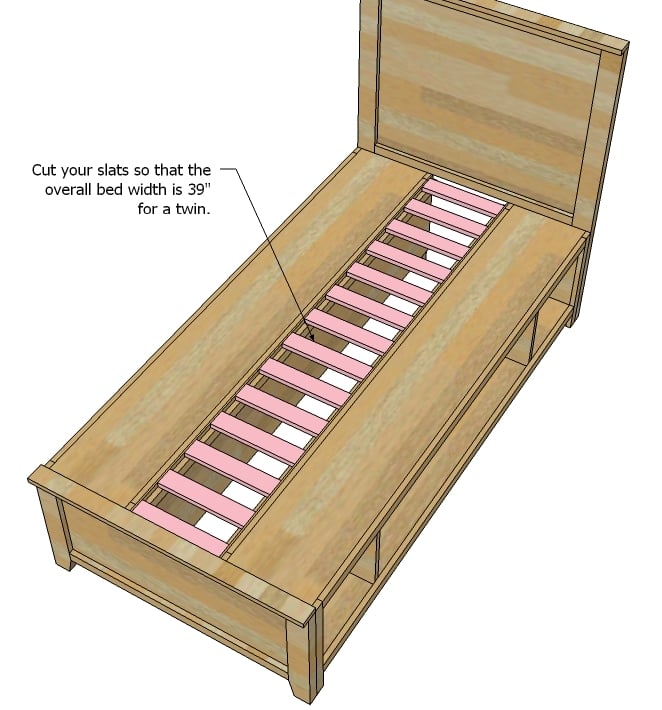
Then I took a measurement (important, as your 1x12s could be a different width) of the space in between and cut a pile of slats and screwed them down.
Step 12
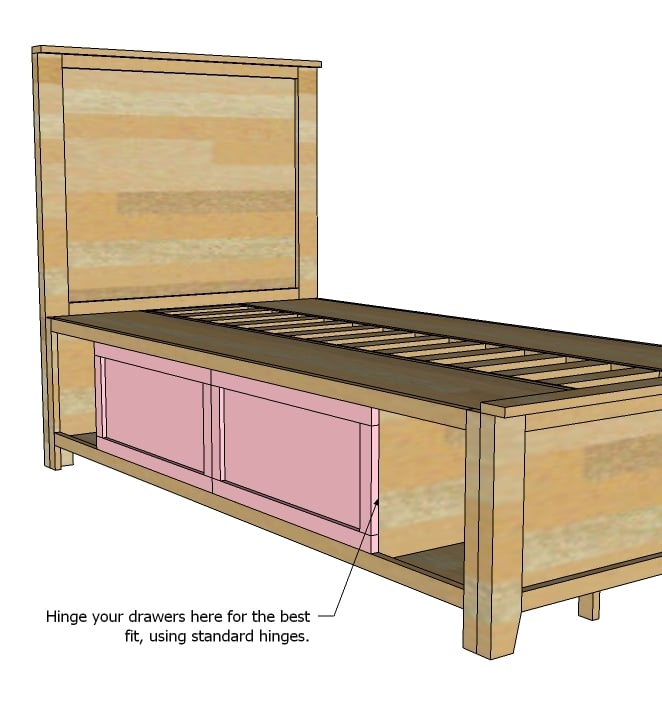
If you want to have some hidden storage (the cubbies on the ends are perfect for fabric bins, and also allow for a nightstand) it's easy to build doors. You should measure the opening, with your doors starting in the center of the bed and covering the outer dividers. I used 1x2s to build a frame, placed plywood on the back (make sure that the plywood is 3/4" short on the ends, so that the door can sit fully inset) with 3/4" finish nails and glue, and attached with hinges and clasps. After many trials and as many errors, the easiest method I found was to use hinges as shown above.
Step 13
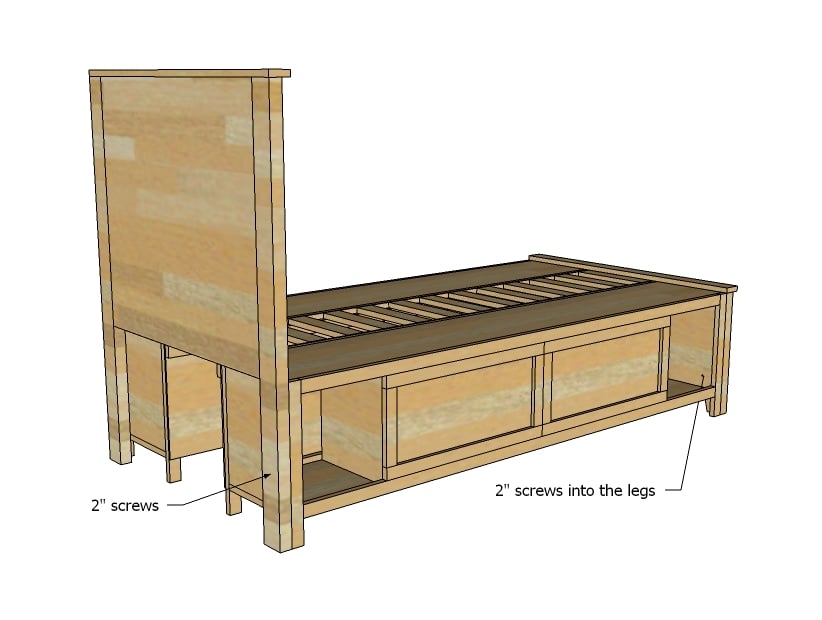
Assemble the bed by attaching the headboard and footboard to the benches with 2" screws as shown above. Grace's bed is extremely sturdy.
It is always recommended to apply a test coat on a hidden area or scrap piece to ensure color evenness and adhesion. Use primer or wood conditioner as needed.


Comments
Valentina (not verified)
Thu, 04/07/2011 - 12:35
Love it, you are fabulous!
Love it, you are fabulous! Keep 'em coming!
seamstress
Thu, 04/07/2011 - 12:37
Absolutely Gorgeous! Thank You for Sharing This!!! =)
It's Perfect! Thanks, again! =)
birdsandsoap
Thu, 04/07/2011 - 13:01
Great Kids bed!
Great plan for a twin bed. I am sure it will be all the more enjoyed considering the time it took to complete! I like the cabinet doors underneath. Kids rooms can get so junky and I love a door that conceals the mess! I am
currently building a modified version of the farmhouse bed for my
husband and I. I just finished building storage benches on either side
to attach the head and footboards. I am so excited! Now if it would quit
raining I could get some work done! and if the baby would take a nap,
and my toddler would give me a break, and the laundry would do itself...
I love your site and the inspiration it brings. If you could make a
plan for some kind of kid corral so I could get a free minute of time I
would be much obliged!
Christy Panzarella (not verified)
Fri, 04/08/2011 - 09:47
Kid Corral. LMFAO. Try the
Kid Corral. LMFAO. Try the playground plans?
susyb1027
Thu, 04/07/2011 - 13:07
Great Bed
I was wondering... can you make plans for one of these high chairs? http://www.stokke.com/highchair.aspx
Chair
Thu, 04/07/2011 - 13:10
Pft. Legs.
A bench at the end and: Legs? What legs? :)
I personally would prefer the footboard to be just a wee bit taller. I don't know what the heck my son does all night but his mattress (on a flat base) always shimmies down through the night -a slightly higher footboard would keep it in place.
Otherwise, it so rocks. One can never have too much storage in a kids' room!
Guest (not verified)
Thu, 04/07/2011 - 13:18
This is really nice if the
This is really nice if the bed can sit away from the wall on both sides, but if your room configuration requires that only one side is facing out this seems to be a lot of unnecessary lumber and labor to build the box that will be hidden against the wall. Can you suggest an alternate plan for if you can only use a cubby system on one side?
mbrottem (not verified)
Thu, 04/07/2011 - 14:31
Fabulous!
We're going to try and build a bed a year as a fund raiser for a local non-profit to help foster and adoptive kids. This would be perfect! Beautiful.
lasmith84
Thu, 04/07/2011 - 18:17
Beautiful Bed
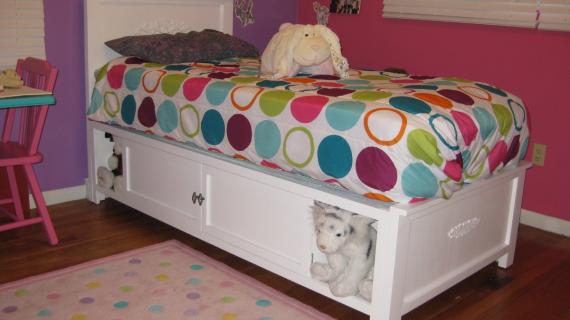
I LOVE this bed. I have been trying to figure out how to make a twin storage bed out of 1*12's instead of ply wood and this is exactly that. I'm already thinking of how to convert this to a day bed for our spare room. Thank you so much Ana!
ACraftyCauldron
Thu, 04/07/2011 - 19:35
Another Beautiful Piece!
2 gorgeous works - the bed and that sweet little one! Thanks for all that you do, Ana!
Laci (not verified)
Thu, 04/07/2011 - 21:56
awesome!
Ana,
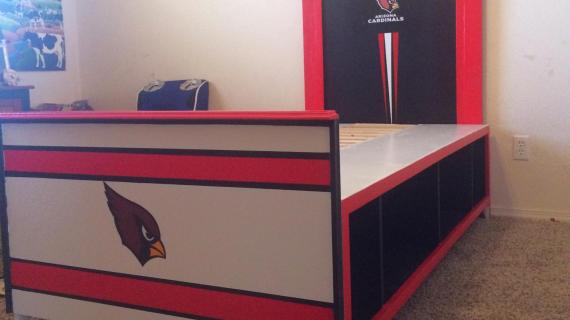
So glad ya'll are feeling better!! LOVE the bed. Thank you so much for your hard work. This is perfect for my son. I've been looking for a design to build that would be a functional, beautiful piece for my son's room. I couldn't get started because I knew it would not be a "long-term" piece for him (or us in our house). This is perfect!! Also, right now we have an issue with storing books in his room close to his bed for him to read at night. He's gonna have a BLAST organizing his books in those shelves and also have space for some of his little treasures (right now he hides them between the wall and his mattress so his baby sister cannot get to them. Last time I checked he had a snake skin, a rock, a deer bone, a flashlight, and a glow-worm stashed back there. Too funny! He's 3 by the way). Thank you for your time, Ana!
Laci
ps. I was glad to hear a little bit of your thought process and "a-day-in-the-life" stuff in this post. I love the plans, but I also love to hear about your Alaskan, building, blogging, mothering life.
mycreativeescapes
Fri, 04/08/2011 - 07:08
I couldn't agree more
I couldn't agree more with the PS in the comment above me. I love love love your plans - but I love when they also have the "note from the author" where you give us a quick look into your life. Because you are far beyond the builder behind this awesome website - you are a fantastic person that we love to hear and learn more about.
I am glad you are feeling better - and this bed is awesome. I am trying to figure out the best bed's to make. I would like to eventually build 3 - one for each kid. But - it's figuring out which one to make. Maybe I will start with the doll bed - and go from there :)
Thanks for building such a great community.
papabear
Mon, 09/01/2014 - 20:03
where to start
Starting with the dollbed is a great idea. Thats where i started.
Kerri (not verified)
Fri, 04/08/2011 - 07:40
This is the one!
I need to build 2 beds for a room, for 2 daughters that share it. This is the one! Thanks so much for this design. Like another poster stated, I will modify the foot board to be taller, the mattresses would be sliding off this as they are ADHD. lol.
On another note, I like the foot stool used here, but is it going to scratch up the paint job on the bed as it is placed?
Can't wait to see the upholstered bench, please do it next! I would like to see it be able to attach easily to the bed, so it is one unit as an option. Is that possible?
Thanks for sharing your designs and your beautiful family.
Kim (not verified)
Fri, 04/08/2011 - 11:05
Headboard
I love, love, love this bed. It's the exact bed that my daughter has been asking for. One question that I have is how do you attach the legs to the particle board headboard. I am not able to rip my 2x4s down so I'm not sure if I can find a fastener that will go through the entire 2x4 if I attach through the side and it looks like the 2x4 just buts up against the particle board so I wouldn't be able to go in through the back. Is this a situation where I would need to get a pocket hole jig to attach? Sorry for all the questions - I'm very new to building. Thank you so much for providing detailed plans that even I feel I can tackle. Thanks, Kim
Tim (not verified)
Mon, 11/21/2011 - 17:01
Headboard
Kim,
Did you ever get an answer for this? Did you need to buy the Kreg tool and use pocket holes? Thanks
Tim
brguad
Sat, 04/09/2011 - 10:29
Perfect!!!
Thanks Ana! I've been struggling the past couple months trying to figure out how to do the storage bed mixed with the farmhouse bed and it seems like you did the best of both! This really is beautiful and I think my daughter is going to love it. This will fit still accommodate the rail to keep her in at night, right?
mommynewcom
Tue, 04/12/2011 - 09:10
We plan to build this for our
We plan to build this for our 3 year old daughter in the next few weekends
Guest (not verified)
Sun, 07/10/2011 - 14:27
Great bed!
My husband and I are thinking of trying to make this bed for my daughter's second birthday. One problem, we have never really taken on a project like this before. The steps and visuals you lay out make it look doable. What do you think? Is this a project a couple of beginners can do? Also we were thinking of doing something like the picture on this site for a fence looking headboard/footboard: http://interiordec.about.com/od/beds/a/bedsizes.htm
Any ideas or suggestions?
I have just come across your site and have really enjoyed looking over it the past few weeks.
Nan (not verified)
Thu, 09/29/2011 - 08:54
paint
THanks so much for this plan! my husband is now hooked! ofcourse I had some convincing at first...we only knew how to hang picture frames. So when I came to him with this plan to build a bed ...well it took awhile but now he's HOOKED!! he's printed out 4 of your plans for the next few projects LOL. Well I'm the painter so I have a question for you. The bed is done and I have done the first coat..but before I go any further. we bought the CIL furniture paint with primer / paint in one (HD recomended) we would like it a little shinier though. We got the semi gloss but how can we make it slightly shinier than it is. HD didn't recomend HIGH gloss for furniture. so can i put a coat of poly..or what do you suggest. thanks!!! and thanks again!
Georgia M
Mon, 10/03/2011 - 15:42
working on this
We are working on this plan, and I think you actually need 10 dividers, 5 for each side. Which means you need an extra 1x12. Also, I totally misread this and thought the wood for the doors were included in the plan, and they aren't so just a heads up in case anyone else is planning to put doors on. Read carefully. :) And I just wanted to make sure before we keep going that those little 1x2 legs will be enough to support the benches without another leg in between? It just seems like a long distance, but I don't know so I wanted to check.
Thanks for the great plans, we can wait to finish it!
Andrew emtp (not verified)
Sat, 10/08/2011 - 14:02
Great Plans
Love your plans and really enjoy building stuff for my little girl. This Bed is going to be perfect for her as we are in desperate need for more sotorage for all the stuff she "obtains" from Grandmas house!!!!! Only mods I am going to make are the footboard a little taller to keep the mattress on, and use wainscot paneling for the head and footboard.
Lady Goats
Mon, 10/10/2011 - 15:16
Dividers (shopping/cut lists need edited, please :-))
I'm glad to see someone mention the dividers. We're spending our fall break in Vegas, at my sister's house, and she conned my step-dad and me into building this bed for my nephew (I use "conned" in the most loving way, as we're more than happy to do this for her). We skipped the particle board and bought another full sheet of ply (it's going to be stained). Good thing, too, since the cut/shopping lists only account for one set of sides/dividers.
I was also quite confused about how the head/footboards are connected (can't pocket hole or side drill into osb). But with the ply, pocket holes will be just fine.
Anyhow, this is a super easy build, and I'm thrilled for my nephew to get this bed :-)
May (not verified)
Fri, 01/06/2012 - 20:41
I'd like to know the
I'd like to know the dimensions for toddler size if anyone has it? Very much appreciate it.
Spolitte
Sat, 01/14/2012 - 23:35
We did it!
My husband found Anna's site and we were excited to give this project a try. In today's market it's easy to spend a lot and not get much with regards to quality or longevity. At least, if we build it, we know the quality, workmanship and love that went into it. Without the encouragement and easy to follow plans and instructions I doubt we'd have been able to accomplish so much. Our girls just love their new bed... a bed that the whole family had a part in building. THANKS ANNA! Now... on to the next project. The folks at our local Home Depot are getting to know us by name! ;-)
Daniel Cook
Wed, 02/15/2012 - 20:06
SketchUp Model
Is there any whay that I would be able to get a copy of your Twin bed SketchUp Model? It would be greatly appreciated. Thank you.
Guest (not verified)
Wed, 02/29/2012 - 19:44
Headboard legs
How do you attach the PartIcle Board to the Legs of the Headboard? I haven't ripped down my 2x4's and i am not sure how to get this part done.
In reply to Headboard legs by Guest (not verified)
Georgia M
Mon, 04/02/2012 - 07:16
Headboard Legs
We used a Kreg Jig to assemble the headboard. If you don't have a Kreg Jig, I would try cutting the headboard a little wider (or not cutting down the 2x4's instead) and overlapping the particle board on the back of the legs. Then you could screw through from the back. :)
Lesley (not verified)
Wed, 05/09/2012 - 17:26
Headboard Assembly
I don't understand how the headboard goes together. How does the Kreg Jig work in assembling the headboard? Is it the same for the footboard?
Any instructions or advice you have would be great!
Thanks! :)
In reply to Headboard Assembly by Lesley (not verified)
Georgia M
Thu, 05/10/2012 - 07:04
headboard
You would make your pocket holes in the headboard and use those to attach it to the legs. There are videos on the Kreg Jig site of how it works. Once you see it in action it makes more sense. Hopefully this helps. :)
http://www.kregtool.com/Pocket-Hole-Jigs-Prodlist.html
Guest (not verified)
Mon, 04/02/2012 - 01:54
Thank you for the plan. I'm
Thank you for the plan. I'm going to make one too for myself :)
Lesley (not verified)
Wed, 05/09/2012 - 17:22
Making the headboard
I really love this plan, and would like to make this bed but I have a question:
I dont understand how the headboard goes together. How does the Kreg Jig work in assembling the headboard? Is it the same for the footboard?
Thanks! :)
Lesley (not verified)
Wed, 05/09/2012 - 17:30
I really love this plan, and
I really love this plan, and would like to make this bed but I have a question:
I dont understand how the headboard goes together. How does the Kreg Jig work in assembling the headboard? Is it the same for the footboard?
Any advice anyone has on using the Kreg Jig would be great!
Thanks! :)
stannius (not verified)
Mon, 05/21/2012 - 22:33
How do you get a fully
How do you get a fully assembled twin size bed in and out of a room? Does it fit through a standard door?
Mackenzie B (not verified)
Sat, 06/30/2012 - 09:32
Queen bed?
Does the full size also work for a queen mattress or are more support legs/a bigger bench dimensions needed?
CSaintD
Wed, 09/03/2014 - 09:51
"Handmade from the Plan" doesn't match anymore
Hi Ana - I love the look of your new website and I know it was a lot of work. One issue I have is that the brag posts no longer line up with the plans. the area "handmade from this plan" seems to show all brag posts, not ones specifically made with the plan I am viewing at the time. I really like looking at what others have done with a plan before I get started, just to see what can be done.
As you are still working on the site, I'm hoping this will get fixed soon. Thanks so much for your awesome site, awesome plans and awesome self!
Ana White Admin
Wed, 09/03/2014 - 10:35
Yes
Thanks so much for your feedback, it is greatly appreciated, and for your patience with the new site while we work out all of the kinks. It is on the fix it list!
Officer_Dad
Tue, 09/16/2014 - 00:00
images no longer work
I am interested in building this bed but the plans no longer include all the images. All the images after the bench (start of headboard) do not display on the page or the PDF version.
judithcsharp
Sun, 04/26/2015 - 18:31
Help with plans
My husband and I are starting to build this bed, have bought all the materials and have done a lot of the cutting. But now we realize that once we get to the part about building the headboard and footboard -- there's really not much instruction. Like, how to put the headboard together. "Once you have decided on your leg widths, cut your particle board panel to the correct width, and the trim. Attach the trim with 1 1/4" finish nails and glue" -- this doesn't really tell me much. Attach the trim to what? and when (and HOW?) does the particle board panel get attached to the legs? What am I missing?
goings
Thu, 03/03/2016 - 12:02
Bench
Thanks for all these plans Ana. Is the bench sturdy enough to use as in a hallway for a sitting bench/storage?
Thanks
In reply to Bench by goings
goings
Thu, 03/03/2016 - 12:06
Actually, I just did a little
Actually, I just did a little more looking around the site and found your plans for the shoe bench.
Amanda Coyle
Mon, 04/18/2016 - 15:29
I am currently working on
I am currently working on this project but have ran into a problem, I don't understand how to attach the panel for the foot board and the headboard to the legs? Is it only attach by the header board at the top?
emilyerkmann
Fri, 03/27/2020 - 03:19
How to attach the legs
How do you attach the legs to the headboard/footboard? I didn’t rip my 2x4 (just didn’t want the extra step, so I’m having a hard time figuring out what to attach them to. Thanks for your help!