House Bed Frame - Modern Tiny House Shape

house shaped bed frame plans
Difficulty
Intermediate
| Print this plan

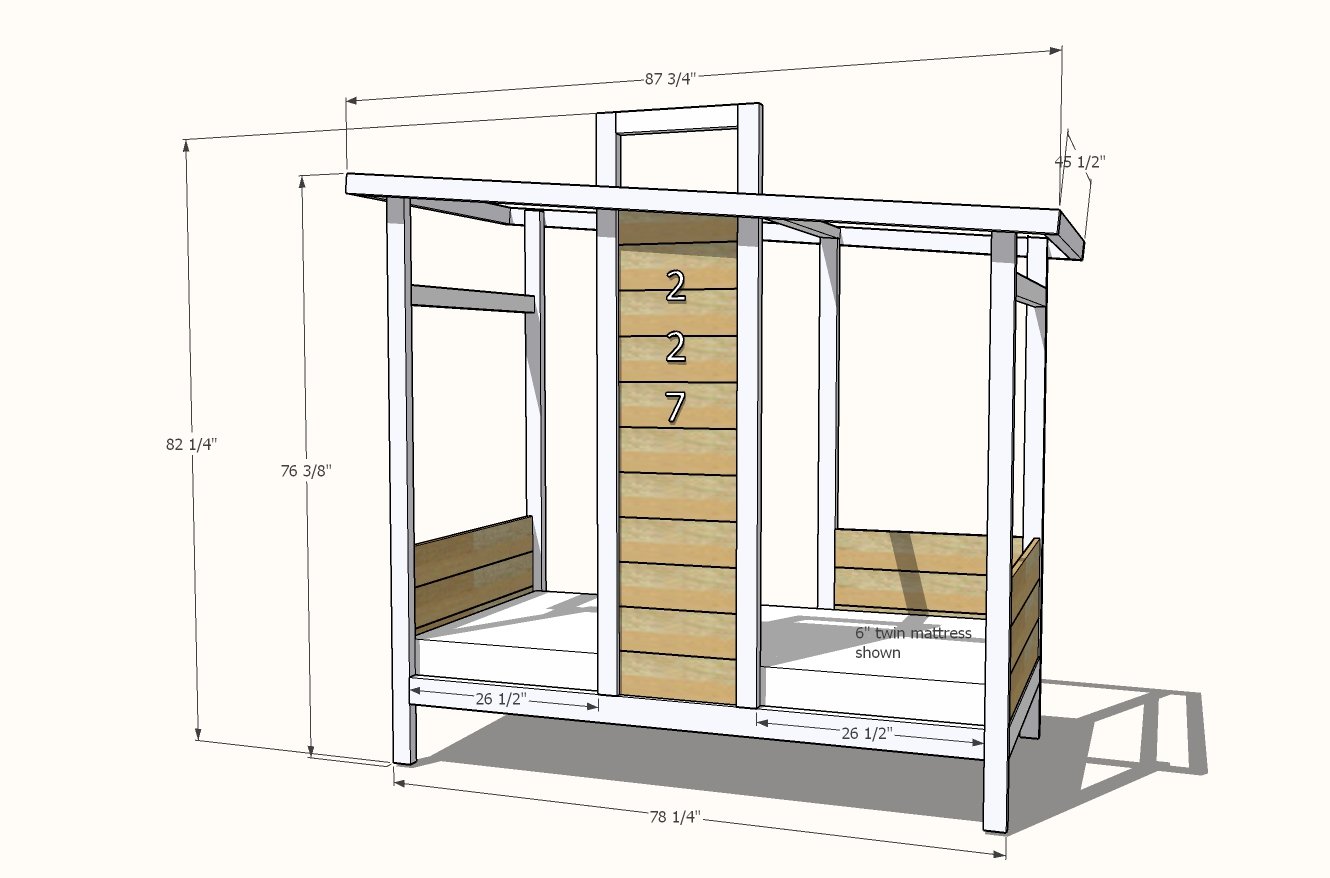
Free plans to build a twin sized house bed frame that is shaped like a modern tiny house!  You'll need basic wood building tools and some off the shelf lumber to create this dream kids bed.  Plans are for twin sized house bed frame.

Dimensions
modern house bed frame - tiny house
Twin sized house bed frame

Preparation

Shopping List
  • 9 - 2x3 @ 8 feet long or stud length, find good straight boards
  • 3 - 2x4 @ 8 feet long or stud length
  • 2 - 2x2 @ 8 feet long (can be furring strips)
  • 6 - 1x4 furring strips @ 8 feet long (for bed slats)
  • 6 - 1x6 @ 8 feet long (will be used for the wood panels)
  • 2 - 1x3 @ 8 feet long 
  • 2 - 1x2 @ 8 feet long
  • 60 - 2-3/4" self tapping construction screws (can be between 2-1/2" and 3" long, prefer #8 or #9 size)
  • 50 - 1-1/4" coarse Kreg Pocket Hole Screws
  • 25 - 2-1/2" Kreg Pocket Hole Screws
  • 3/8" wood dowel for filling pocket holes, about 3 feet
  • 1-1/4" brad nails
  • wood glue
  • Paint with primer or wood stain
Cut List

Headboard and Footboard

  • 2 - 2x3 @ 75-5/8 - longest point measurement, one end cut at 5 degrees off square
  • 2 - 2x3 @ 69-1/4" - longest point measurement, one end cut at 5 degrees off square
  • 2 - 2x4 @ 39" - bottom support
  • 2 - 2x3 @ 39" - top support 
  • 6 - 1x6 @ 39" - wood panels

Bed Frame System

  • 2 - 2x4 @ 73-1/4" - siderails
  • 2 - 2x2 @ 75-1/4" - inside cleats
  • 12 - 1x4 @ 39" - bed slats

Roof

  • 2 - 2x3 @ 88-1/2" - sides
  • 2 - 2x3 @ 42" - ends
  • 1 - 2x3 @ 39" - center of roof (installed in last step)

Back Wall

  • 1 - 2x3 @ 60" - long point measurement, one end cut at 5 degrees off square
  • 3 - 1x6 @ 27-1/4" - back wall panel

Front Wall

  • 2 - 1x3 @ 70-3/4" - front frame
  • 1 - 1x3 @ 13-3/4" - front frame
  • 2 - 1x2 @ 70-3/4" - back frame
  • 1 - 1x3 @ 15-3/4" - back frame
  • 11 - 1x6 @ 15-3/4" - front wall panel boards

Tools
Tape Measure
Pencil
Safety Glasses
Hearing Protection
Kreg Jig
Drill
Miter Saw
Brad Nailer
Power Sander

Instructions

Step 1

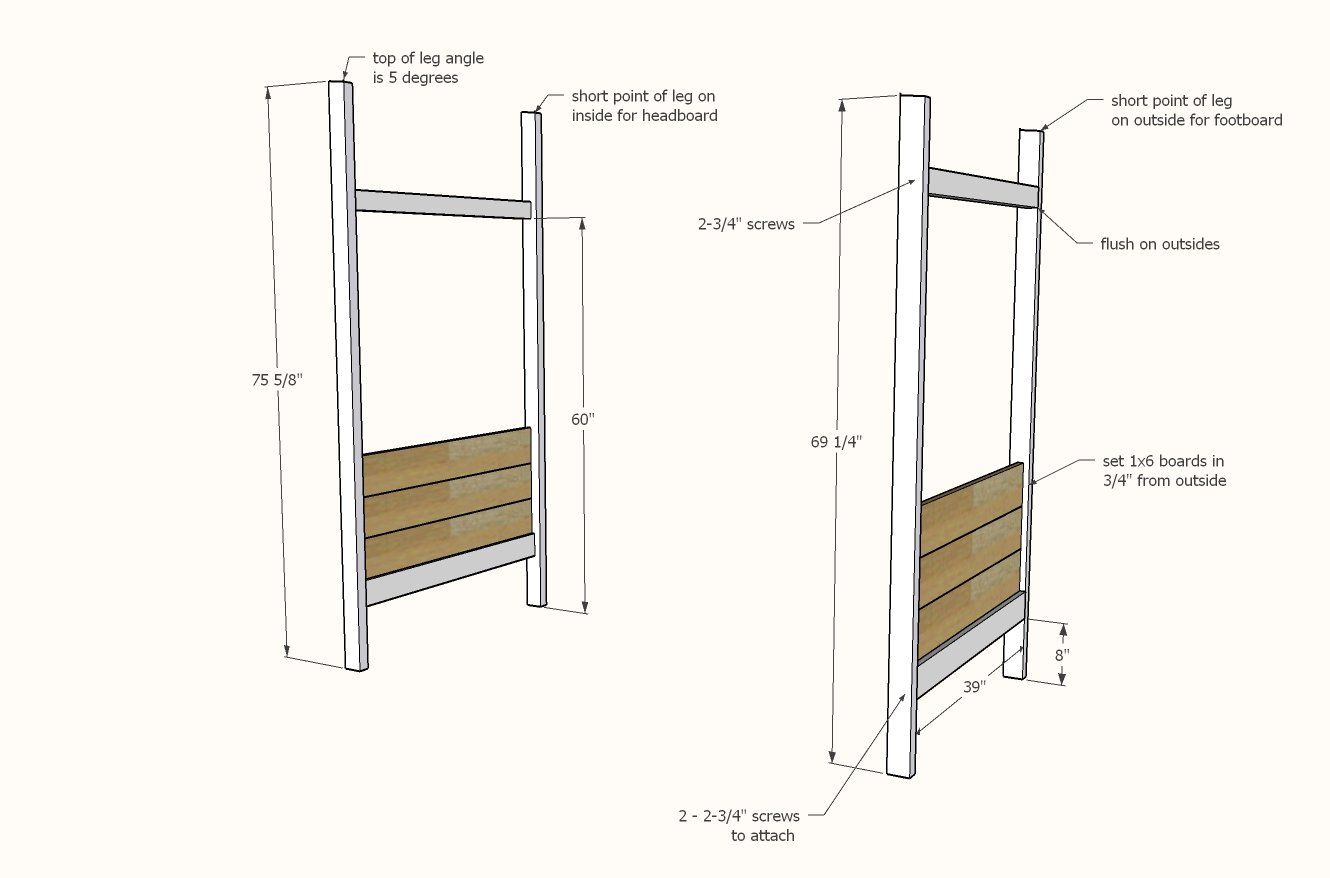
Build the frame for the headboard and footboard first using 2-3/4" self tapping construction screws.

Glue and add the 1x6 panel boards with 3/4" pocket holes and 1-1/4" pocket hole screws.  I recommend two pocket holes per each end of the 1x6 boards, and one in the center, joining the 1x6 boards together edge to edge.

Insert the 3/8" dowel into the pocket holes and use a flush trim hand saw to cut off the excess to fill the pocket holes.

Paint or stain the headboard and footboard.  

Since this bed is too large to fit through a standard doorway, I recommend painting or staining the remaining pieces in portions, and then bringing all the pieces into the room for final assembly.
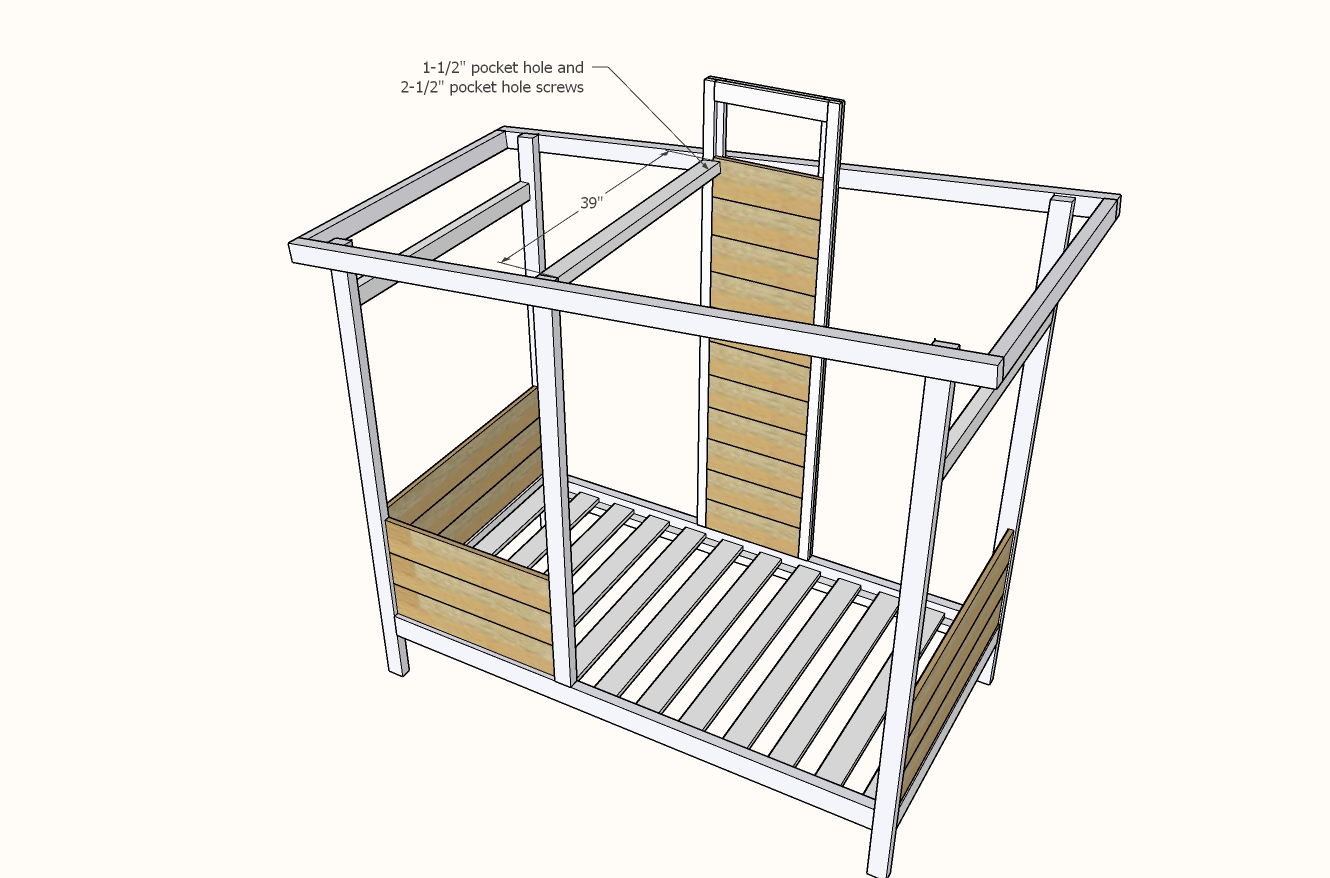
Step 2

Drill two 1-1/2" pocket holes on each end of the siderails.

Attach to the headboard and footboard panels with 2-1/2" pocket hole screws.

Step 3

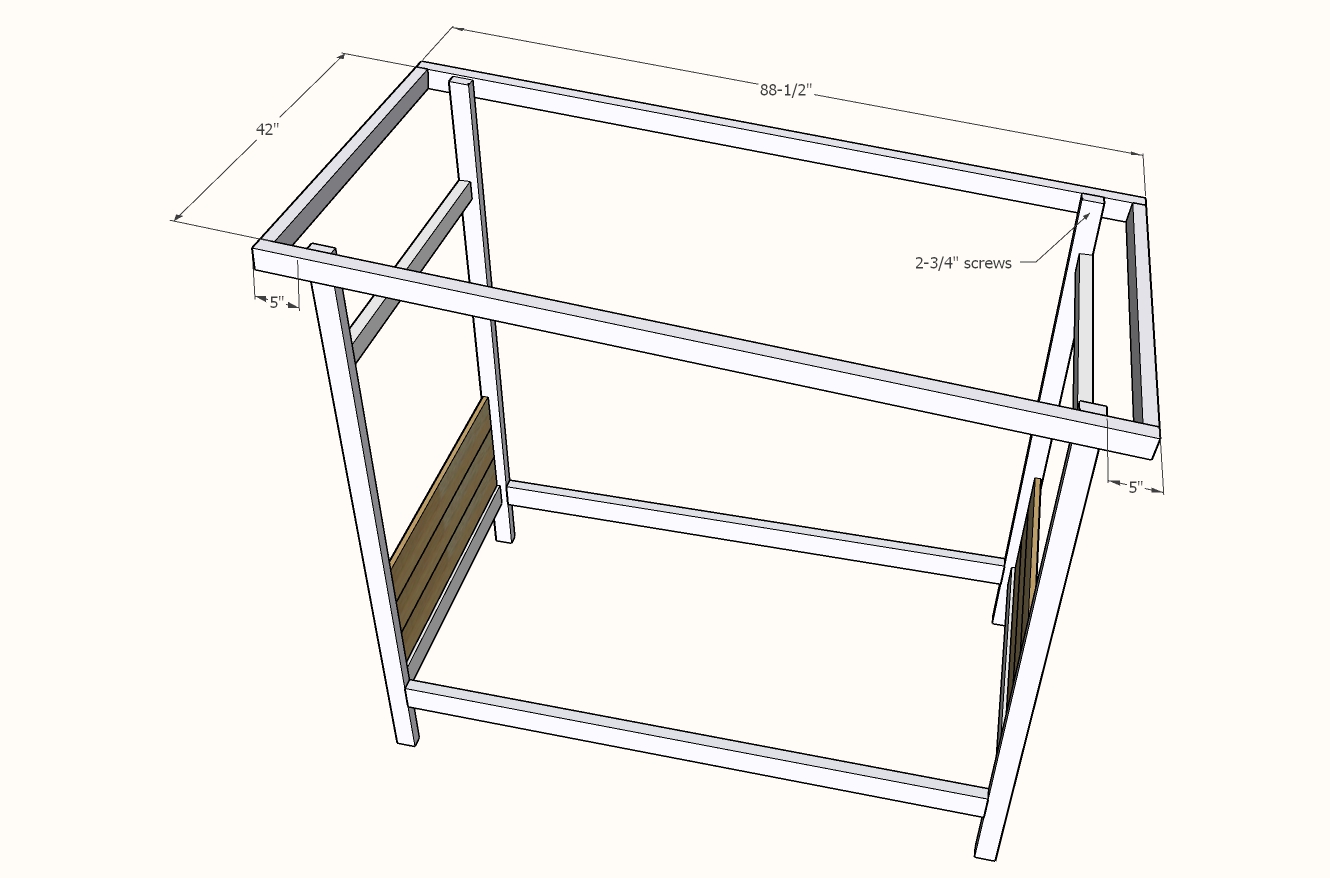
Build the roof section on the ground with construction screws at corners. Paint or stain.

At assembly, bring flush to top of legs and attach with construction screws from insides, with a 5" overhang on each end.

Step 4

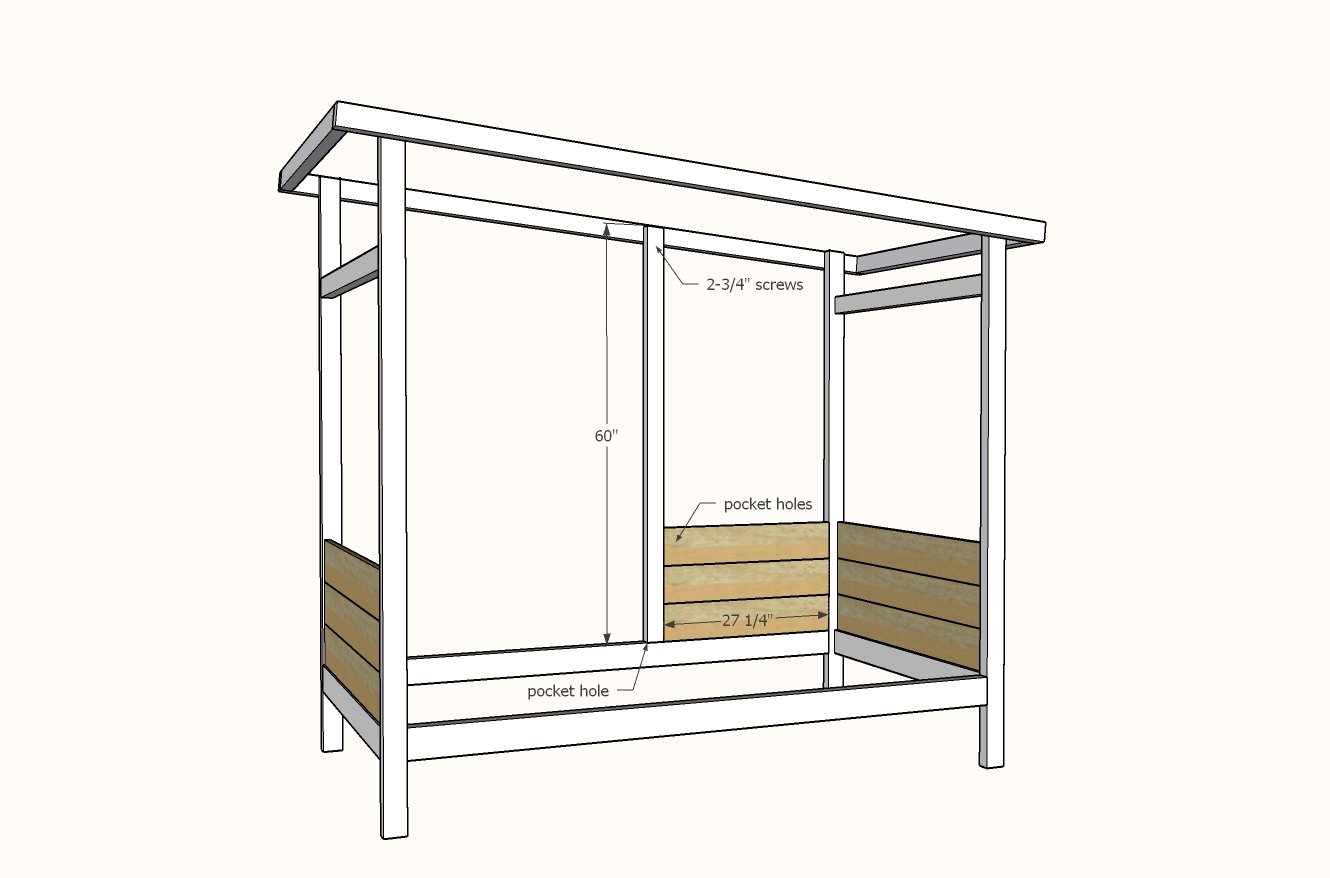
Drill 1-1/2" pocket holes on straight cut end of back wall 2x3.

Attach to the siderail.

Attach at top with construction screws.

Attach 1x6 wood panel boards in between and fill pocket holes with the wood dowel and cut off excess.

NOTE: For easy disassembly, DO NOT glue the pocket hole plugs so they could be removed

Step 5

Attach cleats to the siderails, flush to the bottom, with 2-3/4" construction screws and glue.  Also screw to the legs for added support.

Step 6

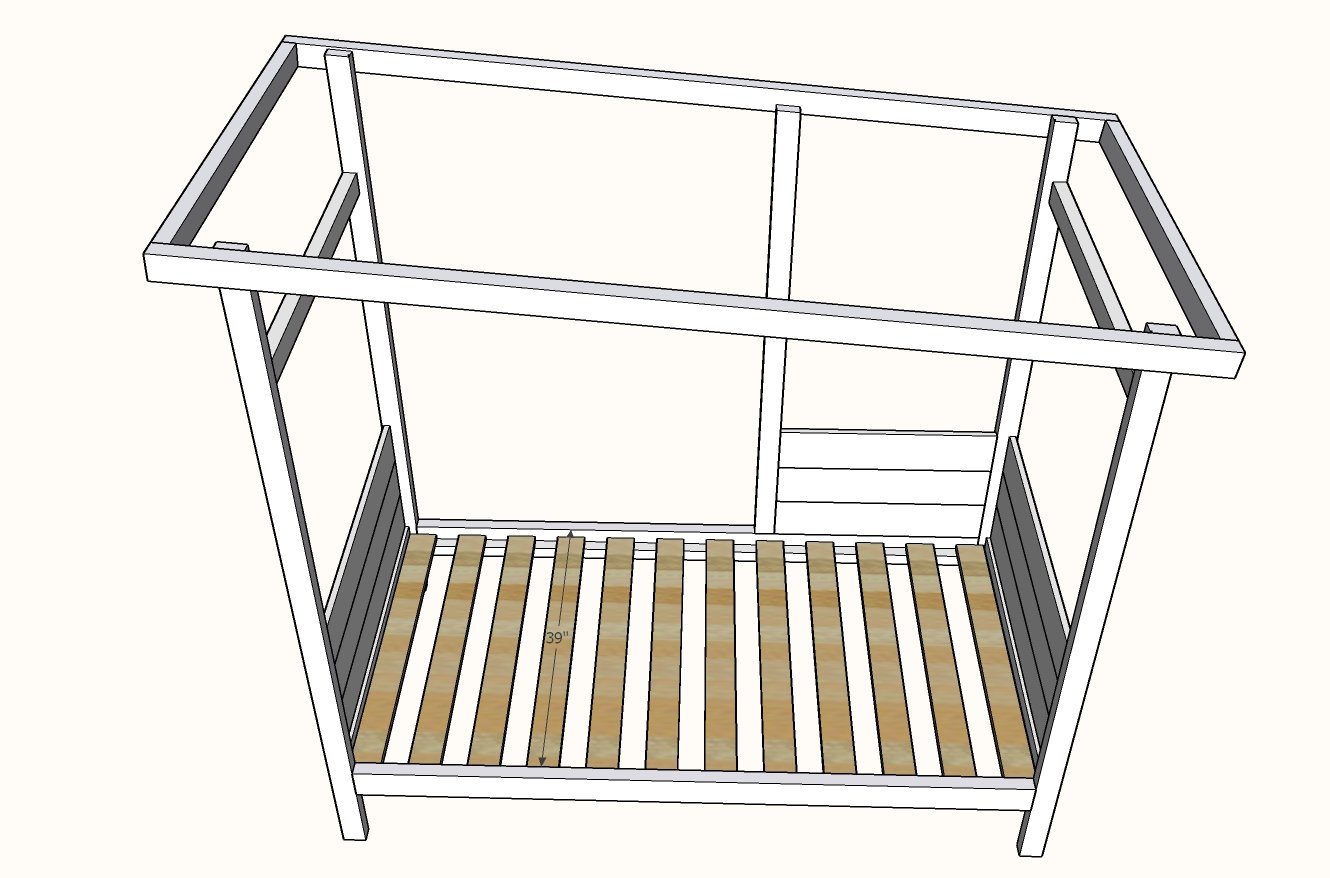
Place slats in bed with a 3" gap in between.  Nail down with 1-1/4" brad nails.

NOTE: For easy disassembly, use 1-1/4" to 2" long self tapping screws instead.

Step 7

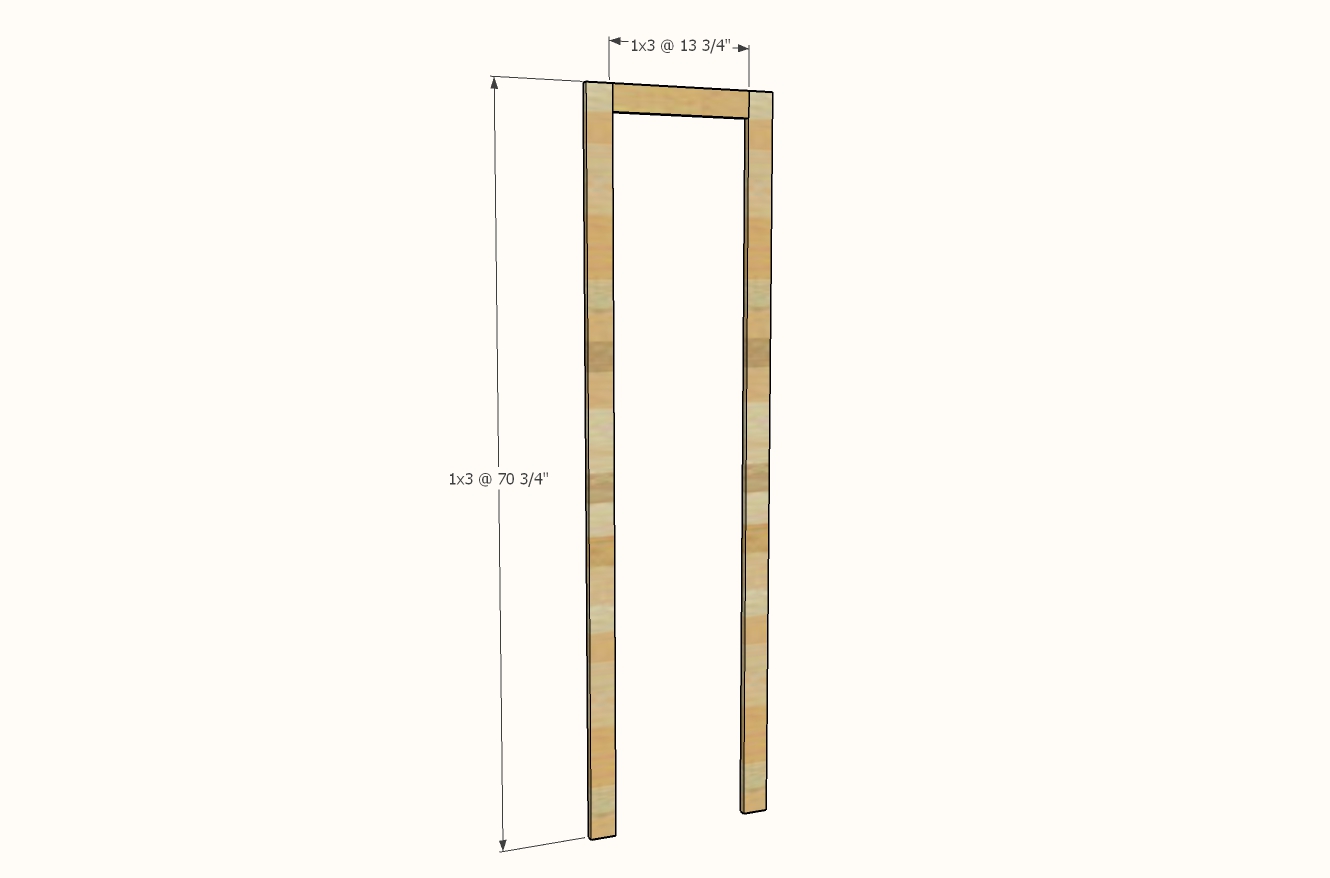
For the front wall, drill two 3/4" pocket holes on each end of the shorter 1x3 piece.

Attach to the long 1x3s with 1-1/4" pocket hole screws.

Step 8

Glue and nail the inner frame to the back side of the outer frame.

Step 9

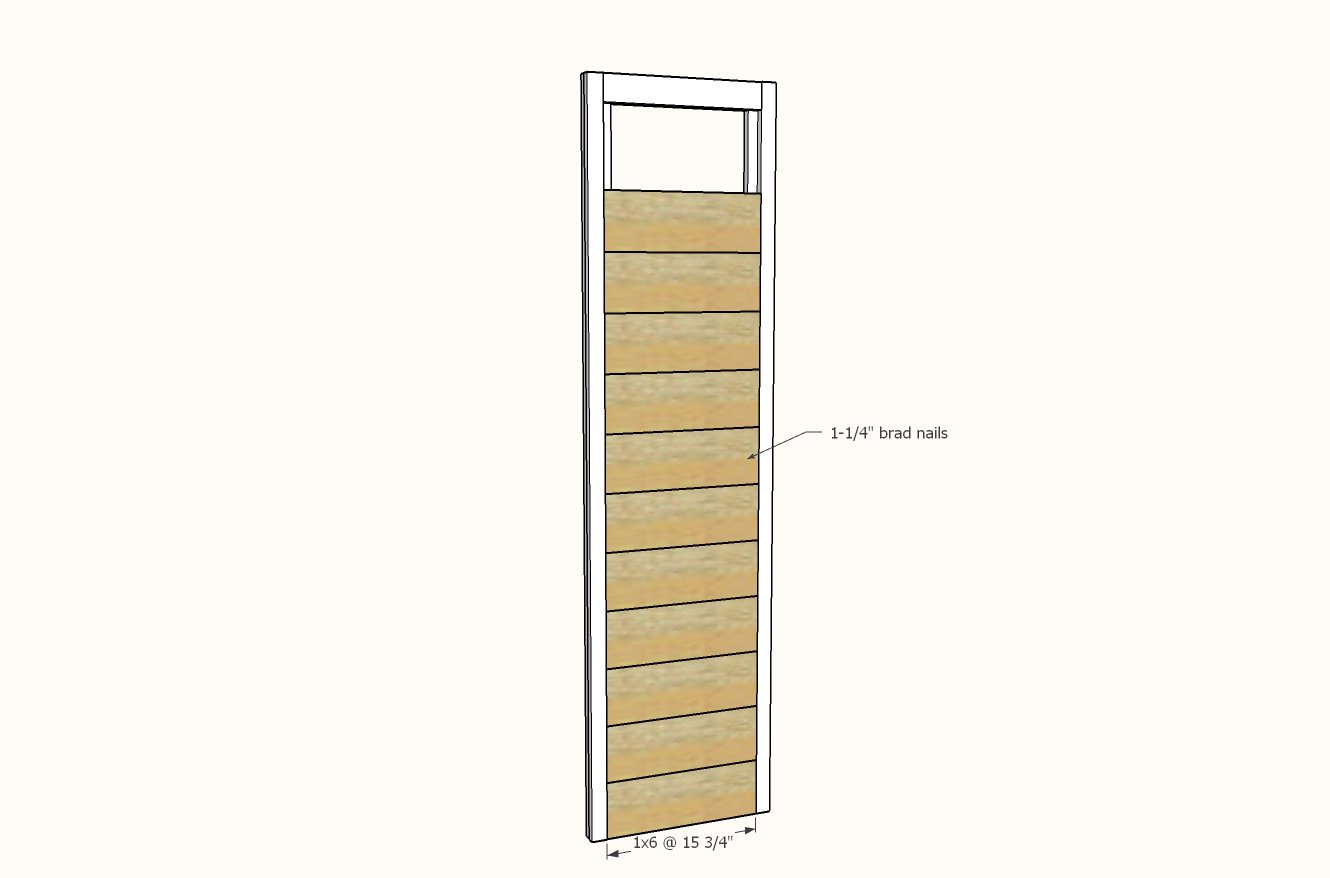
Glue and nail the 1x6 panel boards to the outer frame.

Drill 1-1/2" pocket hole on each end of the bottom (where the 1x2 overlaps the 1x3) for attaching to the siderail in next step.

Step 10

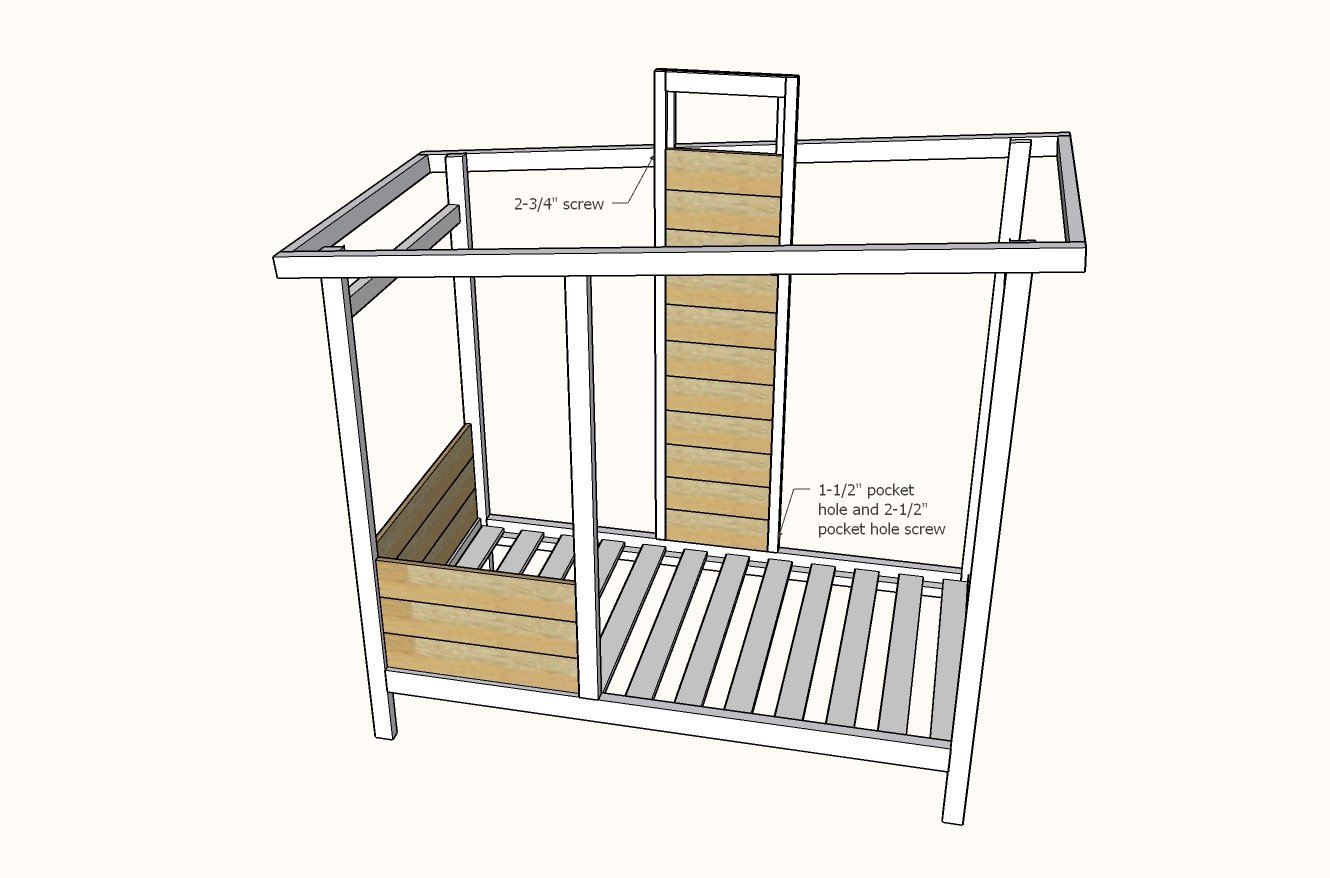
Attach front wall to the siderail.

Attach at top with construction screws.

Step 11

Drill two 1-1/2" pocket holes on each end of the 2x3 roof piece.

Attach to the back wall upright and the front wall with 2-1/2" pocket hole screws.

Frequently Asked Questions

Wood Questions

What kind of wood should I use?
Most of our plans use standard construction lumber like pine or fir. It's affordable, easy to work with, and easy to find. It's also rapidly renewing and biodegradable, so a great eco friendly choice!

Can I use hardwoods instead?
Yes—just keep in mind they're heavier, cost more, and can be tougher on tools and harder to join together and finish. I recommend not tackling a hardwood project until after you have built several softwood projects.

What if my boards are warped?
Choose the straightest boards at the store. You can often work around slight warps by cutting them into shorter pieces.

What wood should I use for outdoor furniture?
Use red-toned or pressure-treated 2x lumber for framing, and cedar or cedar fence pickets for the decking. Outdoor furniture should be built like a deck—your local home center can help recommend the right wood for your climate.

Will my wood move or warp after I build?
Potentially, especially in humid climates. Let your wood acclimate indoors before building. Once acclimated and kept in a stable environment, movement should be minimal. Remember, most houses are built using framing lumber - it's all about keeping moisture down indoors.

Cutting Questions

Do I need a miter saw?
A miter saw is great, creating fast, safe, and precise cuts, even for beginners. But most plans can be built with a circular saw and a straight edge. If using a circular saw to cut, take time to practice, and get good at making cuts, before cutting your project boards.

How do I get clean cuts with a circular saw?
Clamp your board, measure twice, cut slow, and use a sharp blade. This takes practice, so spend some time making cuts. I go through becoming proficient at freehand cutting in my course, it is worth taking if you want to master this skill.

Will the store cut my wood?
Yes—most stores will do rough cuts to help you transport your materials home. But from store to store, the quality of cuts could greatly vary.

Joinery Questions

What screws should I use?
We recommend star-head self tapping screws for framing, most common sizes are 2-1/2", 1-3/4". Pre-drill if close to the edge or you find your wood is splitting.

Do I have to use pocket holes?
Pocket holes are the cheapest, easiest and fastest way to do some joints - like edge to edge or a hidden fastener joint. There are other methods, but these can be time consuming and expensive. We recommend using pocket holes as indicated in plans for best results.

How do I keep things square?
Use a speed square and measure diagonals after each step. Always clamp joints before screwing to keep them tight and flush.

Finishing Questions

Stain or paint before or after building?
A quick sand before and a full finish after gives the best results. Pre-finish if you're doing two-tone or detailed finishes.

What type of finish?
Use oil-based or water-based stain. For paint, cabinet-grade latex or enamel works great. High use surfaces on indoor projects should get a coat of polyurethane, I recommend a Helsman or Spar or other flexible poly that won't crack or peel with wood movement. For exterior projects, use a finish suitable for exterior fences.

How to get a smooth finish?
Start with a well sanded project. Sand between coats (220 grit), wipe clean, and apply light coats with a foam brush or roller.

Plan Questions

Can I change the size?
Many people do, and that's the great thing about building your own furniture! But do keep in mind going bigger might mean more supports are required, and often plans are optimized for minimal material waste.

Are these beginner-friendly?
Yes—plans are written with simple tools and clear steps in mind, with every effort to make plans as simple as possible.

Can I sell what I build?
Absolutely! Just don’t resell or repost the plans themselves.

General Questions

What tools do I really need?
A drill, circular saw, tape measure, square, and a few clamps will get you through most projects.

Do I need a workshop?
Nope! A driveway or small patio is plenty to get started, just make sure you have a level place to work. If you find you are building several projects a year, creating a small workbench is a great way to store tools and have a dedicated workspace.

What if I mess up?
Wood filler, sanding, or flipping boards goes a long way. Mistakes are part of the process!

What can I do to make my projects look more professional?
Start with straight boards, make accurate cuts, clamp all joints, and line up everything neatly. Sand thoroughly, use a neutral finish, and apply it in light coats for a clean look.

I've never built anything before. Where should I start?
Start with a few smaller softwood projects to get hands-on experience. Or if you're tackling a big project, buy a little extra lumber and practice your cuts and joints first. If possible, work with someone who has a bit of experience.

Care & Maintenance

How long will my furniture last?
With good joinery and regular care, your DIY furniture can last for decades. I have pieces in my own home that are over 20 years old and still going strong! One of the best parts about DIY furniture is that it’s easy to repaint, refinish, or repair—so your projects can grow and adapt with you.

How should I care for outdoor furniture?
Lightly pressure wash or hose it down once or twice a year. Tighten screws and reapply finish as needed to protect it—just like a deck or fence. A little upkeep goes a long way in extending the life of your furniture.

How about indoor furniture?
Regularly dust or wipe with a damp cloth. If it starts to look worn, a light sanding and touch-up paint or stain can refresh it in no time. DIY pieces are meant to be durable and fixable—so don’t be afraid to give them some love now and then.

Want to Build with Confidence?

Check out my ebook: 12 Skills to Build Your Own Furniture
It walks you through the core skills every builder needs—measuring, cutting, joinery, and finishing—so you can build beautiful furniture that lasts.

Still Have Questions?

Email us anytime at [email protected] and we’ll be happy to help!