HOW TO: Build a Mirrored Changing Screen with Pin Boards on Back

Difficulty
Intermediate
| Print this plan

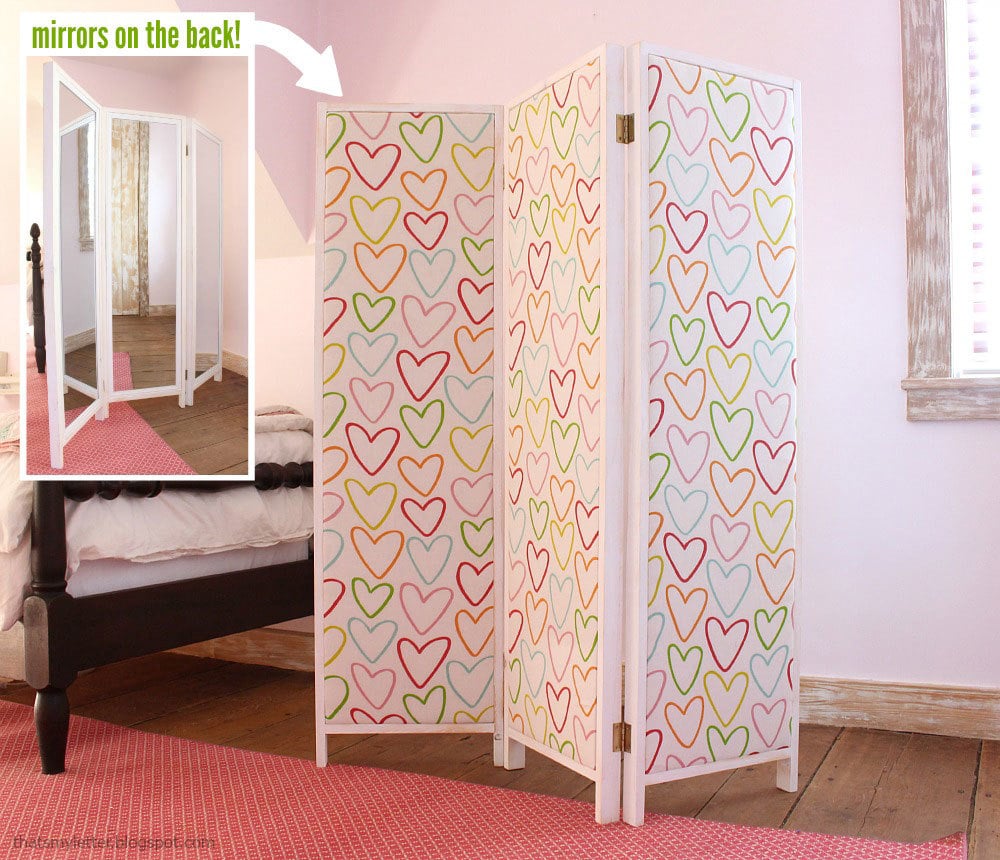
Super cute room divider changing screen, with mirrors on one side and pinboards on back.  Make from store bought wall mirrors!  Free plans by ANA-WHITE.com

Hello, Happy Friday!  You know what every Friday in the 12 weeks before Christmas means, right?

It's Handbuilt Holiday - featuring a new gift plan created by me (not usually that serious) and Jaime from That's My Letter.

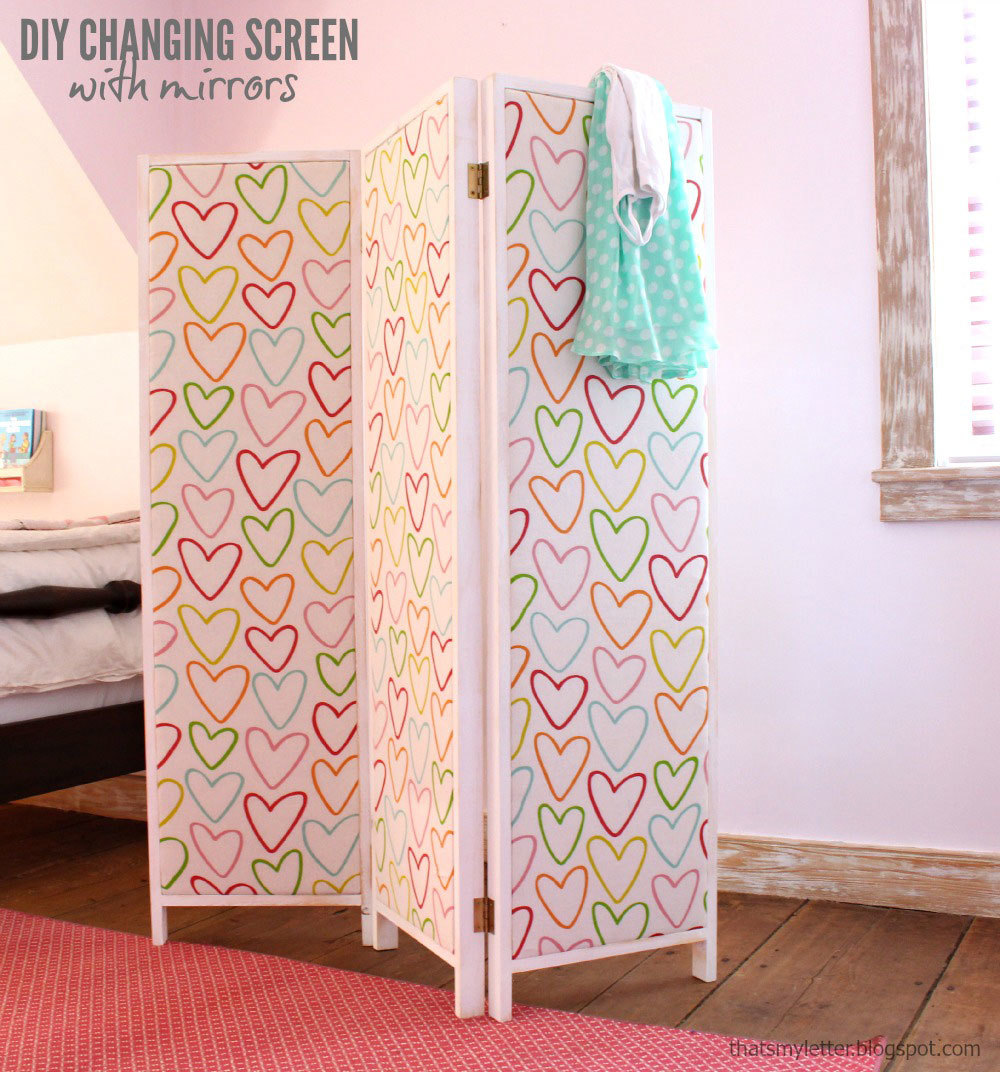
On our top secret list of Holiday plans to give you this season was a changing screen inspired by this adorable find at Land of Nod.

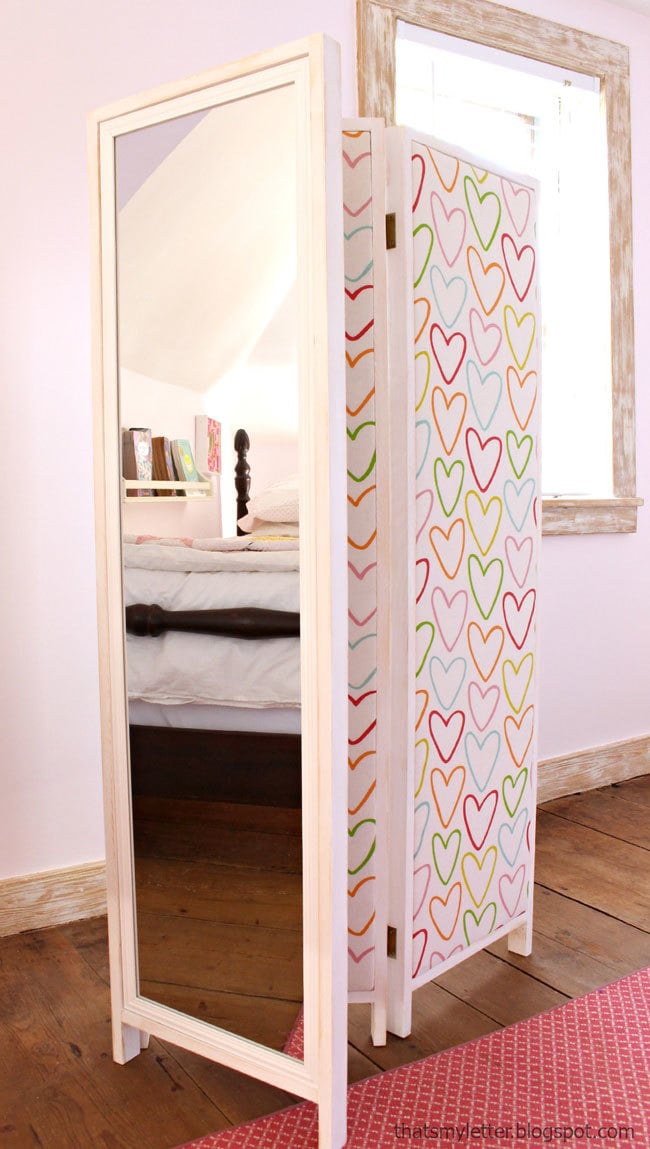
Isn't it darling?  With the mirror on one side, and the fabric pin board on the other?  I know my daughter would love for me to build her something like this too!

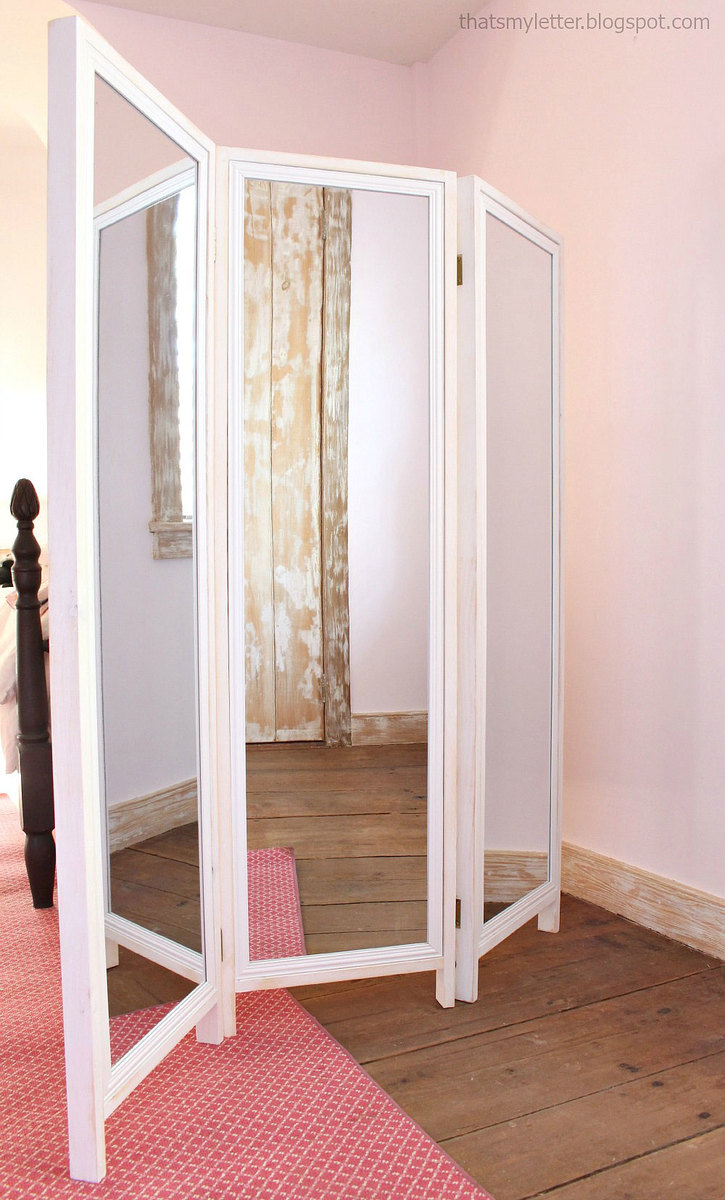
Jaime and I decided to try and keep the cost down we'd use store bought wall mirrors, about $6 each, even up here in Alaska.  I know building is fun, but we are always thinking of way to keep project costs down - so you can build more projects of course.

So Jaime picked up these mirrors from Target (most any full length wall mirror would work), and I got started on the plans.

Now nothing makes more more frusturated than dimensions that are slightly over my favorite numbers - 16", 24", 32" and 48".  I can feel my heart beating faster just thinking about it.  Here's why - let's say you need to cut a piece of plywood 48-1/2" long instead of 47-1/2" long.  Now you need a full sheet instead of a half sheet.  That means you have to spend twice as much money just for an extra inch of plywood.  See why I get so worked up?  Friends don't let friends do that.

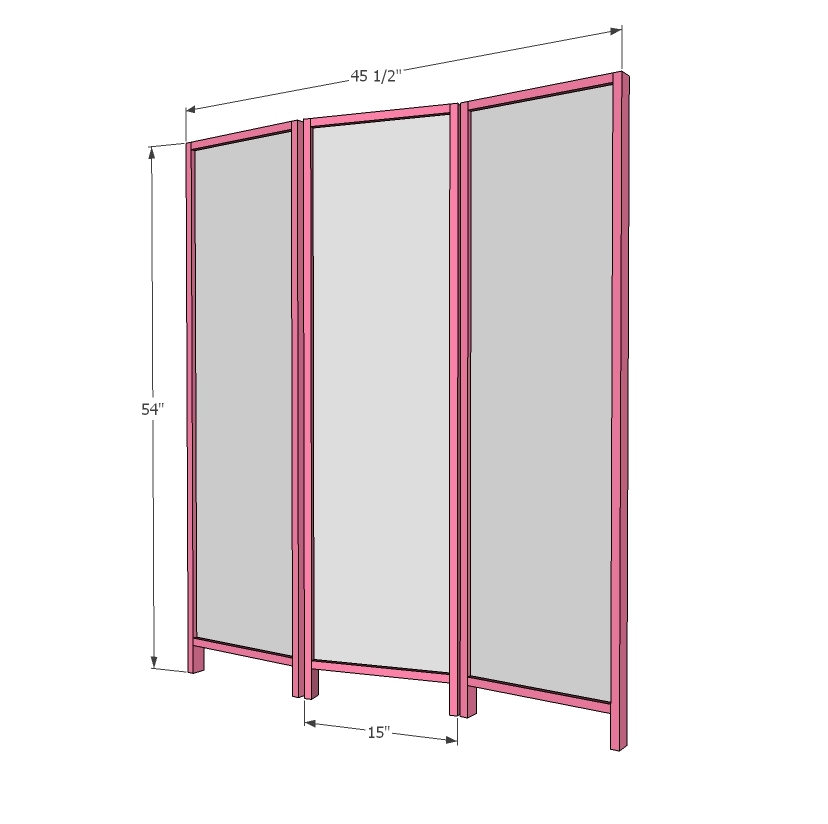
The Target mirrors happened to be 49-5/8" long.  Our original plan was to use 1/2" plywood inside the frames and glue the mirrors and the fabric panels to the 1/2" plywood.  But with the 49-5/8" measurement, you'd have to buy a whole sheet of plywood.  Now mind you scrap wood isn't always a bad thing - if you are always building, there's no shame in being a wood hoarder.  

So we re-worked this plan a few times, and this is what we came up with for about $65 plus fabric (you'll need about 1-1/2" yards) -


So here's what to do to make your own.  First go check out Jaime from That's My Letter's building post right now (with lots more construction photos and beauty shots) and give her some love!  Then when you go to build, the plans follow (if this is the homepage you'll need to click READ MORE below).

Have the awesomest weekend ever!

XO Ana + Friends

Dimensions
Dimensions shown above

Preparation

Shopping List

7 - 1x2x10

3 - vertical door mirrors (http://www.target.com/p/room-essentials-white-framed-mirror/-/A-13568567?lnk=rec|pdp|viewed_viewed|pdpv1)

cardboard

1 - tube construction adhesive
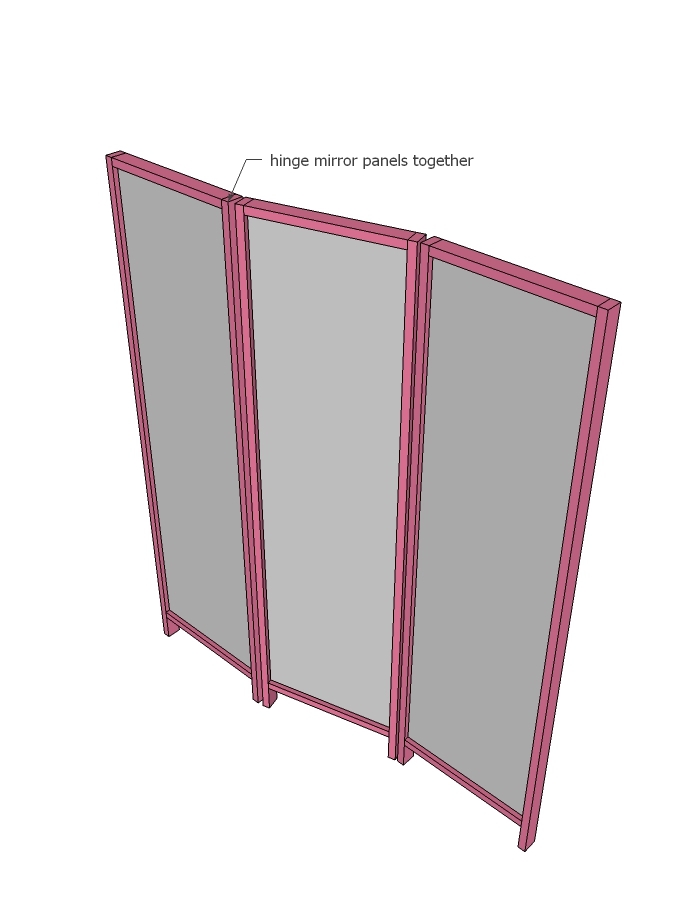
4 - 2” hinges

1 - crib size batting

fabric

staples

1 1/4” brad nails

1 1/4” pocket hole screws

Common Materials
Cut List

INNER FRAMES

6 - 1x2 @ 49-5/8"

12 - 1x2 @ 10-1/2"


OUTER FRAMES

6 - 1x2 @ 54"

6 - 1x2 @ 13-1/2"


Tools
Tape Measure
Speed Square
Pencil
Safety Glasses
Hearing Protection
Kreg Jig
Drill
Miter Saw
Brad Nailer
Staple Gun
General Instructions

Please read through the entire plan and all comments before beginning this project. It is also advisable to review the Getting Started Section. Take all necessary precautions to build safely and smartly. Work on a clean level surface, free of imperfections or debris. Always use straight boards. Check for square after each step. Always predrill holes before attaching with screws. Use glue with finish nails for a stronger hold. Wipe excess glue off bare wood for stained projects, as dried glue will not take stain. Be safe, have fun, and ask for help if you need it. Good luck!

Instructions

Step 1

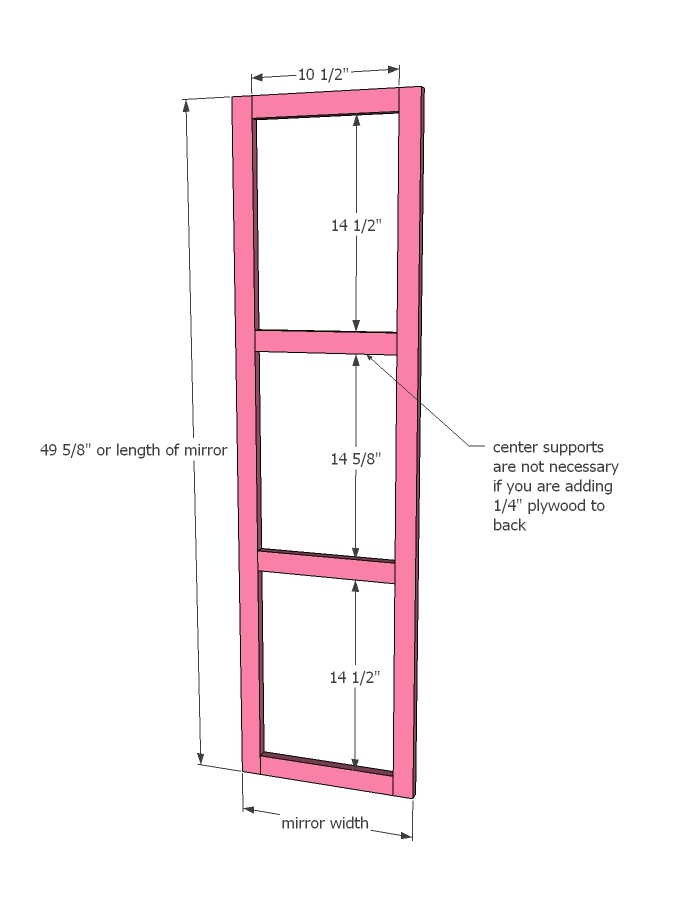
Drill 3/4" pocket holes with your Kreg Jig on each end of the 10-1/2" long 1x2s.  Attach with glue to the 49-5/8" long 1x2s.  This inner frame should be the same size as the mirrors.

To attach the outer frame in later steps, drill 3/4" pocket holes facing outward on the frame.

Step 2

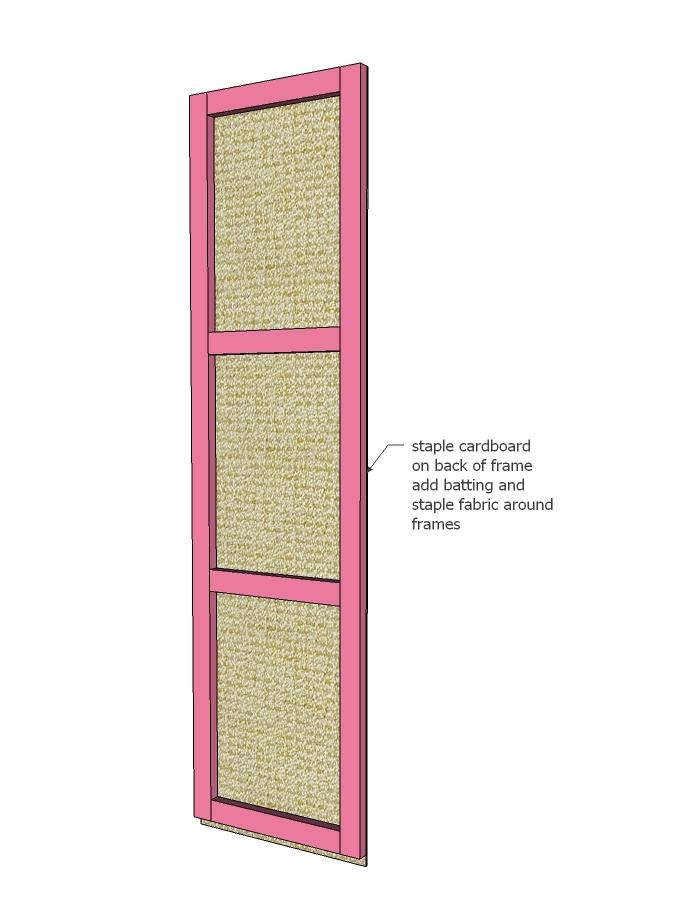
Staple cardboard over the back of the mirror frame. Add batting to the back, and then wrap the entire back with fabric and staple to the mirror side of the frame.

Step 3

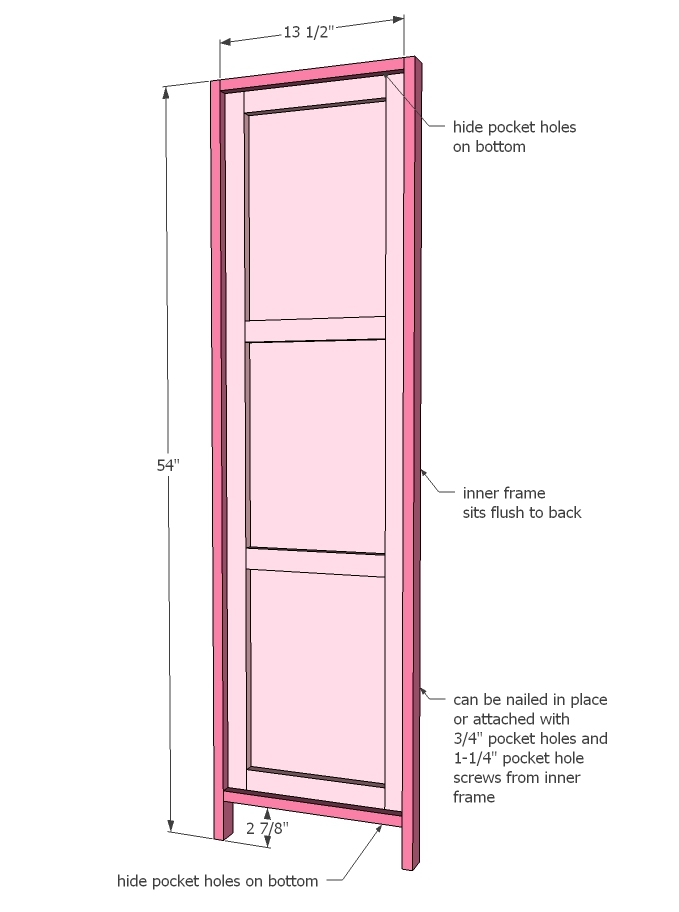
Build the outer frame with 3/4" pocket holes and 1-1/4" pocket hole screws.  Place inner frame inside and attach through the pocket holes you drilled in step 1 (or you can attach from outside with 1-1/4" nails).

Step 4

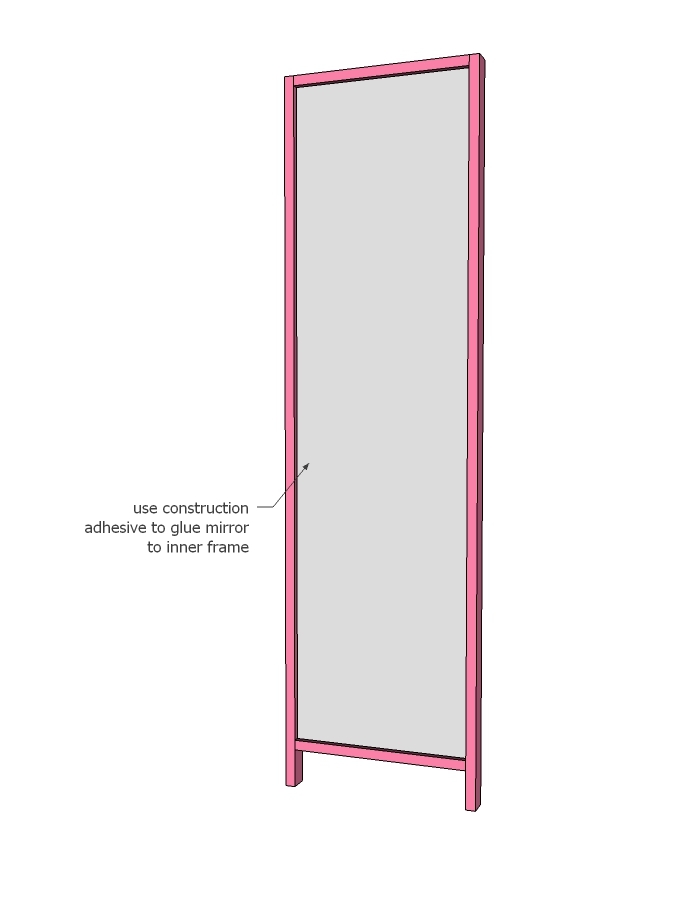
Apply construction adhesive to the inner frame on the mirror side and place mirror inside.  Let fully dry.

Step 5

Finishing Instructions
Preparation Instructions
Fill all holes with wood filler and let dry. Apply additional coats of wood filler as needed. When wood filler is completely dry, sand the project in the direction of the wood grain with 120 grit sandpaper. Vacuum sanded project to remove sanding residue. Remove all sanding residue on work surfaces as well. Wipe project clean with damp cloth.

It is always recommended to apply a test coat on a hidden area or scrap piece to ensure color evenness and adhesion. Use primer or wood conditioner as needed.

Comments

abluefox

Wed, 03/23/2016 - 21:47

This idea is so great!! I hope I can make this one crying Thank you very much for sharing. Perhaps I will find someone makes it for me :3 Need a mirror but it's better with a room divider

Frequently Asked Questions

Wood Questions

What kind of wood should I use?
Most of our plans use standard construction lumber like pine or fir. It's affordable, easy to work with, and easy to find. It's also rapidly renewing and biodegradable, so a great eco friendly choice!

Can I use hardwoods instead?
Yes—just keep in mind they're heavier, cost more, and can be tougher on tools and harder to join together and finish. I recommend not tackling a hardwood project until after you have built several softwood projects.

What if my boards are warped?
Choose the straightest boards at the store. You can often work around slight warps by cutting them into shorter pieces.

What wood should I use for outdoor furniture?
Use red-toned or pressure-treated 2x lumber for framing, and cedar or cedar fence pickets for the decking. Outdoor furniture should be built like a deck—your local home center can help recommend the right wood for your climate.

Will my wood move or warp after I build?
Potentially, especially in humid climates. Let your wood acclimate indoors before building. Once acclimated and kept in a stable environment, movement should be minimal. Remember, most houses are built using framing lumber - it's all about keeping moisture down indoors.

Cutting Questions

Do I need a miter saw?
A miter saw is great, creating fast, safe, and precise cuts, even for beginners. But most plans can be built with a circular saw and a straight edge. If using a circular saw to cut, take time to practice, and get good at making cuts, before cutting your project boards.

How do I get clean cuts with a circular saw?
Clamp your board, measure twice, cut slow, and use a sharp blade. This takes practice, so spend some time making cuts. I go through becoming proficient at freehand cutting in my course, it is worth taking if you want to master this skill.

Will the store cut my wood?
Yes—most stores will do rough cuts to help you transport your materials home. But from store to store, the quality of cuts could greatly vary.

Joinery Questions

What screws should I use?
We recommend star-head self tapping screws for framing, most common sizes are 2-1/2", 1-3/4". Pre-drill if close to the edge or you find your wood is splitting.

Do I have to use pocket holes?
Pocket holes are the cheapest, easiest and fastest way to do some joints - like edge to edge or a hidden fastener joint. There are other methods, but these can be time consuming and expensive. We recommend using pocket holes as indicated in plans for best results.

How do I keep things square?
Use a speed square and measure diagonals after each step. Always clamp joints before screwing to keep them tight and flush.

Finishing Questions

Stain or paint before or after building?
A quick sand before and a full finish after gives the best results. Pre-finish if you're doing two-tone or detailed finishes.

What type of finish?
Use oil-based or water-based stain. For paint, cabinet-grade latex or enamel works great. High use surfaces on indoor projects should get a coat of polyurethane, I recommend a Helsman or Spar or other flexible poly that won't crack or peel with wood movement. For exterior projects, use a finish suitable for exterior fences.

How to get a smooth finish?
Start with a well sanded project. Sand between coats (220 grit), wipe clean, and apply light coats with a foam brush or roller.

Plan Questions

Can I change the size?
Many people do, and that's the great thing about building your own furniture! But do keep in mind going bigger might mean more supports are required, and often plans are optimized for minimal material waste.

Are these beginner-friendly?
Yes—plans are written with simple tools and clear steps in mind, with every effort to make plans as simple as possible.

Can I sell what I build?
Absolutely! Just don’t resell or repost the plans themselves.

General Questions

What tools do I really need?
A drill, circular saw, tape measure, square, and a few clamps will get you through most projects.

Do I need a workshop?
Nope! A driveway or small patio is plenty to get started, just make sure you have a level place to work. If you find you are building several projects a year, creating a small workbench is a great way to store tools and have a dedicated workspace.

What if I mess up?
Wood filler, sanding, or flipping boards goes a long way. Mistakes are part of the process!

What can I do to make my projects look more professional?
Start with straight boards, make accurate cuts, clamp all joints, and line up everything neatly. Sand thoroughly, use a neutral finish, and apply it in light coats for a clean look.

I've never built anything before. Where should I start?
Start with a few smaller softwood projects to get hands-on experience. Or if you're tackling a big project, buy a little extra lumber and practice your cuts and joints first. If possible, work with someone who has a bit of experience.

Care & Maintenance

How long will my furniture last?
With good joinery and regular care, your DIY furniture can last for decades. I have pieces in my own home that are over 20 years old and still going strong! One of the best parts about DIY furniture is that it’s easy to repaint, refinish, or repair—so your projects can grow and adapt with you.

How should I care for outdoor furniture?
Lightly pressure wash or hose it down once or twice a year. Tighten screws and reapply finish as needed to protect it—just like a deck or fence. A little upkeep goes a long way in extending the life of your furniture.

How about indoor furniture?
Regularly dust or wipe with a damp cloth. If it starts to look worn, a light sanding and touch-up paint or stain can refresh it in no time. DIY pieces are meant to be durable and fixable—so don’t be afraid to give them some love now and then.

Want to Build with Confidence?

Check out my ebook: 12 Skills to Build Your Own Furniture
It walks you through the core skills every builder needs—measuring, cutting, joinery, and finishing—so you can build beautiful furniture that lasts.

Still Have Questions?

Email us anytime at [email protected] and we’ll be happy to help!