
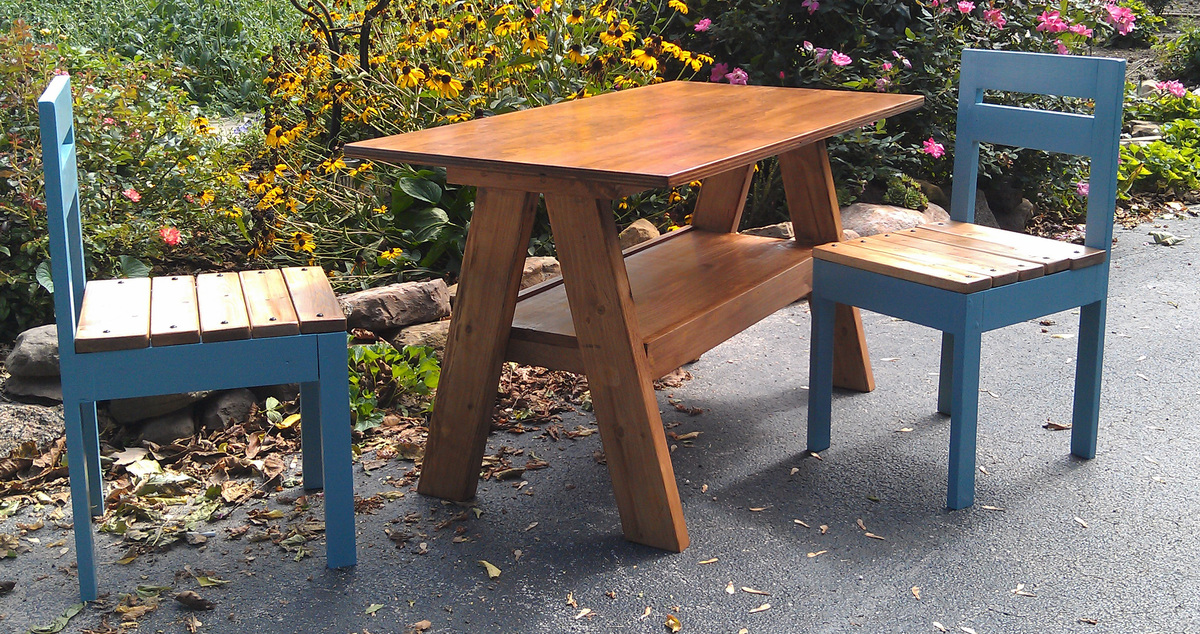

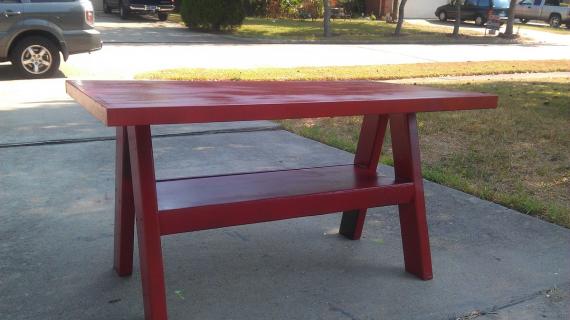
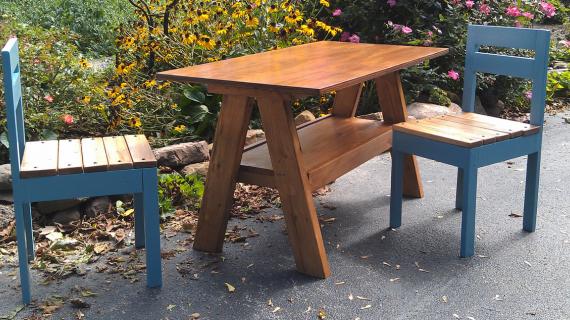
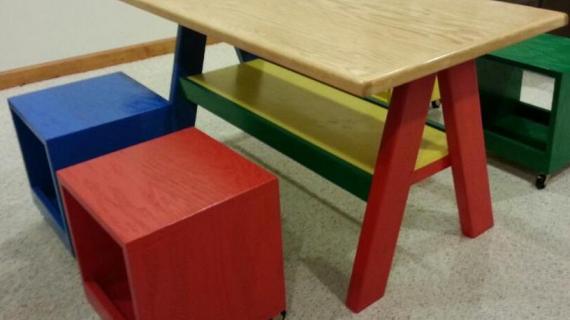
Build the perfect play table for your littles.
Sized perfectly for young children to do activities, play games and schoolwork. We love this trestle table with it's large top, and open shelf on the bottom. It's easy to store craft supplies in the shelf. Our free plans include step by step diagrams, shopping lists and cut list.
Also shown: Four dollar kids chair plans
Preparation
- 1 - 2x4 @ 8 feet long - pick a good one!
- 1 - 1x12 @ 4 feet long
- 1 - 1x3 @ 8 feet long
- 1 - 1x2 @ 8 feet long
- 1 - 2x2 @ 8 feet long
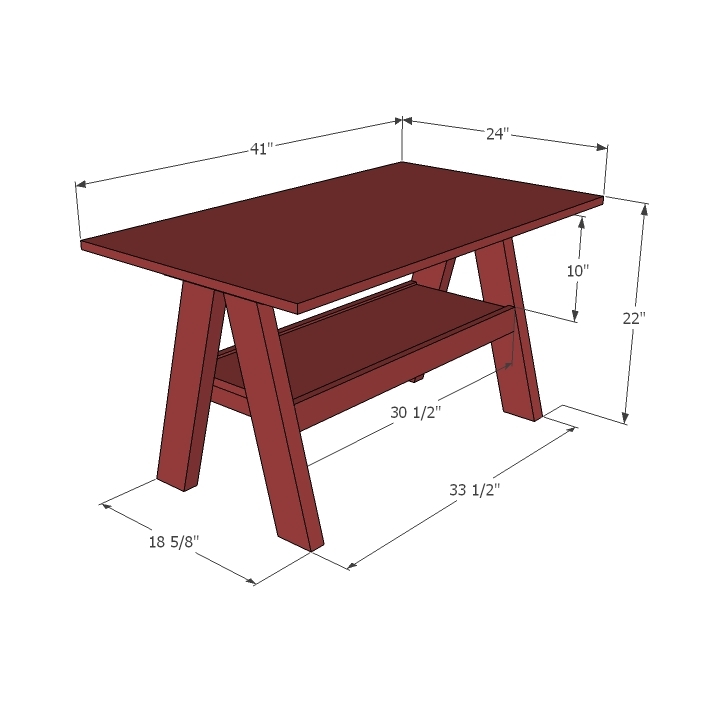
- 24" x 48" sheet of 3/4" plywood or other project board measuring at least 24" x 41" (tabletop)
- 4 - 2x4 @ 22" - Both ends cut at 15 degrees off square, ends are parallel
- 4 - 1x2 @ 11 1/4" (End Cleats)
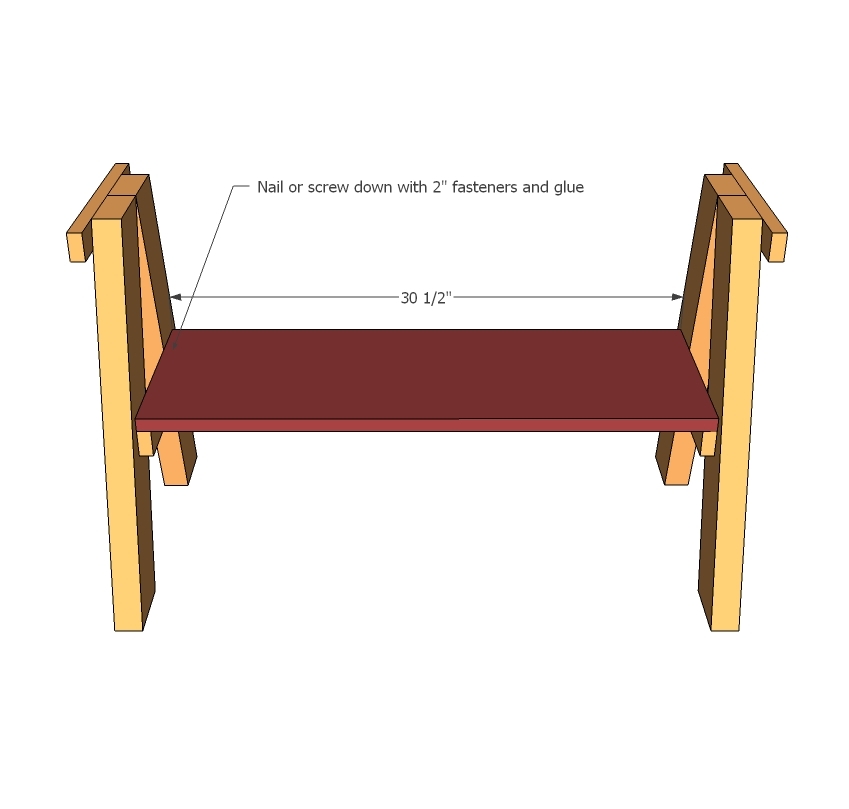
- 1 - 1x12 @ 30 1/2" (Shelf)
- 2 - 1x3 @ 30 1/2" (Shelf Trim)
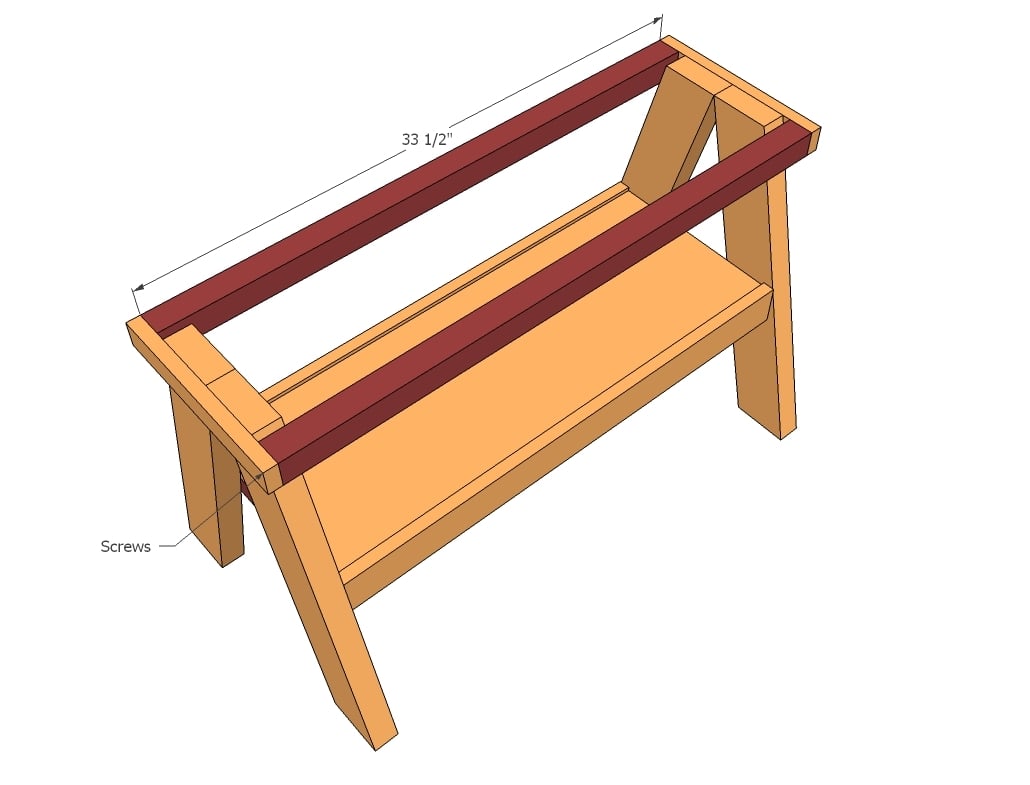
- 2 - 2x2 @ 33 1/2" (Top Supports)
- 1 - 3/4" plywood or other sheet goods @ 24" x 41" (Top)
When you cut your legs at an angle, reuse cuts by simple sliding the board down. It'll save board.


Please read through the entire plan and all comments before beginning this project. It is also advisable to review the Getting Started Section. Take all necessary precautions to build safely and smartly. Work on a clean level surface, free of imperfections or debris. Always use straight boards. Check for square after each step. Always predrill holes before attaching with screws. Use glue with finish nails for a stronger hold. Wipe excess glue off bare wood for stained projects, as dried glue will not take stain. Be safe, have fun, and ask for help if you need it. Good luck!
Instructions
Step 1
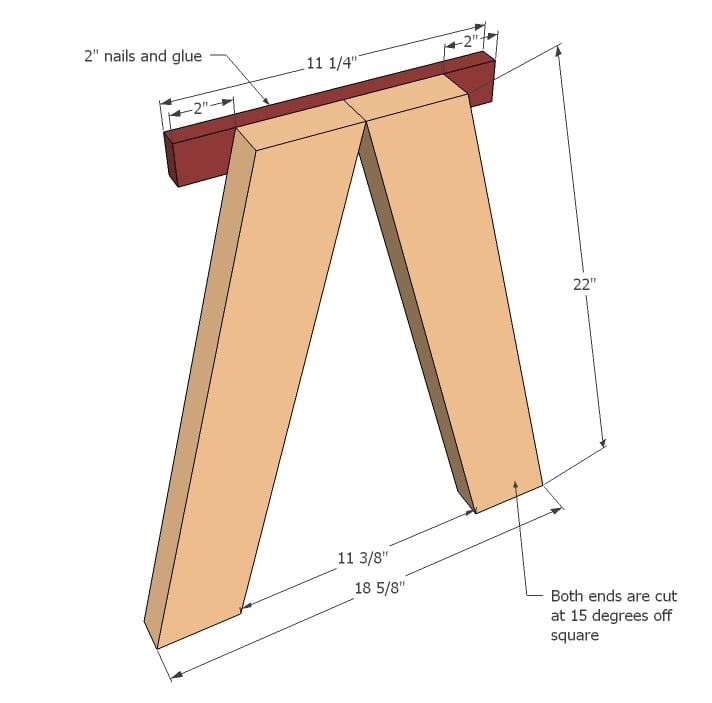
Carefully lay out your legs as shown above so tops are flush, bottoms are spread to measurements. Mark the top of the cleats 2" on each end and lay on top for a dry fit. Remove, apply glue at joint and replace. Use 2" nails or countersunk screws to attach.
Remember to build two legs sets.
Step 2
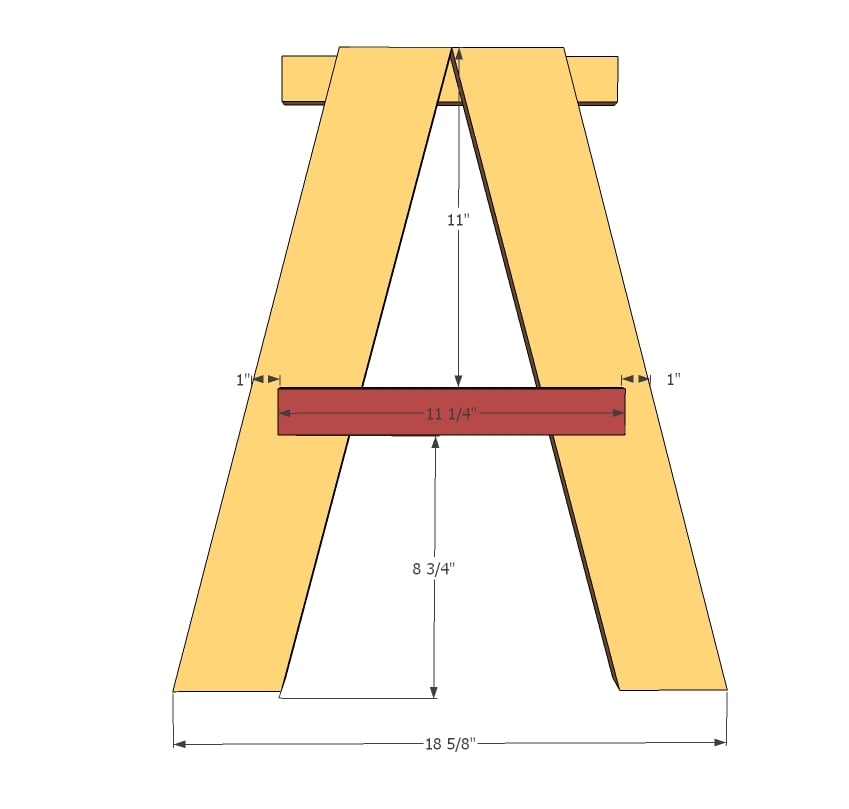
Once your legs are done, it's time to add the shelf cleat. Flip the leg sets over and carefully readjust so legs are positioned as in diagram. Mark the placement of the cleat and dry fit. Remove, apply glue at joint and replace. 2" screw or nails to attach.
Step 3
An easy but motivating step. Place the shelf on the shelf cleat and screw or nail down with glue.
Step 4

The shelf trim will not just keep items on the shelf, but it will reinforce the side to side structure of the table. Make sure you also screw from the outsides for added strength. Is placed flush to the bottom of the 1x2 shelf cleats under the shelf. You will need a few 3" screws here.
Step 5
Step 6
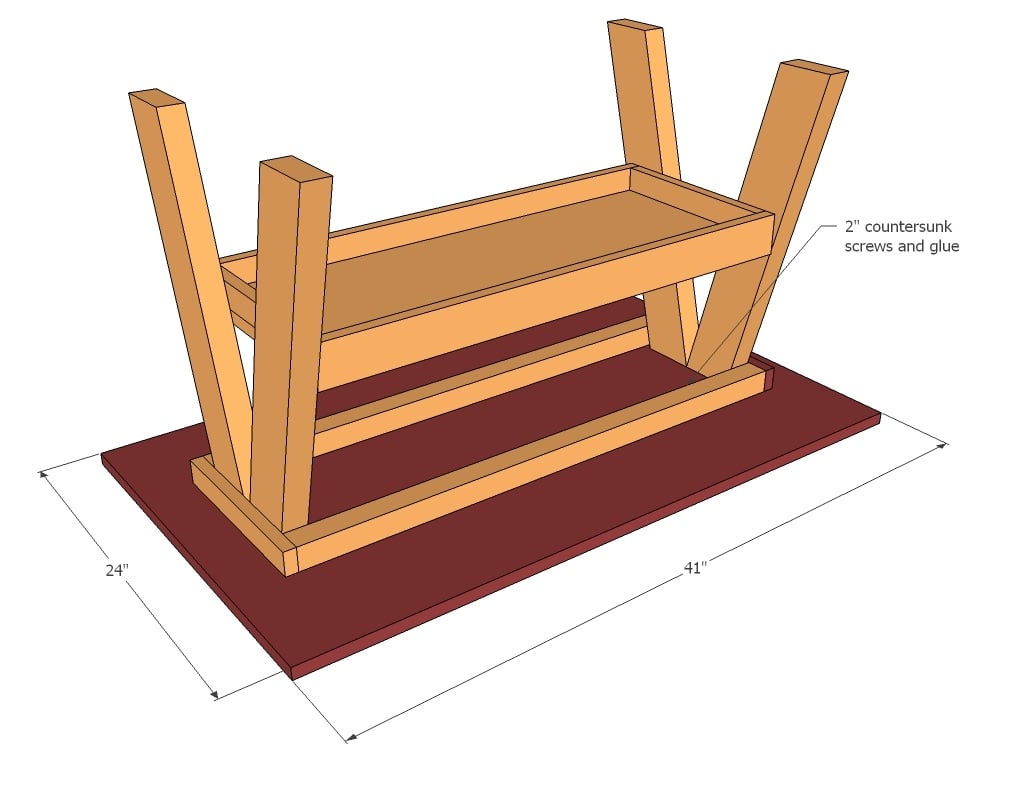
Center the base on the tabletop with project turned upside down. Screw on with 2" screws and glue through tabletop supports.
It is always recommended to apply a test coat on a hidden area or scrap piece to ensure color evenness and adhesion. Use primer or wood conditioner as needed.


Comments
spiceylg
Thu, 09/08/2011 - 10:54
!
Ana, this is adorable! How do you do it? How do you find the time? Do you sleep? :-)
Leah
Thu, 09/08/2011 - 11:04
perfect~
perfect~
fethiye
Thu, 09/08/2011 - 11:08
Table top
It will be costly, but building the table top from actual boards (see Clara table for those who wants to see how to do it) may be a better idea for durability - resanding, repainting etc.
Thank you for these plans. I am trying to see if it makes sense to build a bigger one for adult usage.
MichelleC
Thu, 09/08/2011 - 14:24
Actually I think Ana is spot
Actually I think Ana is spot on...using boards (say two 1x12 boards) would have a lot of stress on the seam because there is nothing to screw the large amount of overhang into...and if a little kid tried to sit on the overhang you could end up with a problem...and using smaller boards (like 1x8's, 1x6's, etc) would be even worse. Maybe you are talking about buying a board that's actually 24" wide...but that'd probably be overkill for a kids table and make it cost as much as actually buying a table, I don't know. I think I need to make a little table for my toddlers for in our dining/kitchen area and it becomes harder to decide with all the cute options!!! Thanks for all the beautiful plans Ana...I check your website every morning right after checking my email! :-)
mebohn
Tue, 09/13/2011 - 09:35
Very first project!
I gotta say, I sincerely considered spending $200 on this table from PB, but just couldn't do it with all of the other furniture we need for our new home. My husband's been a commercial carpenter for 15 yrs, but rarely has a few hrs of down time to build for our family. I'm such a girly girl, never held a saw, maybe a drill once... LOL. But, he encouraged me and said he knew I could do it. And I did! The trestle table was my very first ever project and it only took me a few hours. It turned out amazing! THank you so much, Ana, for showing us mommies that we CAN do this, even with zero experience. You're a serious blessing to me, I know. I'm already moving on to my second project - the parson tower desk. Super excited. Will post pics of my table after it's painted! Thanks again Ana!
allthosedelgados
Thu, 09/22/2011 - 21:18
a little addition
I made the trestle table last week. I used some cabinet grade plywood that I found on sale at Orange. Of course plywood edges are UGLY and they chip....esp when you have boys...
so I just trimmed out the table top with 1x2s. made it look GREAT!
Derek (not verified)
Fri, 12/16/2011 - 21:15
This design is really hokey
This design is really hokey and far from stable, side to side. The disclaimer also misses the fact that some of the dimensions may not work depending on what ACTUAL dimensions the mill cuts wood to. Don't cut and build, cut as you build for this design / instructions!
Mjvjindy
Wed, 11/09/2016 - 18:25
Child table with hidden storage
I added hinges on the table top and added a shelf under the top to add a hidden space for my grandson. I think he will be excited about it. Thank you so much for the plans!!!