Kitchen Island with Open Shelving

kitchen island with open shelving
Difficulty
Advanced
| Print this plan

Free plans for building your own kitchen island with sink, dishwasher and open shelving.  Space for five stools, seating on two sides. Includes video tutorial.  By Ana-White.com

The kitchen island is the heart of the home.  

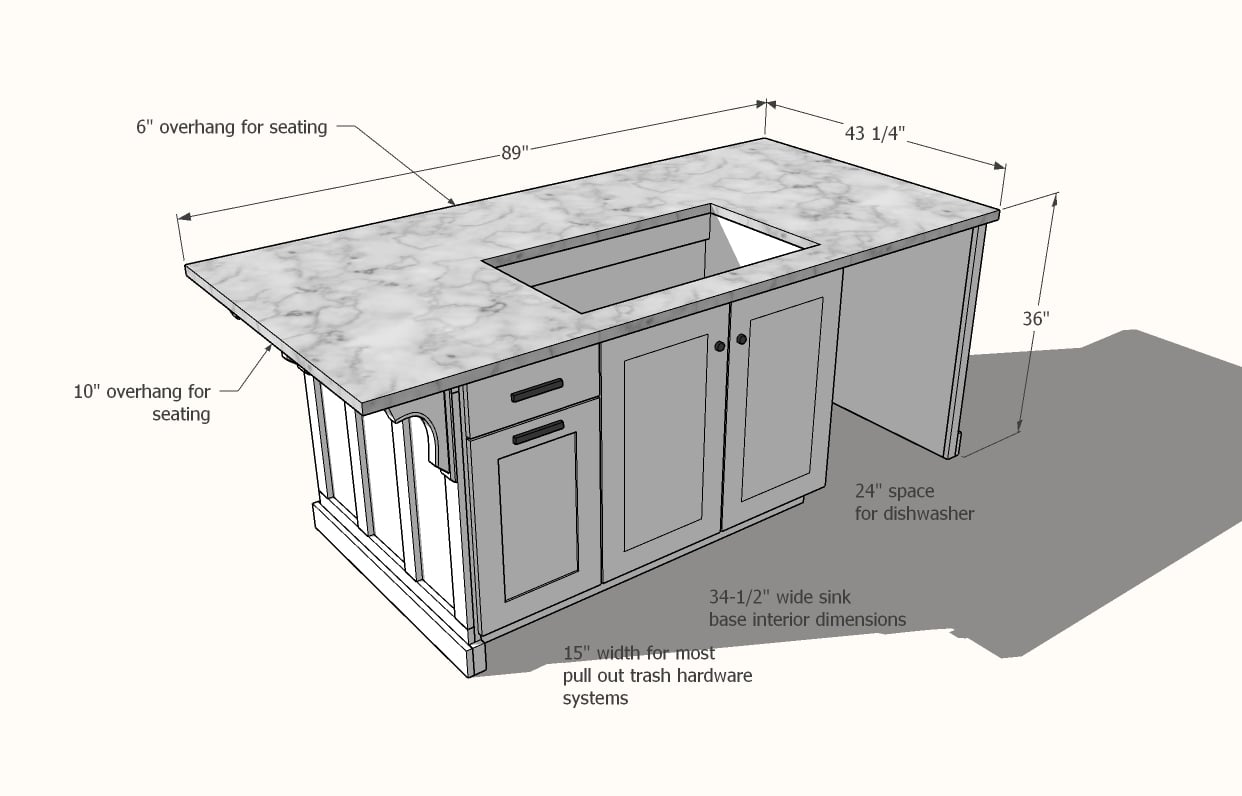
We are building a small, starter home to sell, and of upmost importance is a great kitchen island that does it all, stores it all, while looking beautiful.  Here's what we came up with:

diy kitchen island with cabinets

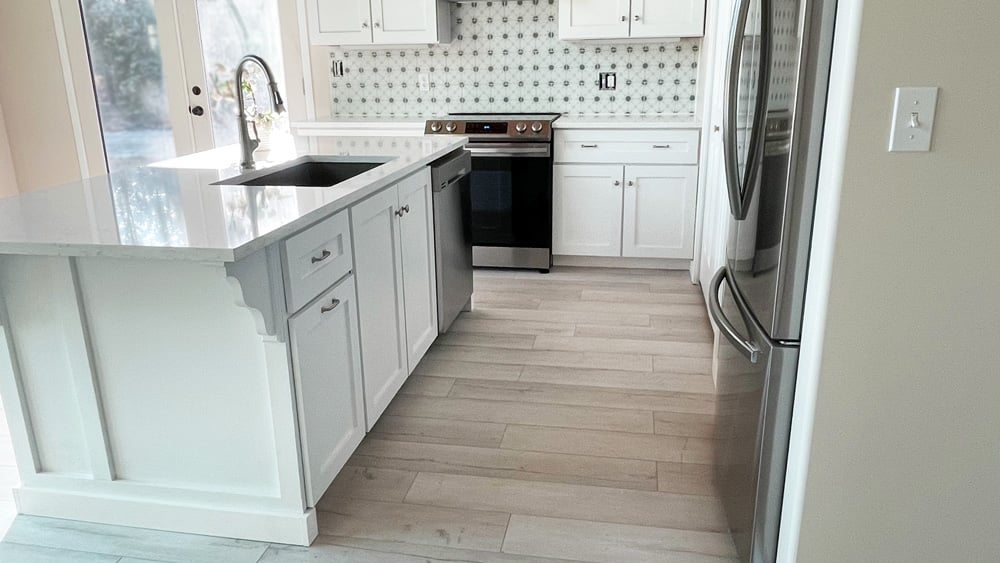
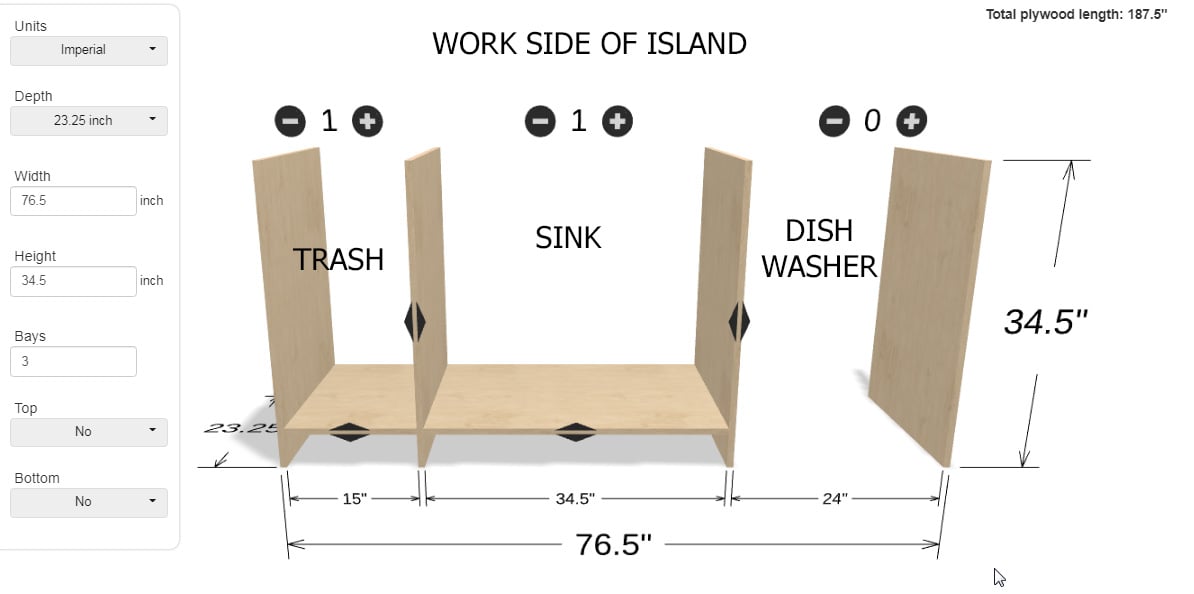
On the "work" side, it features a sink, a pull out trash drawer with a cutting board/knife drawer - so it becomes a prep center - and a dishwasher - so it becomes the dishwashing center.

kitchen island with open shelving

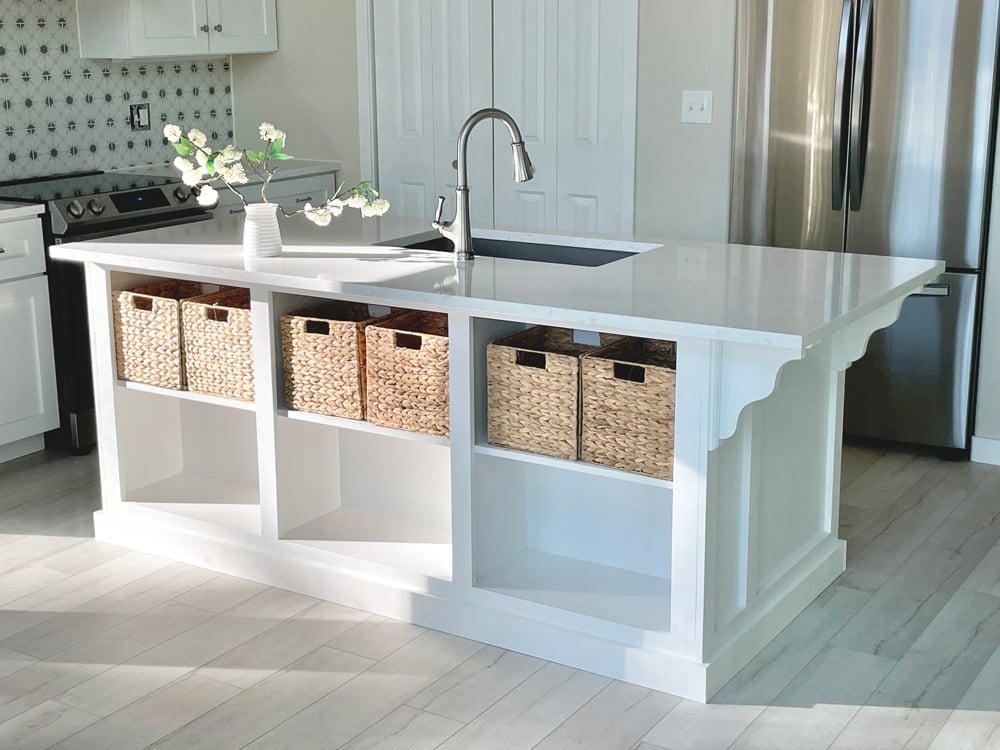
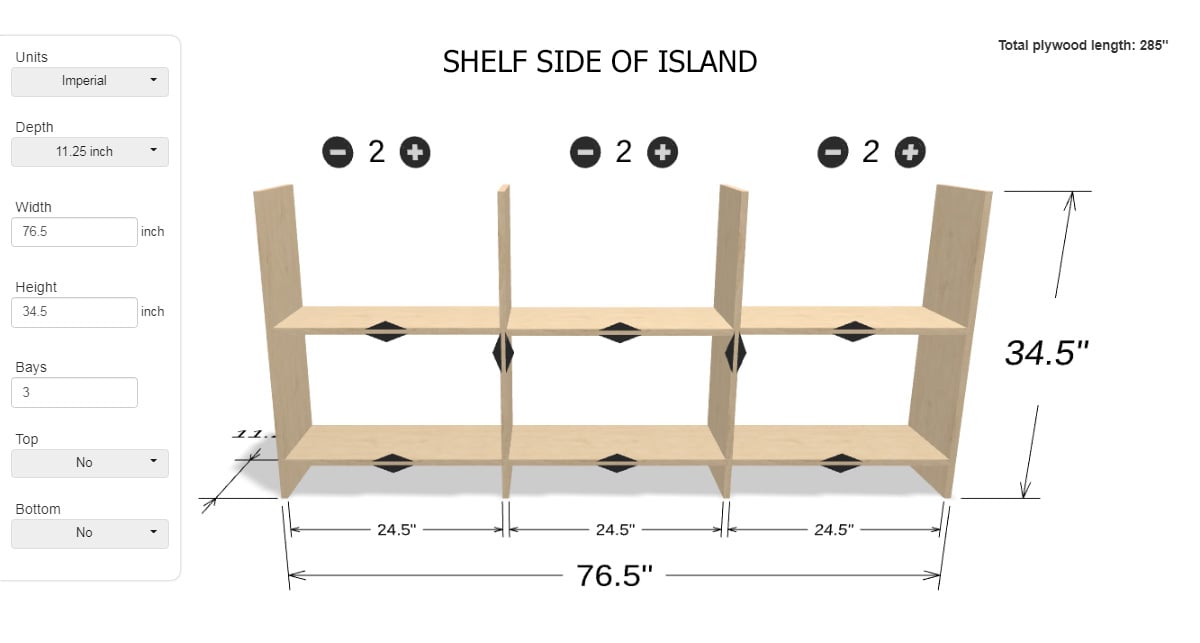
On the seating side, we added open shelving (which also increases countertop space) and keeps stuff off the countertop.  This is where you can put everything from serving dishes to board games, charging cords, laptops - even snacks, paper plates, craft items.

We extended the countertop about 6" over the open shelving - so you can still sit and eat there too.

We also added seating on the corbel end, not only creating more seating, but also creating seating at a corner for cozier conversations and less awkward homework helping.

We tried super hard to make this a great island that the new homeowner will love. And we are sharing the free plans, so you can build it too!

Video Tutorial of this Kitchen Island Build

We put together a quick video of the build, so you can see the steps happen in action.

And the free plans for this project below.  Thank you for using our plans, we very much appreciate your trust.


Pin for Later!

Kitchen Island with Open Shelving

Dimensions
kitchen island plans
Dimensions shown in diagram

Preparation

Shopping List
  • 2 Sheets of 3/4" thick hardwood plywood (or use Shelf Help to have plywood precut and edgebanded and shipped to you)
  • Edge banding for front exposed edges of plywood
  • 1 - 4x8 sheet of 1/2" hardwood plywood
  • 5 - 1x2x8' trim boards 
  • 2 - 1x6x8' trim boards
  • 1 - 1x3x10' trim board
  • 3 - 1x4x8' trim boards for drawers and baseboard
  • 6 - 1x3x8' furring strips or similar for bay supports
  • 1 set of 20" full extension drawer slides
  • 1 - double trash pull out with max width of 15" 
  • 2 sets of Concealed Hinges, Frameless Half Overlay
  • 2 - 9" x 12" corbels
  • 1-1/4" pocket hole screws (About 120, coarse thread recommended)
  • 1-1/4" brad nails and wood glue
  • Countertop sourced seperately
  • Door sizes shown in cut list and diagrams
Cut List

Plywood Carcass Pieces - front edges should be edge banded

  • 5 - 3/4" plywood @ 23-1/4" x 34-1/2"
  • 1 - 3/4" plywood @ 23-1/4" x 15"
  • 4 - 3/4" plywood @ 11-1/4" x 34-1/2"
  • 6 - 3/4" plywood @ 11-1/4" x 24-1/2" 
  • 1 - 1/2" plywood @ 76-1/2" x 34-1/2" - back

Trim (should be measured and cut to fit)

  • 1 - 1x2 @ 76-1/2"
  • 1 - 1x6 @ 76-1/2"
  • 4 - 1x2 @ 27-1/2"
  • 2 - 1x2 @ 35-3/4"
  • 2 - 1x6 @ 35-3/4"
  • 4 - 1x3 @ 27-1/2"
  • 4 - 1x2 @ 27-1/2" - mid stiles on ends, can be 1x3s
  • 1 - 1x2 @ 34-1/2" - dishwasher end panel trim
  • 1x4 baseboard should be measured and cut to fit

Drawer (should be cut to fit)

  • 2 - 1x4 @ 20" - drawer sides
  • 2 - 1x4 @ ABOUT 12-1/2" - Measure and cut to fit after installing the drawer sides inside the cabinet
  • 1 - 1/2" plywood @ ABOUT 14" x 20" - measure and cut to fit

Doors and Drawer Faces

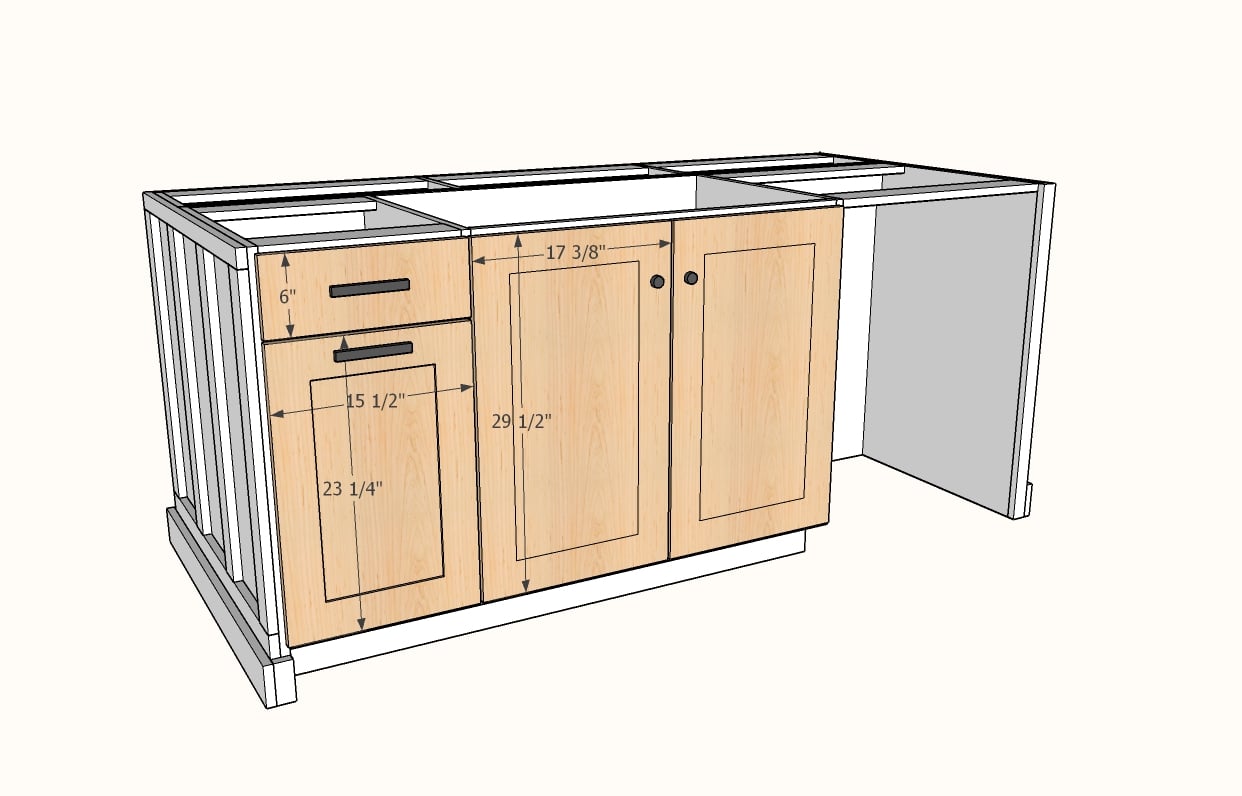
  • 6" x 15-1/2" - Drawer Face on Trash Pull Out
  • 23-1/4" x 15-1/2" - Door on Trash Pull Out
  • 2 @ 17-3/8" x 29-1/2" - Doors on Sink Base


Tools
Tape Measure
Speed Square
Pencil
Safety Glasses
Hearing Protection
Kreg Jig
Drill
Circular Saw
Brad Nailer
Power Sander

Instructions

Step 1

A big part of this project is cutting the plywood pieces for the cabinets and open shelves.  I have listed the cuts needed in the cut list, but you can also use our Shelf Help cutting service to have the pieces cut and shipped direct to you.  Here is the two configurations you will need if you use Shelf Help.

kitchen island open shelving shelf side

open shelving on kitchen island configuration

Step 2

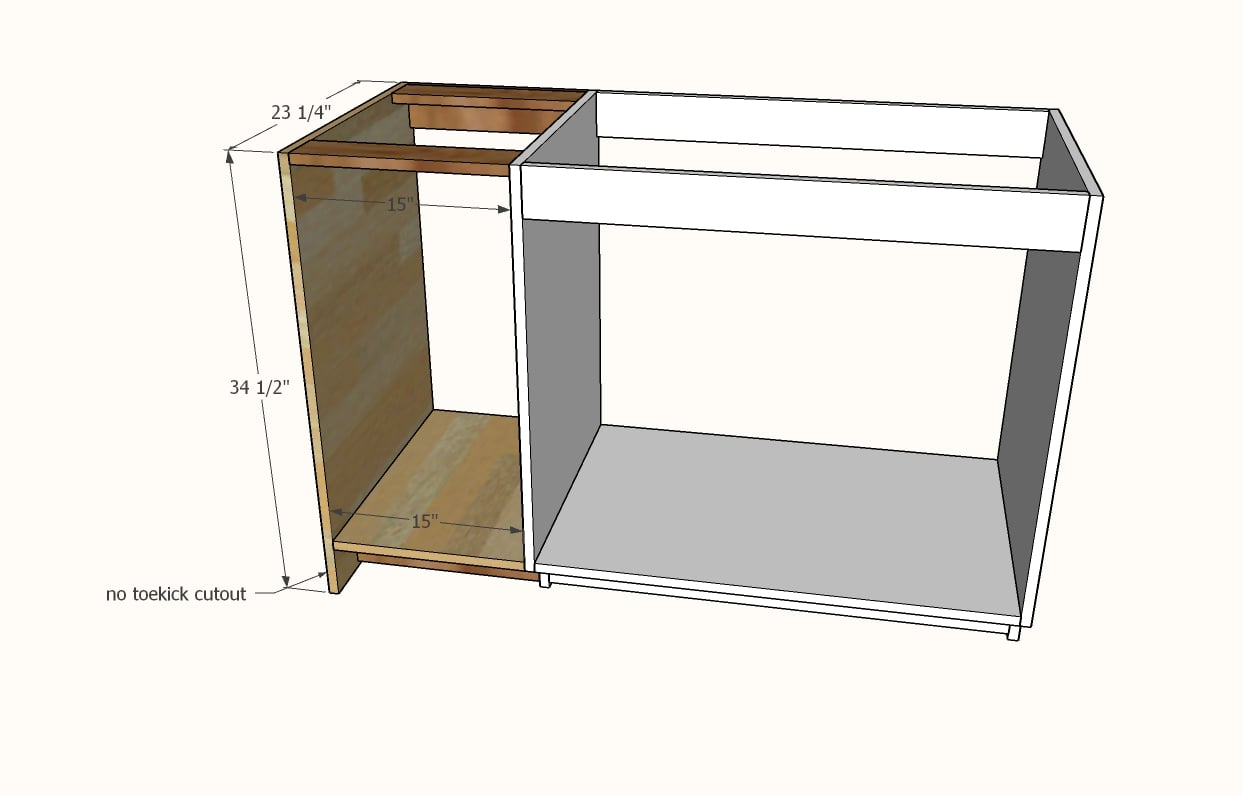
Start by building the sink base. 

Cut out toekicks in the front edges of the plywood, 4" x 4", using a jigsaw.

Use 3/4" pocket holes and 1-1/4" pocket hole screws to attach the shelf to the sides, bottom is flush to toekick cut out (there will be a 4" space under the shelf).

Cut three bay supports from 1x3 or 1x4 boards and attach with pocket holes to further strengthen the cabinet.  Notice how the top bay supports are run vertically?  Sinks are so big these days, this will give you maximum clearance for a sink.

Step 3

Repeat these steps for the trash cabinet panel and shelf, and strengthen with bay supports.  

Step 4

Repeat these steps for the dishwasher panel.  Please double check the clearance needed for your dishwasher - 24" is a standard, but some dishwashers need more.

Add the bay supports - you may not be able to add the top front bay support depending on your dishwasher clearance needed.

I also recommend a bay support at the bottom back for further support.

TIP: You can also drill pocket holes facing downward in the dishwasher panel for attaching the panel to the floor on installation.

Step 5

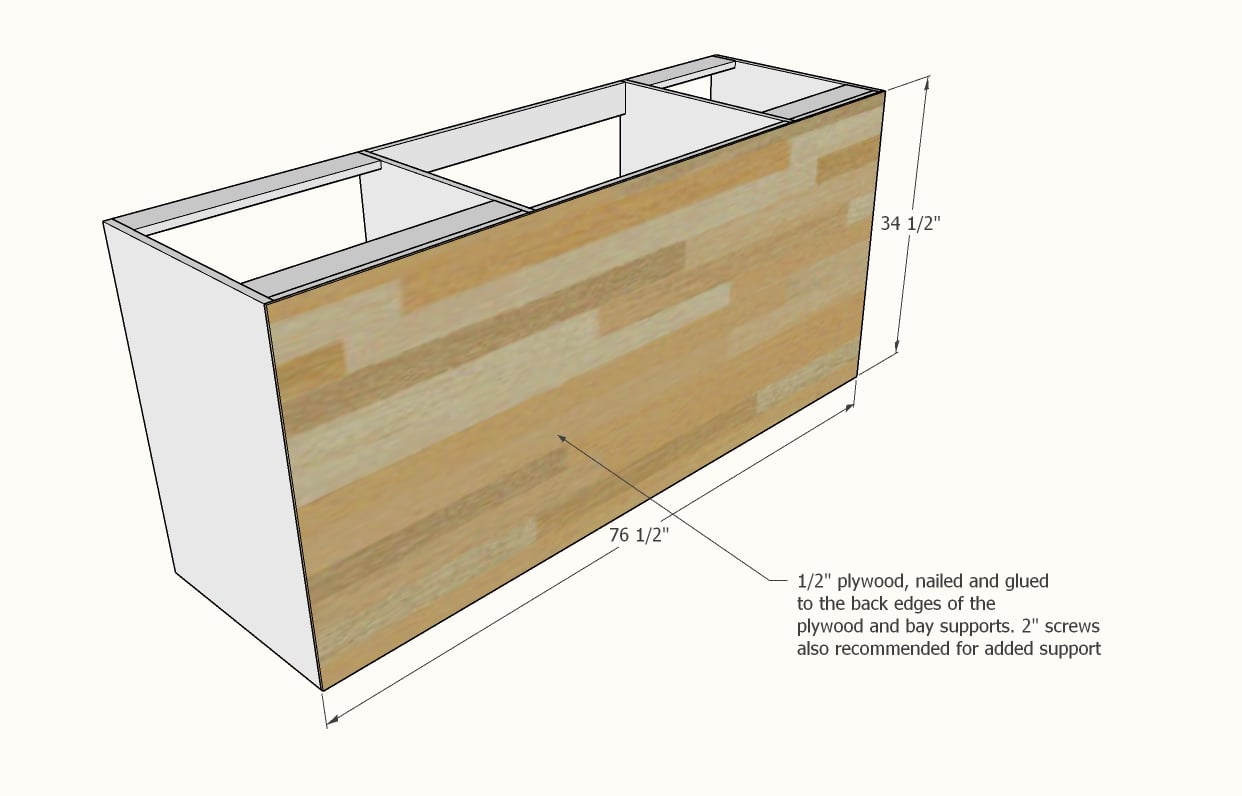
Cut 1/2" plywood with a circular saw and attach to the back with glue and 1-1/4" brad nails.  I also recommend adding some screws (you can use the pocket hole screws) to strengthen the joints.

Step 6

Build the open shelf carcass with 3/4" pocket holes and 1-1/4" pocket hole screws.  Attach through the bay supports to the back plywood.

NOTE: I also added bay supports at the very bottom and attached at the bottom too.

Step 7

Measure and cut the top and bottom trim to fit.

Nail on with 1-1/4" brad nails and glue.

Then measure the 1x2 stiles (vertical) trim and nail and glue to the front edges of the plywood.  

Step 8

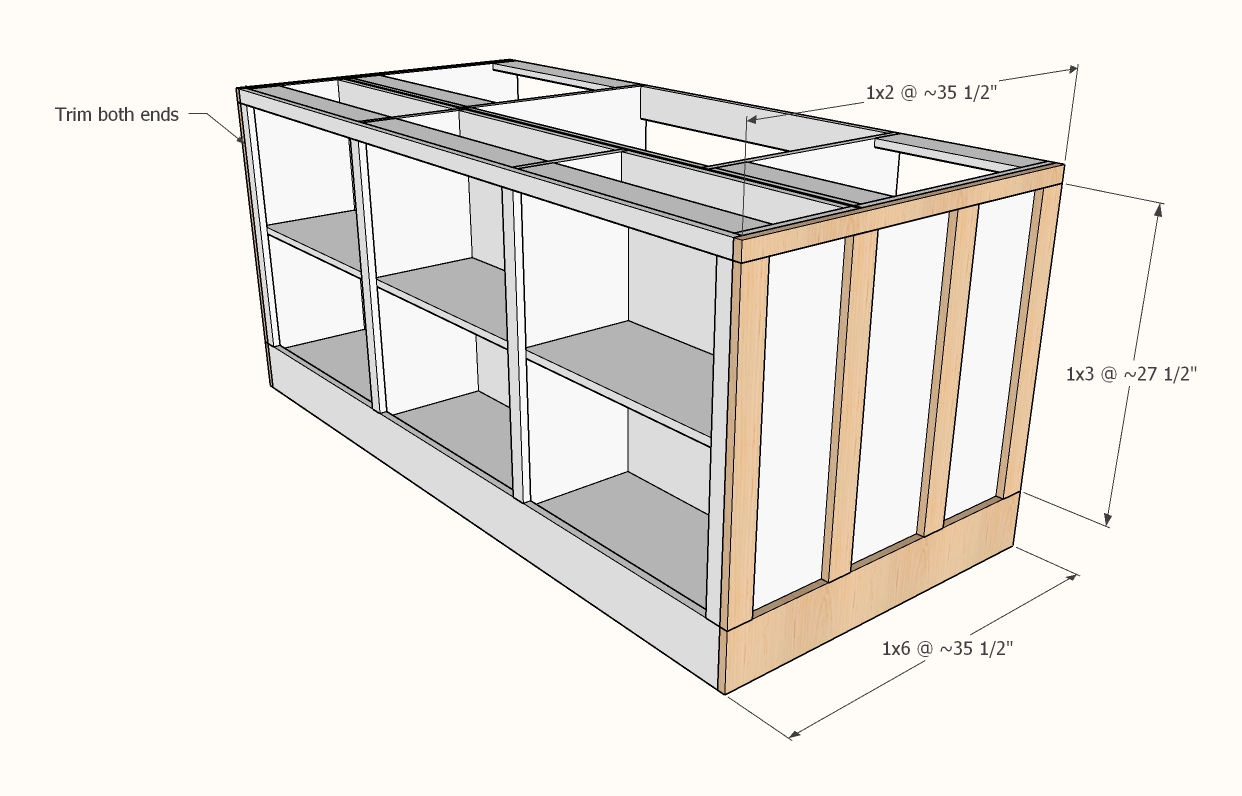
Repeat these steps for the side trim, but use 1x3s for the stiles (so the corbels have a wider board to land on).  You can use 1x2s for the mid-stiles.

Do both sides.

Step 9

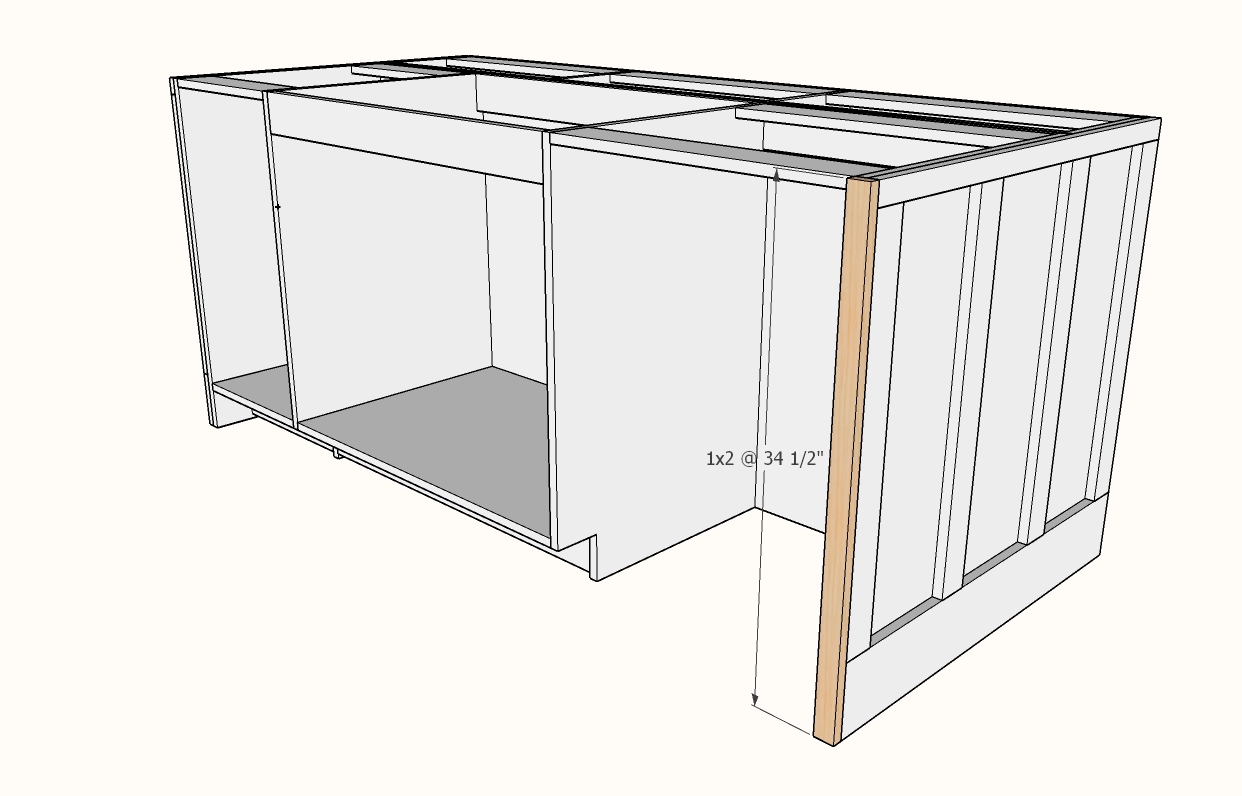
Measure and cut a 1x2 to trim out front edge of dishwasher panel.  Nail and glue in place.

Step 10

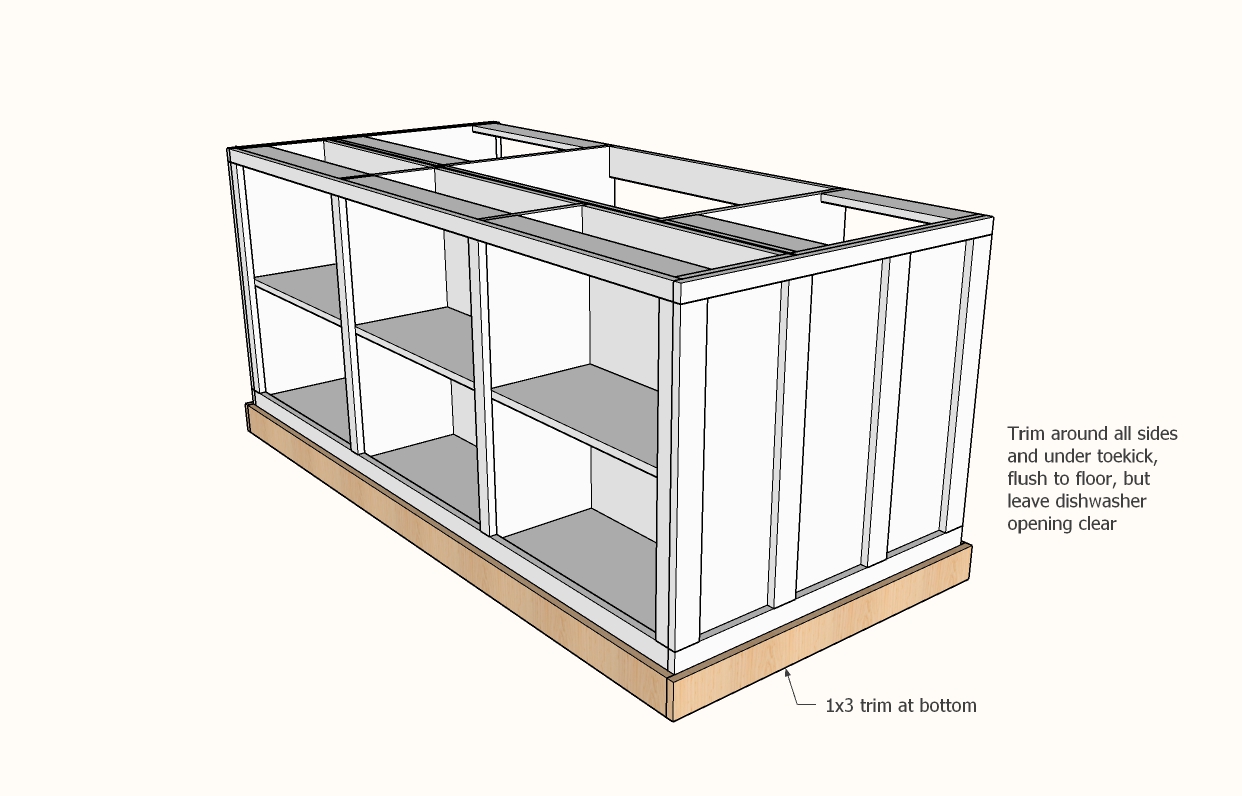
Trim the entire base with 1x4 boards or other base trim. Nail and glue on.  

Step 11

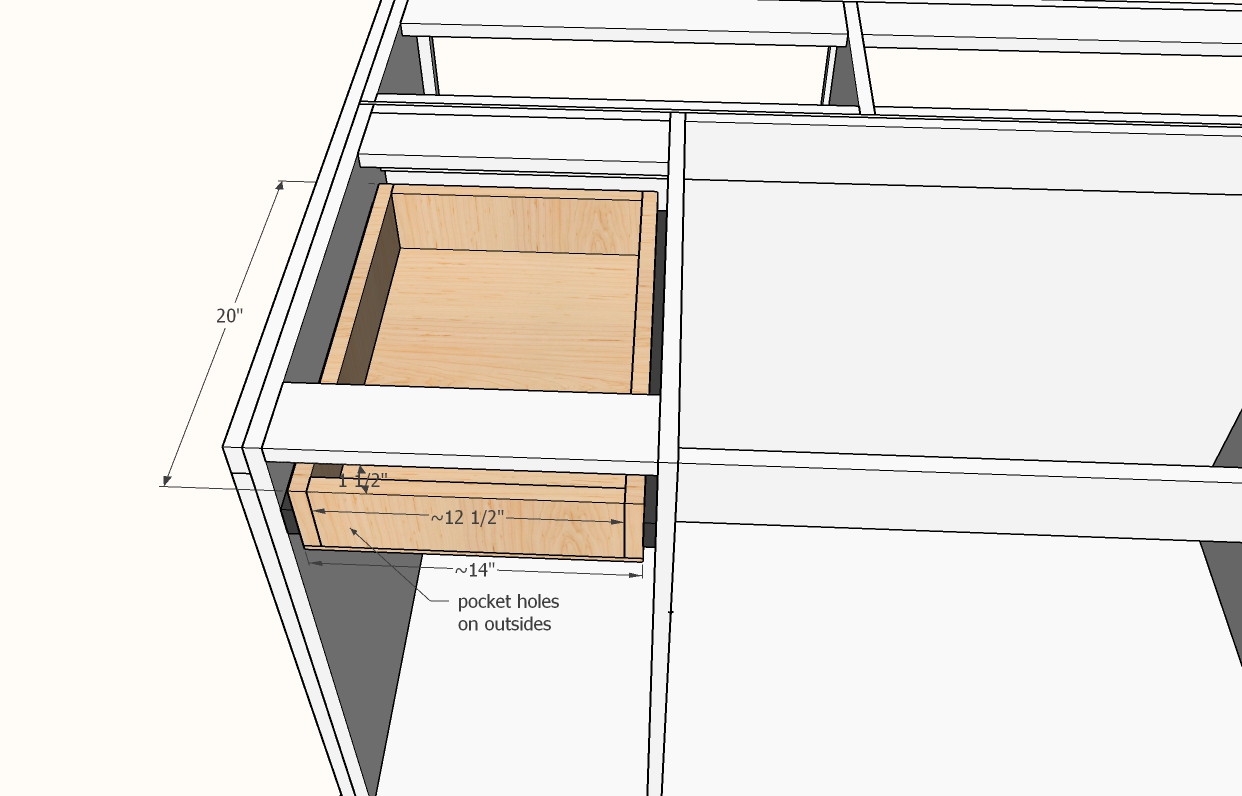
Build the drawer with 1x4 boards.

First cut two 1x4 @ 20" long.

Install the drawer sides to the drawer slide and install inside the cavity.

Measure between the two installed drawer sides and cut two 1x4s to match - should be about 12-1/2" long.

Attach to the two drawer sides with pocket hole screws on the outside.

Measure and cut 1/2" thick plywood for the drawer bottom.  Attach with glue and nails.

NOTE: Make sure you install the drawer at a height that will be covered by the drawer face.

Here is my video tutorial of installing drawer boxes

Step 12

Attach the drawer face to the drawer box.

Install doors with Frameless Hinges, HALF OVERLAY like these.

Here is a video I did on installing these hinges 

Step 13

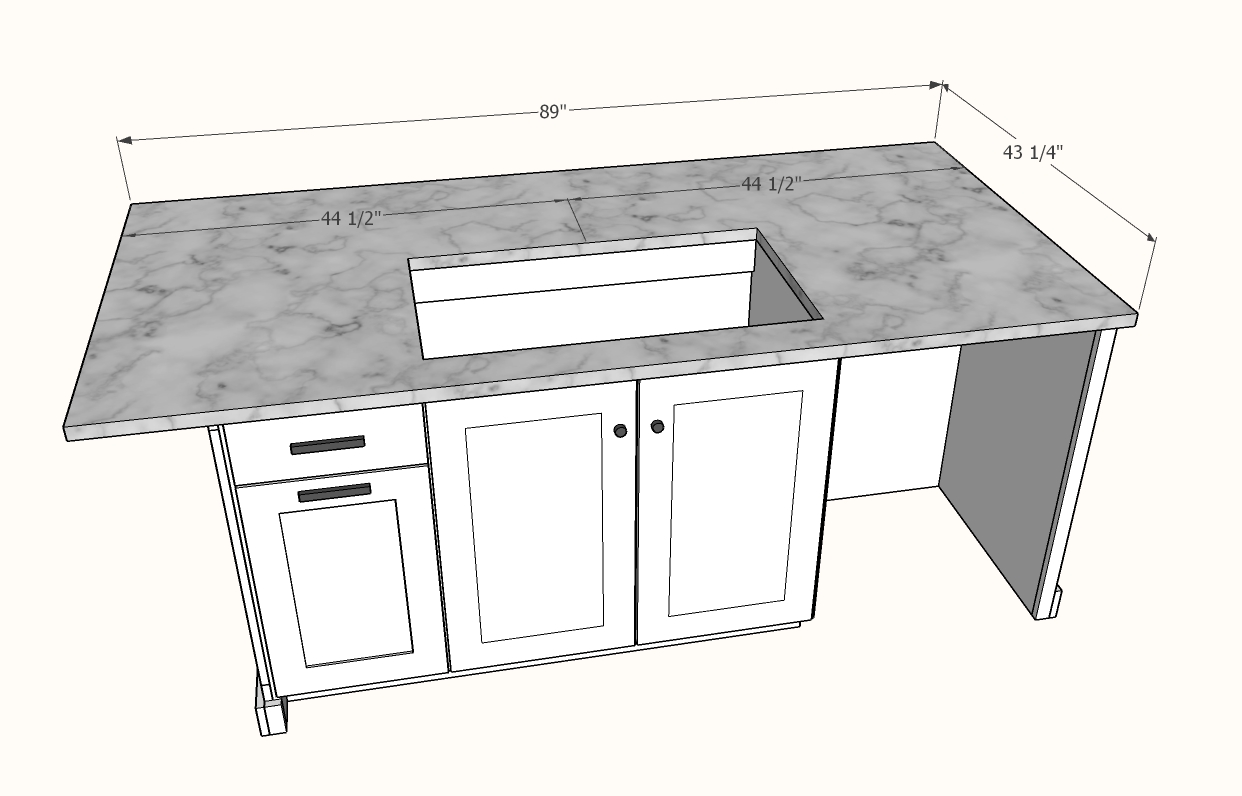
We had a countertop fabricator create and install our countertop out of quartz.  The sink was cut out as well.  

Step 14

The corbels were added after the countertop, secured from the back side with 2" screws. I found these corbels at Home Depot, they are the 9” x 12” ones

Finishing Instructions
Finish Used
We primed and painted with Sherwinn Williams Extra White in semigloss in ProClassic.

Frequently Asked Questions

Wood Questions

What kind of wood should I use?
Most of our plans use standard construction lumber like pine or fir. It's affordable, easy to work with, and easy to find. It's also rapidly renewing and biodegradable, so a great eco friendly choice!

Can I use hardwoods instead?
Yes—just keep in mind they're heavier, cost more, and can be tougher on tools and harder to join together and finish. I recommend not tackling a hardwood project until after you have built several softwood projects.

What if my boards are warped?
Choose the straightest boards at the store. You can often work around slight warps by cutting them into shorter pieces.

What wood should I use for outdoor furniture?
Use red-toned or pressure-treated 2x lumber for framing, and cedar or cedar fence pickets for the decking. Outdoor furniture should be built like a deck—your local home center can help recommend the right wood for your climate.

Will my wood move or warp after I build?
Potentially, especially in humid climates. Let your wood acclimate indoors before building. Once acclimated and kept in a stable environment, movement should be minimal. Remember, most houses are built using framing lumber - it's all about keeping moisture down indoors.

Cutting Questions

Do I need a miter saw?
A miter saw is great, creating fast, safe, and precise cuts, even for beginners. But most plans can be built with a circular saw and a straight edge. If using a circular saw to cut, take time to practice, and get good at making cuts, before cutting your project boards.

How do I get clean cuts with a circular saw?
Clamp your board, measure twice, cut slow, and use a sharp blade. This takes practice, so spend some time making cuts. I go through becoming proficient at freehand cutting in my course, it is worth taking if you want to master this skill.

Will the store cut my wood?
Yes—most stores will do rough cuts to help you transport your materials home. But from store to store, the quality of cuts could greatly vary.

Joinery Questions

What screws should I use?
We recommend star-head self tapping screws for framing, most common sizes are 2-1/2", 1-3/4". Pre-drill if close to the edge or you find your wood is splitting.

Do I have to use pocket holes?
Pocket holes are the cheapest, easiest and fastest way to do some joints - like edge to edge or a hidden fastener joint. There are other methods, but these can be time consuming and expensive. We recommend using pocket holes as indicated in plans for best results.

How do I keep things square?
Use a speed square and measure diagonals after each step. Always clamp joints before screwing to keep them tight and flush.

Finishing Questions

Stain or paint before or after building?
A quick sand before and a full finish after gives the best results. Pre-finish if you're doing two-tone or detailed finishes.

What type of finish?
Use oil-based or water-based stain. For paint, cabinet-grade latex or enamel works great. High use surfaces on indoor projects should get a coat of polyurethane, I recommend a Helsman or Spar or other flexible poly that won't crack or peel with wood movement. For exterior projects, use a finish suitable for exterior fences.

How to get a smooth finish?
Start with a well sanded project. Sand between coats (220 grit), wipe clean, and apply light coats with a foam brush or roller.

Plan Questions

Can I change the size?
Many people do, and that's the great thing about building your own furniture! But do keep in mind going bigger might mean more supports are required, and often plans are optimized for minimal material waste.

Are these beginner-friendly?
Yes—plans are written with simple tools and clear steps in mind, with every effort to make plans as simple as possible.

Can I sell what I build?
Absolutely! Just don’t resell or repost the plans themselves.

General Questions

What tools do I really need?
A drill, circular saw, tape measure, square, and a few clamps will get you through most projects.

Do I need a workshop?
Nope! A driveway or small patio is plenty to get started, just make sure you have a level place to work. If you find you are building several projects a year, creating a small workbench is a great way to store tools and have a dedicated workspace.

What if I mess up?
Wood filler, sanding, or flipping boards goes a long way. Mistakes are part of the process!

What can I do to make my projects look more professional?
Start with straight boards, make accurate cuts, clamp all joints, and line up everything neatly. Sand thoroughly, use a neutral finish, and apply it in light coats for a clean look.

I've never built anything before. Where should I start?
Start with a few smaller softwood projects to get hands-on experience. Or if you're tackling a big project, buy a little extra lumber and practice your cuts and joints first. If possible, work with someone who has a bit of experience.

Care & Maintenance

How long will my furniture last?
With good joinery and regular care, your DIY furniture can last for decades. I have pieces in my own home that are over 20 years old and still going strong! One of the best parts about DIY furniture is that it’s easy to repaint, refinish, or repair—so your projects can grow and adapt with you.

How should I care for outdoor furniture?
Lightly pressure wash or hose it down once or twice a year. Tighten screws and reapply finish as needed to protect it—just like a deck or fence. A little upkeep goes a long way in extending the life of your furniture.

How about indoor furniture?
Regularly dust or wipe with a damp cloth. If it starts to look worn, a light sanding and touch-up paint or stain can refresh it in no time. DIY pieces are meant to be durable and fixable—so don’t be afraid to give them some love now and then.

Want to Build with Confidence?

Check out my ebook: 12 Skills to Build Your Own Furniture
It walks you through the core skills every builder needs—measuring, cutting, joinery, and finishing—so you can build beautiful furniture that lasts.

Still Have Questions?

Email us anytime at [email protected] and we’ll be happy to help!