

Free plans to build your own giant letter Z shelf! Step by step instructions with diagrams, shopping list and cut list to build your own Z wall shelf!
Thank you all for the positive feedback on Beth's Giant Letter A Shelf!
I'm with many of you and have a daughter with a curved letter, G, so I'm still doing some thinking for you on how to construct those letters!
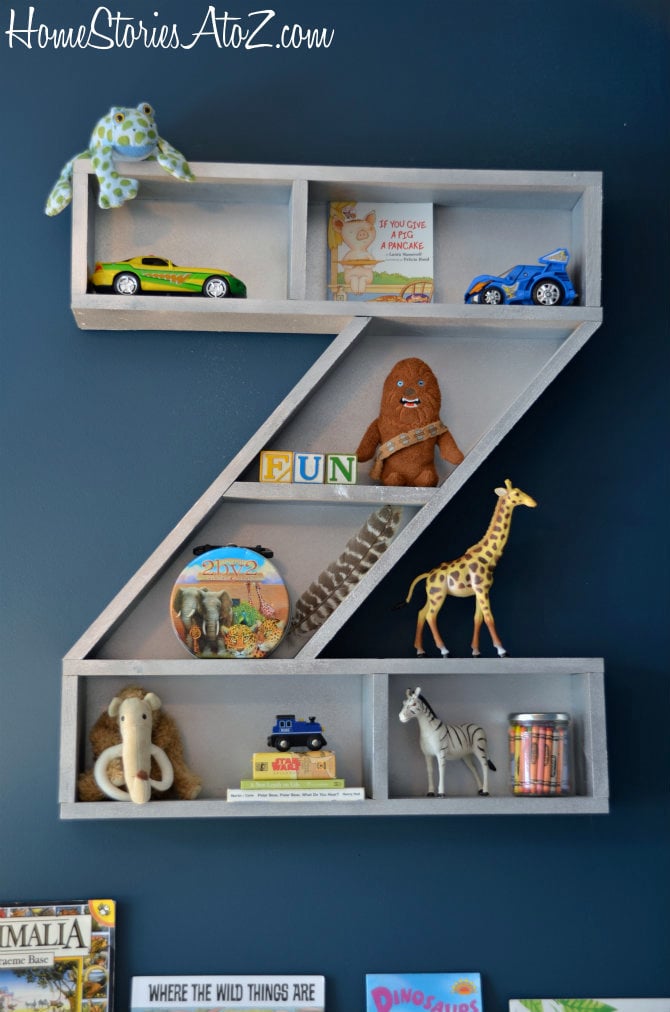
But you don't necessarily need to use these wall or bookshelves as monograms - every kid knows A and Z mean learning to read and letters! The letters are perfect for any playroom!
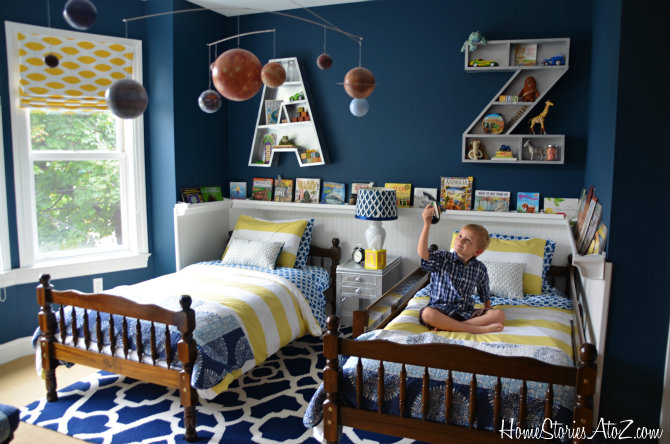
Or perfect for that perfect shared kids room! Beth today is unveiling her boy's room makeover and it includes the A and Z Letter Shelves from plans we worked on together!
Want inspiration for your own boy's room? You must check out Beth's complete room tour here - it is just out of this world - literally! I especially love the planet mobile! Lots of the projects in the room are DIY - go check it out now!
And of course, you can get the free letter Z plans right here!

Preparation
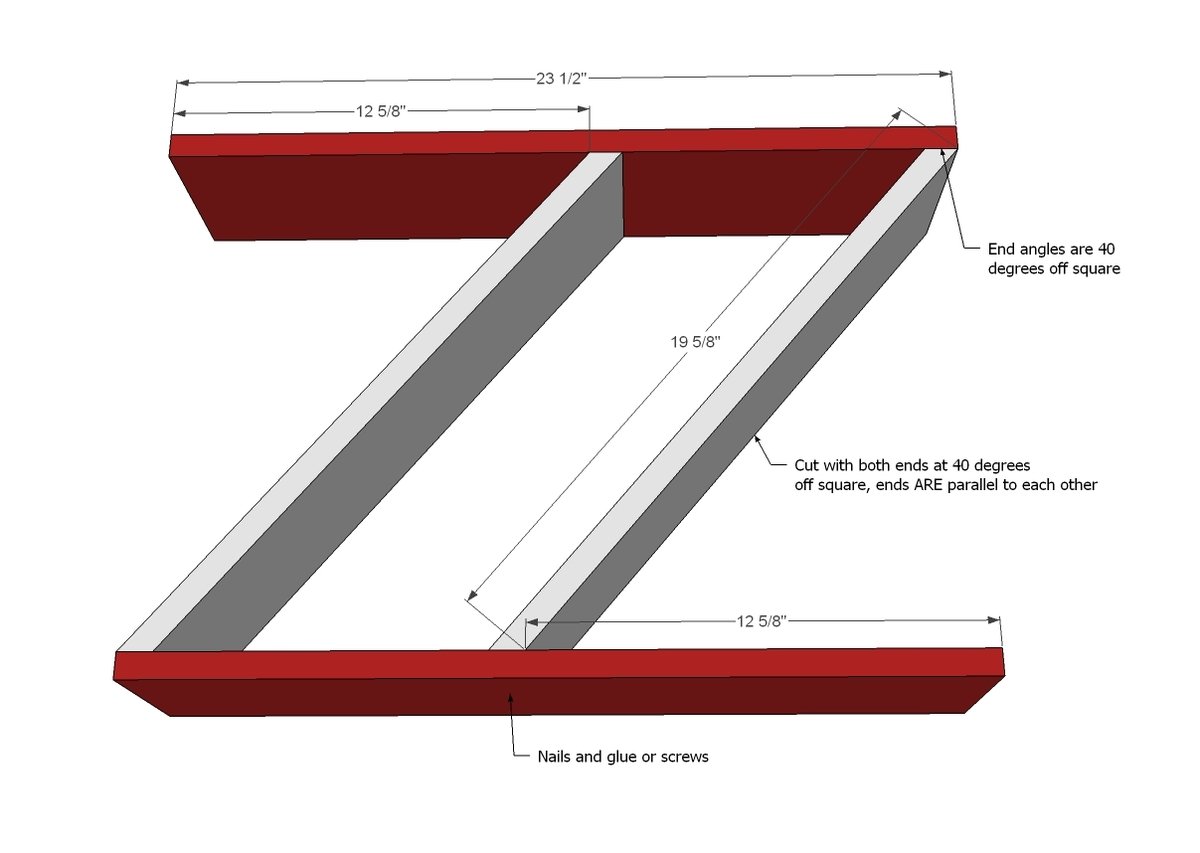
2 – 1x6 @ 8 feet long
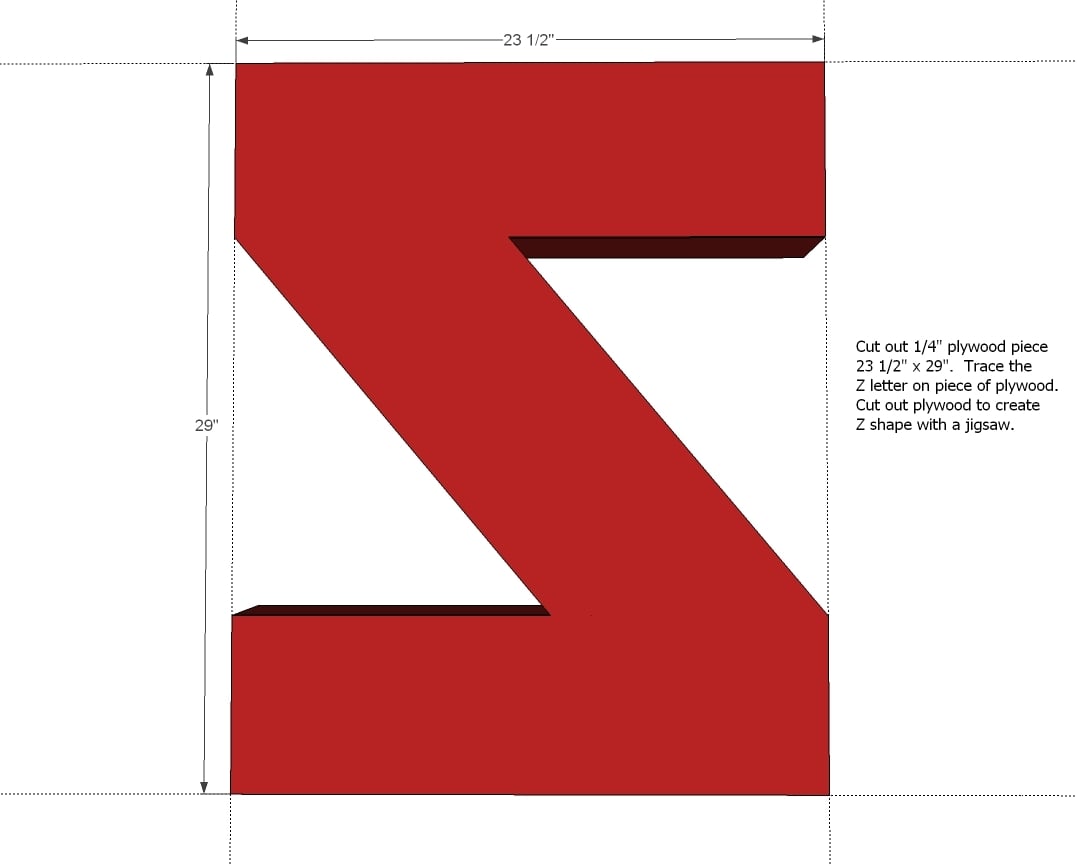
1 – 1/4” plywood 23 ½” x 29”
(for both A and Z letters buy a 1/2 sheet of 1/4" plywood)
1 1/4" Pocket Hole Screws
2” (could get away with smaller) finish nails and wood glue
Hanging Bracket/Hardware that attaches to back (HEAVY DUTY!!!!)
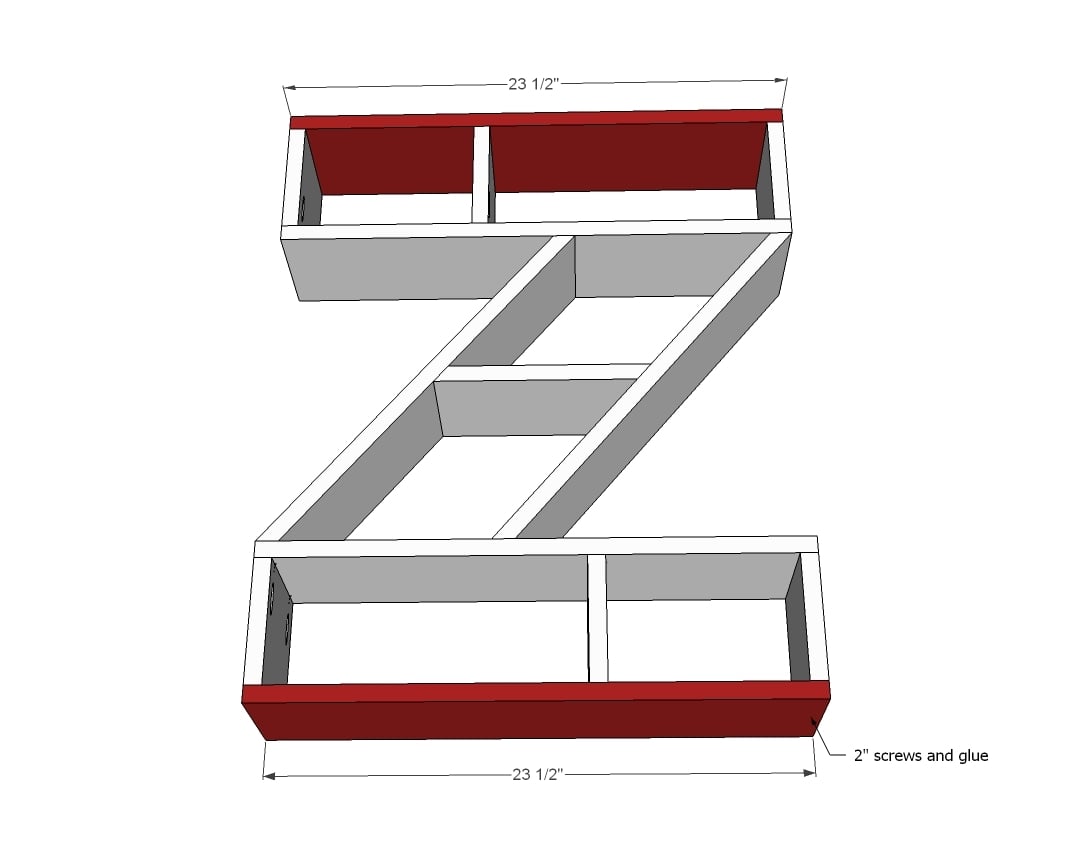
4 – 1x6 @ 23 1/2"
2 – 1x6 @ 19 5/8” (long point to short point, both ends cut at 40 degrees off square, ends ARE parallel)
1 – 1x6 @ 9” (long point to short point, both ends cut at 40 degrees off square, ends ARE parallel)
6 – 1x6 @ 5 1/2"2


Please read through the entire plan and all comments before beginning this project. It is also advisable to review the Getting Started Section. Take all necessary precautions to build safely and smartly. Work on a clean level surface, free of imperfections or debris. Always use straight boards. Check for square after each step. Always predrill holes before attaching with screws. Use glue with finish nails for a stronger hold. Wipe excess glue off bare wood for stained projects, as dried glue will not take stain. Be safe, have fun, and ask for help if you need it. Good luck!
Instructions
Step 1
Let's start on the inside and work outward! I recommend attaching with countersunk screws and glue. Glue, glue, glue!
Step 2
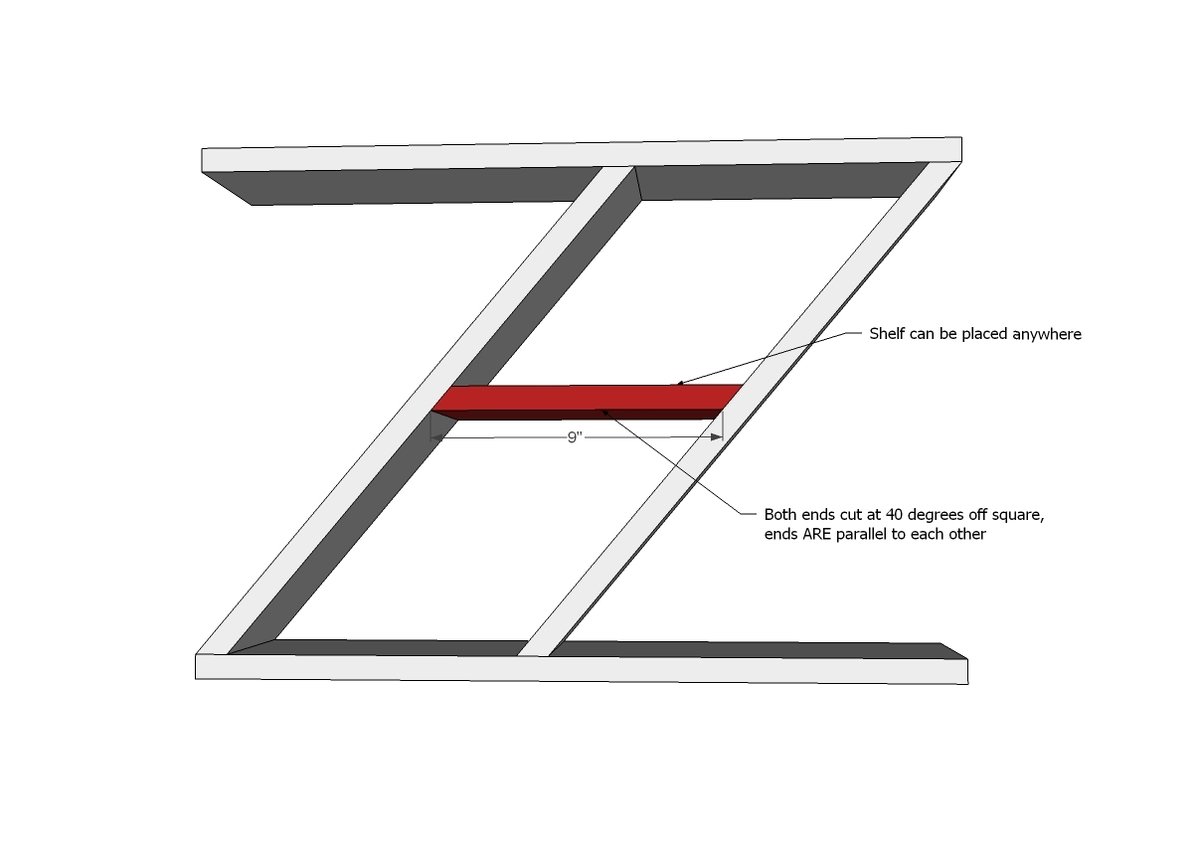
And then add the shelf. Note that you can add shelf at any height.
Step 3
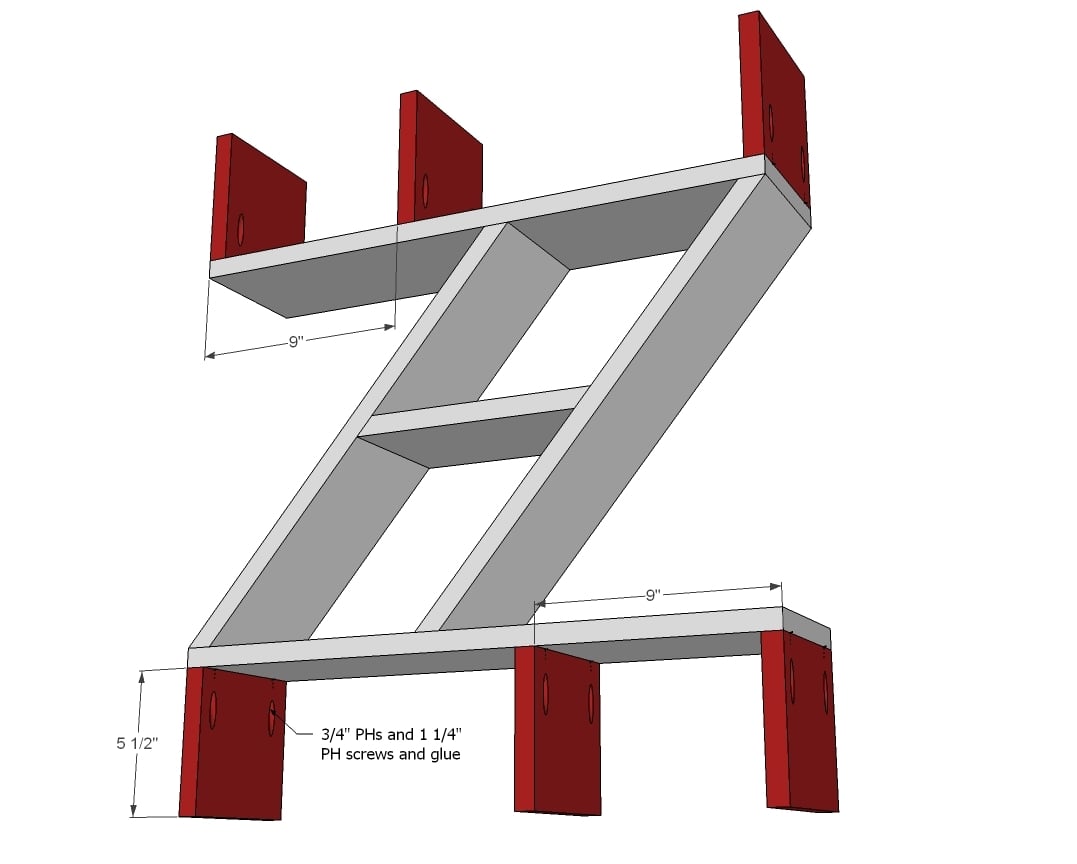
You'll need to attach these shelf dividers with 3/4" PHs and 1 1/4" PH screws and glue.
Step 4
And finally attach the top and bottom shelf.
Step 5
Step 6
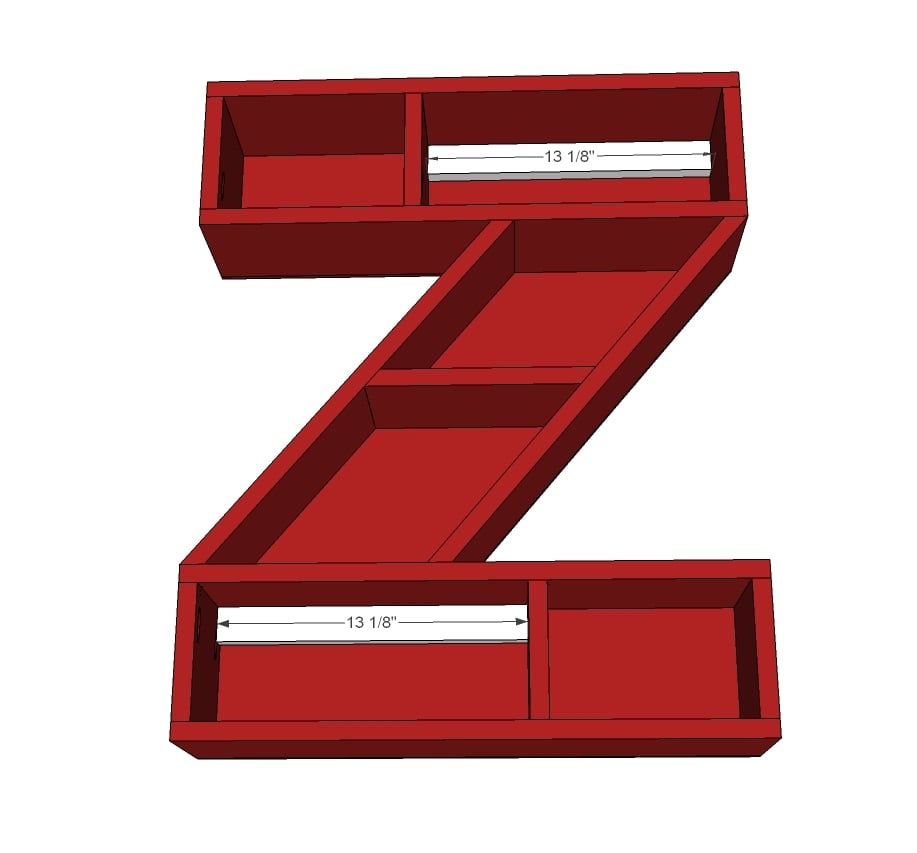
For hanging the shelves, I highly recommend adding some 1x2s inside the letter to give you something to screw directly into the wall into a stud in the wall. These shelves will be very very heavy and we don't want them falling off the wall! When you do hang it, it is very important to secure the structure of the letter (the 1x6s or the added 1x2 cleats) into a stud in the wall and use the appropriate hanging system for the weight of your shelf. Also consider added weight of shelf objects in hanging this shelf.
DISCLAIMER: This shelf will be heavy. Hang and use at your own risk.
It is always recommended to apply a test coat on a hidden area or scrap piece to ensure color evenness and adhesion. Use primer or wood conditioner as needed.

Comments
teacherlady
Fri, 09/21/2012 - 12:28
Thanks for the awesome inspiration!
My son's name starts with a "C," so I am going to do one to look like a varsity letter. This will be an awesome addition to his room! I am really excited!
campm0m (not verified)
Wed, 10/17/2012 - 13:03
"C" shelf
How did the "C" shelf turn out? I also need to make a "C" shelf. Any tips?
Huthbert
Tue, 10/09/2012 - 15:09
Awesome!
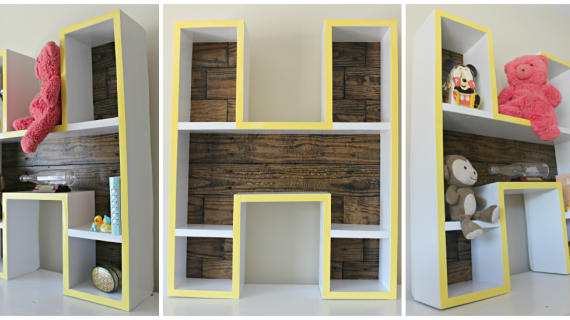
Thanks so much for the plans/inspiration! We just used the same basic concept for a letter H shelf!
Elise (not verified)
Tue, 11/20/2012 - 18:11
Alphabet bookshelf
That letter bookshelf looks awesome! Any ideas how I could make a letter R?
Thanks
Rich Bullock (not verified)
Thu, 12/06/2012 - 10:50
Finished the Z Shelf
I used your plans and built the Z shelf for our grandson, Zane, who is still on the way (due March 30, 2013).
I used primed MDF for the 1X6s. Nice to work with, and super straight. They were made for shelving, and had one of the long edges rounded. I sanded the matching edge round so the front edges of the shelf would look the same.
Got a chance to use the Kreg, pocket hole jig I bought awhile back. For the backing, I used 1/8" hardboard--just like pegboard except smooth.
I cut all the pieces at once with a 10" chop saw, following the plan measurements. During assembly, everything lined up pretty well.
Thanks for the plans. Now we're working on a J for our other grandson, Jaksen.
jhib1212
Wed, 10/01/2014 - 11:22
Can I get an "N"!
Love the letter shelf...my kids names are Noe, Nathan and Natalie. I know didn't start that way...blended family...we also have an Emily but she has left the nest...I may still make her one ;)
Any input on how to make an "N"...I was going to just rotate it 90° and call it a day but the mid section would be rough to store any goods in the middle...any suggestions?
Also which Kreg would you recommend to start with...I see they have a mini but I can also see that I will probably making more cool stuff as I seek and destroy.
Thanks for all the cool stuff...hope to hear from you soon.
Regards,