Loft Closet in Tiny House

Difficulty
Intermediate
| Print this plan

Closet in a loft in a tiny house - diy tutorial by Ana White

A few of you have been asking for more details on the loft closet we built for the Wild Rose Tiny House.

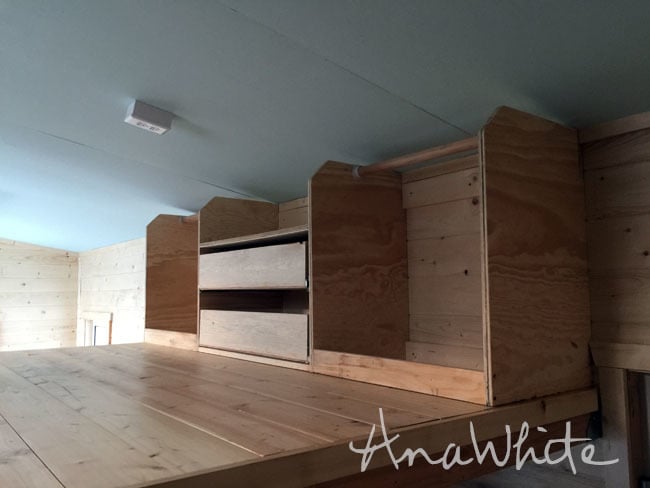
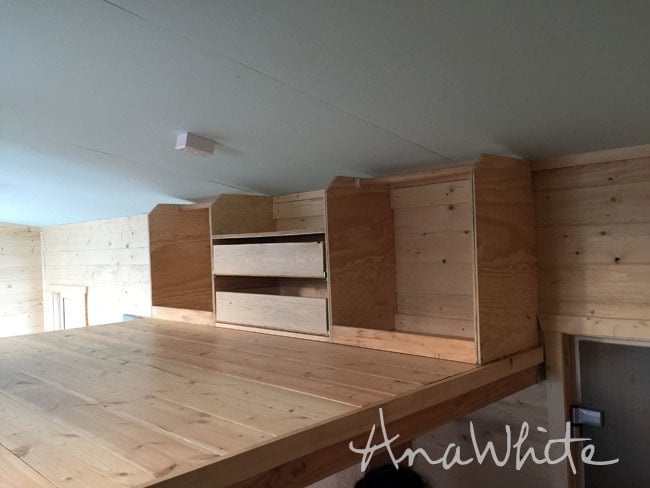
The homeowner wanted a simple closet system in the low ceiling in the loft with a few drawers.  But we wanted to keep the closet system light weight and functional.  

Given the space constraints, I think it turned out really well and will be very useful for the homeowner.  I wish we had more space vertically for clothes to fully hang, but the homeowner was fine with perhaps longer items resting on the bottom of the closet in the hanging space. 

The drawers ended up being very roomy too, perfect for smaller items.  All in all, a great project that was easy and fast to build.  

Since this one should definitely be customized to the space, I thought I'd tackle this one in more of a how we did it style, rather than a plan with specific cut list.

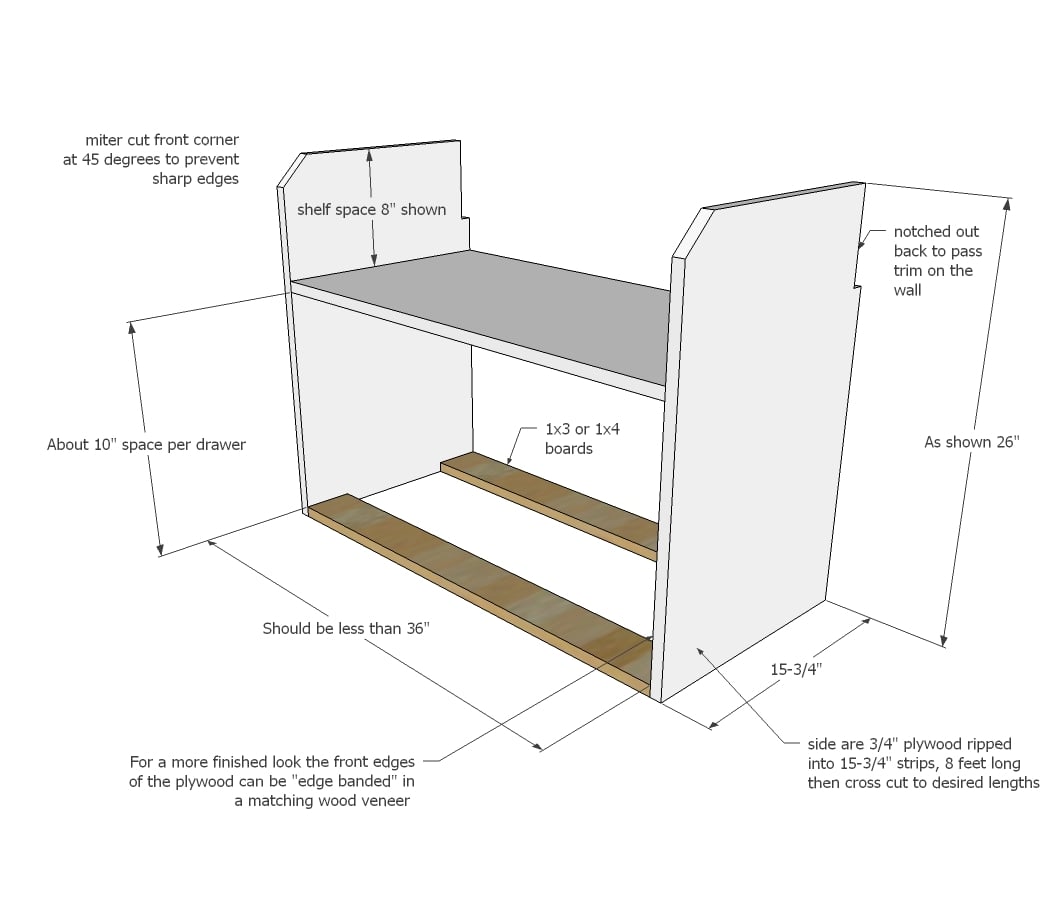
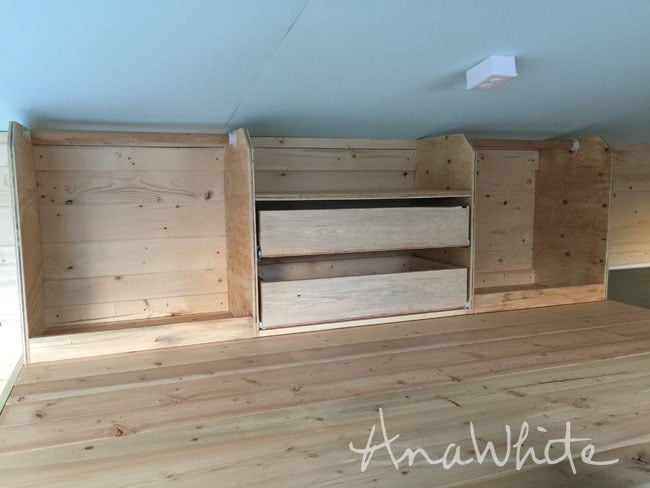
The first thing we did was build the center section.  You don't want to go over 36" wide here because the top shelf will start sagging and drawers won't slide right any larger.  We built the sides and shelf out of 3/4" plwyood ripped into strips 15-3/4" wide by 8 feet long, and then just cross cut from there.

Everything is pocket holed together with a Kreg Jig on the 3/4" setting, with 1-1/4" pocket hole screws and wood glue.  


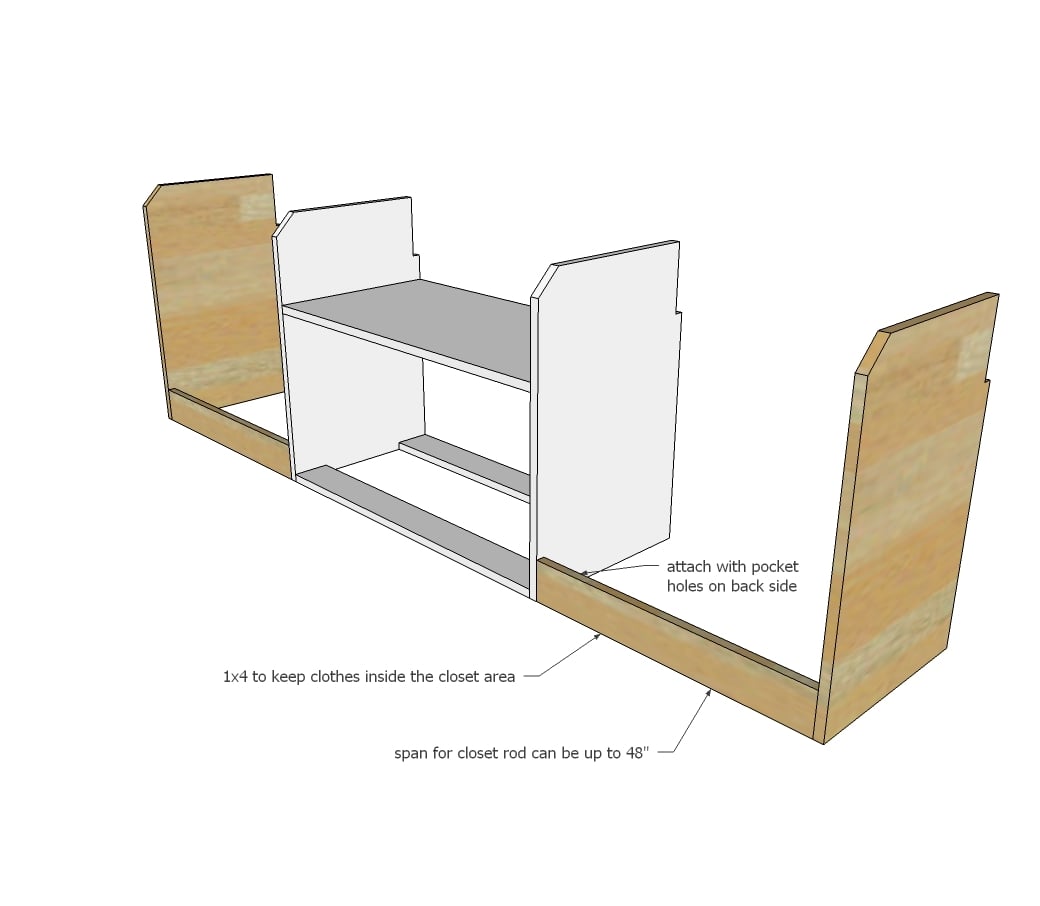
Now for the two sides with hanging clothing space - we just spaced outward with 1x4s no more than 48" as a wood closet rod will start to sag any longer and need additional support.

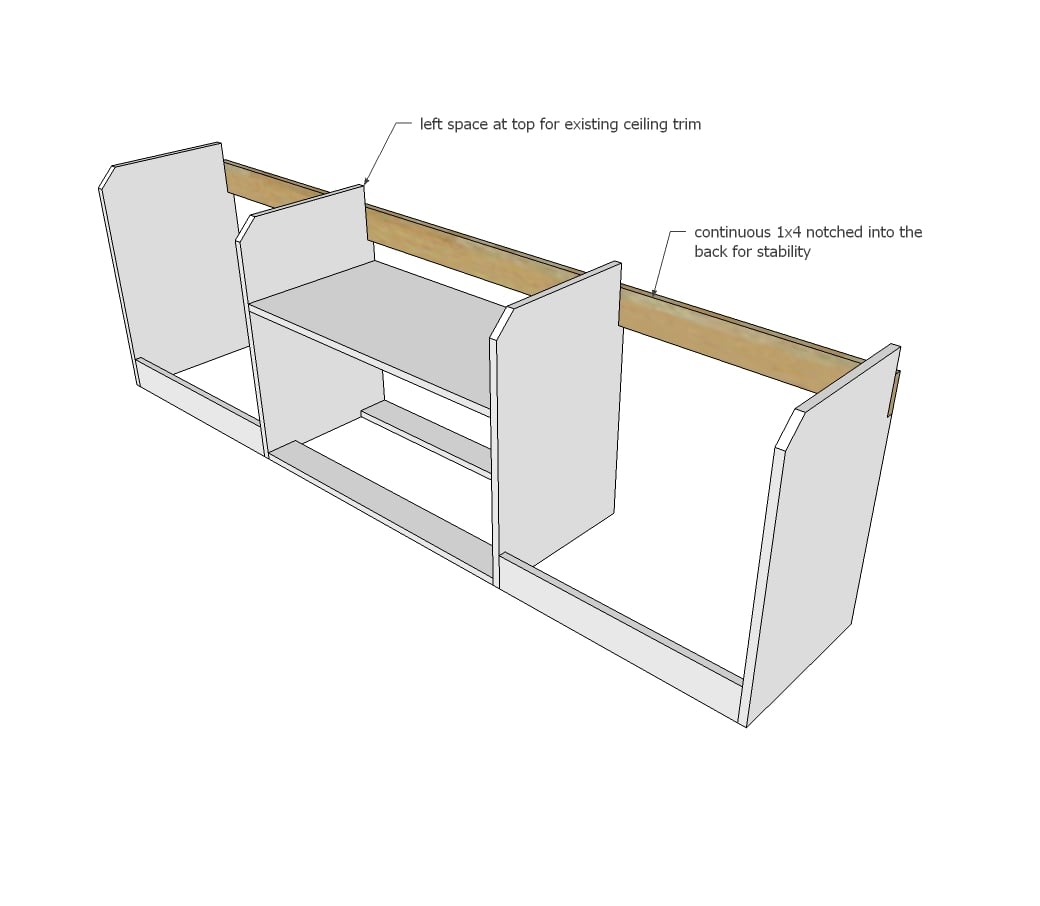
The backs of the side pieces were all notched out with a jigsaw so a continuous 1x4 could be screwed to the back for stability.  When you do this make sure the drawer area is very square, or your drawers will not slide right.

For the drawers, cut a 1x6 or 1x8 or however deep your drawers are 1" smaller than the inside of the opening, since each drawer slide needs 1/2" clearance.  The sides should be 1-1/2" less than the inside depth - should be 14-1/4" if your plywood is 15-3/4" wide. I kreg jig my drawers together and staple and glue the bottoms on.

I'm a big fan of euro style bottom corner mount drawer slides for three reasons -

1. Since the drawer slide is mounted under the bottom of the drawer, you can just staple the drawer bottom on without ever worrying about the drawer bottom falling out (as you might with side mount drawer slides).

2. Euro style drawer slides are easy to install and very easy to adjust and there is margin for error.

3. They are inexpensive and perfect for projects like this.  A kitchen cabinet utensil drawer that is opened hundreds of times may warrant a pricer drawer slide, but for a clost that is opened once a day, these are perfect.

My go to drawer slides are these guys from Liberty -

Here's how they are installed -

You can grab them at Home Depot or on Amazon.

Do modify away, and please, share when you are done.  Love seeing your projects!

XO Ana


Project Type
Room

Frequently Asked Questions

Wood Questions

What kind of wood should I use?
Most of our plans use standard construction lumber like pine or fir. It's affordable, easy to work with, and easy to find. It's also rapidly renewing and biodegradable, so a great eco friendly choice!

Can I use hardwoods instead?
Yes—just keep in mind they're heavier, cost more, and can be tougher on tools and harder to join together and finish. I recommend not tackling a hardwood project until after you have built several softwood projects.

What if my boards are warped?
Choose the straightest boards at the store. You can often work around slight warps by cutting them into shorter pieces.

What wood should I use for outdoor furniture?
Use red-toned or pressure-treated 2x lumber for framing, and cedar or cedar fence pickets for the decking. Outdoor furniture should be built like a deck—your local home center can help recommend the right wood for your climate.

Will my wood move or warp after I build?
Potentially, especially in humid climates. Let your wood acclimate indoors before building. Once acclimated and kept in a stable environment, movement should be minimal. Remember, most houses are built using framing lumber - it's all about keeping moisture down indoors.

Cutting Questions

Do I need a miter saw?
A miter saw is great, creating fast, safe, and precise cuts, even for beginners. But most plans can be built with a circular saw and a straight edge. If using a circular saw to cut, take time to practice, and get good at making cuts, before cutting your project boards.

How do I get clean cuts with a circular saw?
Clamp your board, measure twice, cut slow, and use a sharp blade. This takes practice, so spend some time making cuts. I go through becoming proficient at freehand cutting in my course, it is worth taking if you want to master this skill.

Will the store cut my wood?
Yes—most stores will do rough cuts to help you transport your materials home. But from store to store, the quality of cuts could greatly vary.

Joinery Questions

What screws should I use?
We recommend star-head self tapping screws for framing, most common sizes are 2-1/2", 1-3/4". Pre-drill if close to the edge or you find your wood is splitting.

Do I have to use pocket holes?
Pocket holes are the cheapest, easiest and fastest way to do some joints - like edge to edge or a hidden fastener joint. There are other methods, but these can be time consuming and expensive. We recommend using pocket holes as indicated in plans for best results.

How do I keep things square?
Use a speed square and measure diagonals after each step. Always clamp joints before screwing to keep them tight and flush.

Finishing Questions

Stain or paint before or after building?
A quick sand before and a full finish after gives the best results. Pre-finish if you're doing two-tone or detailed finishes.

What type of finish?
Use oil-based or water-based stain. For paint, cabinet-grade latex or enamel works great. High use surfaces on indoor projects should get a coat of polyurethane, I recommend a Helsman or Spar or other flexible poly that won't crack or peel with wood movement. For exterior projects, use a finish suitable for exterior fences.

How to get a smooth finish?
Start with a well sanded project. Sand between coats (220 grit), wipe clean, and apply light coats with a foam brush or roller.

Plan Questions

Can I change the size?
Many people do, and that's the great thing about building your own furniture! But do keep in mind going bigger might mean more supports are required, and often plans are optimized for minimal material waste.

Are these beginner-friendly?
Yes—plans are written with simple tools and clear steps in mind, with every effort to make plans as simple as possible.

Can I sell what I build?
Absolutely! Just don’t resell or repost the plans themselves.

General Questions

What tools do I really need?
A drill, circular saw, tape measure, square, and a few clamps will get you through most projects.

Do I need a workshop?
Nope! A driveway or small patio is plenty to get started, just make sure you have a level place to work. If you find you are building several projects a year, creating a small workbench is a great way to store tools and have a dedicated workspace.

What if I mess up?
Wood filler, sanding, or flipping boards goes a long way. Mistakes are part of the process!

What can I do to make my projects look more professional?
Start with straight boards, make accurate cuts, clamp all joints, and line up everything neatly. Sand thoroughly, use a neutral finish, and apply it in light coats for a clean look.

I've never built anything before. Where should I start?
Start with a few smaller softwood projects to get hands-on experience. Or if you're tackling a big project, buy a little extra lumber and practice your cuts and joints first. If possible, work with someone who has a bit of experience.

Care & Maintenance

How long will my furniture last?
With good joinery and regular care, your DIY furniture can last for decades. I have pieces in my own home that are over 20 years old and still going strong! One of the best parts about DIY furniture is that it’s easy to repaint, refinish, or repair—so your projects can grow and adapt with you.

How should I care for outdoor furniture?
Lightly pressure wash or hose it down once or twice a year. Tighten screws and reapply finish as needed to protect it—just like a deck or fence. A little upkeep goes a long way in extending the life of your furniture.

How about indoor furniture?
Regularly dust or wipe with a damp cloth. If it starts to look worn, a light sanding and touch-up paint or stain can refresh it in no time. DIY pieces are meant to be durable and fixable—so don’t be afraid to give them some love now and then.

Want to Build with Confidence?

Check out my ebook: 12 Skills to Build Your Own Furniture
It walks you through the core skills every builder needs—measuring, cutting, joinery, and finishing—so you can build beautiful furniture that lasts.

Still Have Questions?

Email us anytime at [email protected] and we’ll be happy to help!