


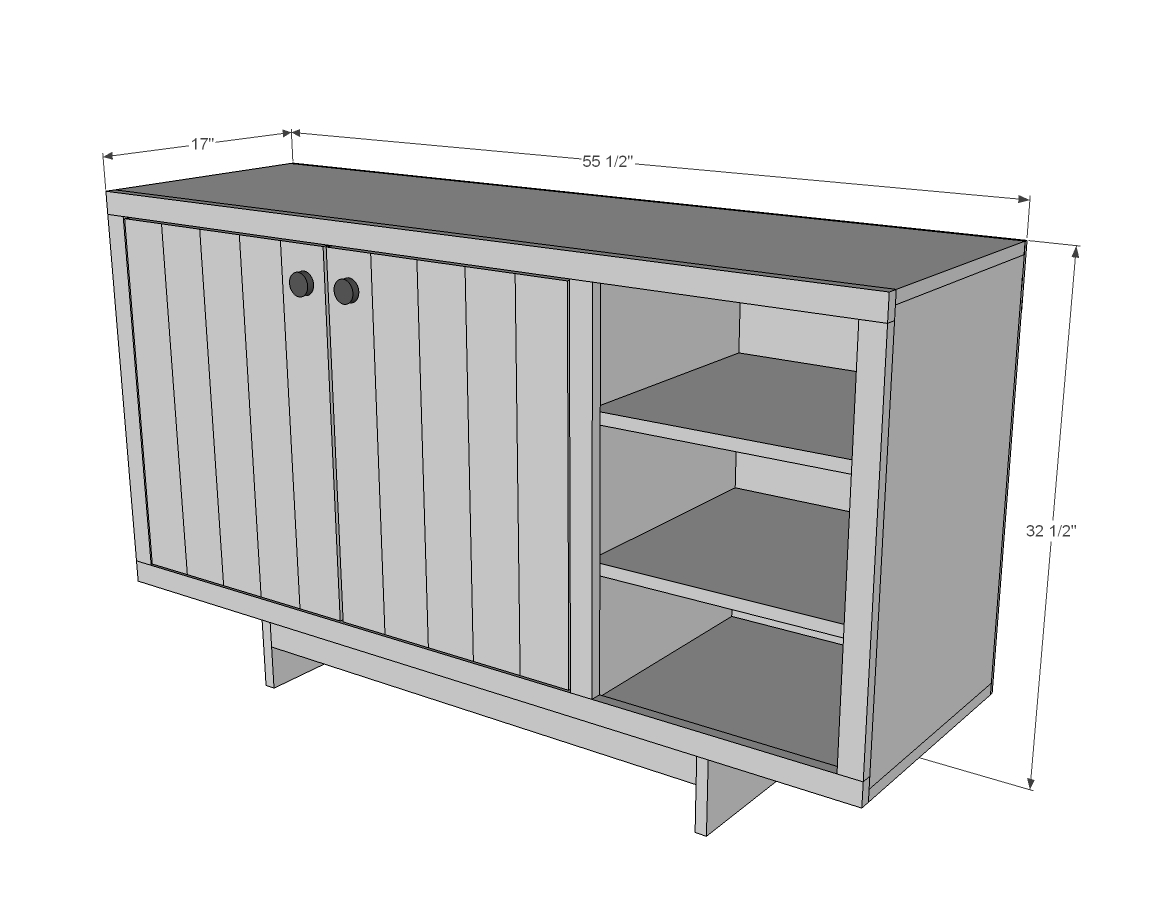
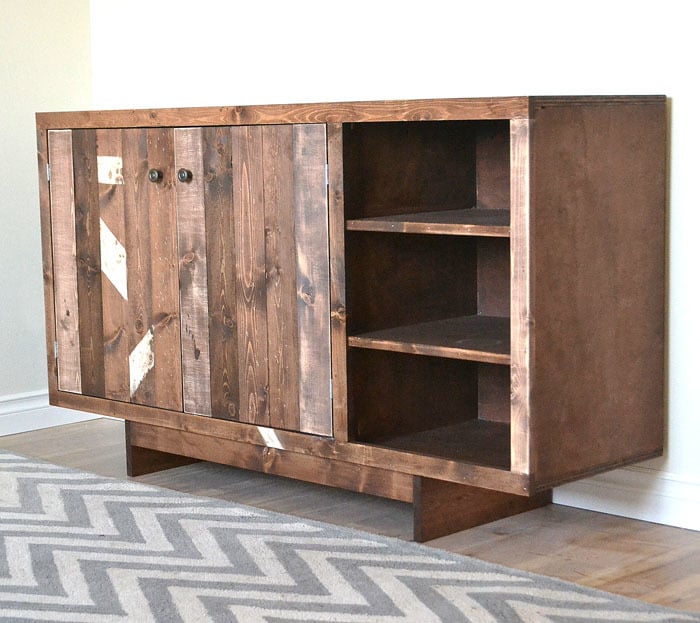
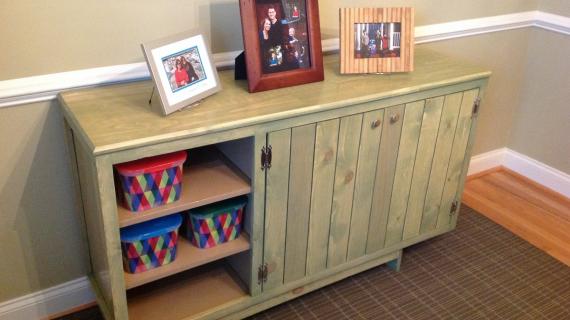
This easy to build console table or buffet cabinet adds style and storage to your space! Free step by step plans from Ana-White.com


Yodel Lay He Ho!
Have you been enjoying all the knock-off goodness this week shared by the dozens of amazing bloggers who are part of Knocktoberfest 2013?
I sure have!!!

This week long party is in full swing, and I'm pretty excited to jump in and share my Knocktoberfest 2013 project with you!
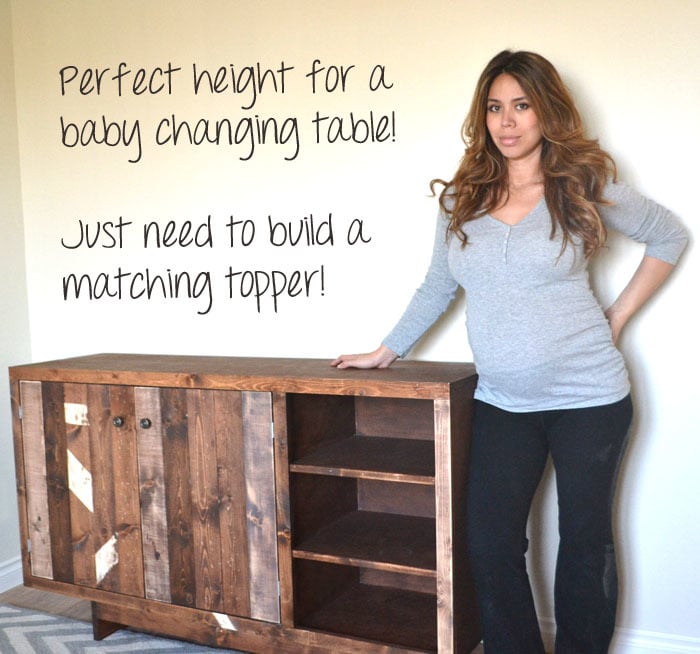
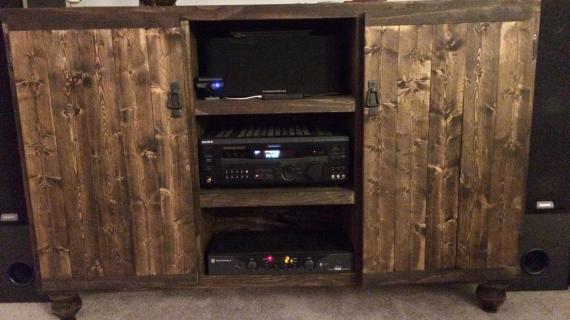
You know we've got a wee one on the way, right? Well, I've been in search of the perfect changing table to build for our new baby, something that fits in a rustic yet refined room, can be used beyond diapering, and has tons of storage.
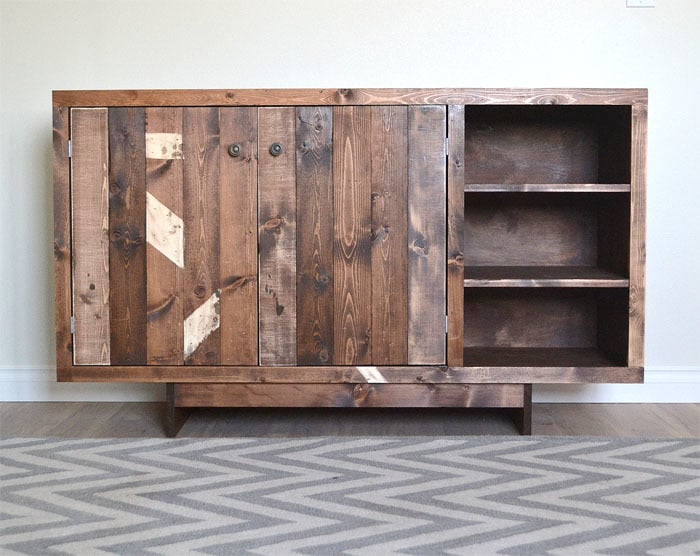
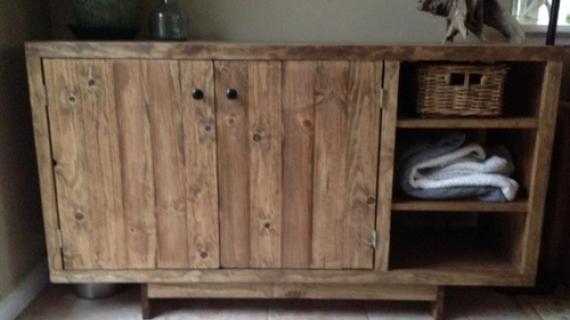
Our family agreed that this West Elm Emmerson buffet or console would make the perfect changing table/storage solution for our new baby's room. It's the right height, the right amount of open and concealed storage, the right mix of modern and rustic ... everything is right ....

Everything except the price - $1100!!! ($999 plus $100 shipping surcharge).
And PS - they don't ship to Alaska.
What's a excited expectant mom to do???
Well, bust the power tools out and DIY it, of course.
Our whole family helped out on this console for our new baby. The hubs helped me with construction (being 32 weeks along, any help is gladly accepted and appreciated), and my sister applied the beautiful stained finish.

All for under $100!!!
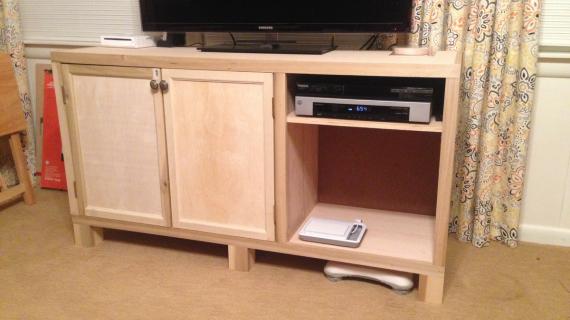
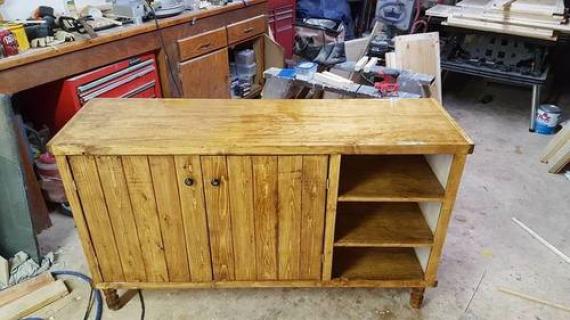
That's right - the main box of this console is simply one sheet of 3/4" plywood (I used PureBond Formaldehyde Free because it's non-toxic and American made and it's pretty)
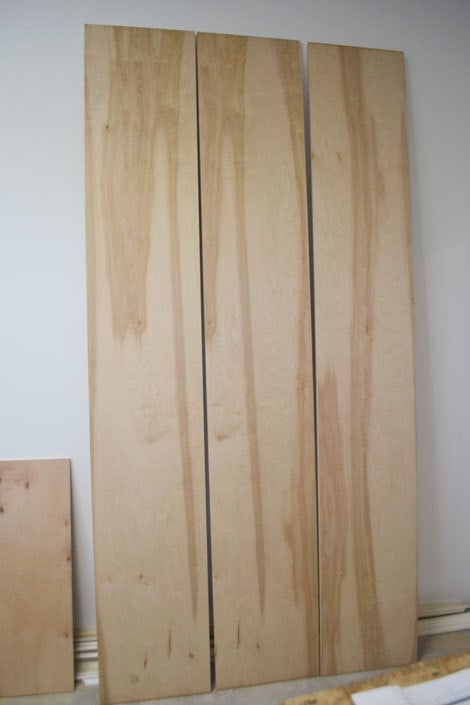
That was ripped into easy to manage, transport and cut strips. If you don't have a table saw, ask your home improvement store to rip the plywood for you. It'll be much easier to work with in pre-ripped strips.
Just make sure they rip it so the strips are all exactly equal in width.
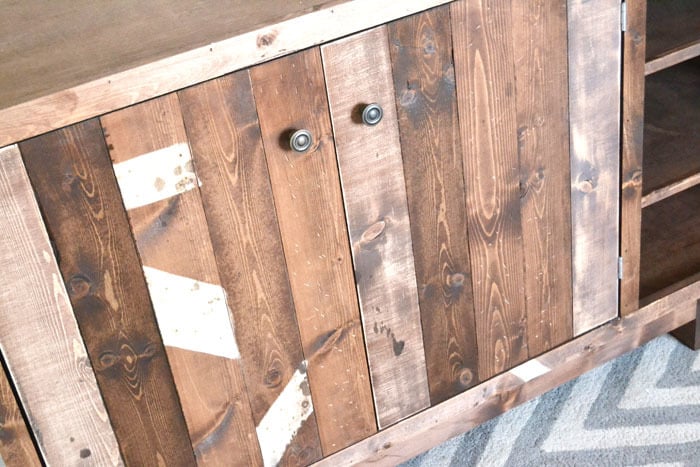
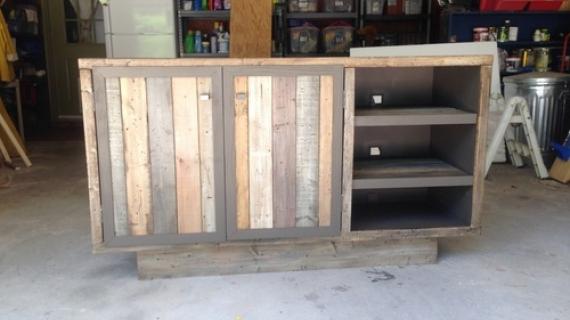
The doors are just cheapo white pine boards (pallet boards would have been lovely too!).
Here's a breakdown of my costs:
1 sheet 3/4" PureBond Plywood - $50
2 - 10' long 1x4 whitewood boards (used furring strips) - $8
3 - 8' long 1x2 whitewood boards (used furring strips) - $3
1 - sheet 1/4" plywood or backerboard - $20
1 - 1x6 @ 6 feet long - $5
1 - 1x3 @ 3 feet long - had scrap leftover already but these run about $1.50 for 8 feet
2 - sets of butt hinges - $4
2 knobs - $5
Had lefttover screws and nails and glue from other projects
Right at $95!!!!
Happy Knocktoberfest indeed!!!
I'll raise my mug and chicken dance to that!

And of course, we'll be building a topper too!!! Stay tuned for that coming soon!
I'm sharing below the step-by-step tutorial so you can also make this buffet cabinet or console or changing table - whatever you are going to use it as - but the party is far from over!!!
Next up - Marianne from Songbird blog is sharing her Knoctoberfest project! Check it out!!!
And of course, the plans follow.
Enjoy!
XO Ana
Preparation
1 sheet 3/4" plywood ripped into strips 15 3/4" wide
3 - 1x2 @ 8 feet long
1 sheet 1/4" plywood or backerboard
1 - 1x6 @ 6 feet long
1 - 1x3 @ 3 feet long
2 - 1x4 @ 10 feet long
2 sets of butt hinges
magentic clasp or hasp (recommended)
2 knobs edge banding or 1x1 pine trim for finishing small shelf exposed plywood edges (I used pieces of 1x2 ripped in half)
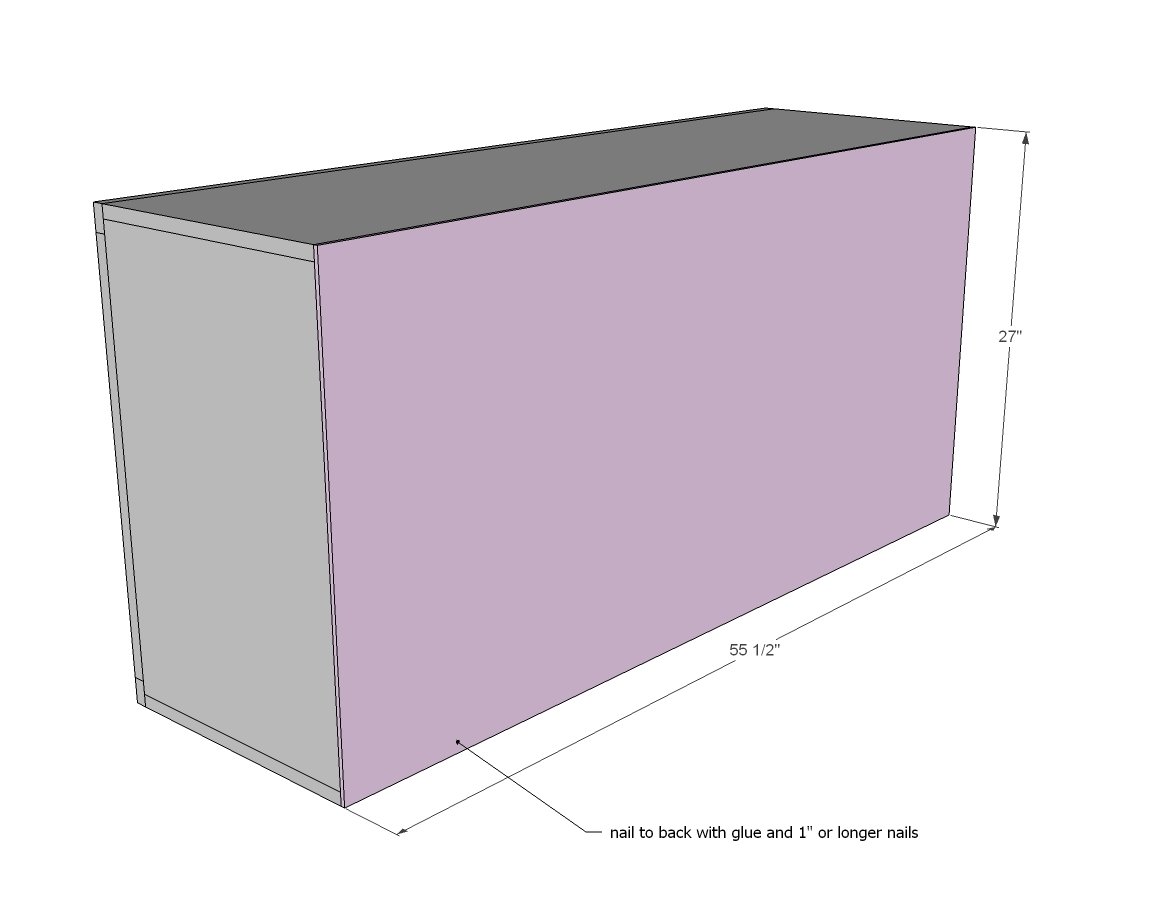
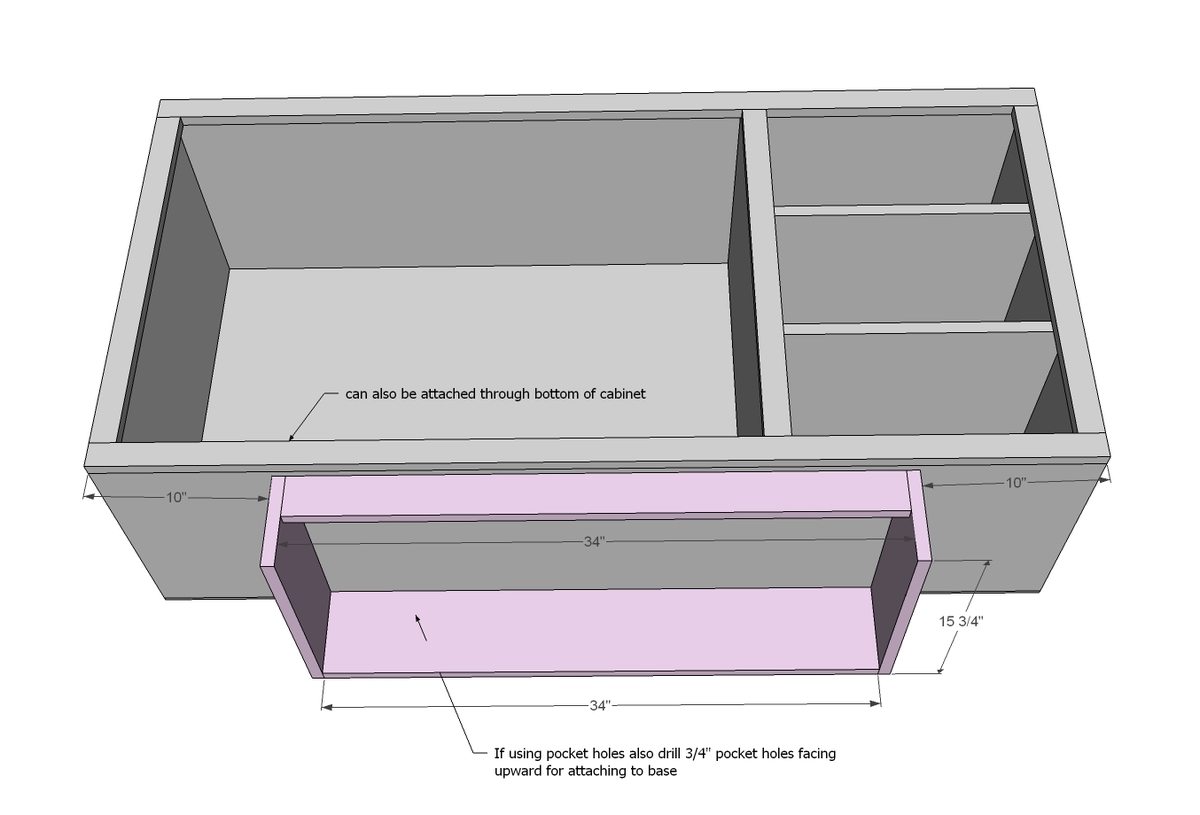
BOX 2 - 3/4" plywood @ 15 3/4" x 55 1/2" (top and bottom)
1 - 3/4" plywood @ 15 3/4" x 36 1/4" (main shelf - cut to fit)
3 - 3/4" plywood @ 15 3/4" x 25 1/2" (sides/dividers)
2 - 3/4" plywood @ 15 3/4" x 17" (small shelves - cut to fit)
1 - 1/4" plywood @ 55 1/2" x 27" FACE FRAME
2 - 1x2 @ 55 1/2"
3 - 1x2 @ 24" BASE
2 - 1x6 @ 15 3/4"
1 - 1x6 @ 34"
1 - 1x3 @ 34" DOORS
4 - 1x2 @ 17 1/2" (both ends beveled at 45 degrees off square, long point to long point)
5 - 1x4 @ 23 3/4"
TIP: Make sure you plan so all the plywood cuts fit on the same sheet of plywood. There's just enough - not alot of extra!


Please read through the entire plan and all comments before beginning this project. It is also advisable to review the Getting Started Section. Take all necessary precautions to build safely and smartly. Work on a clean level surface, free of imperfections or debris. Always use straight boards. Check for square after each step. Always predrill holes before attaching with screws. Use glue with finish nails for a stronger hold. Wipe excess glue off bare wood for stained projects, as dried glue will not take stain. Be safe, have fun, and ask for help if you need it. Good luck!
Instructions
Step 1
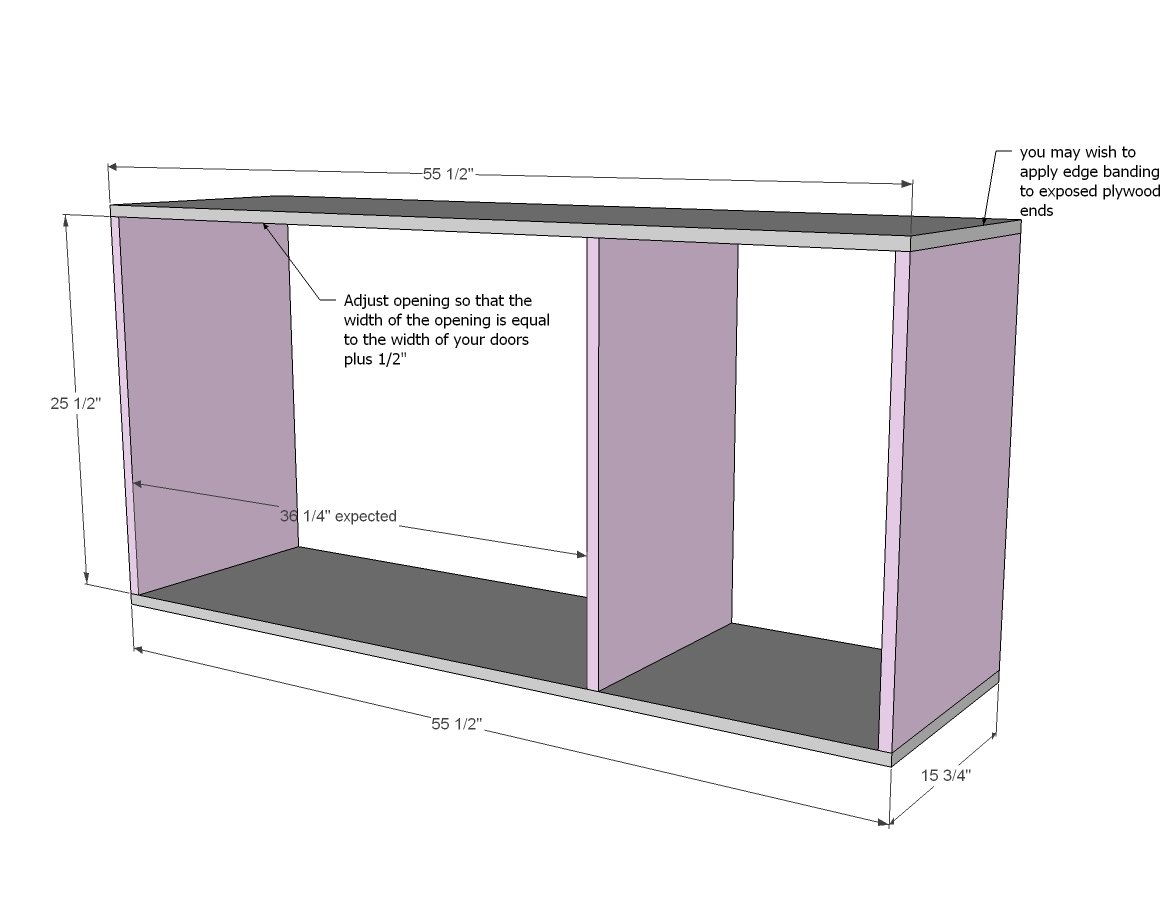
NOTE on getting doors to fit perfectly: So here's the deal - wood isn't always true to widths. Measure your 1x4 boards that you will use for the doors. If they measure 3 1/2' wide, then you can just proceed. If they don't, I recommend modifiying the main opening width to the width of your finished doors + 1/2" for clearance around doors + 1-1/2" for the face framing. You could also build your doors first (see step 6) and then measure the finished door, add 1/2", add another 1 1/2" for the face framing, and this will be the main opening width. Another option is if your 1x4 boards are a little on the narrow side, you could leave gaps between the 1x4s as you build the doors. If the 1x4 boards are too wide (not likely) you could build the door and then trim it down to fit. A final option is to just go ahead and build the box, but hold off on the middle 1x2 in the face frame (next step) until after you build the doors. Then attach the middle 1x2 in the face frame to give you just enough room for your doors. Just giving you options so your doors look beautiful when done with an even gap around them!
So once you get that figured out, it's time to build the box. We use 3/4" pocket holes (3 per end of each of the sides and divider) and 1-1/4" pocket hole screws. Another option is 2" wood screws or nails and glue (nails aren't as strong but since this project is face framed with a full back and isn't for sitting or climbing on, would most likely be enough).
The main shelf can be added at this step too.
Step 2
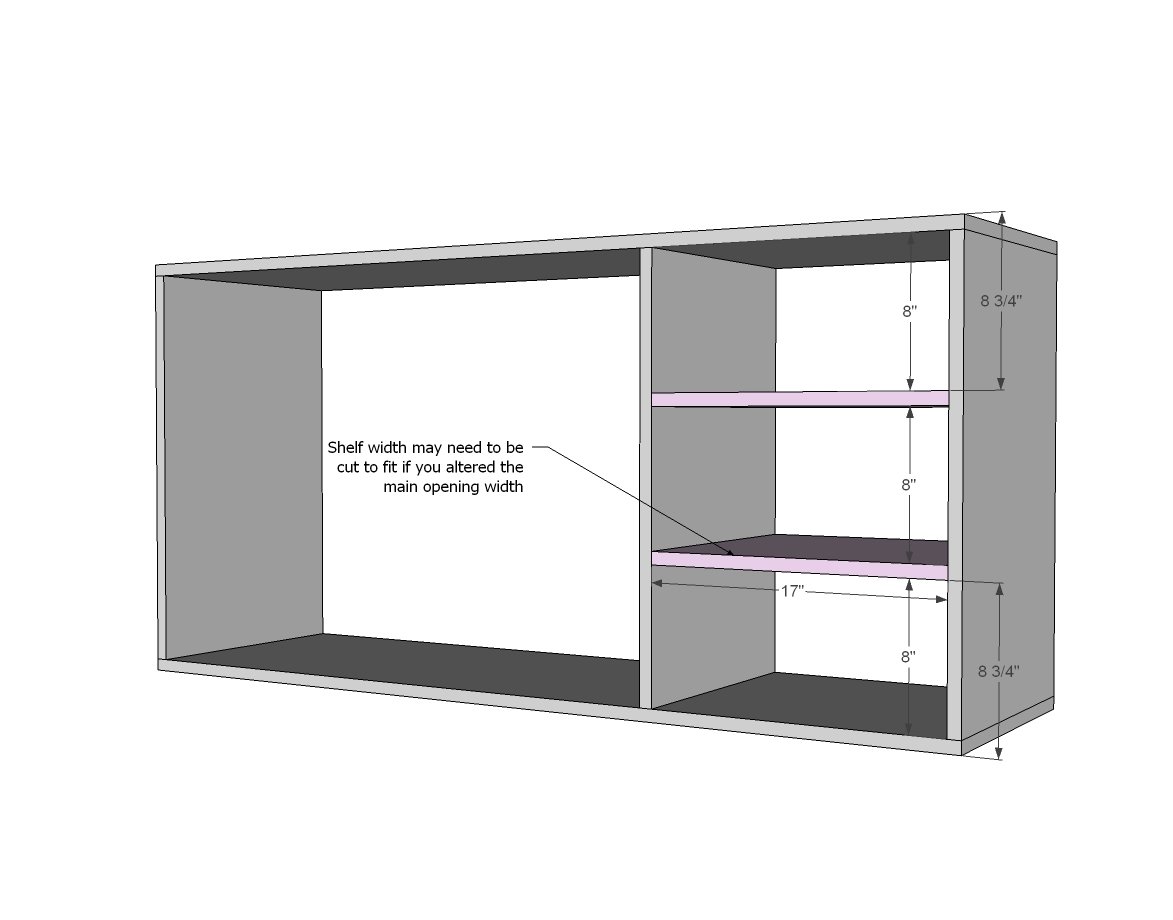
If you altered the width of your main opening, this will affect the width of your smaller shelves. Cut to fit and attach. We attached on the underside with 3/4" pocket holes and 1-1/4" pocket hole screws, but again, countersinking screws or nails would work too. Just don't forget the glue.
Step 3
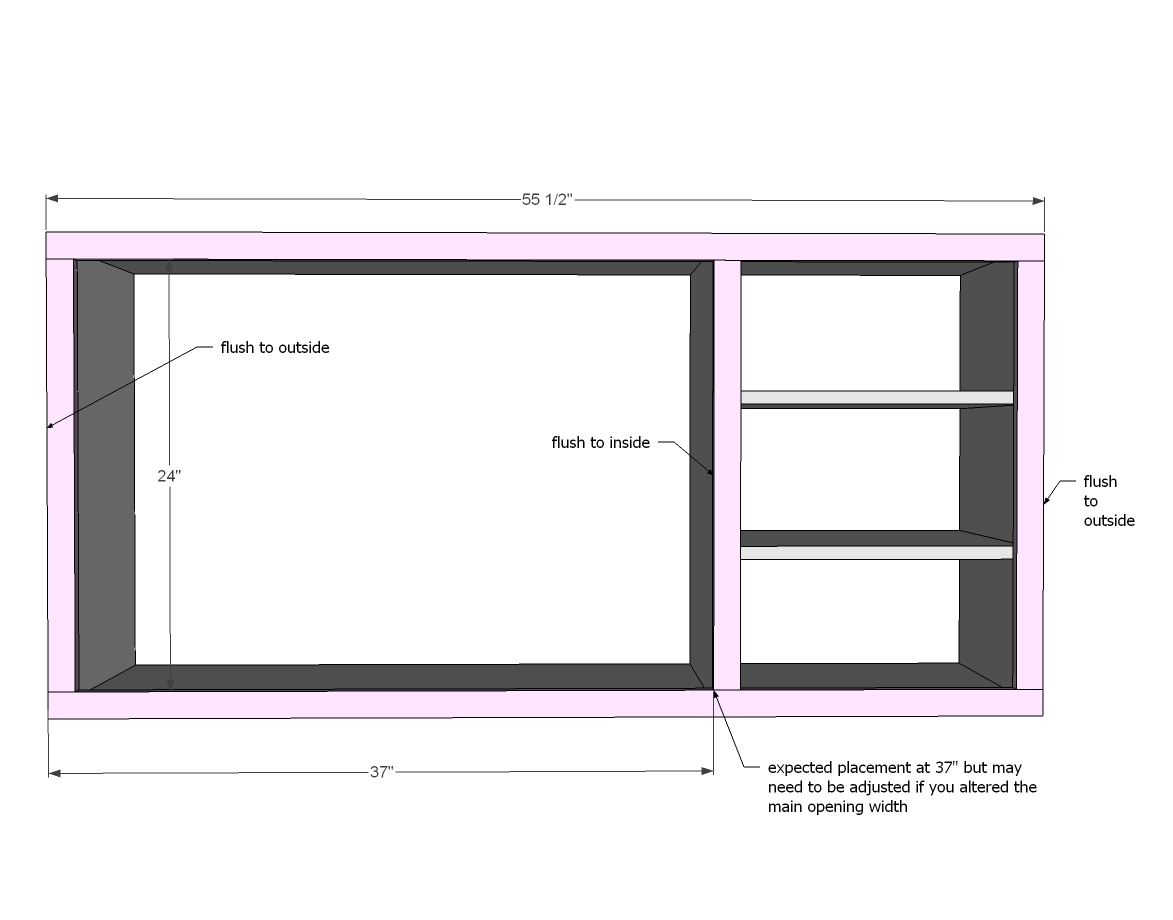
We built our face frame first on the ground with 3/4" pocket holes and 1-1/4" pocket hole screws, then nailed the whole thing to the front of the project.
Step 4
And then we added the back, nailing and gluing it to the project.
Step 5
Step 6
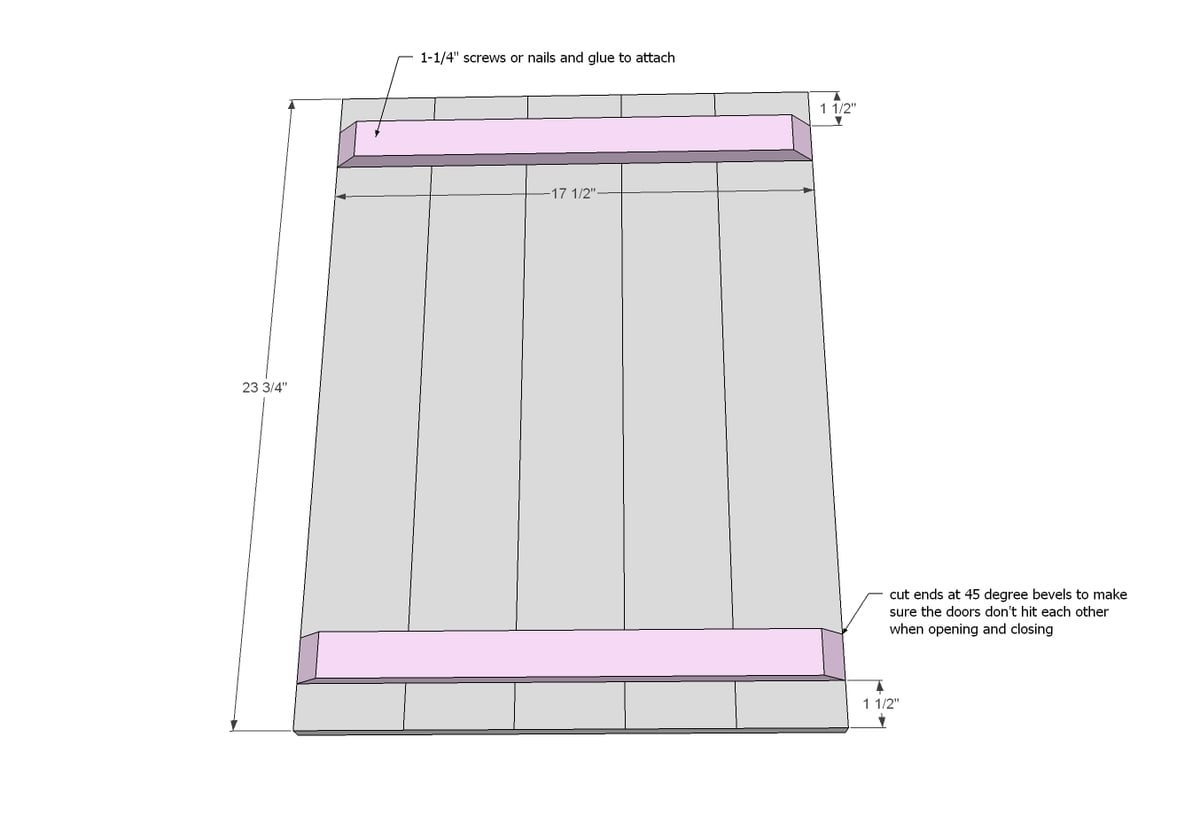
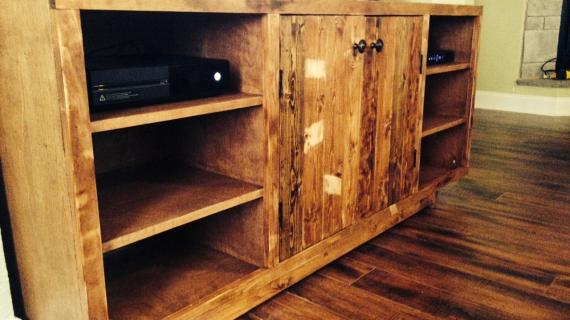
Now for those doors - be careful to build them square, so the ends match up. I glued between each 1x4 and also glued and nailed the back supports on.
Step 7
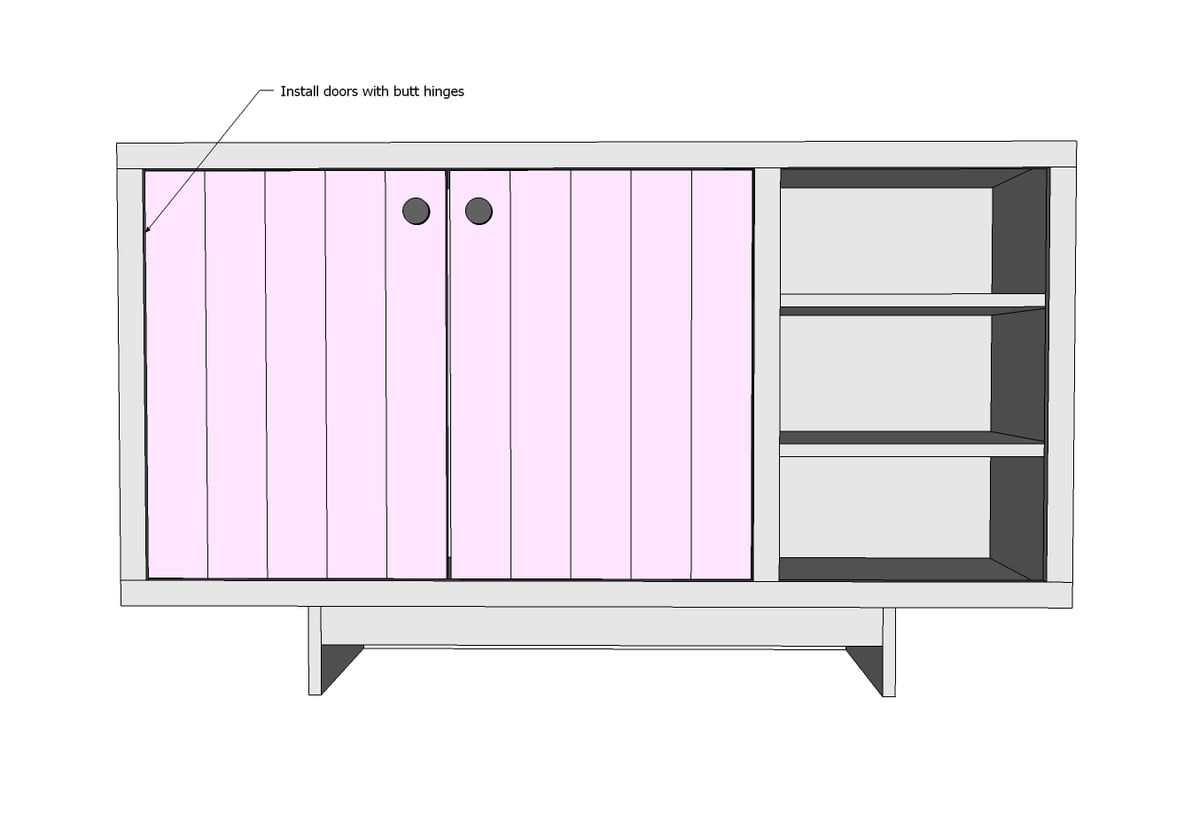
I attached the doors with simple butt hinges, in the crack between the door and face frame. The goal is 1/8" gap around all sides of the door.
To keep the doors shut, add magnetic clasps or hasps.
Step 8
To achieve this stain, the entire cabinet was stained a medium stain. Then for the doors, selective boards were sanded down to remove some of the stain, lightening the boards. Other boards were given another layer of darker stain. And for the lighter areas, I taped off areas and sanded all the stain off to give the appearance of a past board to board joint.
It is always recommended to apply a test coat on a hidden area or scrap piece to ensure color evenness and adhesion. Use primer or wood conditioner as needed.


Comments
jaimecostiglio
Wed, 10/23/2013 - 06:57
Looking good Mommy (and the console too!)
A perfect fit for that new Alaskan baby, love the rustic build and finish. So exciting for you to see your family expanding!
Juanita_r
Fri, 10/25/2013 - 02:55
Cutest bump ever and awesome
Cutest bump ever and awesome console. You continue to amaze us Ana!
dzmom
Wed, 01/22/2014 - 06:39
finish
This is my next project, but I want the exact finish. Can you give me some direction?
eksthompson
Tue, 02/17/2015 - 20:06
Need to modify...help!
First, Ana, you are awesome! Thank you so much for creating this site!
So, this will be my first ever project. I was so excited and proud when I went to Home Depot to get the lumber. I spent lots of time picking out boards that were both straight AND pretty. So, getting ready to see what we still needed to cut tonight, and find that Home Depot cut almost all my boards at least a 1/4 in. off! What I'm wondering is, can I just modify the whole thing by taking 1/2 in. off all the boards? Do I have to do it for both dimensions if so? We only took the half inch off on the one side (so instead of the 1/4 in. plywood being the original 55 1/2 in. X 27in., it is 55 x 27.). I hope this makes sense.
Thank you!
Bander
Fri, 02/20/2015 - 11:51
If it is just the backing
If it is just the backing that is short, you can get away with 1/2 in because you can attach it without fully overlapping the boards at the end and it will still look fine from the front. (No one will know but you). If the rest of your boards are short, you will have to shorten the piece by the same amount in whatever dimension(s) you are short, or get new boards cut.
MN1987
Fri, 02/17/2017 - 06:36
Door area width question
Thanks for these great plans. I am in the middle of making this and have been struggling with the 1-1/2 inch addition to the door-area width that's called for to accommodate the face frame. If the face frame only overhangs on one side (since it's flush inside on the right side), why wouldn't the add-on be just 3/4-inch to accommodate the face frame for both doors? Thanks for your help!
Konzen@94
Wed, 07/29/2020 - 09:56
I'm also stuck on this. The…
I'm also stuck on this. The drawing differs from the written instructions.