Open Wall Cabinet - 36" Wide x 30" Tall

Difficulty
Intermediate
| Print this plan

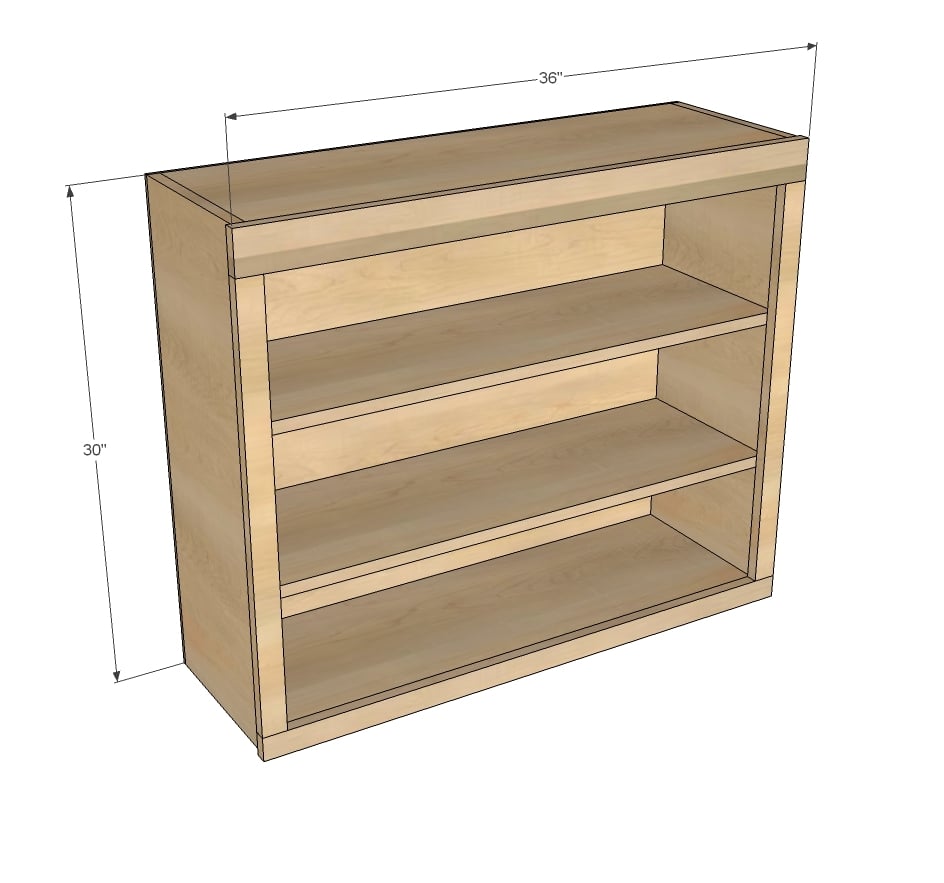
DIY Kitchen wall cabinet plans by ana-white.com

It took great thought, time and careful planning to build this here cabinet.

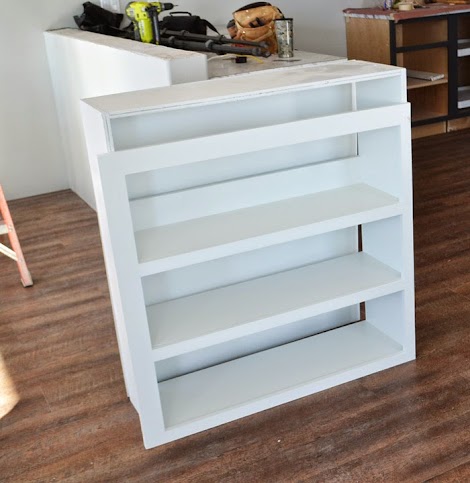
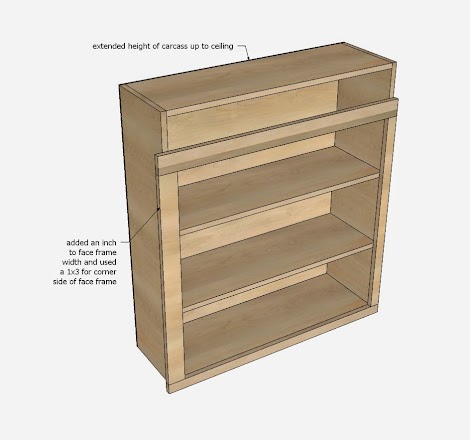
Yes, we sure did spend hours considering exactly how "off" we should build the face frame from the carcass.  Not only is the carcass several inches too tall, the face frame is an extra inch wide.  

Many hours.  Of careful planning.

To get this cabinet built just right.

And we are so proud of it!

Here's why.  In the corner of this kitchen, there is a return air duct smack dab where the top of the kitchen cabinet would go.  

We'd have to move the air duct to fit a cabinet in there that matched the rest of the cabinets.

Or we'd have to build a wonky cabinet around the air duct.

If it's a choice of doing drywall or making sawdust, well, that's a no brainer.

We'll take the sawdust.

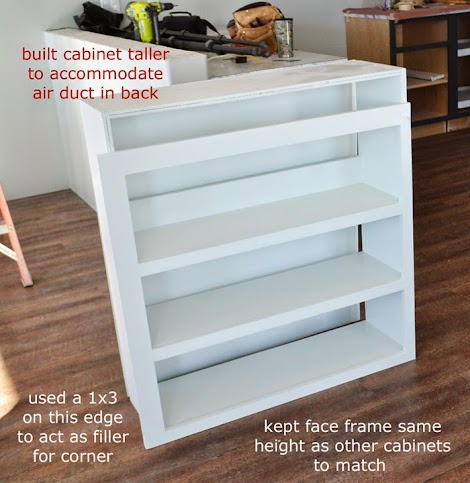
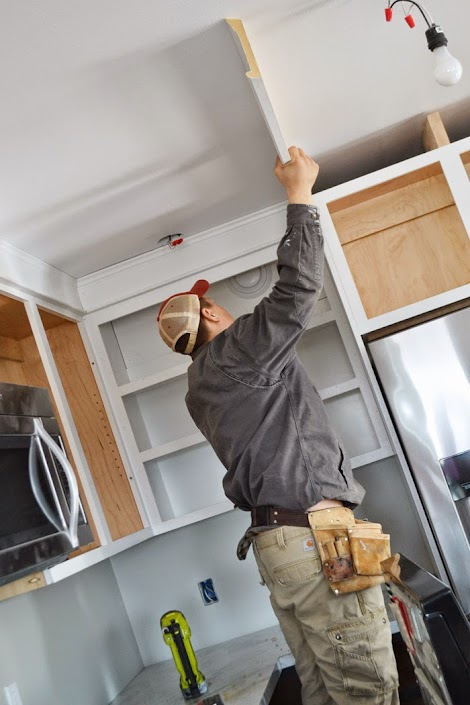
So we decided to make the carcass of the cabinet as tall as the ceiling height to allow the air duct to fit inside the cabinet, BUT keep the face frame the same height as the neighboring cabinets for consistency.  Since this cabinet is in a corner, we also used a 1x3 at the left edge to tie into the neighboring cabinet at 90 degrees.

We cut a hole out in the back of the cabinet for the air duct, and hung the cabinet.

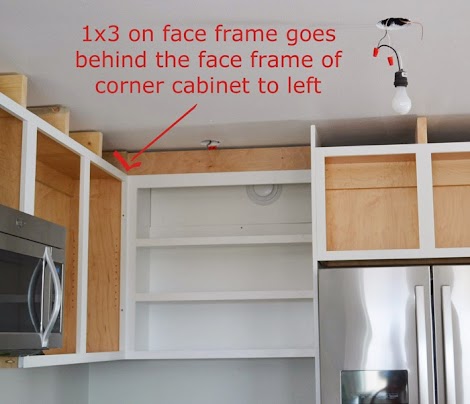
Then we blocked on top of the cabinet with 3/4" material (in the open space above the face frame)

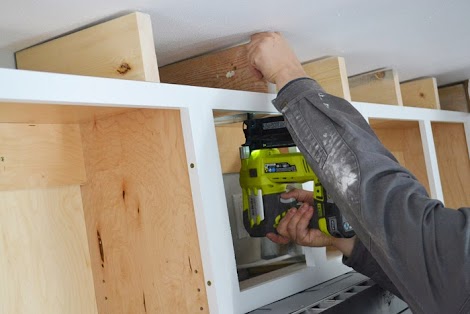
And also added blocking for all the other cabinets to support our crown moulding (it's not actually crown, it's the same stuff we used for our window and door headers, flat on the back side).

Then we just cut the crown and fit it,
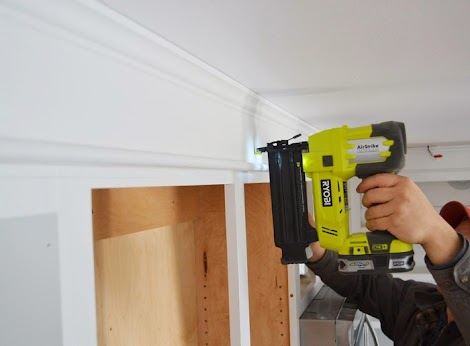
Nailed it up,

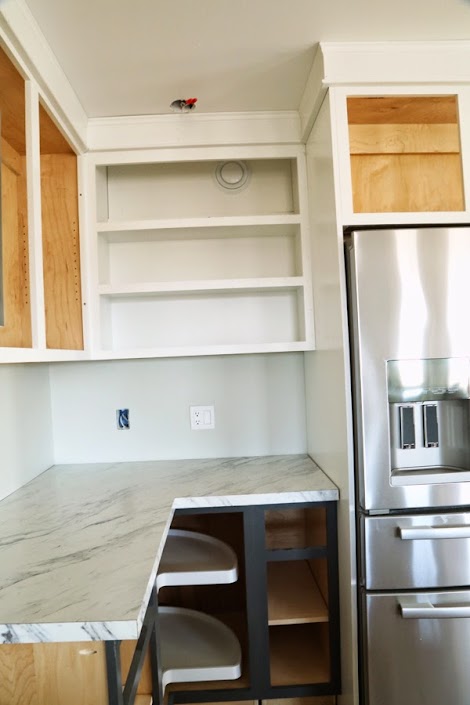
And you'd never know that this cabinet actually at one point looked like we'd forgotten how to read a tape measure.

I'm sharing with you the plans for an open 36" wall cabinet below, but just in case you find yourself in a corner with a duct in the way, here's the mods we made:

Enjoy the plans following!

XO 

Ana + Family

Dimensions
Dimensions shown above

Preparation

Shopping List

3/4" plywood (18 linear feet) ripped into depth of cabinet (we did 10-1/4" but you can choose any width just make sure the width is consistent from cabinet to cabinet)
1/2 sheet of 1/4" plywood
scrap plywood piece for top support/hanging cabinet
3 feet of 1x3s
8 feet of 1x2s
1-1/4" nails for attaching face frame (unless you use pocket holes) or fixed shelves
3/4" nails for attaching back
Glue
1-1/4" pocket holes for building and attaching frame
shelf pins if you use adjustable shelves
edge banding for front edges of shelves

Cut List

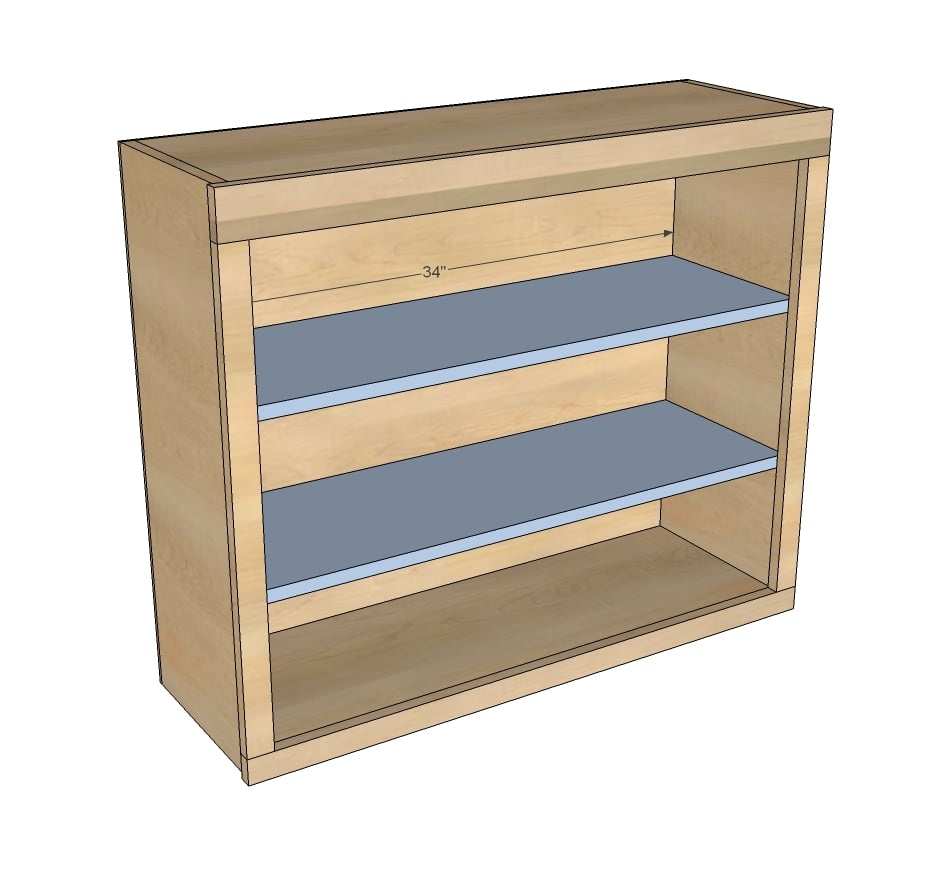
2 - 3/4" plywood @ 10-1/4" (or your rip width) x 30" (sides)
2 - 3/4" plywood @ 10-1/4" (or your rip width) x 34" (top and bottom)
1 - 3/4" plywood or 1x4 @ 34" (can be different width, this piece is just used for hanging on wall)
1 - 1/4" plywood 30" x 35-1/2" (back)

FACE FRAME
1 - 1x3 @ 36"
1- 1x2 @ 36"
2 - 1x2 @ 26"

SHELVES
Fixed with front edgebanding - cut 36" long and trim front edge back 1/8" for edge banding
Adjustable with front edgebanding - cut 35-3/4" long and trim front edge back 1/8" for edge banding

Tools
Tape Measure
Speed Square
Pencil
Safety Glasses
Hearing Protection
Kreg Jig
Drill
Miter Saw
Table Saw
Brad Nailer
General Instructions

Please read through the entire plan and all comments before beginning this project. It is also advisable to review the Getting Started Section. Take all necessary precautions to build safely and smartly. Work on a clean level surface, free of imperfections or debris. Always use straight boards. Check for square after each step. Always predrill holes before attaching with screws. Use glue with finish nails for a stronger hold. Wipe excess glue off bare wood for stained projects, as dried glue will not take stain. Be safe, have fun, and ask for help if you need it. Good luck!

Instructions

Step 1

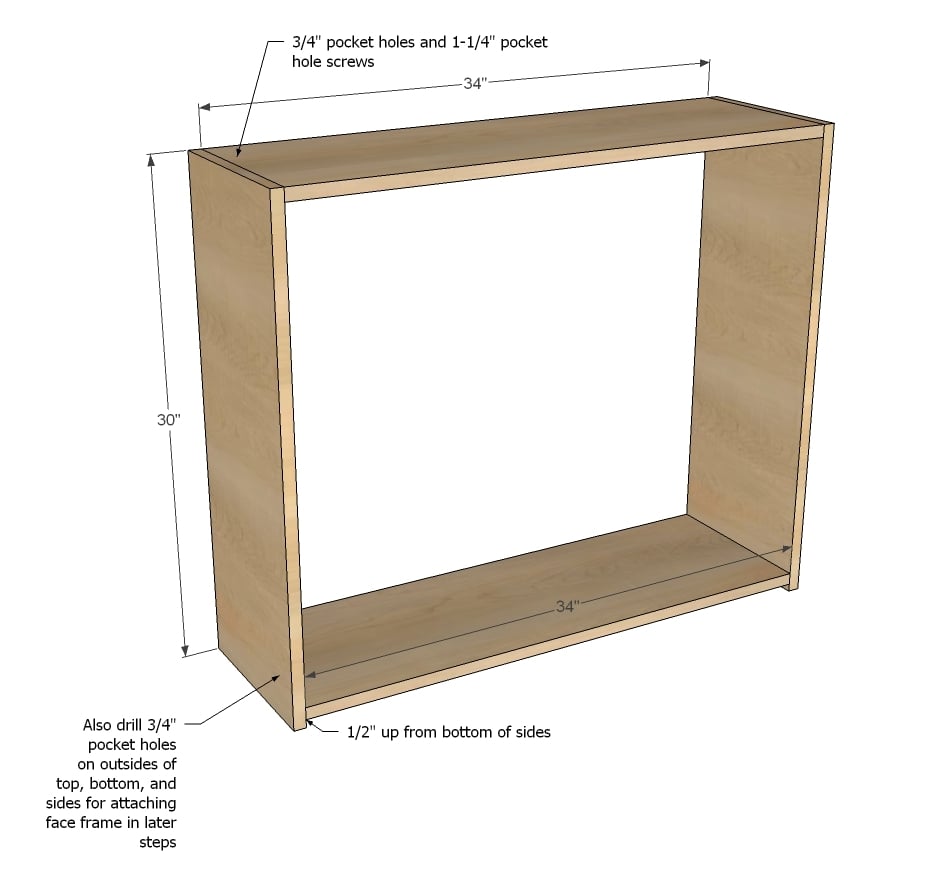
Build your carcass by attaching top and bottom to sides. Remember to keep all pocket holes on outsides - the neighboring cabinets or end panels will finish out outsides when you install your kitchen.

TIP: Drill 3/4" pocket holes facing forward along all top, bottom and side edges for attaching face frame in later steps.

Step 2

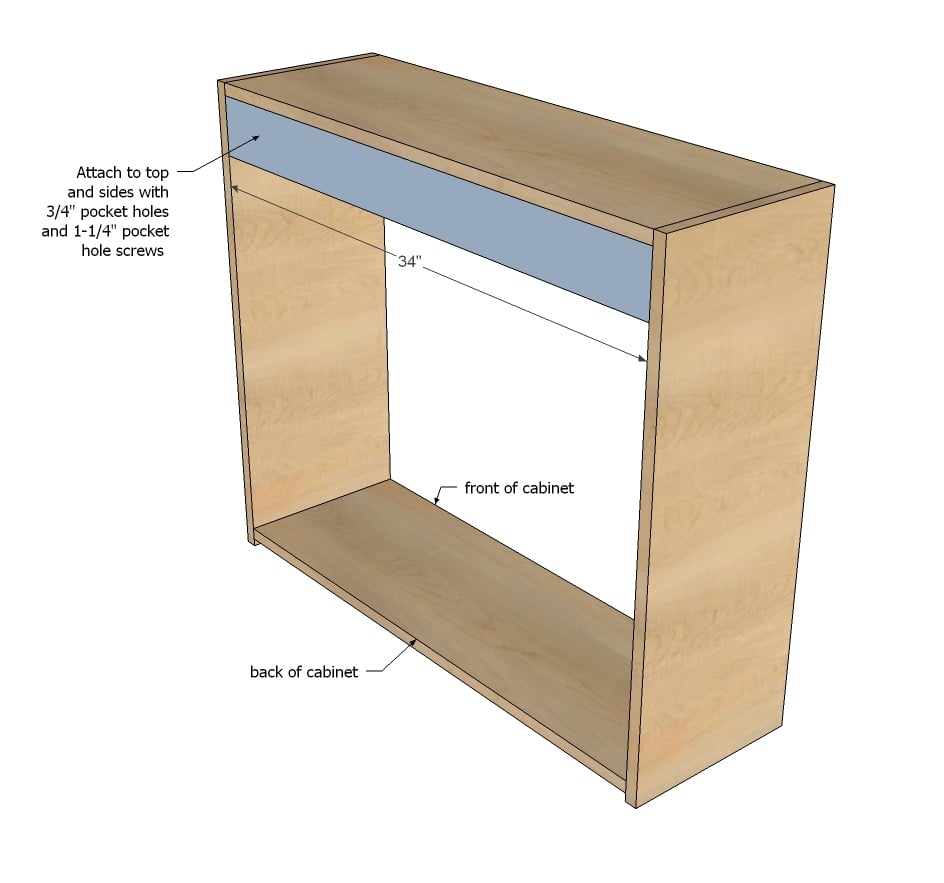
You'll need something for hanging the cabinet on the wall. We use scraps from the carcass plywood (but you could use a 1x4 here too) attached from the back with pocket holes.

Step 3

Attach back with nails and glue. We use 3/4" nails.

Step 4

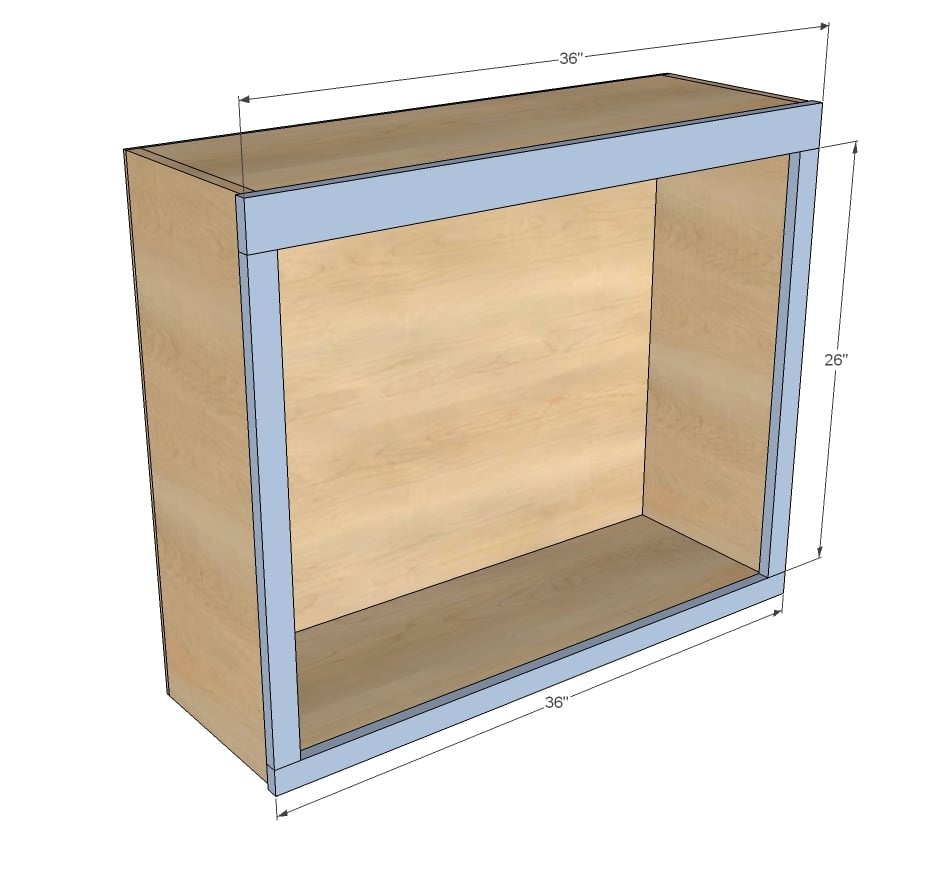
Build the face frame first with 3/4" pocket holes and 1-1/4" pocket hole screws, then attach through the pocket holes you drilled in step 1 with 1-1/4" pocket hole screws. The face frame will overhang the sides by 1/4", but is flush to top and bottom of sides.

Step 5

Step 6

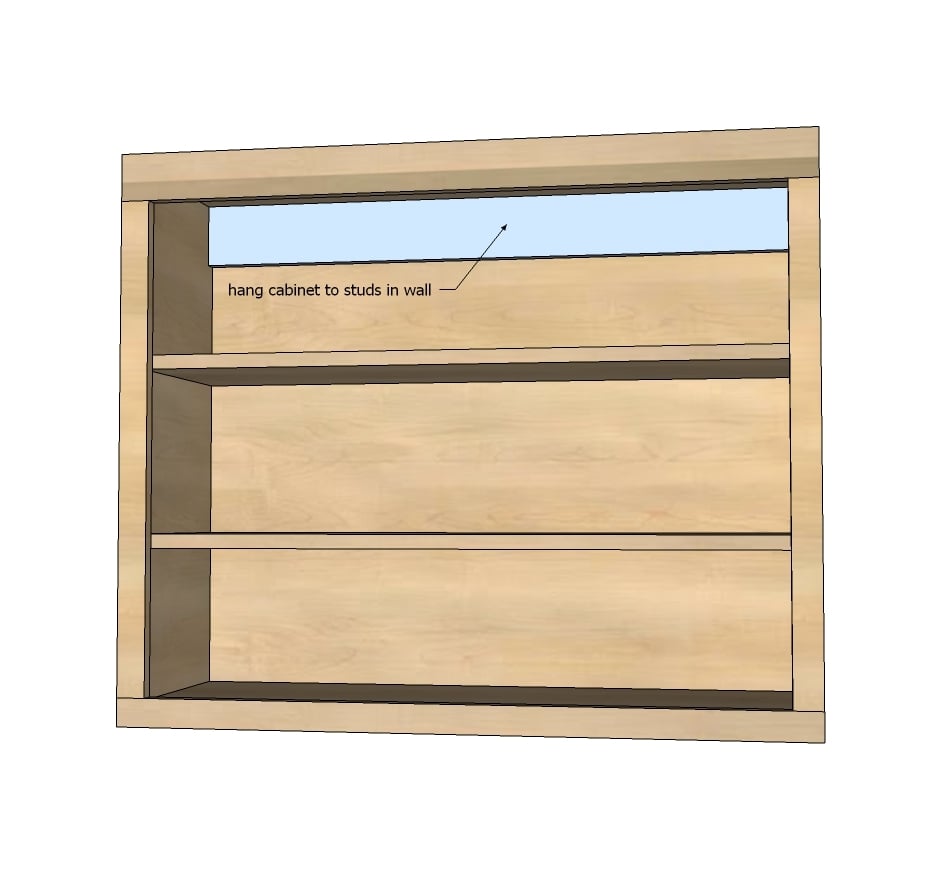
Hang cabinet through top back support to studs in walls.

Finishing Instructions
Preparation Instructions
Fill all holes with wood filler and let dry. Apply additional coats of wood filler as needed. When wood filler is completely dry, sand the project in the direction of the wood grain with 120 grit sandpaper. Vacuum sanded project to remove sanding residue. Remove all sanding residue on work surfaces as well. Wipe project clean with damp cloth.

It is always recommended to apply a test coat on a hidden area or scrap piece to ensure color evenness and adhesion. Use primer or wood conditioner as needed.

Frequently Asked Questions

Wood Questions

What kind of wood should I use?
Most of our plans use standard construction lumber like pine or fir. It's affordable, easy to work with, and easy to find. It's also rapidly renewing and biodegradable, so a great eco friendly choice!

Can I use hardwoods instead?
Yes—just keep in mind they're heavier, cost more, and can be tougher on tools and harder to join together and finish. I recommend not tackling a hardwood project until after you have built several softwood projects.

What if my boards are warped?
Choose the straightest boards at the store. You can often work around slight warps by cutting them into shorter pieces.

What wood should I use for outdoor furniture?
Use red-toned or pressure-treated 2x lumber for framing, and cedar or cedar fence pickets for the decking. Outdoor furniture should be built like a deck—your local home center can help recommend the right wood for your climate.

Will my wood move or warp after I build?
Potentially, especially in humid climates. Let your wood acclimate indoors before building. Once acclimated and kept in a stable environment, movement should be minimal. Remember, most houses are built using framing lumber - it's all about keeping moisture down indoors.

Cutting Questions

Do I need a miter saw?
A miter saw is great, creating fast, safe, and precise cuts, even for beginners. But most plans can be built with a circular saw and a straight edge. If using a circular saw to cut, take time to practice, and get good at making cuts, before cutting your project boards.

How do I get clean cuts with a circular saw?
Clamp your board, measure twice, cut slow, and use a sharp blade. This takes practice, so spend some time making cuts. I go through becoming proficient at freehand cutting in my course, it is worth taking if you want to master this skill.

Will the store cut my wood?
Yes—most stores will do rough cuts to help you transport your materials home. But from store to store, the quality of cuts could greatly vary.

Joinery Questions

What screws should I use?
We recommend star-head self tapping screws for framing, most common sizes are 2-1/2", 1-3/4". Pre-drill if close to the edge or you find your wood is splitting.

Do I have to use pocket holes?
Pocket holes are the cheapest, easiest and fastest way to do some joints - like edge to edge or a hidden fastener joint. There are other methods, but these can be time consuming and expensive. We recommend using pocket holes as indicated in plans for best results.

How do I keep things square?
Use a speed square and measure diagonals after each step. Always clamp joints before screwing to keep them tight and flush.

Finishing Questions

Stain or paint before or after building?
A quick sand before and a full finish after gives the best results. Pre-finish if you're doing two-tone or detailed finishes.

What type of finish?
Use oil-based or water-based stain. For paint, cabinet-grade latex or enamel works great. High use surfaces on indoor projects should get a coat of polyurethane, I recommend a Helsman or Spar or other flexible poly that won't crack or peel with wood movement. For exterior projects, use a finish suitable for exterior fences.

How to get a smooth finish?
Start with a well sanded project. Sand between coats (220 grit), wipe clean, and apply light coats with a foam brush or roller.

Plan Questions

Can I change the size?
Many people do, and that's the great thing about building your own furniture! But do keep in mind going bigger might mean more supports are required, and often plans are optimized for minimal material waste.

Are these beginner-friendly?
Yes—plans are written with simple tools and clear steps in mind, with every effort to make plans as simple as possible.

Can I sell what I build?
Absolutely! Just don’t resell or repost the plans themselves.

General Questions

What tools do I really need?
A drill, circular saw, tape measure, square, and a few clamps will get you through most projects.

Do I need a workshop?
Nope! A driveway or small patio is plenty to get started, just make sure you have a level place to work. If you find you are building several projects a year, creating a small workbench is a great way to store tools and have a dedicated workspace.

What if I mess up?
Wood filler, sanding, or flipping boards goes a long way. Mistakes are part of the process!

What can I do to make my projects look more professional?
Start with straight boards, make accurate cuts, clamp all joints, and line up everything neatly. Sand thoroughly, use a neutral finish, and apply it in light coats for a clean look.

I've never built anything before. Where should I start?
Start with a few smaller softwood projects to get hands-on experience. Or if you're tackling a big project, buy a little extra lumber and practice your cuts and joints first. If possible, work with someone who has a bit of experience.

Care & Maintenance

How long will my furniture last?
With good joinery and regular care, your DIY furniture can last for decades. I have pieces in my own home that are over 20 years old and still going strong! One of the best parts about DIY furniture is that it’s easy to repaint, refinish, or repair—so your projects can grow and adapt with you.

How should I care for outdoor furniture?
Lightly pressure wash or hose it down once or twice a year. Tighten screws and reapply finish as needed to protect it—just like a deck or fence. A little upkeep goes a long way in extending the life of your furniture.

How about indoor furniture?
Regularly dust or wipe with a damp cloth. If it starts to look worn, a light sanding and touch-up paint or stain can refresh it in no time. DIY pieces are meant to be durable and fixable—so don’t be afraid to give them some love now and then.

Want to Build with Confidence?

Check out my ebook: 12 Skills to Build Your Own Furniture
It walks you through the core skills every builder needs—measuring, cutting, joinery, and finishing—so you can build beautiful furniture that lasts.

Still Have Questions?

Email us anytime at [email protected] and we’ll be happy to help!