


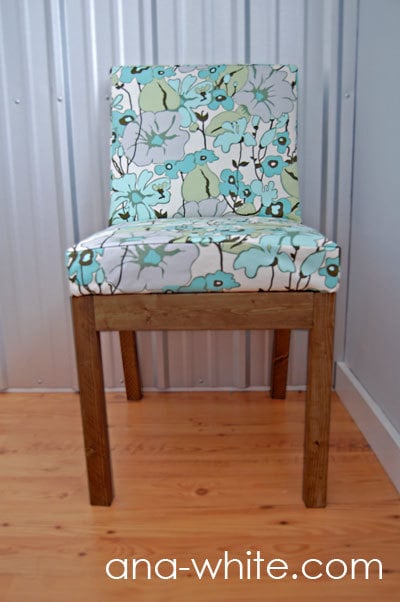
These Parson Chair plans do not require any special cutting and all sewing is straight lines. Very sturdy and lightweight, but the chair is overall a compact chair.
Thank you so much to everyone for their thoughts and prayers. My mom had a rare instance where her white blood cells attacked her platelets instead of a cold virus. The condition is fully treatable, and she is doing well. Thank you so much for thinking of our family these last few days.
Just before this incident happened, actually on my day off, I built a chair. And now I finally get to blog it.

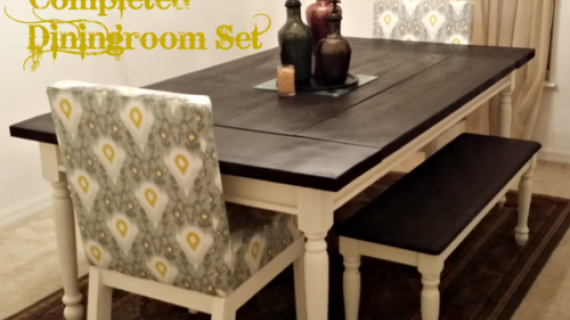
Finally, not just a Parson Chair, but one that I believe anyone can build.

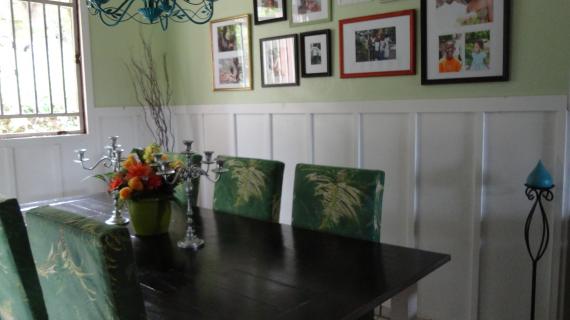
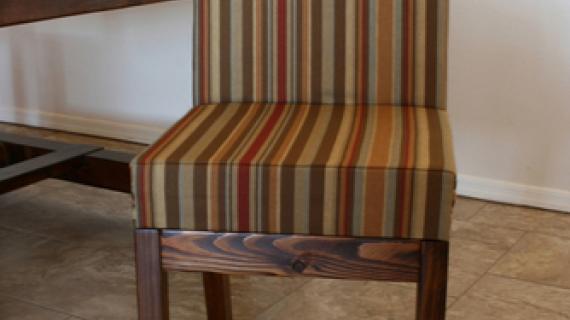
I choose Amy Butler August Fields for the fabric.

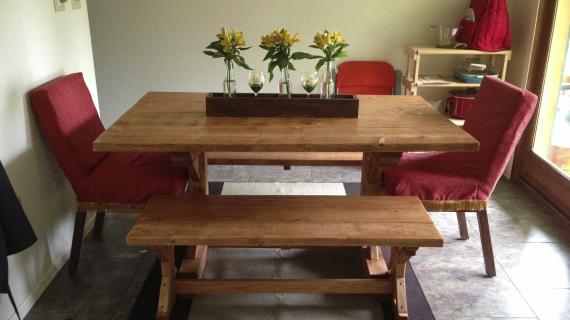
And stained the bases Dark Walnut. Of course you could extend the slipcover to the floor if you would like.

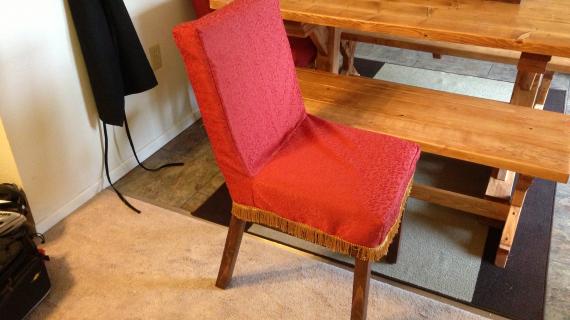
And my mother-in-law sewed the slipcover from my pattern. She's better at the sewing machine, and we wanted to test just how replicate-able my pattern was. What do you think? Her seams are perfect, but the pattern fits this chair like an expensive sheath.

And the best part about the pattern? Simply tuck under, staple, and attach the wood base. All bottoms seams are completely hidden.

I did promise you this chair is easy to build. Here is just how easy.
Preparation
2 – 2x2s, 8′ long
1 – 2×3, stud length of 8′ long
1 – 1×3
1 – 1×2
Scrap pieces of 1/4″ plywood or No Sag Springs (also called Zig-Zag or Sineous Springs) or Jute Webbing
1 – 15 1/2″ x 17 1/2″ x 2″ standard chair foam cushion (like this one)
1 yard 1/2″ thick foam batting
1 yard burlap
1 yard decorator weight fabric
5/8″ staples
1 1/4″ and 2 1/2″ pocket hole screws OR 2″ and 3″ screws
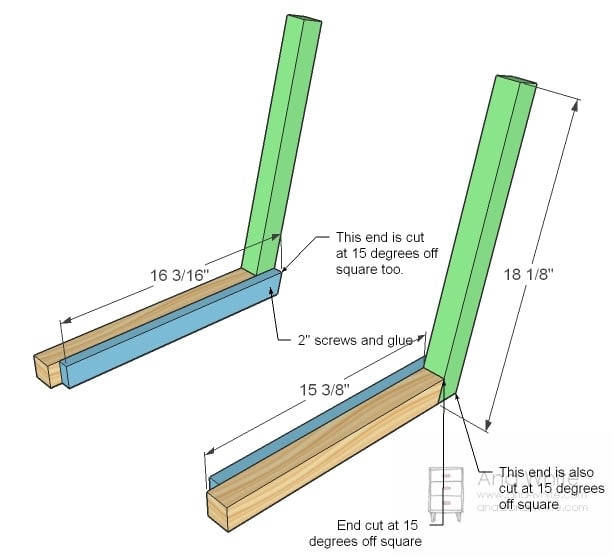
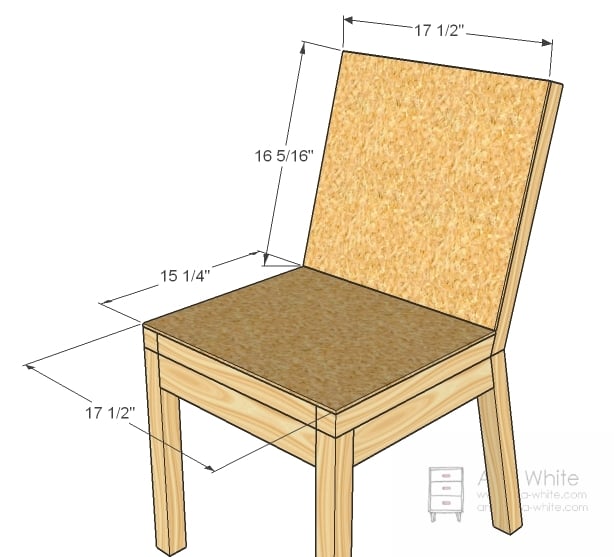
2 – 2×2 @ 18 1/8″ (one end cut at 15 degrees, measurement to long point)
2 – 2×2 @ 15 3/8″ (one end cut at 15 degrees, measurement to long point)
1 – 1×2 @ 16 3/16″ (one end cut at 15 degrees, measurement to long point)
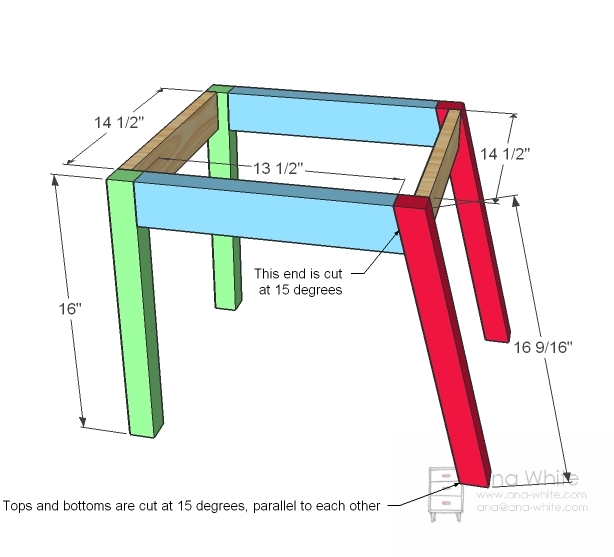
1 – 1×2 @ 14 1/2″ (Front Apron)
1 – 2×2 @ 14 1/2″ (Back Support)
1 – 2×2 @ 13″ (Back Base Support)
2 – 2×2 @ 16″ (Front Legs)
2 – 1×3 @ 14 1/2″ (Front and Back Aprons)
2 – 2×3 @ 13 1/2″ (one end cut at 15 degrees off square, measurement to short point)
2 – 2×2 @ 16 9/16″ (Both ends cut at 15 degrees, parallel to each other)


Instructions
Step 1
Chair Backs
I’m so proud of this chair design because it does not require you to cut chair back legs. But it is very very strong – passed the Ram test. Just make sure you use glue and 2″ screws to screw the 1×2 to the insides of the 2x2s as shown above. I also joined the 2x2s with pocket hole screws and a screw from the back. It is very important to create a strong joint here.
Step 2

Front and Top
Now just screw these on. I used pocket hole screws, but it would be easy to use 2″ screws on the front apron, and 3″ screws on the top. These are not structural joints and will be reinforced.
Step 3
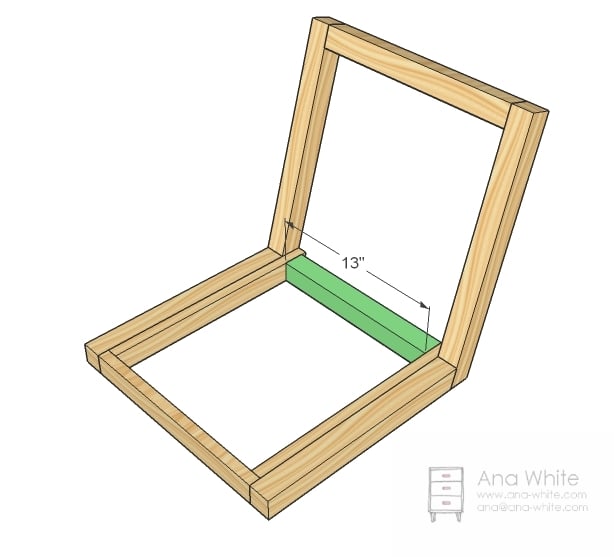
Back Base
This one is used to secure the back. I used pocket holes, but you can use 3″ screws and glue as well.
Step 4
Base
Simply build the base as shown above. If you don’t have 2x3s, you can double up 1x3s. One trick if you are using pocket holes from the insides is to drill the holes as if you were using 3/4″ stock and use 1 1/4″ pocket hole screws. Then your front legs won’t split out. Another means of strengthening up you base is to add corner bracing by cutting 2x2s with both ends at 45 degrees (perpendicular to each other) and attaching in place. Don’t forget your glue.
Step 5
Step 6
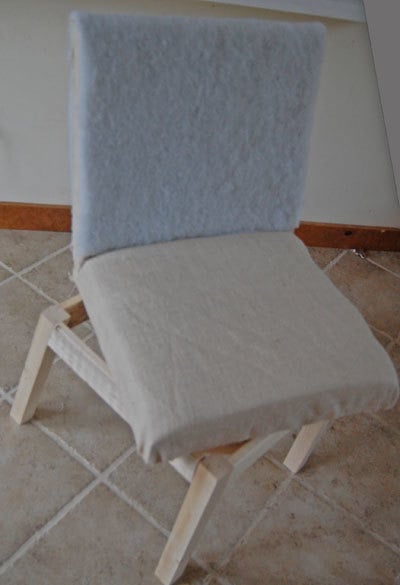
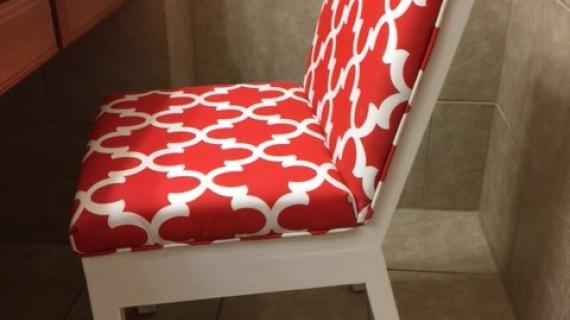
Burlap and Foam
I covered my entire base frame with burlap, stapled to the underside. Trim burlap. Then over the burlap, is spray glued the foam pieces to the seat, and then wrapped the foam over the back. Notice how the sides of the back do not have foam. Trim the foam for a nice clean chair to sew your slipcover off of.
Step 7
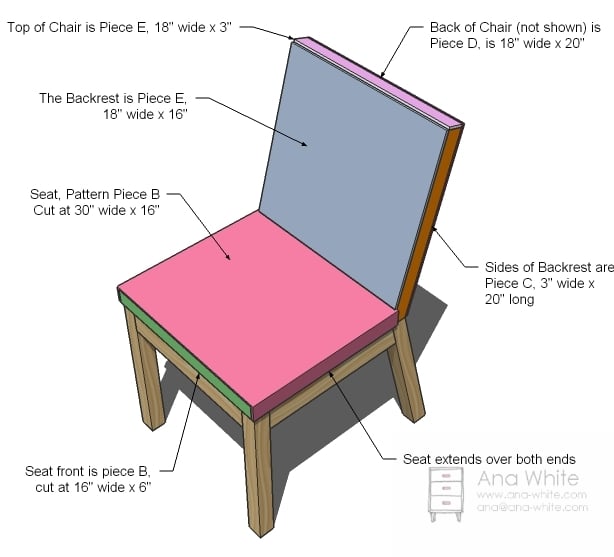
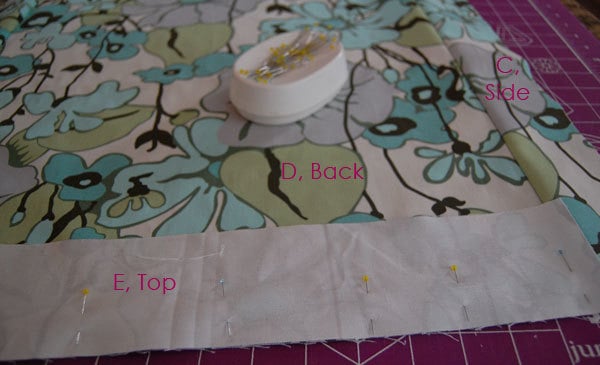
Sewing Pattern
Cut out all your pieces as shown above. If your fabric has a direction, take note of this and carefully cut out each piece so the direction of the fabric matches the chair. This pattern is for 1/4″ seams.
Step 8
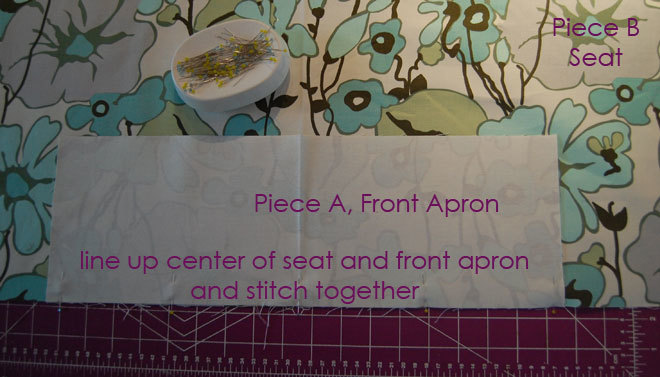
Seat
Fold both pieces A and B in half the long way and press a seam down the centers. Pin A to B, right sides together, making note of the direction of the fabric, with the pressed lines matching up.
Step 9
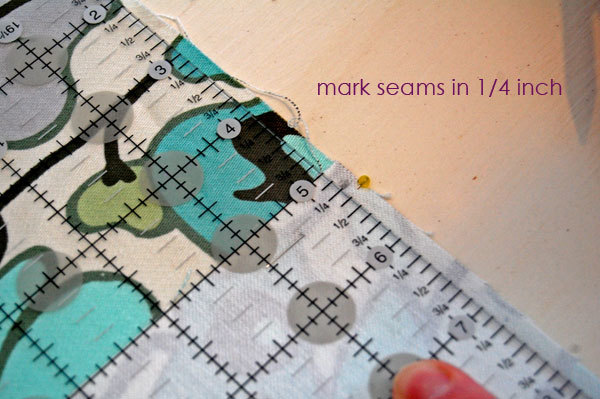
Mark Piece A
Mark the front apron as shown above 1/4″ from the ends on the pinned edge. When you sew, start at the pressed line in the center, sew outward to the mark, 1/4″ from the end.
Step 10
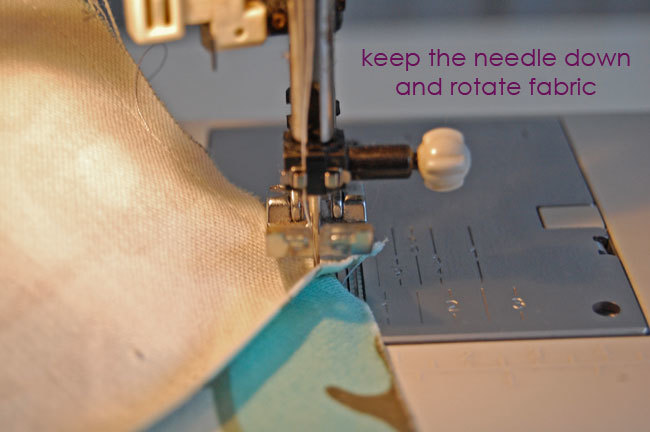
Turn Corners
When you get the the mark, leave your needle in the fabric, but lift the foot. Turn piece A (the smaller front apron) 90 degrees so it matches the edge of the seat piece B. Stitch. If the ends do not meet up exactly, do not worry. All edges on the bottom can be easily hemmed.
Go back to the center seam and stitch the other side in the same manner.
Step 11

Admire your Corners
See how pretty the corners are in this method?
Step 12
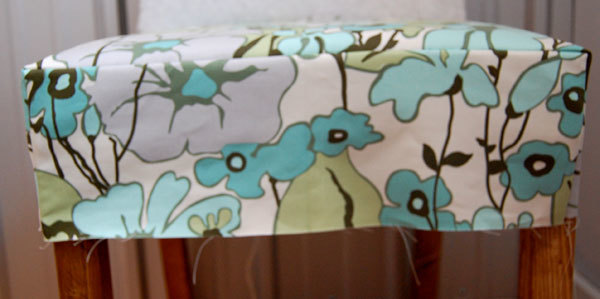
Seat is done!
Make sure the seat fits on the chair. This is your chance to let out or tighten any seams.
Step 13
Back
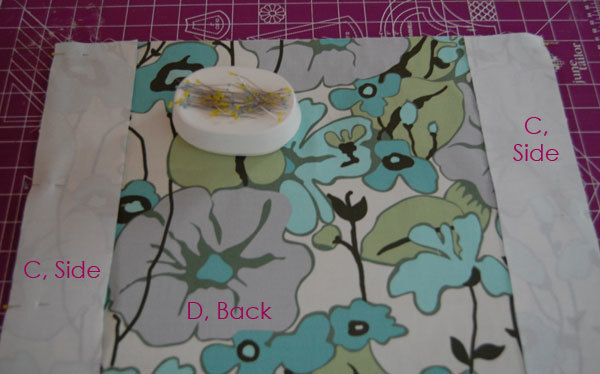
Pin pieces C to piece D as shown above. Remember take not of the direction of your fabric. Stitch along pinned edges.
Step 14
Top
The top will go on just like the front apron. You will need to turn corners. Begin by pinning the top to the Back (piece D) centered with the back. Stitch the back to the top, stopping 1/4″ front the ends (on the side seam). Rotate fabric so that the top can be stitched to the sides. Stitch.
Step 15

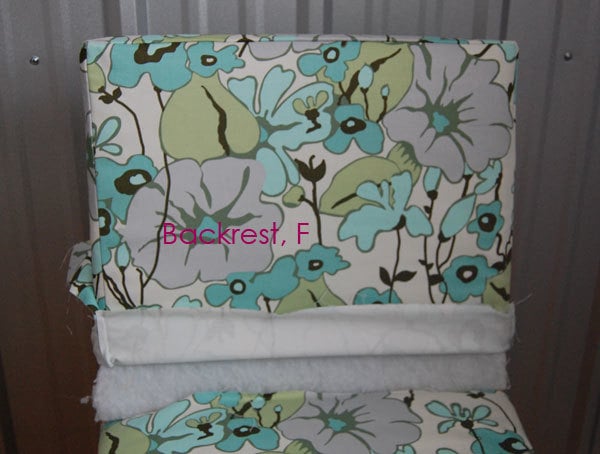
Fit Back
Place the slipcover on the back and test fitting. Then pin the seat back (Piece F) to the sides and top. Start at the top and stitch downward, matching the center of the backrest with the center of the top. Turn corners to stitch sides to backrest. Fit again, letting out or taking in seams so back fits snug but not tight. See photo below.
Step 16
Take note of the seam you need to make in the next step – the seat to the back.
Step 17
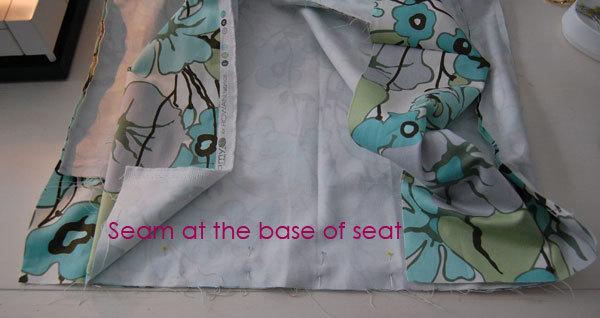
Stitch Back to Seat
Pin the seat back part to the seat base part. Stitch along base seam, but not sides. Fit on seat top.
Step 18
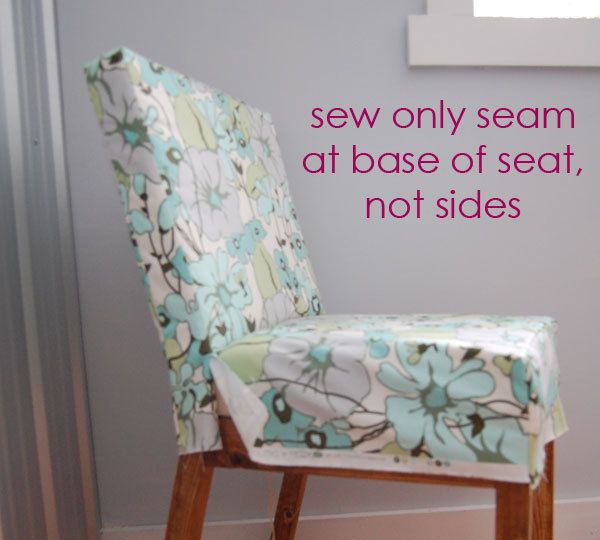
Note that the seam to the sides is open.
Step 19
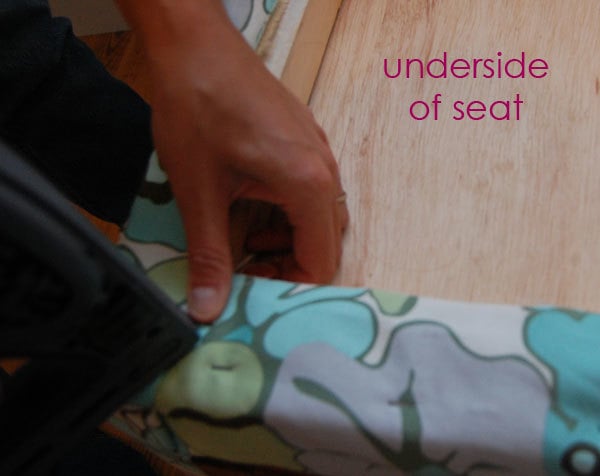
Step 16: Staple Slipcover to Base
Fit slipcover on, noting that the seams to the sides are open. Staple to base.
Step 20
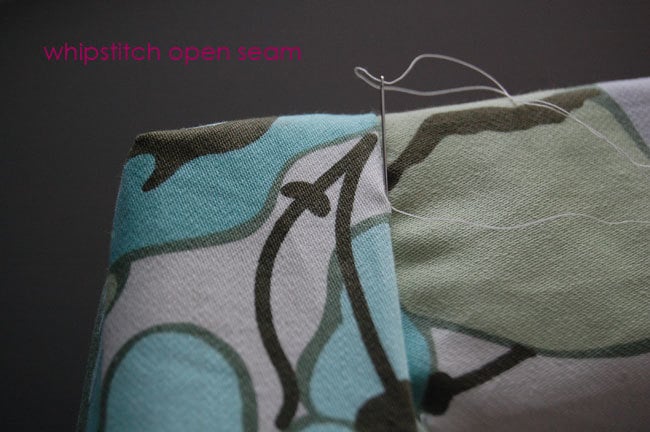
Whipstitch open side seam
Finish slipcover by hand stitching side seams closed.
Step 21
Bases
Stain or paint bases and attach to seat.
I promise, it really is that easy!


Comments
Tanjia (not verified)
Mon, 11/01/2010 - 09:07
You know that feeling you get
You know that feeling you get when you're falling in love? That fluttery feeling in your stomach? I totally got that feeling when I was reading these plans. Seriously. I love it!!!!!!!!!! I'm so excited that I could actually build these chairs. whoooooohooooooooooo!!
Anna (not verified)
Mon, 11/01/2010 - 09:07
Oh Ana! First, I am so glad
Oh Ana! First, I am so glad that your mom is recovering. And secondly, oh man I love this chair!!! I've been scouring thrift stores with no luck for two chairs small enough for my living room. These will be perfect. I cannot wait to make a pair! Thanks again, and continued good healing vibes coming your mom's way. :)
Alexis (not verified)
Mon, 11/01/2010 - 09:08
Your skills are crazy. And so
Your skills are crazy. And so happy your mom is doing better.
Donna (not verified)
Mon, 11/01/2010 - 09:24
A chair!!!!! Thanks for the
A chair!!!!! Thanks for the plans...you're great!
Laura (not verified)
Mon, 11/01/2010 - 09:39
Ana, I've been waiting to see
Ana, I've been waiting to see a chair that truly inspired and excited me on here!! (Not to say that any of the past ones didn't, but this one beats them all in my mind!) Can't wait to pick out a funky fabric and make them for my dining room!! I'm much more comfortable with a sewing machine than power tools (although I'm learning), so this looks like loads of fun!
Thanks!
Laura
Maggie (not verified)
Mon, 11/01/2010 - 09:41
Lovely! I really like the
Lovely!
I really like the choice in fabric, but I bet it would look great in just about any color or pattern. Nicely done!
nillabeans6 (not verified)
Mon, 11/01/2010 - 09:46
OMG! I love it! That fabric
OMG! I love it! That fabric is really pretty, too! And I am truly glad your mom is doing better.
Felicity (not verified)
Mon, 11/01/2010 - 09:49
Beautiful chair and cover. I
Beautiful chair and cover. I may have to splurge on a new sewing machine soon - three oldies that try my patience is just getting old.
Glad to hear you mom is doing better.
Tracie (not verified)
Mon, 11/01/2010 - 09:50
So glad your
So glad your back!!!!

Kate (not verified)
Mon, 11/01/2010 - 10:05
I'm so glad to hear your mom
I'm so glad to hear your mom is doing better, I've been thinking about her this weekend and hoping things were going well!
I can't wait to make this chair! Right now I don't have a place in my apartment that needs this chair, but it will be perfect once we (finally) find our house.
angie (not verified)
Mon, 11/01/2010 - 10:42
Wow this looks pretty doable.
Wow this looks pretty doable. I was always amazed how a parsons chair is close to $70 each. If you could make them instead the savings versus buying can justify buying the tools I would need to make it! I totally need to live somewhere with a garage. I'm always drooling over your builds.
Love that fabric and stain combo by the way.
Nan Tovar (not verified)
Mon, 11/01/2010 - 10:48
Awesome job, Ana! And to
Awesome job, Ana! And to echo everyone else, continued healing vibes coming your whole family's way, as it can be exhausting worrying over your loved ones. Oh, if I only had enough room to make a set of four chairs! Don't suppose you could give us bigger *house* plans? Just kidding! Love your site and back when it was a blog :)
Letter Lady (not verified)
Mon, 11/01/2010 - 11:12
Thanks again Ana for a great
Thanks again Ana for a great idea and another line item on my to-do list. One question - do you think it would be a problem to forgo the 15 degree angle on the back support? I want more of an upright look, not so much inclined. I understand to keep the angle on the legs for stability and support but I'm thinking about a straight back - any structural issue with doing that?
Katelyn (not verified)
Mon, 11/01/2010 - 11:33
You are amazing!!!! and such
You are amazing!!!! and such an inspiration!! great work--i love your blog!
Shannon (not verified)
Mon, 11/01/2010 - 11:40
LoVe iT!!! Thanks for the
LoVe iT!!!
Thanks for the detail on the sewing. I'm a visual learner and all those pictures will really help.
I'm going to start off by making one as a desk chair...and if it goes well, who knows? I might branch out into the breakfast area.
Amy Butler fabric was def. the way to go. SO CUTE.
So glad your mom has something manageable. I was really scared when I read that last night.
Hugs to you all!!!
Vanessa Fuson (not verified)
Mon, 11/01/2010 - 13:29
i love it! i have been
i love it! i have been wanting a chair like that for my front room. I can't really stomach paying over $100 for a chair that my boys will cover in dirt no doubt! the fact that you made it where the fabric can be easily changed...for cleaning or a new look is great! maybe this will be adding to my "hunny to do list" or a project for me to do during winter break when I am not being a full time mother & taking 6 college classes. Thanks Ana!!
Ana White (not verified)
Mon, 11/01/2010 - 14:21
The straighter the back the
The straighter the back the better! The more of an incline, the more support you need. This seat is with a 15 degree angle, for more informal chairs. Go with a 5 degree for a more formal chair, with a taller back.
ruth (not verified)
Mon, 11/01/2010 - 15:23
is it called a parsons chair
is it called a parsons chair because that is where you put your parsons nose? Good to see you back ana and great to hear your mum is travelling well now
Rachelle (not verified)
Mon, 11/01/2010 - 16:12
I was wondering just last
I was wondering just last week when all the other parson plans were coming if you'd figured out this slipcovered chair. I'm so excited. Thanks again. And best to your mom too.
Kelli (not verified)
Mon, 11/01/2010 - 16:57
I love these! Thanks for
I love these! Thanks for sharing the plans and for all your hard work!
Tracie (not verified)
Tue, 11/02/2010 - 03:13
Powder room
Powder room love...

Jenna (not verified)
Tue, 11/02/2010 - 05:58
Love it!! I think 2 of them
Love it!! I think 2 of them would make a cute little sitting area, but I would love to make 6 for my dining room! Thank you so much for all that you do, glad your mom is doing better.
HammerTime (not verified)
Tue, 11/02/2010 - 07:39
Ana! I'm so happy your mom
Ana! I'm so happy your mom is doing well. I was holding my breath!
And...there are no words for how much I love this chair! I just got a "new" dining room table from the thrift store--I'm refinishing it--and I need EIGHT matching chairs. I cannot afford to purchase eight chairs, and honestly, I haven't seen eight chairs that I like enough anyway. I knew I wanted parson chairs, but the fabrics weren't anything I liked, and the finishes weren't right either. I am so excited. It's going to take me forever to make eight, but it will be worth it!
Thank you so much!!
HammerTime (not verified)
Tue, 11/02/2010 - 07:55
Ooh, I just thought of
Ooh, I just thought of something else. Part of the problem I've had with finding chairs with fabric I like is because I've designed my dining room around a painting my mom did. My mom passed away a few months ago, so that painting means even more to me now. So now that we have a chair, with fabric, I can go to spoonflower.com and design my own fabric to be sure it goes perfectly with Mom's painting. Wow, it's going to look so cool.
Allison (not verified)
Tue, 11/02/2010 - 20:59
Ana, so glad your mom is
Ana, so glad your mom is doing well. These are great chairs and I'd like to add one piece of advice to the sewing directions if I may..... :)
The mark of a good seamstress is that she always presses her seams. Those beautiful corners will look so crisp when pressed. Your readers might consider top stitching (pressing the seam allowance to one side and sewing through the seam allowance and one layer of fabric from the top/right side of fabric) along each seam as well for added durability. And don't forget to choose fabrics designated for upholstery.
Jamalee (not verified)
Sat, 11/06/2010 - 10:40
Any suggestions for making
Any suggestions for making this counter height chairs? I am concerned the leg angle will take up lots of floor space by just extending them. I would like to put these at my kitchen island!
Paige S (not verified)
Sun, 11/07/2010 - 18:50
Good info! Keep up these nice
Good info! Keep up these nice posts.
Dee (not verified)
Tue, 11/09/2010 - 23:05
Where did you get the
Where did you get the beautiful fabric...I am in love with it.
Ana White (not verified)
Thu, 11/11/2010 - 07:20
Dee, the fabric is Amy Butler
Dee, the fabric is Amy Butler August Fields.
sarahhiggs (not verified)
Sat, 11/13/2010 - 05:15
I'm also swooning over that
I'm also swooning over that fabric. I'm in love - now to try to conquer the sewing machine too! :)
Thank you so much for the inspiration Ana - I am so excited to re-do the office.
Deana (not verified)
Mon, 11/15/2010 - 07:53
Love that fabric! I would
Love that fabric! I would absolutely love to make some pillows for my bed out of that fabric. Problem is I can't find it anywhere. Searched online, nothing. Did you recently get it from a local store out there in alaska?
Ana (not verified)
Mon, 11/15/2010 - 13:08
In my head, I am singing
In my head, I am singing Alanis Morisette's Ironic song because it just so happens that my Mom has a set of Parson Chairs that she has not intentionally butchered and now thanks to you, I have found the perfect Christmas present to make her. Thank you! I'll keep your Mom & loved ones in my prayers. I hope she gets better soon.
cheep3r5 (not verified)
Tue, 11/16/2010 - 09:42
I would love to see this as a
I would love to see this as a bench for a dining table - maybe short ones to be combined. Like....two could sit side by side when the table has been extended for a big gathering and the short benches could be used elsewhere in the house when not needed for the table.
Glad your Mom is better. She has mad skillz!!! =D
Danielle Kappes (not verified)
Fri, 12/10/2010 - 05:27
You mentioned the chair could
You mentioned the chair could easily be increased in size. I have a large great room with a large dining table, and chairs on the smaller side just seem really out of place. I think we've determined that about 38 " in total height looks like the right scale for this room and table. We are also a tall family, so I'm thinking of increasing the height of the back a couple inches and also the floor-t o seat distance. (gotta brush off my Geometry-skills a bit to make all the adjustments to the plan.)
So am I thinking along the right way here?.... front legs, easy.. Add 2 inches. back legs, use some math, angles, the 15 degrees, etc. to figure out how much to extend the legs. I think this will be an important calculation so that the chair sits flat.
then for the chair back, I could just choose 2 1/2 inches, and as long as I added it to the chair back sides, and the chair back panel, (and the appropriate fabric and upholstery adjustments), that it would work.
will the chair back be weakened any by sticking out further?? should I maybe change the angle slightly so that it angles back even more gradually, since it will be going further back? or stick to the 15 degrees? Is the 15 degrees a standard ergonomic chair back placement? or does the angle change with chair-back height?
Thanks SO MUCH!!! I love these chairs SO MUCH!!!
thanks....
Danielle Kappes (not verified)
Fri, 12/10/2010 - 05:39
I just realized the leg
I just realized the leg calculations are much easier. (it's been a long time, and I'm kind of rusty...and I actually majored in Math in college, but I won't mention where, because I'd give them a bad name with how rusty I am.) but duh!! There's a right triangle, you gave us the 16" height, and the hypotenuse of 16 9/16 ". If I increase the height of this virtual right triangle to 18", it will still have the same angles, and be in ratio. So I just gotta calculate "16:18 as 16 9/16 : X". So the new leg length should be 18.63 ish inches.
Is that all I'd need to do, Ana?
Rob (not verified)
Thu, 01/06/2011 - 04:49
Ana- We've already
Ana-
We've already purchased the IKEA HENRIKSDAL chair *covers*. Can I build the chair from your plans/modify to fit the purchased covers for less than the IKEA chair ($59). Found here: http://www.ikea.com/us/en/catalog/products/S39874213

Rob (not verified)
Fri, 01/07/2011 - 05:11
What's the seat height for
What's the seat height for this chair?
ups (not verified)
Fri, 03/04/2011 - 05:14
Thank you so much for sharing
Thank you so much for sharing your projects. I've learn a lot from them.
Melissa (not verified)
Wed, 03/09/2011 - 16:01
Could I increase the seat
Could I increase the seat height of the chair to 24" without having to add cross-wise support to the legs? (Sorry, this would be my very first project, so not a lot of confidence here). I've been dreaming about Parson chairs for years that count scoot up to my kitchen counter.
Guest (not verified)
Sun, 08/14/2011 - 13:01
Type of chair I would like to make
Thanks for making the chair plans available.
I'm looking for a plan to make a chair with arms that I can use at a desk. A "captain's chair" for example.
Arms, and small-of-back support, are important when you sit at a desk all day. I cannot find a chair for sale that I like.
Function and simplicity of construction are more important than looks.
Looking at your chair plans, you don't seems to anything about the joints. These are difficult to do and vital.
I'm trying to think of the easiest way of making my chair - an "A" frame shape perhaps, held together with bolts.
Lauren227 (not verified)
Fri, 09/16/2011 - 22:47
Two piece E's?
Hi Ana,
On the sewing directions (step 7), the illustration shows two different pieces both labeled Piece E. They have separate measurements, so they can't be part of the same piece.
I am hoping to build these for dining room chairs - if I change all the angled cuts to 10 degrees, instead of 15, will it all measure out ok or will I have to change the lengths of pieces?
Thanks! The chairs look divine and I can't wait to start building/sewing them!
ElleMay (not verified)
Mon, 04/09/2012 - 22:59
Could u alter the chair for
Could u alter the chair for an un-upholstered back? I like the idea that this chair is so simple, but Im lookin for an open backed design. maybe someone could make a design option?
In reply to Could u alter the chair for by ElleMay (not verified)
Lady Goats
Tue, 04/10/2012 - 10:28
Simple modification
You could absolutely make this open-backed. You just need to add "stretchers" for back support. Just cut some boards 14 1/2" (in step 2, just add one or two more to the back, you could use any 2x, and it would look good. Just figure out the spacing and attach with pocket hole screws). Then you won't have to use the plywood, and proceed without doing any more to the top! I would imagine that the sewing part would only mean that you staple the back of the seat instead of sewing it to anything... Someone else'll have to chime in, there... There shouldn't be any structural issues, and this chair would actually look really good like that!
ElleMay (not verified)
Tue, 04/10/2012 - 12:42
I actually meant vertical
I actually meant vertical boards, but i like your horizontal design also! Thanks!
Hillary Addison (not verified)
Thu, 04/12/2012 - 09:34
Made these...
Ana, we made these chairs, and love how they look, however they aren't as sturdy as I'd hoped. We did use regular screws, as the plans said that would work just fine. Any suggestions for re-enforcing these?
khaleq ahmed
Thu, 05/16/2013 - 04:39
Office chairs online
all of my entire officers are thinking about our office furniture. they could not take decision that where is the good office furniture for us. after some time they are decided to buy some Office chairs online for us. when we are starting to used that furniture it feels pretty good and we enjoyed that very much.