Patchwork Dresser on Wheels

patchwork dresser wood drawer faces
Difficulty
Advanced
| Print this plan

This is a free project plan with step by step instructions to build your own modern patchwork dresser.  

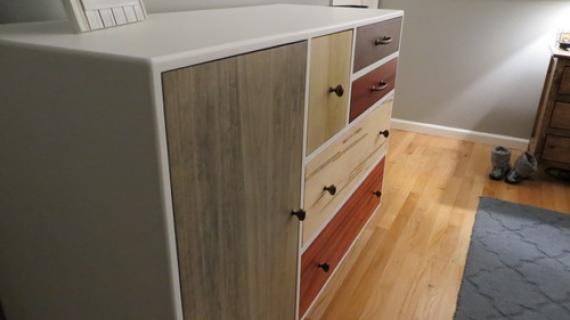
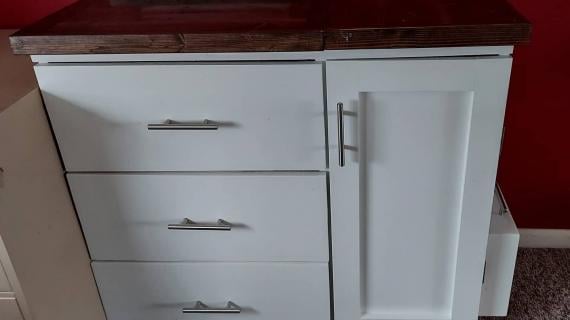
This dresser features different drawer sizes, with drawer faces that can be stained different colors to add more interest to the piece. Free plans include diagrams, shopping and cut list, and lots of reader submitted photos - from Ana White.com

diy west elm dresser plans

Why We Built this Dresser Plan

I'm pretty darn excited today to share brand new plans with you! 

My friends over at Shanty2Chic and I teamed up so you can build this:

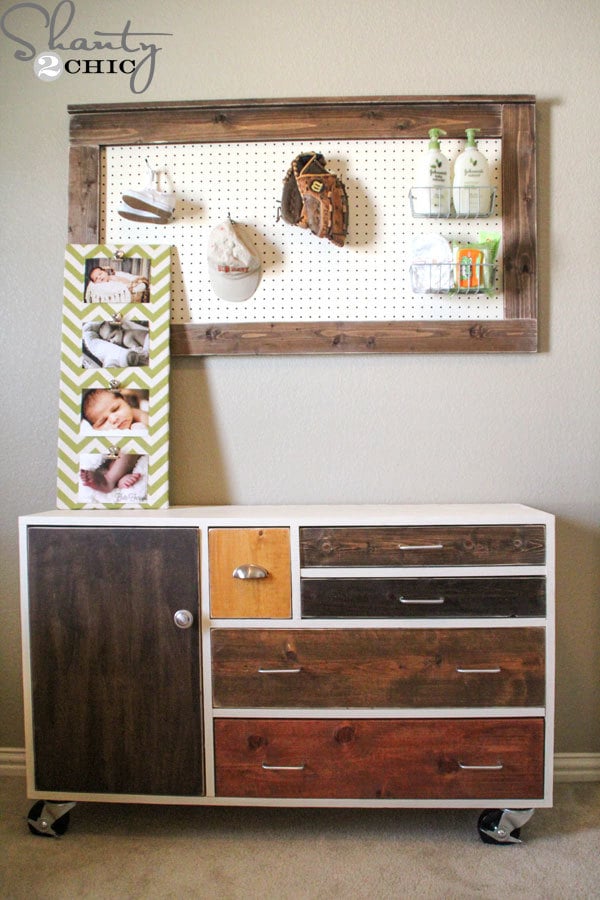
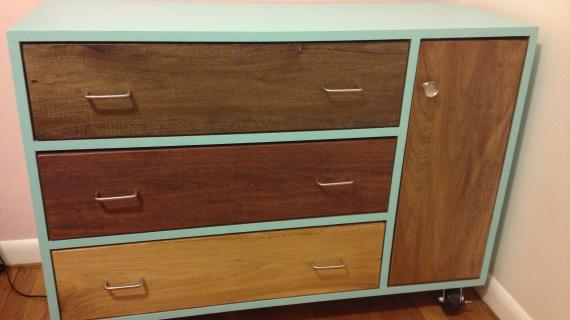
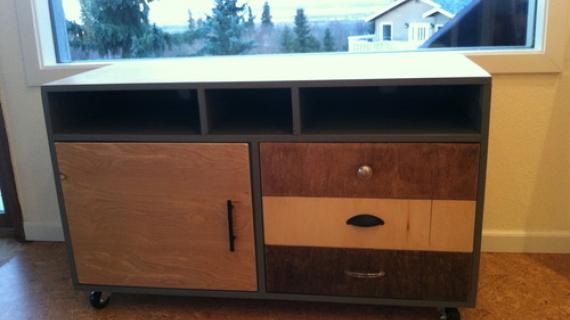
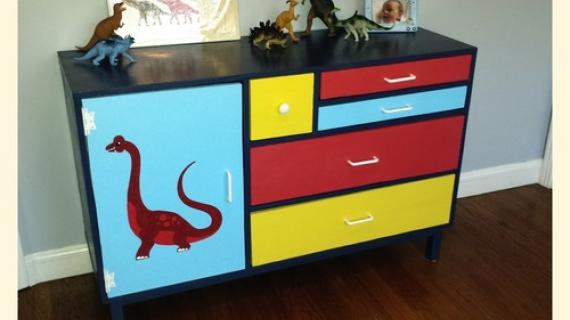
A modern patchwork dresser - It's inspired by the West Elm Patchwork Dresser .... only didn't cost $1200 +$100 surcharge - and you can say you made it yourself!!!


More Photos and Build Post

We totally got you covered with the free plans below, but if you want more photos and to check out all the DIY projects in this photo, please take a second to stop over and visit Shanty2Chic.  


Free Plans to Build Your Own Modern Patchwork Dresser


Dimensions
west elm dresser plans
Dimensions are shown above

Preparation

Shopping List
  • 1 - sheet 3/4” plywood ripped into 15 3/4” wide strips
  • 1/2 sheet 1/4” plywood (for drawer bottoms and backs)
  • 1 - 1x6 @ 8 feet long
  • 1 - 1x6 @ 10 feet long
  • 1 - 1x3 @ 8 feet long
  • 1 - 1x4 @ 4 feet long - MUST BE 3 1/2" WIDE
  • 1 - 1x8 @ 6 feet long - MUST BE 7 1/4" WIDE
  • 5 sets 14” White European Style bottom corner mount drawer slides
  • 4 Caster Wheels
  • 1 set FULL INSET concealed hinges for Euro Style Cabinet (no face frame)
  • Edge banding if desired
Cut List
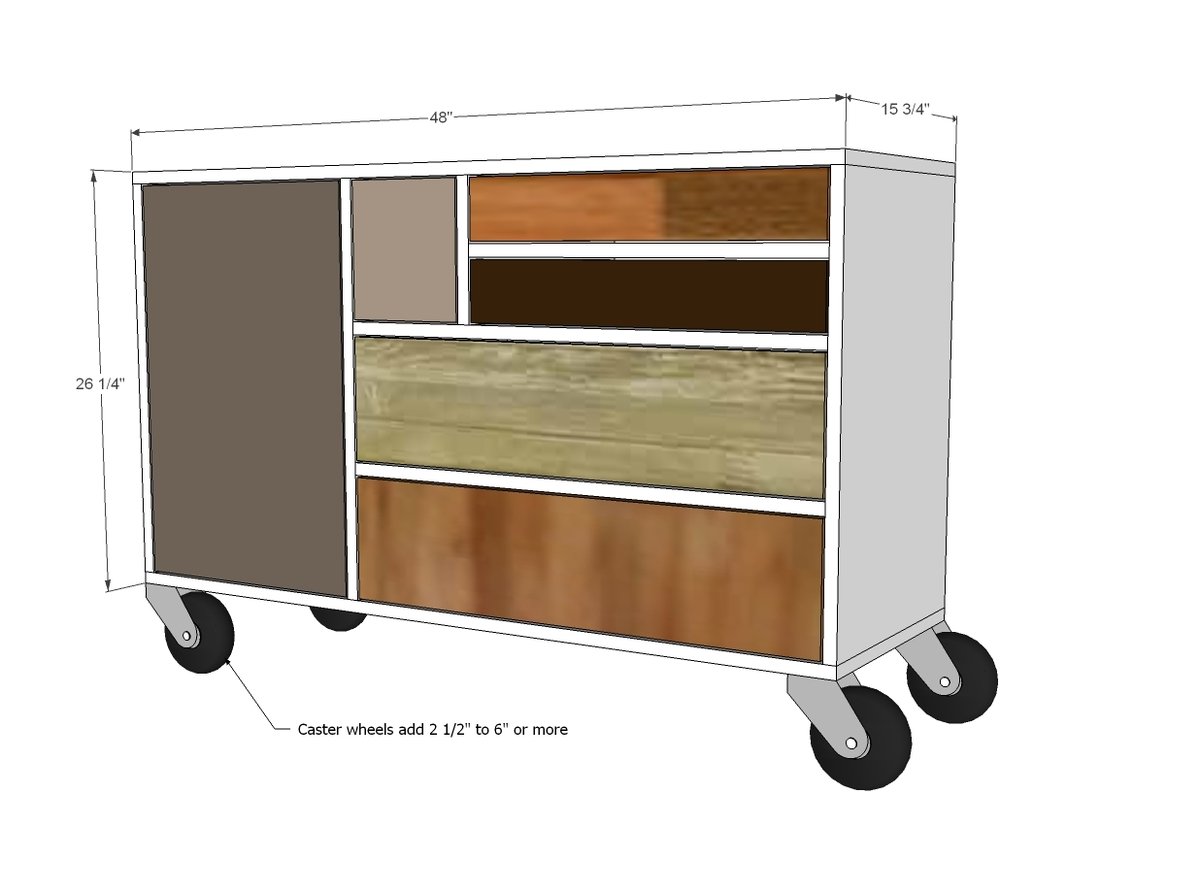
  • 3 - 3/4” plywood @ 15 3/4” x 24 3/4”
  • 1 - 3/4” plywood @ 15 3/4” x 29 3/4”
  • 1 - 3/4” plywood @ 15 3/4” x 8 1/4”
  • 2 - 3/4” plywood @ 15 3/4” x 48”
  • 2 - 1x2 @ 21 1/2”
  • 2 - 1x2 @ 29 3/4”

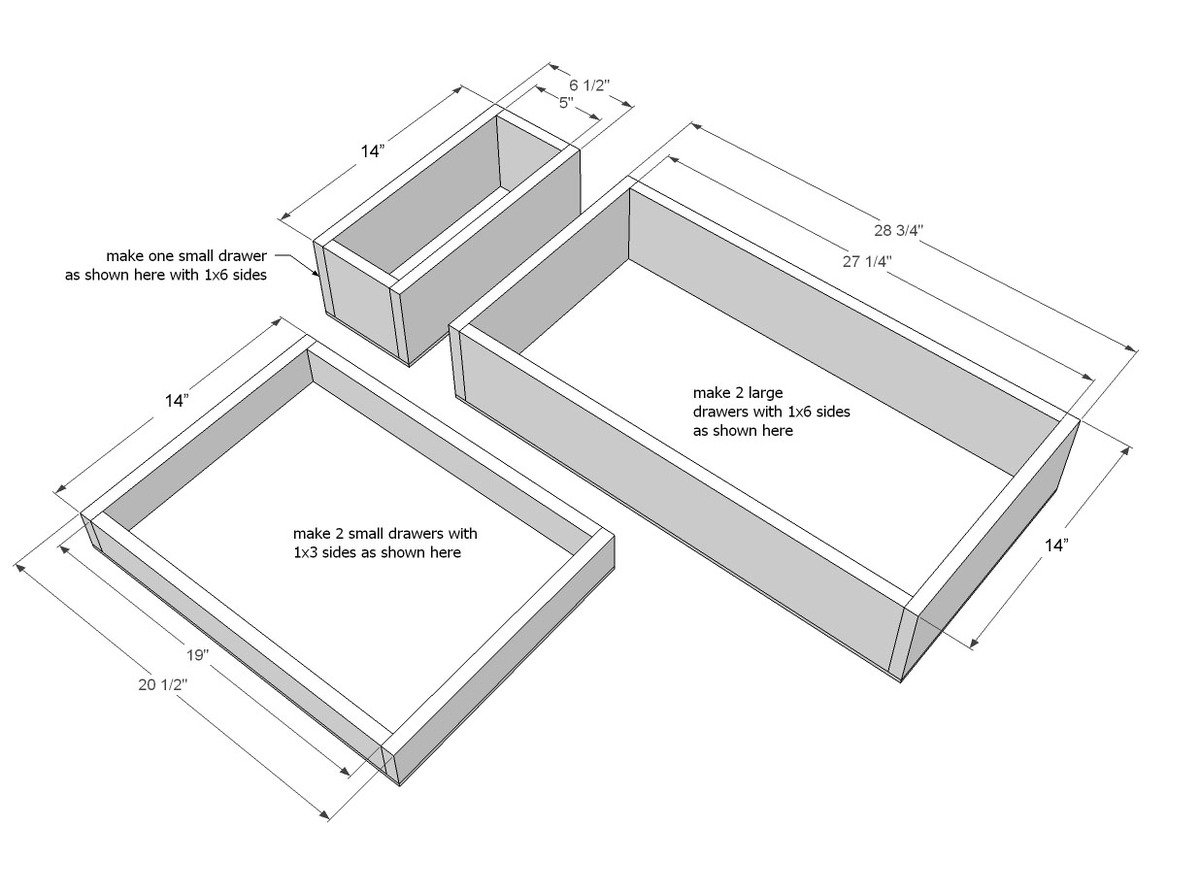
DRAWERS - Recommend cutting to fit slides and measured openings

  • 6 - 1x6 @ 14”
  • 2 - 1x6 @ 5”
  • 4 - 1x6 @ 27 1/4”
  • 2 - 1x3 @ 14”
  • 2 - 1x3 @ 19”
  • 2 - 1/4” plywood @ 20 1/2” x 14”
  • 2 - 1/4” plywood @ 28 3/4” x 14”
  • 1 - 1/4” plywood @ 6 1/2” x 14”

DRAWER FACES

  • 2 - 1x4 @ 21 1/4”
  • 1 - 1x8 @ 8”
  • 2 - 1x8 @ 29 1/2”
  • 1 - 3/4” plywood @ 15 3/4” x 24 1/2”
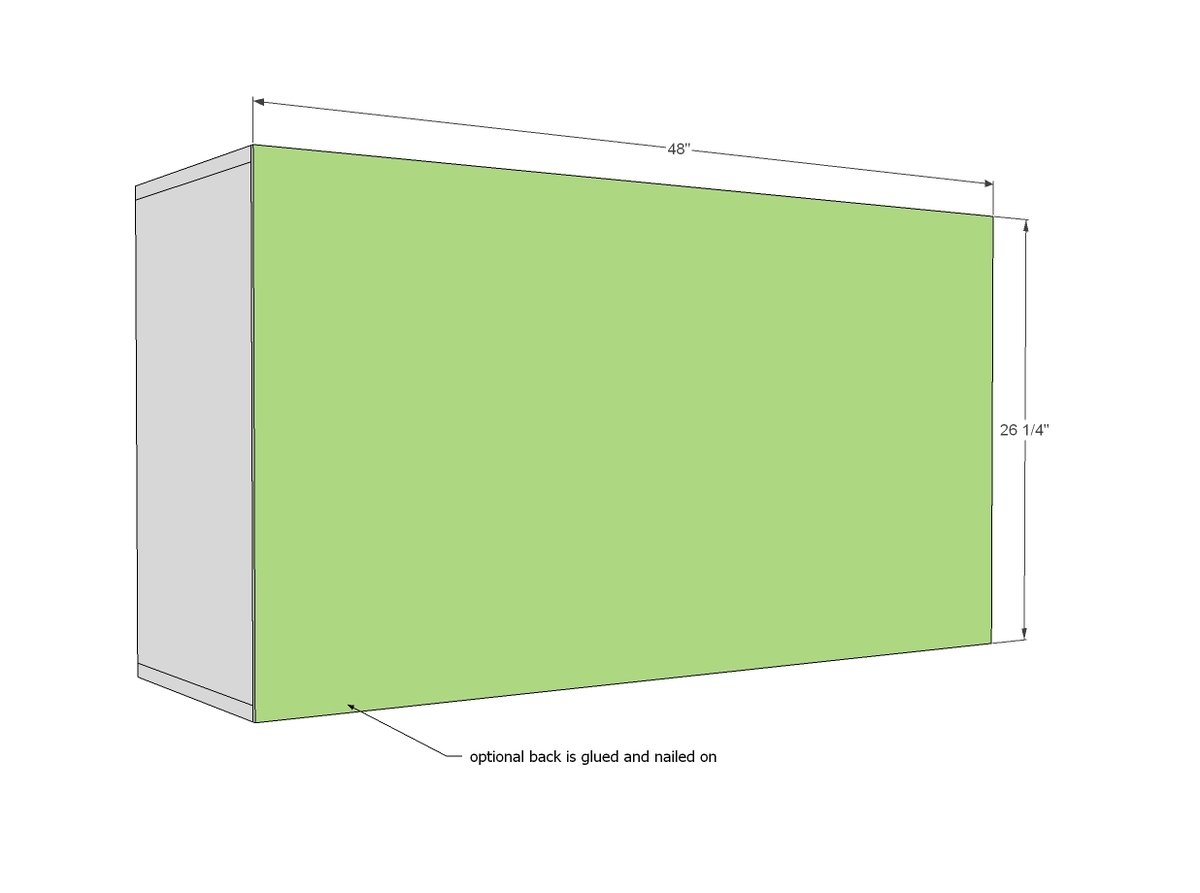
  • 1 - 1/4” plywood 48” x 26 1/4”
Tools
Tape Measure
Speed Square
Pencil
Safety Glasses
Kreg Jig
Drill
Circular Saw
Miter Saw
Brad Nailer
Power Sander
General Instructions

Please read through the entire plan and all comments before beginning this project. It is also advisable to review the Getting Started Section. Take all necessary precautions to build safely and smartly. Work on a clean level surface, free of imperfections or debris. Always use straight boards. Check for square after each step. Always predrill holes before attaching with screws. Use glue with finish nails for a stronger hold. Wipe excess glue off bare wood for stained projects, as dried glue will not take stain. Be safe, have fun, and ask for help if you need it. Good luck!

Instructions

Step 1

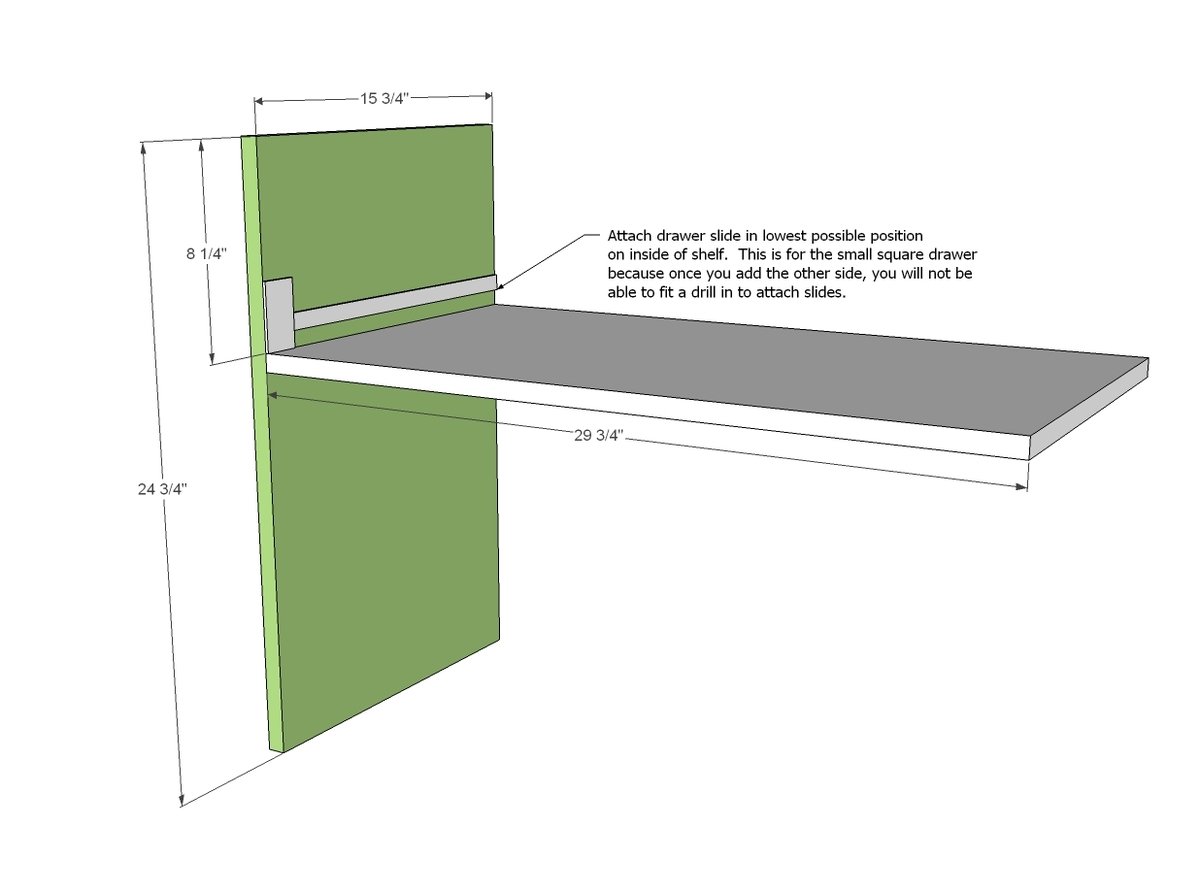
NOTE: This slide (and all others in this dresser) MUST be attached inset 3/4” (not shown in diagram) to allow for the drawer face frames to be attached in later steps. If you are using drawer slides for the little drawer, it will be much easier to install the cabinet members now instead of when the space is super tight. Attach shelf with 3/4" pocket holes and 1 1/4" pocket hole screws and glue. This is a dresser, so make sure you are very precise when attaching boards, square all the way down - or your drawers will be cockeyed when the slide. TIP: Drill 3/4" pocket holes on top and bottom edge of divider for attaching top and bottom in step 3. Drill 3/4" pocket holes on end of shelf for attaching side in step 3.

Step 2

Attach remaining drawer slide cabinet member to the small divider. Then attach the small divider to the shelf with 3/4" pocket holes and 1 1/4" pocket hole screws and glue. TIP: Drill 3/4" pocket holes on top edge of small divider facing upward for attaching top in step 3.

Step 3

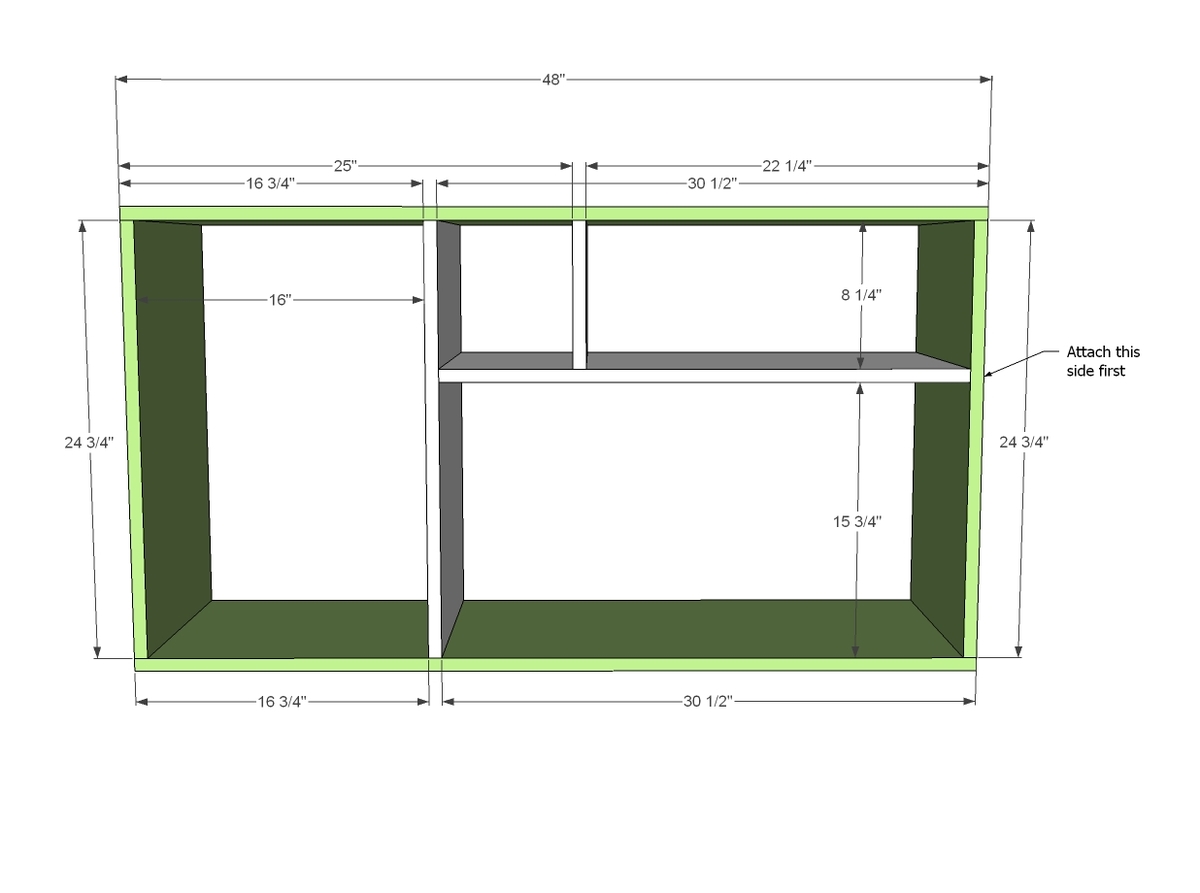
Now attach the top and bottom to the partion boards, and the sides. Recommended is 3/4" pocket holes and 1 1/4" pocket hole screws and glue.

Step 4

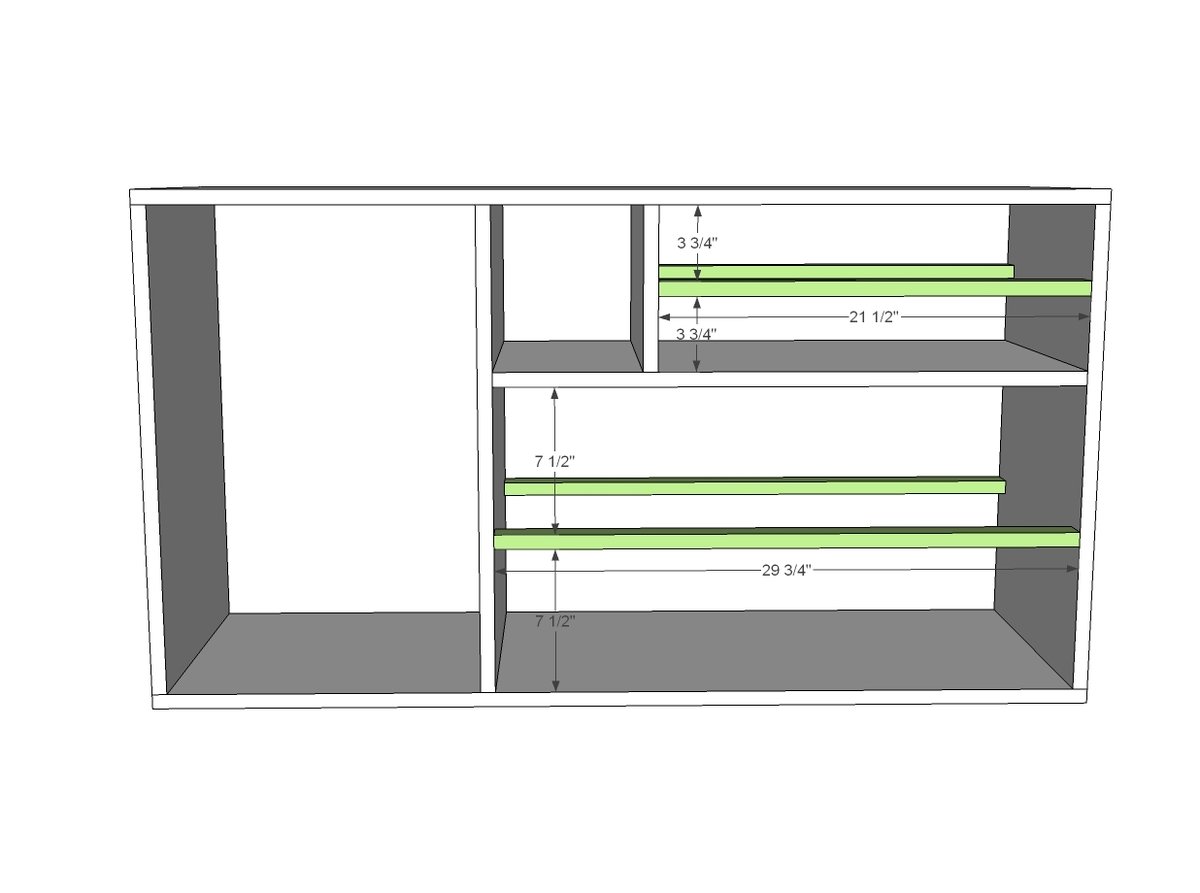
Attach the 1x2 trim boards with 3/4" pocket holes and 1 1/4" pocket hole screws.

Step 5

Watch this video on how to size and install drawers using Euro Drawer Slides:

Step 6

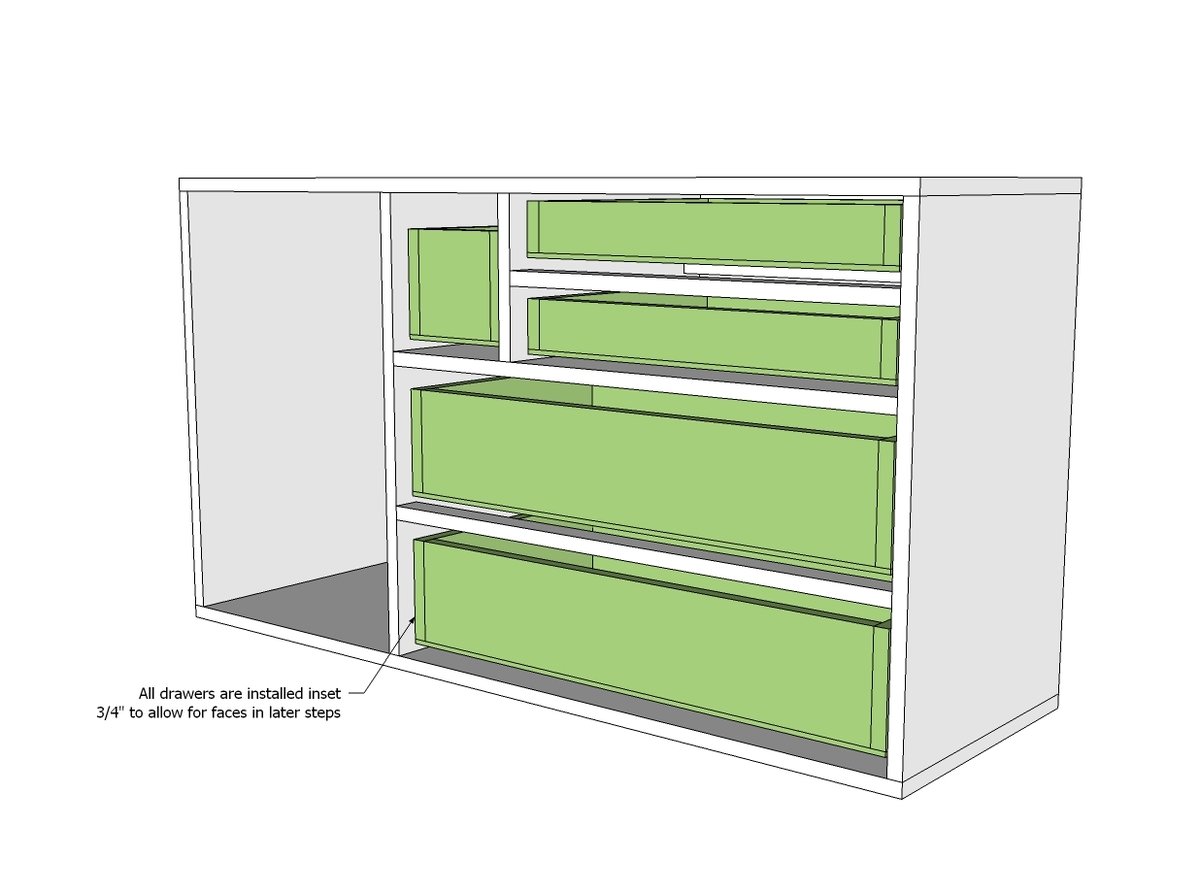
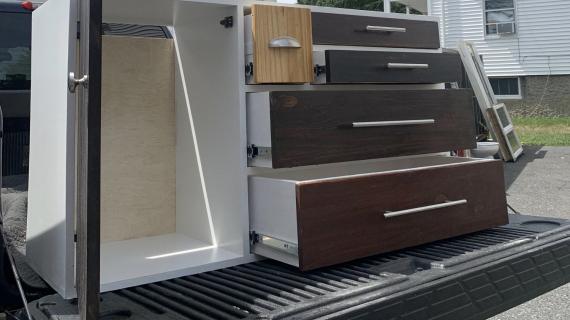
Insert drawers into cabinet, installing with drawer slides so drawer boxes are INSET 3/4" - this is to allow for the drawer faces (next step).

Step 7

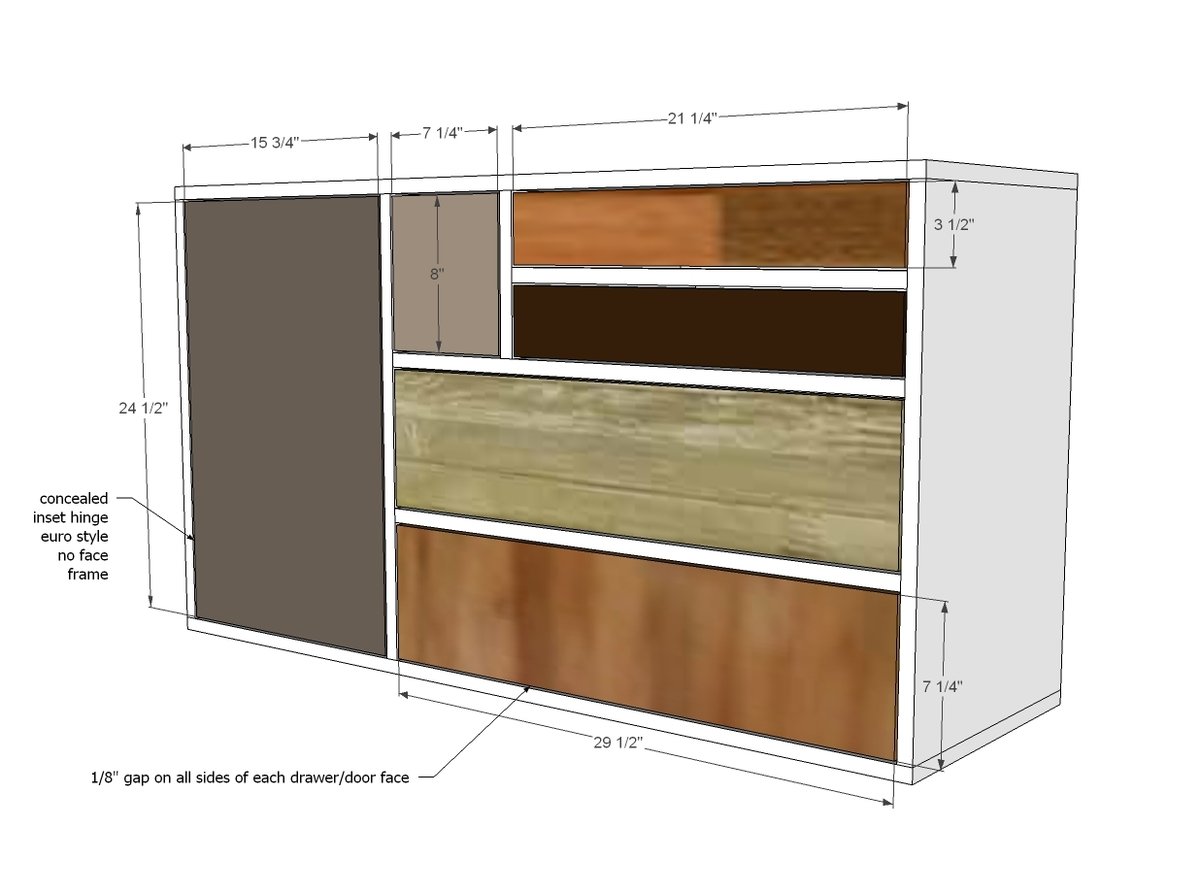
Attach drawer faces to the drawers with a 1/8" gap around all sides. Then attach the cabient door with the inset hinges.

Step 8

The back can really be attached at any time, but it's nice to do this afterwards so you can reach in from back to get your drawers/hinges just right.

Step 9

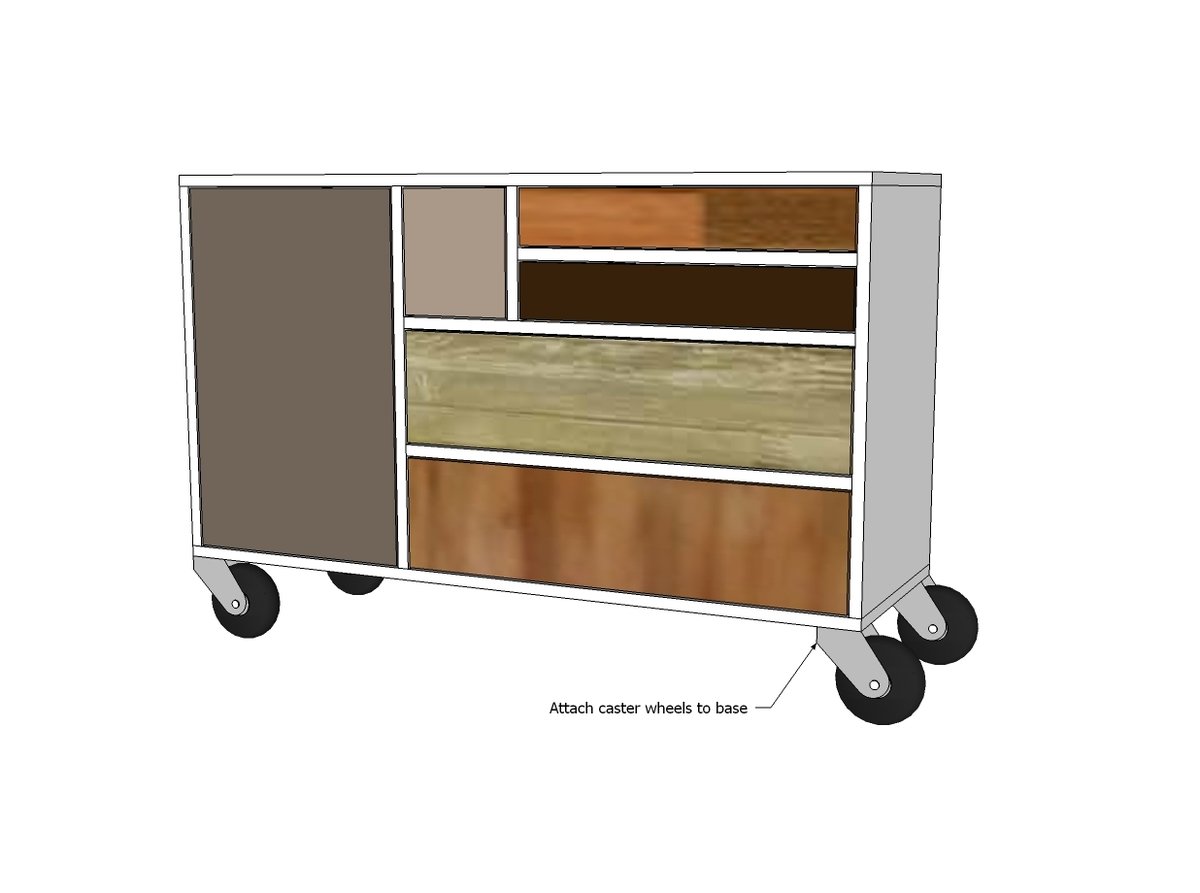
Attach caster wheels to base. Done deal!

Finishing Instructions
Preparation Instructions
Fill all holes with wood filler and let dry. Apply additional coats of wood filler as needed. When wood filler is completely dry, sand the project in the direction of the wood grain with 120 grit sandpaper. Vacuum sanded project to remove sanding residue. Remove all sanding residue on work surfaces as well. Wipe project clean with damp cloth.

It is always recommended to apply a test coat on a hidden area or scrap piece to ensure color evenness and adhesion. Use primer or wood conditioner as needed.

Comments

biz_kid1

Wed, 07/03/2013 - 09:26

My to do list is so full already!!!! LOL! But I see a modified version of this for our workshop in the garage!!!! Thanks! I LOVE the mixed finishes!

jkassel78

Fri, 07/05/2013 - 10:09

I have been drooling over this dresser for ever...could never afford it from west elm. Thank you so much for these plans, can't wait to get to work!

yurra-bazain

Sat, 07/06/2013 - 00:29

Thank you both for taking the time to make plans and execute them beautifully. This dresser is well done, and so nicely styled. Being part of a community of doers has been empowering for me and has given me a new love for wood and the possibilities it holds. :)

Doyletron

Mon, 08/05/2013 - 06:33

Hey Ana,

My husband and I started this build yesterday. We are having some difficulties reconciling the shopping list with the cut list. We seem to have lost the wood for the large cabinet face and the wood for the slim cross pieces for the frame that go between the drawers.

We went over everything we did twice, and we believe there may be a typo on your lists.

Hoping to be helpful.
Thanks for the plans.

Frequently Asked Questions

Wood Questions

What kind of wood should I use?
Most of our plans use standard construction lumber like pine or fir. It's affordable, easy to work with, and easy to find. It's also rapidly renewing and biodegradable, so a great eco friendly choice!

Can I use hardwoods instead?
Yes—just keep in mind they're heavier, cost more, and can be tougher on tools and harder to join together and finish. I recommend not tackling a hardwood project until after you have built several softwood projects.

What if my boards are warped?
Choose the straightest boards at the store. You can often work around slight warps by cutting them into shorter pieces.

What wood should I use for outdoor furniture?
Use red-toned or pressure-treated 2x lumber for framing, and cedar or cedar fence pickets for the decking. Outdoor furniture should be built like a deck—your local home center can help recommend the right wood for your climate.

Will my wood move or warp after I build?
Potentially, especially in humid climates. Let your wood acclimate indoors before building. Once acclimated and kept in a stable environment, movement should be minimal. Remember, most houses are built using framing lumber - it's all about keeping moisture down indoors.

Cutting Questions

Do I need a miter saw?
A miter saw is great, creating fast, safe, and precise cuts, even for beginners. But most plans can be built with a circular saw and a straight edge. If using a circular saw to cut, take time to practice, and get good at making cuts, before cutting your project boards.

How do I get clean cuts with a circular saw?
Clamp your board, measure twice, cut slow, and use a sharp blade. This takes practice, so spend some time making cuts. I go through becoming proficient at freehand cutting in my course, it is worth taking if you want to master this skill.

Will the store cut my wood?
Yes—most stores will do rough cuts to help you transport your materials home. But from store to store, the quality of cuts could greatly vary.

Joinery Questions

What screws should I use?
We recommend star-head self tapping screws for framing, most common sizes are 2-1/2", 1-3/4". Pre-drill if close to the edge or you find your wood is splitting.

Do I have to use pocket holes?
Pocket holes are the cheapest, easiest and fastest way to do some joints - like edge to edge or a hidden fastener joint. There are other methods, but these can be time consuming and expensive. We recommend using pocket holes as indicated in plans for best results.

How do I keep things square?
Use a speed square and measure diagonals after each step. Always clamp joints before screwing to keep them tight and flush.

Finishing Questions

Stain or paint before or after building?
A quick sand before and a full finish after gives the best results. Pre-finish if you're doing two-tone or detailed finishes.

What type of finish?
Use oil-based or water-based stain. For paint, cabinet-grade latex or enamel works great. High use surfaces on indoor projects should get a coat of polyurethane, I recommend a Helsman or Spar or other flexible poly that won't crack or peel with wood movement. For exterior projects, use a finish suitable for exterior fences.

How to get a smooth finish?
Start with a well sanded project. Sand between coats (220 grit), wipe clean, and apply light coats with a foam brush or roller.

Plan Questions

Can I change the size?
Many people do, and that's the great thing about building your own furniture! But do keep in mind going bigger might mean more supports are required, and often plans are optimized for minimal material waste.

Are these beginner-friendly?
Yes—plans are written with simple tools and clear steps in mind, with every effort to make plans as simple as possible.

Can I sell what I build?
Absolutely! Just don’t resell or repost the plans themselves.

General Questions

What tools do I really need?
A drill, circular saw, tape measure, square, and a few clamps will get you through most projects.

Do I need a workshop?
Nope! A driveway or small patio is plenty to get started, just make sure you have a level place to work. If you find you are building several projects a year, creating a small workbench is a great way to store tools and have a dedicated workspace.

What if I mess up?
Wood filler, sanding, or flipping boards goes a long way. Mistakes are part of the process!

What can I do to make my projects look more professional?
Start with straight boards, make accurate cuts, clamp all joints, and line up everything neatly. Sand thoroughly, use a neutral finish, and apply it in light coats for a clean look.

I've never built anything before. Where should I start?
Start with a few smaller softwood projects to get hands-on experience. Or if you're tackling a big project, buy a little extra lumber and practice your cuts and joints first. If possible, work with someone who has a bit of experience.

Care & Maintenance

How long will my furniture last?
With good joinery and regular care, your DIY furniture can last for decades. I have pieces in my own home that are over 20 years old and still going strong! One of the best parts about DIY furniture is that it’s easy to repaint, refinish, or repair—so your projects can grow and adapt with you.

How should I care for outdoor furniture?
Lightly pressure wash or hose it down once or twice a year. Tighten screws and reapply finish as needed to protect it—just like a deck or fence. A little upkeep goes a long way in extending the life of your furniture.

How about indoor furniture?
Regularly dust or wipe with a damp cloth. If it starts to look worn, a light sanding and touch-up paint or stain can refresh it in no time. DIY pieces are meant to be durable and fixable—so don’t be afraid to give them some love now and then.

Want to Build with Confidence?

Check out my ebook: 12 Skills to Build Your Own Furniture
It walks you through the core skills every builder needs—measuring, cutting, joinery, and finishing—so you can build beautiful furniture that lasts.

Still Have Questions?

Email us anytime at [email protected] and we’ll be happy to help!