Perfect Children's Closet Organizer

awesome kids closet organizer
Difficulty
Intermediate
| Print this plan

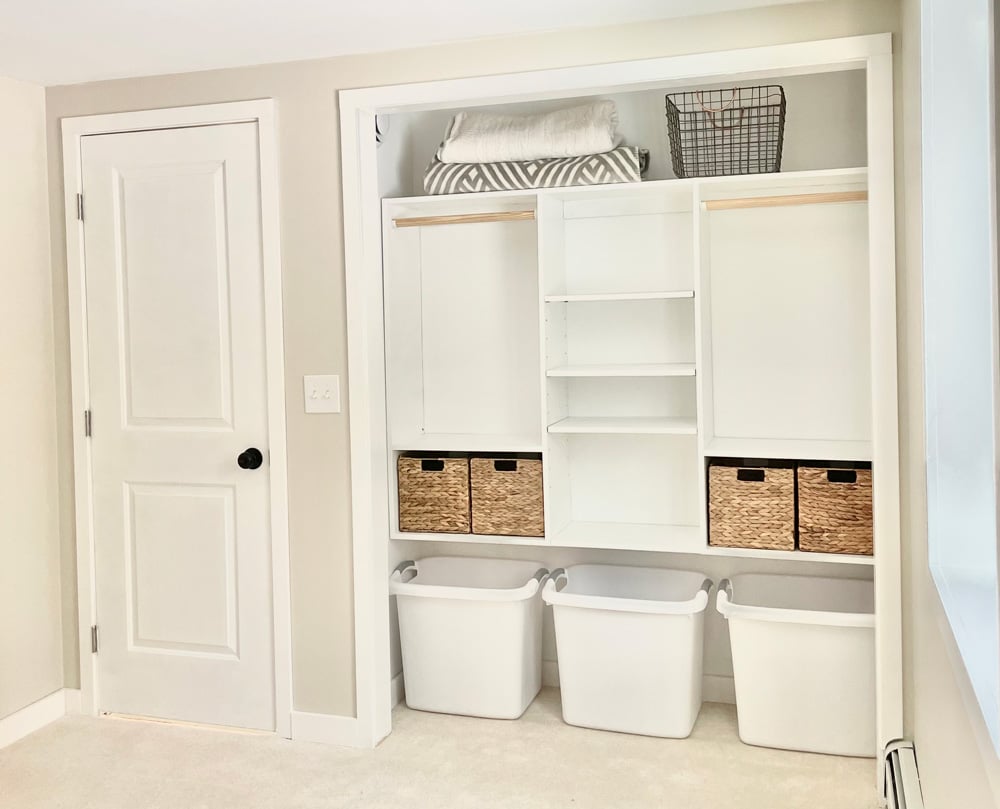
Build your own full width kid's closet organizer, no matter the width of your closet.  We love the open bottom perfect for toy bins, the shelves at lower heights so littles can easily access their favorite clothes.  And there's even a little hanging space for mom (to hang those cut outfits!).  

organizing a kids closet

Why We Love This Closet

  • Custom Sized - A tailored fit looks so much better than making something work and blocking the walls out for closet rods.  
  • Beyond Clothes - This kids closet is perfect for storing clothes AND toys, books, blankets and out of season items.  
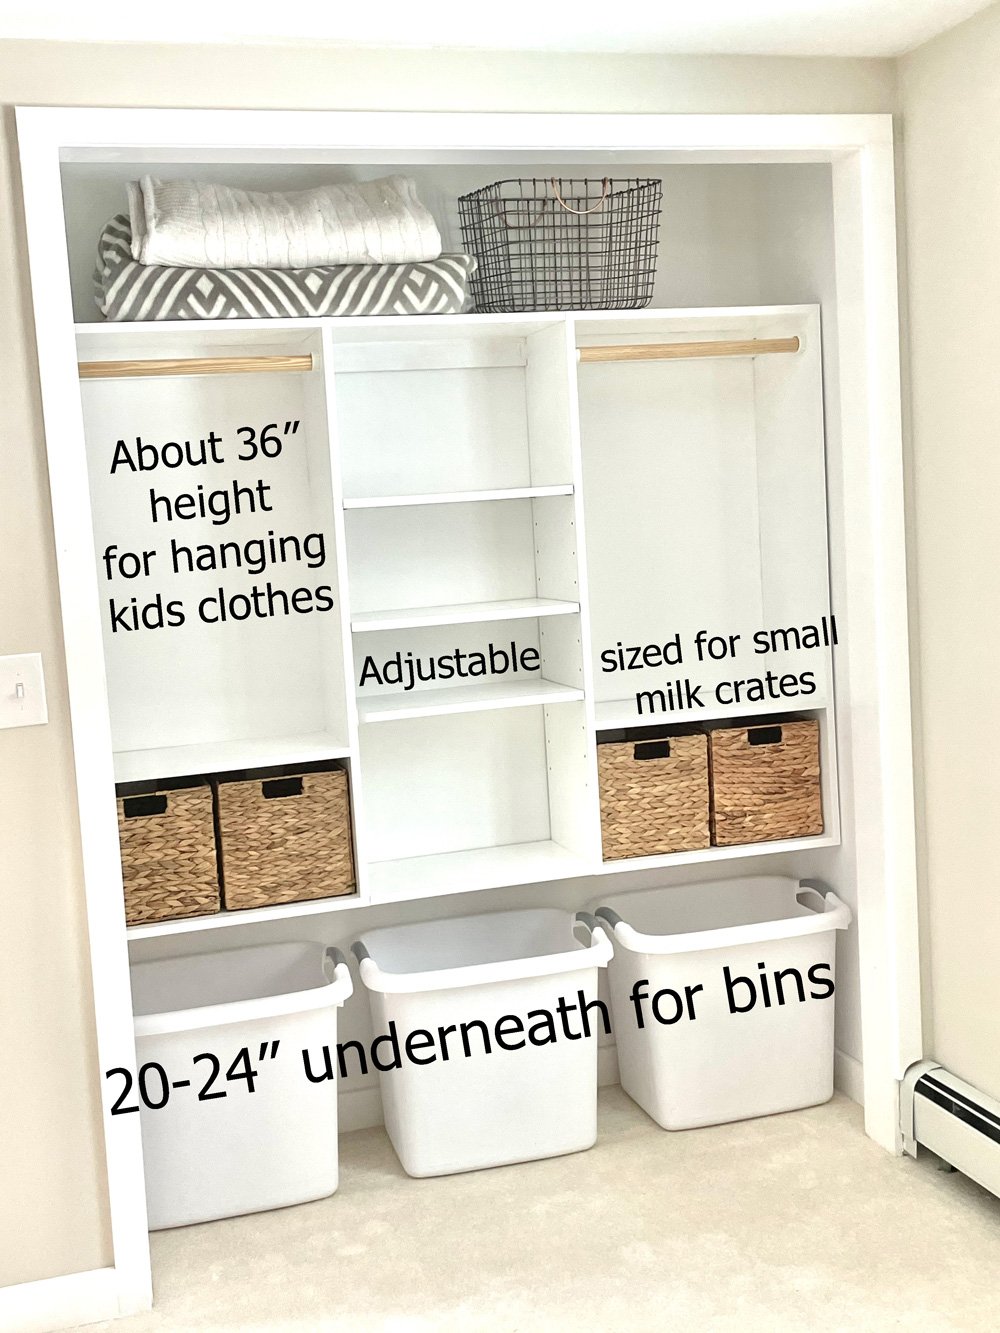
  • User Friendly - The higher placed shelving is suitable for adult placing (think hanging outfits or top shelf bins).  The lower storage areas, like the toy bins and milk crates for socks, are perfect for littles to access and use independantly.
  • Grows with Them - with adjustable shelves and removeable milk crates, this closet is ready to grown with your child.  
  • Designed to Last - you just have one closet to make amazing.  Why not do it right the first time with the right materials?  This closet was built using 3/4" hardwood plywood and easy to repair, repaint, and repurpose.


VIDEO - Watch Me Build this Closet Organizer

This closet was actually super easy to tackle and install!  In this video I'll show you how I built this closet.


Pin For Later! 

Perfect Children's Closet Organizer

Preparation

Shopping List


  • 3/4" plywood ripped to 11.25" (as needed for your closet design)
  • 3/4" edge banding for finishing front edges of plywood
  • 1 - 1x3 in the total width of your closet interior
  • Pocket Hole Jig set on 3/4" setting with 1-1/4" pocket hole screws
  • Optional Shelf Pins for adjustable shelves and Shelf Pin Jig
  • 3" wood screws (self tapping star bit recommended) for hanging on walls and matching bit
  • Drill
  • Table Saw
  • Miter Saw
  • Level and Stud Finder (for hanging in the closet)
  • Tape Measure
  • Paint or Stain and suitable finishing tools for desired finish

Instructions

Step 1

Designing Your Closet Organizer

Since closets come in varying sizes, it's best to measure your closet and design to fit your closet specifically.  Use Ana's Free Furniture Design App to create your own custom design and download the plans:

Click here to use this tool in a pop-up full page view

Here's the configuration I used:

  • Depth = 11.25"
  • Height = 48"
  • Width = Inside width of closet minus about 1" 
  • Bays = 3 - you may need more or less bays depending on your closet width.  Make sure shelf spans are between 12" (to prevent hard to access and build shelves) and 36" (to prevent sagging shelves)

The two outer bays I sized to fit standard milk crates.  I do suggest leaving out the shelves on top of the milk crates - they will just be in the way of accessing the milk crates.  And when your child grows (and clothes get longer), you can just remove the milk crates.

The middle shelves are all adjustable.


Cutting the Pieces

Download the plans for your custom design and cut the pieces from 3/4" plywood.  The front edges of the plywood need to be finished with 3/4" edge banding applied to an iron, then trimmed off and sanded.

Step 2

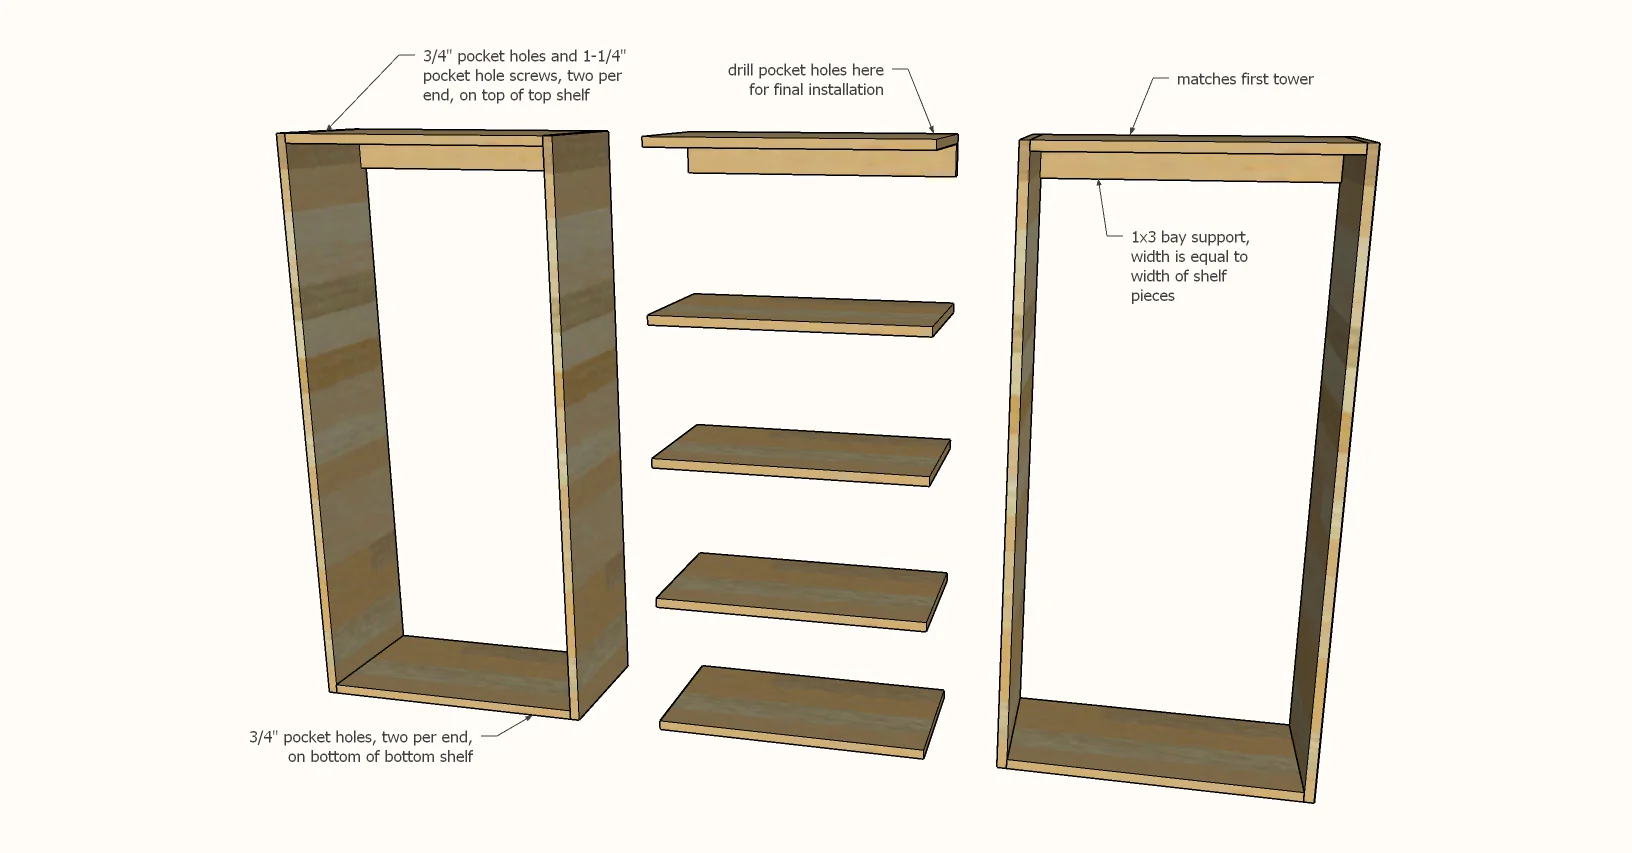
Once you have your carcass pieces cut and front edges finished, simply build the two outside towers with 3/4" pocket holes and 1-1/4" pocket hole screws.

For the middle pieces, also attach the top shelf to a same sized bay support.  The bottom shelf of the middle should be drilled with pocket holes for attaching on final assembly. 

Paint or stain the closet pieces.

Place inside the closet and attach middle top and bottom to the two outer towers.

Hang the organizer about 24" off the floor through the back cleats into studs in the wall.

Add closet rods and shelf pins for adjustable shelves.

Finishing Instructions
Preparation Instructions
Sanded with medium grit sandpaper
Finish Used
Roll and brushed organizer with paint with primer in semi-gloss.
I did sand between coats with fine grit sandpaper.

Comments

Frequently Asked Questions

Wood Questions

What kind of wood should I use?
Most of our plans use standard construction lumber like pine or fir. It's affordable, easy to work with, and easy to find. It's also rapidly renewing and biodegradable, so a great eco friendly choice!

Can I use hardwoods instead?
Yes—just keep in mind they're heavier, cost more, and can be tougher on tools and harder to join together and finish. I recommend not tackling a hardwood project until after you have built several softwood projects.

What if my boards are warped?
Choose the straightest boards at the store. You can often work around slight warps by cutting them into shorter pieces.

What wood should I use for outdoor furniture?
Use red-toned or pressure-treated 2x lumber for framing, and cedar or cedar fence pickets for the decking. Outdoor furniture should be built like a deck—your local home center can help recommend the right wood for your climate.

Will my wood move or warp after I build?
Potentially, especially in humid climates. Let your wood acclimate indoors before building. Once acclimated and kept in a stable environment, movement should be minimal. Remember, most houses are built using framing lumber - it's all about keeping moisture down indoors.

Cutting Questions

Do I need a miter saw?
A miter saw is great, creating fast, safe, and precise cuts, even for beginners. But most plans can be built with a circular saw and a straight edge. If using a circular saw to cut, take time to practice, and get good at making cuts, before cutting your project boards.

How do I get clean cuts with a circular saw?
Clamp your board, measure twice, cut slow, and use a sharp blade. This takes practice, so spend some time making cuts. I go through becoming proficient at freehand cutting in my course, it is worth taking if you want to master this skill.

Will the store cut my wood?
Yes—most stores will do rough cuts to help you transport your materials home. But from store to store, the quality of cuts could greatly vary.

Joinery Questions

What screws should I use?
We recommend star-head self tapping screws for framing, most common sizes are 2-1/2", 1-3/4". Pre-drill if close to the edge or you find your wood is splitting.

Do I have to use pocket holes?
Pocket holes are the cheapest, easiest and fastest way to do some joints - like edge to edge or a hidden fastener joint. There are other methods, but these can be time consuming and expensive. We recommend using pocket holes as indicated in plans for best results.

How do I keep things square?
Use a speed square and measure diagonals after each step. Always clamp joints before screwing to keep them tight and flush.

Finishing Questions

Stain or paint before or after building?
A quick sand before and a full finish after gives the best results. Pre-finish if you're doing two-tone or detailed finishes.

What type of finish?
Use oil-based or water-based stain. For paint, cabinet-grade latex or enamel works great. High use surfaces on indoor projects should get a coat of polyurethane, I recommend a Helsman or Spar or other flexible poly that won't crack or peel with wood movement. For exterior projects, use a finish suitable for exterior fences.

How to get a smooth finish?
Start with a well sanded project. Sand between coats (220 grit), wipe clean, and apply light coats with a foam brush or roller.

Plan Questions

Can I change the size?
Many people do, and that's the great thing about building your own furniture! But do keep in mind going bigger might mean more supports are required, and often plans are optimized for minimal material waste.

Are these beginner-friendly?
Yes—plans are written with simple tools and clear steps in mind, with every effort to make plans as simple as possible.

Can I sell what I build?
Absolutely! Just don’t resell or repost the plans themselves.

General Questions

What tools do I really need?
A drill, circular saw, tape measure, square, and a few clamps will get you through most projects.

Do I need a workshop?
Nope! A driveway or small patio is plenty to get started, just make sure you have a level place to work. If you find you are building several projects a year, creating a small workbench is a great way to store tools and have a dedicated workspace.

What if I mess up?
Wood filler, sanding, or flipping boards goes a long way. Mistakes are part of the process!

What can I do to make my projects look more professional?
Start with straight boards, make accurate cuts, clamp all joints, and line up everything neatly. Sand thoroughly, use a neutral finish, and apply it in light coats for a clean look.

I've never built anything before. Where should I start?
Start with a few smaller softwood projects to get hands-on experience. Or if you're tackling a big project, buy a little extra lumber and practice your cuts and joints first. If possible, work with someone who has a bit of experience.

Care & Maintenance

How long will my furniture last?
With good joinery and regular care, your DIY furniture can last for decades. I have pieces in my own home that are over 20 years old and still going strong! One of the best parts about DIY furniture is that it’s easy to repaint, refinish, or repair—so your projects can grow and adapt with you.

How should I care for outdoor furniture?
Lightly pressure wash or hose it down once or twice a year. Tighten screws and reapply finish as needed to protect it—just like a deck or fence. A little upkeep goes a long way in extending the life of your furniture.

How about indoor furniture?
Regularly dust or wipe with a damp cloth. If it starts to look worn, a light sanding and touch-up paint or stain can refresh it in no time. DIY pieces are meant to be durable and fixable—so don’t be afraid to give them some love now and then.

Want to Build with Confidence?

Check out my ebook: 12 Skills to Build Your Own Furniture
It walks you through the core skills every builder needs—measuring, cutting, joinery, and finishing—so you can build beautiful furniture that lasts.

Still Have Questions?

Email us anytime at [email protected] and we’ll be happy to help!