Rustic Hutch for the Workbench Console

Difficulty
Intermediate
| Print this plan

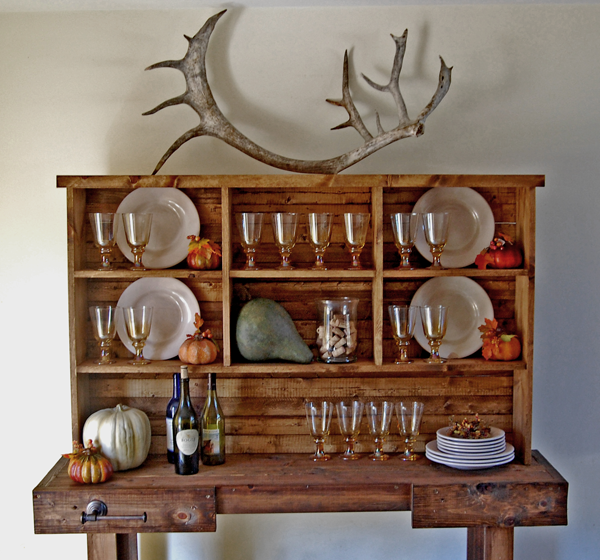
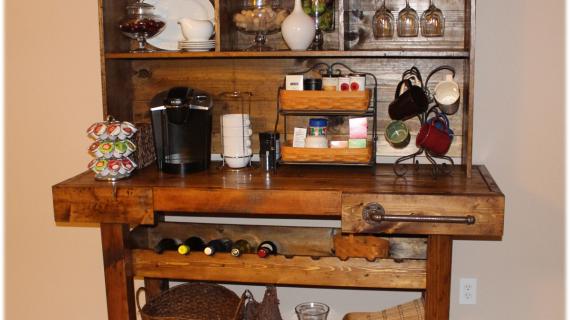
Hutch for the workbench bar/console. Six large cubbies and a large bottom shelf area. Simple crown.

Remember when Amanda totally outbuilt me with her stunning Antique Workbench Console?

Antique Workbench Console Pottery Barn Markham

I was so excited!  But then some of our readers commented that they would love to have plans for the matching hutch.

Pottery Barn Markham Console Plans DIY Build

But I had actually built the hutch for HGTV and was waiting for HGTV to post the plans.  And in the meantime I got outbuilt OUTBUILT by one of our talented readers, Chris G.


And that's without a plan.  But I'm so delighted to tell you that HGTV has posted the plans for the hutch, and you can find a very detailed, step by step plan written by me at HGTV right here. And you can also find plans for the Antique Workbench Console Bar right here.

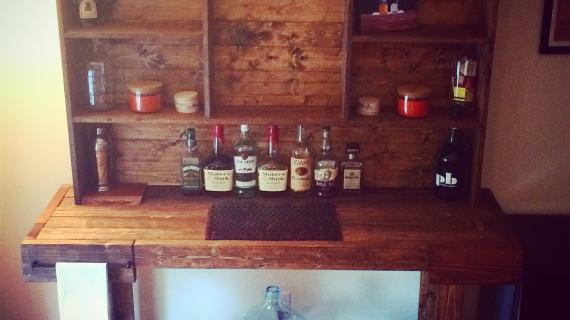
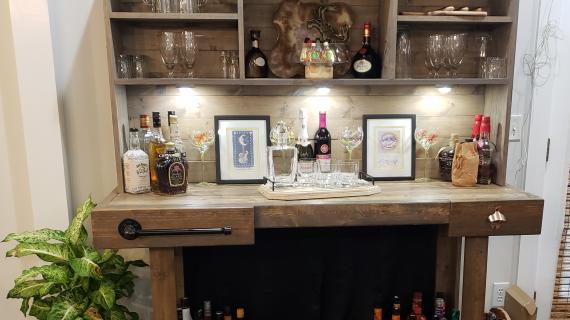
But first, we've got to admire Chris G's amazing work.

Just wow.


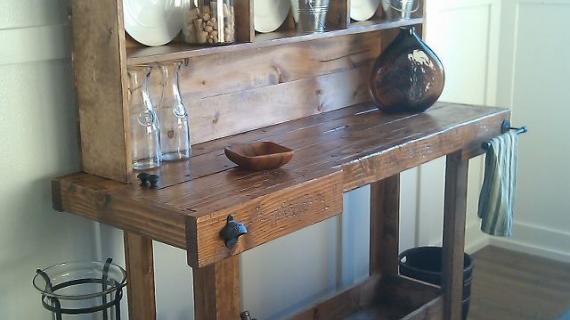
The towel holder.  Maybe I should buy one and then we can put our toilet paper holder back  :)  This looks so good!

Really loved the simple crown on this piece.

But one of my favorite parts was the feet.

But it's the finish that really makes a piece.  And I'm so inspired and amazed by Chris G's finish.

Thanks Chris G for sharing your photos.  If you would like plans for this hutch, HGTV has them published for free here. And the workbench console plans are located here.

Enjoy.

Comments

Jessica (not verified)

Tue, 01/04/2011 - 08:01

I love this, Ana! I have a vintage chest of drawers in my dining room that I adore (lots of storage) but have always really wanted a hutch for display--unfortunately, it's the wrong size for everything they seem to sell. So, making my own is the perfect solution, and I think this will be the perfect balance of elegant and rustic for the space. Thank you for letting us know it's live on HGTV!

N.L.Walke (not verified)

Sat, 01/15/2011 - 05:19

Good morning everyone. We are starting this bench today....will post pictures as soon as it looks like something instead of just a bunch of wood. I'm wondering if anyone has a read a comment (I'm not on facebook!) concerning where Chris found that towel bar he attached to his?! Many thanks!

Guest (not verified)

Sun, 06/05/2011 - 07:14

Did you ever get an answer on where to find the towel bar??? I was able to find the exact bottle opener but can't seem to find anything even close to the towel bar...

1916home.net (not verified)

Sat, 01/15/2011 - 16:41

What do you recommend for a finish on something like this? I really like the finishes on similar tables and furniture at PB and would be interested how to obtain a similar finish. If had some success with using a clean varathane from a spray can. Its thin so doesnt look slopped or brush on and I can control the coats easier than with a brush. Any recommendations I could use to get a similar PB style finish on furniture? GREAT website! I love all the ideas in here!

Lori (not verified)

Mon, 01/31/2011 - 08:56

Chris, it looks like your hutch is a little taller than Ana's. Would you mind giving the dimensions on it? Also, is the table the same dimensions as Ana's? Thanks!

chrisgaiser

Sun, 08/07/2011 - 17:35

I got the towel bar at lowes. Its satin nickel and I sprayed it with RustOleum oil rubbed bronze. Let me tell you stuff is great I have used it on several thing around the house and it looks great! The Height of hutch is 44" and the top shelves are adjustable. I used minwax dark walnut and minwax waterborne gloss poly.

Chris
www.cgwoodwork.com

Brandy (not verified)

Sun, 01/01/2012 - 10:21

Just curious, I have scoured the pages to see if I am to in fact build the workbench or already have it. Any help is so appreciated!! Also, if I am to purchase it, what is the estimated cost? Thank you!

Brandy (not verified)

Sun, 01/01/2012 - 10:24

I knew once I posted the question, I would find the answer. Bench plans are separate. Found them :) Sorry about that!! Cannot wait to build this!

Frequently Asked Questions

Wood Questions

What kind of wood should I use?
Most of our plans use standard construction lumber like pine or fir. It's affordable, easy to work with, and easy to find. It's also rapidly renewing and biodegradable, so a great eco friendly choice!

Can I use hardwoods instead?
Yes—just keep in mind they're heavier, cost more, and can be tougher on tools and harder to join together and finish. I recommend not tackling a hardwood project until after you have built several softwood projects.

What if my boards are warped?
Choose the straightest boards at the store. You can often work around slight warps by cutting them into shorter pieces.

What wood should I use for outdoor furniture?
Use red-toned or pressure-treated 2x lumber for framing, and cedar or cedar fence pickets for the decking. Outdoor furniture should be built like a deck—your local home center can help recommend the right wood for your climate.

Will my wood move or warp after I build?
Potentially, especially in humid climates. Let your wood acclimate indoors before building. Once acclimated and kept in a stable environment, movement should be minimal. Remember, most houses are built using framing lumber - it's all about keeping moisture down indoors.

Cutting Questions

Do I need a miter saw?
A miter saw is great, creating fast, safe, and precise cuts, even for beginners. But most plans can be built with a circular saw and a straight edge. If using a circular saw to cut, take time to practice, and get good at making cuts, before cutting your project boards.

How do I get clean cuts with a circular saw?
Clamp your board, measure twice, cut slow, and use a sharp blade. This takes practice, so spend some time making cuts. I go through becoming proficient at freehand cutting in my course, it is worth taking if you want to master this skill.

Will the store cut my wood?
Yes—most stores will do rough cuts to help you transport your materials home. But from store to store, the quality of cuts could greatly vary.

Joinery Questions

What screws should I use?
We recommend star-head self tapping screws for framing, most common sizes are 2-1/2", 1-3/4". Pre-drill if close to the edge or you find your wood is splitting.

Do I have to use pocket holes?
Pocket holes are the cheapest, easiest and fastest way to do some joints - like edge to edge or a hidden fastener joint. There are other methods, but these can be time consuming and expensive. We recommend using pocket holes as indicated in plans for best results.

How do I keep things square?
Use a speed square and measure diagonals after each step. Always clamp joints before screwing to keep them tight and flush.

Finishing Questions

Stain or paint before or after building?
A quick sand before and a full finish after gives the best results. Pre-finish if you're doing two-tone or detailed finishes.

What type of finish?
Use oil-based or water-based stain. For paint, cabinet-grade latex or enamel works great. High use surfaces on indoor projects should get a coat of polyurethane, I recommend a Helsman or Spar or other flexible poly that won't crack or peel with wood movement. For exterior projects, use a finish suitable for exterior fences.

How to get a smooth finish?
Start with a well sanded project. Sand between coats (220 grit), wipe clean, and apply light coats with a foam brush or roller.

Plan Questions

Can I change the size?
Many people do, and that's the great thing about building your own furniture! But do keep in mind going bigger might mean more supports are required, and often plans are optimized for minimal material waste.

Are these beginner-friendly?
Yes—plans are written with simple tools and clear steps in mind, with every effort to make plans as simple as possible.

Can I sell what I build?
Absolutely! Just don’t resell or repost the plans themselves.

General Questions

What tools do I really need?
A drill, circular saw, tape measure, square, and a few clamps will get you through most projects.

Do I need a workshop?
Nope! A driveway or small patio is plenty to get started, just make sure you have a level place to work. If you find you are building several projects a year, creating a small workbench is a great way to store tools and have a dedicated workspace.

What if I mess up?
Wood filler, sanding, or flipping boards goes a long way. Mistakes are part of the process!

What can I do to make my projects look more professional?
Start with straight boards, make accurate cuts, clamp all joints, and line up everything neatly. Sand thoroughly, use a neutral finish, and apply it in light coats for a clean look.

I've never built anything before. Where should I start?
Start with a few smaller softwood projects to get hands-on experience. Or if you're tackling a big project, buy a little extra lumber and practice your cuts and joints first. If possible, work with someone who has a bit of experience.

Care & Maintenance

How long will my furniture last?
With good joinery and regular care, your DIY furniture can last for decades. I have pieces in my own home that are over 20 years old and still going strong! One of the best parts about DIY furniture is that it’s easy to repaint, refinish, or repair—so your projects can grow and adapt with you.

How should I care for outdoor furniture?
Lightly pressure wash or hose it down once or twice a year. Tighten screws and reapply finish as needed to protect it—just like a deck or fence. A little upkeep goes a long way in extending the life of your furniture.

How about indoor furniture?
Regularly dust or wipe with a damp cloth. If it starts to look worn, a light sanding and touch-up paint or stain can refresh it in no time. DIY pieces are meant to be durable and fixable—so don’t be afraid to give them some love now and then.

Want to Build with Confidence?

Check out my ebook: 12 Skills to Build Your Own Furniture
It walks you through the core skills every builder needs—measuring, cutting, joinery, and finishing—so you can build beautiful furniture that lasts.

Still Have Questions?

Email us anytime at [email protected] and we’ll be happy to help!