
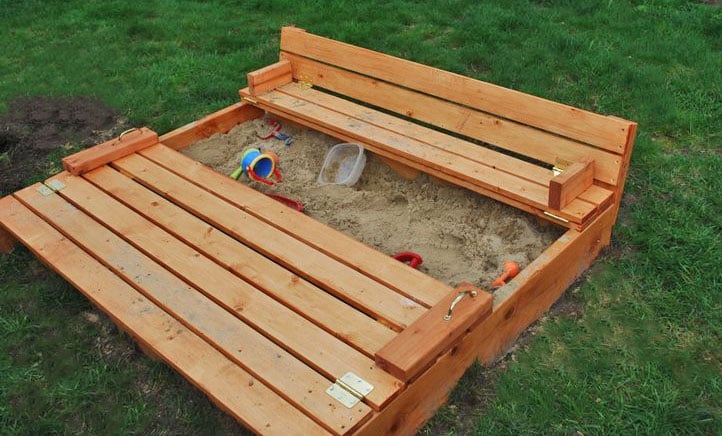

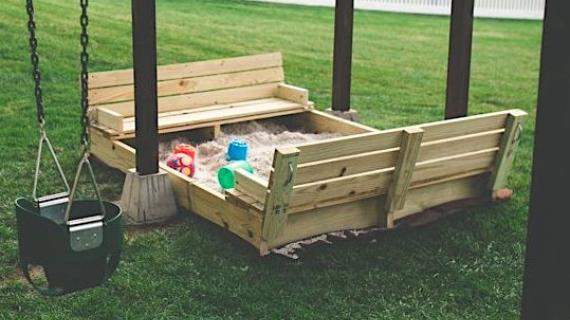
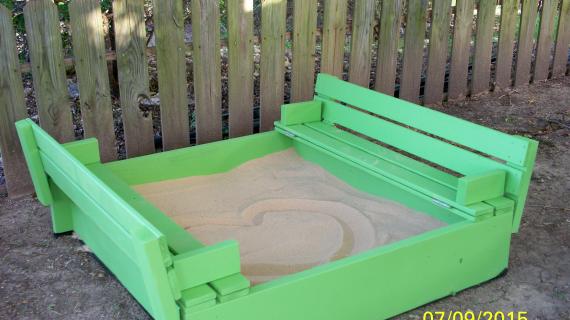
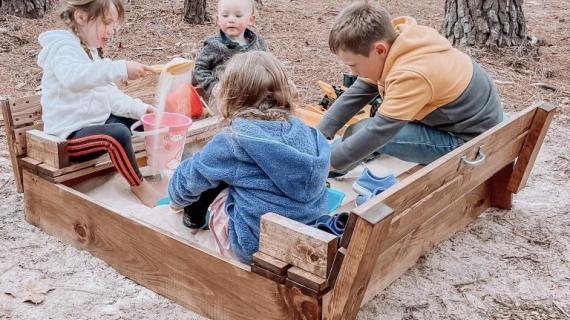
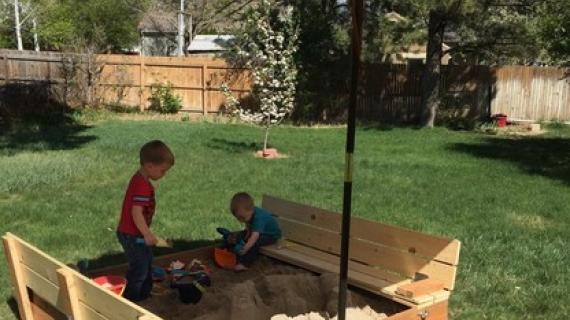
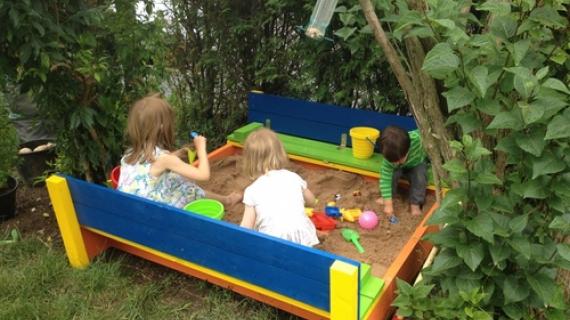
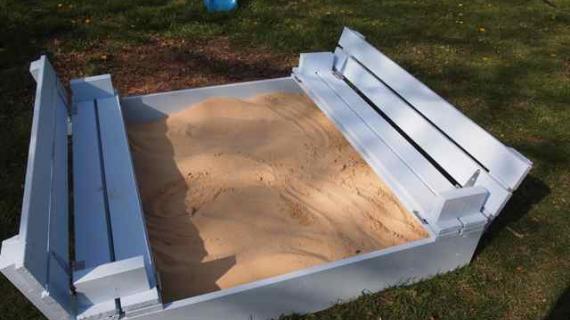
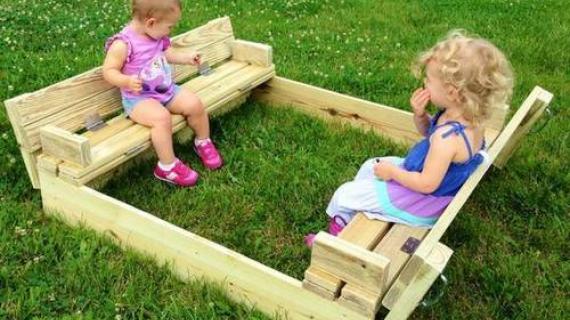
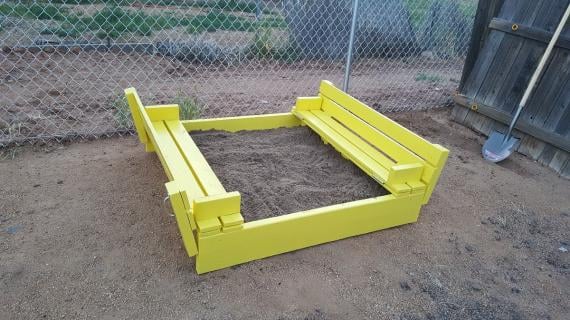
Everyone with a sand box knows that lids are a necessity. But double-duty lids are crazy awesome, especially if they convert to a seat! This easy to build sandbox with built-in seats is a reader favorite and has been built thousands of times.
For more awesome projects (or to leave some love if you've built this) visit my blog at www.ladygoats.com
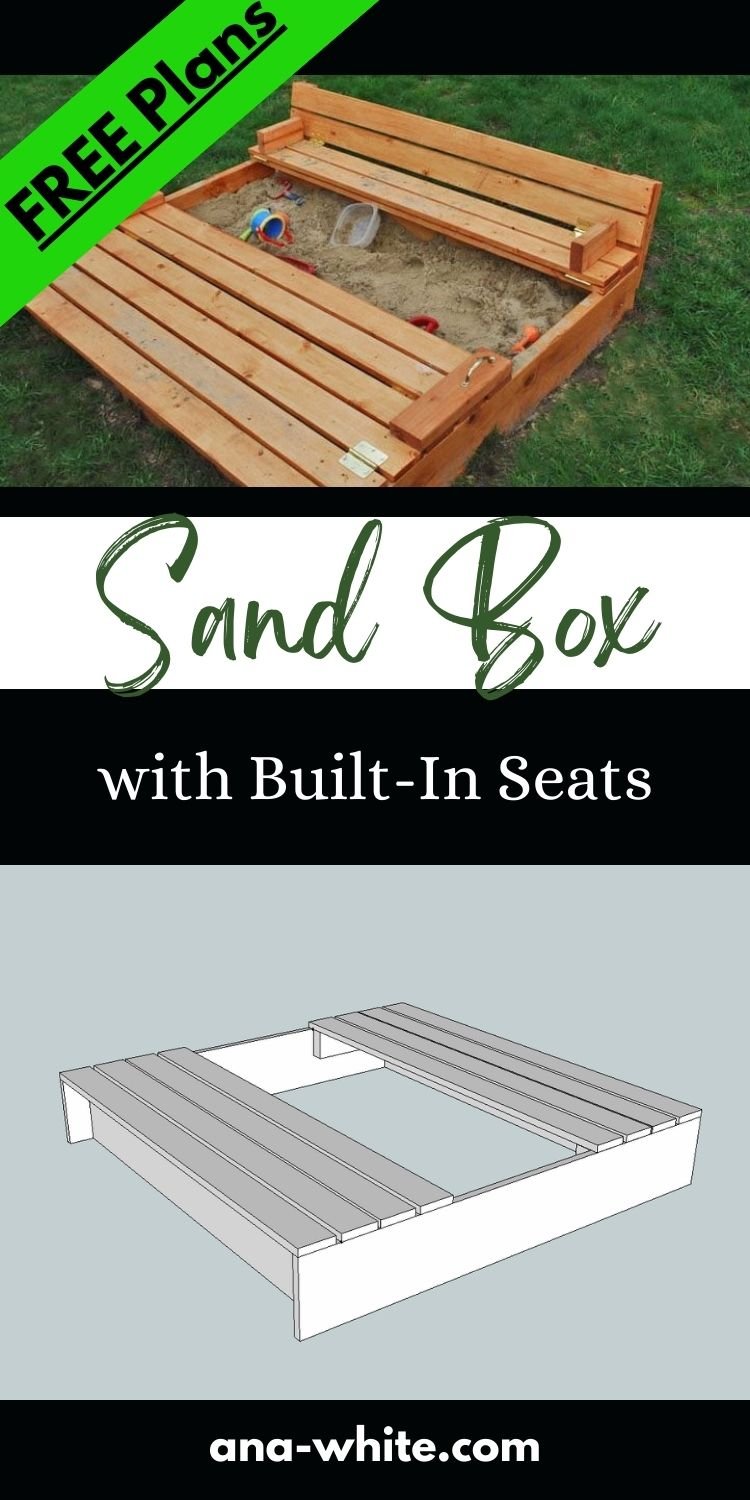
Pin For Later!
Preparation
- 2 - 1 x 8 @ 8 Feet Long
- 6 - 1 x 4 @ 8 Feet Long
- 1 - 2 x 4 @ 8 or Stud Length
You will also need:
- 4 sets of exterior grade hinges
- Rope OR 4 exterior grade handles (search "gate pull" or "gate handle")
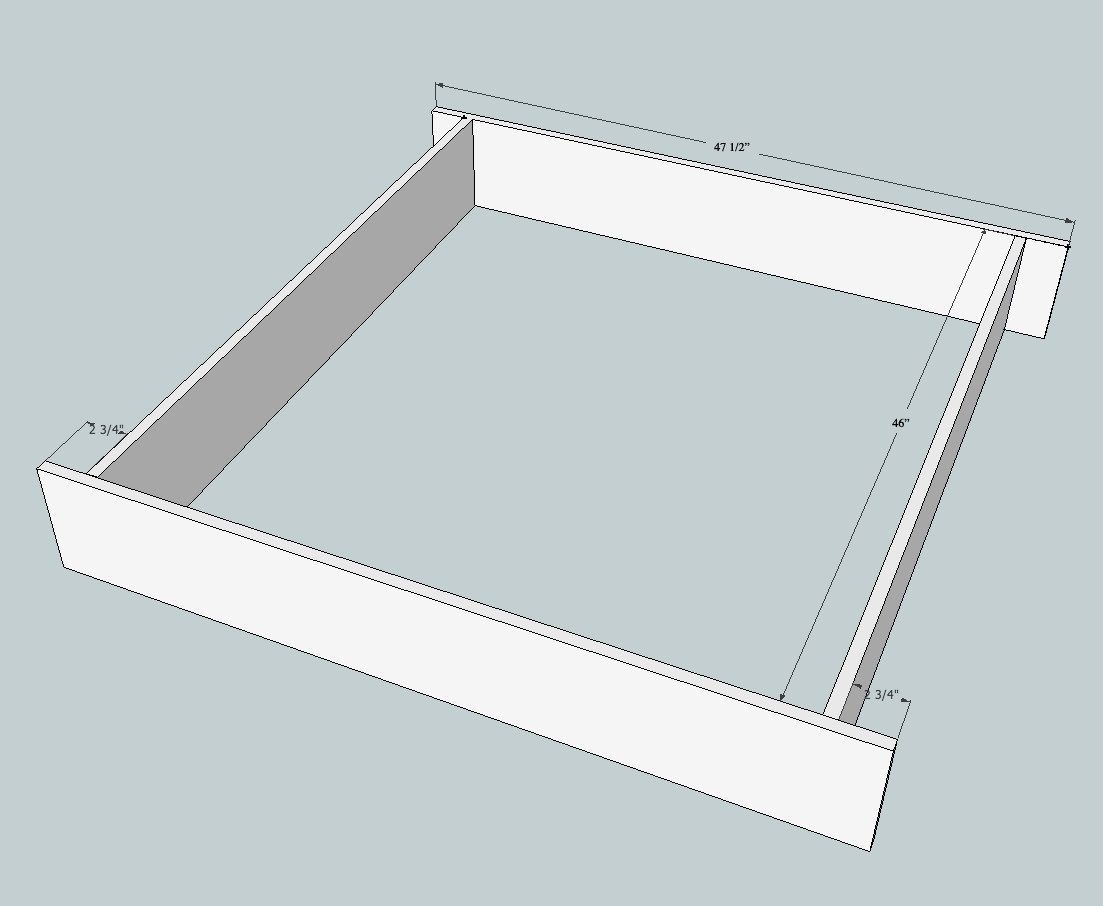
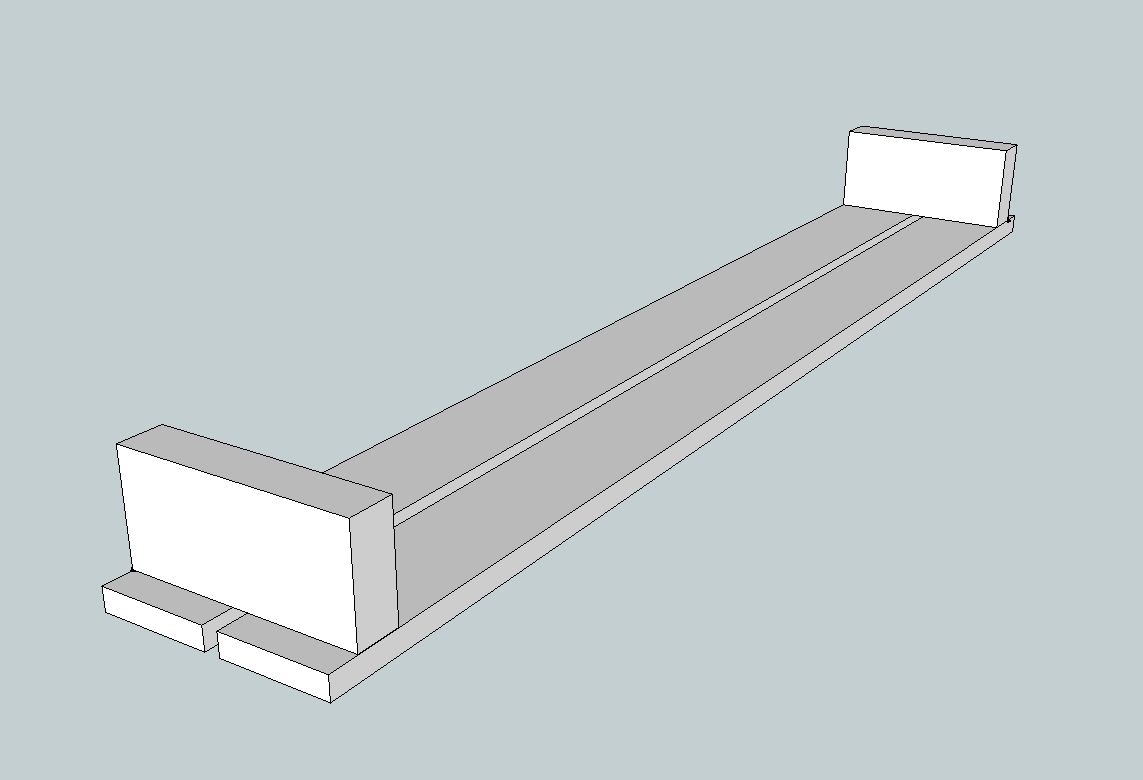
(a) 2 - 1 x 8 @ 47 1/2" - long sides of box
(b) 2 - 1 x 8 @ 46" - short sides of box
(c) 12 - 1 x 4 @ 47 1/2" - top planks
(d) 4 - 2 x 4 @ 7 1/2" - arm rests
(e) 4 - 2 x 4 @ 12 1/2" - back support/handle


Please read through the entire plan and all comments before beginning this project. It is also advisable to review the Getting Started Section. Take all necessary precautions to build safely and smartly. Work on a clean level surface, free of imperfections or debris. Always use straight boards. Check for square after each step. Always predrill holes before attaching with screws. Use glue with finish nails for a stronger hold. Wipe excess glue off bare wood for stained projects, as dried glue will not take stain. Be safe, have fun, and ask for help if you need it. Good luck!
Instructions
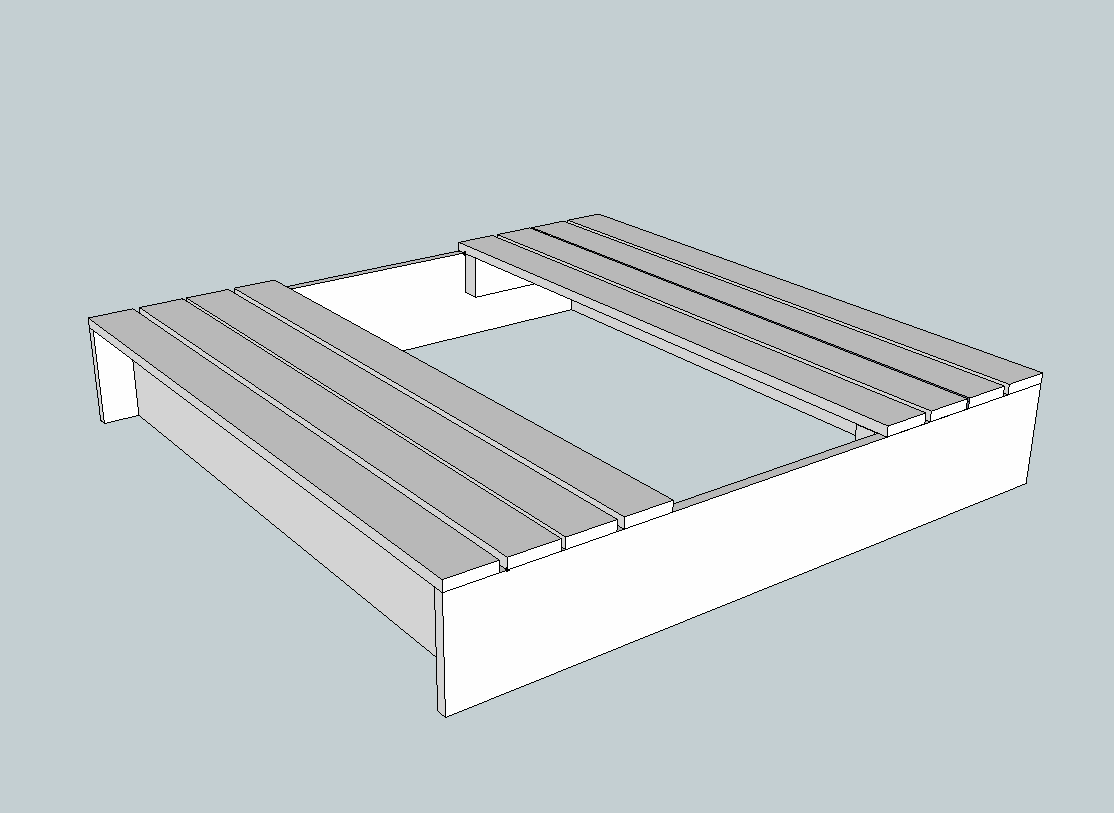
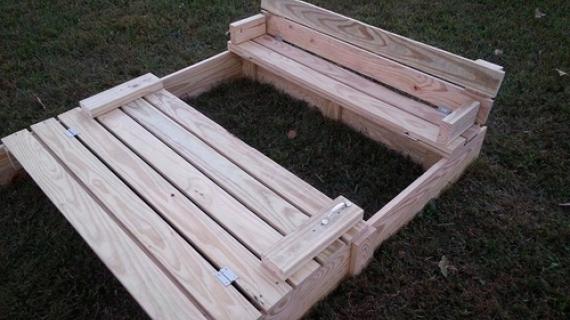
Step 1

Create a basic box, insetting the short sides as shown above. You can either use pocket holes or pre-drill through the long sides and use 1 1/4" screws.
Step 2
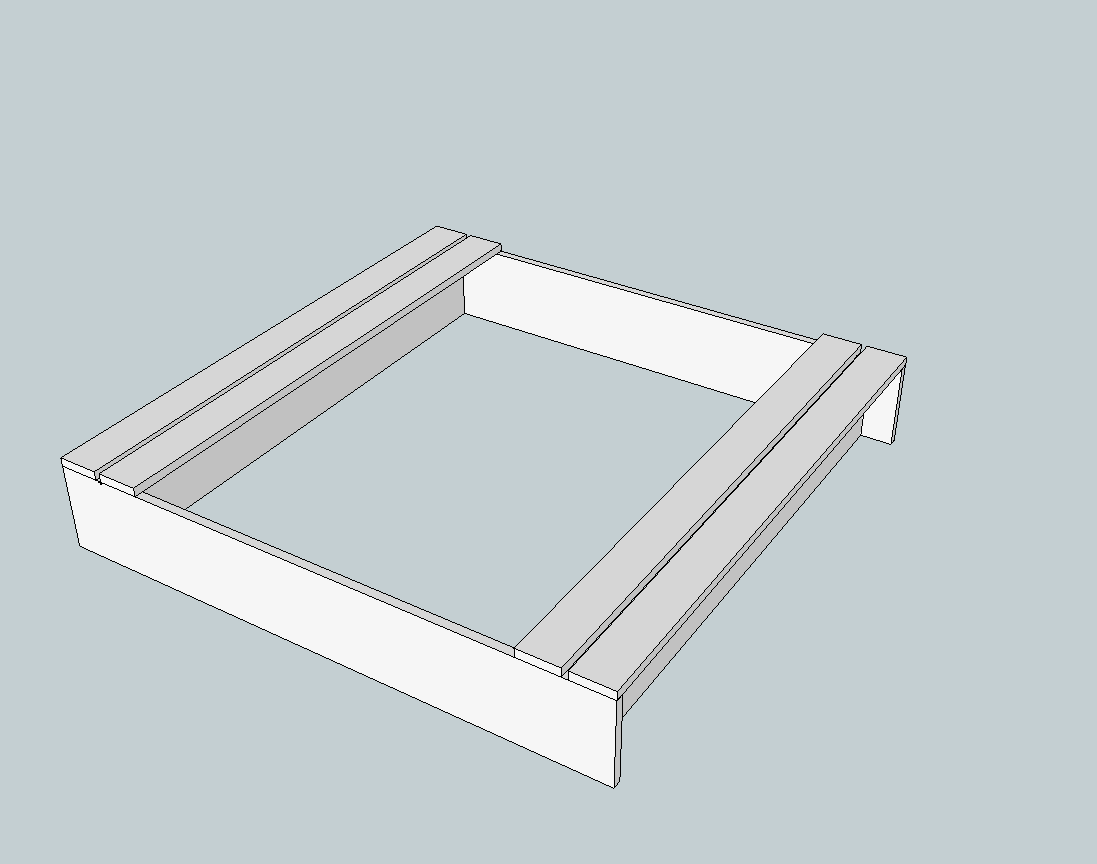
Screw in two planks on each side, countersinking your screws through the top. Space the boards 1/2" apart
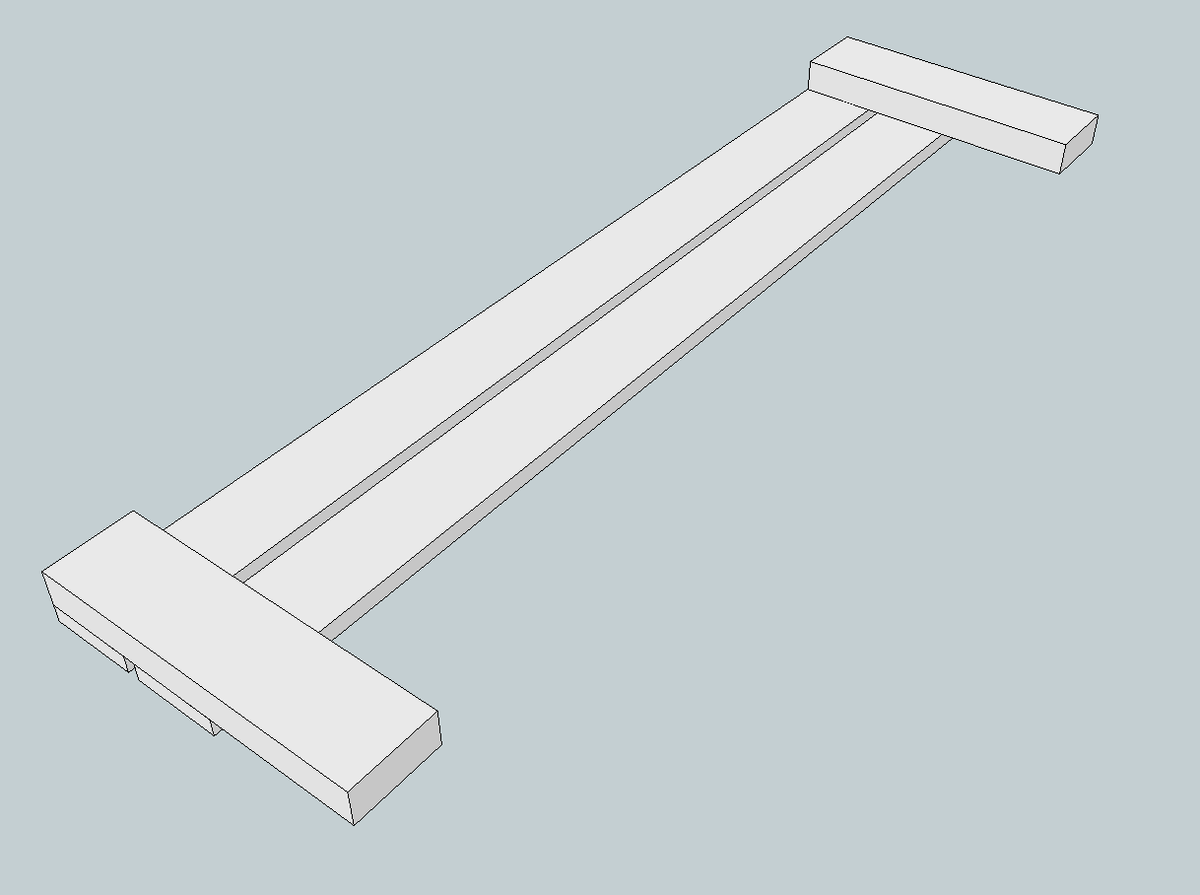
Step 3
Create what will become the seat. Screw the 1 x 4 boards (1/2" apart) onto the 2 x 4 arm rests (d). Make sure that the 2 x 4s are at least 1" inset from the edge to allow for them to fold into the box nicely. (you'll be making two of these)
Step 4
I have NO idea how to add hinges in sketch-up, but attach the seat that you made in step 3 to the plank you screwed in in step 2. I found it easier to attach the hinge to the seat (on the side opposite the arm rests) and THEN attach it to the screwed-in plank. Make sure to space them 1/2" apart.
Step 5
Step 6
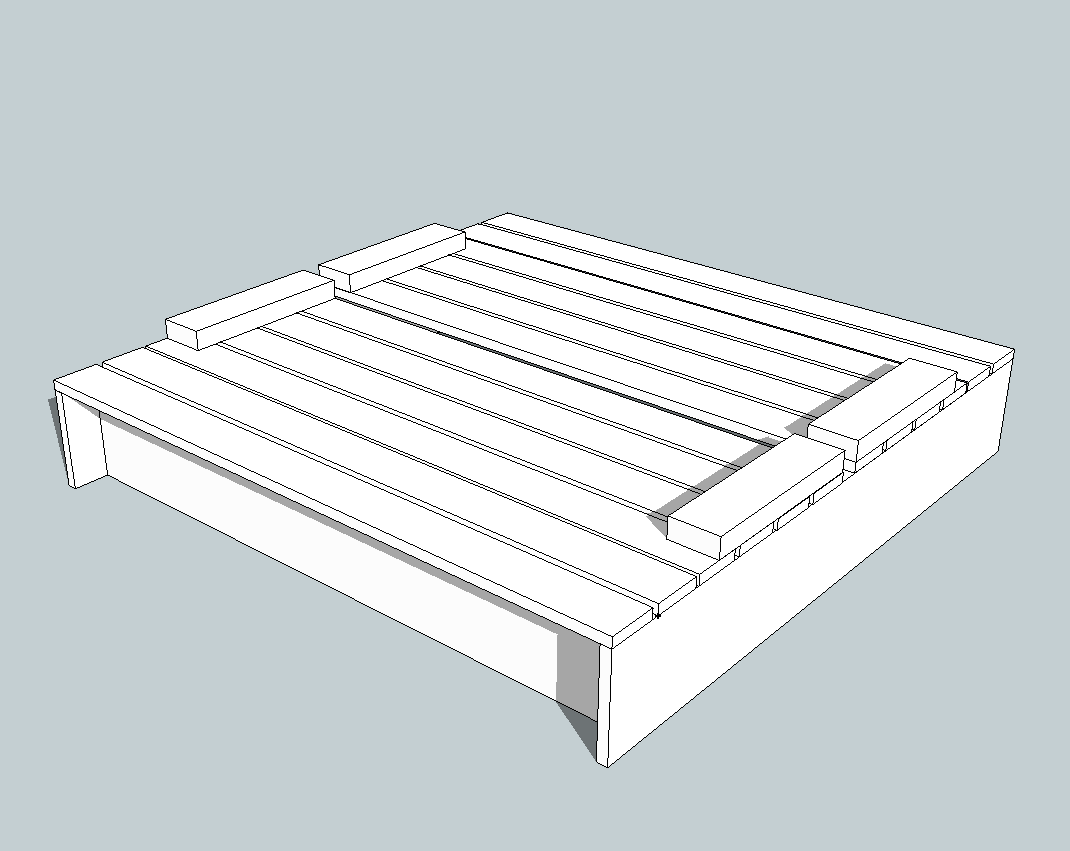
Attach your second set of hinges to the seat back, on the opposite side of the 2 x 4s, and then attach to the seat (easy to do with the seat "up"). Make sure to space the 1/2" apart.


Comments
Amanda H. (not verified)
Sun, 10/16/2011 - 13:26
THANK YOU!!!
I saw this on Pinterest and was just telling my husband about it yesterday in hopes maybe we could figure out how to build it. It is exactly what my little guy needs! Thanks so much for posting these!!
theworldmovesforlove
Sun, 10/16/2011 - 20:08
Great job! This looks
Great job! This looks fabulous! Can't wait to see your pictures! Soon, I hope! : )
thecozychateau (not verified)
Sun, 10/30/2011 - 10:22
Love this! I also saw this on
Love this! I also saw this on pinterest recently and am thrilled to find plans for this. Any concern with little fingers getting caught in the hinges? That is my only concern. Thoughts/suggestions?
Thanks so much!
In reply to Love this! I also saw this on by thecozychateau (not verified)
Lady Goats
Sun, 10/30/2011 - 16:48
Little Fingers
Hi there! We've actually not had ANY problems with that so far. The seat pretty much stays put until everything's lifted to close it, and I really don't think little kids will be able to do that. I have a pretty strong 6 year old that can get mine closed, but mine's only 2 feet wide. The added 2 feet will add weight that'll keep it safer from the kids moving it.
thecozychateau (not verified)
Mon, 10/31/2011 - 11:45
Thanks so much for taking the
Thanks so much for taking the time to answer my question! All the best. :)
DJHITMAN29
Tue, 02/07/2017 - 08:36
Latches
Hello! I'm new to the site but wanted to say that I've seen similar plans (possibly on YouTube) where the builder added some latches so that the possibility of accidents is brought down to a minimum. Small cost and easy fix to save your children's fingers! :)
Guest (not verified)
Sun, 10/30/2011 - 19:07
Ana Thank you for this plan,
I have been wanting to build a sandbox with a lid that is easy to open and close. Thank you this one looks great.
Guest (not verified)
Sun, 10/30/2011 - 19:07
Ana Thank you for this plan,
I have been wanting to build a sandbox with a lid that is easy to open and close. Thank you this one looks great.
Guest (not verified)
Mon, 01/09/2012 - 11:20
I would LOVE to see a
I would LOVE to see a pic/diaghram of this opened up :-)
In reply to I would LOVE to see a by Guest (not verified)
Lady Goats
Mon, 01/09/2012 - 11:30
Opened up
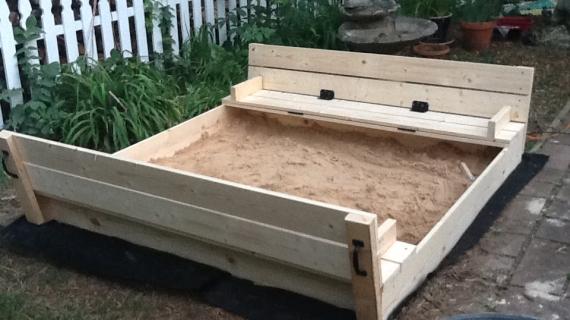
There's a photo in the brag post, here http://ana-white.com/2011/10/modified-sand-box-lid
niecey
Mon, 01/16/2012 - 17:12
Looks great
I'd love to make this when I get done with the gazillion other projects I have lined up for myself. hehe. I'm going to try to come up with some sort of canopy to go over it too...Thanks so much for the plans. My kids will have a ton of fun.
Guest (not verified)
Fri, 04/06/2012 - 16:04
Am I missing something or is
Am I missing something or is the cut list off? Should it be 4 cuts for the arms and 4 for the back rests, 2 per side
Guest (not verified)
Fri, 04/06/2012 - 16:12
Cutlist
Wondering if the cultist for the 2x4 should be 4 pieces for the arm rest and 4 pieces for the back rest
In reply to Cutlist by Guest (not verified)
Lady Goats
Fri, 04/06/2012 - 17:26
Yes, you're absolutely right!
Sorry 'bout that. There should totally be 4 arm rests and back... thingies.. (Duh, Gina!)
LMf (not verified)
Mon, 04/16/2012 - 14:43
Cut list and lid
Hi thanks for the plans on this. Sadly we must have downloaded them just before the cut list was edited. Had ordered the wood precut from timber yard and husband thought I'd ordered incorrectly.
On the lid, we ran into trouble with the 1/2" spacing. 12-1x4 without spacing would be 48". Even accounting for the fact that the 1x4s came up a bit less than 4, more like 3 3/4, we still ended up having to adjust everything at the end.
In reply to Cut list and lid by LMf (not verified)
Lady Goats
Mon, 04/16/2012 - 19:26
Lid Spacing
Hi! Sorry, it was just a total blonde moment! You're gonna need 4 of each, and I feel bad for messing up something so obvious! Typically, 1x4s should measure approx 3 1/2, and that's what I'd accounted for in the plan. Hopefully it's an easy fix for ya, and tell the husband I take full blame! :o)
Big Grizz (not verified)
Sat, 04/28/2012 - 05:56
Very cool sandbox
This is an easy project to build and looks great. The only thing I changed was I cut my arm rests at 7 1/2" instead of 6 1/2". It made it very easy to build that section. No extra measuring or centering.
In reply to Very cool sandbox by Big Grizz (not verified)
Lady Goats
Mon, 04/30/2012 - 09:09
Good Call
And I love how yours turned out! I'll update the cut list, thanks for the head's up!
Loral Johnson (not verified)
Tue, 05/08/2012 - 09:08
Compound Mitre Saw
Hi,
I'm heading to Lowe's now to get some lumber to build one of these for my one Grandson for his birthday.
I was looking for some ideas online when I found your site and after reading this over, it looks like this one will work nicely.
I was wondering why you specified a compound mitre saw as a tool needed? I have a DeWalt compound mitre saw, but I don't see any cuts that even require a mitre saw at all unless I missed something?
Anyway, the posted finished projects look great, and like a few others, I'm making my sides 2" X 8" for more stability as I will be moving it to their home after building it.
In reply to Compound Mitre Saw by Loral Johnson (not verified)
Lady Goats
Tue, 05/08/2012 - 11:54
"Tools required"
Hi Loral!
I listed the compound miter saw as a tool needed because there's a checklist to choose from, and there isn't just "chop saw". You can cut the boards however you want, there aren't any particular reasons you need a compound miter saw. Take a hand saw, if you'd like! ;-)
Hope this helps!
Gina
Loral Johnson (not verified)
Tue, 05/08/2012 - 14:43
Tools Required
Hi Gina,
I thought as much, but I read quickly and was wanting to run to get my lumber quick, and didn't want to miss a step. I didn't see any cuts requiring a compound mitre.
A note to those planning on using 2 X 8 boards for sides, you will have to run the boards the opposite way so they straddle the 47½" cut. Otherwise, you are looking at 49¼". Don't let that throw you, just run your 1 X 4's along the 47½" edge and all will work out.
I'm about 75% complete, and thinking about starting fresh again tomorrow.
Would you tell me how to post photos like the others have when I complete my project?
Loral
Sherryann112
Thu, 05/24/2012 - 14:46
sandbox
I am trying to post my finished project - what's a URL? Thanks, Sherry
Sherryann112
Thu, 05/24/2012 - 14:55
sandbox
never mind, figured it out and posted! Sherry
Erin Riley (not verified)
Fri, 05/25/2012 - 19:50
Oh my gosh! I pinned a
Oh my gosh! I pinned a similar picture of this over a year ago, but it was a link to purchase it from over seas! I was hoping I could figure out how to make it by looking at the pictures. You have no idea how excited I am that you have made these plans! Thank you, thank you, thank you!
Debbie Howell (not verified)
Fri, 06/15/2012 - 20:53
Hmm...
Did Home Depot steal your plans??? They are posted on their front web page.... The wording is awfully close for the buy/cut list....
Rachel Rich (not verified)
Sat, 06/16/2012 - 11:12
Wow! they DID steal your plans
Wow! just looked at Home Depot website--I think they copied you. Thank you for posting this--your plans are awesome and I can't wait to make my own for my little girl.
Jimmy B (not verified)
Tue, 06/26/2012 - 15:23
Easy!
This went together in about 2 hours...and only because I misread the list and got 1 X 6s and had to rip them down to 3-1/2" on my table saw. Thanks!
Kulia B (not verified)
Thu, 06/28/2012 - 13:39
Paint/Stain First?
This is exactly what I've been looking for!
I've got all my wood cut & ready to go, but should I stain it first? This will be my first "large" project, so I have ZERO experience! I'm SO excited to get it done! I now have a huge list of things I want to tackle! Thanks!!
In reply to Paint/Stain First? by Kulia B (not verified)
Lady Goats
Thu, 06/28/2012 - 20:19
Yes!
It will make your life SOOOOOO much easier if you paint or stain it before assembling. A note from now-on: "finish" your wood for outdoor projects first, that way the elements can't make their way into the wood that isn't "finished"!
Peter (not verified)
Mon, 07/02/2012 - 12:48
I like you design, very
I like you design, very clever and looks great. I am going to build one for my daughter over the coming weekend. There will be one more of your sandboxes build in the other side of the world - in Slovakia. Thanks for inspiration.
Peter (not verified)
Mon, 07/02/2012 - 12:51
This design looks great, very
This design looks great, very clever. I am going to build one for my daughter over the coming weekend. There will be one more of your sandboxes built in the other side of the world - in Slovakia. Thanks for inspiration.
In reply to This design looks great, very by Peter (not verified)
Lady Goats
Mon, 07/02/2012 - 22:45
Oooh, how exciting!
You'll have to take a picture of the Sandbox on the Other Side of the World :-)
Heidi Sentivan
Wed, 07/18/2012 - 16:45
The Design Worked Great!
The design worked great. I adjusted the size to 5'x4' (with a taller seat back). I am going to try posting up some brag shots now. The cover of the new Home Depot mailer had a very similar project. Although I thought your instructions were better!
-Heidi
http://www.statelykitsch.com/diy-sandbox-with-lid-benches/
Jess Holland (not verified)
Tue, 07/24/2012 - 17:05
Modifying
So I am completely in love with this project, and so need it! We have had problem with neighborhood cats using it as a litter box and when we use the canvas cover that came with our swing set we get GIANT crickets in it. They leave a mess too. So i need something that will keep the cats out but has light so the crickets stay out. Your cover design is great but our sandbox is under a tower which has a rockwall on one side a slide on an adjacent side. So the posts for the tower are inside the sandbox in each of the four corners with two of the corners having a support cross beam that crosses the corners infront of the posts. So I am having a hard time planning how the seat will fold up with the post and how to install the 1x4's for the cover/seat...any suggestions??
In reply to Modifying by Jess Holland (not verified)
Lady Goats
Wed, 07/25/2012 - 15:41
Sand Box Mods
Hi Jess, I am having a tough time coming up with a solution. Would you mind emailing a picture of the sandbox to me at ladygoats (at) gmail (dot) com? Maybe I can help when I see it!?
Nannybonk (not verified)
Wed, 08/01/2012 - 15:10
Waterproof?
Hi, I am really interested in making this for my daughter. However, I am concerned that this wont be very waterproof and the sand will end up getting waterlogged for when she comes to use it. How waterproof is the sandpit? Any ideas of how to make it more waterproof.
Thanks :)
Gunfus (not verified)
Thu, 09/06/2012 - 07:53
I also share the same concern..
I also share the same concern.. not sure how to solve it now, or how water proof the unit is. Any comments?
In reply to I also share the same concern.. by Gunfus (not verified)
Lady Goats
Mon, 09/10/2012 - 09:08
Waterproofing
Well, I guess a good way to go about waterproofing the sand box would be to fill the cracks with clear silicone sealant? That's what I did with my shed. The thing is that it doesn't create a tight seal when you put the lid down (don't get me wrong, it's not big!), so water could definitely get it. It would be significantly lessened by sealing the top, though....
In reply to Waterproof? by Nannybonk (not verified)
claydowling
Mon, 09/10/2012 - 13:13
Waterproofing Necessary?
Will waterproofing really be needed? As a kid my sandbox was just a hole in the yard with 2x6 forming a frame around it. Because sand drains really well, the only time water was a problem was while it was raining (mom made me come in). Immediately after the rain it was a little too wet, but within a pretty short time it was dry enough to use. In fact, my favorite time to play in it was first thing in the morning, while it was still wet from the dew but before it had dried out completely.
If you think that will be a problem though I think Lady Goats' suggestion is excellent.
Lexy (not verified)
Thu, 11/29/2012 - 15:45
How to Modify it bigger...
Hello,
Im trying to figure out how to make this larger.
Ive never really done a wood project before but I would like this to be 6ft x 6ft rather than the 4ftx4ft i think it is since I have my 2 kids and then their 3 cousins who come to play. The fame i can imagen would be easy to extend but I dont know what the measurements for the seats would have to be to make it a good fit to reach so that it will be able to be folded down like in this design since we have 2 large dogs who LOVE to take over the yard and do as they please. Could you please help me with a modified walk through so it can be bigger?I WOULD GREATLY APPRECIATE IT!
Richard (not verified)
Sun, 12/23/2012 - 21:41
Sandbox
Just stained box #4 for each of the grand kids
Sandra Brown (not verified)
Thu, 12/27/2012 - 14:42
Bigger Box
I would love to know how to make this bigger also! I am a preschool teacher at a public school so I need one big enough for 6 to 8 kids at a time. I don't want to seats to be too heavy for me and my assistant to lift. Hoping to have our All-Pro Dads help with this project!
bwilkins
Mon, 04/15/2013 - 09:31
Built-it
I built this last night. It took me about 3 hours. Since I wanted to have a bottom, I took a paint tarp and stapled it to the sides of the box so the sand has something to sit in and weeds won't push up through the sand. Thank you for the wonderful plans
c-e-fogus
Tue, 04/23/2013 - 17:44
Thanks for the tip!
I will be making this for my boys and this is a great tip to keep the sand inside the box. Well, except for my kids throwing it out! Thanks!!
Addie's Daddy
Mon, 06/10/2013 - 06:25
tarp in the bottom
Aren't you concerned about it holding water in the bottom if you use a tarp? I stapled landscape fabric to the bottom of mine. Hoping that keeps the weeds out and allows the water to drain.
MommyinHonduras
Tue, 06/04/2013 - 14:04
Needs help making a bigger box
I have a 7 ft by 9ft cement block rectangle. I am adding sand and want to add benches like these that is strong enough for the kids to stand on when closed. And thought for a middle support when closed or what size wood to use that can span the 9ft?
Addie's Daddy
Mon, 06/10/2013 - 06:22
Just finished..some suggestions
I just finished this for my daughter and it turned out great. The only comments I wanted to share are that you should consider a middle support under the bench plank in Step 2. I'm also thinking of adding middle supports for the other planks when the box is closed so she can stand on it without bowing.
The other suggestion is to make sure when you get the hinges the screws are not too long. I got gate hinges and the screws ended up coming through the 1x4 plank which meant you'd be sitting on them. Ouch! I exchanged the hinges for smaller galvanized versions.
Also, curious why you didn't do the planks 48" long instead of 47.5"? If they were 48" you would only have to cut them once. The only difference is you'd have a 1/4" overhang on each side but I don't see that being an issue. Or just make the short sides of the box 46.5" and you'd have no overhang.
Thanks for the design. My daughter loves it!
In reply to Just finished..some suggestions by Addie's Daddy
Lady Goats
Tue, 06/11/2013 - 00:00
Awesome tips, thanks!
Excellent points about the screws. That would be a pain! LITERALLY!
I don't know about a support. Maybe if you add one, you could take a picture to explain. Also, I didn't want to list the planks at 48" because not all boards are exactly 8', *and* if you cut one at 48", the blade takes up anywhere from 1/8"-3/16", so one would be shorter than the other. Not a big deal, but I wanted to make sure all bases were covered.
Glad you like the sand box!
Vincentbobby@y…
Mon, 11/03/2014 - 20:08
SandBox
I built this, but used and the base of a play fort and swing set above it. It really came out beautiful. Thank U for the plan