Sawhorse Outdoor Bench

outdoor dining bench plans
Difficulty
Advanced
| Print this plan

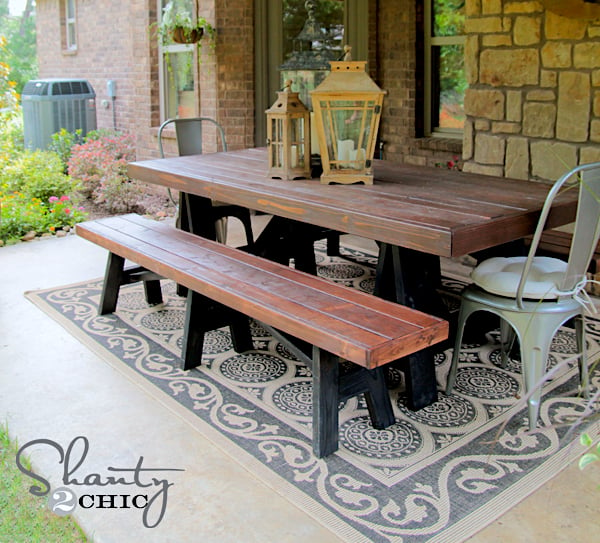
Build your own outdoor benches to match our Sawhorse Outdoor Table Plans.

Free step by step plans with diagrams from Ana-White.com

outdoor dining bench plans


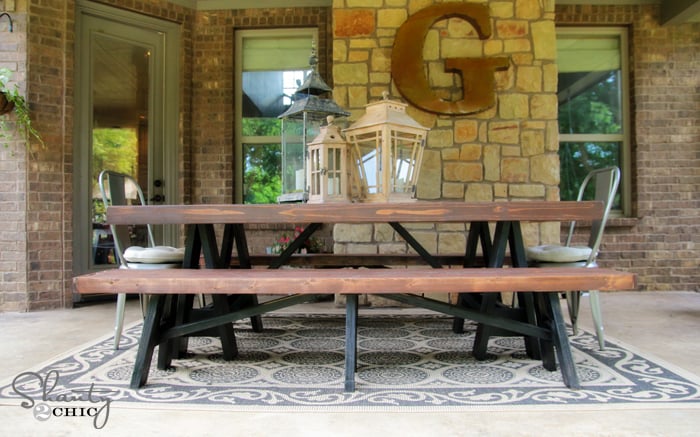
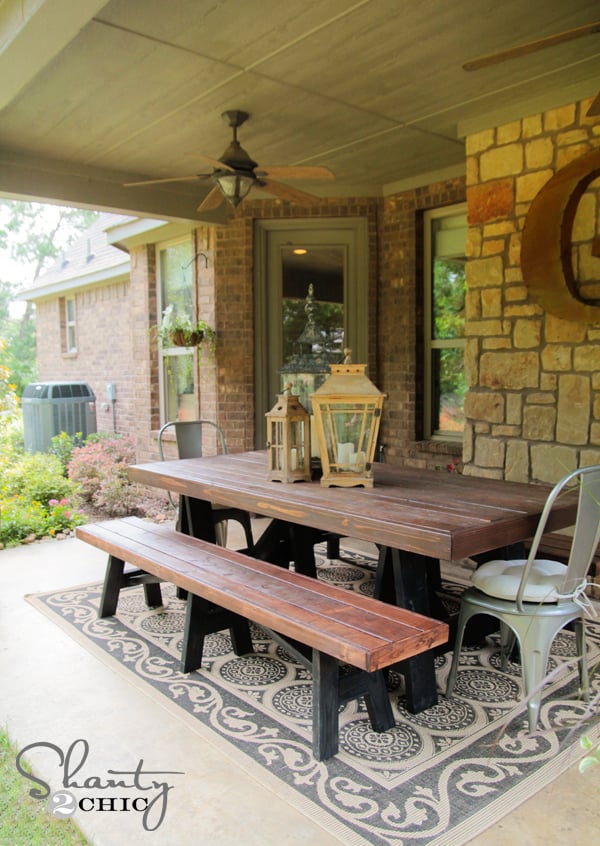
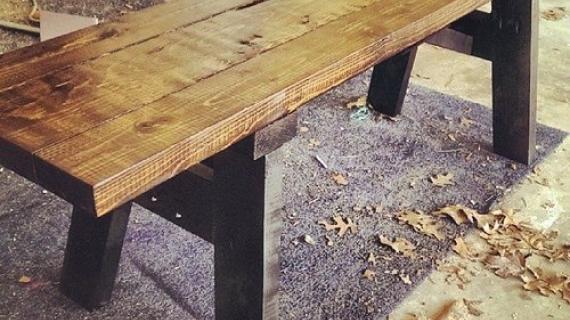
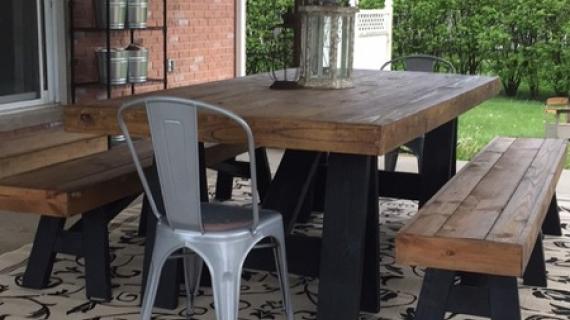
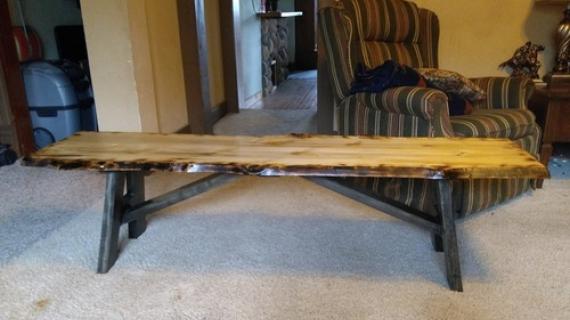
See More Photos: I teamed up with Whitney from Shanty2Chic to design and build these benches and share the plans with you!

Build the Matching Table: The matching table plans are available for free here.


Dimensions
sawhorse outdoor bench plans
Dimensions are shown above

Preparation

Shopping List

5 - 2x4 @ 8 feet long

1 - 2x6 @ 8 feet long

Cut List
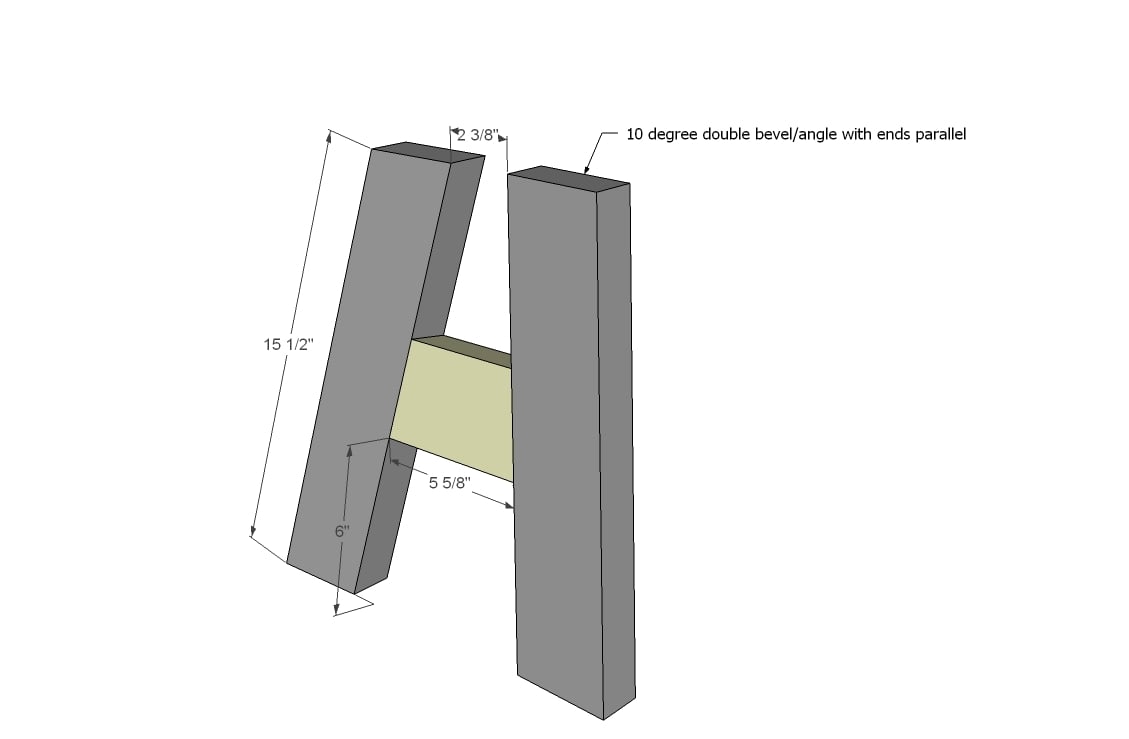
  • 4 - 2x4 @ 15 1/2" long (both ends cut at 10 degree double bevel ends ARE parallel)
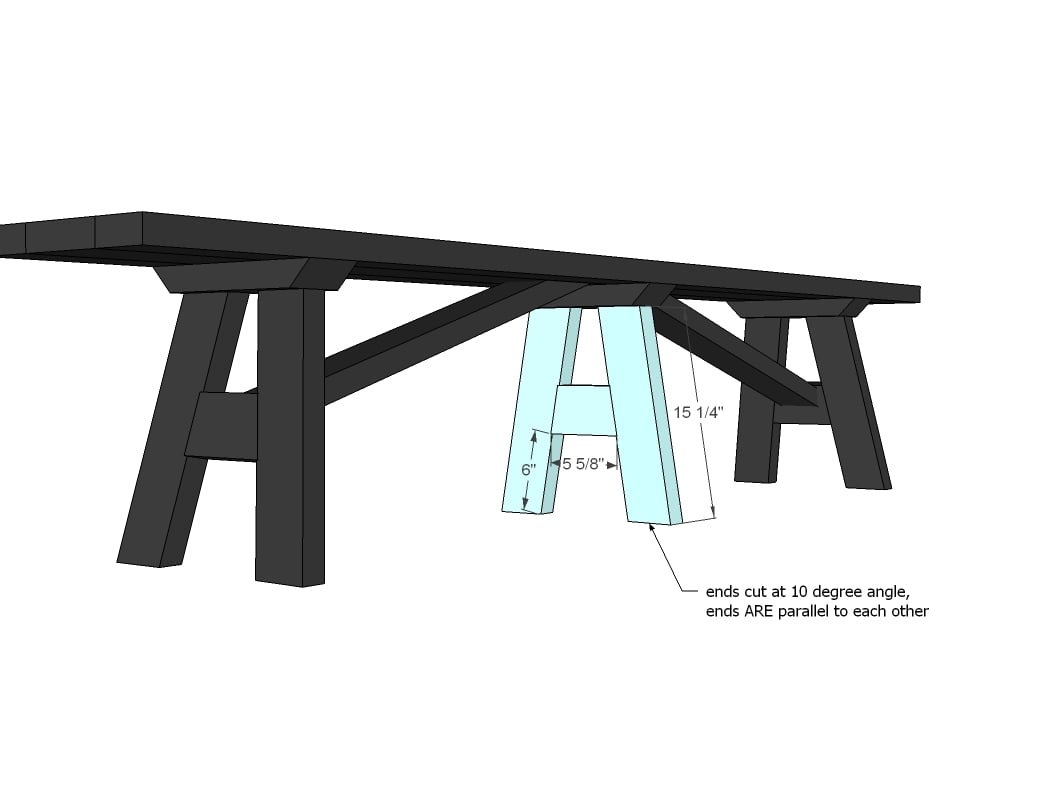
  • 2 - 2x4 @ 15 1/4" long, both ends cut at 10 degree ANGLE off square, ends ARE parallel (not a double bevel like the end legs)
  • 3 - 2x4 @ 5 5/8" long (longest point, both ends cut at 10 degrees off square, ends NOT parallel)
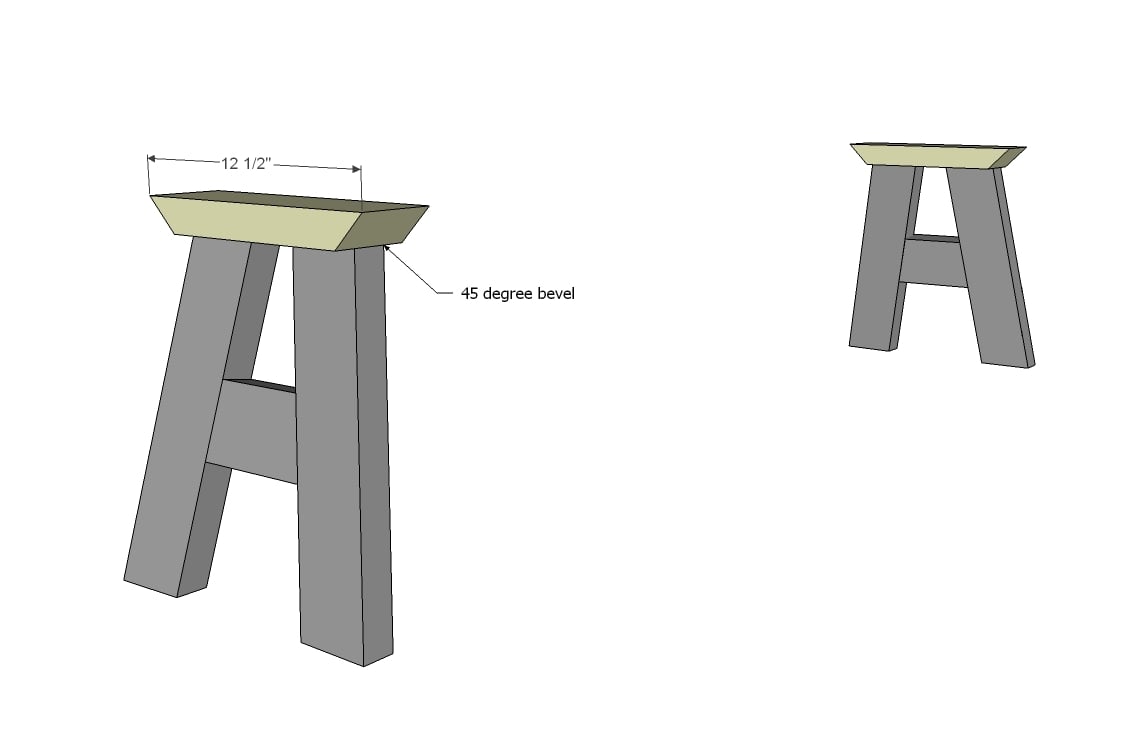
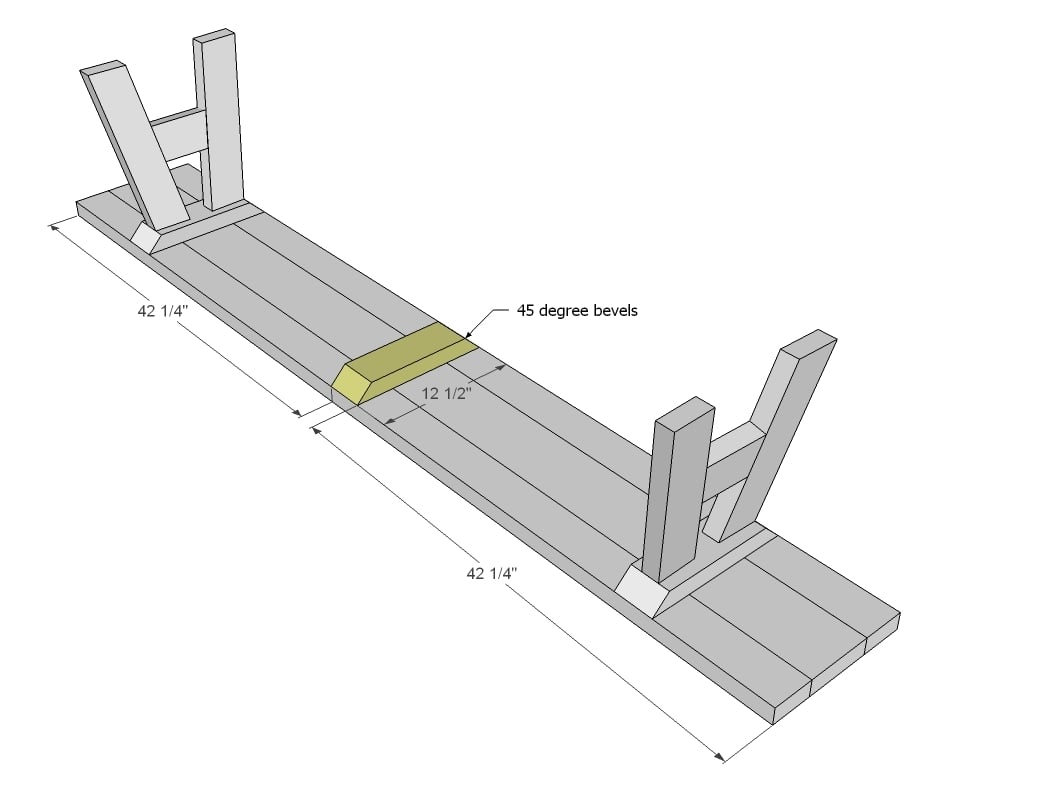
  • 3 - 2x4 @ 12 1/2" long (both ends cut at 45 degree bevel, ends NOT parallel)
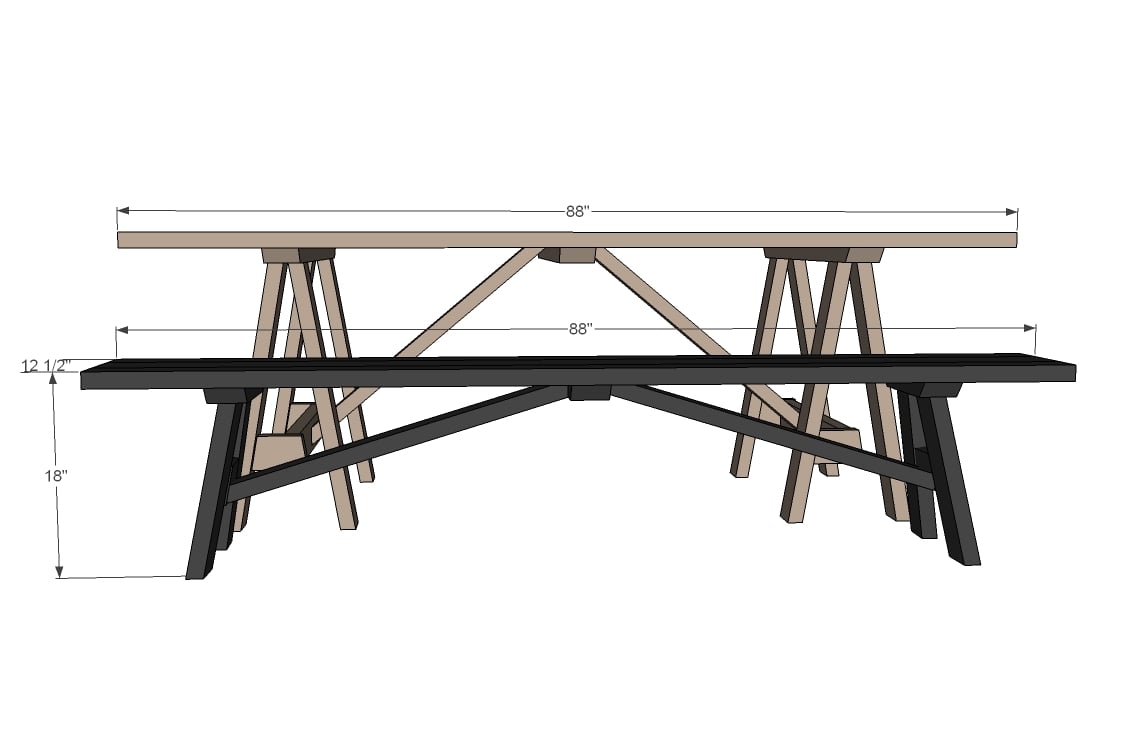
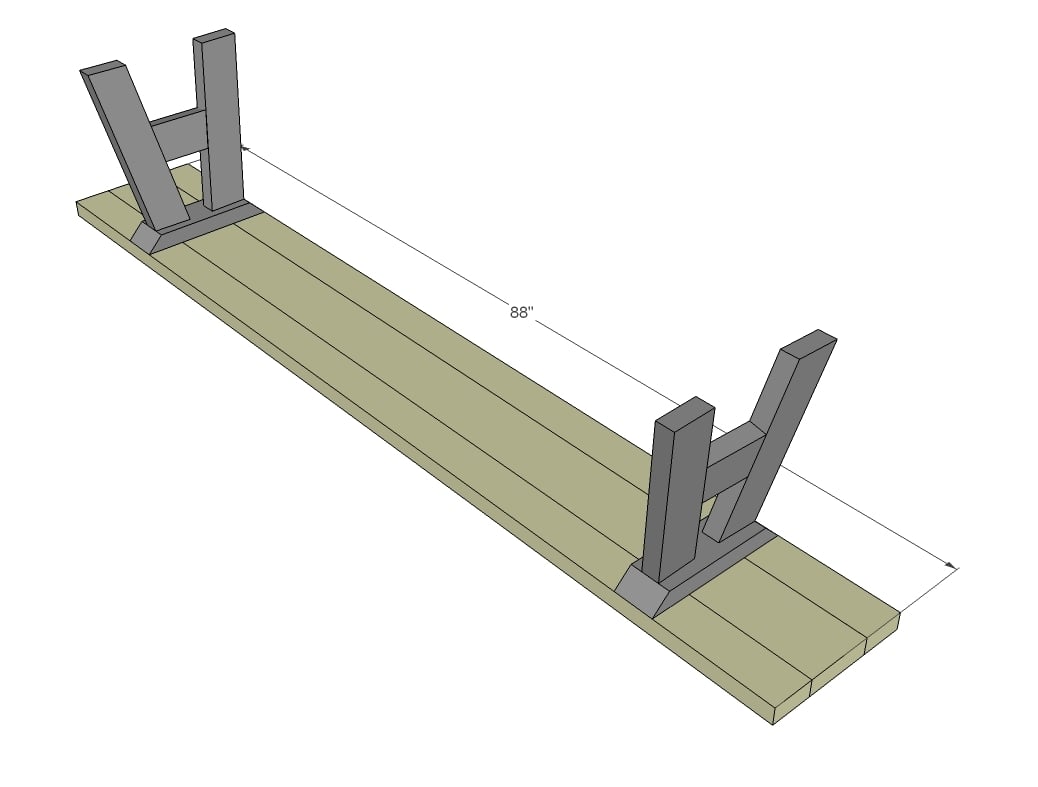
  • 2 - 2x4 @ 88"
  • 1 - 2x6 @ 88"
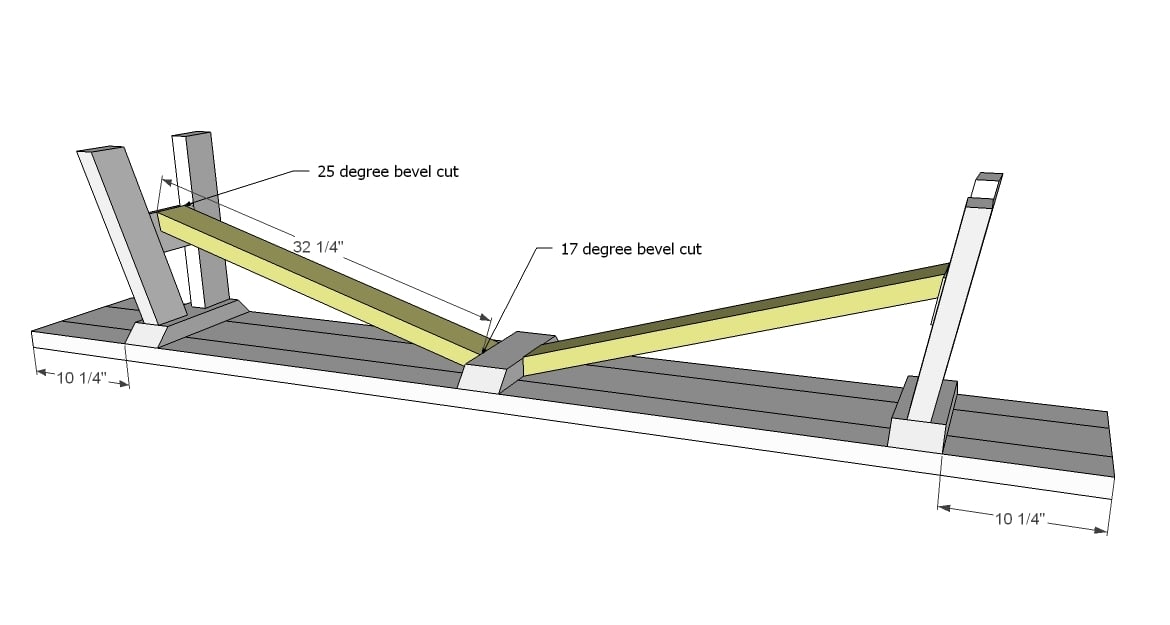
  • 2 - 2x4 @ 32 1/4" (one end cut at 25 degree bevel, other at 17 degree bevel, cut in same bevel direction)
Tools
Tape Measure
Speed Square
Pencil
Safety Glasses
Kreg Jig
Drill
Miter Saw
Drill Bit Set
General Instructions

Please read through the entire plan and all comments before beginning this project. It is also advisable to review the Getting Started Section. Take all necessary precautions to build safely and smartly. Work on a clean level surface, free of imperfections or debris. Always use straight boards. Check for square after each step. Always predrill holes before attaching with screws. Use glue with finish nails for a stronger hold. Wipe excess glue off bare wood for stained projects, as dried glue will not take stain. Be safe, have fun, and ask for help if you need it. Good luck!

Instructions

Step 1

A Kreg Jig is highly recommended for construction of this project.

Build your two end leg sets using 1 1/2" pocket holes and 2 1/2" pocket hole screws and glue.

You can also build the center leg (see last diagram) now.

Step 2

Attach legs to headers with 1 1/2" pocket holes and 2 1/2" pocket hole screws and glue.

Step 3

Build your bench top with pocket holes first (unles you are using outdoors and will require water drainage, then leave spacing between boards to allow water to drain).

Then attach legs to the underside of bench top. Overhang is 10 1/4' from ends (see diagram 5)

Step 4

You can either build the entire center leg (see last diagram) and attach you did the outside legs, or attach middle header here.

Step 5

Step 6

Attach center leg to center.

For additional support, the center leg could also be tied into the outside legs.

Step 7

Whitney also framed the bench top out for additional support and looks - check out how she did that here.

Finishing Instructions
Preparation Instructions
Fill all holes with wood filler and let dry. Apply additional coats of wood filler as needed. When wood filler is completely dry, sand the project in the direction of the wood grain with 120 grit sandpaper. Vacuum sanded project to remove sanding residue. Remove all sanding residue on work surfaces as well. Wipe project clean with damp cloth.

It is always recommended to apply a test coat on a hidden area or scrap piece to ensure color evenness and adhesion. Use primer or wood conditioner as needed.
Project Type
Room

Comments

spiceylg

Tue, 06/25/2013 - 04:35

Do you two ever stop building? LOL! Another great collaboration and beautiful build by the Shanty2Chic girls! Love that carpet, too!!! Oh yes, the lanterns as well. The whole setting = beautiful!

Bond

Fri, 07/26/2013 - 07:36

Love the table, but I am wondering is the best type of wood for this project. Would it be better to use pressure treated wood and cedar or just plain 2 x 4 untreated.
thanks

Bond

Fri, 07/26/2013 - 07:37

Love the table, but I am wondering is the best type of wood for this project. Would it be better to use pressure treated wood and cedar or just plain 2 x 4 untreated.
thanks

Frequently Asked Questions

Wood Questions

What kind of wood should I use?
Most of our plans use standard construction lumber like pine or fir. It's affordable, easy to work with, and easy to find. It's also rapidly renewing and biodegradable, so a great eco friendly choice!

Can I use hardwoods instead?
Yes—just keep in mind they're heavier, cost more, and can be tougher on tools and harder to join together and finish. I recommend not tackling a hardwood project until after you have built several softwood projects.

What if my boards are warped?
Choose the straightest boards at the store. You can often work around slight warps by cutting them into shorter pieces.

What wood should I use for outdoor furniture?
Use red-toned or pressure-treated 2x lumber for framing, and cedar or cedar fence pickets for the decking. Outdoor furniture should be built like a deck—your local home center can help recommend the right wood for your climate.

Will my wood move or warp after I build?
Potentially, especially in humid climates. Let your wood acclimate indoors before building. Once acclimated and kept in a stable environment, movement should be minimal. Remember, most houses are built using framing lumber - it's all about keeping moisture down indoors.

Cutting Questions

Do I need a miter saw?
A miter saw is great, creating fast, safe, and precise cuts, even for beginners. But most plans can be built with a circular saw and a straight edge. If using a circular saw to cut, take time to practice, and get good at making cuts, before cutting your project boards.

How do I get clean cuts with a circular saw?
Clamp your board, measure twice, cut slow, and use a sharp blade. This takes practice, so spend some time making cuts. I go through becoming proficient at freehand cutting in my course, it is worth taking if you want to master this skill.

Will the store cut my wood?
Yes—most stores will do rough cuts to help you transport your materials home. But from store to store, the quality of cuts could greatly vary.

Joinery Questions

What screws should I use?
We recommend star-head self tapping screws for framing, most common sizes are 2-1/2", 1-3/4". Pre-drill if close to the edge or you find your wood is splitting.

Do I have to use pocket holes?
Pocket holes are the cheapest, easiest and fastest way to do some joints - like edge to edge or a hidden fastener joint. There are other methods, but these can be time consuming and expensive. We recommend using pocket holes as indicated in plans for best results.

How do I keep things square?
Use a speed square and measure diagonals after each step. Always clamp joints before screwing to keep them tight and flush.

Finishing Questions

Stain or paint before or after building?
A quick sand before and a full finish after gives the best results. Pre-finish if you're doing two-tone or detailed finishes.

What type of finish?
Use oil-based or water-based stain. For paint, cabinet-grade latex or enamel works great. High use surfaces on indoor projects should get a coat of polyurethane, I recommend a Helsman or Spar or other flexible poly that won't crack or peel with wood movement. For exterior projects, use a finish suitable for exterior fences.

How to get a smooth finish?
Start with a well sanded project. Sand between coats (220 grit), wipe clean, and apply light coats with a foam brush or roller.

Plan Questions

Can I change the size?
Many people do, and that's the great thing about building your own furniture! But do keep in mind going bigger might mean more supports are required, and often plans are optimized for minimal material waste.

Are these beginner-friendly?
Yes—plans are written with simple tools and clear steps in mind, with every effort to make plans as simple as possible.

Can I sell what I build?
Absolutely! Just don’t resell or repost the plans themselves.

General Questions

What tools do I really need?
A drill, circular saw, tape measure, square, and a few clamps will get you through most projects.

Do I need a workshop?
Nope! A driveway or small patio is plenty to get started, just make sure you have a level place to work. If you find you are building several projects a year, creating a small workbench is a great way to store tools and have a dedicated workspace.

What if I mess up?
Wood filler, sanding, or flipping boards goes a long way. Mistakes are part of the process!

What can I do to make my projects look more professional?
Start with straight boards, make accurate cuts, clamp all joints, and line up everything neatly. Sand thoroughly, use a neutral finish, and apply it in light coats for a clean look.

I've never built anything before. Where should I start?
Start with a few smaller softwood projects to get hands-on experience. Or if you're tackling a big project, buy a little extra lumber and practice your cuts and joints first. If possible, work with someone who has a bit of experience.

Care & Maintenance

How long will my furniture last?
With good joinery and regular care, your DIY furniture can last for decades. I have pieces in my own home that are over 20 years old and still going strong! One of the best parts about DIY furniture is that it’s easy to repaint, refinish, or repair—so your projects can grow and adapt with you.

How should I care for outdoor furniture?
Lightly pressure wash or hose it down once or twice a year. Tighten screws and reapply finish as needed to protect it—just like a deck or fence. A little upkeep goes a long way in extending the life of your furniture.

How about indoor furniture?
Regularly dust or wipe with a damp cloth. If it starts to look worn, a light sanding and touch-up paint or stain can refresh it in no time. DIY pieces are meant to be durable and fixable—so don’t be afraid to give them some love now and then.

Want to Build with Confidence?

Check out my ebook: 12 Skills to Build Your Own Furniture
It walks you through the core skills every builder needs—measuring, cutting, joinery, and finishing—so you can build beautiful furniture that lasts.

Still Have Questions?

Email us anytime at [email protected] and we’ll be happy to help!