

Build your own shed chicken coop with free step by step plans with diagrams, shopping list and cut list. Free plans from Ana-White.com
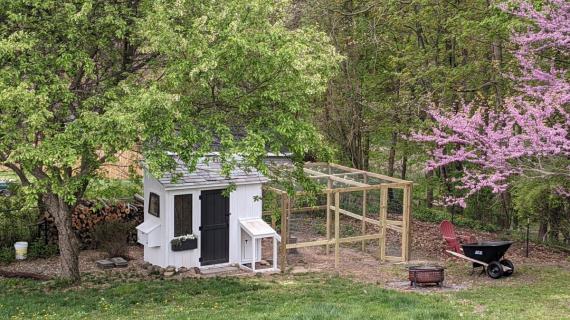
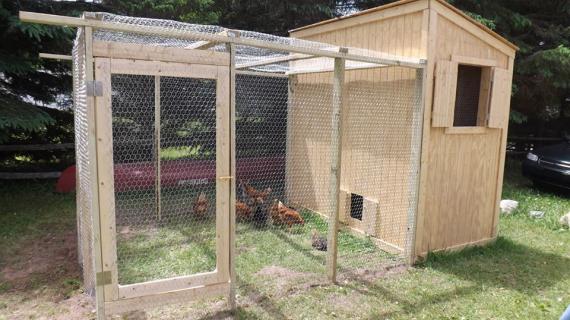
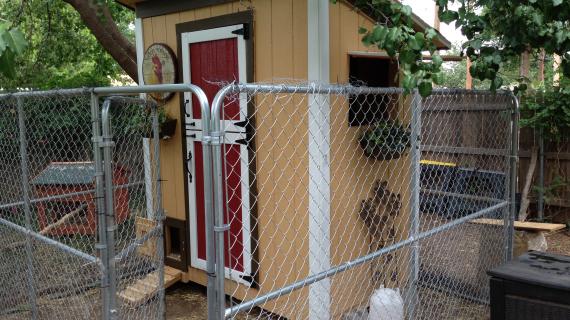
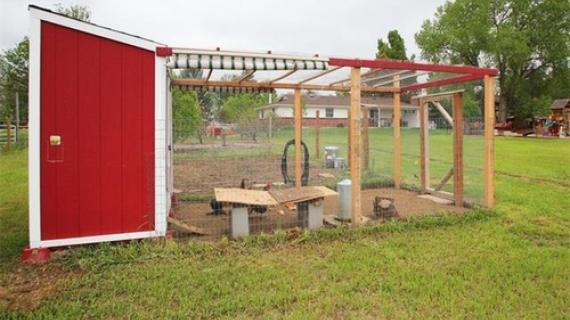
Reader Photos and Whitney Builds:
We did use 2x3's for the framing and it really did work out nice. They are a little harder to work with because they are not as ridged as a 2x4. But at a cost savings of about $0.75 per board it really saves.
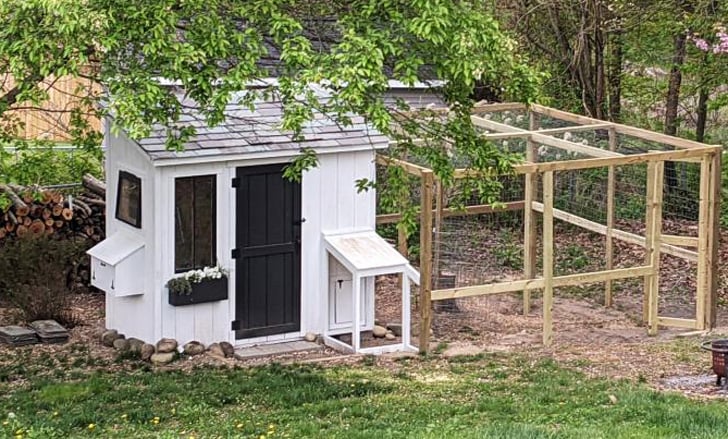
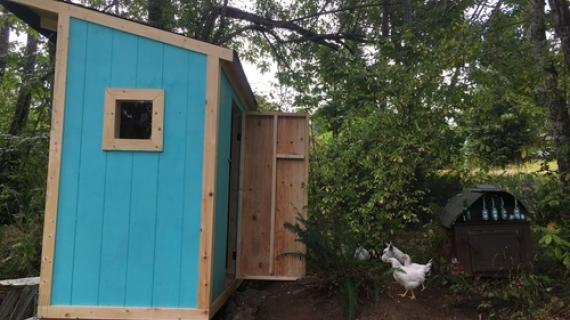
We did use some old wood windows and opted to not make the shutters operational. My concern was that the shutters would keep out the sunlight that helps keep the chicks warm in the winter. So this may be an option for someone who can get a hold of windows. We also used some barn wood for the shutters... so cute!
Another change, we did not make the front of the nesting box hinge. From what I have read the hens keep their nesting box fairly clean so it should be easy enough to clean it from the top. This also helps make the nesting box extra strong (my 5 year old nephew was already caught standing in it!).
One other change to the nesting box, I made it shorter. Once we got the wood right up to the coop it was way to deep and would have been hard for the hens to get in and out. I shortened sides by 4" and that left it with about a 3" drop into the box.
Please stop over and check out more construction photos and read more tips from Whitney from Whitney's Workshop. Thank you again Whitney and family!
Pin For Later!
Preparation
• 6 – Sheets T1-11 side or other sheathing
• 1 – Sheet 3/4" plywood suitable for flooring
• 40 – 2x4 x8 or stud length (only 5 must be full 8 feet length)
• 17 – 1x4 @ 8 feet long
• 8 – 1x3 @ 8 feet long
• 3 – Sheets 1/2" plywood suitable for roof
• 1 – 1x12 @ 10 feet long
• Hinges for doors and shutters and nesting box
• 16d nails for framing with 2x4s OR 3” torq head wood construction screws (for framing 2x4 walls)
• 2” galvanized or ring shank nails for attaching T1-11 and roofing plywood and trim boards or suitable screws
• 1 1/2” Pocket hole screws for attaching roof rafters
• 1 1/4" Pocket hole screws for building doors and nesting box
• Roofing to cover approximately 50 square feet
Due to the size and complexity of this plan, it is recommended to cut as you go. Below is cut list for framing, but trim will need to be cut to fit.
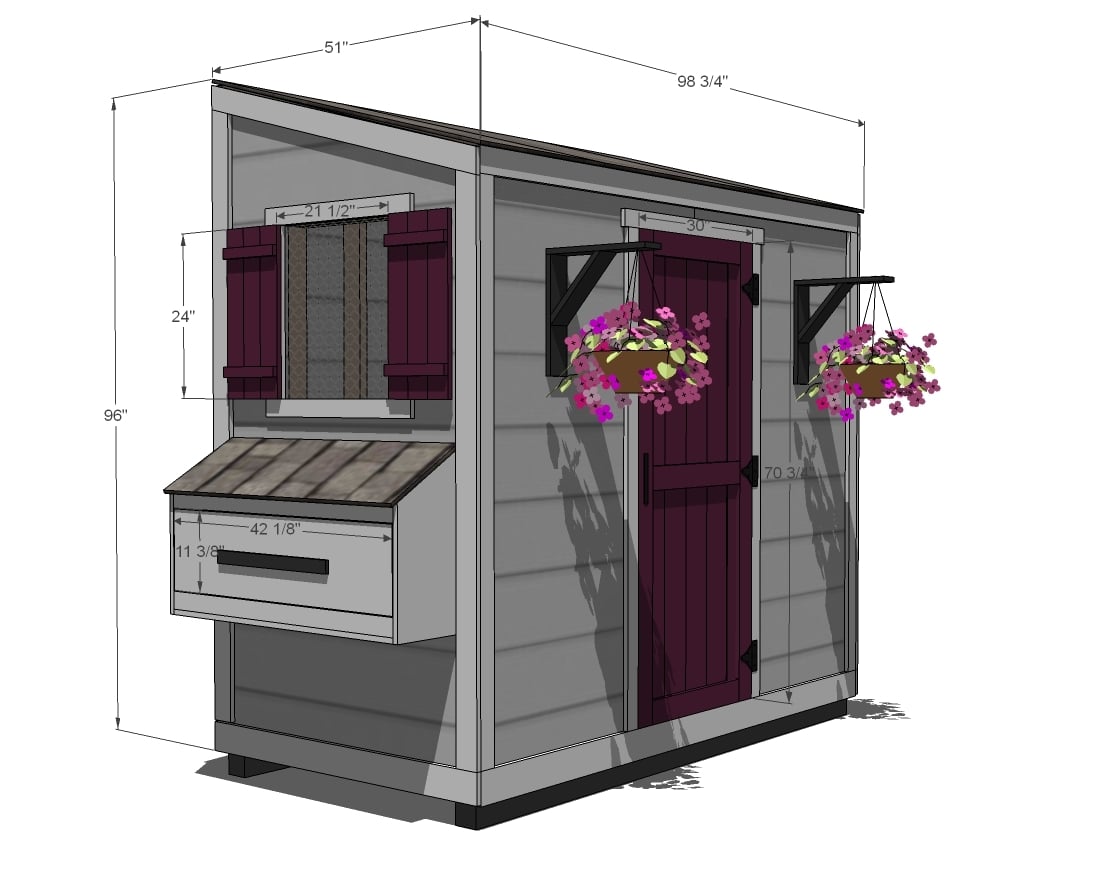
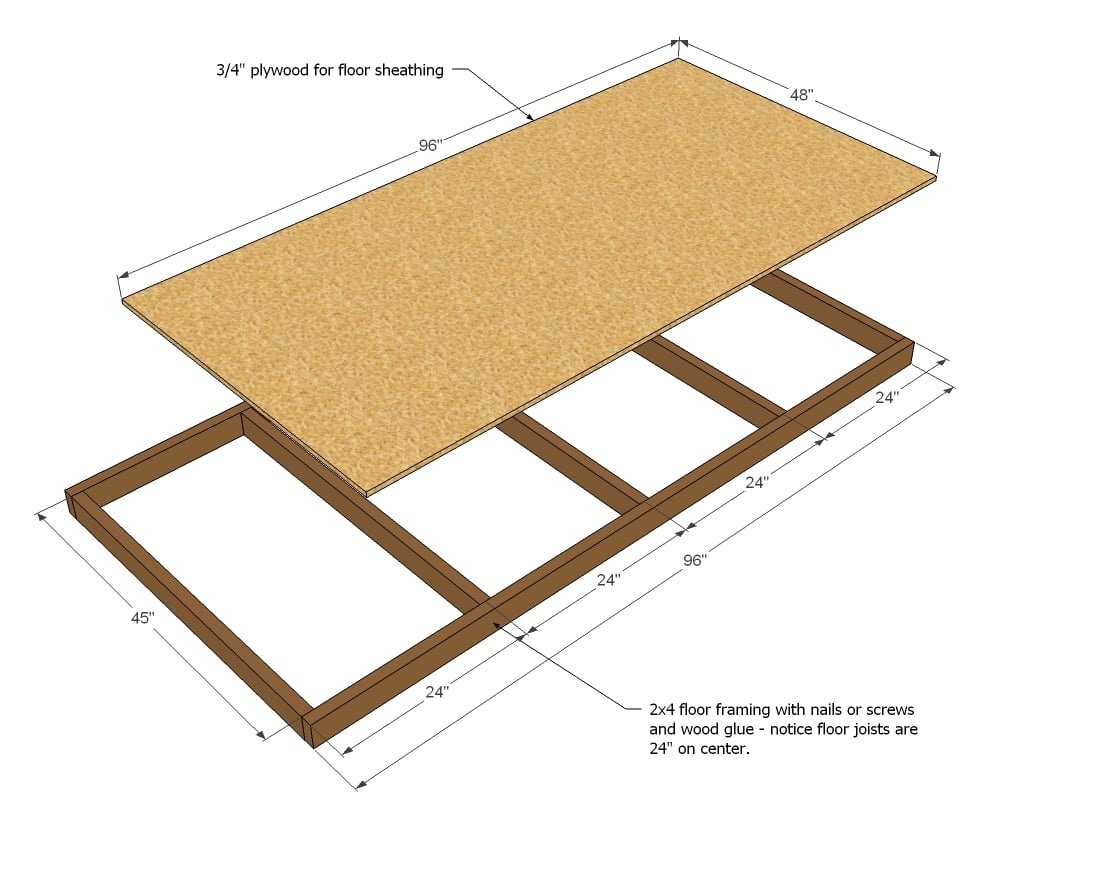
FLOOR
- 5 - 2x4 @ 45"
- 2 - 2x4 @ 96"
- 1 - 3/4" plywood for flooring 96x48"
FRONT WALL
- 1 - 2x4 @ 96" (top plate)
- 6 - 2x4 @ 72 3/4" (studs)
- 2 - 2x4 @ 69 1/4" (jack studs for doorway)
- 4 - 2x4 @ 33" (door header and bottom plates)
SIDE WALLS - BUILD 2
- 8 - 2x4 @ 72 3/4" (studs)
- 6 - 2x4 @ 21 1/2" (window header and sill)
- 4 - 2x4 @ 41" (top and bottom plates)
BACK WALL
- 2 - 2x4 @ 96" (top and bottom plates)
- 5 - 2x4 @ 84 1/2" - top end cut at 15 degrees off square (studs)
ROOF FRAMING
- 5 - 2x4 @ 49 7/8" - both ends cut at 15 degrees off square, ends parallel, with bottom point cut off at a 90 degree angle - see diagram (rafters)
- Cut roof plywood to length.
SIDING Use full sheets of siding, only trimming down the length to fit.
Nesting box, door and shutter cuts are in plan.


Please read through the entire plan and all comments before beginning this project. It is also advisable to review the Getting Started Section. Take all necessary precautions to build safely and smartly. Work on a clean level surface, free of imperfections or debris. Always use straight boards. Check for square after each step. Always predrill holes before attaching with screws. Use glue with finish nails for a stronger hold. Wipe excess glue off bare wood for stained projects, as dried glue will not take stain. Be safe, have fun, and ask for help if you need it. Good luck!
Instructions
Step 1
You will need to first determine the type of foundation you will put the coop on. Probably the easiest and simplest foundation is pier blocks with treated 4x4s on top. Then your flooring system can set on that. Because foundation requirements vary greatly by where you live, ask locally for the best way to create a foundation for the coop.
To build the floor, simply frame up with 2x4s as shown above, 24” on center, using the 3” wood screws or 16d nails. Check the floor for square, and sheath with 3/4” plywood, glued on with subfloor glue and ring shank nails. At this point, you could also add insulation underneath if you live in a cold climate – for example blueboard.
I recommend on the final finish linoleum to protect the plywood from pet damage.
Attach the floor to your foundation and adjust for level.
Step 2

Once your floor is done, it’s time to build walls. You will need a large flat area to frame your walls. Use the 16d nails or 3” screws. Build one front wall.
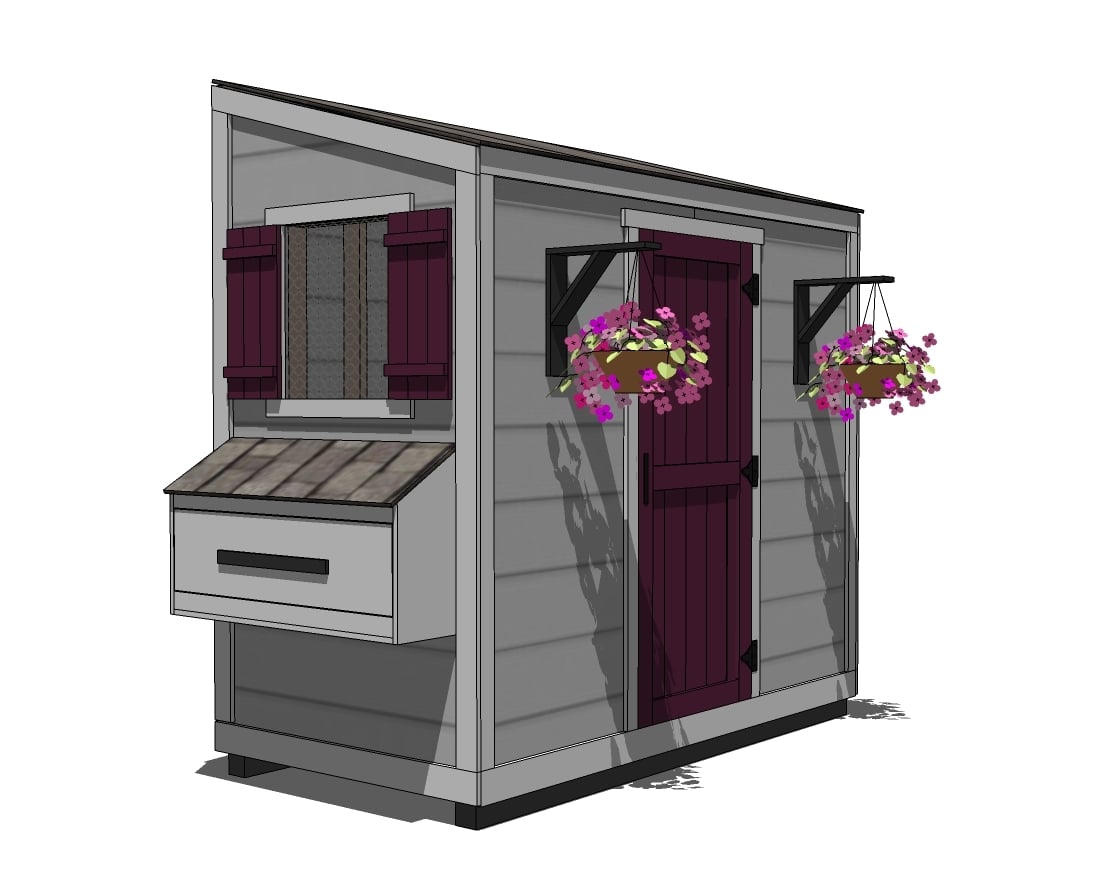
Step 3
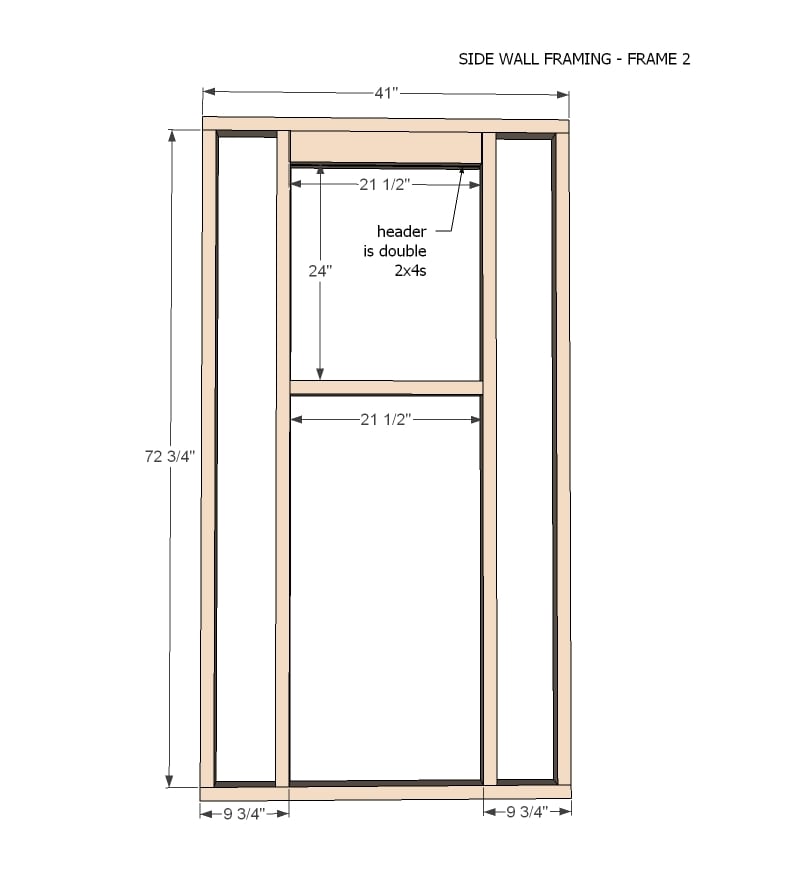
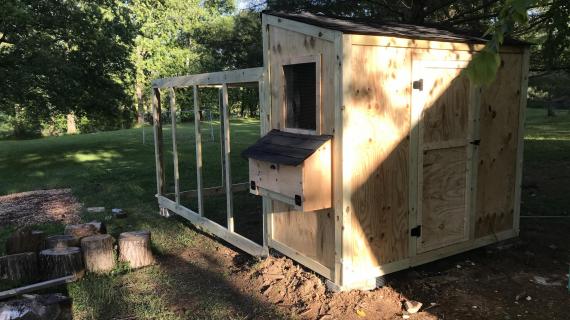
You will need to frame two side walls. The windows can be made smaller or larger or positioned differently. In this plan, both side walls have a window. Also, with scrap wood, you can frame out the nesting box opening, or a lip to help the hens get into the nesting box.
Step 4

The back wall is a little different, but no biggie. Simple cut the top ends at 15 degrees off square, with the longest point measurement 84 ½”. Then fasten top plate to wall. Do not allow the top plate to extend past the back wall studs, because t1-11 will sheath all the way up, and the back surface needs to be flush.
Step 5

Attach rafters to top of walls.
Step 6
With all the walls built, attach walls to the floor, attaching to the floor joists in the floor. Attach walls to each other as well.
Now it’s time to build the roof!
The rafters are simply 2x4s cut with both ends parallel at 15 degrees off square. Once the rafter is cut, on the bottom edge, mark 2 5/8” down, and use a carpenter’s square to draw a line perpendicular to the bottom cut at 2 5/8” down. Cut off the bottom of the rafter. This will give you something flush to attach to your front wall.
The easiest way to attach rafters is with a Kreg Jig and 1 ½” pocket holes and 2 ½” pocket hole screws. But you can also toenail to the top plates, or use brackets.
Step 7
I do not give exact trim dimensions because depending on the thickness of your T1-11, your trim boards will vary. On the fronts and back, you will need to use full 8 foot sticks at the top and bottom. Trim out front and back first, followed by side walls. Use galvanized nails or screws.
Step 8

There’s no way around this to do it correctly than to use 3 sheets of 1/2” plywood. Cut the center piece to fit – it should just be a single lengthwise cut as the studs are spaced 24” on center. Nail down with galvanized nails or screws. Then add the remaining two pieces on the sides. Add roofing to top of plywood.
Step 9
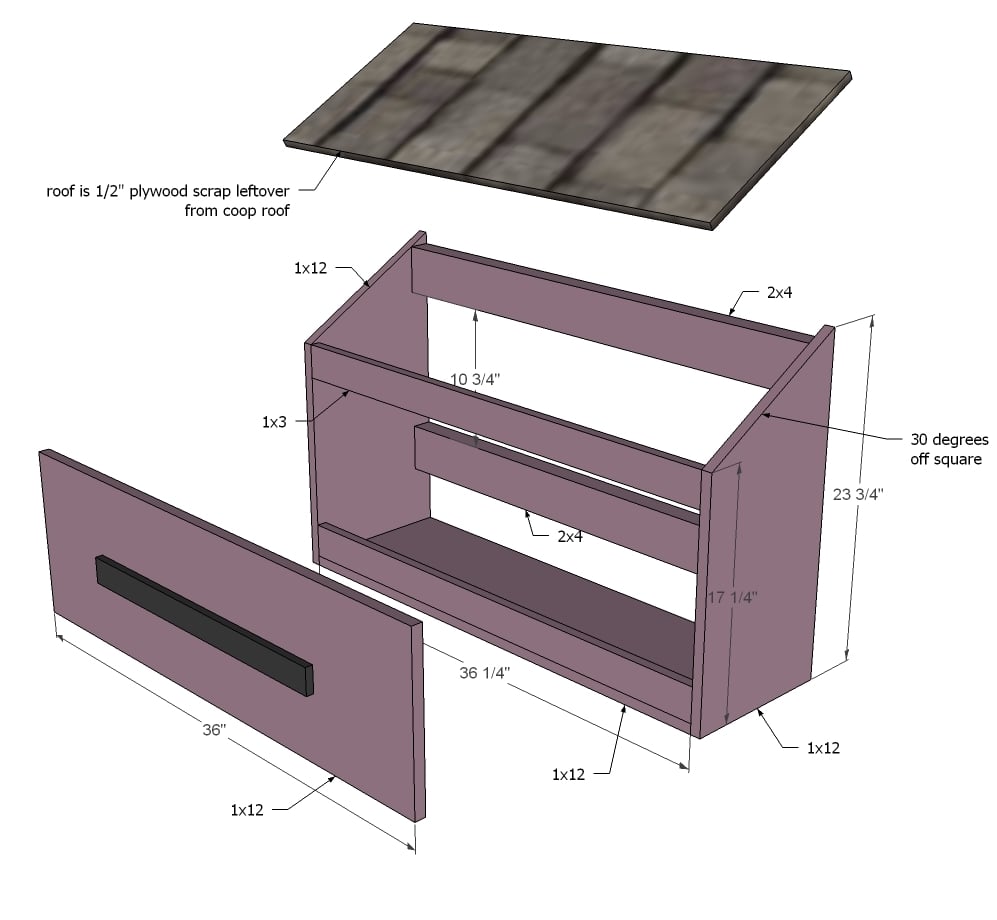
For the nesting box, I designed it with 1x12 boards.
• 2 – 1x12 @ 23 ¾” – one end at 30 degrees off square, longest point (sides)
• 2 – 1x3 @ 36 ¼” (front trim)
• 2 – 2x4 @ 36 ¼” (back supports)
• 1 – 1x12 @ 36 ¼”(bottom)
• 1 – 1x12 @ 36” (door)
• ½” plywood for the roof
Step 10
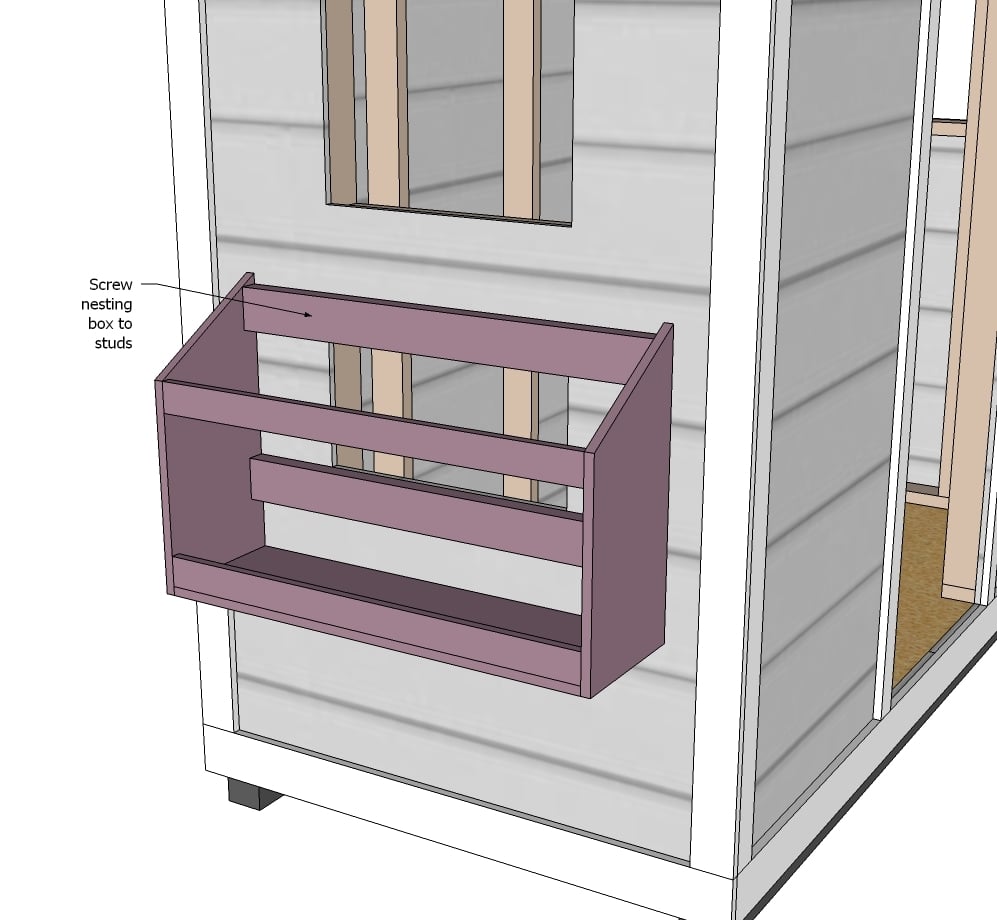
Attach nesting box to side of coop, screwing into studs in wall.
Step 11
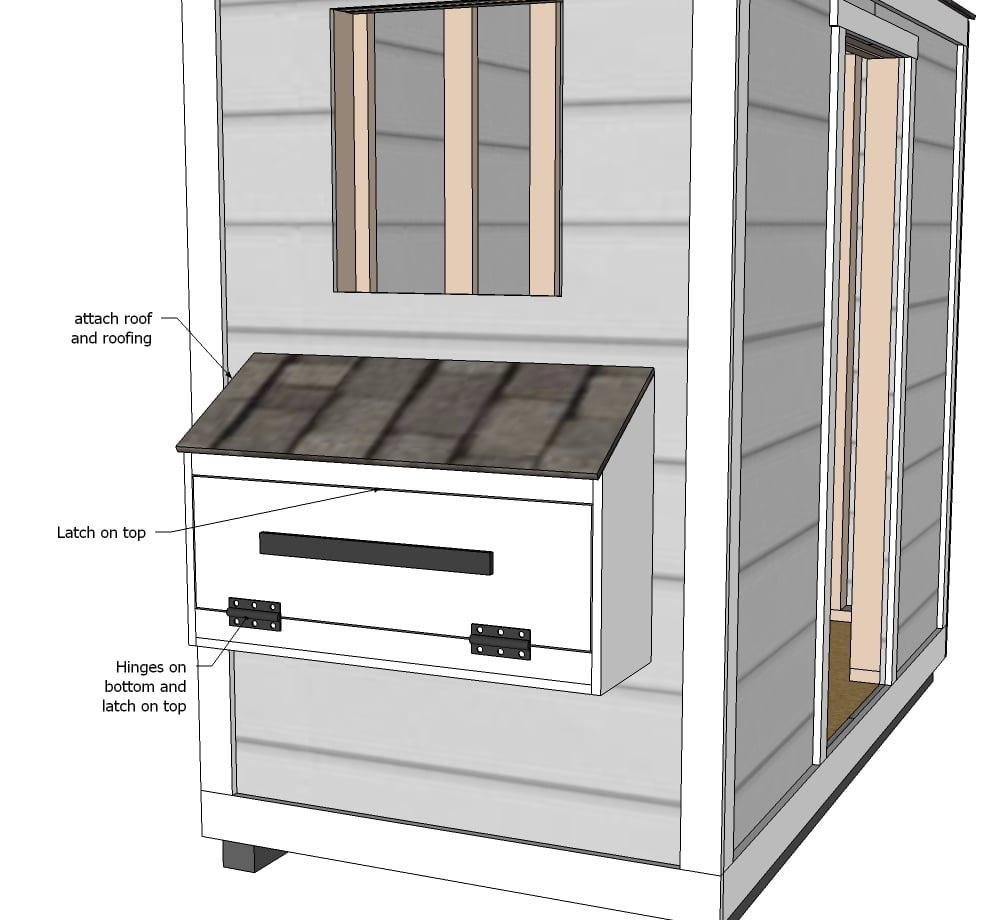
Then add the roofing and door with hinges.
Step 12
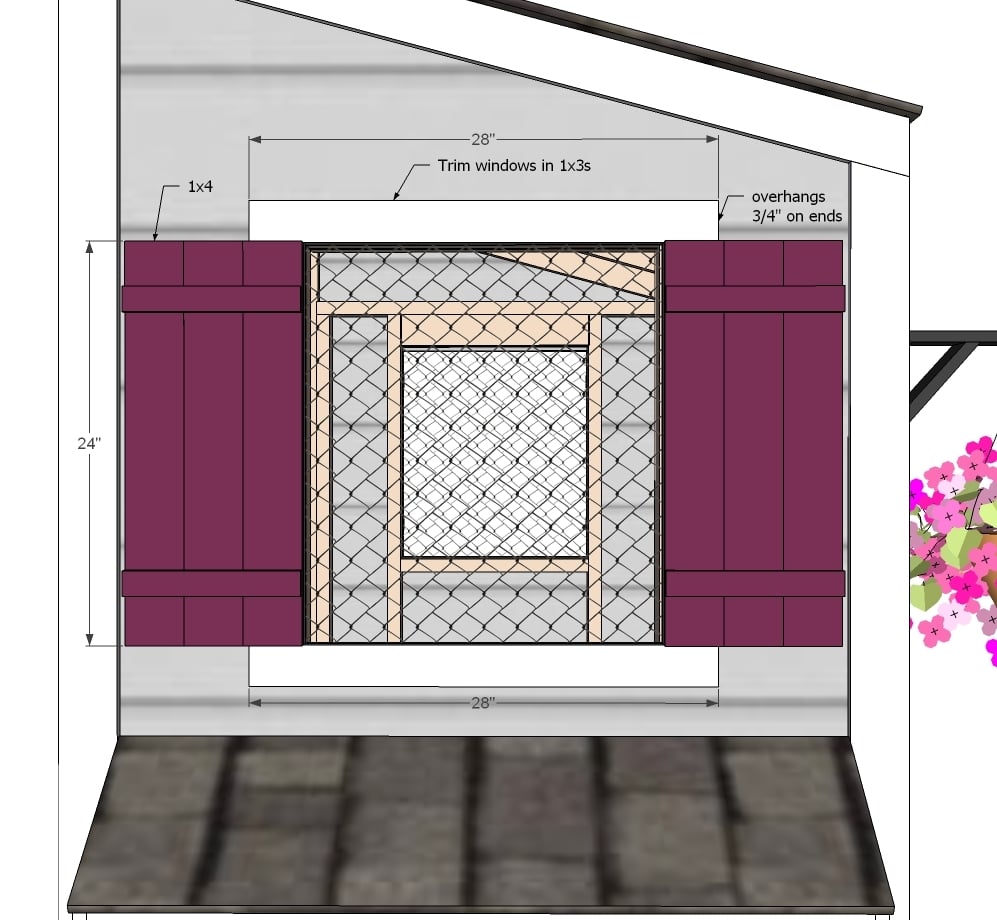
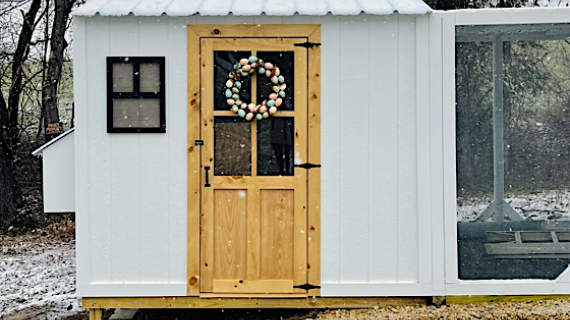
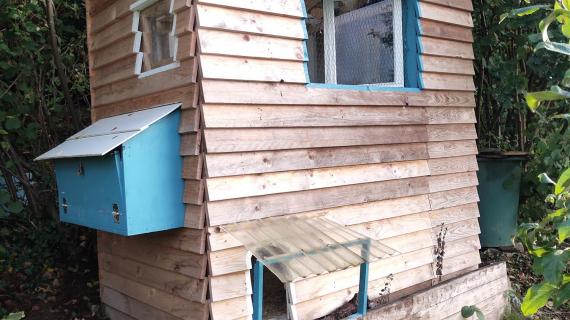
Windows are trimmed out in 1x3s followed by shutters made from 1x3s and 1x2 boards. Staple chicken wire or hardware cloth to inside of coop. Shutters are attached with hinges so they can close in rainy or cooler weather.
SHUTTERS (for 4)
12 – 1x4 @ 24”
8 – 1x2 @ 10 ½”
Step 13
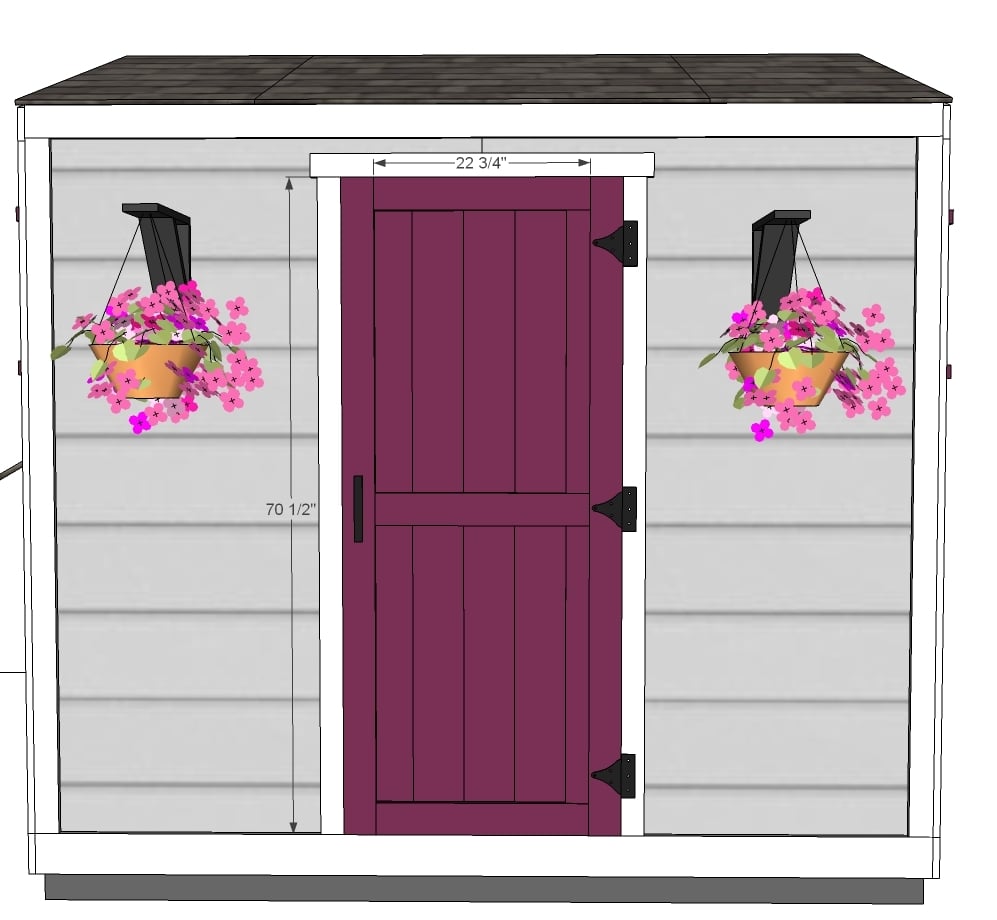
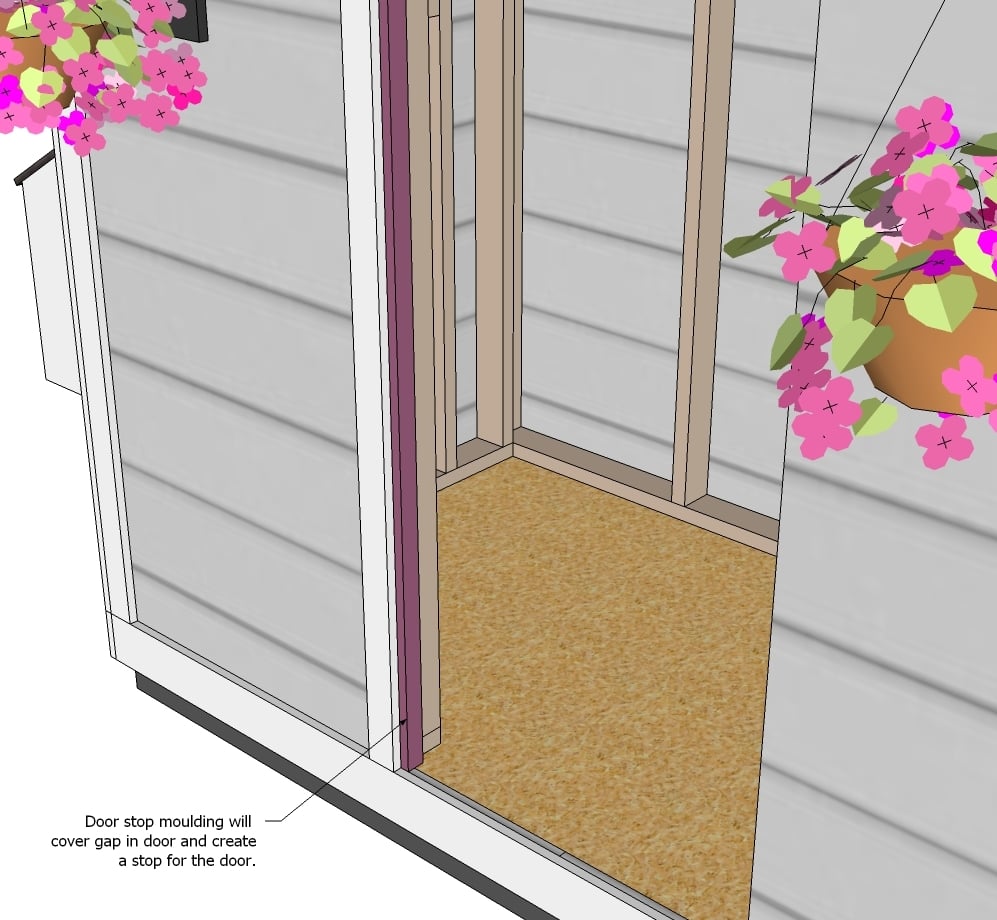
The door is framed in 1x4s with the Kreg Jig. Then you can back it with either scrap plywood leftover or as shown, 1x6 boards. The door should be built to fit your opening. I like to leave 1/8” gaps all the way around. You can add door stop moulding in 1x2s to the inside of the doorway to act as both a stop and a weather seal – see next diagram.
Step 14
Step 15
Step 16

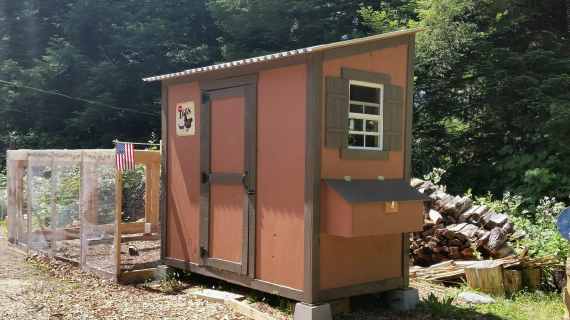
For lots more tips and building photos, please stop over and check out Whitney's post.
It is always recommended to apply a test coat on a hidden area or scrap piece to ensure color evenness and adhesion. Use primer or wood conditioner as needed.

Comments
Whitney Smith (not verified)
Wed, 05/09/2012 - 03:56
Oh Ana...
Thank you for this opportunity! There were a lot of good laughs. And now I'm off to let my dad and BIL know they made it onto your website! LOL Thanks!!!
llama (not verified)
Wed, 05/09/2012 - 12:15
does it have any ventilation
does it have any ventilation on the side opposite the window? it seems like it would kind kind of stuffy with just the one window, especially if they were shut in in bad weather.
Pam the Goatherd
Wed, 05/09/2012 - 13:02
llama, there are windows on
llama, there are windows on both ends.
There are no directions in these plans for making the flap/exit for the chickens as pictured in Whitney's coop.
As an experienced chicken-herd I would suggest making the chicken flap open to the INSIDE of the coop. That way you don't have to go into the fenced-in chicken run to close it, you can just close it from inside the coop.
theworldmovesforlove
Wed, 05/09/2012 - 16:41
Ventilation
My concern is ventilation as well. I don't think it would matter near as much if you live northern U.S.. I live in Texas though, and it's already 95 degrees everyday (and it's only the beginning of May!). If you live where it is hotter, then I would consider building in some ventilation. Either put in some vents, like the type of vents that would be on a regular ol' house, on the roof, or on the side of a house or something.
Many people will do something like the following: starting from the ground, the first foot or so is chicken wire. As long as you attach it very securely, with seems only at the corners, if possible, it will hold up very well. Make the chicken wire go into the ground as well, bury it about a foot down - this will prevent dogs/foxes/coyotes from digging in. You could wrap the chicken around all four sides of the coop, or you could do the two longest sides, whichever you prefer. This would at least give them a sheltered area that would still have a breeze.
Just thought I would share. The one pictured is absolutely adorable! I would love to have that in my own yard!
AnnaMaye (not verified)
Sat, 05/12/2012 - 23:17
flooring
I can see already that you will get many chicken people on here with their 2 cents as chickens (and their poeple) can be a bit fickle.
I wanted to point out really quickly that the instructions on step 5 are duplicated in step 6. They are a copy.
Also after having animals for a few years, it's a good idea to use a piece of pressure treated plywood for the floor in the chicken coop. If you just use plywood or OSB it will rot out where the water is in about 2 years and the rest will follow...ask me how I know. Our other coop with the treated wood floor is still going strong after 7 years. I have heard of other people treating the flooring with other material but the PT works for me.
Ventilation is a good point for extreme heat and then for us in the cold for winter time coop lockdown. A few 1/2" holes under the eaves does the trick, but wouldn't be as pretty as adding a quaint vent.
I am very excited about this coop as it gives me good tips for the greenhouse I'm trying to build. I soooooo appreciate this website and all the time you put into this.
Thanks! Anna in Alaska
john calhoun (not verified)
Thu, 11/29/2012 - 02:48
chickens
how many chickens will this coop house
In reply to chickens by john calhoun (not verified)
whitney_smith
Thu, 11/29/2012 - 04:21
Hi John. I think I remember
Hi John. I think I remember as we were working on this that it would work well for 6-8. Right now there are 8 chickens in it and there is no issue with over crowding and everyone has room to lay. Hope that helps!
Cris (not verified)
Mon, 12/03/2012 - 17:45
The link is broken
The address for http://passionforwood.blogspot.com/2012/05/operation-coop-that-chicken… doesn't work; Blogger states "Sorry, the blog at passionforwood.blogspot.com has been removed."
Is this material available elsewhere?
In reply to The link is broken by Cris (not verified)
whitney_smith
Mon, 12/10/2012 - 14:03
Hi! Use this link instead.
Hi! Use this link instead. There was a site change and Ana has yet to update. So sorry.
http://whitneysworkshop.blogspot.com/2012/05/operation-coop-that-chicke…
Cris (not verified)
Tue, 12/18/2012 - 16:19
Whitney- Thanks for the
Whitney- Thanks for the link!
This coop is almost exactly what I am looking for, with a few modifications. I live in Portland, OR, so rain is a big concern. I don't think the roof overhang on the existing plan is enough. I think what I might try is making the rafters longer, by cutting a birdsmouth and extending them over the front and back, having a 6" or so overhang. I could basically then screen off the space between the top of the siding (which would only then come up to the top plate) and the rafters as a vent. I'd hinge the windows at the top rather than the bottom, and probably put a gutter on the down side of the roof. What do you all think?
In reply to Whitney- Thanks for the by Cris (not verified)
whitney_smith
Thu, 01/10/2013 - 08:33
Hi Chris, sorry I am just now
Hi Chris, sorry I am just now seeing this. I think those mods sound great! You could even make the overhang on the back (run side) angle down and then enclose that section for a smaller run. Maybe use about a 4' board?
Chloe (not verified)
Thu, 01/10/2013 - 11:36
Love this!
I am a total chicken addict and when my mom said she was on a website with chicken coop designs, i was right there! this is a really adorable coop that looks well built.
I would make it but i already have 6 other coops..
keagan
Sun, 04/06/2014 - 15:06
Cost to build?
Does anyone know approximately how much it costs to build this?
keagan
Sun, 04/06/2014 - 15:06
Cost to build?
Does anyone know approximately how much it costs to build this?
jeanetteturner41
Tue, 01/19/2016 - 09:48
LINK EXPIRED!!
the link to "whitneysworkshop" says it jas expired. Is there anywhere or can you tell me what the cut dimensions are for the back flap leading into the run are??
In reply to LINK EXPIRED!! by jeanetteturner41
Ana White
Tue, 01/19/2016 - 13:30
Thanks for your patience.
Thanks for your patience. Here is the cached link
http://webcache.googleusercontent.com/search?q=cache:hRsozJ2fitYJ:www.w…
Hope this helps!
---------- Forwarded message ----------
From:
isilveus
Mon, 03/13/2017 - 18:57
Blizzard Warning and My Girls are Safe and Sound
There's a blizzard warning here in Southeastern PA tonight. Thanks to you, my hens are in a sturdy, solid, draft-free house with salvaged windows locked up tight and a plexiglass door all battened down. I knew I could build it because you told me I could. I'm very grateful.
In reply to Blizzard Warning and My Girls are Safe and Sound by isilveus
Ana White
Mon, 03/13/2017 - 20:00
Grateful! Sent from my iPhone
Grateful!
Sent from my iPhone
bundaboy
Wed, 04/26/2017 - 23:38
I wonder...
...what happened to Whitney? :-(
ertucker311
Sun, 02/09/2020 - 18:35
Roof Rafters have us stumped
My husband and I doubled this plan to make a bigger shed and I am curious as to how this affects the angles on the roof rafters. I'm thinking you do a 7.5 degree angle on the ends but how do you do the second cut? We absolutely love all of your plans!
rgculham
Fri, 05/22/2020 - 13:05
Design Comments
Ana This looks like a great plan for a good sized chicken coop. I am curious as to why the roof slopes towards the "man" door as opposed to the other way towards the chicken run side. When its raining you are in the drip zone when entering the shed.
I would tend to use pressure treated wood for the base structure. Having 3/4 in (19 mm) thick plywood is a good idea when the "floor joists" are 24 inches on centre. Considering the live floor load from the chickens and the "egg collector", one could use 5/8 in (16 mm) thick pressure treated plywood. For cold climates I might consider 1/2" plywood on the underside of the joists, fill the cavities with either 3 1/2 in thick ROXUL insulation or 2 layers of extruded polystyrene rigid insulation. The 1/2" top and bottom of the joists would make the floor very strong.
The T1-11 designation for the siding seems to be uncommon in Canada. What I have been able to find is 5/8" 4' x 8' Fir Panel Siding with 4" on center or 5/8" 4' x 8' yellow pine panel siding with either 4" or 8" on centre. What I have also found on the Home Depot Canada web site is a product called LP SmartSide 3/8 inch (10 mm) 4' x 8' 8" on centre.
Just curious; are you using SketchUp for your drawings?
Regards and thank you.
Deanikki
Wed, 01/25/2023 - 08:39
Sketchup Plans
We have access to a lot of free wood. The dimensions are not as easy as you have drawn out. I am quite good at Sketchup, could I get your model so I can tweak to match the wood I have? Is it in the 3dwarehouse?