
Free kitchen island plans from Ana-White.com
Hi everyone! Happy Monday!
Pretty excited today to share with you brand new plans!
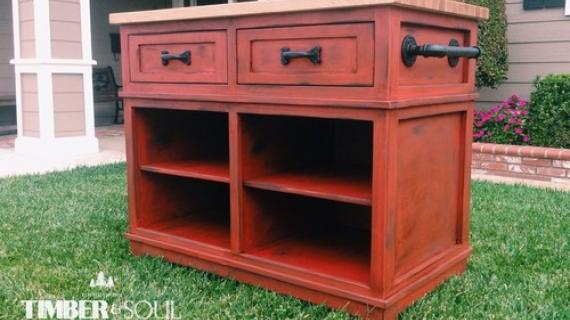
When my friend Hillary from The Friendly Home built this media console a while back ...

She built something else to at the same time!
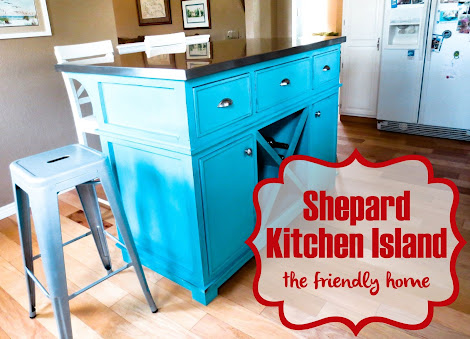
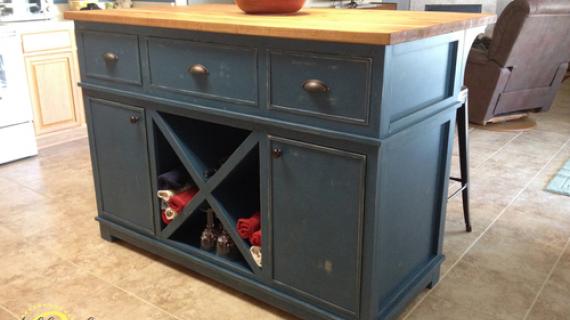
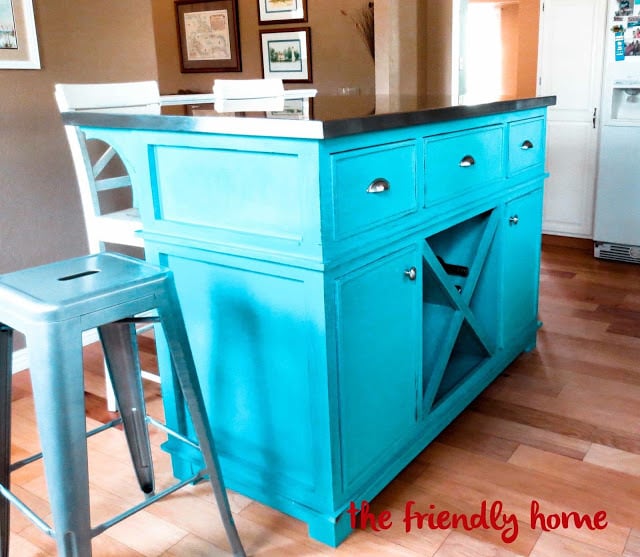
A new kitchen island with a wine grid!!!!
Hillary generously offered to share the plans with you so you can build this island too! If you want to check out more photos, building notes, and finishing details, please read Hillary's post here.
And of course, the plans follow!
Enjoy!
XO Ana
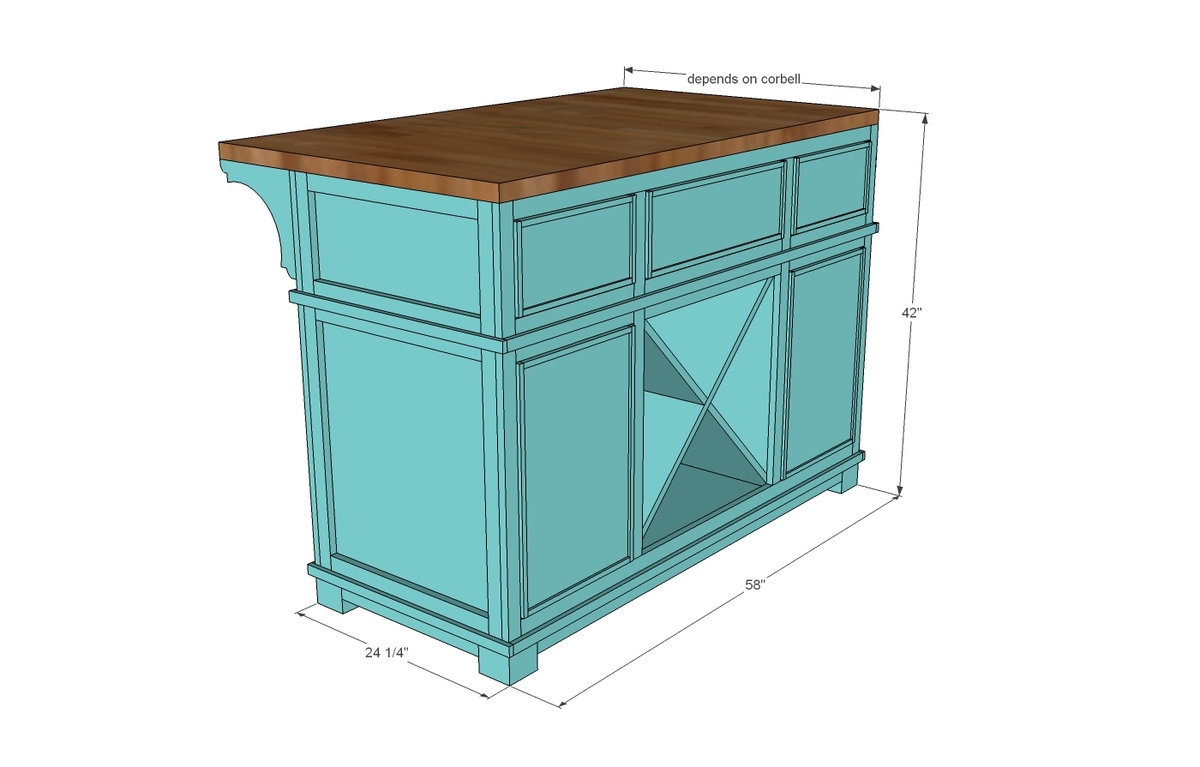
Preparation
2 sheets of 3/4" plywood ripped into strips 8 feet long x 22 1/2" wide
1 sheet 1/4" plwyood (back and drawer bottoms)
7 - 1x2 @ 8 feet long
2 - 1x4 @ 8 feet long
12 feet of 1x3s or 2x3s (for base)
10 feet of 1x3s (supports and drawer furring)
18" of 4x4s
20 feet of 1x6s
3 sets of 21" Euro Style bottom corner mount drawer slides (the white cheapo ones)
2 sets of inset hinges
7 - 8 foot sticks of wood moulding 1" x 1/2"
1 1/4" pocket hole screws
1" and 1 1/4" finish nails
2 corbells - less than 10 1/2" tall
countertop made to fit
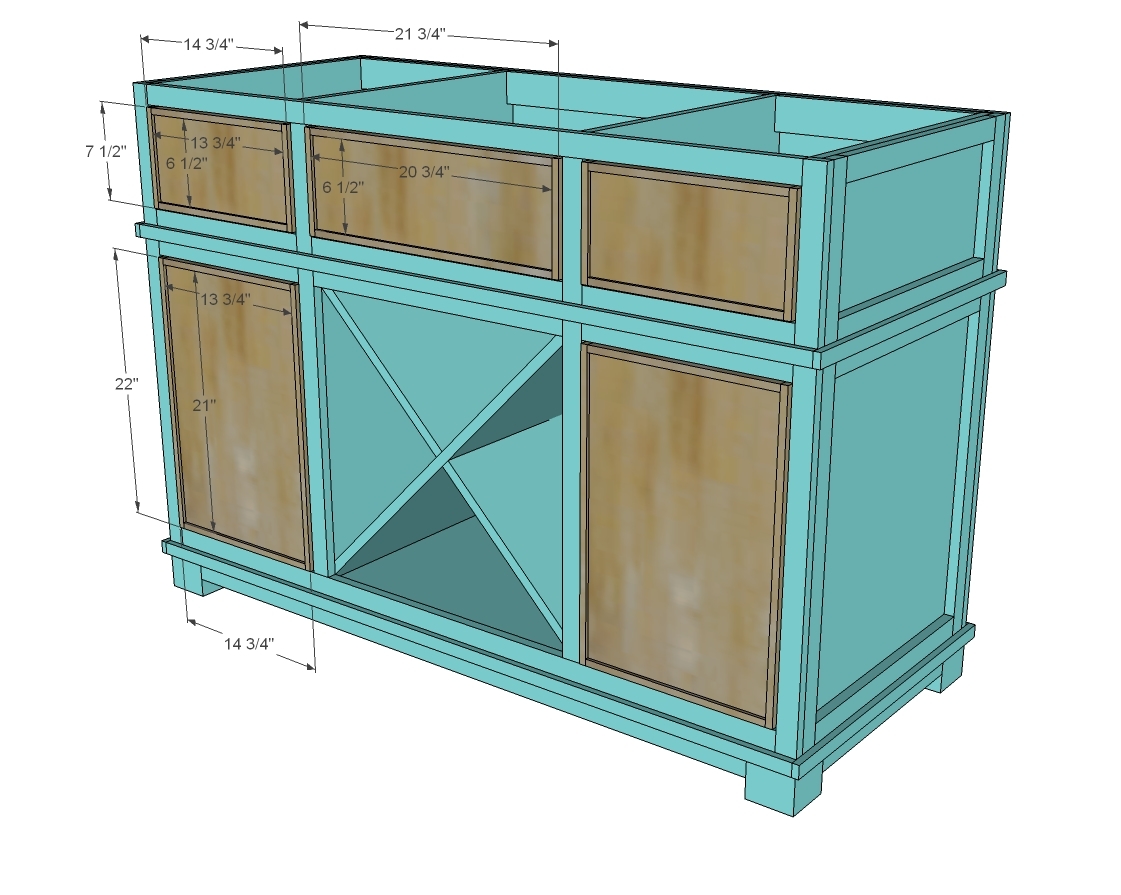
Main Carcass
1 - 3/4" plywood @ 22 1/2" x 56 1/2" (bottom)
4 - 3/4" plywood @ 22 1/2" x 35 3/4" (sides and dividers)
2 - 1x3 @ 15" (back supports)
1 - 1x3 @ 23 1/2" (center back support)
1 - 1/4" plywood @ 36 1/2" x 56 1/2" (back)
2 - 3/4" plywood @ x 32 1/2" (center X pieces)
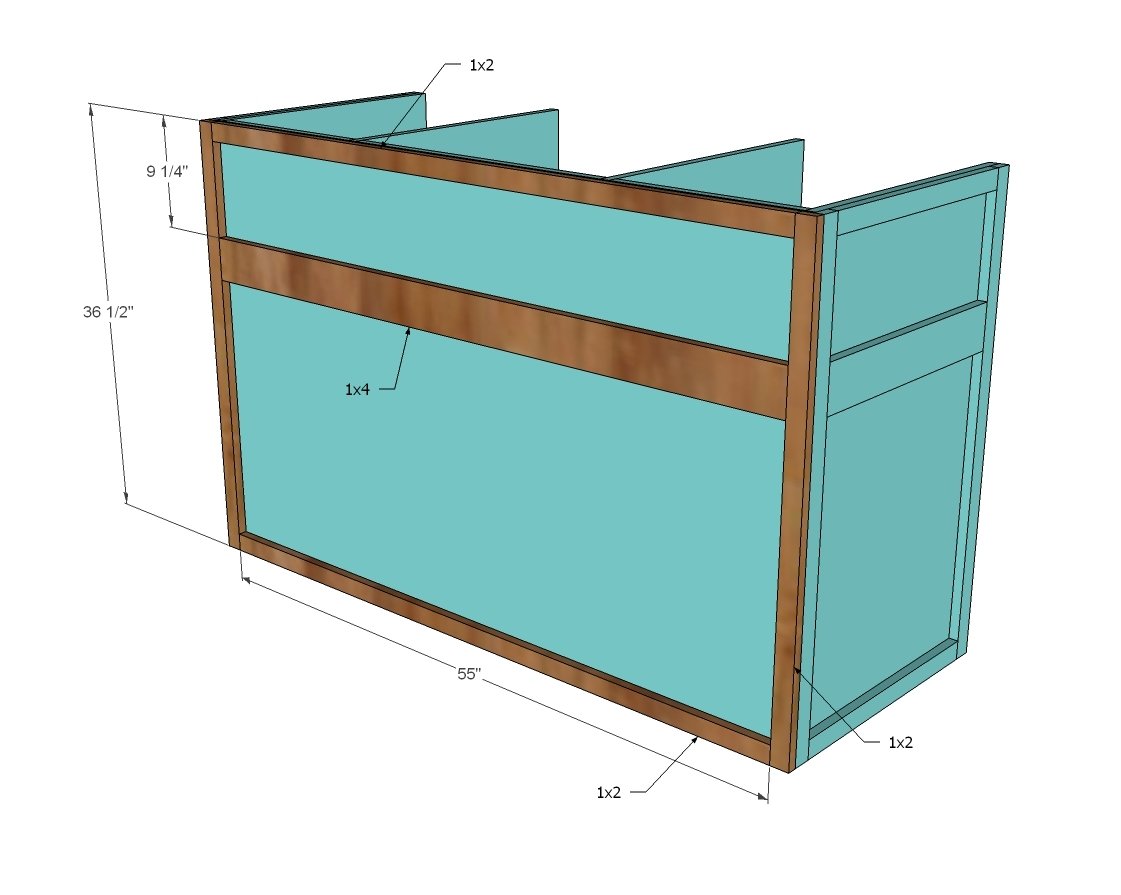
Side Face Frames (recommend cutting to fit)
4 - 1x2 @ 36 1/2"
4 - 1x2 @ 19 3/4"
2 - 1x4 @ 19 3/4"
Back Face Frame (recommend cutting to fit)
2 - 1x2 @ 36 1/2"
2 - 1x2 @ 55"
1 - 1x4 @ 55"
Front Face Frame (recommed cutting to fit)
2 - 1x2 @ 36 1/2"
2 - 1x2 @ 55"
2 - 1x2 @ 33 1/2"
2 - 1x4 @ 15"
1 - 1x4 @ 22"
Bottom Base
4 - 4x4 @ 4"
2 - 2x3s or 1x3s @ 17 1/4"
2 - 2x3s or 1x3s @ 51"
Drawers (cut drawers to fit drawer slides and opening - cut list is for openings of 15" and 22" with 1/2 clearance drawer slides)
2 - 1x3 @ 21 3/4" (center drawer furring)
6 - 1x6 @ 21" (drawer sides)
4 - 1x6 @ 12 1/2" (smaller drawer fronts/backs)
2 - 1x6 @ 19 1/2" (larger drawer fronts/backs)
Cut Drawer faces to fit - shown with edge trimming 1/2" thick around all sides


Please read through the entire plan and all comments before beginning this project. It is also advisable to review the Getting Started Section. Take all necessary precautions to build safely and smartly. Work on a clean level surface, free of imperfections or debris. Always use straight boards. Check for square after each step. Always predrill holes before attaching with screws. Use glue with finish nails for a stronger hold. Wipe excess glue off bare wood for stained projects, as dried glue will not take stain. Be safe, have fun, and ask for help if you need it. Good luck!
Instructions
Step 1
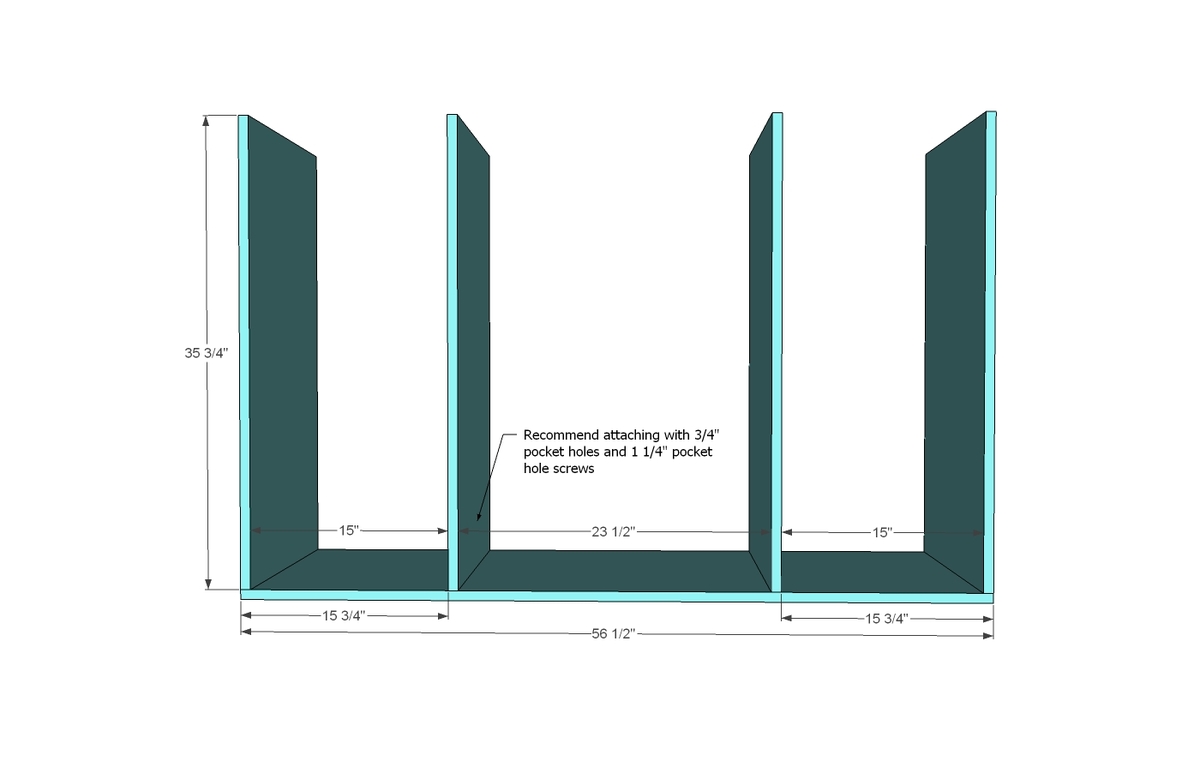
Attach sides and dividers to the base.
Step 2
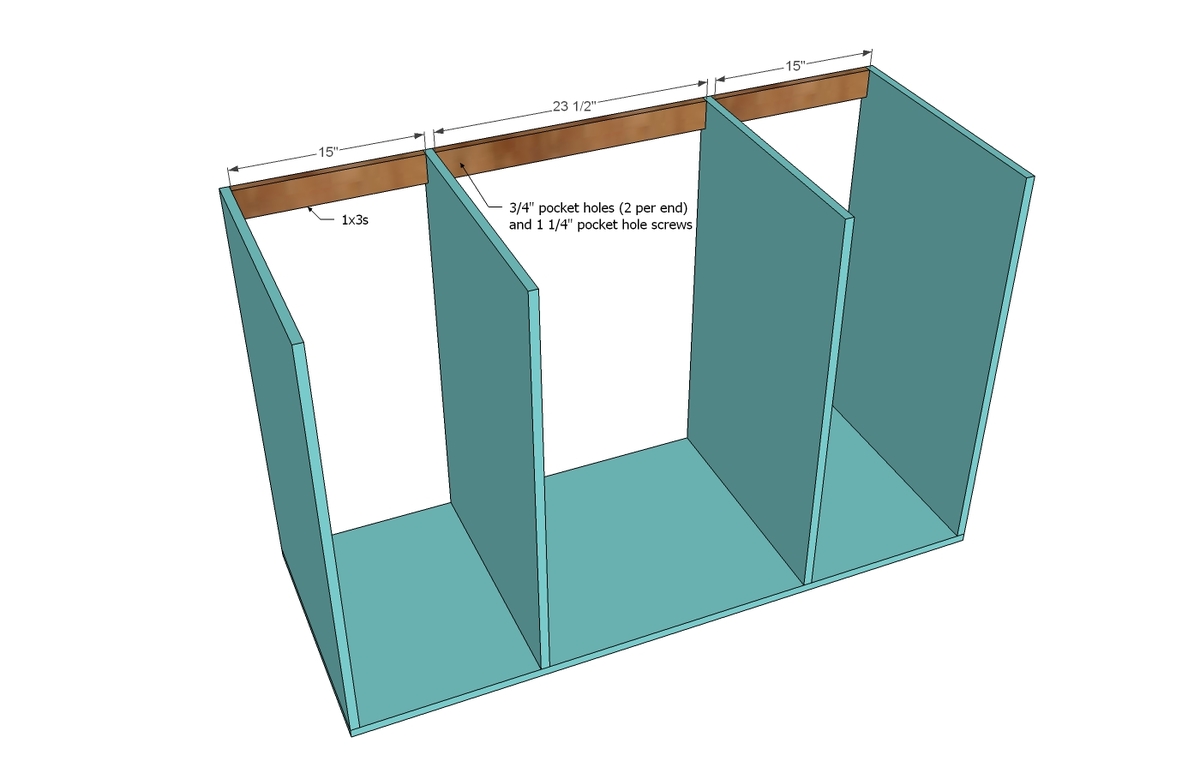
These guys add a little support to the back and give you something to attach the back plywood to.
Step 3
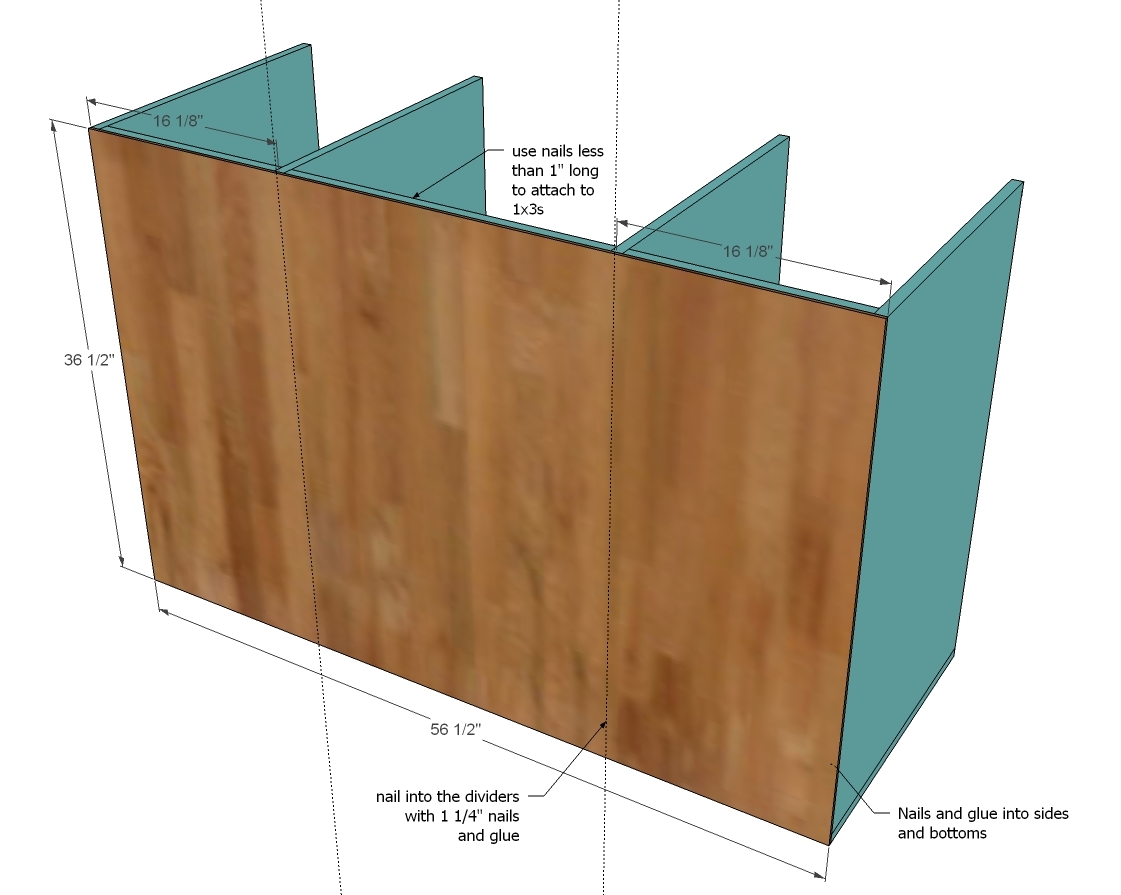
Attach back plywood to back with finish nails and glue - make sure everything is square.
Step 4
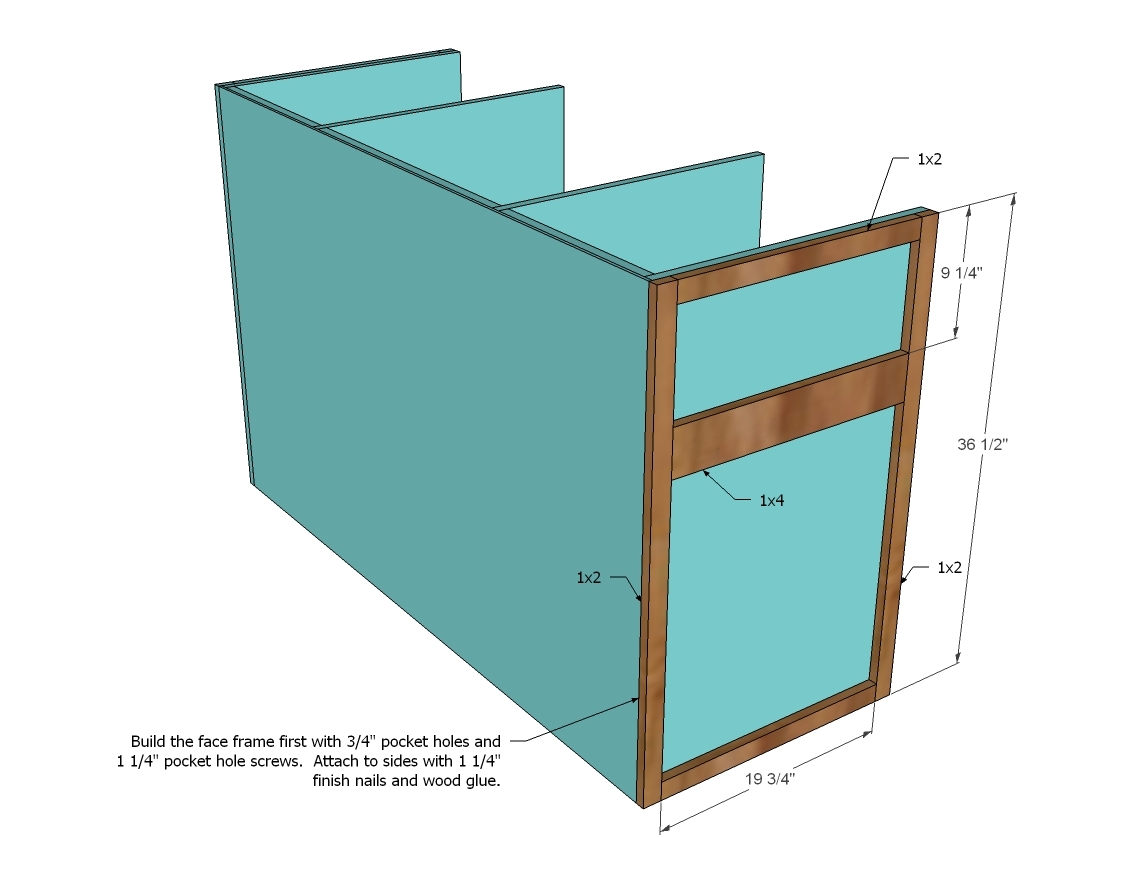
Measure and cut your side face frames to fit. Build first with 3/4" pocket holes and 1 1/4" pocket hole screws. Then nail on to sides.
NOTE: If you are opting to not place the edge banding around door/drawer faces (see step 13) - and would like to use just 1x8 boards for the drawer faces, leave a 7 1/2" gap between the top 1x2 and 1x4 (for 7 1/4" wide 1x8s) by moving the 1x4 board upward on the face frame slightly. Do the same for the back and front face frames.
Step 5
Step 6
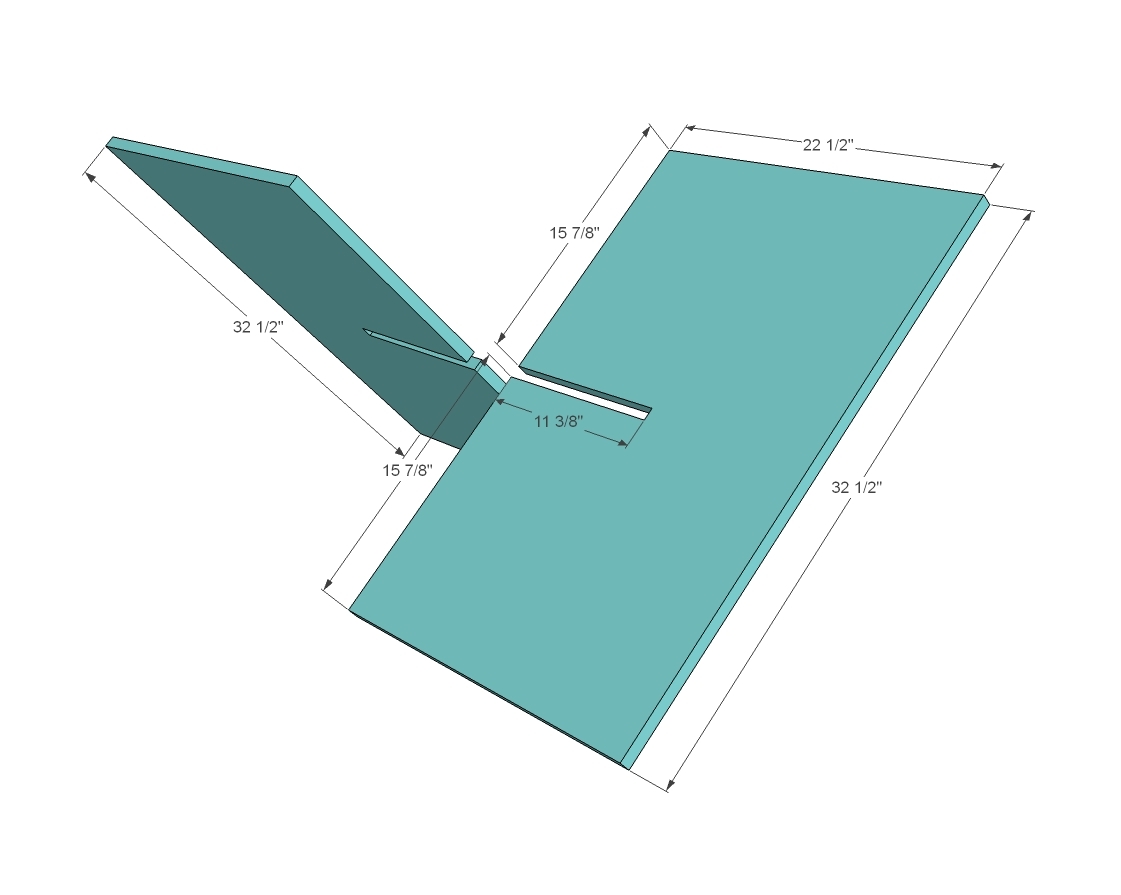
Hillary felt the most difficult part of the entire project was this X - she recommeds for less experienced builders to just place shelving inside the center.
If you do go ahead with the X - I suggest notching out the two shelving piecs as shown above and sliding together.
Step 7
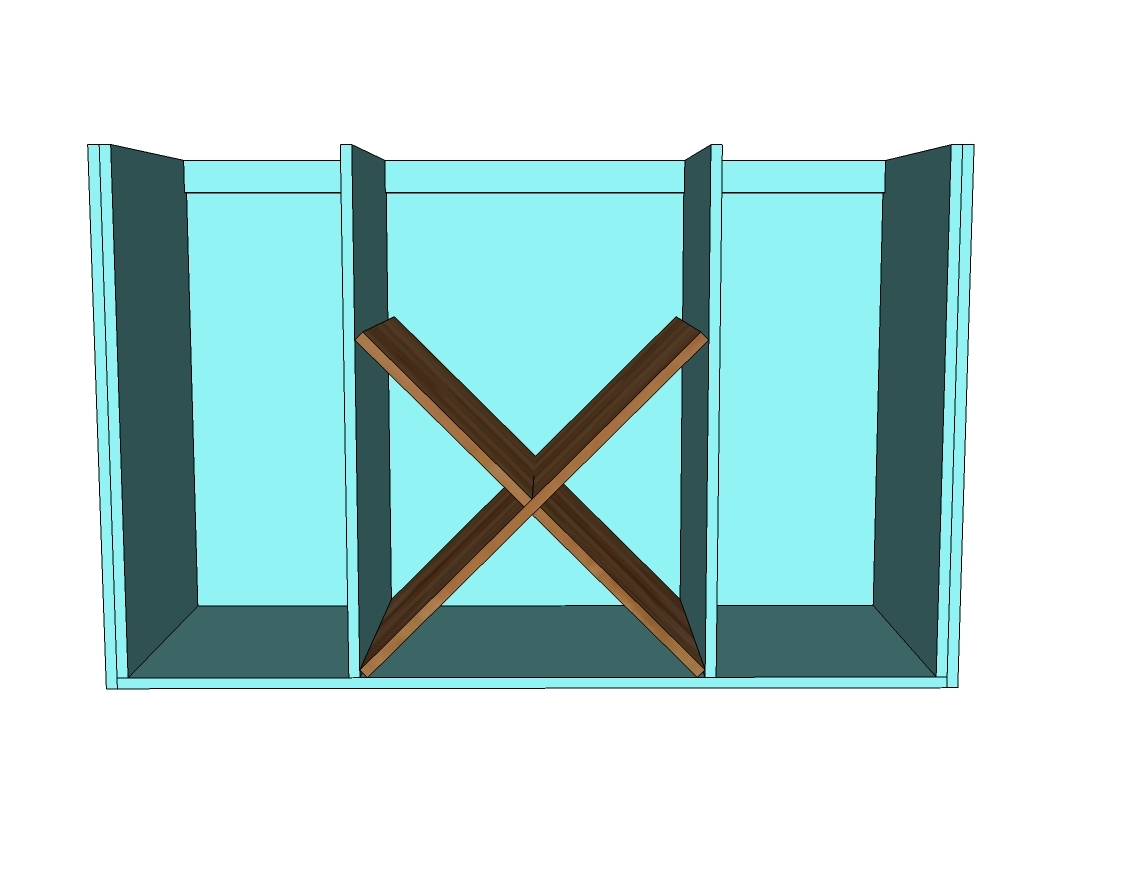
Then before the face framing on the front is added, slide the X in place.
Step 8
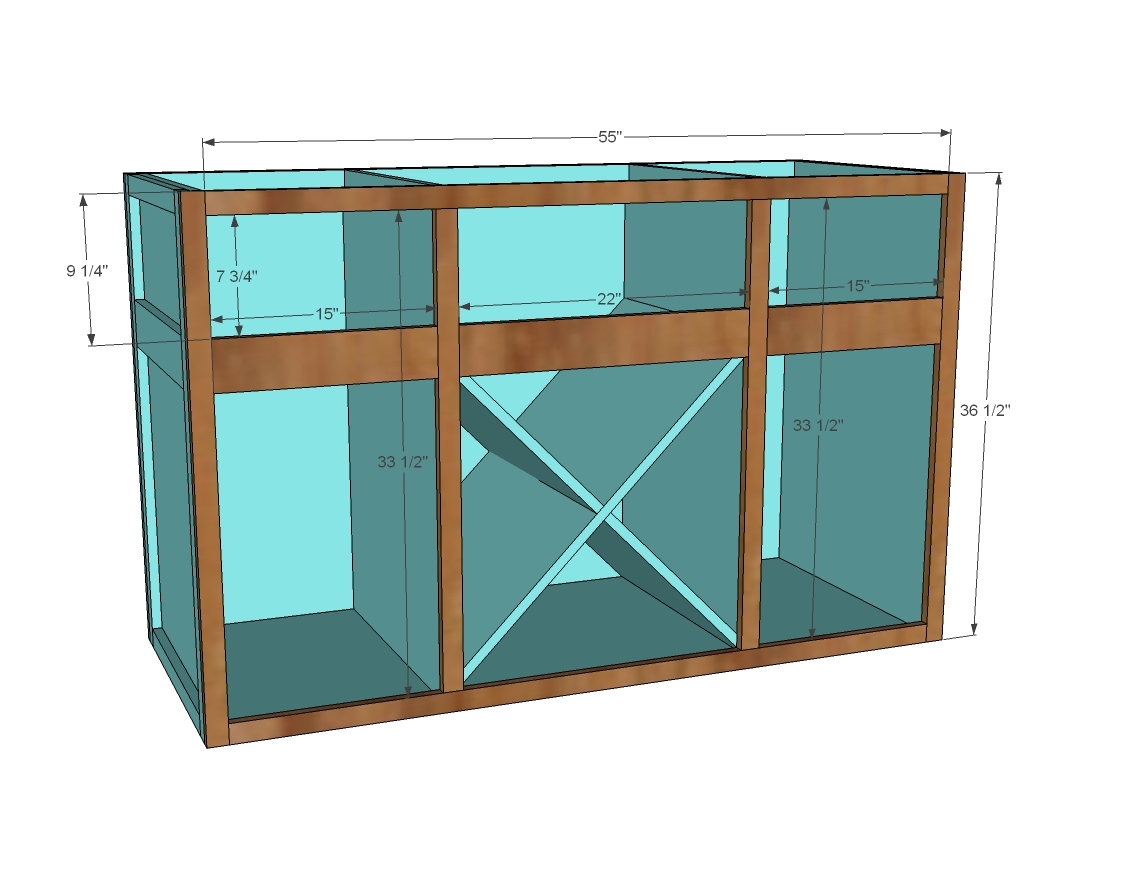
Then build your front face frame to fit and atach to front. You can also apply trim to the front edges of the X.
It is important for your upper drawers that the side openings are flush to the face frames. The center opening will not be flush - we'll take care of that in later steps.
Step 9
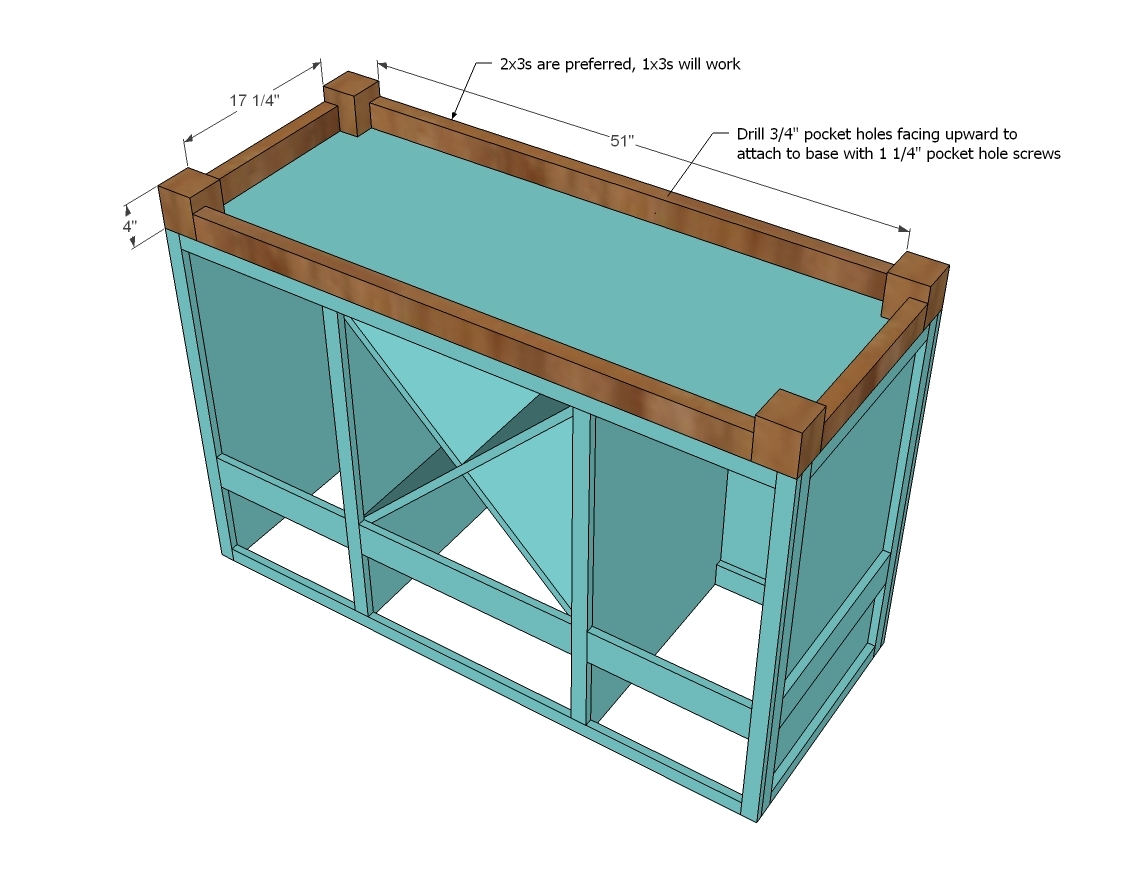
Build your base seperately, then attach to bottom of the island.
Step 10
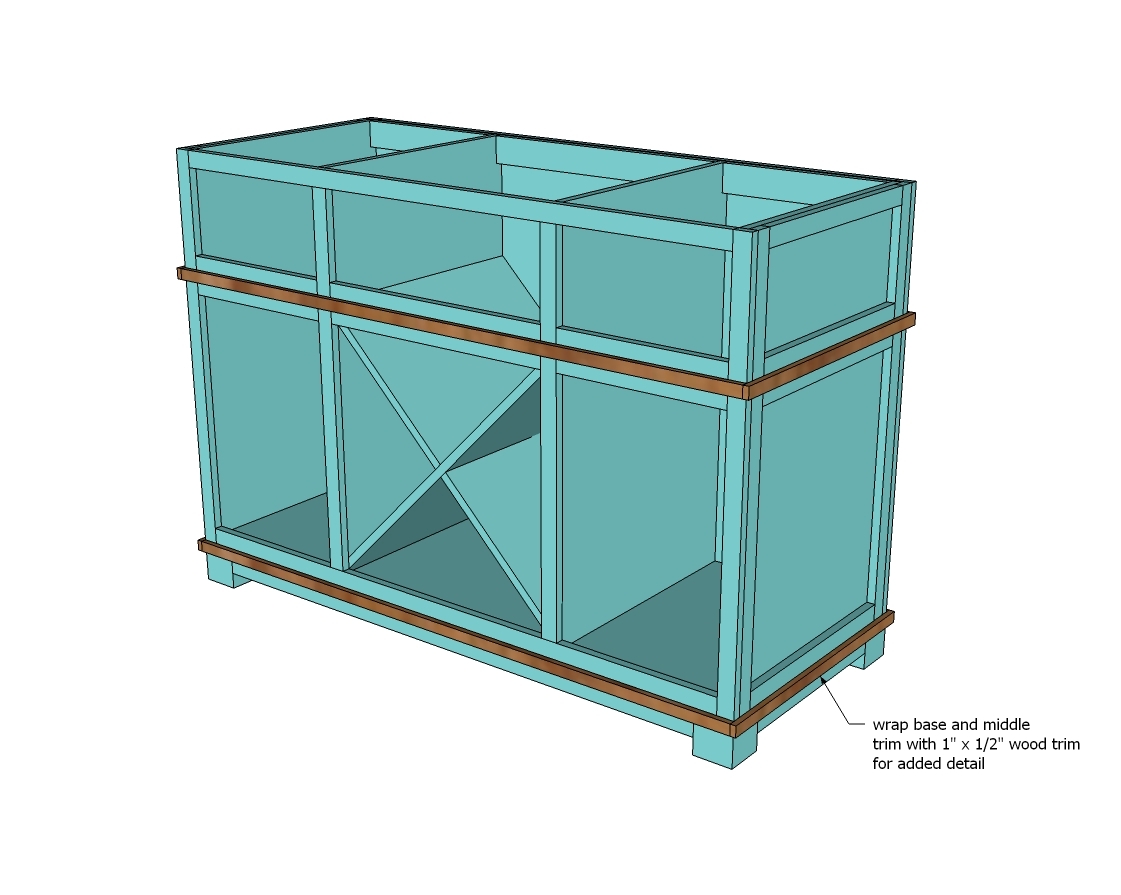
For added detail, cut and nail the 1" x 1/2" trim around bottom and center of 1x4s.
Step 11
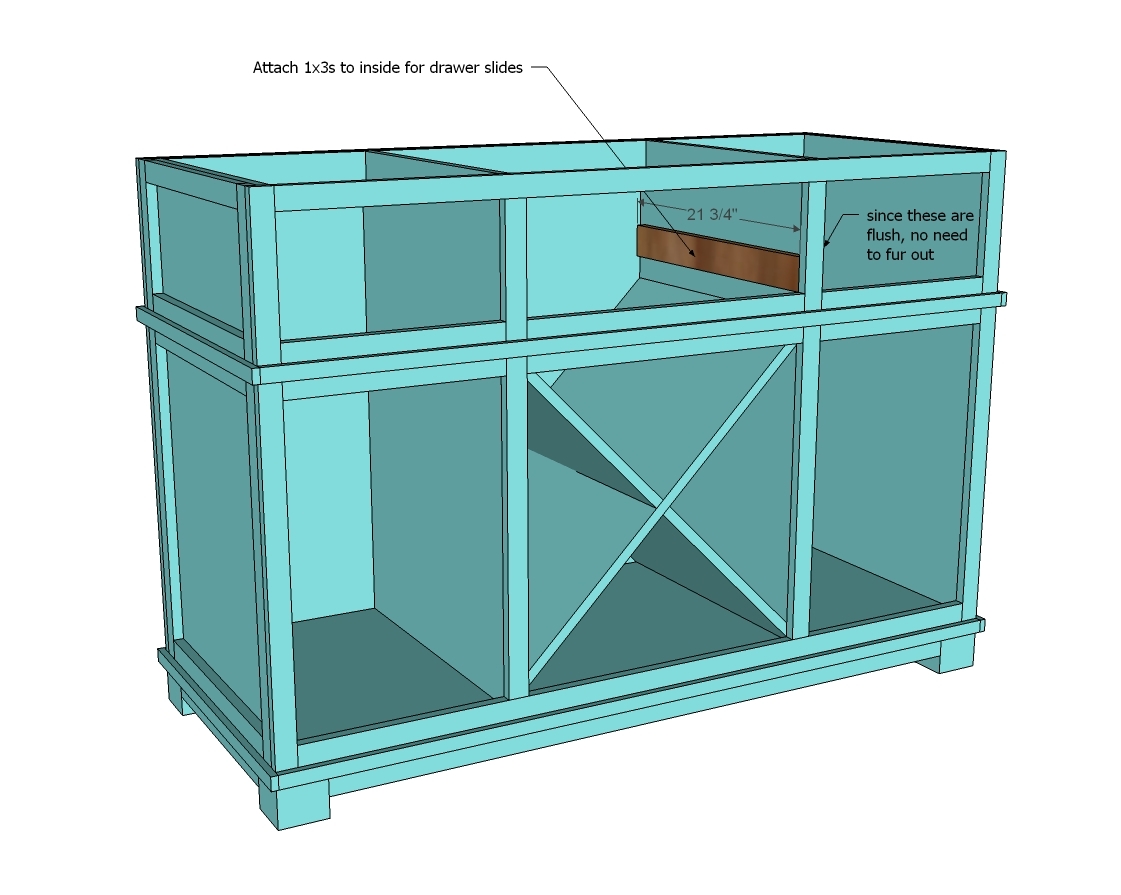
For the middle drawer, since the opening is not flush on the inside, you'll need to fur it out to give you something to mount the drawer slides too. Use 1 1/4" nails to attach.
Step 12
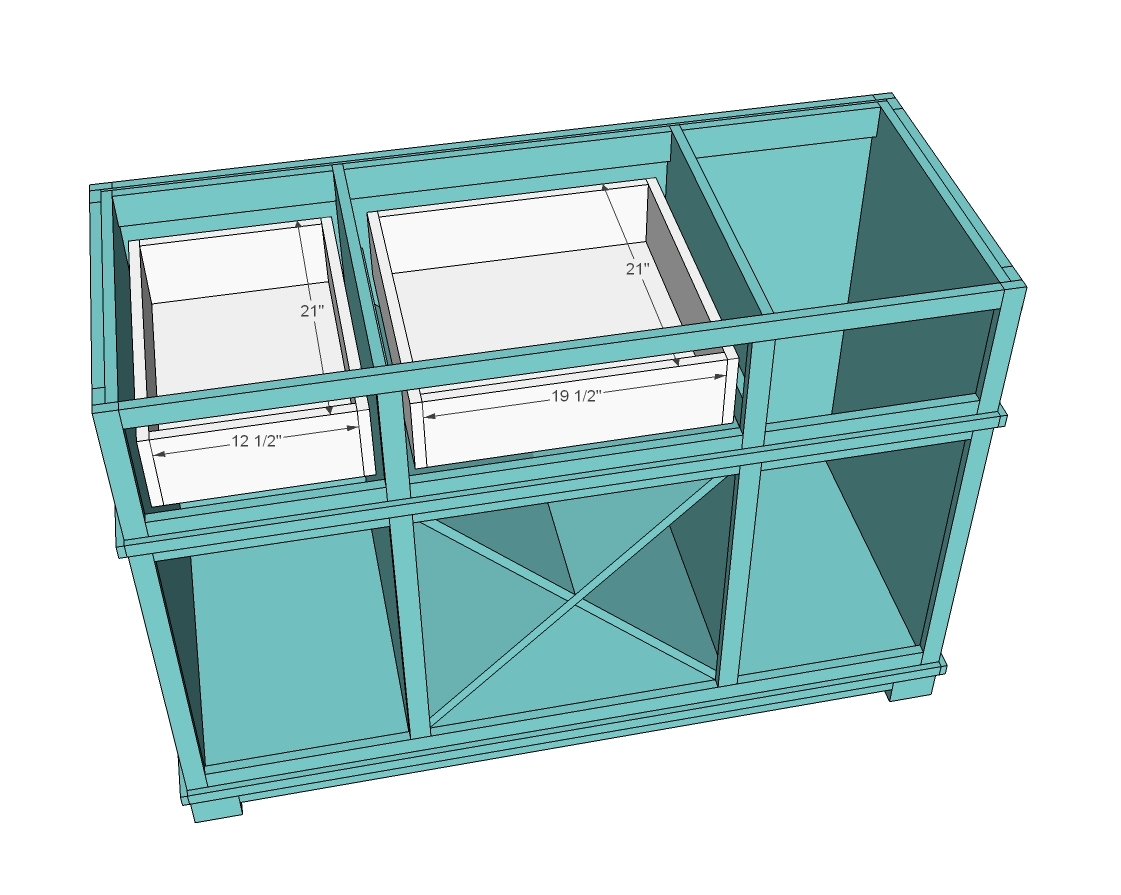
Drawers should be built to fit openings and drawer slides. Hide 3/4" pocket holes and 1 1/4" pocket hole screws to the outsides - the drawer face will cover them up. The bottoms of these drawers are simply 1/4" plywood cut to fit - this works if you use bottom or bottom corner mount drawer slides.
Install drawers inside cabient with drawer slides.
Step 13
Drawers and doors are figured with an 1/8" gap around all sides. Measure and cut to fit the openings. These drawers are shown with wood trim around plywood centers.
Attach faces with 1/8" gaps around all sides.
Step 14

Attach store bought corbels to back side of island. For additional support, 2 additional corbels can be added on the back side of the dividers. First, you'll need to fill in the spacing between the face frame 1x2 and 1x4 with a 1x2.
Step 15
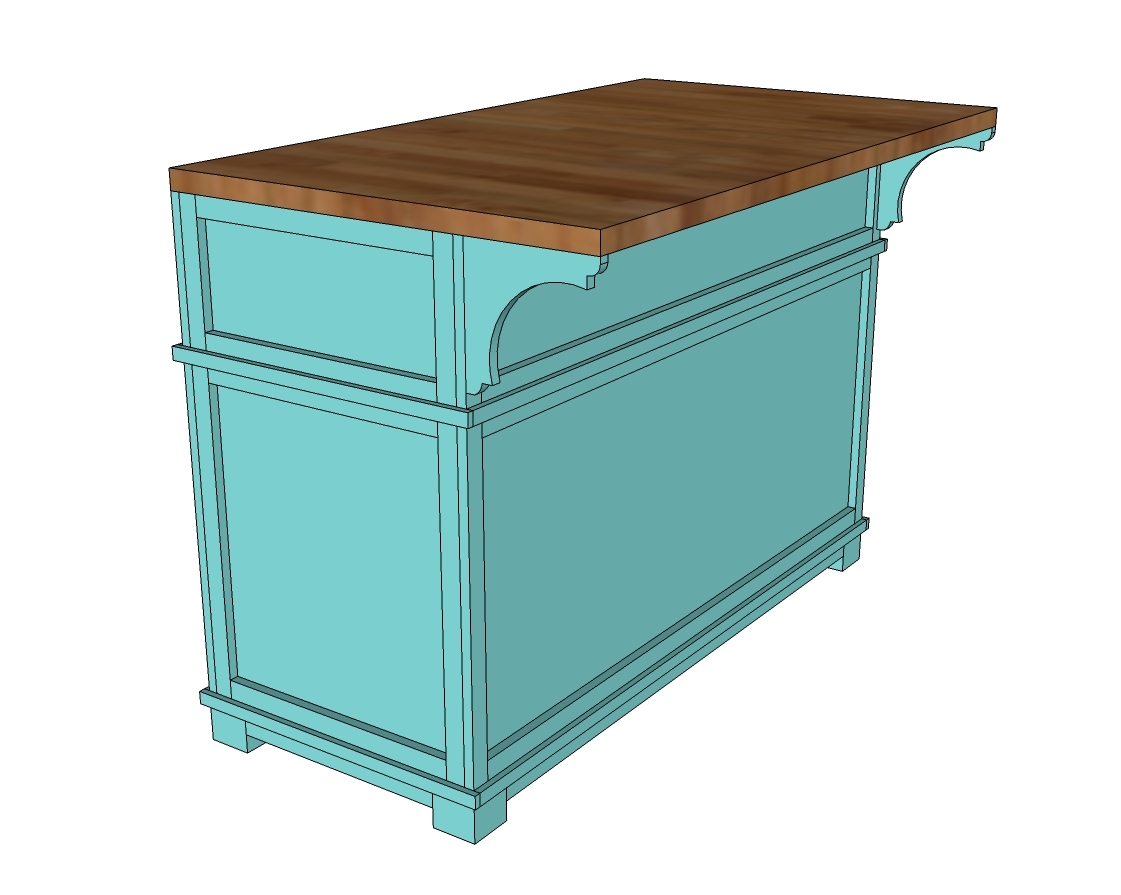
Hillary used a prefab countertop - but thought a butcher block countertop would be lovely too.
It is always recommended to apply a test coat on a hidden area or scrap piece to ensure color evenness and adhesion. Use primer or wood conditioner as needed.