
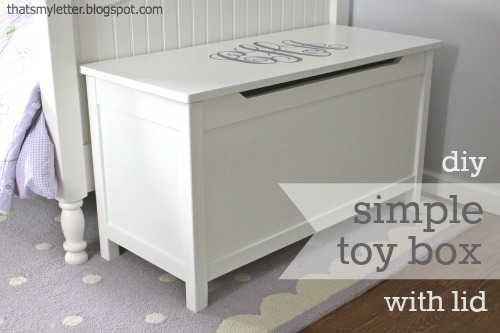

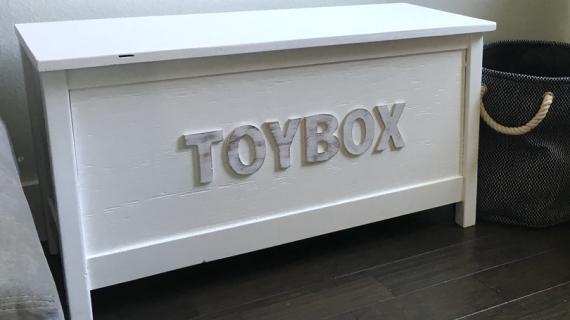
Free step by step plans to build a Land of Nod inspired toybox with hinged lid from Ana-White.com

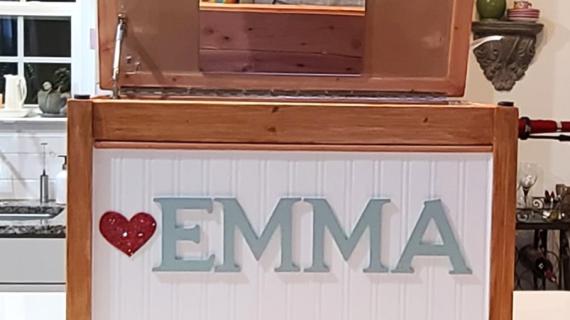
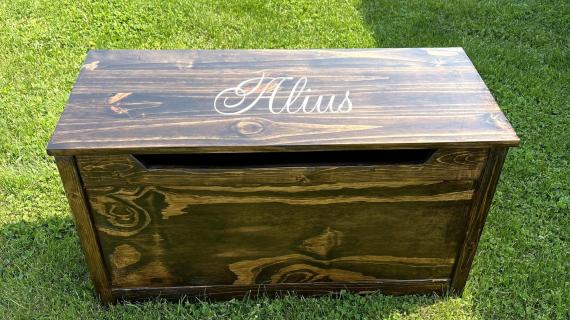
My friend Jaime from That's My Letter asked me to design a simple, more modern toybox for her, with a lid, inspired by this one from Land of Nod.

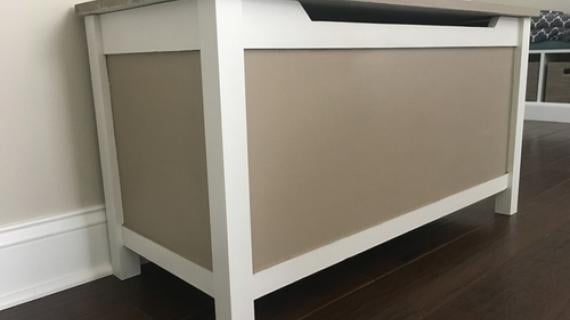
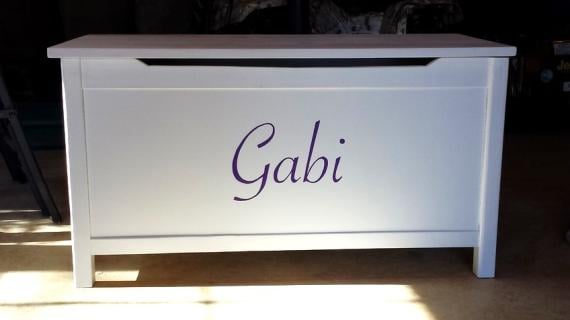
And this is the DIY version!!! I absolutely love how it turned out!!!

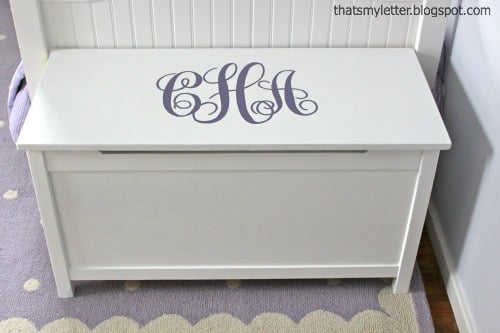
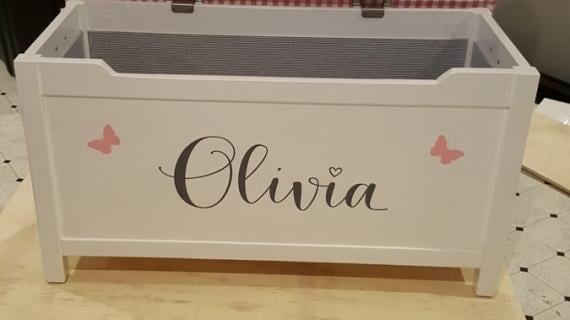
Jaime also added this beautiful monogram to the top - you can get more details on how she did that here.

Isn't it beautiful? And of course you can build this toybox too with the plans following!
But please take a quick second to read Jaime's building post here - she's got everything covered from how she hides pocket holes to what type of hinges she used to how to make such a beautiful monogram.
Thanks Jaime!
Enjoy the plans!
XO Ana
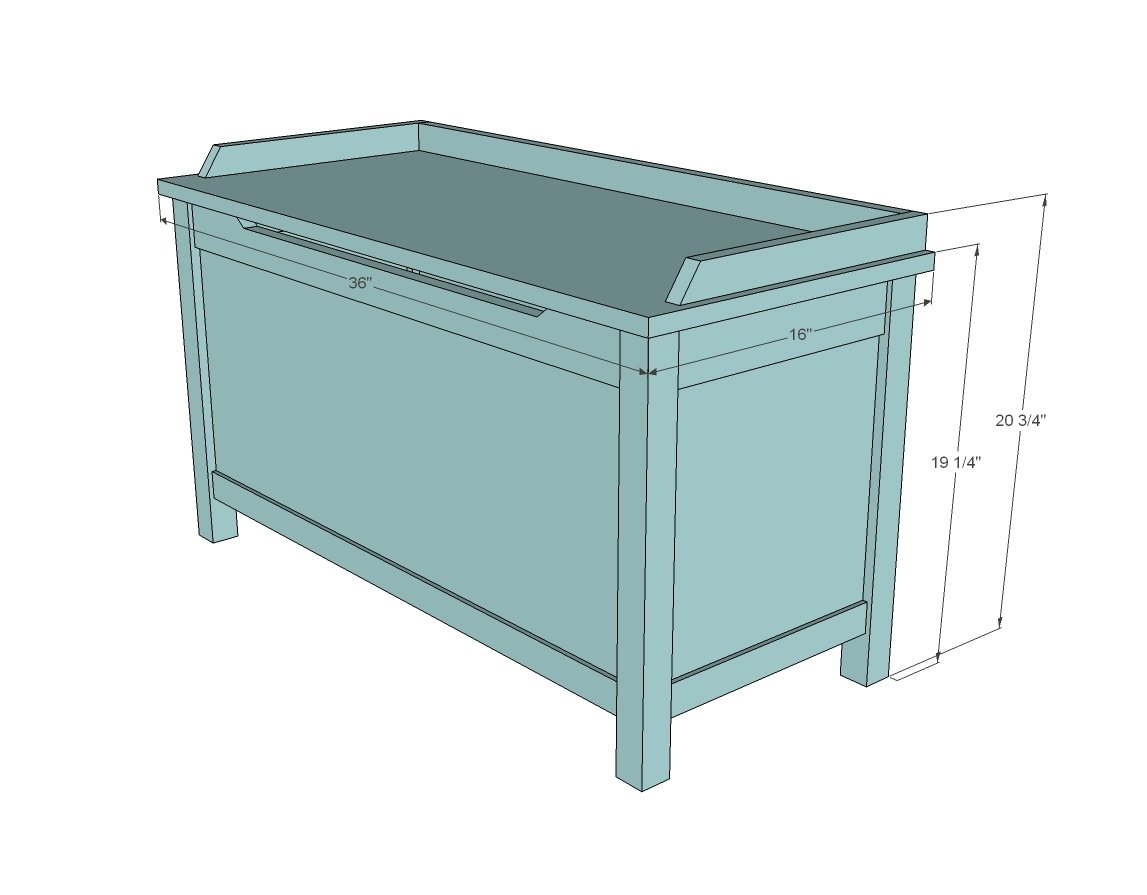
Preparation
- 1 - 4x4 foot sheet of 1/2” thick hardwood plywood
- 1 - 3/4” thick project panel 36” x 16”
- 2 - 1x3 @ 8 feet long
- 1 - 1x2 @ 8 feet long (need 1 more for optional top)
- 1 - 2x2 @ 8 feet long
- 1” and 1 1/4” pocket hole screws
- Hinges and felt pads, possibly a hinge support to keep the lid from slamming shut or falling backwards
- 2 - 1/2” plywood 12” x 12”
- 2 - 1x3 @ 12”
- 2 - 1x2 @ 12”
- 2 - 1/2” plywood @ 12” x 32”
- 2 - 1x3 @ 32”
- 2 - 1x2 @ 32”
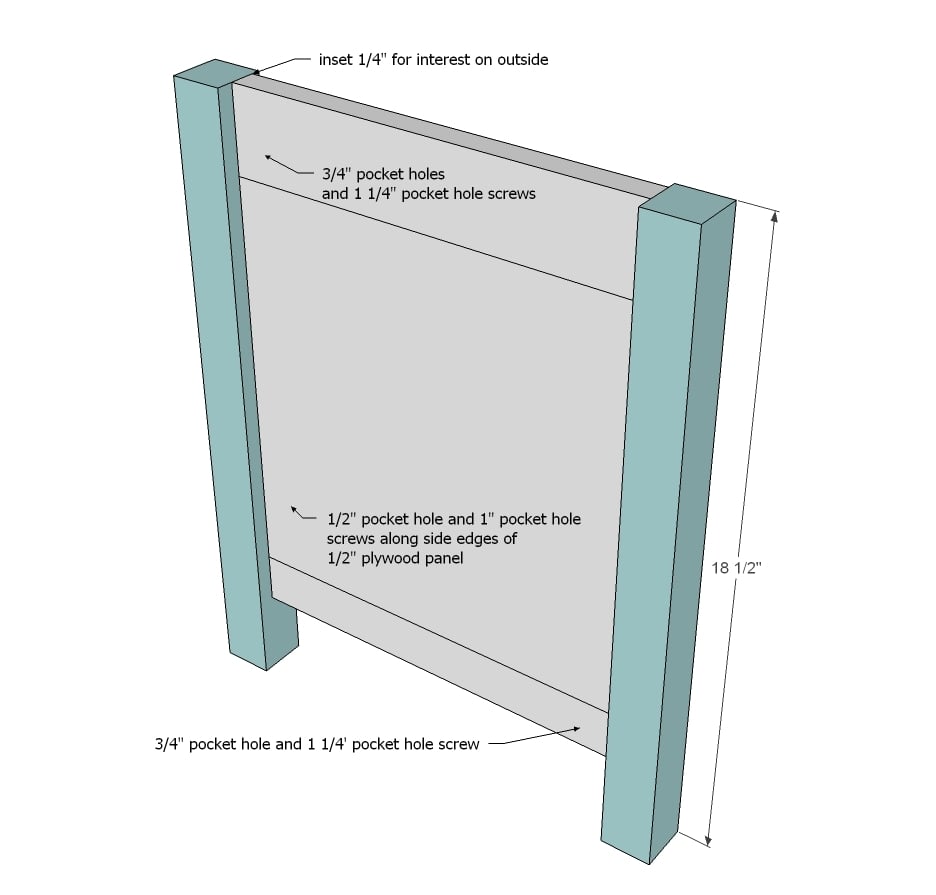
- 4 - 2x2 @ 18 1/2”
- 3 - 1x3 @ 13”
- 1/2” plywood 33” x 13”
- 1 - 3/4” thick project panel 36” x 16”
Optional top
- 1 - 1x2 @ 33 1/2”
- 2 - 1x2 @ 14”


Please read through the entire plan and all comments before beginning this project. It is also advisable to review the Getting Started Section. Take all necessary precautions to build safely and smartly. Work on a clean level surface, free of imperfections or debris. Always use straight boards. Check for square after each step. Always predrill holes before attaching with screws. Use glue with finish nails for a stronger hold. Wipe excess glue off bare wood for stained projects, as dried glue will not take stain. Be safe, have fun, and ask for help if you need it. Good luck!
Instructions
Step 1

TIP: Drill all 1/2” pocket holes first (basically, just drill 1/2” pocket holes around all sides of 1/2” plywood pieces) and then drill the 3/4” pocket holes so you don’t have to reset your jig multiple times.
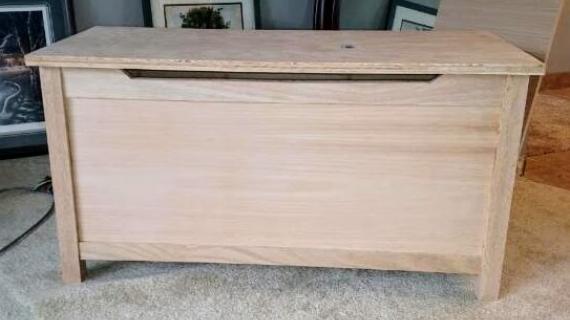
I designed this toy box a little different - more like how I build doors - to conserve space inside, and keep it light, and also because 1/2" plywood (used for the panels) is so much easier to work with than 3/4". This means you'll need to use 1/2" pocket holes for attaching the 1/2" plywood (with 1" pocket hole screws), and then 3/4" pocket holes for attaching the 1x boards (1 1/4" pocket hole screws).
This type of construction requires very straight plywood cuts. Make sure you use a straight edge to guide your cuts or a Rip Cut is what I use.

It's a miracle tool.
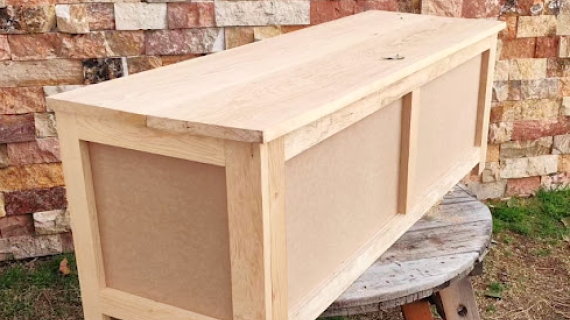
Start by building your side panels. Make sure the side panel edges are flush and the two panels match. If not, you may need to trim the whole side panel edge down.
Step 2
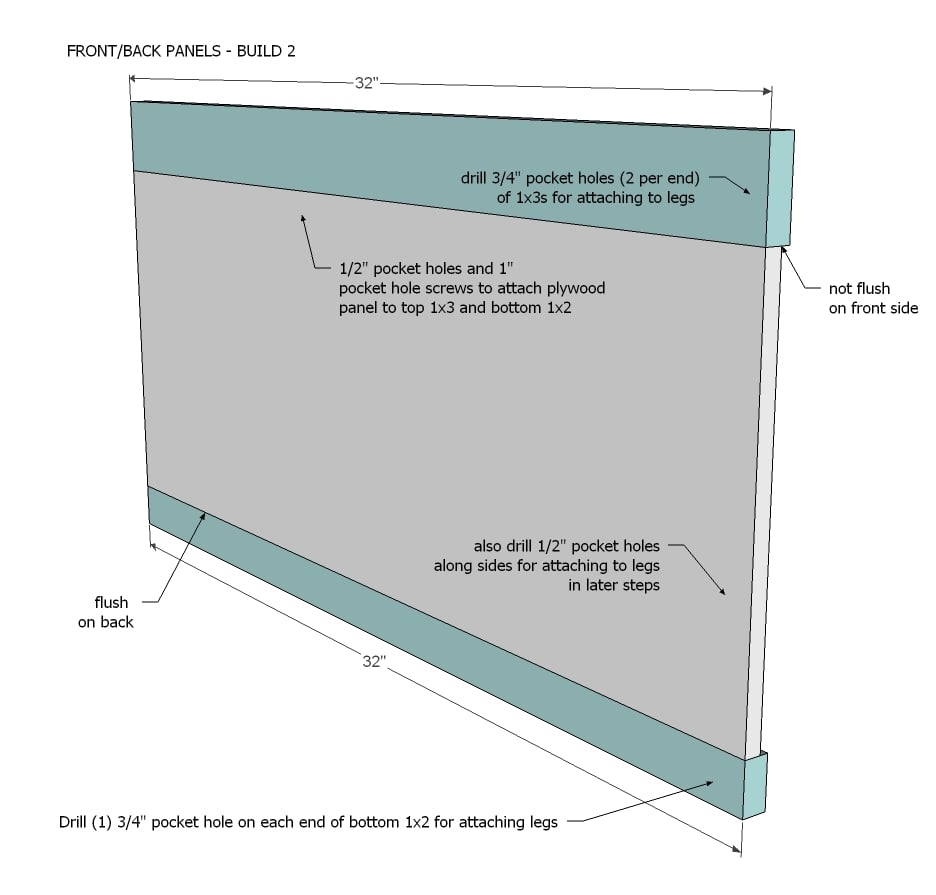
Then build the two front and back panels.
Step 3
Attach side panels to legs.
TIP: Fill any pocket holes that you can now instead of later when it's tough to reach inside.
Step 4
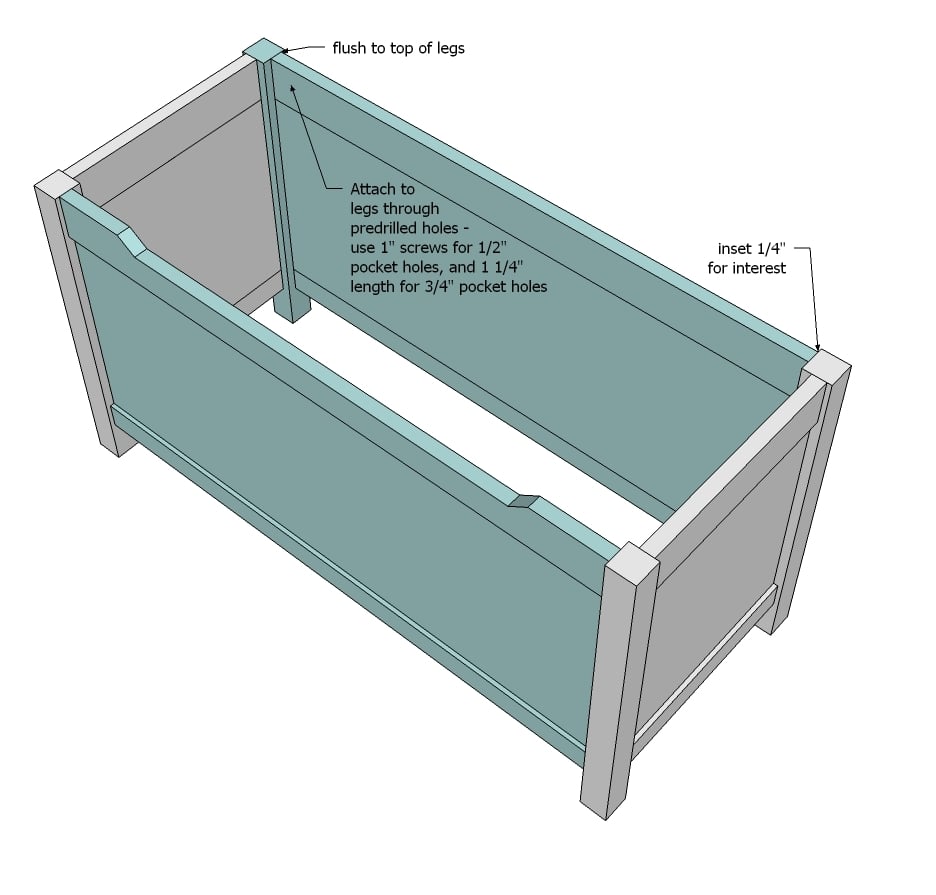
And then the front and back panels to the side panels.
Step 5
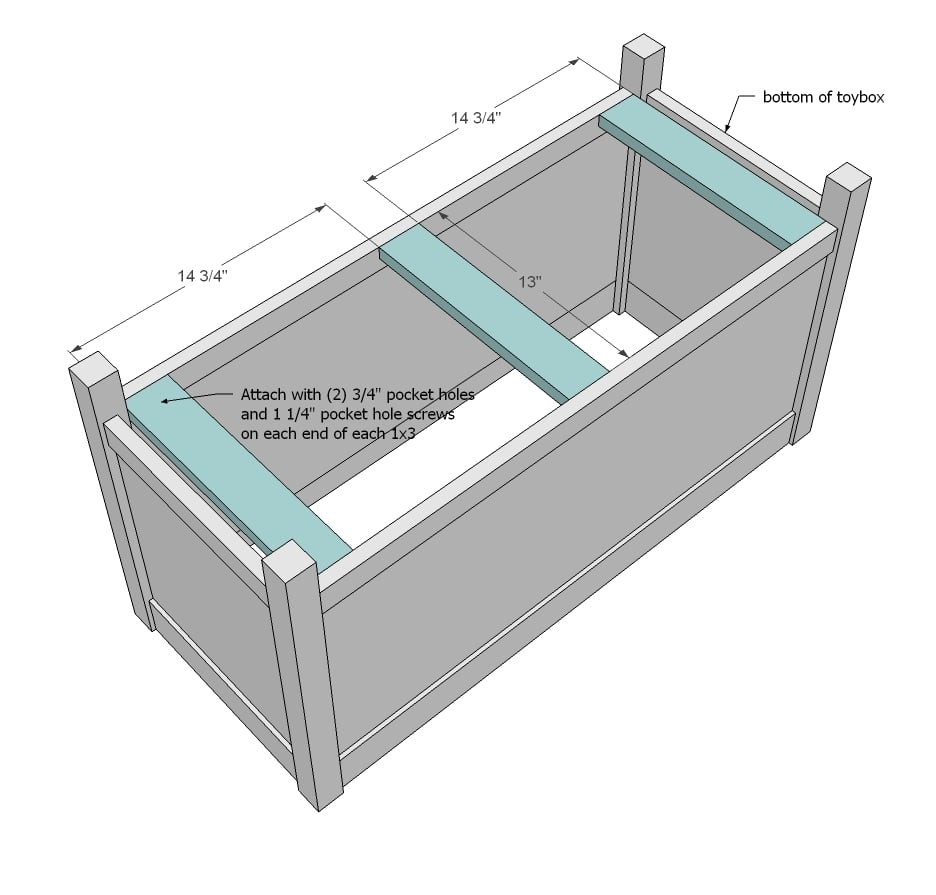
Step 6
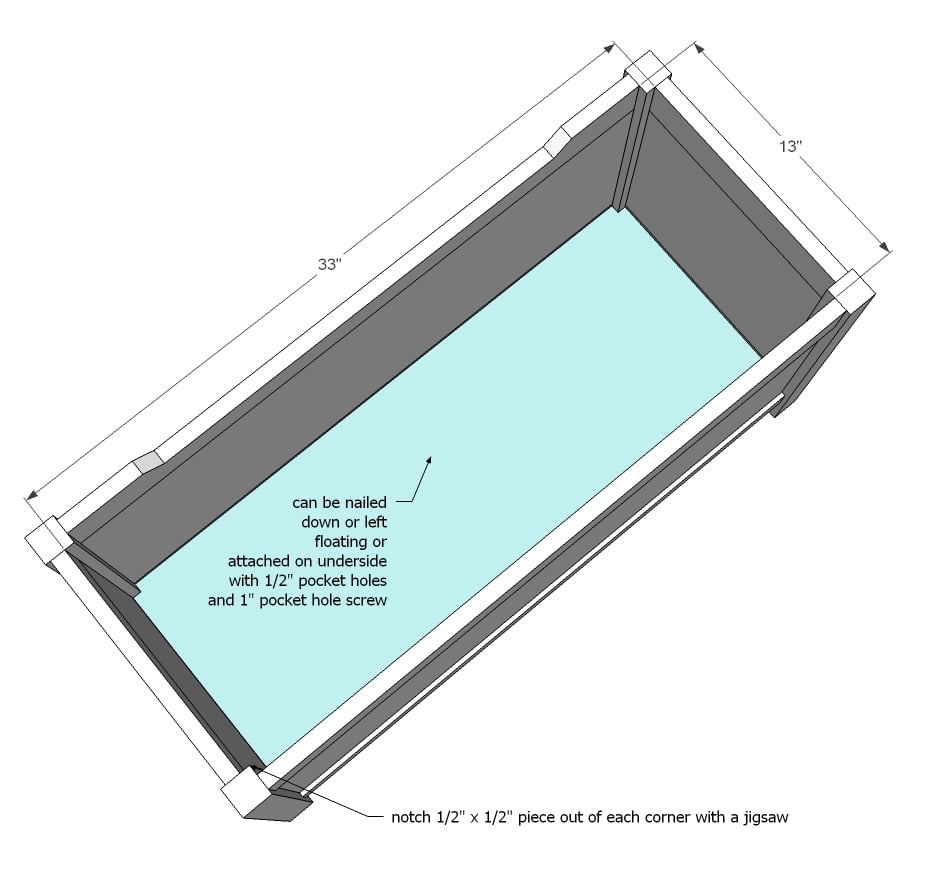
Then the bottom can rest inside. For even more support and to help square things up, I recommend attaching the plywood to the sides with 1/2" pocket holes and 1" pocket hole screws.
Step 7
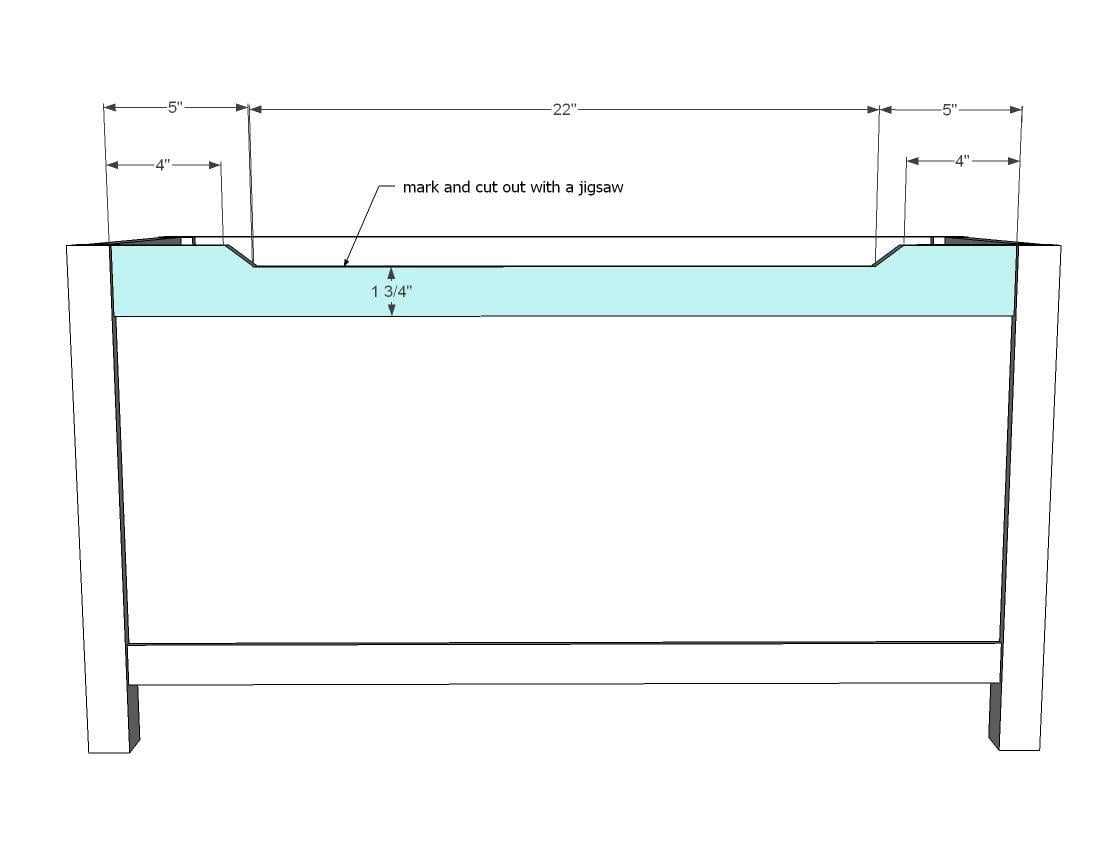
Now cut the front edge out with a jigsaw. Sand the cut edge until smooth.
Step 8

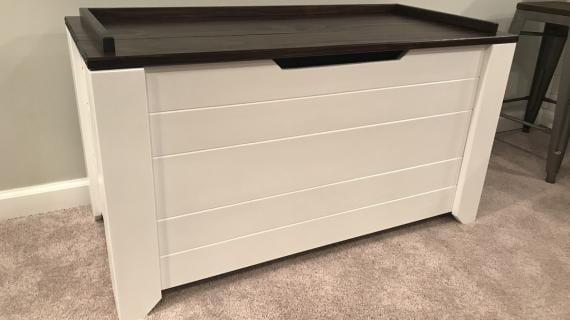
Attach top - Jaime has more details on what type of hardware she used here. Remember, you'll want to take steps to prevent little fingers from getting pinched from the toy box top.
Step 9
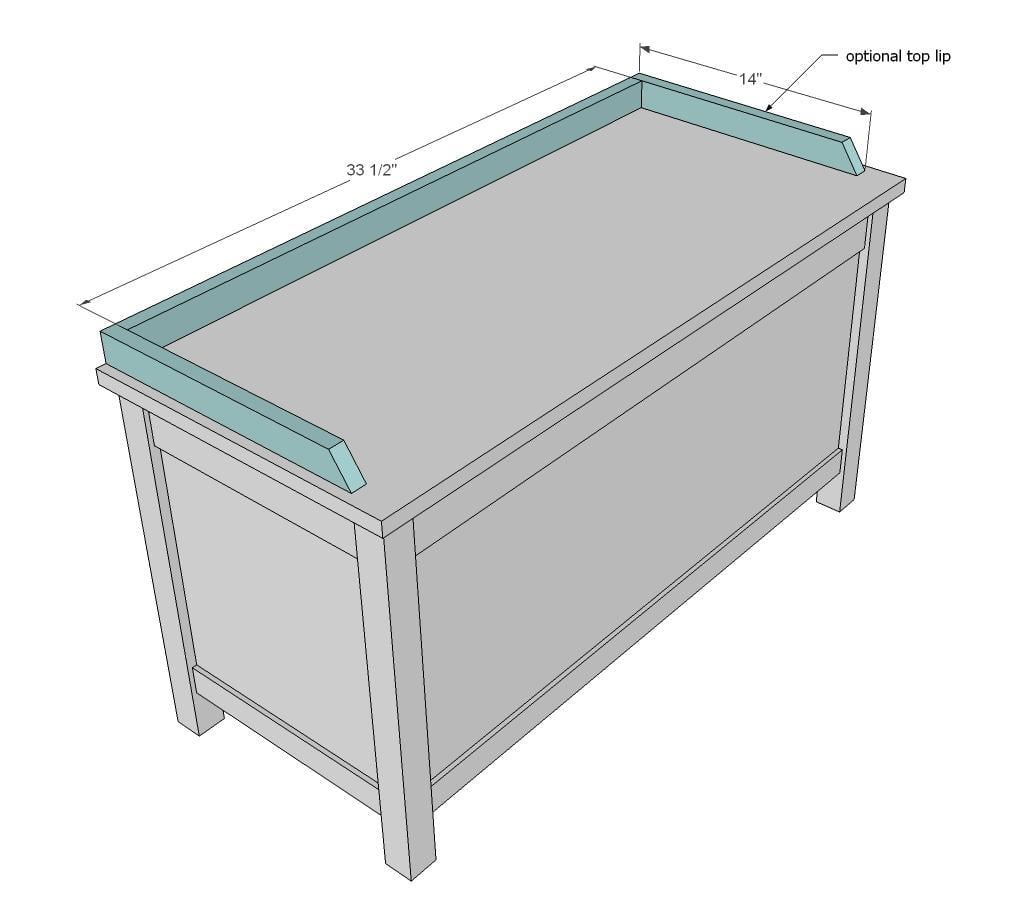
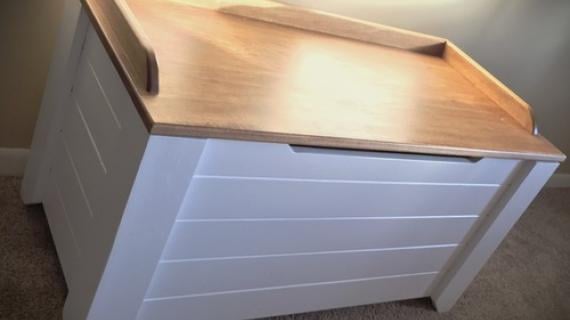
If you want to add a top lip, you can do that too - for example, to place a top cushion on. Here's what I recommend but this is optional of course.
It is always recommended to apply a test coat on a hidden area or scrap piece to ensure color evenness and adhesion. Use primer or wood conditioner as needed.

Comments
momofour09
Tue, 09/17/2013 - 12:53
Plywood sheet
Are the plywood sheets the 2x4 foot?
In reply to Plywood sheet by momofour09
Ana White
Tue, 09/17/2013 - 12:59
Hi - you'll want the 4x4
Hi - you'll want the 4x4 sheet.
spiceylg
Tue, 09/17/2013 - 17:22
Collaboration
Awesome job you two and love the monogram!
ncampbell
Wed, 10/02/2013 - 15:51
cost?
aprox. cost??
mariog2912
Sun, 10/27/2013 - 07:30
First Intermediate Project
I fell in love with this project as soon as I saw it. I've built a sectional headboard that went together in my bedroom because set I bought would not fit up my stairwell, and I have also built an end table with circular saw dadoes (I saw it online and had to try it). That is the length of my woodworking prowess. If I can pull this off for my grandchild, it will be epic. I'm slowly getting materials together for project and I have two questions. 1. How long did you let wood acclimate to your home before starting construction? I'm thinking about purchasing pine because it seems to be the straightest wood at Lowes, just way more expensive. 2. Did you apply any finish to the inside of toy box? Thanks again for great design. I will post pics when done.
In reply to First Intermediate Project by mariog2912
jaimecostiglio
Wed, 10/30/2013 - 03:09
wood acclimate and finish
Mariog - I build outside in my garage so the wood doesn't acclimate at all. I don't think it's necessary since you're not securing it down (like a wood floor). Just purchase your lumber and start building :) And I used 1/2" plywood and #2 pine boards.
Yes the inside is finished. See my post here for more pics of the interior and how I plugged up all the pocket holes:
http://thatsmyletter.blogspot.com/2013/09/s-is-for-simple-toy-box-with-…
Good luck!
In reply to wood acclimate and finish by jaimecostiglio
mariog2912
Thu, 04/17/2014 - 05:47
Inspiration
Jaime,
I wanted to reach out and thank you for your help on this project. It turned out more fabulous than I ever could have expected. It also inspired me to do other projects with the skills I learned. I submitted some pics on brag post (#toybox). Thanks, again.
In reply to Inspiration by mariog2912
jaimecostiglio
Fri, 04/18/2014 - 04:31
You're welcome
So nice to hear of your success and thank for the note. Glad your toy box came out fabulous, it makes all the hard work worth it. Here's to more building!
gsumarcinko
Wed, 11/13/2013 - 10:30
2x2 lumber for this project
To Jaime or anyone else following these comments, where are you finding straight 2x2 lumber? If I can't find it in my area do you think gluing and clamping 2 pieces of 1x2 from my local lumber store would work as a replacement?
The only 2x2 stuff I can find is a mess at the big box stores.
Thanks and love this project can't wait to build it.
-Jeff
In reply to 2x2 lumber for this project by gsumarcinko
jaimecostiglio
Fri, 04/18/2014 - 04:33
straight 2x2 s
Jeff my local Home Depot carries 2x2 SELECT PINE boards but only recently (last Fall?) did they appear on the shelves. They run about $9 each but so worth it compared to the furring sticks.
http://www.homedepot.com/p/Unbranded-2-in-x-2-in-x-8-ft-Select-Pine-Boa…
Good luck with your project.
papabear
Mon, 08/25/2014 - 23:22
2x2 lumber
you could also get a 2x4 and cut it down to size. It would also be cheaper
In reply to 2x2 lumber for this project by gsumarcinko
mikepattenson
Mon, 05/25/2015 - 18:23
Cheap and easy to construct!
Cheap and easy to construct! I really appreciate people sharing their plans. This will really help me build my own for my son.
Prepare things for the future, download your own woodworking plans for any project:
brandonbobo
Tue, 11/19/2013 - 18:34
Top Lip
I have nearly completed this toy box for my 18 month old's Christmas present. I have all the sides together and pocket holes filled, but I have not yet primed or painted. My question is, how should the top lip be attached to the lid? Should pocket holes be placed in the lid or the 1x2's? If so, what size pocket holes? Is there an alternative way to attach the lip as opposed to pocket holes? (Ran out of wood filler on my very last pocket hole). I was considering finishing nails with pilot holes and a nail set, but the nails may be slightly too long for the lid.
Artylarry77
Sat, 12/28/2013 - 13:38
project panel
Hi. Im from UK and am not familier with project panel. Is it A type of plywood? or different.
newbie
In reply to project panel by Artylarry77
JoanneS
Sat, 12/28/2013 - 14:38
Try a Furniture Board
Hello!
I believe these are called "Furniture Board" over in the UK. It's an edge glued wood panel, usually made from pine. I tried sending a link, but it got stuck in the spam filter. Hope this suggestion gets through. Happy building!
Joanne
rosejr
Thu, 06/12/2014 - 08:07
Staining top
This is a great design. I am getting ready to start this project but would like to stain the toy box rather than paint it. Will the project panel top stain well? If not do you have alternative suggestions for the top if I were to stain it.
royalriver83
Sat, 07/19/2014 - 13:26
Hi. This is my first attempt
Hi. This is my first attempt at building anything like this. I wanted to know how to make the toy box longer, as I will be placing it in front of a window and making it into a window seat. Which boards would I make longer? Sorry for the stupid questions, but I'm a brand new newbie. Thank you so much for sharing these plans with us so that we could create for our kiddos.
cday0509
Thu, 07/31/2014 - 19:19
Top lip for cushion
I'm wanting to add a cushion to the top. Not sure how I want to secure it yet, maybe screw in snaps? Anyway, my question is if I put on top lips on the lid, will this be uncomfortable when sitting down? If someone sits too far back or to the sides, will they be sitting on 1x2s? or am I overthinking this.
balloongal247
Fri, 08/01/2014 - 07:26
Cushion
I think maybe it would be easier to either: upholster the top (there are a lot of diy tutorials for that) or if you want to be able to remove the cushion for cleaning, maybe figure out a way to screw some kind of fastener (like a snap?) onto the top, and then the corresponding part on the cushion. Velcro may also be an option. This way you wouldn't have to worry about lips. If you did decide to do a lip, just make sure it's smaller than the cushion when compressed. I think there exists 1x1 wood, though maybe not in the lumber section. That might be enough to keep it from falling off without causing issues.
majorbrain
Thu, 10/16/2014 - 11:22
Personal tips for other builders
I wanted to make my son a toy chest for his first birthday and came across this site. Love the project. I am well on my way to completing it and very happy with the results so far. Thank you!
I do have some tips for others that will take on this project.
Cutting tips…if you use a chop saw like I did to cut the 1x3, 1x2, and 2x2:
I stacked the 1X2 on top of a 1x3 and cut 24”. Then I cut the 24” (stacked again) perfectly in half (make sure to account for blade width if you want to be exactly 12” according to the project plans). That at least gave me identical lengths for the four pieces that will make up the tops and bottoms of the side panels. I did the same thing for the 32” pieces for the front and back panels. I then used these pieces to mark where to cut the plywood so that I was certain to have the same length when assembling the panels.
Pay attention to the torque setting(s) (clutch and transmisson) on your drill when performing the different steps of the project. For best pocket hole drilling results, use your highest setting. When driving the pocket hole screws, use a low setting, especially with the ½ plywood – the material may split if you drive the screw with too much force. Start low and add torque until you find the sweet spot for your drill.
Also, if you’re new to pocket holes and the Kreg Jig (which I was) and you run out and buy one of the Kreg kits and additional pocket hole screws (which I did), pay attention to the thread on the screws. The Kreg kit I bought came with a handful of Fine screws and the additional screws I bought off the shelf next to the kit were Coarse. It’s not a big deal which thread you use when assembling, but if you find yourself disassembling and reassembling (for whatever reason [see below]), you will not want to use a Fine screw in a hole that had previous been attached with a Coarse screw.
During panel assembly and attaching the legs, the detail is made by (hence the instructions call for) leaving a ¼” space. I did not have a ¼” piece of scrap, but I did have a Home Depot yard stick, which happens to be pretty darn close to ¼”. So I used that!
Do follow the assembly order in the instructions. I got a little excited and attached the legs to the long panels first, without reviewing the instructions. Not only does that make it awkward to assemble the first side panel, but you will quickly learn that your drill does not fit in the box when you try to drive the screws into the second side panel L A small setback.
Last tip: Before cutting the plywood for the bottom of the box, measure the area. It may not be exactly 13 x 33!
Will upload WIP and final product pics when I’m done. Thanks again Ana and Jaime and good luck to others!
fjohnson
Fri, 12/12/2014 - 11:25
Pocket holes
Great plans. I am building one now. One thing in the plans I am not familiar with. The terms you use in the plans: (1/2" hole with 1" screws and 3/4" hole with 1 1/4" screws. The holes are all the same size with pocket holes fixtures. Kreg does not reference this dimension. What is it?
In reply to Pocket holes by fjohnson
Ana White
Fri, 12/12/2014 - 12:15
Be sure to see placement of
Be sure to see placement of pocket holes here
http://thatsmyletter.blogspot.com/
mikepattenson
Sun, 04/12/2015 - 19:59
Cut List:
Cut List:
2 - 1/2” plywood 12” x 12”
2 - 1x3 @ 12”
2 - 1x2 @ 12”
2 - 1/2” plywood @ 12” x 32”
2 - 1x3 @ 32”
2 - 1x2 @ 32”
4 - 2x2 @ 18 1/2”
3 - 1x3 @ 13”
1/2” plywood 33” x 13”
1 - 3/4” thick project panel 36” x 16”
Optional top
1 - 1x2 @ 33 1/2”
2 - 1x2 @ 14”
Very simple and basic cuts... I like this project!
For more projects like this, follow the resource below:
mikepattenson
Tue, 05/26/2015 - 16:16
Use one of these free toy box
Use one of these free toy box plans to build a gift for your child or grandchild that they'll cherish for years. It's a great way to add storage to a kid's room or playroom and the kids will love being able to organize all their toys.
Some of these plans make it super easy to build a toy chest, but others may be more difficult if you're a beginner at building. Be sure to look through each plan to see which one will work best for your skill level and the child's needs.
Each free toybox plan includes instructions, diagrams, photos, materials, tools, and even videos. All the plans are straight forward and easy to follow.
If you're like me who are having a hard time looking for woodworking plan for project, I recommend to DOWNLOAD your own collection for future use. CHECK the reference below:
levita
Tue, 06/02/2015 - 10:16
pocket holes?
excuse the dumb question, but can you please explain what a pocket hole is?
and, rather than use plywood, i am thinking of edge gluing some cedar planks - do you advise against that?
sewcuriousnerd
Sun, 08/09/2015 - 15:02
what is a pocket hole
a pocket hole is what the kreg jig creates. :)
lungo
Thu, 10/01/2015 - 10:54
First time with some ?'s
I just finished this last night. I built it for my sons first birthday. My wife saw it and now she wants another for the front room, where toys seem to accumulate. My only question was on the hinges. I bought some soft close cabinet hinges, but they are not strong enough to slow down the lid. I want to make sure he doesn't smash his fingers. I saw "That's My Letter" suggested torsion hinges, but to get enough in/lbs it would cost $50+, which is almost as much as I spent on the rest of the project. Does anyone have any suggestions on a less expensive way to make the lid soft close?
wellsec
Mon, 07/25/2016 - 06:08
Project Panel?
The plans calls for a project panel for the top. What exactly is this? I went to my local store, but could not find anything. Any help would be great. Thanks
[email protected]
Sun, 12/18/2016 - 20:13
Finishing the inside?
How did you make the inside look more finished? Hide the pocket holes, etc.?
Open to ideas! We're considering fabric on the inside, but would love to hear what others have done.
Thanks,
Emily and Alex
coryjon
Mon, 03/27/2017 - 10:57
Hinges
Hello! It seems that when you attach the hinges, there will be a gap between the top of the chest and the lid. Did you attach anything to support the front of the lid when it is closed due to this gap?
[email protected]
Fri, 01/17/2020 - 07:07
Cutting Plywood with Table Saw
Hi Ana -
I'm a newbie and I am building the Toy Chest. Can you please provide me with some clarification. I see in the tools section that you are using a circular saw to cut the plywood. I am getting the large sheets cut down in big box store and I am using my table saw to square if necessary.
"This type of construction requires very straight plywood cuts. Make sure you use a straight edge to guide your cuts or a Rip Cut is what I use."
Would I need a Rip Cut or straight edge with a table saw that has a fence? I know that I would need it if I were using a circular saw for straight cuts.
Thanks - Joanne
dkakridge
Sun, 03/01/2020 - 18:53
Great Project
Just finished this and i'm so happy with the way it turned out. Wood was about $100 at The Home Depot and I had about $20 in hardware. You really need to be careful of the pocket holes in the 1/2" plywood they will bulge out if not drilled precisely. I had to fix several.
If you search for wooden toy boxes on google you will find a box built exactly like this for $299. This will be a family heirloom for generations.
https://www.crateandbarrel.com/im-just-a-charcoal-wooden-toy-box/s484193?localedetail=US&a=1552&campaignid=1818350877&adgroupid=70975511953&targetid=pla-337747915644&pla_sku=484193&pcat=HSW&ag=kids&scid=scplp484193&sc_intid=484193&gclid=Cj0KCQiA1-3yBRCmARIsAN7B4H3dKm7HhFSEy0FFG7QKPdcDBnuPmCg2fa4rD2SZAFA_TYaRKQvHryUaAhL6EALw_wcB
vtmama
Mon, 06/22/2020 - 08:23
What is the easiest way to…
What is the easiest way to attain that quarter inch inset on the sides?
Sherrie B.
Thu, 08/20/2020 - 09:14
This is the second project I…
This is the second project I have made using your plans. I’m a fan!! I did however run into a problem when connecting the 1/2 inch plywood to the other boards and legs. My Kreg screws didn’t go fully into the pocket hole leaving the heads slightly exposed. The pocket hole plugs won’t fit because of that. Any idea how this happened? I followed your plans exactly as stated. Thank you!
Sherrie B.
randallmd
Fri, 09/25/2020 - 08:52
Skecthup File Available?
I plan on modifying the plans so my son and daughter-in-law to make it easier to assemble and disassemble as they move around the country. Is the Sketchup file available for download?
Thanks
hellopf
Tue, 03/16/2021 - 06:46
Front Edge Cutting
The cutout on the front panel is shown as early as Step 4 but, is not detailed until Step 7. I think it would have much easier to cut this area on the 1x3 before the front panel was assembled and especially before the front/back and end pieces were all joined.
I guess if you are a whiz with a jigsaw, it doesn't matter. I had planned to cut my piece before building the front panel but didn't think about until I had already added the wood glue and the pocket hole screws. Now, I am thinking I might just leave the front panel uncut. I will be sure the lid hangs over enough on the front to allow the chest to be easily opened.
Any suggestions as to how I can easily cut this area without it looking terrible?
Thanks for any suggestions.