Slide Out Closet for Tiny House

Difficulty
Intermediate
| Print this plan

DIY closet that slides away into shower for a tiny house.  Designed and built by Ana White.

Perhaps one of the most controversial builds I've done of late is this closet.

Or more specifically, not the closet, but where the closet is located.


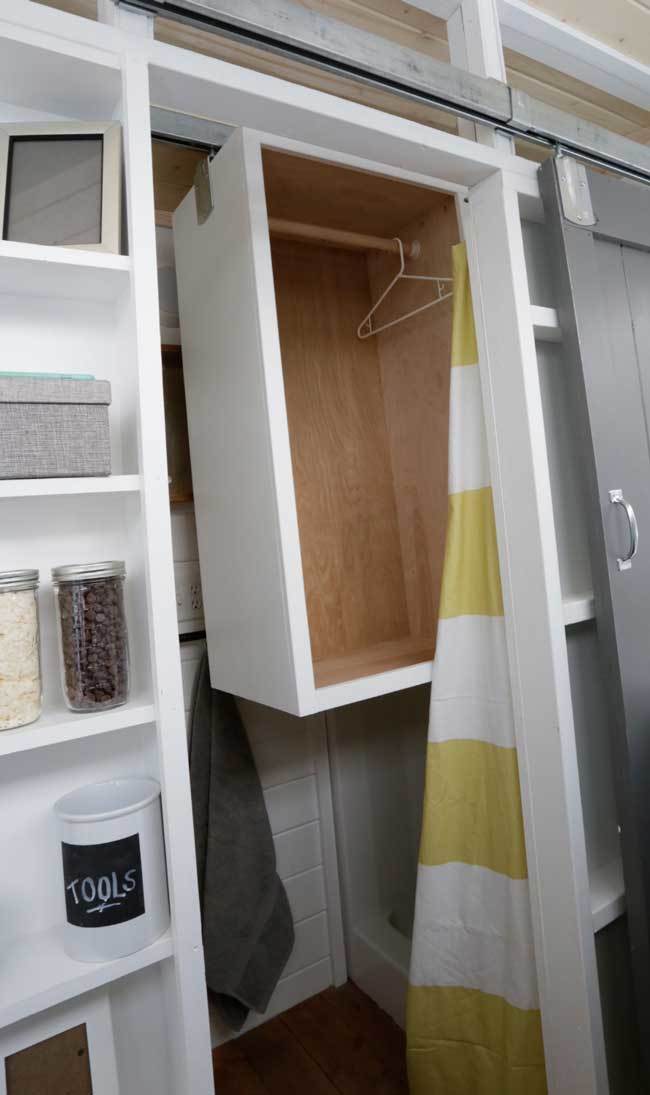
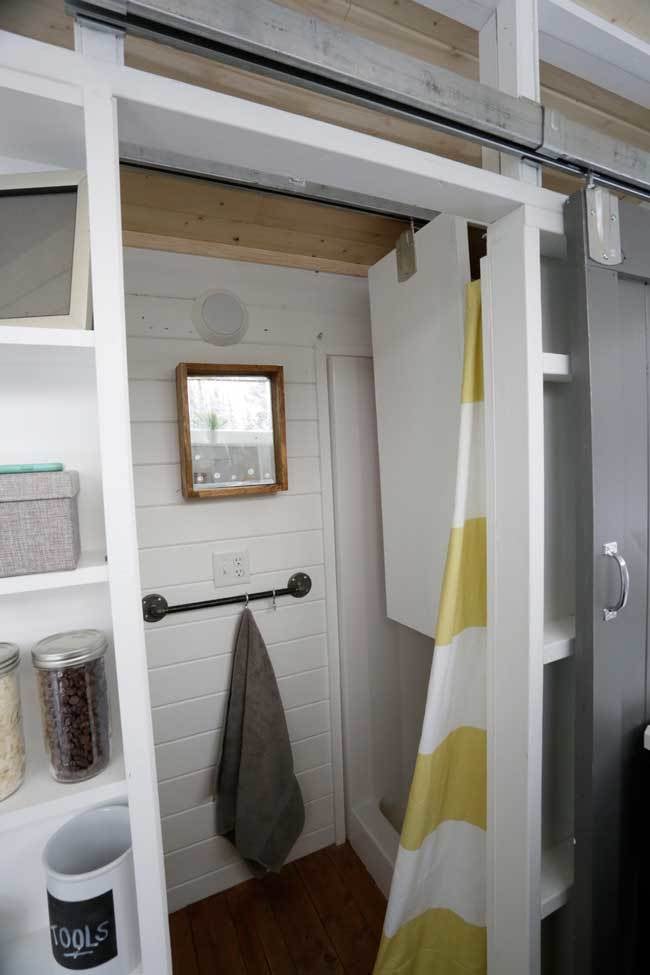
The closet is mounted on a sliding track, and slides across the bathroom, stored in the shower when not in use.  

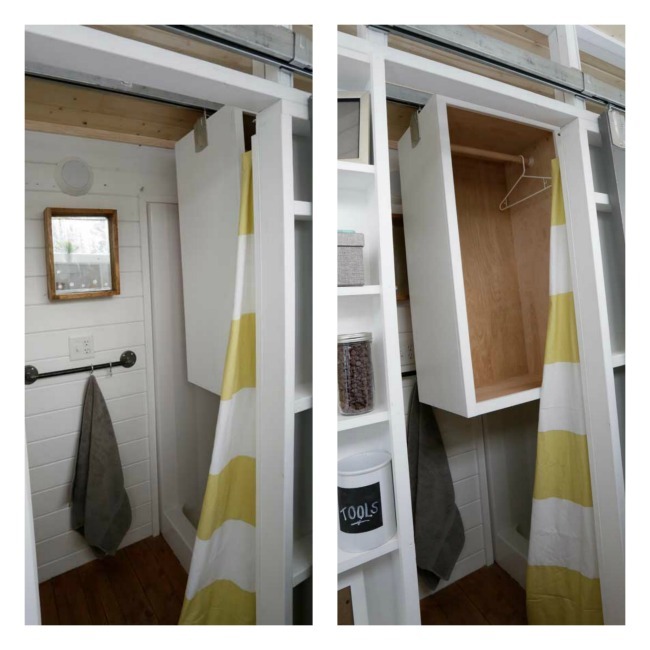
Its an almost effortless motion to pull the closet out of the shower to access your clothing.  The closet then can slide over the toilet when the shower is in use for access to the bathroom.  After showering, the shower curtain is clipped over the shower head, preventing water from running into the closet.

This closet solution was perfect for my client, a single guy with a small amount of clothes who takes quick showers.  But many of you did not agree, concerned about moisture in the bathroom, or storing clothing in the same room as the composting toilet.  The key to creating a tiny house that works for you is custom.  In such a small space you have to do what works for you.  This sliding closet may not be the right storage solution for everyone, but I'm guessing there's a few of you who could roll - or should we say slide - with this set up, so I thought I'd share more details on how we built it in a blog post.

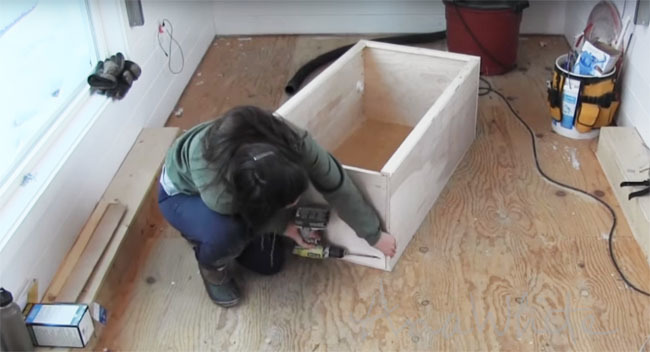
I built the closet out of 3/4" plywood, ripped into strips 15-3/4" wide by eight feet long.  The reason for this width is most clothing hangers are about 16" wide and you can get three 15-3/4" rips out of a 4 foot wide piece of plywood (once you factor in the saw blade width).  Also, the closet had to be narrow enough to slide past the shower head and the vanity light fixture in a 32" wide shower.

Once the strips are ripped, I treat them like 1x16 boards, just cross cutting for the sides and top/bottom.  I used a Kreg Jig to pocket hole the joints at the top and bottom.

To finish the front plywood edges, I built a face frame out of 1x2s and nailed and glued to the front.

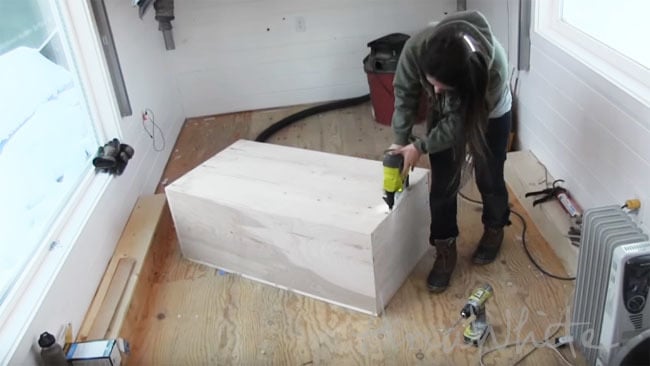
On the back, I stapled and glued 1/4" plywood to the back edges.  I used 3/4" staples with my Ryobi AirStrike Crown Stapler.

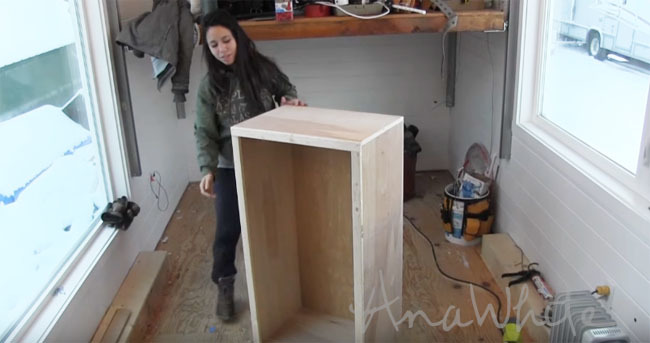
It's just a simple plywood box, but the back and face frame are important to keep it square.

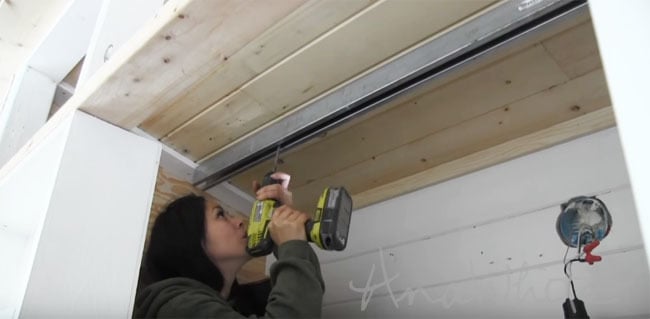
In the bathroom, I cut a box rail track to the length of the bathroom using a sawsall with a metal blade.  Then I drilled holes in the back of the box rail and screwed it to studs in the wall.  I used big wood screws.  NOTE: We went back and added a shim under the box rail to compensate for the angled ceiling so the box rail is hung level to the floor.

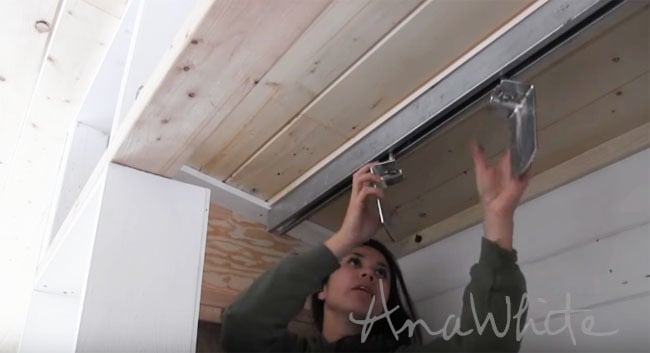
Then I used sliding door hangers that work with the box rail, sliding on to the box rail.

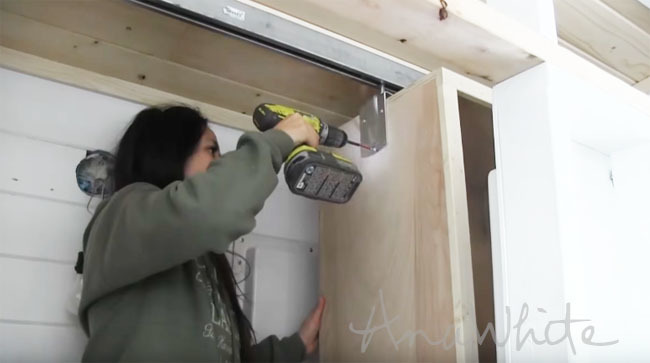
The hangers are screwed to the closet.  There was some fine tuning to get the hangers centered perfectly on the closet.

I know this closet isn't for everyone, but I loved how it turned out and how the rarely used space in the shower was maximized.  

If you want to see the build in action, check out the video -

And to see it finished in the tiny house, here's the full video tutorial -

Do share if you build, I'd love to know if someone else made this sliding closet too, and how it turned out, and how it functions for them.

XO Ana


Comments

Pagriffin53

Sun, 12/17/2017 - 23:54

Do you sell your floor plans? I am very interested in this open floor plan concept tiny house. Thank you in advance.

CP Wms Sr

Mon, 10/11/2021 - 18:40

I like the idea but, it looks like you moved the useless empty space from the shower to behind the shelves which is hard to make out what else could be there but it looks like unused space....if the slide had been adjecent to a kitchen seating area or bed etc and you could hang.it over a common space then slide it back into the shower that would definitely be double duty . Very clever using vertical space like that.....

Frequently Asked Questions

Wood Questions

What kind of wood should I use?
Most of our plans use standard construction lumber like pine or fir. It's affordable, easy to work with, and easy to find. It's also rapidly renewing and biodegradable, so a great eco friendly choice!

Can I use hardwoods instead?
Yes—just keep in mind they're heavier, cost more, and can be tougher on tools and harder to join together and finish. I recommend not tackling a hardwood project until after you have built several softwood projects.

What if my boards are warped?
Choose the straightest boards at the store. You can often work around slight warps by cutting them into shorter pieces.

What wood should I use for outdoor furniture?
Use red-toned or pressure-treated 2x lumber for framing, and cedar or cedar fence pickets for the decking. Outdoor furniture should be built like a deck—your local home center can help recommend the right wood for your climate.

Will my wood move or warp after I build?
Potentially, especially in humid climates. Let your wood acclimate indoors before building. Once acclimated and kept in a stable environment, movement should be minimal. Remember, most houses are built using framing lumber - it's all about keeping moisture down indoors.

Cutting Questions

Do I need a miter saw?
A miter saw is great, creating fast, safe, and precise cuts, even for beginners. But most plans can be built with a circular saw and a straight edge. If using a circular saw to cut, take time to practice, and get good at making cuts, before cutting your project boards.

How do I get clean cuts with a circular saw?
Clamp your board, measure twice, cut slow, and use a sharp blade. This takes practice, so spend some time making cuts. I go through becoming proficient at freehand cutting in my course, it is worth taking if you want to master this skill.

Will the store cut my wood?
Yes—most stores will do rough cuts to help you transport your materials home. But from store to store, the quality of cuts could greatly vary.

Joinery Questions

What screws should I use?
We recommend star-head self tapping screws for framing, most common sizes are 2-1/2", 1-3/4". Pre-drill if close to the edge or you find your wood is splitting.

Do I have to use pocket holes?
Pocket holes are the cheapest, easiest and fastest way to do some joints - like edge to edge or a hidden fastener joint. There are other methods, but these can be time consuming and expensive. We recommend using pocket holes as indicated in plans for best results.

How do I keep things square?
Use a speed square and measure diagonals after each step. Always clamp joints before screwing to keep them tight and flush.

Finishing Questions

Stain or paint before or after building?
A quick sand before and a full finish after gives the best results. Pre-finish if you're doing two-tone or detailed finishes.

What type of finish?
Use oil-based or water-based stain. For paint, cabinet-grade latex or enamel works great. High use surfaces on indoor projects should get a coat of polyurethane, I recommend a Helsman or Spar or other flexible poly that won't crack or peel with wood movement. For exterior projects, use a finish suitable for exterior fences.

How to get a smooth finish?
Start with a well sanded project. Sand between coats (220 grit), wipe clean, and apply light coats with a foam brush or roller.

Plan Questions

Can I change the size?
Many people do, and that's the great thing about building your own furniture! But do keep in mind going bigger might mean more supports are required, and often plans are optimized for minimal material waste.

Are these beginner-friendly?
Yes—plans are written with simple tools and clear steps in mind, with every effort to make plans as simple as possible.

Can I sell what I build?
Absolutely! Just don’t resell or repost the plans themselves.

General Questions

What tools do I really need?
A drill, circular saw, tape measure, square, and a few clamps will get you through most projects.

Do I need a workshop?
Nope! A driveway or small patio is plenty to get started, just make sure you have a level place to work. If you find you are building several projects a year, creating a small workbench is a great way to store tools and have a dedicated workspace.

What if I mess up?
Wood filler, sanding, or flipping boards goes a long way. Mistakes are part of the process!

What can I do to make my projects look more professional?
Start with straight boards, make accurate cuts, clamp all joints, and line up everything neatly. Sand thoroughly, use a neutral finish, and apply it in light coats for a clean look.

I've never built anything before. Where should I start?
Start with a few smaller softwood projects to get hands-on experience. Or if you're tackling a big project, buy a little extra lumber and practice your cuts and joints first. If possible, work with someone who has a bit of experience.

Care & Maintenance

How long will my furniture last?
With good joinery and regular care, your DIY furniture can last for decades. I have pieces in my own home that are over 20 years old and still going strong! One of the best parts about DIY furniture is that it’s easy to repaint, refinish, or repair—so your projects can grow and adapt with you.

How should I care for outdoor furniture?
Lightly pressure wash or hose it down once or twice a year. Tighten screws and reapply finish as needed to protect it—just like a deck or fence. A little upkeep goes a long way in extending the life of your furniture.

How about indoor furniture?
Regularly dust or wipe with a damp cloth. If it starts to look worn, a light sanding and touch-up paint or stain can refresh it in no time. DIY pieces are meant to be durable and fixable—so don’t be afraid to give them some love now and then.

Want to Build with Confidence?

Check out my ebook: 12 Skills to Build Your Own Furniture
It walks you through the core skills every builder needs—measuring, cutting, joinery, and finishing—so you can build beautiful furniture that lasts.

Still Have Questions?

Email us anytime at [email protected] and we’ll be happy to help!