Street Hockey Goal - Lacrosse, Soccer, Multi-sport Goal

Difficulty
Beginner Projects
| Print this plan

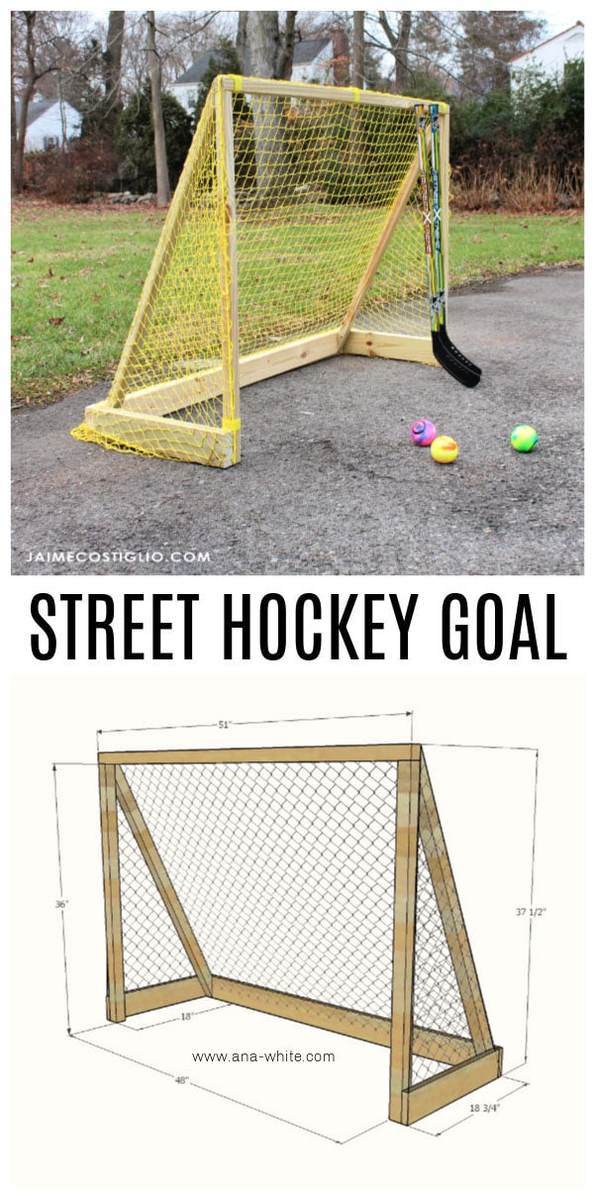
Make your own street hockey, lacrosse or soccer goal!  Heavier than PVC so won't blow away in the wind, but inexpensive and easy to make! Free plans by ANA-WHITE.com

Here's a great gift idea that will get the kids moving and outside!

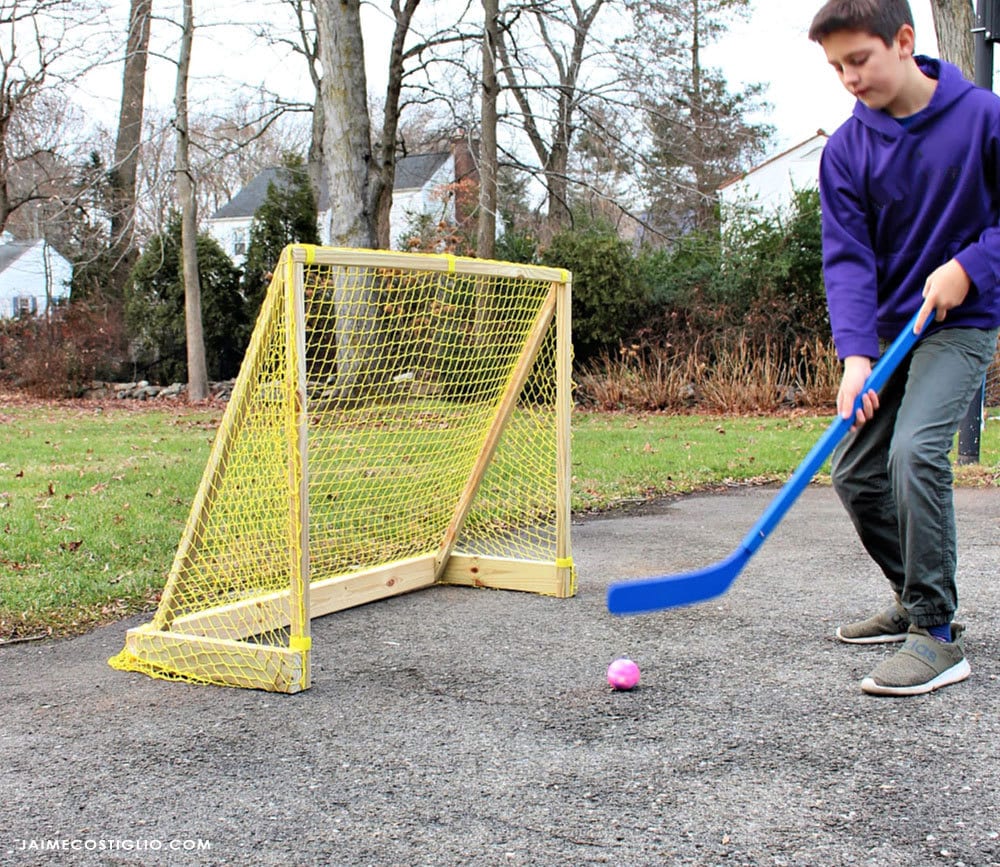
Build them a lacrosse, street hockey or soccer goal!!!

You can use this goal indoors or out, you can even stain it up and make it "farmhousey" and feature it in your rec room or basement.  It's much less expensive than buying a real goal, and more substantial than a plastic one - so won't get blown away in the wind or knocked over by a hard shot.

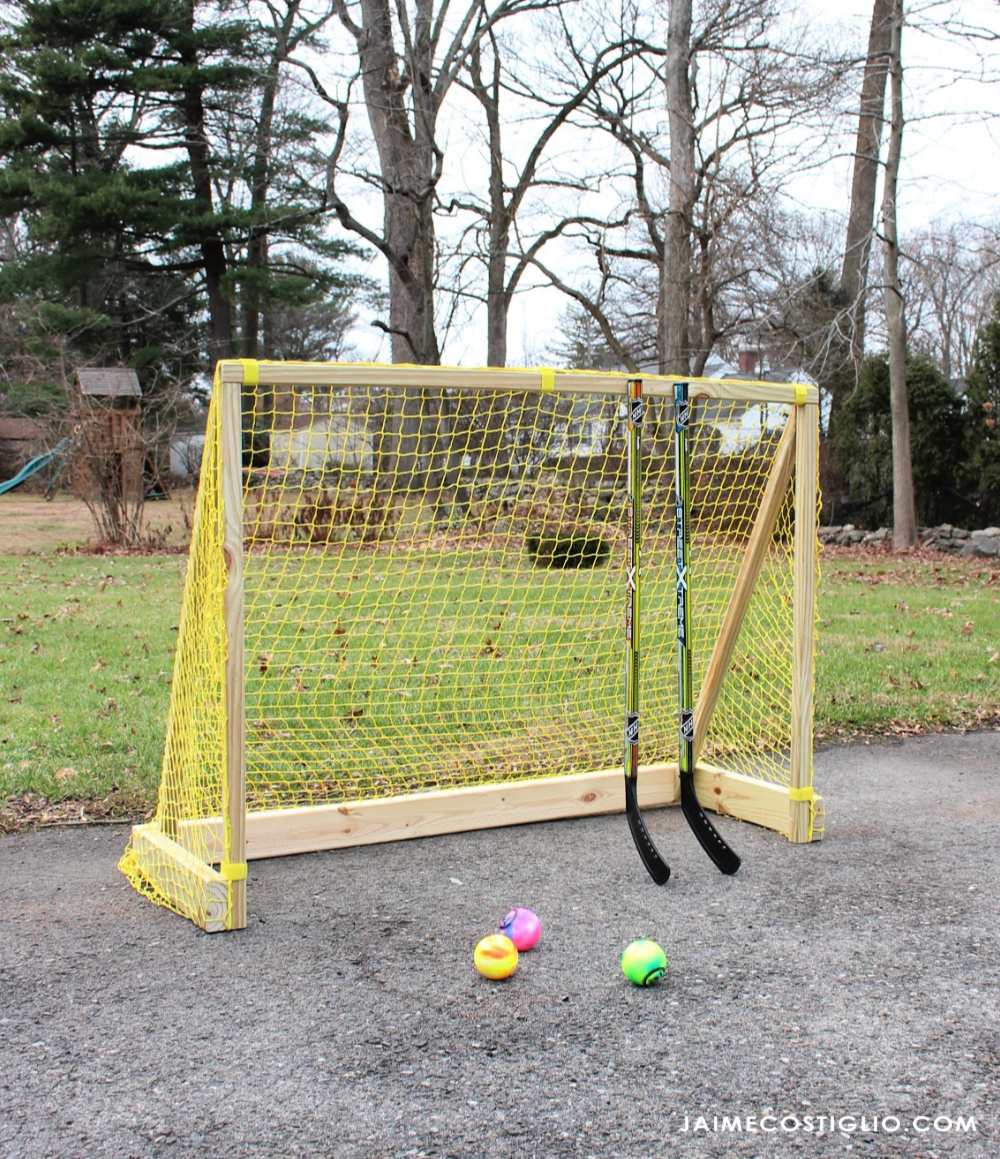
This street hockey goal was built by Jaime Costiglio for Handbuilt Holiday

If you are new here, Handbuilt Holiday is a series that Jaime Costiglio and I have put on for five years in a row where we share new, free gift plans every Friday in the weeks leading up to Christmas.  There are hundreds of amazing plans that you can grab for free right here.

Please head on over to JaimeCostiglio.com for the build post - with lots more pictures and details on the accessories and net.

Then grab the free plans below and build!

Enjoy! Ana


CLICK HERE FOR MORE PHOTOS AND ACCESSORIES AT JAIMECOSTIGLIO.COM


Dimensions
Dimensions shown above - sized for street hockey or cross ice hockey games

Preparation

Shopping List

INDOOR VERSION

1 - 1x4 @ 8 feet long

3 - 2x2 @ 8 feet long

1 - 1/4" and 2-1/2" pocket hole screws

Recommed Kreg Jig 


OUTDOOR VERSION  - Use outdoor appropriate materials

4 - 2x4 @ 8 feet or stud length

2-3/4" self tapping exterior screws

Does not need Kreg Jig


Cut List

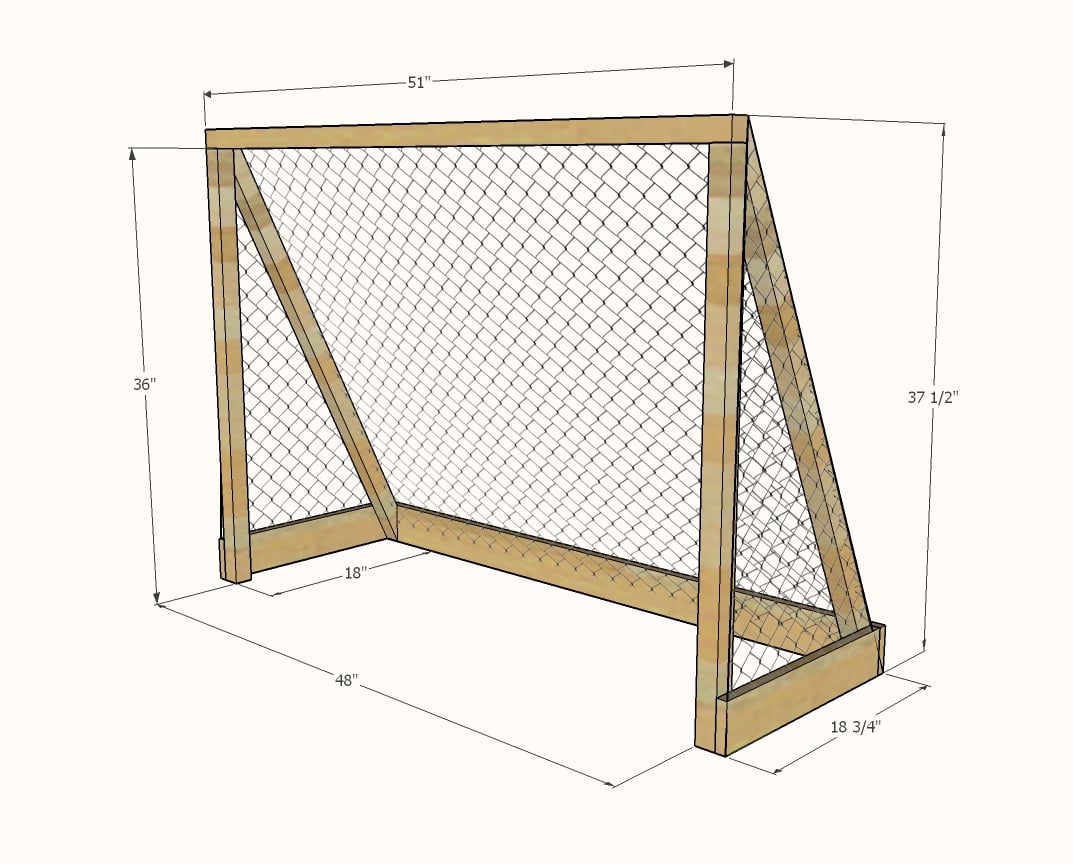
Can be made as shown with 1x4 and 2x2 or can be made with all 2x4s for exterior use (heavier and more durable).  If for exterior use use treated or cedar or other outdoor appropriate materials.

1 - 1x4 @ 52-1/2" OR 2x4 @ 54"

2 - 1x4 or 2x4 @ 18"

2 - 2x2 or 2x4 @ 36"

1 - 2x2 or 2x4 @ 51" 

2 - 2x2 or 2x4 @ approx 48" - cross piece, will be cut shorter


Tools
Tape Measure
Speed Square
Pencil
Safety Glasses
Hearing Protection
Drill
Circular Saw

Instructions

Step 1

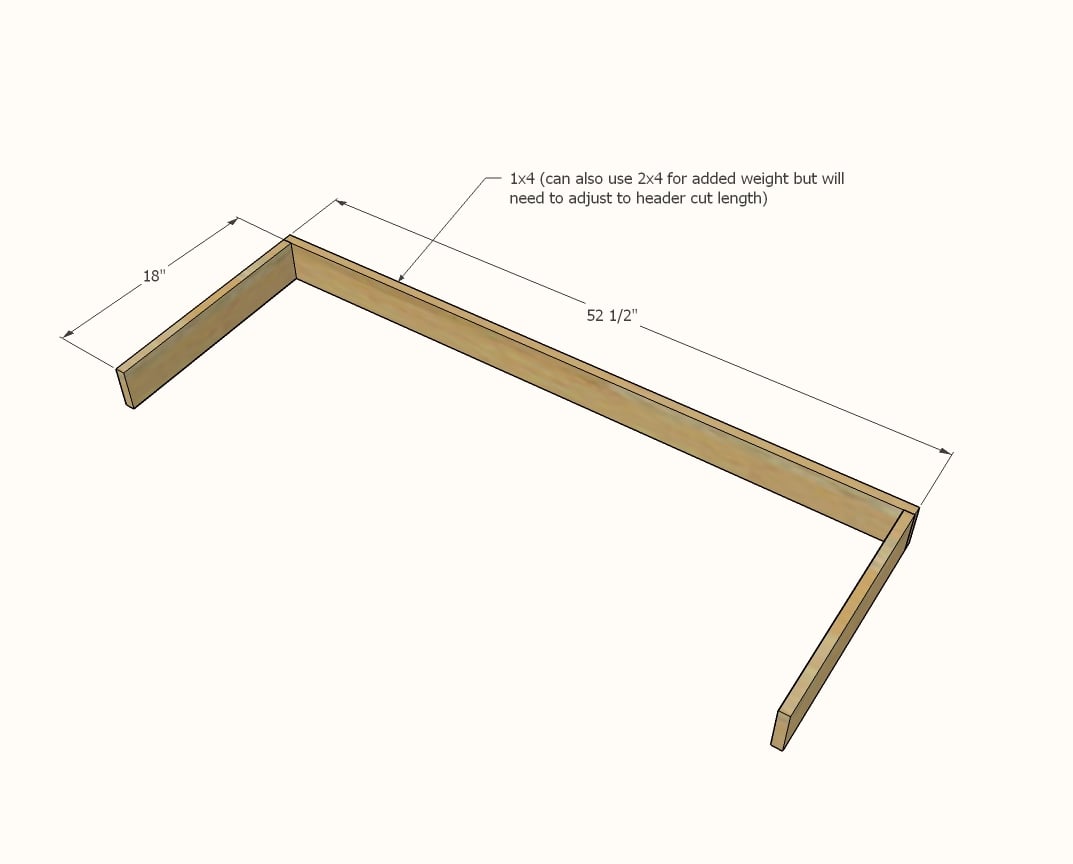
Build the base frame as shown. 


If using 1x4s, use 3/4" pocket holes and 1-1/4" pocket hole screws. 


For the outdoor version (2x4s), use 2-3/4" screws.

Step 2

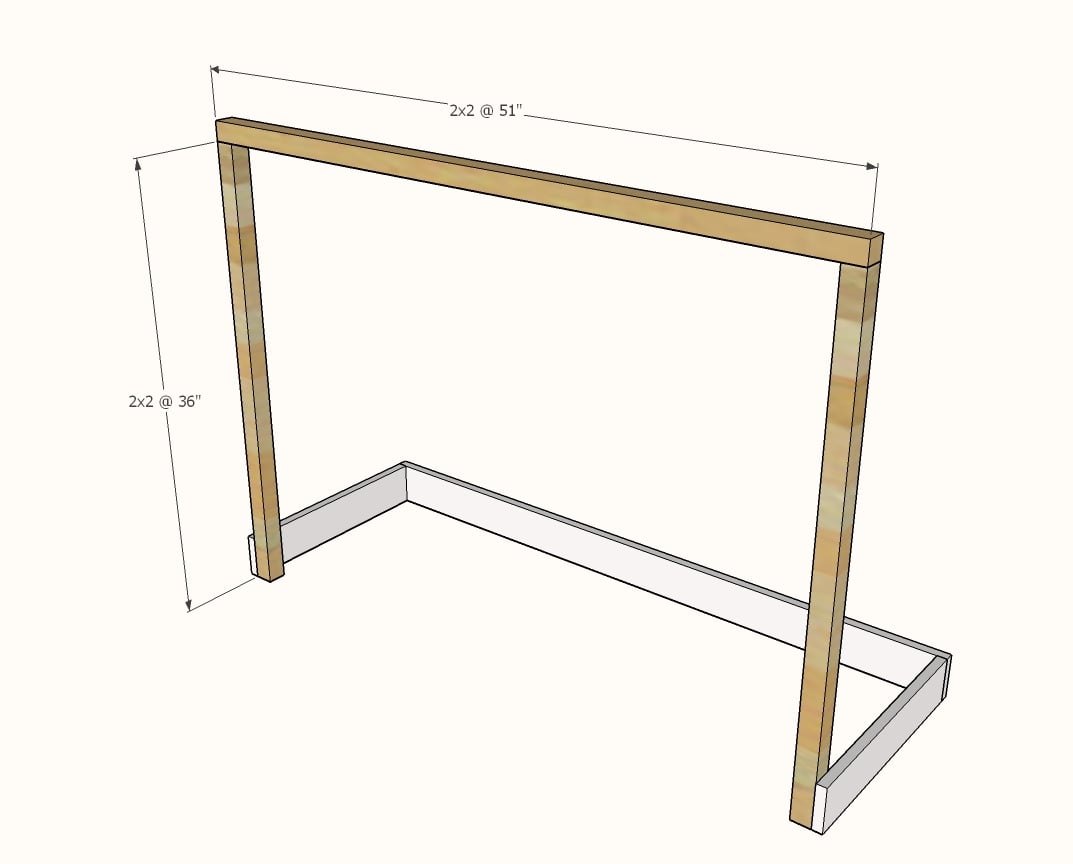
INDOOR VERSION: Attach 2x2s together at top with 1-1/2" pocket holes and 2-1/2" pocket hole screws.  Then attach 2x2 frame to 1x4 frame with 1-1/4" pocket hole screws, screwed through the 1x4s into the 2x2s from outside - 2 screws per joint.


OUTDOOR VERSION: Build the upper frame exactly as you did the lower frame in step 1 (but legs will be longer) using the 2-3/4" self tapping screws.  Then attach to the lower frame at the bottom corner.

Step 3

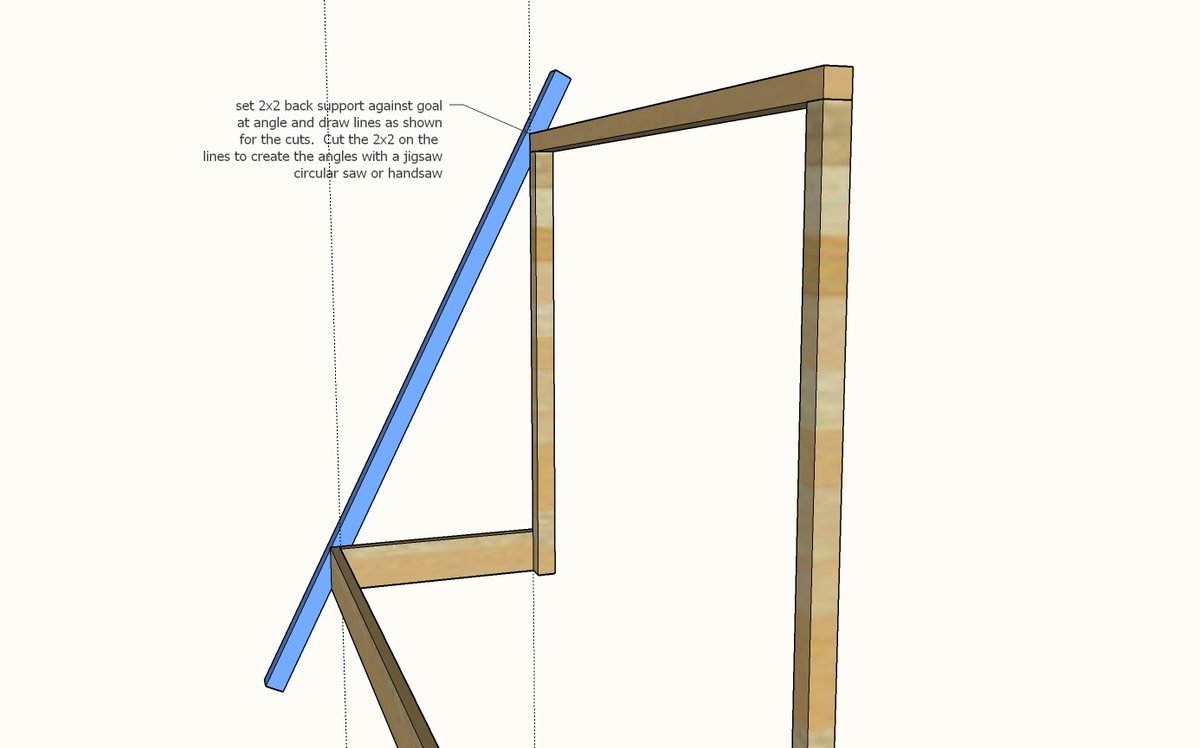
BOTH VERSIONS: Position cross piece where it will be installed and mark the angles.  Cut the angles with a circular saw or jigsaw.  

Step 4

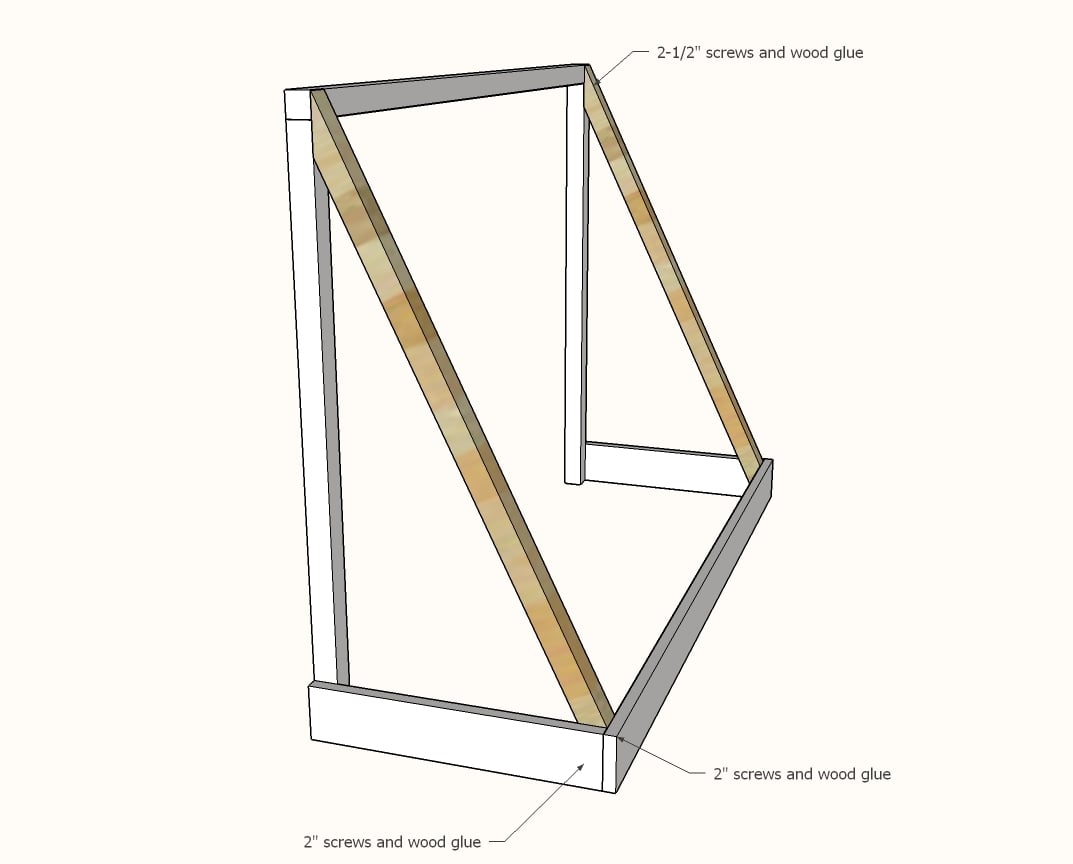
BOTH VERSIONS: Attach in place with glue and wood screws. You can use pocket hole screws for indoor version, self tapping screws for outdoor version.


Step 5

Frequently Asked Questions

Wood Questions

What kind of wood should I use?
Most of our plans use standard construction lumber like pine or fir. It's affordable, easy to work with, and easy to find. It's also rapidly renewing and biodegradable, so a great eco friendly choice!

Can I use hardwoods instead?
Yes—just keep in mind they're heavier, cost more, and can be tougher on tools and harder to join together and finish. I recommend not tackling a hardwood project until after you have built several softwood projects.

What if my boards are warped?
Choose the straightest boards at the store. You can often work around slight warps by cutting them into shorter pieces.

What wood should I use for outdoor furniture?
Use red-toned or pressure-treated 2x lumber for framing, and cedar or cedar fence pickets for the decking. Outdoor furniture should be built like a deck—your local home center can help recommend the right wood for your climate.

Will my wood move or warp after I build?
Potentially, especially in humid climates. Let your wood acclimate indoors before building. Once acclimated and kept in a stable environment, movement should be minimal. Remember, most houses are built using framing lumber - it's all about keeping moisture down indoors.

Cutting Questions

Do I need a miter saw?
A miter saw is great, creating fast, safe, and precise cuts, even for beginners. But most plans can be built with a circular saw and a straight edge. If using a circular saw to cut, take time to practice, and get good at making cuts, before cutting your project boards.

How do I get clean cuts with a circular saw?
Clamp your board, measure twice, cut slow, and use a sharp blade. This takes practice, so spend some time making cuts. I go through becoming proficient at freehand cutting in my course, it is worth taking if you want to master this skill.

Will the store cut my wood?
Yes—most stores will do rough cuts to help you transport your materials home. But from store to store, the quality of cuts could greatly vary.

Joinery Questions

What screws should I use?
We recommend star-head self tapping screws for framing, most common sizes are 2-1/2", 1-3/4". Pre-drill if close to the edge or you find your wood is splitting.

Do I have to use pocket holes?
Pocket holes are the cheapest, easiest and fastest way to do some joints - like edge to edge or a hidden fastener joint. There are other methods, but these can be time consuming and expensive. We recommend using pocket holes as indicated in plans for best results.

How do I keep things square?
Use a speed square and measure diagonals after each step. Always clamp joints before screwing to keep them tight and flush.

Finishing Questions

Stain or paint before or after building?
A quick sand before and a full finish after gives the best results. Pre-finish if you're doing two-tone or detailed finishes.

What type of finish?
Use oil-based or water-based stain. For paint, cabinet-grade latex or enamel works great. High use surfaces on indoor projects should get a coat of polyurethane, I recommend a Helsman or Spar or other flexible poly that won't crack or peel with wood movement. For exterior projects, use a finish suitable for exterior fences.

How to get a smooth finish?
Start with a well sanded project. Sand between coats (220 grit), wipe clean, and apply light coats with a foam brush or roller.

Plan Questions

Can I change the size?
Many people do, and that's the great thing about building your own furniture! But do keep in mind going bigger might mean more supports are required, and often plans are optimized for minimal material waste.

Are these beginner-friendly?
Yes—plans are written with simple tools and clear steps in mind, with every effort to make plans as simple as possible.

Can I sell what I build?
Absolutely! Just don’t resell or repost the plans themselves.

General Questions

What tools do I really need?
A drill, circular saw, tape measure, square, and a few clamps will get you through most projects.

Do I need a workshop?
Nope! A driveway or small patio is plenty to get started, just make sure you have a level place to work. If you find you are building several projects a year, creating a small workbench is a great way to store tools and have a dedicated workspace.

What if I mess up?
Wood filler, sanding, or flipping boards goes a long way. Mistakes are part of the process!

What can I do to make my projects look more professional?
Start with straight boards, make accurate cuts, clamp all joints, and line up everything neatly. Sand thoroughly, use a neutral finish, and apply it in light coats for a clean look.

I've never built anything before. Where should I start?
Start with a few smaller softwood projects to get hands-on experience. Or if you're tackling a big project, buy a little extra lumber and practice your cuts and joints first. If possible, work with someone who has a bit of experience.

Care & Maintenance

How long will my furniture last?
With good joinery and regular care, your DIY furniture can last for decades. I have pieces in my own home that are over 20 years old and still going strong! One of the best parts about DIY furniture is that it’s easy to repaint, refinish, or repair—so your projects can grow and adapt with you.

How should I care for outdoor furniture?
Lightly pressure wash or hose it down once or twice a year. Tighten screws and reapply finish as needed to protect it—just like a deck or fence. A little upkeep goes a long way in extending the life of your furniture.

How about indoor furniture?
Regularly dust or wipe with a damp cloth. If it starts to look worn, a light sanding and touch-up paint or stain can refresh it in no time. DIY pieces are meant to be durable and fixable—so don’t be afraid to give them some love now and then.

Want to Build with Confidence?

Check out my ebook: 12 Skills to Build Your Own Furniture
It walks you through the core skills every builder needs—measuring, cutting, joinery, and finishing—so you can build beautiful furniture that lasts.

Still Have Questions?

Email us anytime at [email protected] and we’ll be happy to help!