


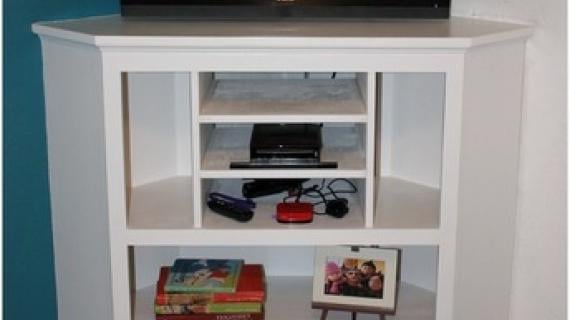
Build a corner media stand! Free plans from Ana-White.com
I've had a hard time not sharing this project with you already!
My friend Debbie wrote me a long long while back about needing help with her media center in her living room. Here's from Debbie:
Hi there. My name is Debbie and I'm a crazy crafter/DIYer. I've dabbled in the likes of cross-stitching, quilting, crocheting, print making, jewelry and sewing. I also do all the fun parts of home interior like tiling, putting down wood floors, painting, trim work, re-siding the house and decorating. But my love for building furniture came when I found Ana's site. And boy, have I taken advantage of all the plans.
I am also a stay-at-home mom to two insane kids, certifiable, really. There is my 3-year old Haley. Need I say more -- she's three. She keeps me on my toes more than I care to mention, but it's all in good fun. Then there is Jack, my 6 year old boy who was born with Down syndrome (and now battling leukemia). Having a child with special needs truly puts parenting in a different category. Until Haley came along, I had no idea how much thought went into everything I planned with Jack. From managing visits to the grocery store, play dates with other children, to organizing my home. It's like having his IEP (Individualized Education Plan) at school, I need to create a "least restrictive environment" at home as well.

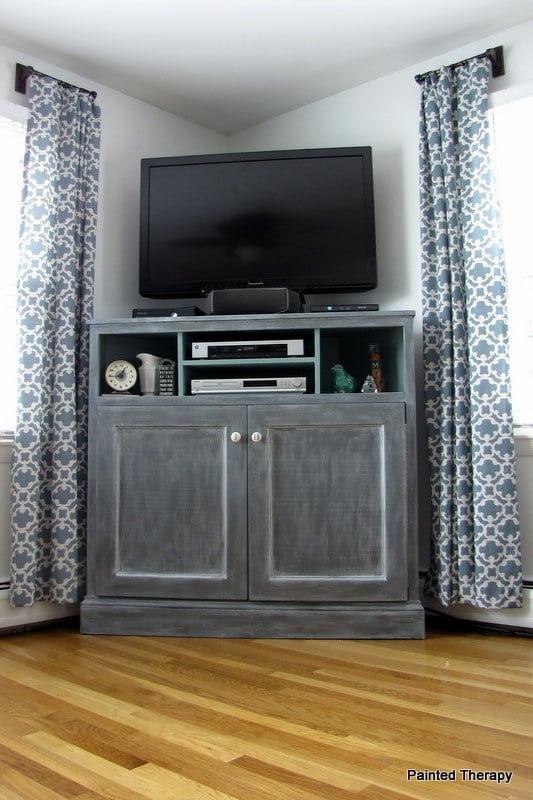
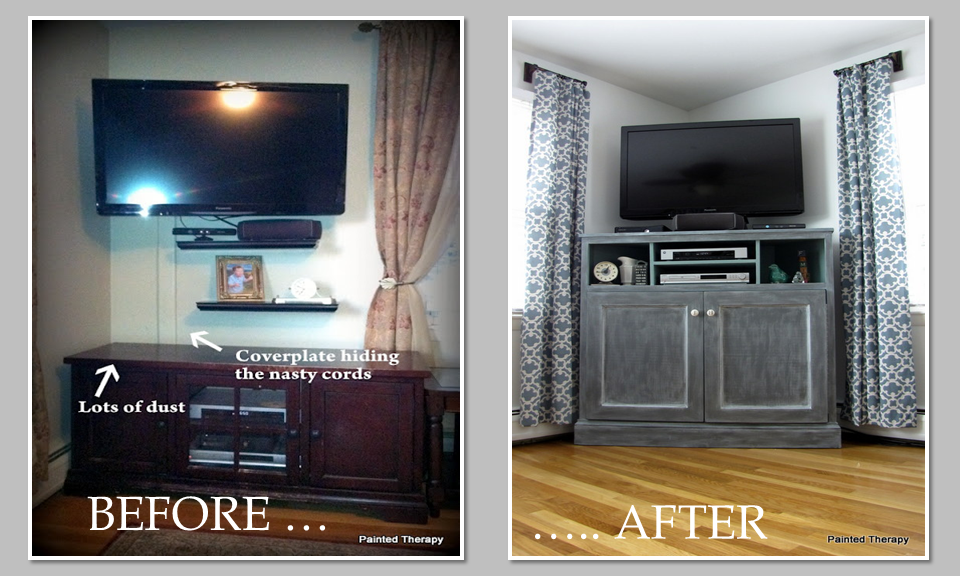
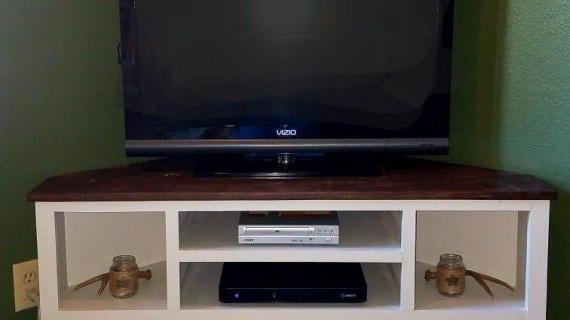
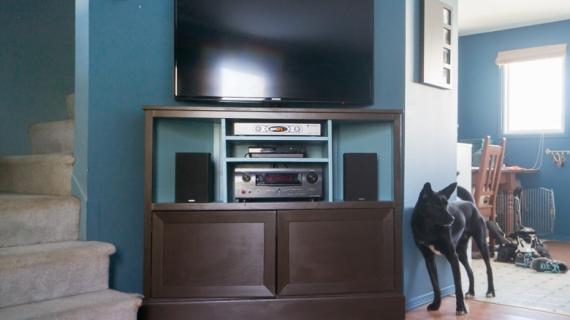
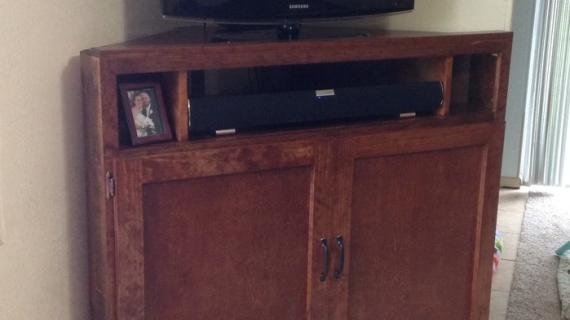
With that in mind, our TV set-up was just not working with Jack. If I had a nickel for every time I told Jack to stop standing in front of the TV, well, I'd be buzzing around in a 1965 Mustang convertible. It just wasn't fair to keep yelling at him and so we had to do something about it. We ended up putting the TV on the wall, but aesthetically, it just wasn't the look I was going for.

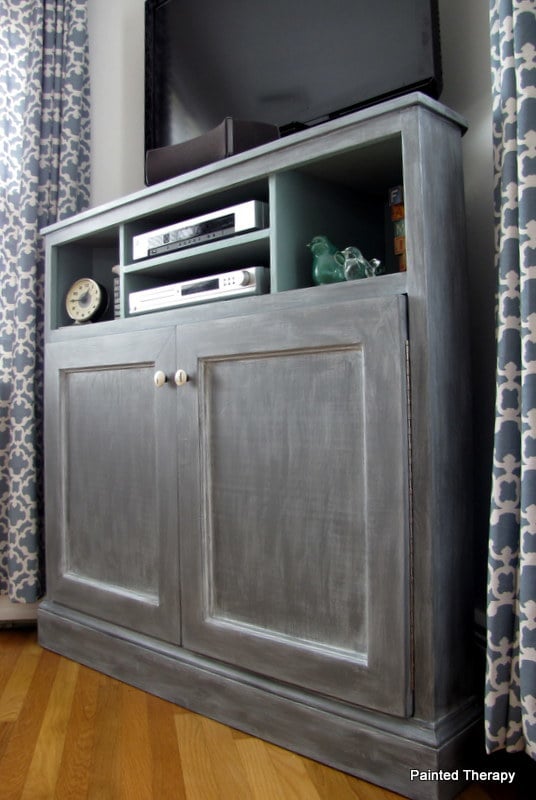
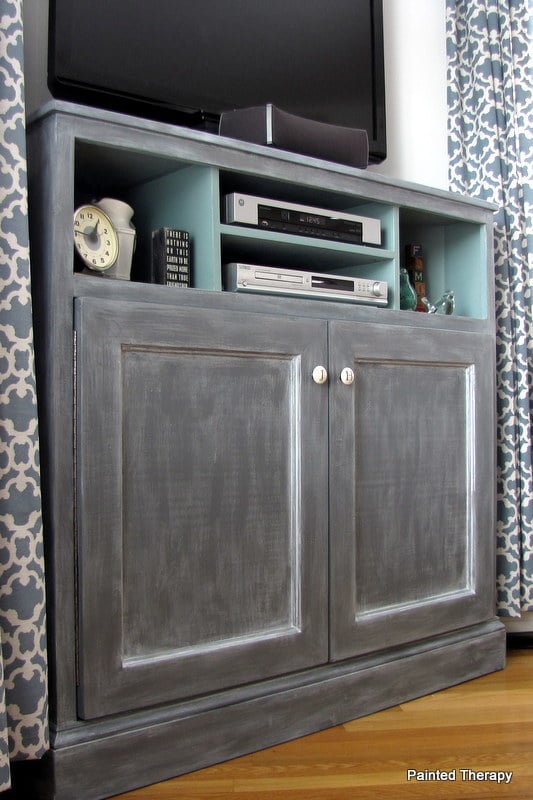
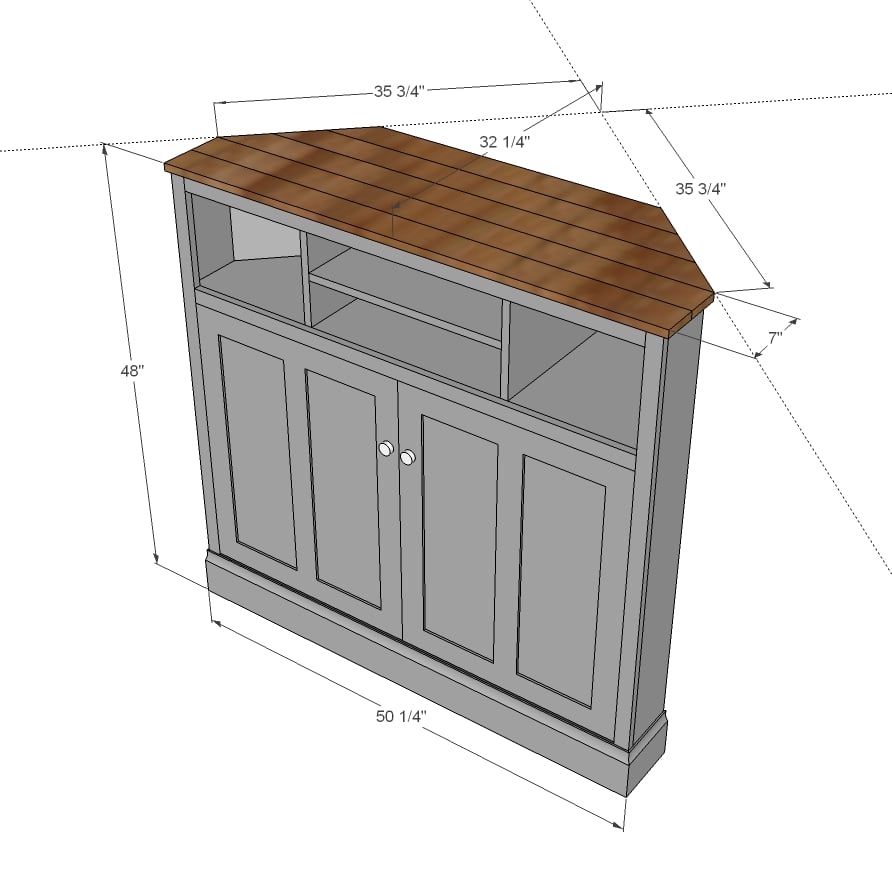
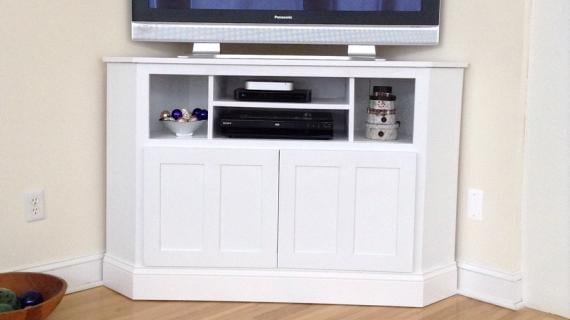
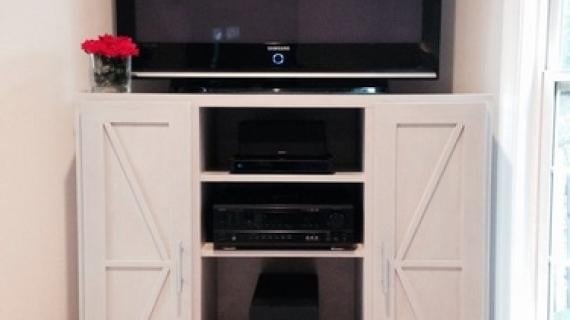
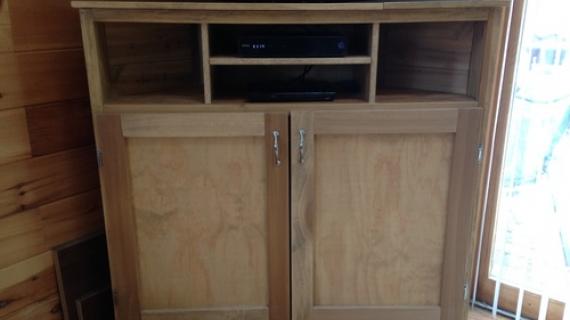
Enter Ana and her fabulous plans. After many discussions regarding my issue, we decided on a tall corner console with plenty of storage. It's a fabulous plan, easy to follow and provides one less headache in our lives. No more telling Jack, "You make a better door than a window." Now, if someone can just help me with his constant requests for the Wiggles. Is there a plan for that?!?

Thank you Debbie for letting me work with you on this project. It has brought me great joy to know that I can help in some way to make your life a tiny bit more manageable.

I cannot believe the room transformation as well!!!!

You truly are an amazing woman!

If you'd like to go a meet Debbie, read more about her story - and get the details on those fabulous curtains - and see more photos and construction details - and the low down on that paint finish - PLEASE stop over and visit Debbie at Painted Therapy.
Thanks Debbie!
Preparation
1 – sheet ¾” plywood cut into strips 15 ¾” wide by 8 feet long (referred to as 1x16 boards in this plan)
1 – 1x6 @ 8 feet long (you can use scrap 1x16s ripped down if you have a tablesaw)
5 – 1x2 @ 8 feet long
1 – sheet ¼” plywood (for back and door backs)
2 – 1x4 @ 8 feet long
1 – 1x4 @ 6 feet long
5 ¼” base moulding (6 foot stick)
1x3s for door frame or other materials for doors
2” screws or 1 ¼” pocket hole screws
2” and 1 ¼” finish nails
Wood glue
Finishing supplies
2 – 1x16 @ 10 1/2" (dividers)
1 – 1x16 @ 20” (center shelf)
4 – 1x16 @ 48” – ends cut as shown in step 2 (shelves)
2 – 1x6 @ 47 1/4" (sides)
4 – 1x2 @ 47 1/4” (back supports)
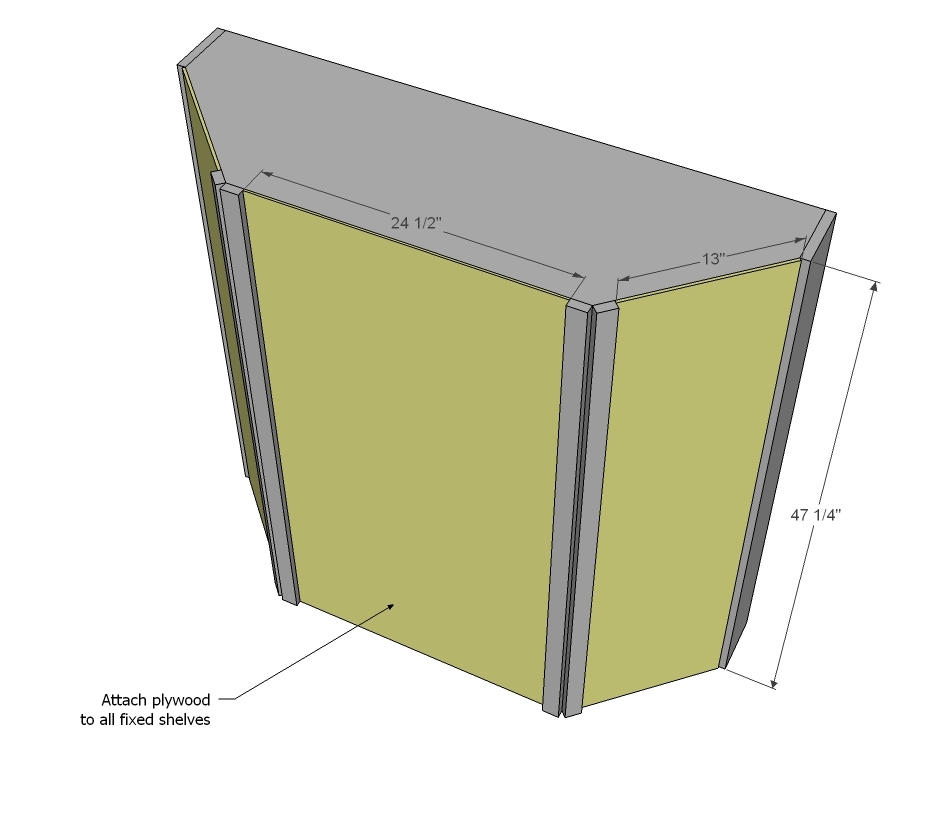
1 – 1/4” plywood @ 24 1/2” x 47 1/4" (back middle)
2 – 1/4” plywood @ 13” x 47 1/4" (back middle)
2 – 1x2 @ 47 1/4” (side face frame)
3 – 1x2 @ 46 1/2" (shelf face frame trim)
TOP
2 – 1x4 @ 50 1/2"
1 – 1x4 @ 50 1/2" (both ends cut at 45 degrees off square, ends NOT parallel, long point measurement)
1 – 1x4 @ 43 1/2" (both ends cut at 45 degrees off square, ends NOT parallel, long point measurement)
1 – 1x4 @ 36 1/2" (both ends cut at 45 degrees off square, ends NOT parallel, long point measurement)
Please read through the entire plan and all comments before beginning this project. It is also advisable to review the Getting Started Section. Take all necessary precautions to build safely and smartly. Work on a clean level surface, free of imperfections or debris. Always use straight boards. Check for square after each step. Always predrill holes before attaching with screws. Use glue with finish nails for a stronger hold. Wipe excess glue off bare wood for stained projects, as dried glue will not take stain. Be safe, have fun, and ask for help if you need it. Good luck!
Instructions
Step 1

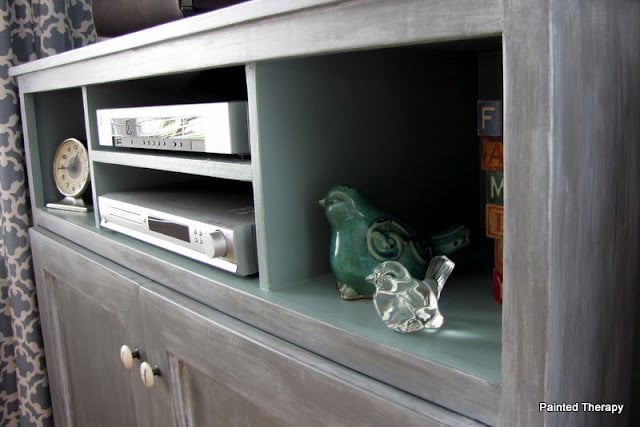
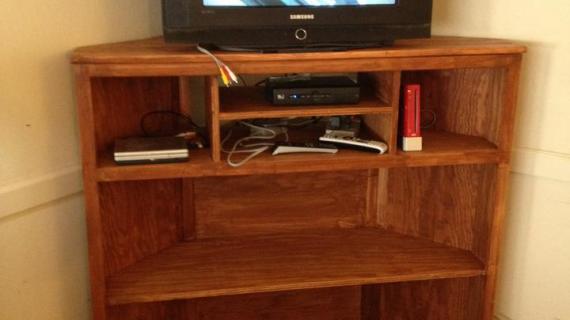
Let's start by building those top shelves for the media controllers. I recommend using a Kreg Jig as Debbie did, but if you don't have one, you can also countersink screws or use a finish nailer and glue.
If you are using the Kreg Jig, go through the entire plan and mark out and drill all pocket holes now - it's easier to drill a pocket hole on a board rather than on a project!
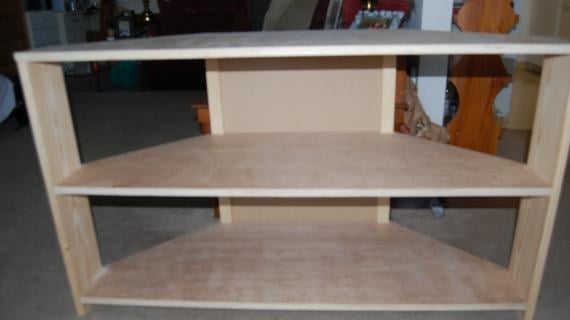
Step 2
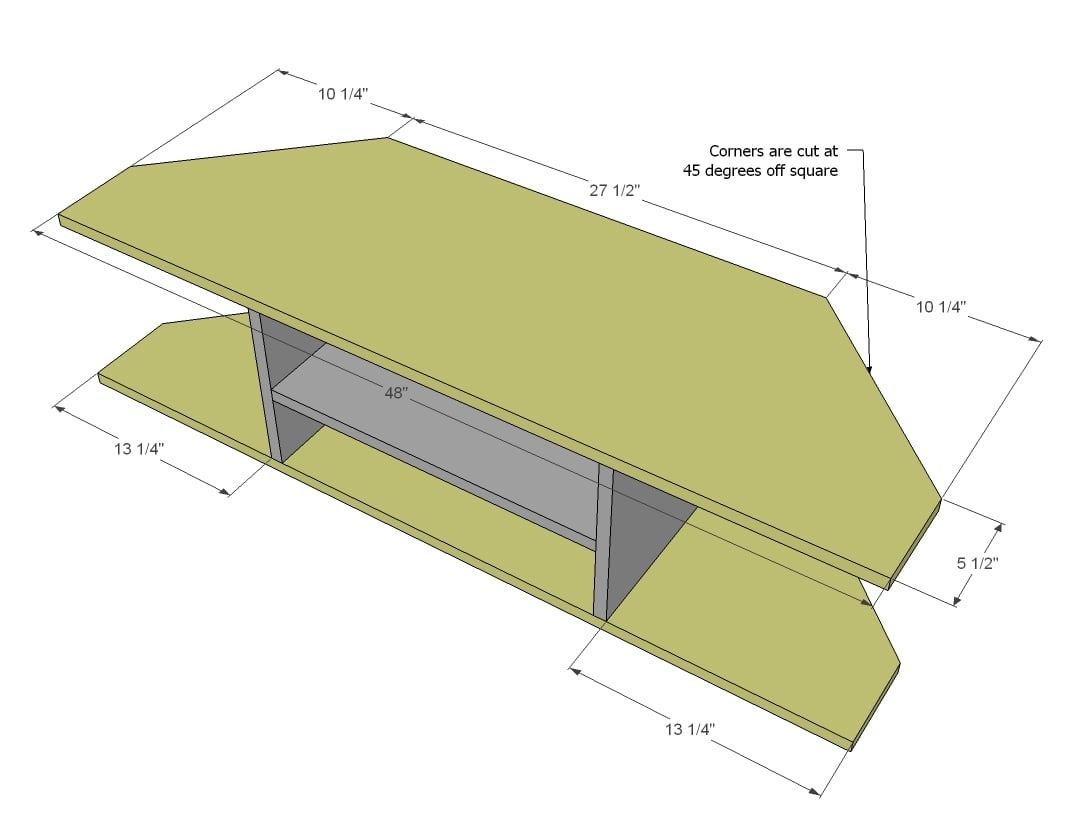
Now we are going to add the top and bottom to the shelves. What I would do is attach the top from underside with 3/4" PHs and 1 1/4" PH screws, and then attach the bottom shelf from underside with 2" countersunk screws, as it will be very difficult to get your drill in there to drive a PH screw.
Step 3
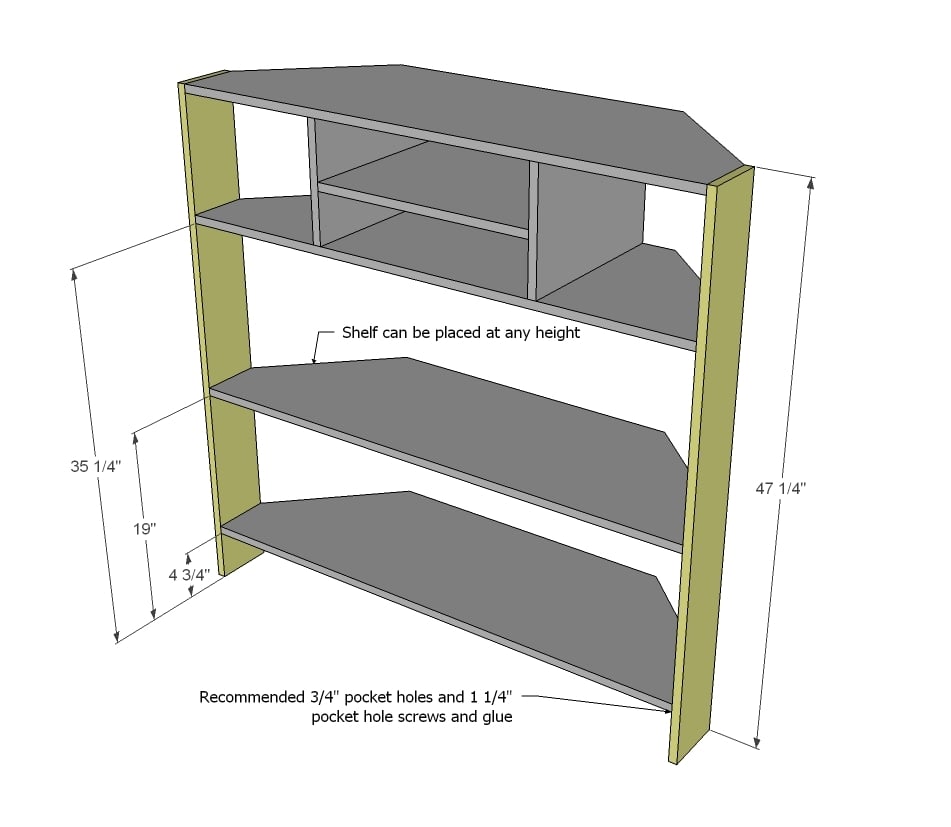
Now on the sides, mark out all shelf locations. PH users should drill 3/4" PHs along sides of all shelves. Attach with screws and glue.
Step 4
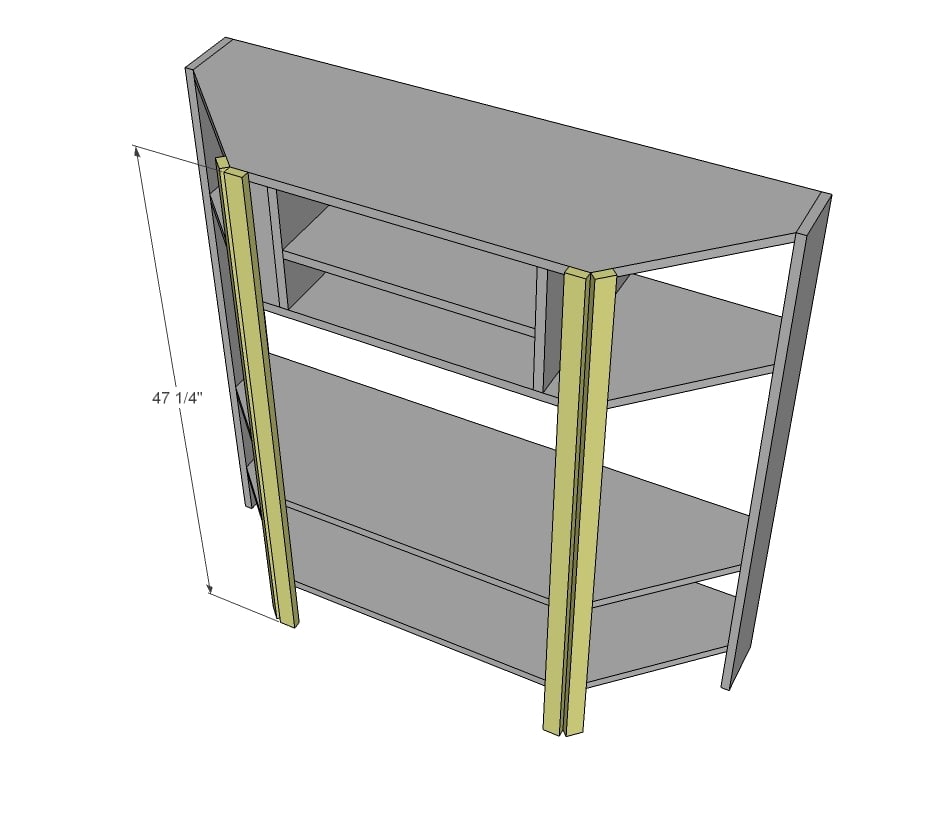
And then add back pieces.
Step 5
Step 6
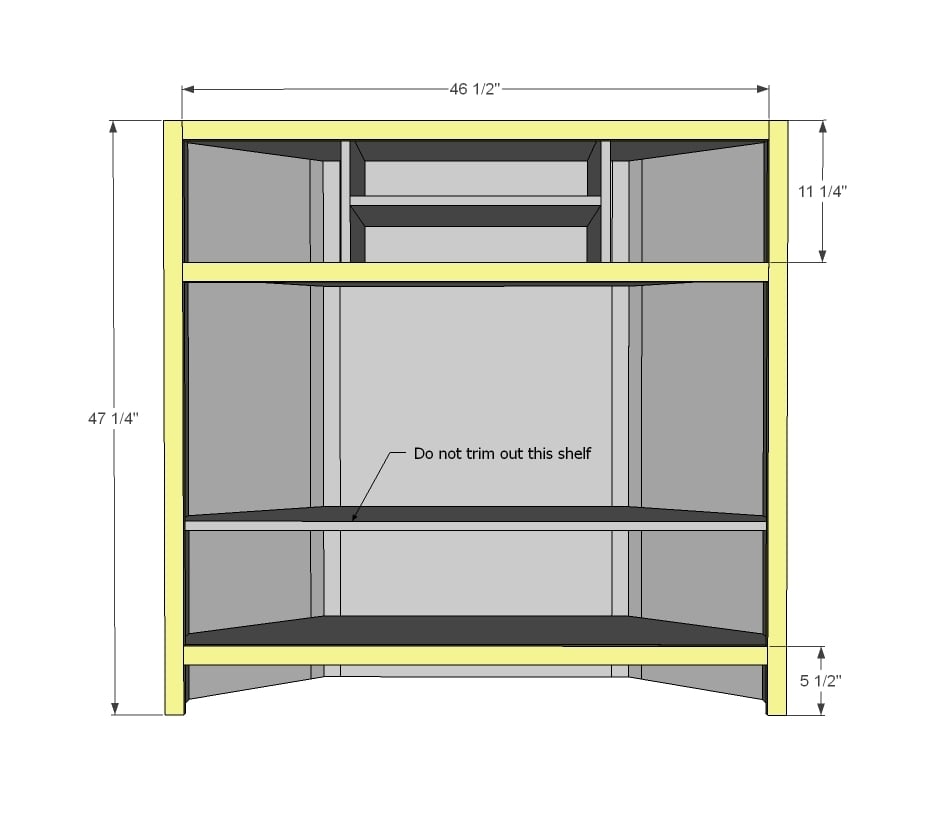
Now we do the face frame! You can build your face frame first with 3/4" PHs and 1 1/4" PH screws or attach each board with nails and glue.
Step 7

Nail moulding on bottom mitering the corners.
Step 8
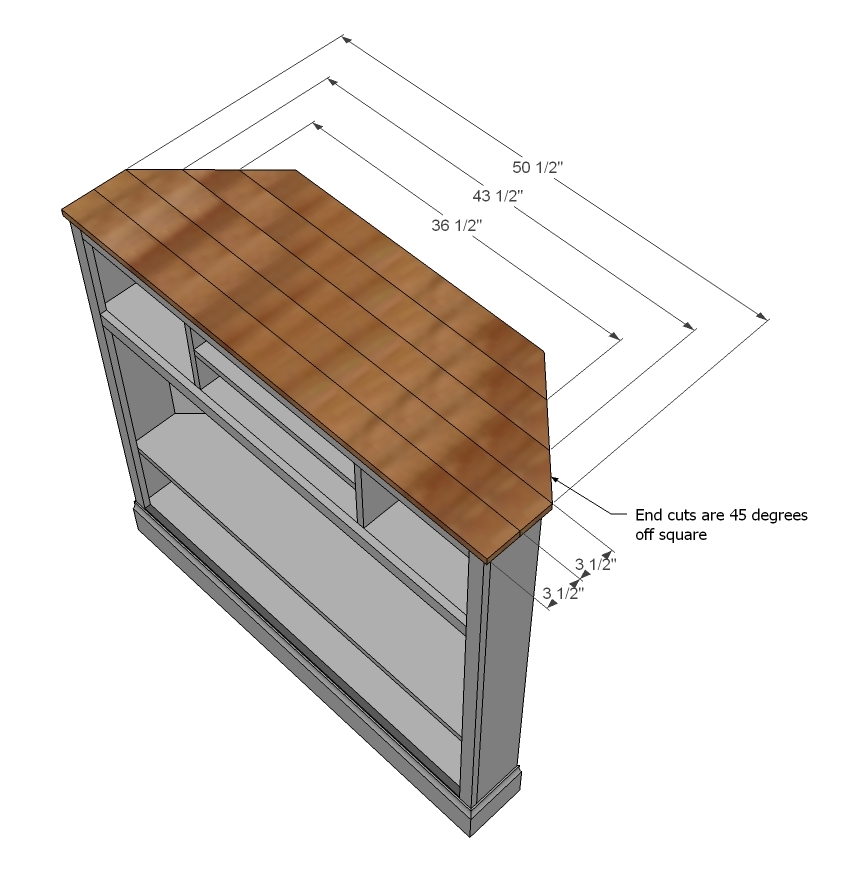
And the decorative top isn't entirely necessary, but we wanted to add something pretty to the top. Nail down with 1 1/4" finish nails and glue.
Step 9
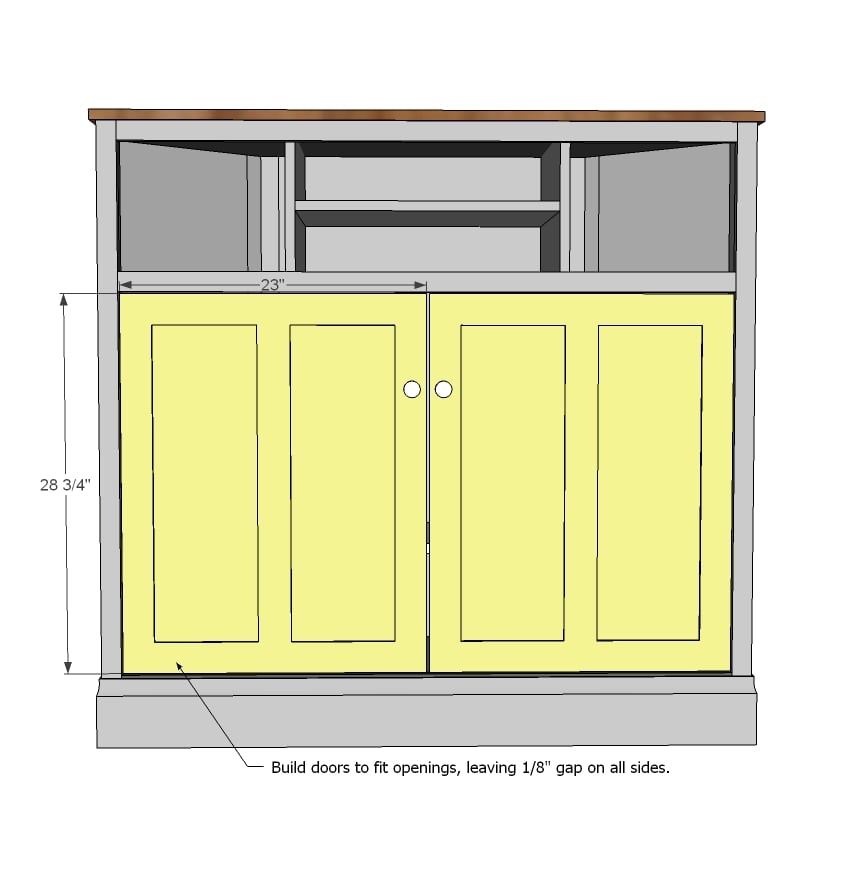
Debbie ended up doing overlay doors, which is a great idea. For inset doors, you will want to measure your openings - just to be SURE of the opening - and then build to suit. I like to leave 1/8" gaps all the way around. For overlay doors, build your doors slightly larger than the opening and use overlay hinges. Overlay doors will be easier to install and open and close easier.
Step 10
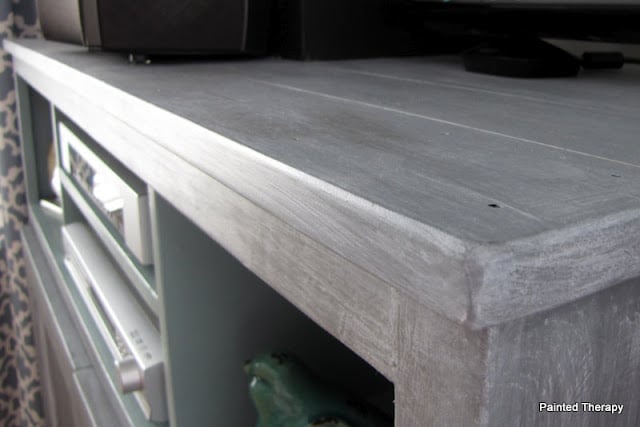
For more details on this beautiful finish, please visit Debbie at Painted Therapy. Thanks Debbie!
It is always recommended to apply a test coat on a hidden area or scrap piece to ensure color evenness and adhesion. Use primer or wood conditioner as needed.


Comments
annamarie6269
Tue, 06/12/2012 - 12:58
This made my day. I have
This made my day. I have been looking for a plan for something in the corner to hold our TV. I have been avoiding a wall mount! Great job and way to problem solve!!
SawgrassHomeGirl
Tue, 06/12/2012 - 15:33
Great Plan!
Now I just have to find a spot in my home to build it for! ;)
sgilly02 (not verified)
Tue, 06/12/2012 - 17:58
Beautiful finish
I just love the finish you've put on this. Great job.
Leslie @ NE Po… (not verified)
Tue, 06/12/2012 - 18:46
Nice piece!
I really like this plan. I might have to take the plunge and make my first piece of furniture!
bookette
Tue, 06/12/2012 - 19:44
I don't think that I could want this any more than I do right no
It's like you read my mind! I've been looking around seeing if I could frankenstein something together with the plans that were here already.
GORGEOUS job!!!
Now... how to convince the DH that I need to do another build.... ;o)
mbstarr (not verified)
Thu, 08/30/2012 - 10:20
Hi Ana! I love this plan. It
Hi Ana!
I love this plan. It is similar to what I've had in mind for a corner buffet in my dining room.
How hard would it be to modify this for a smaller corner (there are only 32.5" from the corner to where the door opens) and to make it so it goes further onto the corner for more storage inside? Would it be possible to make the 2 shelves adjustable inside and add a drawer in the top?
Mary
Novice Carpenter
Fellow Alaskan
jdel0323
Tue, 07/28/2015 - 17:48
Short corner
I have the same dilemma, with only 32" to spare. Did you ever get an answer or find a way to modify this design?
gabbiegal
Sun, 09/16/2012 - 19:32
Almost done!
I have built the whole piece now and painted it except for the doors. I am not finding where the instructions are to build the doors.
Then I have to decide to antique it or not.
In reply to Almost done! by gabbiegal
debandtom25
Wed, 10/31/2012 - 18:06
Doors
Sorry I got to this so late . . . I'm Debbie, the builder. Ana did not include instructions for the doors, but you basically just figure out the space you have and divide it by two, allowing a little room around each door. Of course, by now, you've figured all of this out. ;)
AJ (not verified)
Fri, 10/19/2012 - 10:19
Will it fit my tv?
I'm not sure how large the tv is in the pics, but my tv is 55". Will it fit on this stand?
AJ (not verified)
Fri, 10/19/2012 - 10:20
Tv stand
Will a 55" tv fit on this stand? I'm not sure how big the tv in the picture is.
In reply to Tv stand by AJ (not verified)
debandtom25
Wed, 10/31/2012 - 18:04
TV size
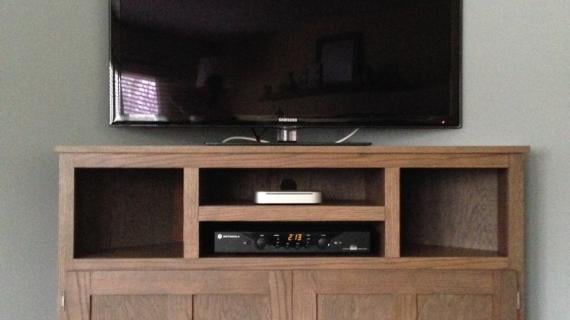
Hi there. The TV that is on the console is a 42". I'm thinking you can fit a much bigger TV on there. If it doesn't fit when the base is flush to the wall, just kick it back a little to give your self more room. Ours is not flush to the wall as we have baseboard heaters.
Sara Jo (not verified)
Thu, 12/13/2012 - 16:19
How much?
I haven't seen anywhere what an estimate on the cost of this project is. Can someone tell me?
c-e-fogus
Fri, 03/15/2013 - 17:11
Sturdy?
How much weight can this type of console take? We have an old TV and it weighs a TON. It's probably at least a 42 incher. My husband and I can hardly lift it together. We have a particle board high board that I always worry is going to crumple and crush one of our kids. I'm considering building my own and it would have to be a corner unit to hide the huge back end of the TV. But would this thing hold a really heavy TV?
dmcquaide
Thu, 01/02/2014 - 17:29
Really sturdy!
I know this is a super late response, but we just built this out of oak and it is VERY sturdy. I think it would be sturdy no matter what type of wood.
jah406
Tue, 01/28/2014 - 06:27
new dimensions and cut list
Hi is there an easy way or program to put in different dimensions and figure out material list and cut list? Thanks