Taylors Coffee Table

diy coffee table with wheels
Difficulty
Intermediate
| Print this plan

Build your own coffee table with free plans from Ana-White.com

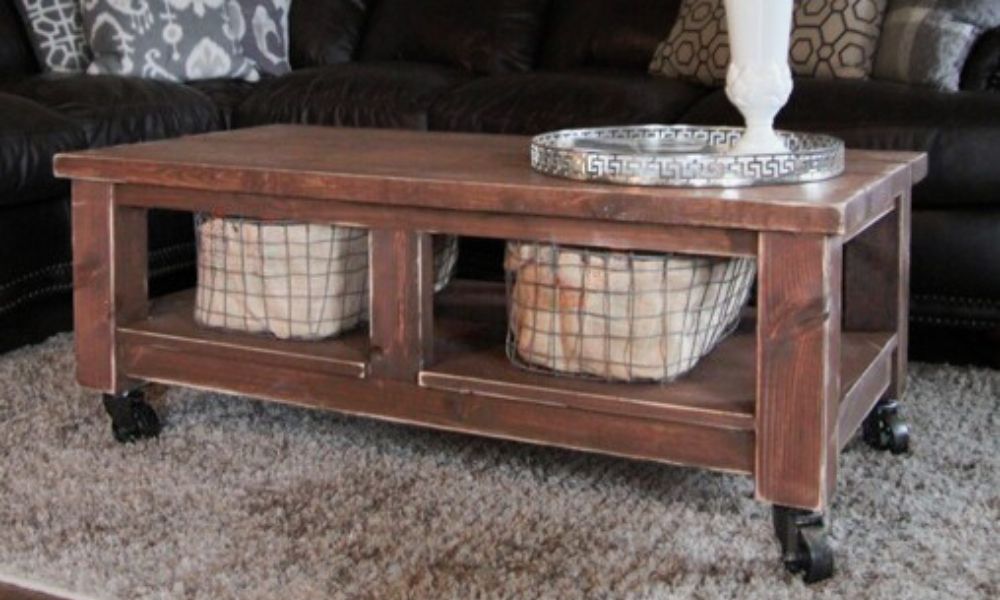
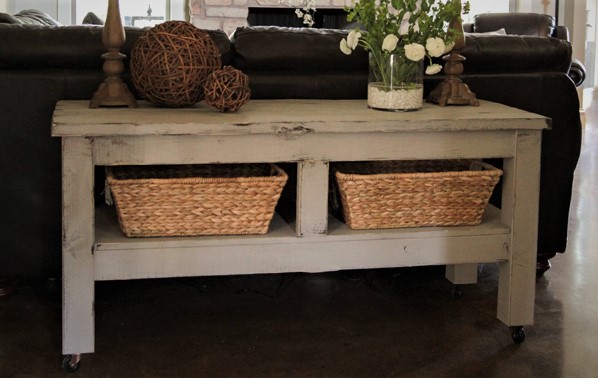
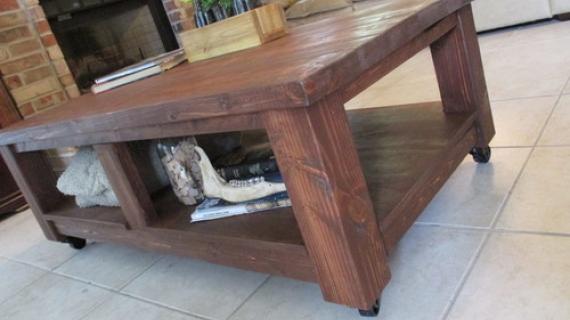
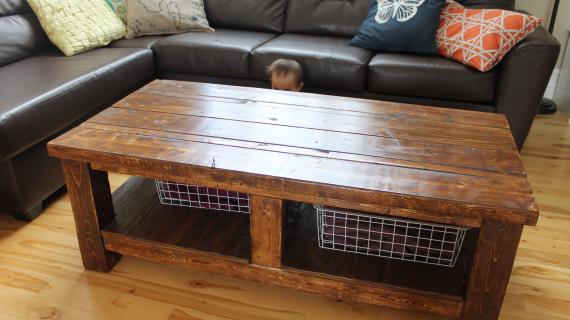
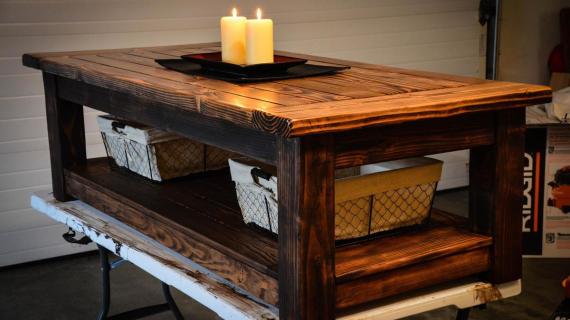
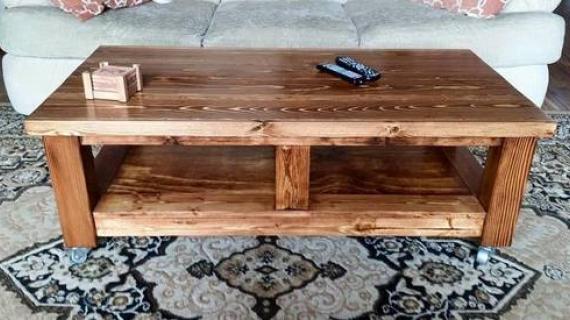
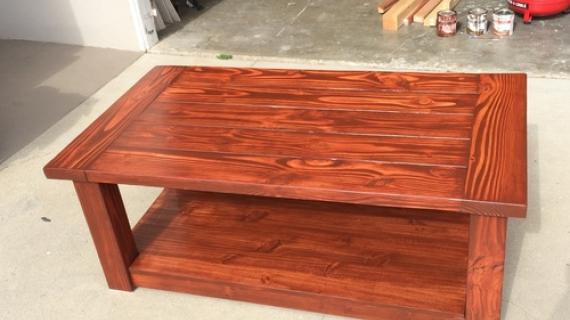
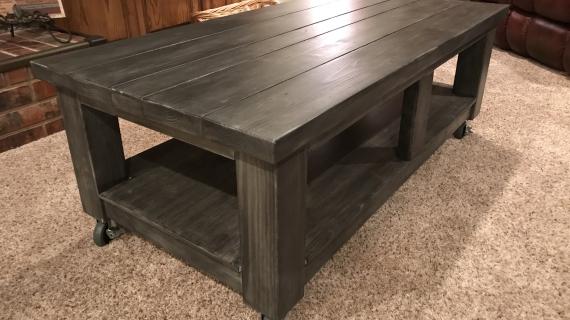
This beautiful coffee table features a solid wood design - so you can paint or stain it any color!  With room for baskets and optional casters, this coffee table is functional too! 

Related: Build the Matching Console Table

diy coffee table with wheels


Photos and Build Credit: Whitney from Shanty2Chic 

This is such a fun and easy build guys!  I used my Kreg Jig and Ryobi toolsto build the whole thing in under 3 hours.   I love how beefy and rustic it looks!  The cost for all my wood and wheels was right at $100… Sure beats the $700 Pottery Barn is asking for theirs ;-) 

Related Plans

Love this project?  Build the matching console table for behind the sofa, in an entryway, under the tv, or anywhere you need a surface with some storage!

free console table plans farmhouse style ana white


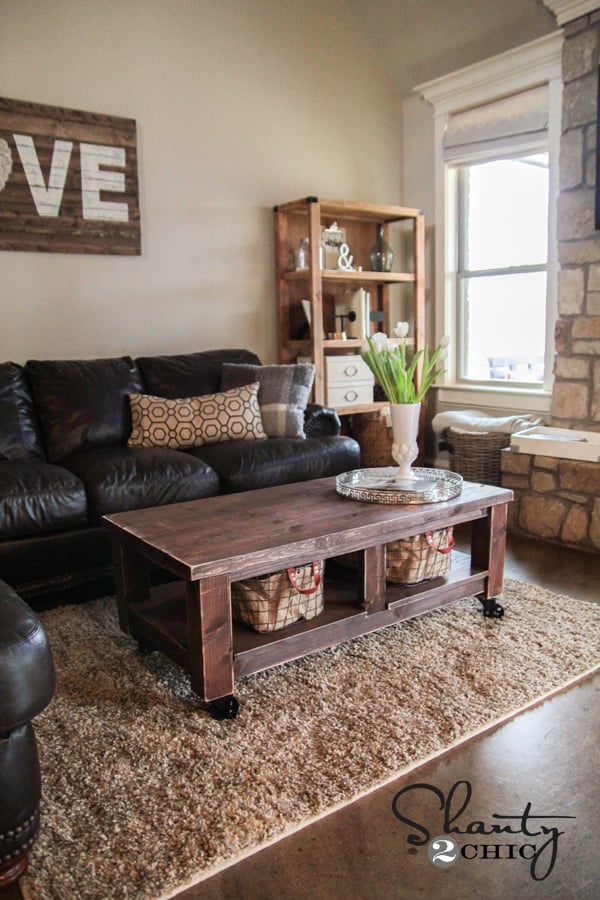
Notice the beautiful bookshelf?  That's DIY too! Free plans for the this bookshelf are here.

open frame bookshelf pottery barn wood


Dimensions
diy coffee table plans

Preparation

Shopping List
  • 1 - 4x4 @ 6 feet long
  • 1 - 1x3 @ 12 feet long
  • 3 - 2x2 @ 8 feet long
  • 1 - 2x4 @ 8 feet long
  • 2 - 2x6 @ 9' stud length or 10 feet
  • 1 - 1/2" thick plywood panel @ 24" x 48" (quarter sheet)
  • 2 -1/2" pocket hole screws and 1-1/4" pocket hole screws (if you kept the 1x3s)
  • 1" or longer brad nails (for nailing bottom shelf plywood down)
  • 4 - caster wheels and screws to attach (if not included)
Cut List

NOTE: Instead of 1x3s, Whitney used 2x3s which does not affect the plan (actually makes it stronger) but many of you cannot source 2x3s locally. If you do make this change, you will need to measure and cut a few boards that tie in to the 1x3s (step 2).

  • 4 - 4x4 @ 13-1/2" (legs)
  • 2 - 1x3 @ 17" (short aprons)
  • 2 - 1x3 @ 41" (long aprons)
  • 2 - 2x2 @ 21-1/2"
  • 1 - 2x4 @ 21-1/2"
  • 2 - 2x2 @ 41"
  • 2 - 2x4 @ 8-1/2"
  • 1 - 1/2" plywood @ 48" x 24"
  • 2 - 2x2 @ 17"
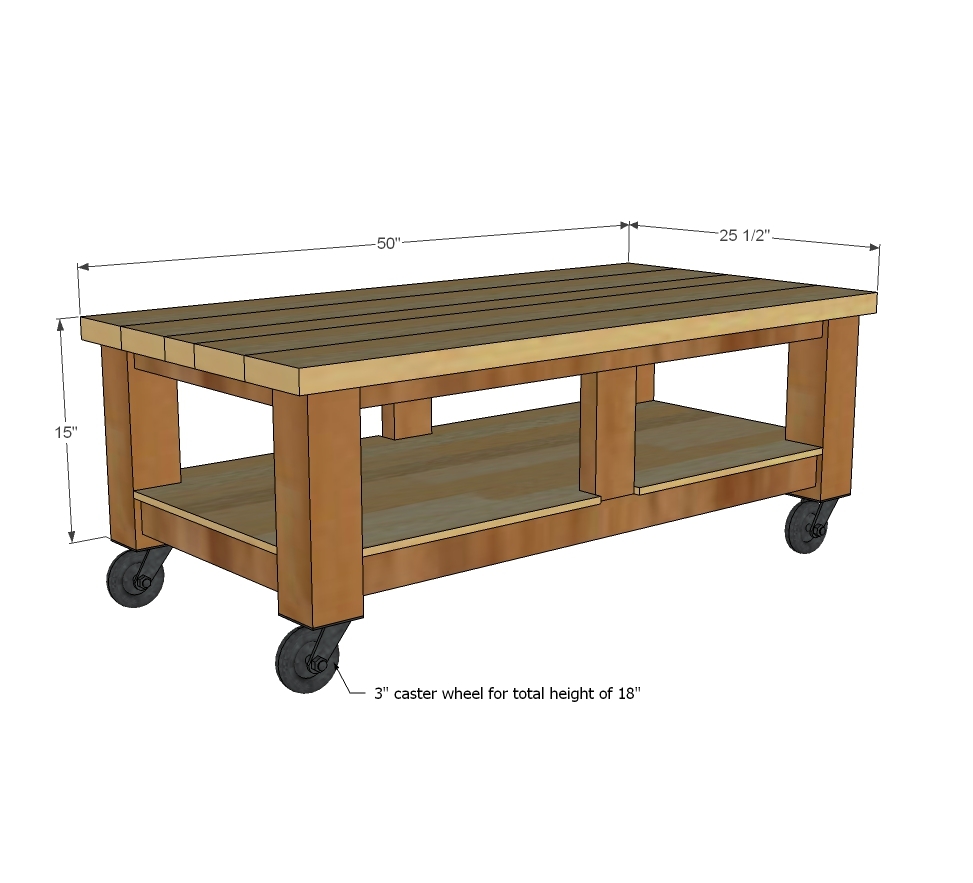
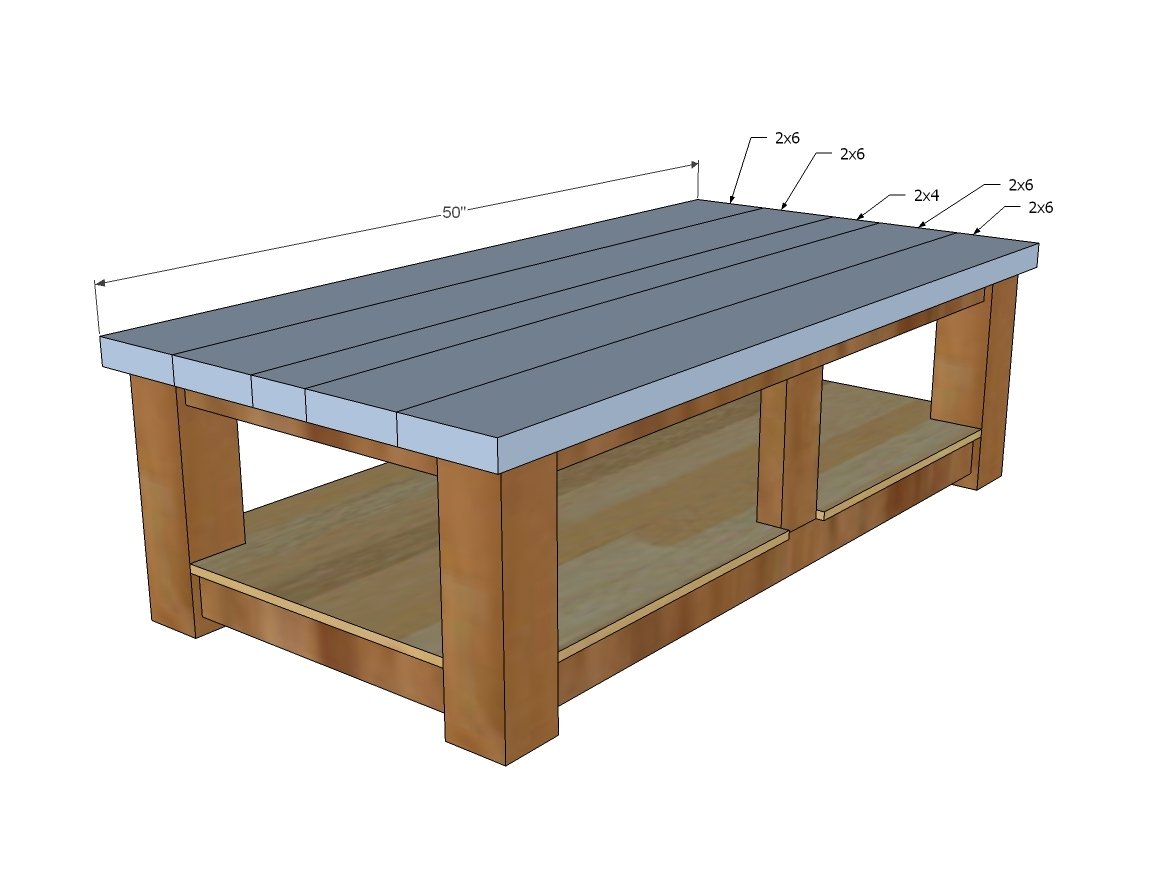
  • 1 - 2x4 @ 20" Tabletop
  • 4 - 2x6 @ 50"
  • 2 - 2x2 @ 50"
Tools
Tape Measure
Speed Square
Pencil
Safety Glasses
Kreg Jig
Drill
Circular Saw
Miter Saw
Brad Nailer
Power Sander
General Instructions

Please read through the entire plan and all comments before beginning this project. It is also advisable to review the Getting Started Section. Take all necessary precautions to build safely and smartly. Work on a clean level surface, free of imperfections or debris. Always use straight boards. Check for square after each step. Always predrill holes before attaching with screws. Use glue with finish nails for a stronger hold. Wipe excess glue off bare wood for stained projects, as dried glue will not take stain. Be safe, have fun, and ask for help if you need it. Good luck!

Instructions

Step 1

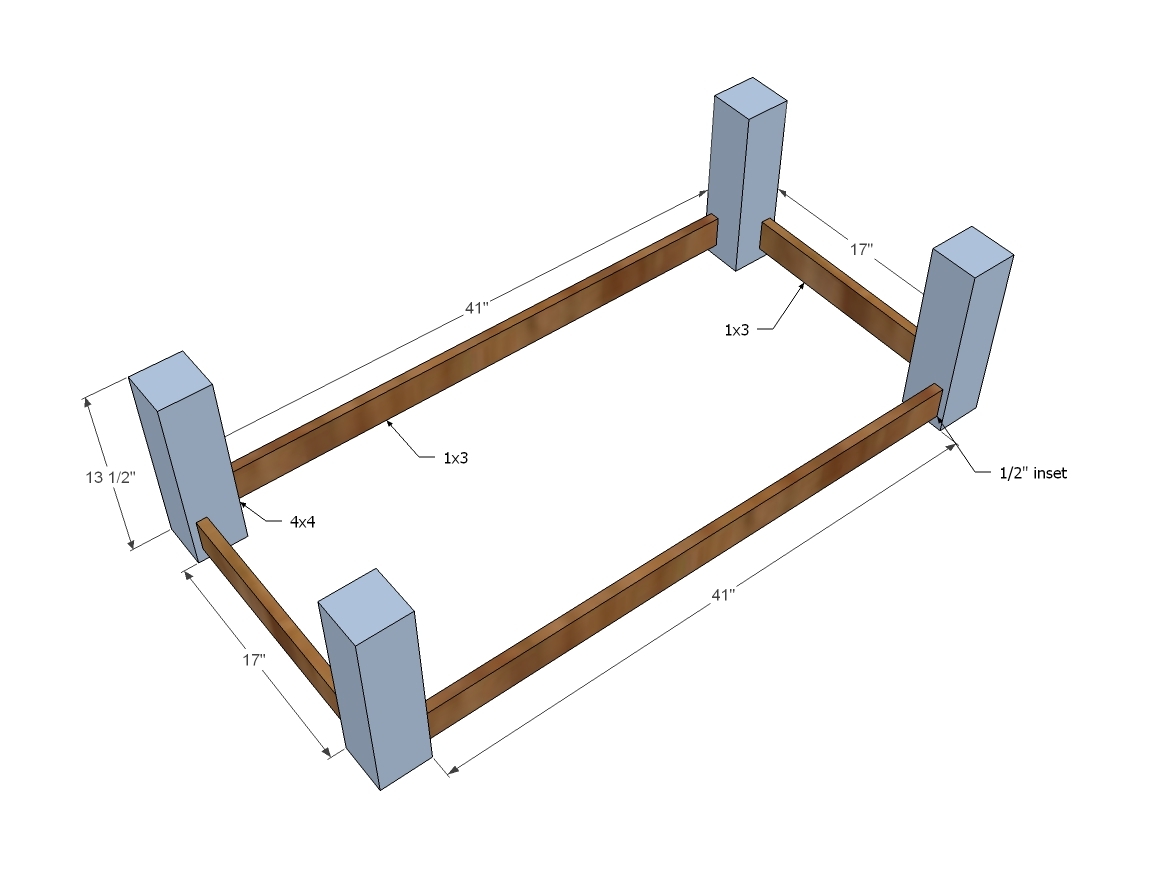
Attach 1x3s (or 2x3s if you are using) to the four legs. For 1x boards, use 3/4" pocket holes and 1-1/4" pocket hole screws. For 2x boards, use 1-1/2" pocket holes and 2-1/2" pocket hole screws to attach.

Step 2

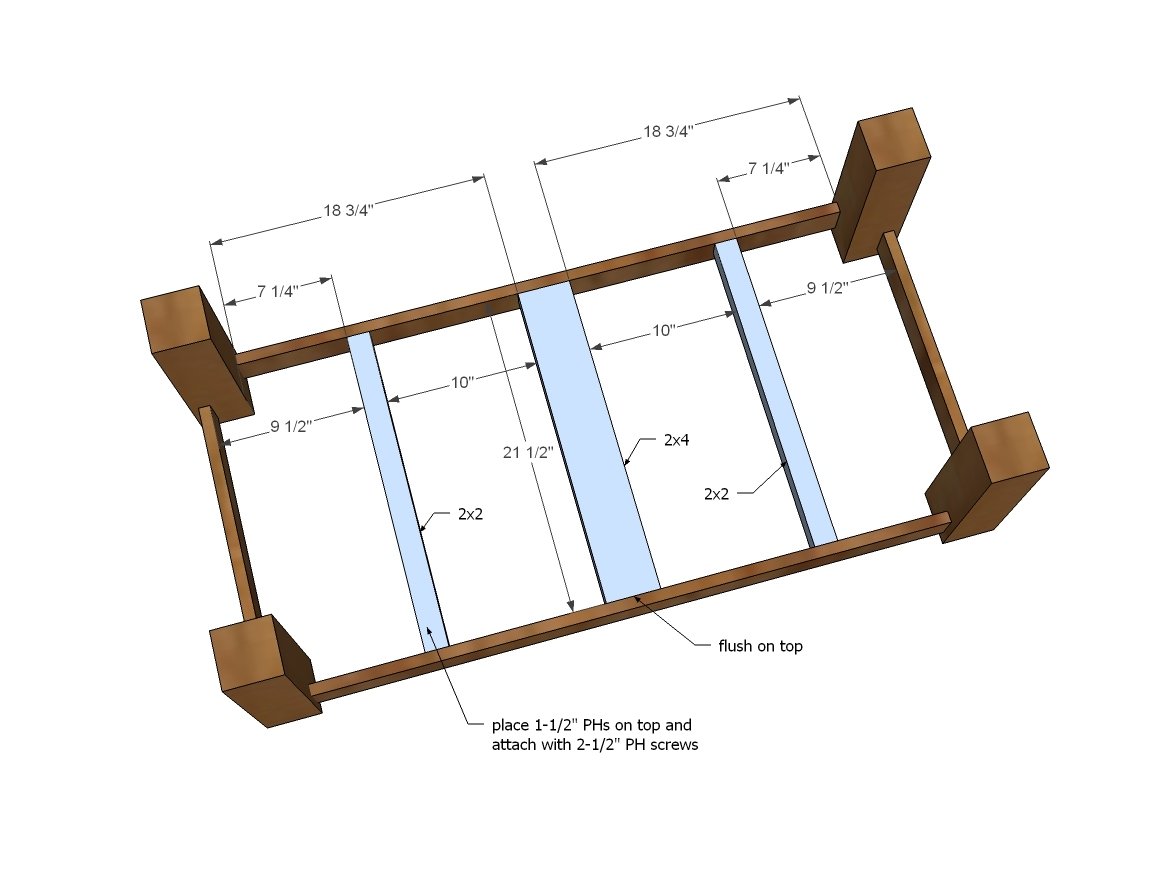
Attach bottom supports - this will support the bottom shelf plywood. Best way is pocket hole screws - if you are screwing into 1x boards (used 1x3s for sides) use 3/4" setting on pocket hole jig and 1-1/4" pocket holes.

If you use 3/4" plywood for the bottom you don't need the 2x2 supports.

Step 3

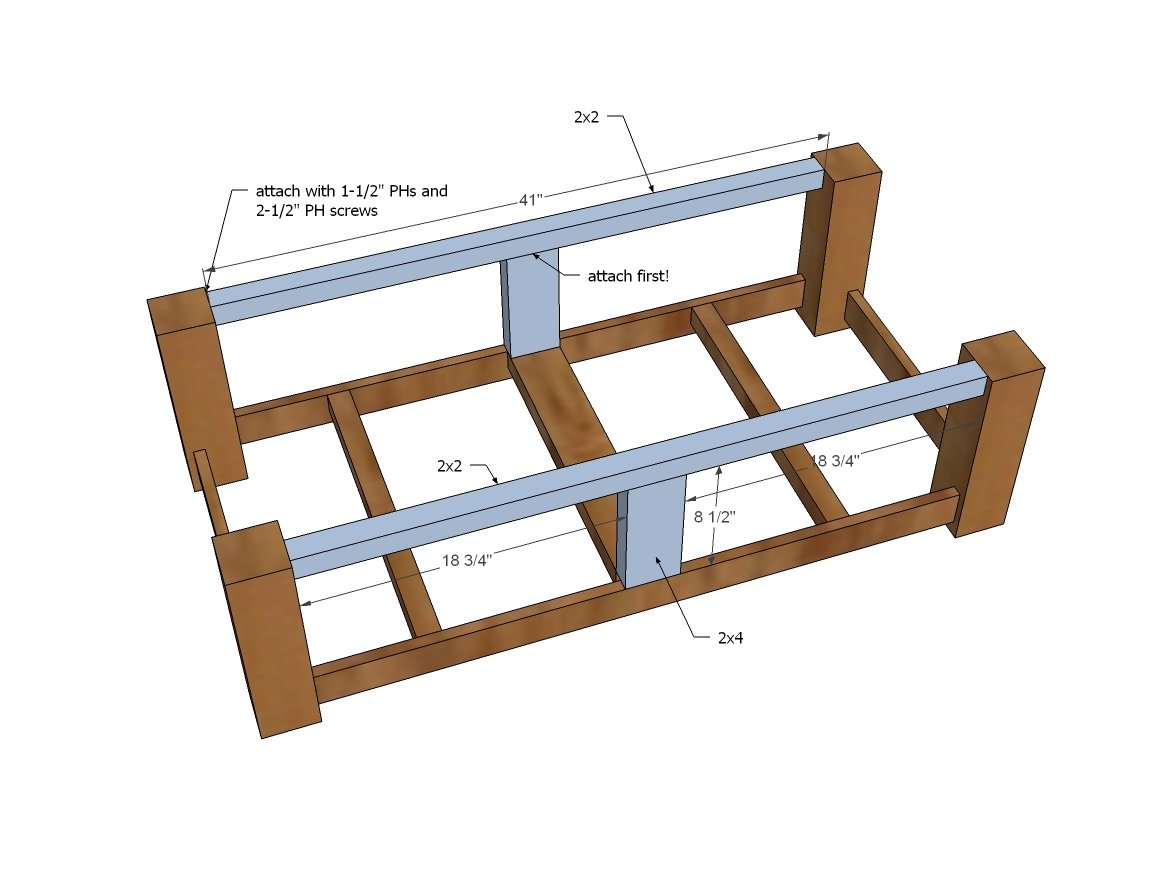
Build these "T" pieces first, then attach to the legs and bottom.

Step 4

Notch out with a jigsaw the bottom shelf and attach to the bottom with finish nails and glue.

Step 5

Step 6

Instead of the 2x4 down the center as pictured, Whitney liked using 2 - 2x2s spaced between the 2x6s to make it look more balanced - and I'd have to agree.

Build the tabletop first with 1-1/2" pocket holes and 2-1/2" pocket hole screws and wood glue. Then attach to base with through aprons and center undermount support with 2-1/2" screws (you can use pocket hole screws so you don't have to go out and buy special screws just for this step).

Step 7

Attach caster wheels to bottom of the legs.

Step 8

For finishing details - please visit Shanty2Chic

Finishing Instructions
Preparation Instructions
Fill all holes with wood filler and let dry. Apply additional coats of wood filler as needed. When wood filler is completely dry, sand the project in the direction of the wood grain with 120 grit sandpaper. Vacuum sanded project to remove sanding residue. Remove all sanding residue on work surfaces as well. Wipe project clean with damp cloth.

It is always recommended to apply a test coat on a hidden area or scrap piece to ensure color evenness and adhesion. Use primer or wood conditioner as needed.

Comments

AndyH

Thu, 02/20/2014 - 12:13

Love these plans that use 4 by 4s for the legs but I cannot find anywhere that sells them untreated and Lowes and Home Depot both tell me they cannot order them.

Where can they be sourced from?

Thanks!

DIYER_MD

Thu, 02/20/2014 - 14:31

The 4 x 4's can be purchased at Lowes. I have purchased untreated 4 x 4's there many times. Look for the Douglas-Fir type. Here is a link to their website with the 4 x 4's.

Lowes 4 x 4

carongirls

Fri, 02/21/2014 - 08:54

No, not all Lowes sell 4x4's untreated. I have gone as far as 4 hours away to check different Lowes or Home Depot. Just not available in my area at all.

Frequently Asked Questions

Wood Questions

What kind of wood should I use?
Most of our plans use standard construction lumber like pine or fir. It's affordable, easy to work with, and easy to find. It's also rapidly renewing and biodegradable, so a great eco friendly choice!

Can I use hardwoods instead?
Yes—just keep in mind they're heavier, cost more, and can be tougher on tools and harder to join together and finish. I recommend not tackling a hardwood project until after you have built several softwood projects.

What if my boards are warped?
Choose the straightest boards at the store. You can often work around slight warps by cutting them into shorter pieces.

What wood should I use for outdoor furniture?
Use red-toned or pressure-treated 2x lumber for framing, and cedar or cedar fence pickets for the decking. Outdoor furniture should be built like a deck—your local home center can help recommend the right wood for your climate.

Will my wood move or warp after I build?
Potentially, especially in humid climates. Let your wood acclimate indoors before building. Once acclimated and kept in a stable environment, movement should be minimal. Remember, most houses are built using framing lumber - it's all about keeping moisture down indoors.

Cutting Questions

Do I need a miter saw?
A miter saw is great, creating fast, safe, and precise cuts, even for beginners. But most plans can be built with a circular saw and a straight edge. If using a circular saw to cut, take time to practice, and get good at making cuts, before cutting your project boards.

How do I get clean cuts with a circular saw?
Clamp your board, measure twice, cut slow, and use a sharp blade. This takes practice, so spend some time making cuts. I go through becoming proficient at freehand cutting in my course, it is worth taking if you want to master this skill.

Will the store cut my wood?
Yes—most stores will do rough cuts to help you transport your materials home. But from store to store, the quality of cuts could greatly vary.

Joinery Questions

What screws should I use?
We recommend star-head self tapping screws for framing, most common sizes are 2-1/2", 1-3/4". Pre-drill if close to the edge or you find your wood is splitting.

Do I have to use pocket holes?
Pocket holes are the cheapest, easiest and fastest way to do some joints - like edge to edge or a hidden fastener joint. There are other methods, but these can be time consuming and expensive. We recommend using pocket holes as indicated in plans for best results.

How do I keep things square?
Use a speed square and measure diagonals after each step. Always clamp joints before screwing to keep them tight and flush.

Finishing Questions

Stain or paint before or after building?
A quick sand before and a full finish after gives the best results. Pre-finish if you're doing two-tone or detailed finishes.

What type of finish?
Use oil-based or water-based stain. For paint, cabinet-grade latex or enamel works great. High use surfaces on indoor projects should get a coat of polyurethane, I recommend a Helsman or Spar or other flexible poly that won't crack or peel with wood movement. For exterior projects, use a finish suitable for exterior fences.

How to get a smooth finish?
Start with a well sanded project. Sand between coats (220 grit), wipe clean, and apply light coats with a foam brush or roller.

Plan Questions

Can I change the size?
Many people do, and that's the great thing about building your own furniture! But do keep in mind going bigger might mean more supports are required, and often plans are optimized for minimal material waste.

Are these beginner-friendly?
Yes—plans are written with simple tools and clear steps in mind, with every effort to make plans as simple as possible.

Can I sell what I build?
Absolutely! Just don’t resell or repost the plans themselves.

General Questions

What tools do I really need?
A drill, circular saw, tape measure, square, and a few clamps will get you through most projects.

Do I need a workshop?
Nope! A driveway or small patio is plenty to get started, just make sure you have a level place to work. If you find you are building several projects a year, creating a small workbench is a great way to store tools and have a dedicated workspace.

What if I mess up?
Wood filler, sanding, or flipping boards goes a long way. Mistakes are part of the process!

What can I do to make my projects look more professional?
Start with straight boards, make accurate cuts, clamp all joints, and line up everything neatly. Sand thoroughly, use a neutral finish, and apply it in light coats for a clean look.

I've never built anything before. Where should I start?
Start with a few smaller softwood projects to get hands-on experience. Or if you're tackling a big project, buy a little extra lumber and practice your cuts and joints first. If possible, work with someone who has a bit of experience.

Care & Maintenance

How long will my furniture last?
With good joinery and regular care, your DIY furniture can last for decades. I have pieces in my own home that are over 20 years old and still going strong! One of the best parts about DIY furniture is that it’s easy to repaint, refinish, or repair—so your projects can grow and adapt with you.

How should I care for outdoor furniture?
Lightly pressure wash or hose it down once or twice a year. Tighten screws and reapply finish as needed to protect it—just like a deck or fence. A little upkeep goes a long way in extending the life of your furniture.

How about indoor furniture?
Regularly dust or wipe with a damp cloth. If it starts to look worn, a light sanding and touch-up paint or stain can refresh it in no time. DIY pieces are meant to be durable and fixable—so don’t be afraid to give them some love now and then.

Want to Build with Confidence?

Check out my ebook: 12 Skills to Build Your Own Furniture
It walks you through the core skills every builder needs—measuring, cutting, joinery, and finishing—so you can build beautiful furniture that lasts.

Still Have Questions?

Email us anytime at [email protected] and we’ll be happy to help!