

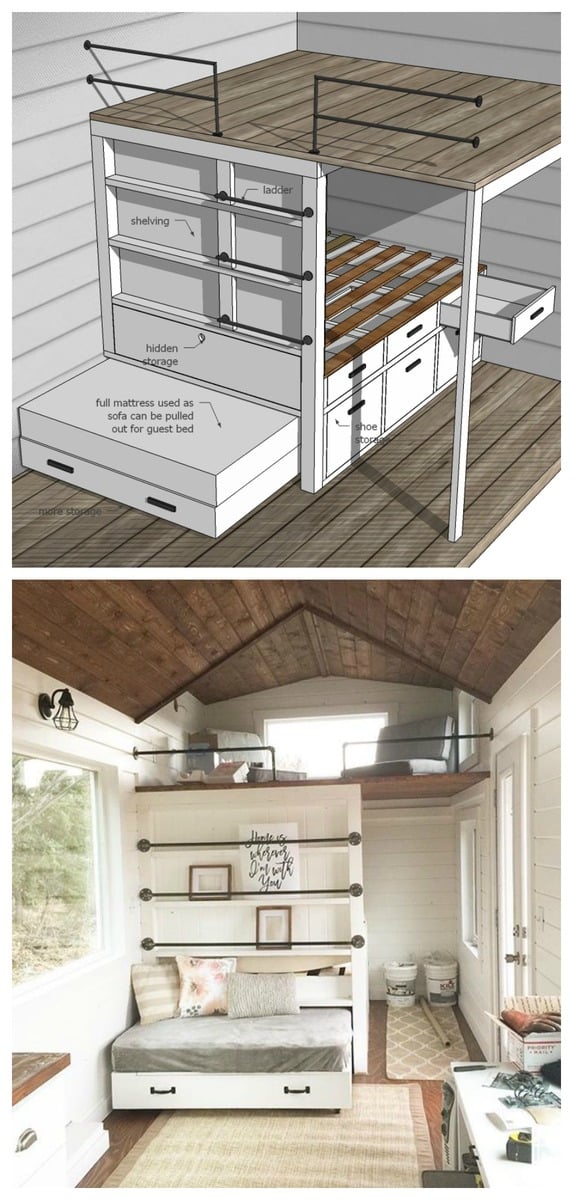
Plans for a tiny house loft with lower bedroom, storage drawers, and hidden sofa that converts to a guest bed. Detailed plans by Ana-White.com
Hi everyone! Thanks for following along on our Tiny House Video Series! A big thank you to everyone who has subscribed and followed along!
It's been fun, and I'm both sad and happy to be getting to the final stages. Sad because that means this project is almost done. And happy because I finally get to start sharing plans with you lovely people.
Today I'm sharing the first of the project plans for the tiny house. But before we get to it, check out the orignial design -
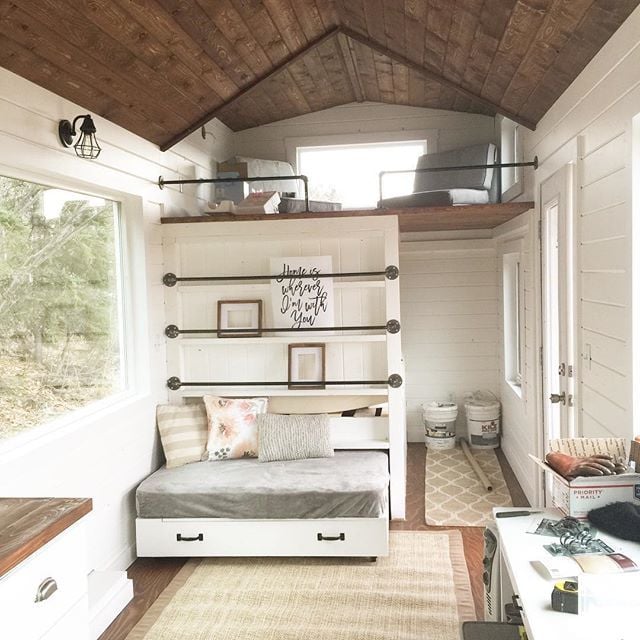
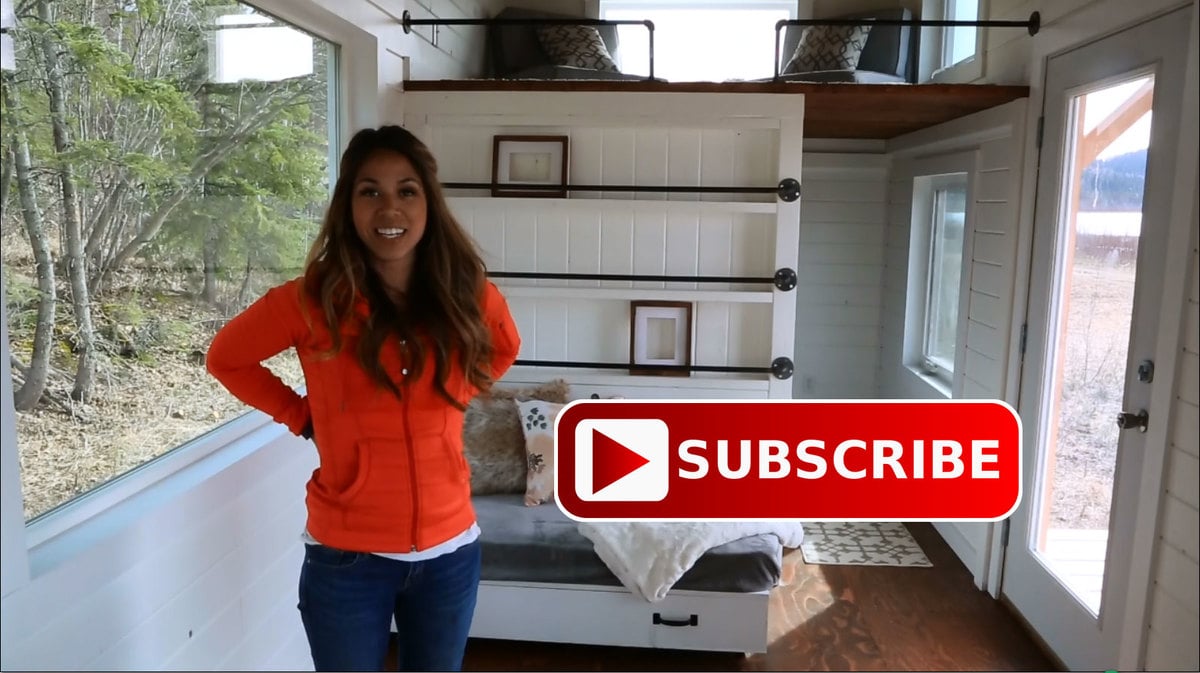
Now are you ready to see how the loft area turned out?
I think what I love most about this loft area in the tiny house is that it is so simple and does not feel cluttered or complicated - yet it does so many things!
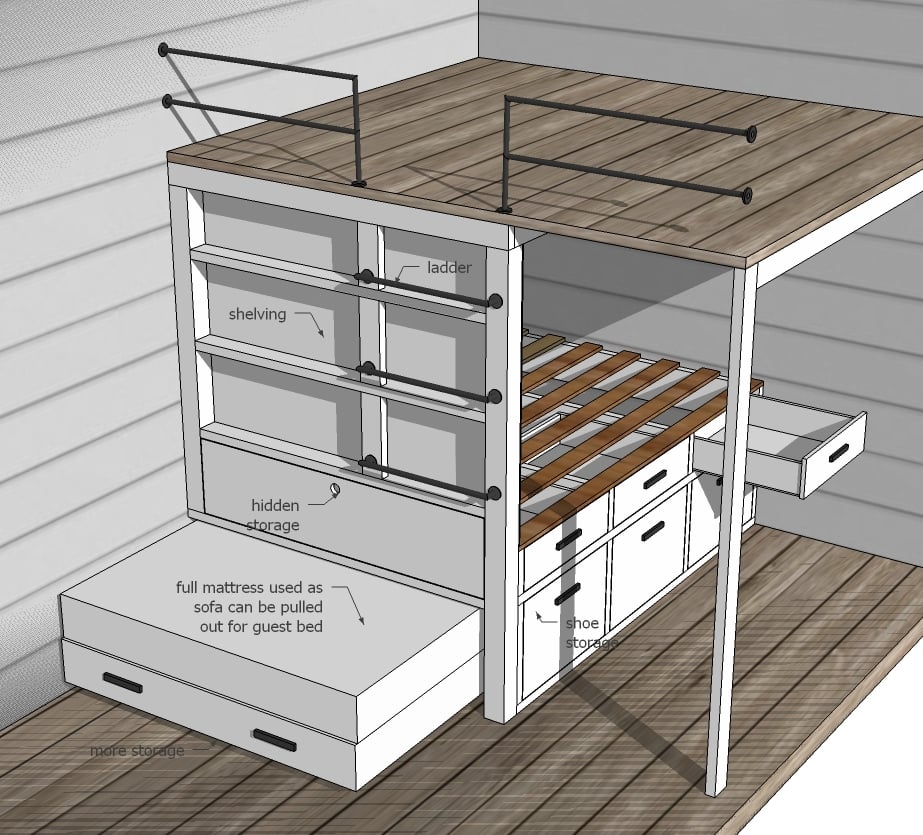
It's a couch. A ladder. A shelving display wall. It's a real guest bed. And a bedroom encloure. It's also a queen bed. And a dresser. And a shoe storage system. There's hidden storage. And of course, it's a loft.
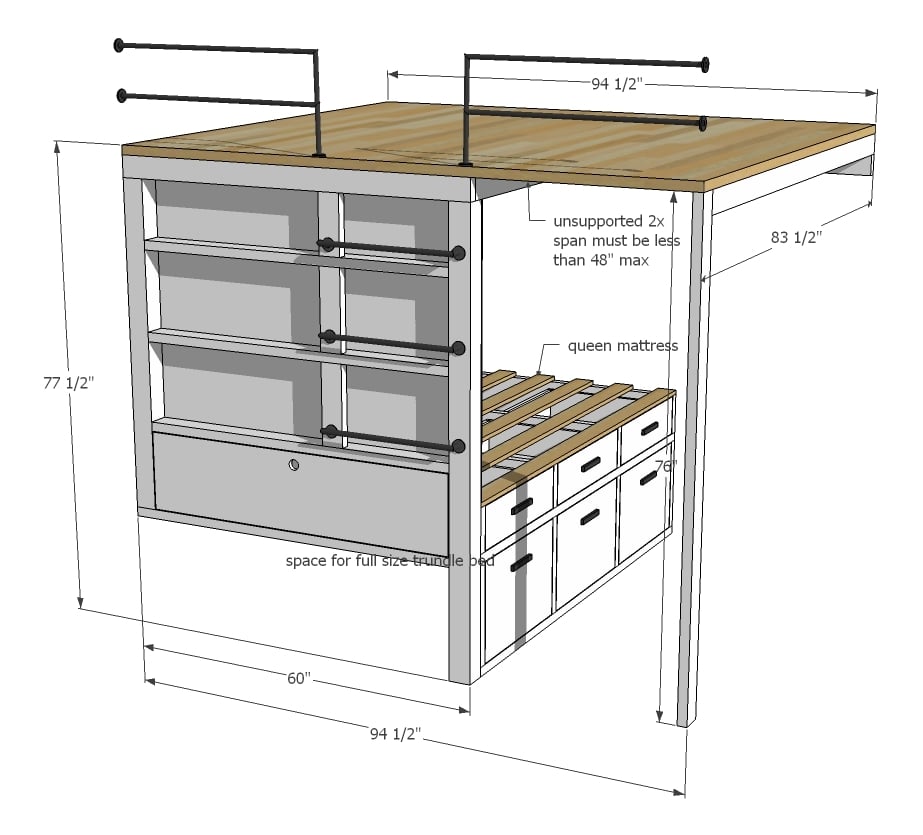
We put a ton of thought into each board in this loft bed system - did you notice that the wall framing becomes shelving? That the bed support system is a dresser? That the loft floor is only 1-1/2" thick where you need headroom? It's a tiny house - you can't afford to waste space or materials (that take up space and cost weight).
Hope you enjoy the plans following (if this is the homepage click READ MORE below), and if you do build, please share, would love to see how this system works out for you.
Happy Building!
Ana
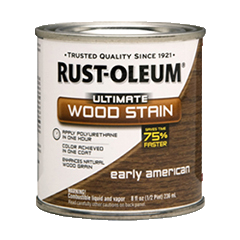
PS - The stain on the upstairs floor is Rustoleum Early American with Triple Thick poly on top. Best staining combo ever invented.
PSS - Love this? Pin for later!
And if you haven't done so already, please subscribe to our YouTube channel to get updates when new videos are published!
Preparation
- 2 - 4X4 @ 6 FEET LONG
- 14 - 2X4 @ 8 FEET LONG
- 1 - 2X8 @ 8 FEET LONG
- 2 - 2X8 @ 10 FEET LONG
- 3 - 1X6 @ 8 FEET LONG
- 2X6 TONGUE AND GROOVE FOR UPSTAIRS LOFT OF OTHER FLOORING
- 1 SHEET OF 1/4" PLYWOOD FOR DRAWER BOTTOMS/SHOE STORAGE BACKS
- 1 SHEET OF BEADBOARD, PANELING OR 1X6 T&G FOR BACK OF WALL
- 1 SHEET OF 3/4" PLYWOOD FOR DRAWER/DOOR FACES
- 2-1/2" POCKET HOLE SCREWS
- 2-3/4" SELF TAPPING WOOD SCREWS (SPAX OR SIMILAR)
- 5" LAG SCREWS FOR ATTACHING 4X4 TO WALL (JUST NEED A FEW)
- 1-1/4" NAILS FOR ATTACHING SLATS TO FRAMING AND WALL MATERIAL BACKING
- 3 - 24" BOTTOM SIDE MOUNT DRAWER SLIDES (WHITE)
- 4 SETS OF HINGES IF HINGES ARE NOT SELF CLOSING MAY NEED CLASPS OR HASPS
- 6 KNOBS OR HANDLES
- BLACK PIPE FOR LADDER AND RAILING
WALL
- 1 - 4x4 @ 52"
- 1 - 4x4 @ 71"
- 4 - 2x4 @ 53"
- 2 - 2X4 @ 13" - LADDER SUPPORTS
- 1 - 2X4 @ 8" - LADDER SUPPORT
- 1 - 1/4" PLYWOOD OR PANELING @ 45-3/4" X 60"
- 1 - 3/4" PLYWOOD @ 52-3/4" X 12-3/4" (HIDDEN STORAGE DOOR)
QUEEN BED
- 2 - 2x4 @ 80"
- 4 - 2x4 @ 16-1/2"
- 1 - 2X8 @ 80"
- 4 - 2X8 @ 58-1/2"
QUEEN BED DRAWERS (CUT TO FIT)
- 6 - 1x6 @ 24"
- 4 - 1x6 @ 22"
- 2 - 1x6 @ 22-1/2"
- 2 - 1/4" plywood @ 24" x 23-1/2"
- 1 - 1/4" plywood @ 24" x 24"
- 2 - 3/4" plywood or 1x8s ripped to fit 7" x 24-1/4"
- 1 - 3/4" plywood or 1x8s ripped to fit 7" x 24-3/4"
- 2 - 3/4" plywood 16-1/4" x 24-1/4"
- 1 - 3/4" plywood 16-1/4" x 24-3/4"
- Bed slats are total of 80" long
WALL CLEATS 1 - 2x4 @ 76"
- 1 - 2X4 @ 80"
- 1 - 2X4 @ LENGTH OF ROOM (OURS WAS 94-1/2")
LOFT FLOOR FRAMING
- 1 - 2X4 @ 60"
- 4 - 2X4 @ 82"
- 2X6 TONGUE AND GROOVE FOR FLOORING/CEILING


Instructions
Step 1
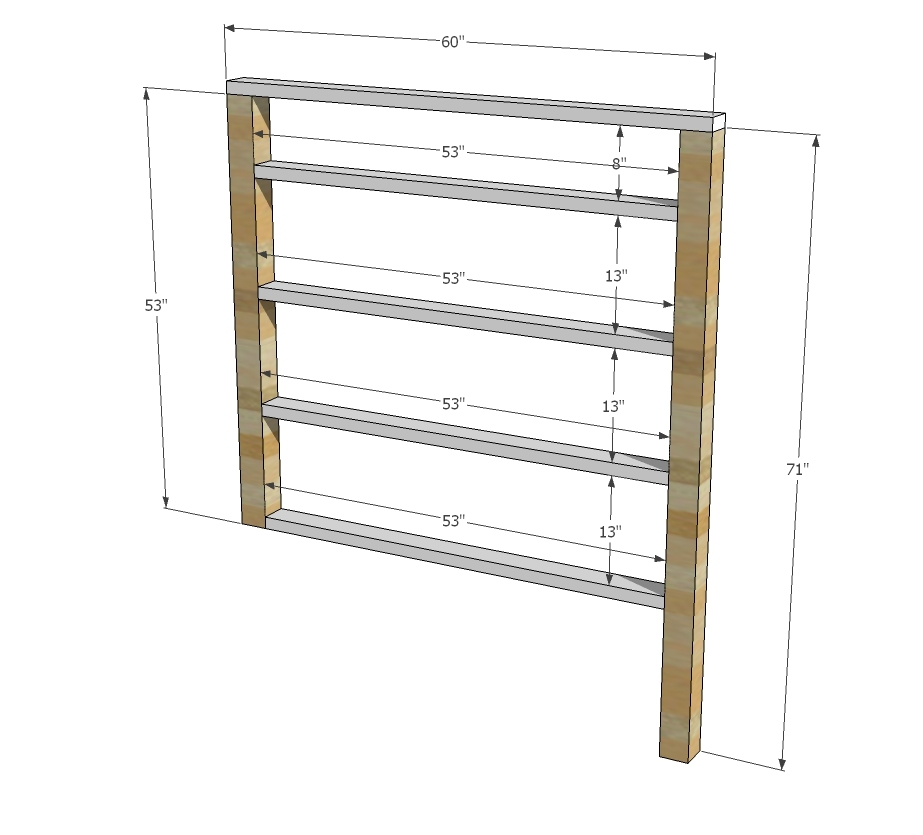
Build the main wall system. The best way to attach into the 4x4 posts is with a Kreg Jig, hiding pocket holes on underside.
Step 2
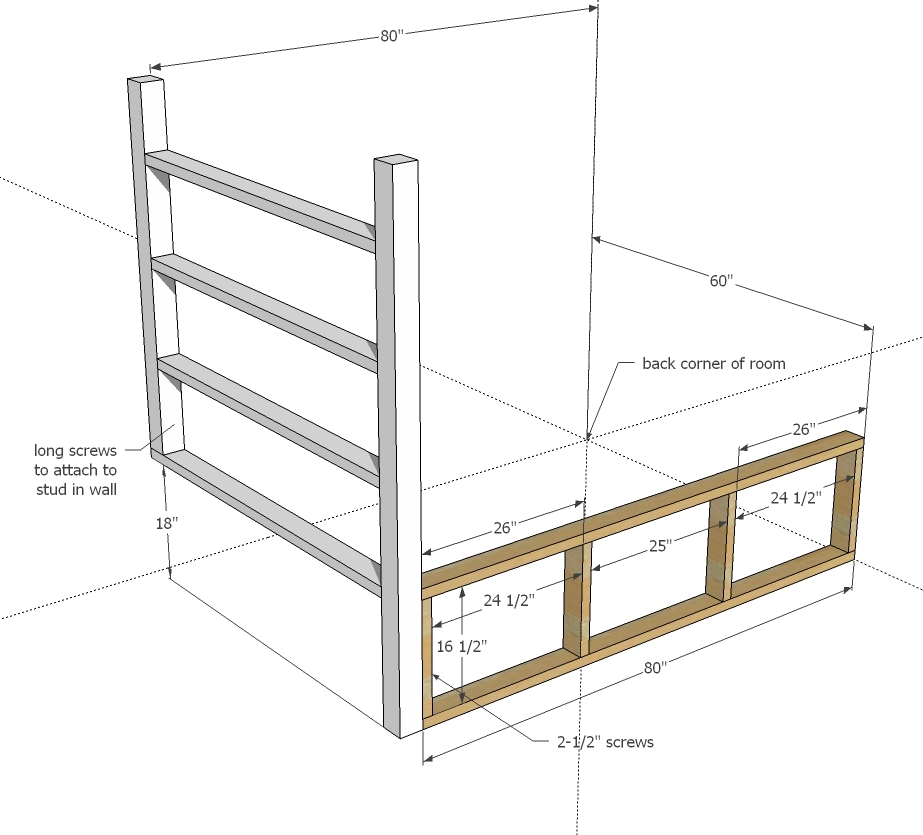
Next, build the 2x4 bed support. We made ours using the self tapping wood screws (2-3/4" length but similar lengths would work just fine). Make sure this area is very square. Then attach the two pieces to the walls in the room and together using the 2-3/4" screws. You will need longer lag screws to attach 4x4s to the wall.
Step 3
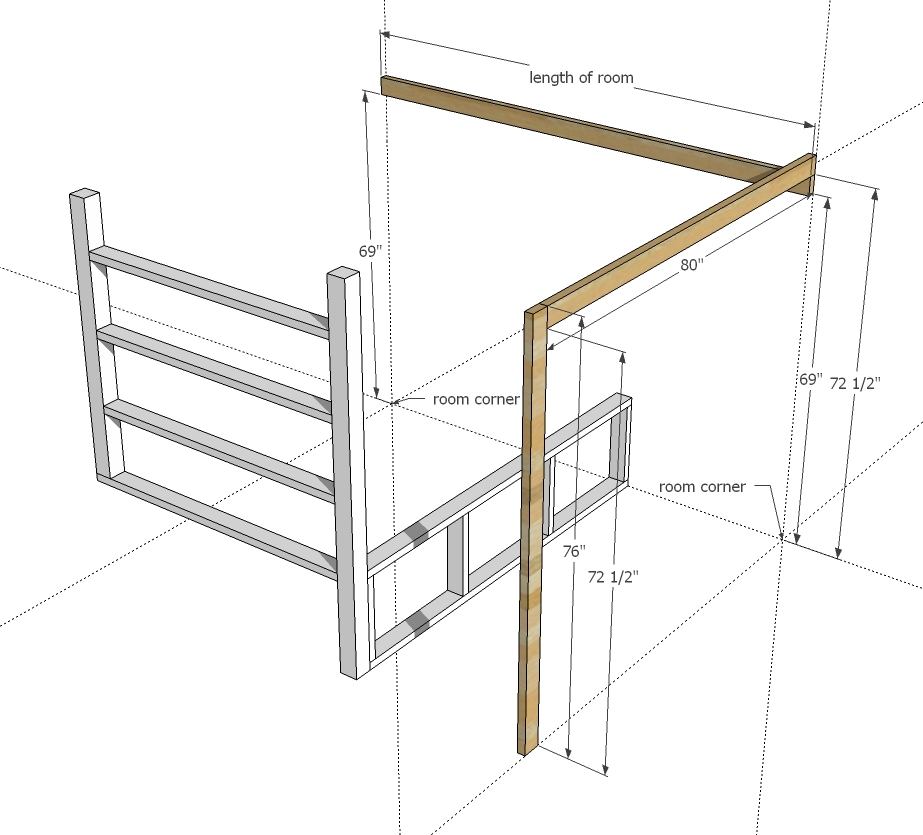
Use a level to attach wall cleats to studs in the wall using the 2-3/4" screws.
Step 4
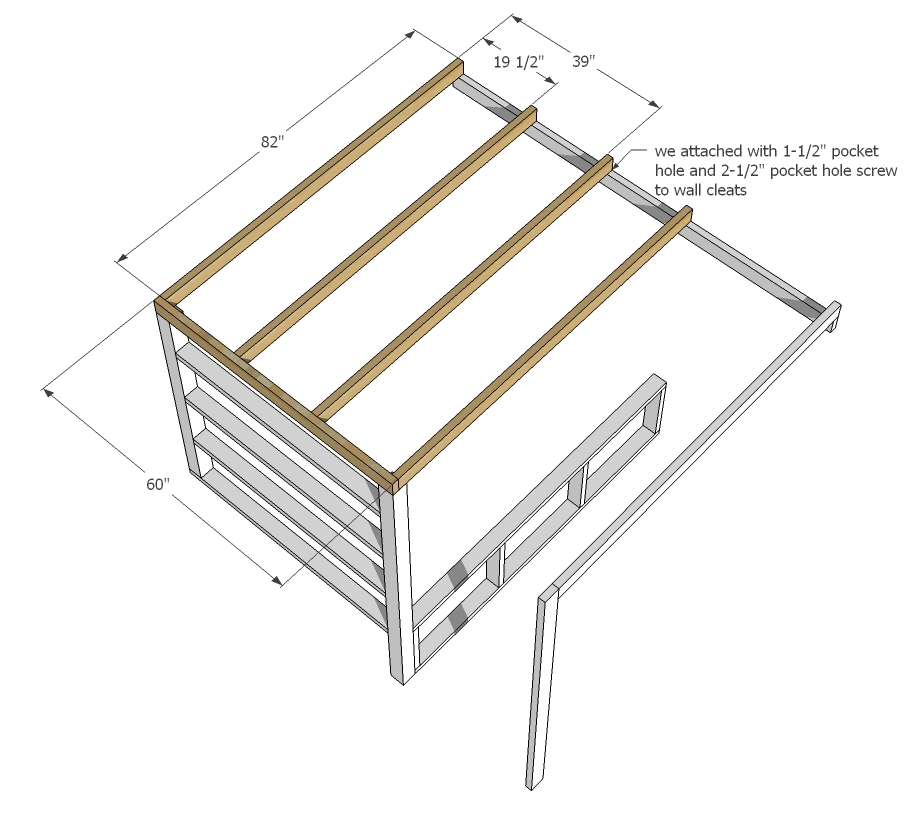
Step 5

Step 6
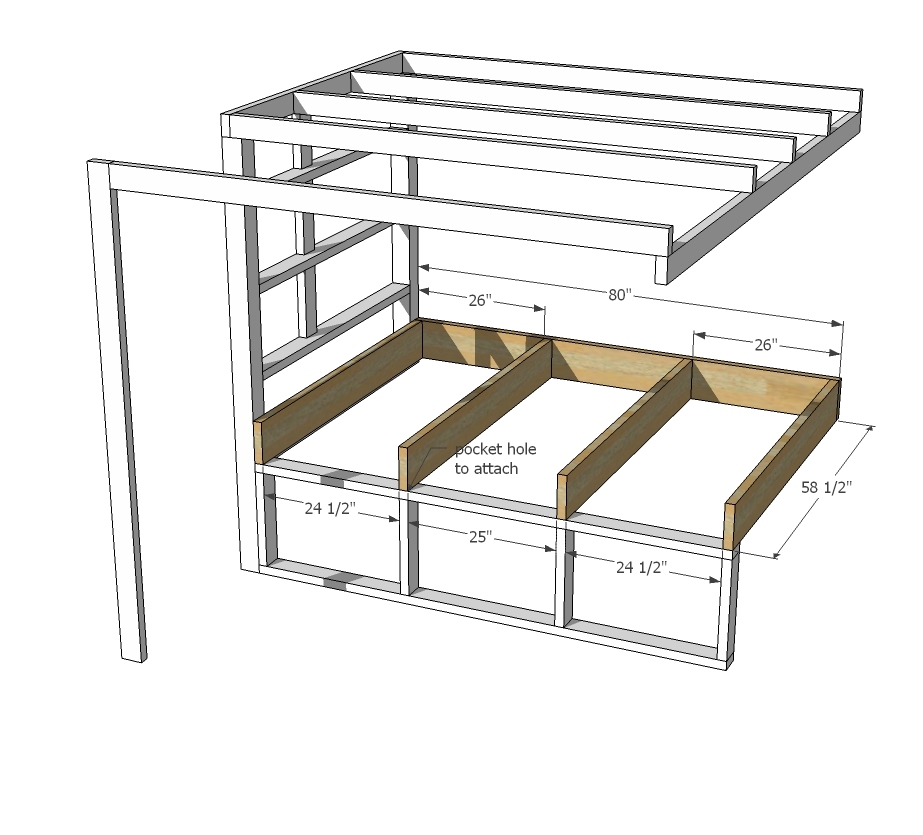
I decided to use the 2x8s to support the mattress because it creates a nice sized cavity for drawers. 2x4 or 2x6 framing would have been fine too if you are not doing the drawers. If doing drawers take extra care to make sure the boards are attached square so you don't have a cockeyed drawer that doesn't slide right.
Step 7
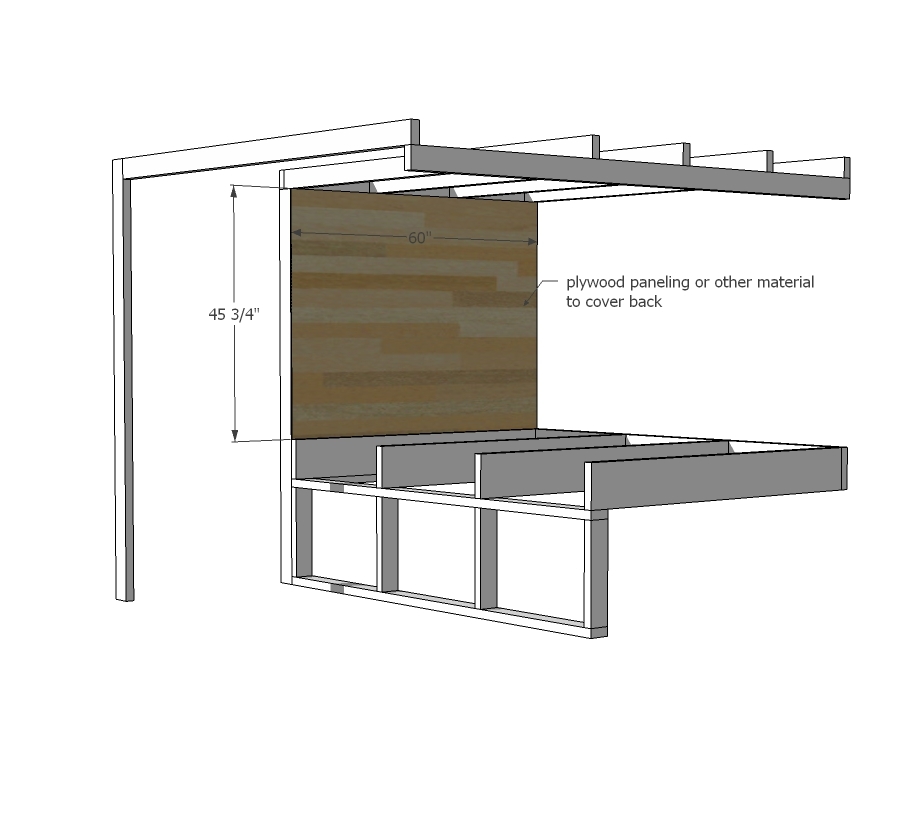
We used leftover 1x6 tongue and groove from the wall paneling to cover the back of the "wall" but any material will do - beadboard, paneling, plywood - your choice. It's nice that this area is less than a full sheet of plywood. Just cut and attach with nails and glue.
Step 8
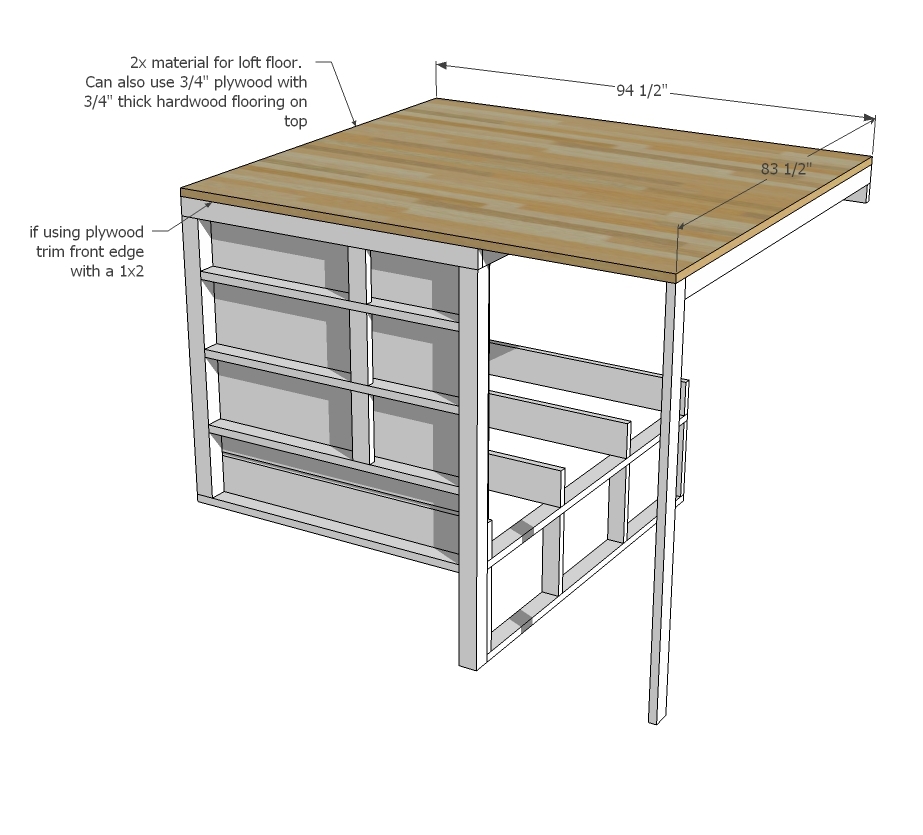
We used 2x6 tongue and groove for the upstairs loft. You could probably get away with 1x material, but not sure if I would recommend it with the span over the doorway being so close to 36". Another option is 3/4" plywood, then top with 3/4" hardwood flooring running the opposite direction.
Step 9
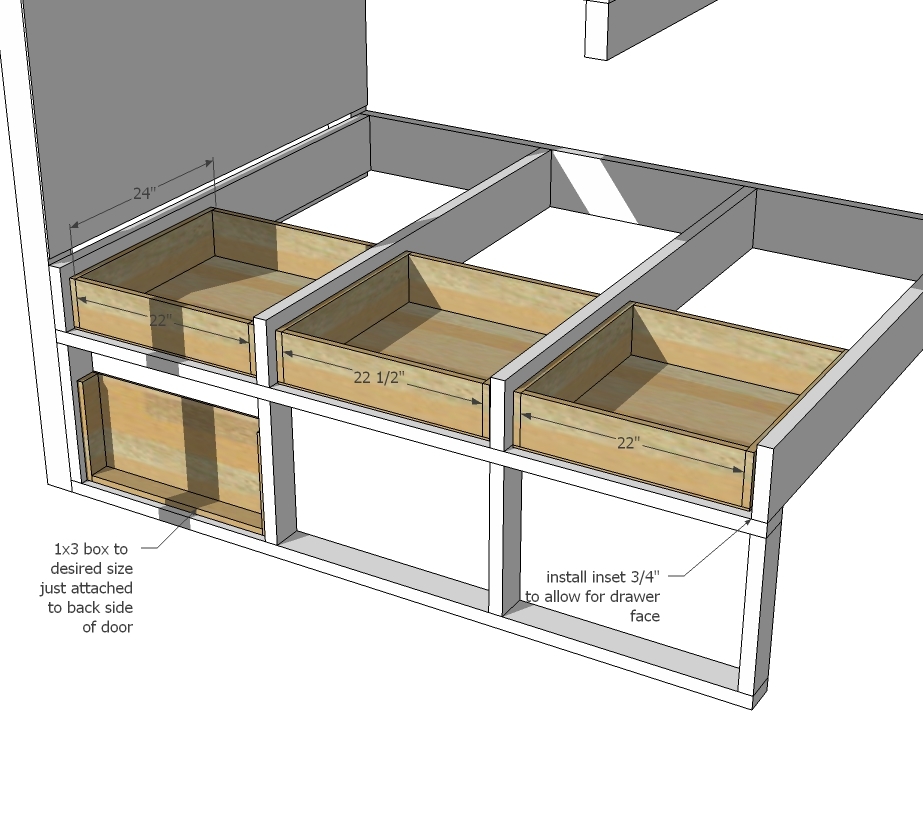
Drawers should always be built to fit openings and drawer slides. The picture shows the perfect situation. For the shoe tilt out drawers I just used 1x3s to box out an area, and scrap 1/4" plywood on the back, all attached to the door (see next step).
Step 10

Attach drawer faces and doors. There should be an 1/8" gap on all sides of the doors/drawers when installed properly.
Step 11

For the bed slats, I used a full length board (front edge painted) for the first slat, then burned up any 3/4" material for the remaining slats, splicing joints over the 2x8 framing.
Step 12
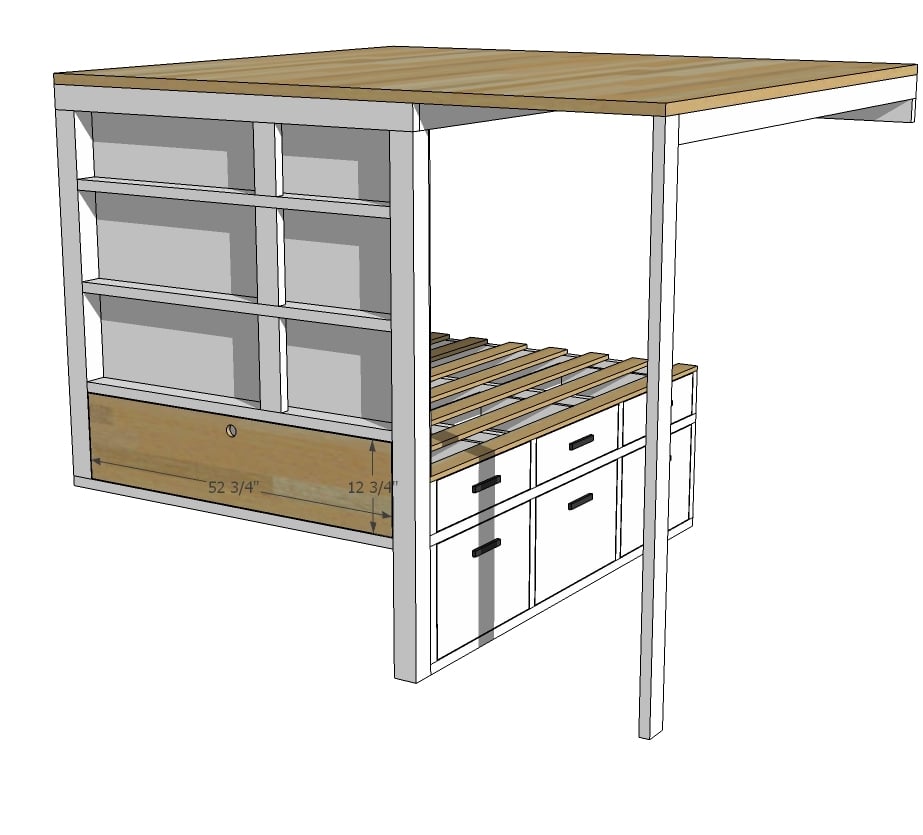
I hinged a piece of 3/4" plywood over the opening in the front. We cut a circle out in the middle to act as a handle.
Step 13
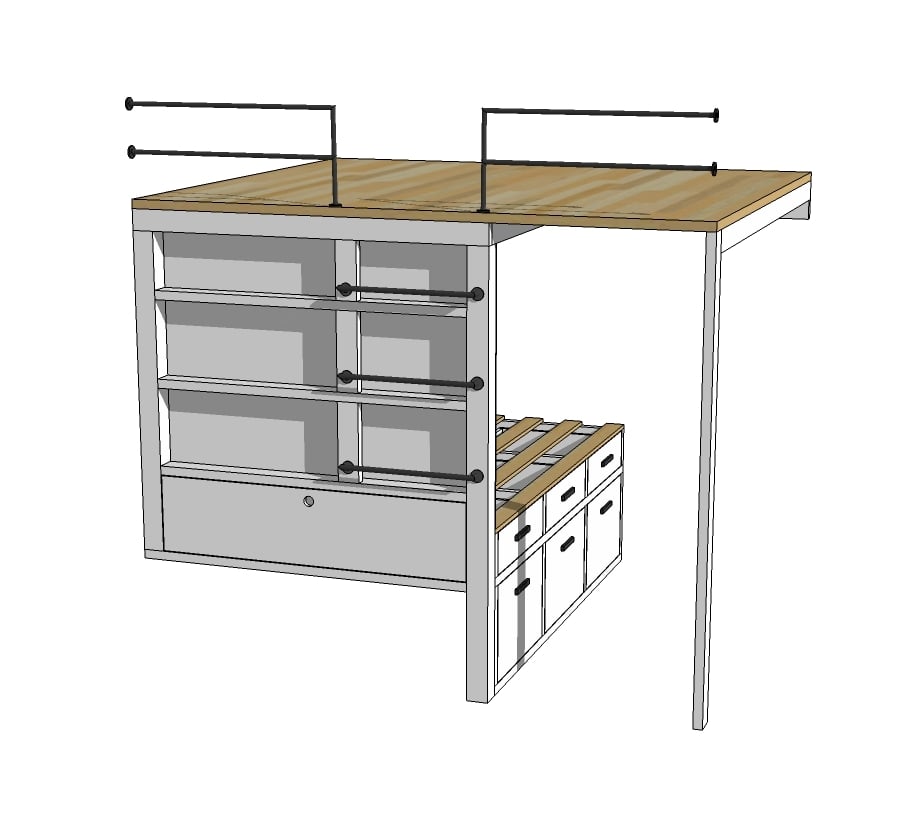
Store bought black iron pipe is an easy railing (though not code approved so please be reasonable and safe here) and ladder.

Comments
Ana White
Fri, 04/22/2016 - 11:26
CUT LIST
Also add 1 additional 2x4 @ 60" to the cut list.
Angelika1962
Sun, 04/24/2016 - 11:09
Kitchen plans
I have enjoyed all 12 episodes of your Tiny House build, but I am still waiting for your plan on how you built your kitchen in this Tiny House! When should I expect to see it, or did I miss something! Lol! Thanks, Angie
In reply to Kitchen plans by Angelika1962
Ana White
Mon, 04/25/2016 - 11:00
The kitchen plans are coming
The kitchen plans are coming in the next few weeks, stay tuned!:)
Lareej
Thu, 06/02/2016 - 23:56
Hinging the queen bed like the trundle
Love this design. Quick question though would it be terribly difficult or too heavy to make that upper section of the queen bed (with the pull out drawers) into a box with those cool hinges like the trundle has to utilize all that space? Thanks p.s. The house looks awesome.
imamommy87
Wed, 07/27/2016 - 07:57
Modified plans
Can you modify these plans for a full size bed with twin trundle?
Priscillarae1
Tue, 08/16/2016 - 06:13
Tiny house wall
Hi. I was wondering what you used on the interior walls of the tiny house? Thanks
mconrad
Fri, 01/06/2017 - 10:10
What kind of wood
What kind of wood should I use for loft bed in your tiny house? We are building this at our lake house.
In reply to What kind of wood by mconrad
Ana White
Mon, 01/23/2017 - 09:08
Hello, we used construction
Hello, we used construction grade lumber to build, mostly 2x4s and 4x4s. All materials should be available at Home Depot or similar.
mconrad
Fri, 02/24/2017 - 21:57
The chairs in the loft
We are almost done making this loft bed in our lake house. As soon as it is done i will post pictures. I was wondering where you got the chairs that make into beds that i see in your picture of the tiny house loft?
Thanks
Margie Conrad
In reply to The chairs in the loft by mconrad
Ana White
Sat, 02/25/2017 - 21:00
https://www.amazon.com/Your
https://www.amazon.com/Your-Zone-Convertible-Sleeper-Lounger/dp/B00L6YW…
jessalvarado17
Wed, 02/21/2018 - 10:51
plans for a smaller unit?
Hi there I am wanting to build two of these this weekend for my large family. At some points my celings are 6 foot high. Could you possibly help me modify these plans (since I am new at doing this kind of stuff)! Any advise is great. I would like to do this asap!