
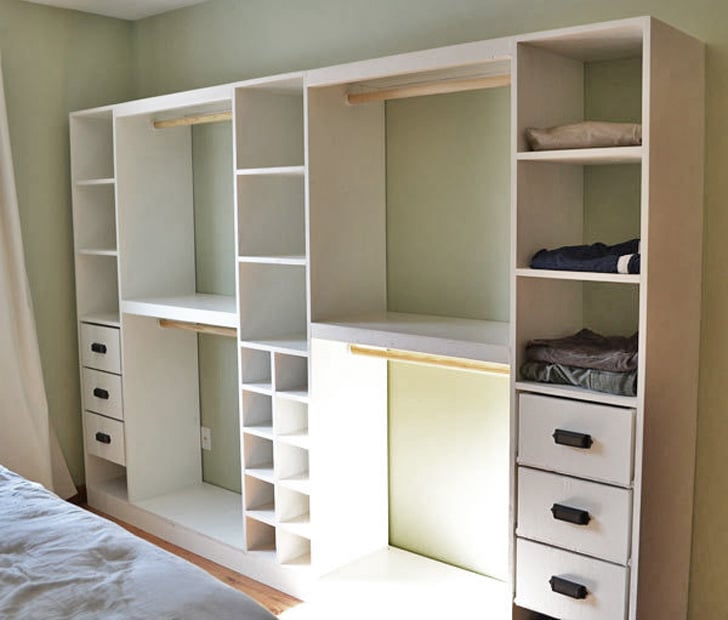

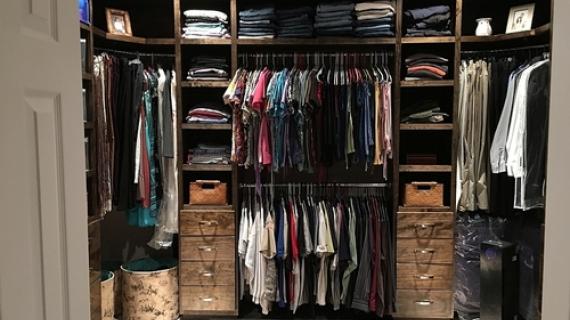
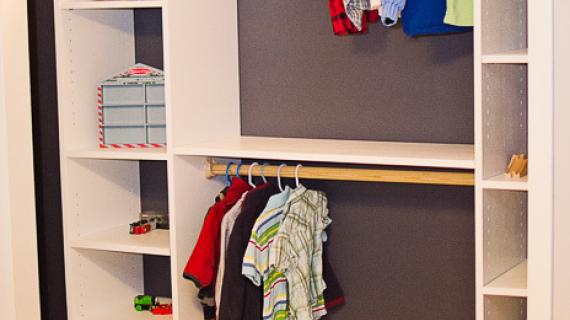
Build your own master closet system. This sturdy, freestanding closet can be customized to suit your space and needs. Free step by step plans from Ana-White.com
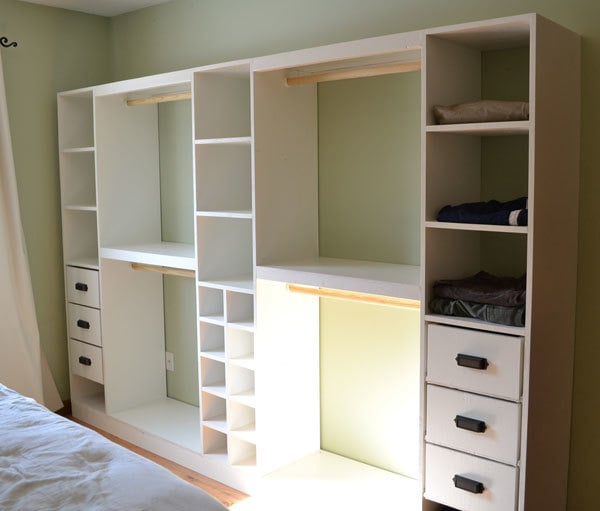

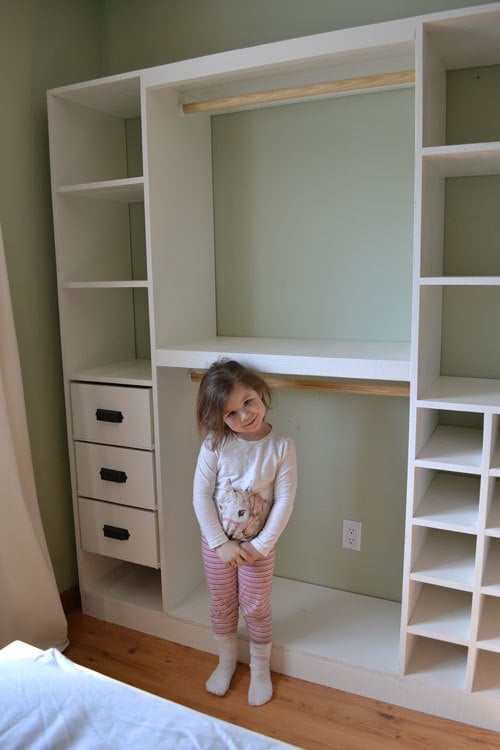
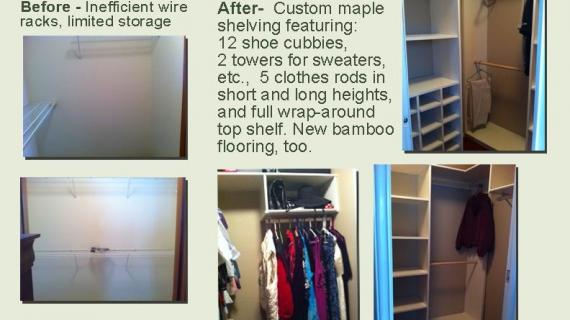
Do you need more closet space? In our first house, the master closet was only four feet wide. So I gave the entire closet to my husband and built my own master closet system!
Preparation
- 4x8 sheet of 3/4" cabinet grade plywood (1 sheet per tower plus an additional sheet for shelving) OR 3/4" thick melamine or particle board shelving like this (about three 8 foot long shelves per tower)
- IF using the melamine strips, you'll need 1x3s for the top shelf supports, one 1x3 per opening, IF using the plywood sheets, there will be an extra scrap about 2-1/2" wide, you can use this scrap for the supports
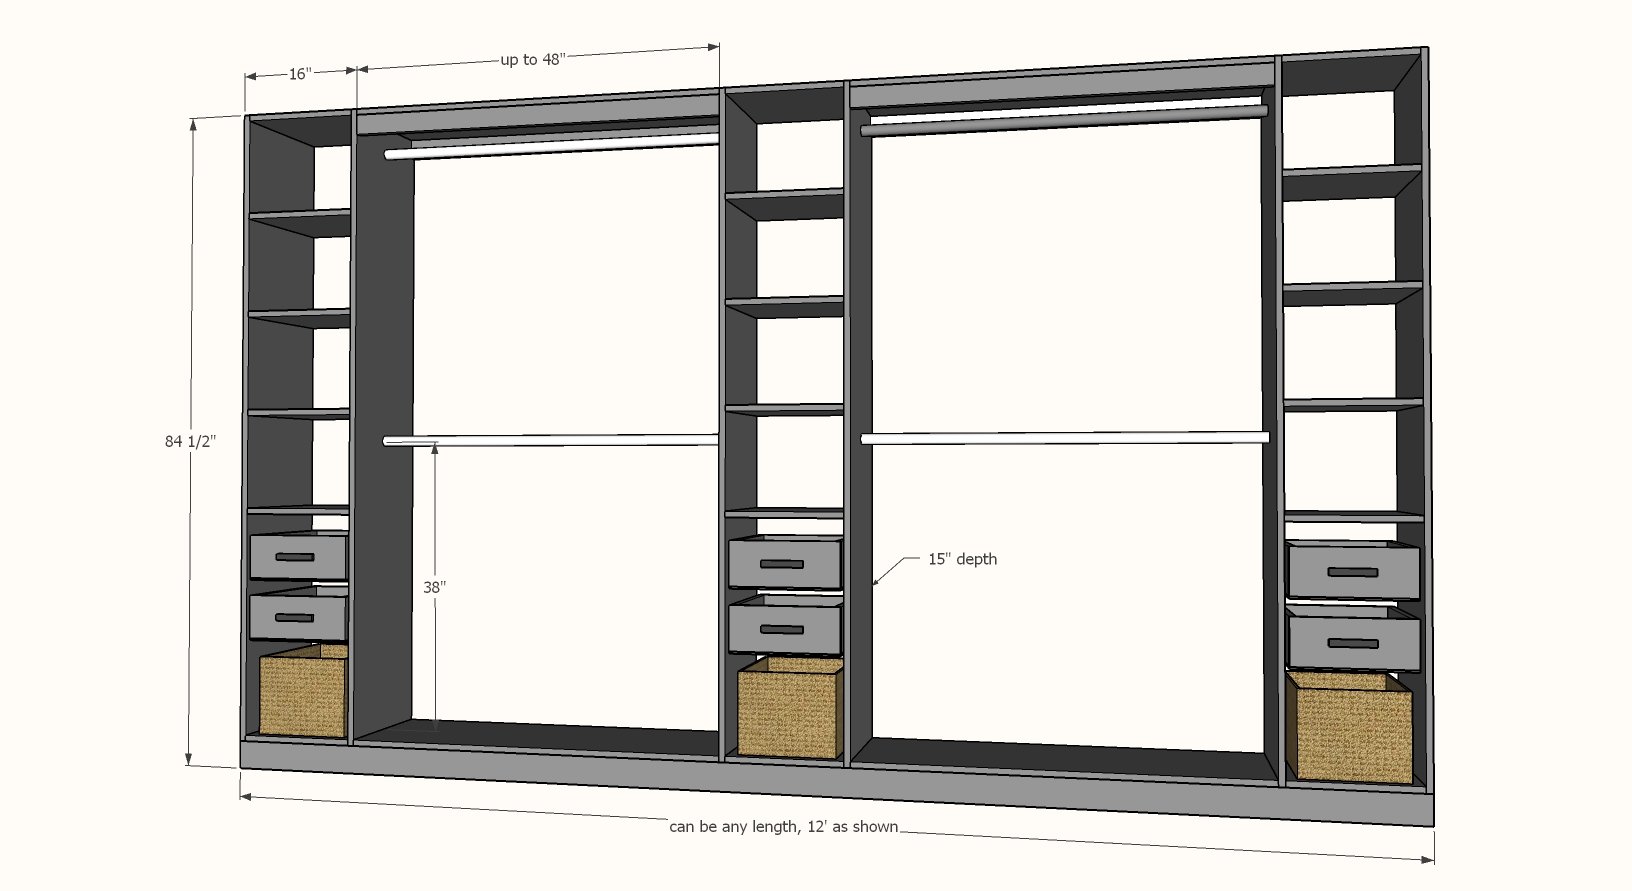
- 2 - 2x4s (use 2x6s if your base moulding is over 3-1/2" tall) in the entire length of the closet run (as shown in diagram this is 12' long) PLUS 24" for the ends of the base
- 5 feet of 1x6 or 1x8 boards (width of board determines drawer box depth) PER drawer
- 1 set of 14" euro style drawer slides PER drawer
- Closet rod sockets (one set per each run of closet rod)
- Wood closet rods (max run is about 48" without additional support)
- 1-1/4" Kreg Pocket Hole Screws OR 2" self tapping construction screws (#7 or #8)
- 1-1/4" and 3/4" brad nails (can use screws if you don't have a brad nailer)
- 2-3/4" self tapping wood screws (#8 or #9) - you'll just need 8 for building the base but these are good to keep around for a variety of uses and projects, and can also be used to anchor the closet to the wall
- Wood glue
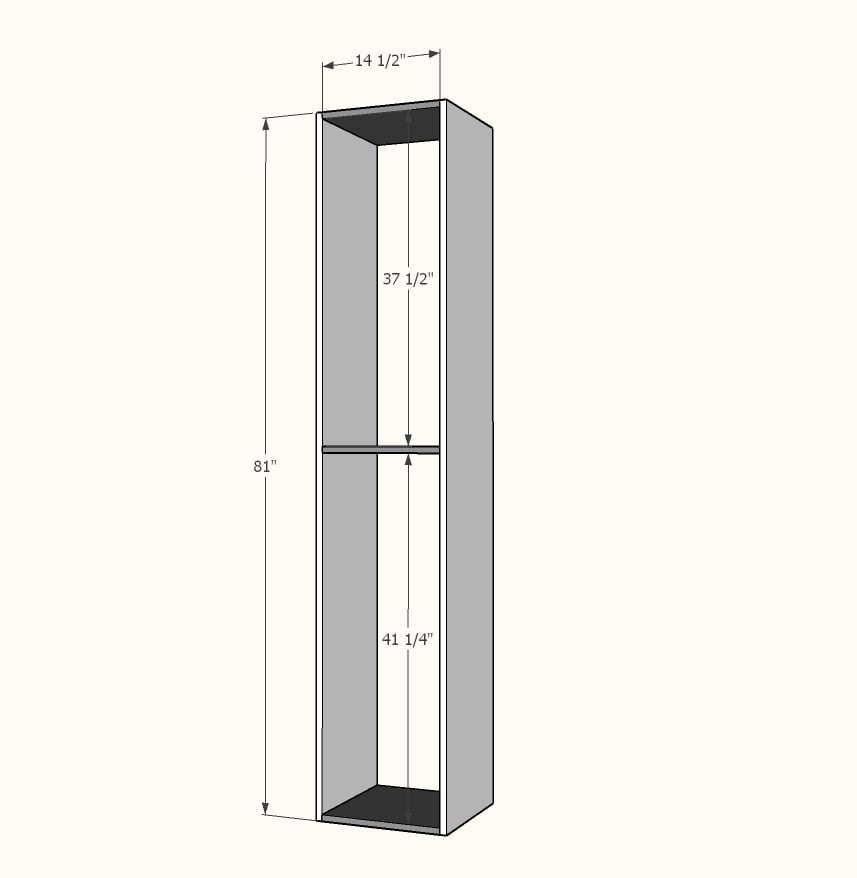
- 2 - 3/4" plywood @ 15" x 81" OR melamine shelf board @ 81" - sides of tower
- 3 - 3/4" plywood @ 15" x 14-1/2" OR melamine shelf board @ 14-1/2" - fixed shelves
- Additional shelves are 3/4" plywood @ 15" x 14-1/2" OR melamine shelf board @ 14-1/2" - additional shelves
Cut list per ONE drawer
- 4 - 1x6 or 1x8 @ 13-1/2"
- 1 - 1/4" plywood @ 13-1/2" x 15"
Cut list for base
- 2 - 2x4 or 2x6 for taller baseboards @ overall length of closet
- 2 - 2x4 or 2x6 for taller baseboards @ 10"
Cuts for Shelves in Between Towers
- 3/4" plywood 15" wide, cut to fit in between the towers on installation
- 1x3 or scrap plywood cut to fit in between the towers on installation
- Rip plywood sheets into three pieces, 8 feet long x 15" wide. If you don't have a table saw or other rip guide, you can have your hardware store do this on their track saw - just make sure the rips are exactly the same. Request to have the saw set and the plywood run through the saw horizontally for consistency.
- Save the remaining scrap piece to use as supports
- Cut the ripped pieces of plywood on a sliding miter saw (may need to flip and cut both sides) or use a circular saw and a square to make square cuts. Sacrificial styrofoam panels under the plywood for support will make cutting much easier.


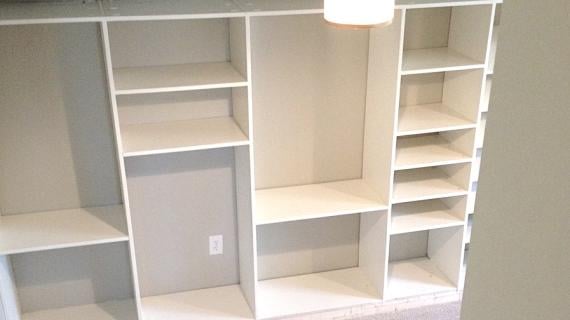
Instructions
Step 1
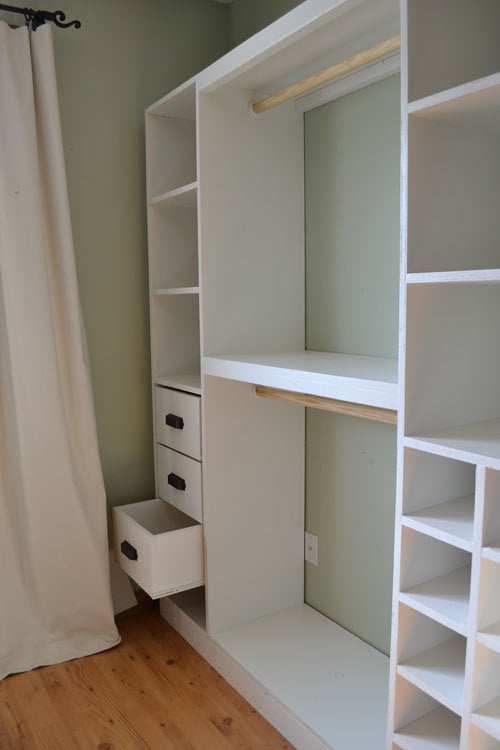
Attach the two side boards to the shelf boards. You can use 3/4" pocket holes and 1-1/4" pocket hole screws, or 2" self tapping wood screws, or 1-1/4" brad nails and wood glue.
It is important that the center shelf is fixed to keep the closet structural good.
Step 2
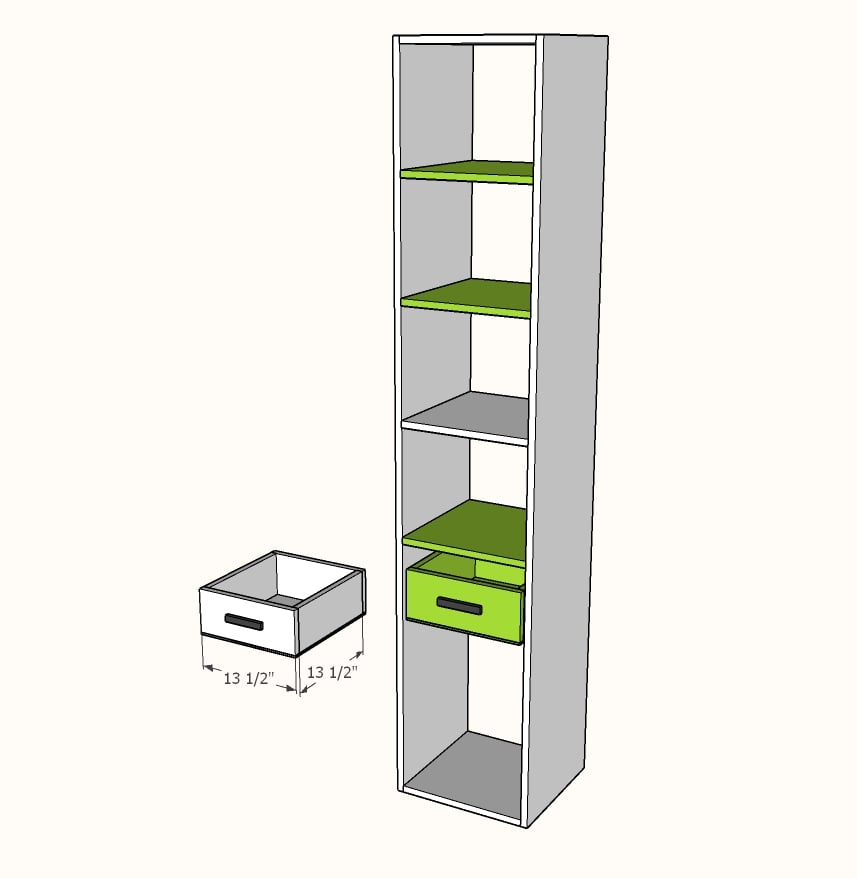
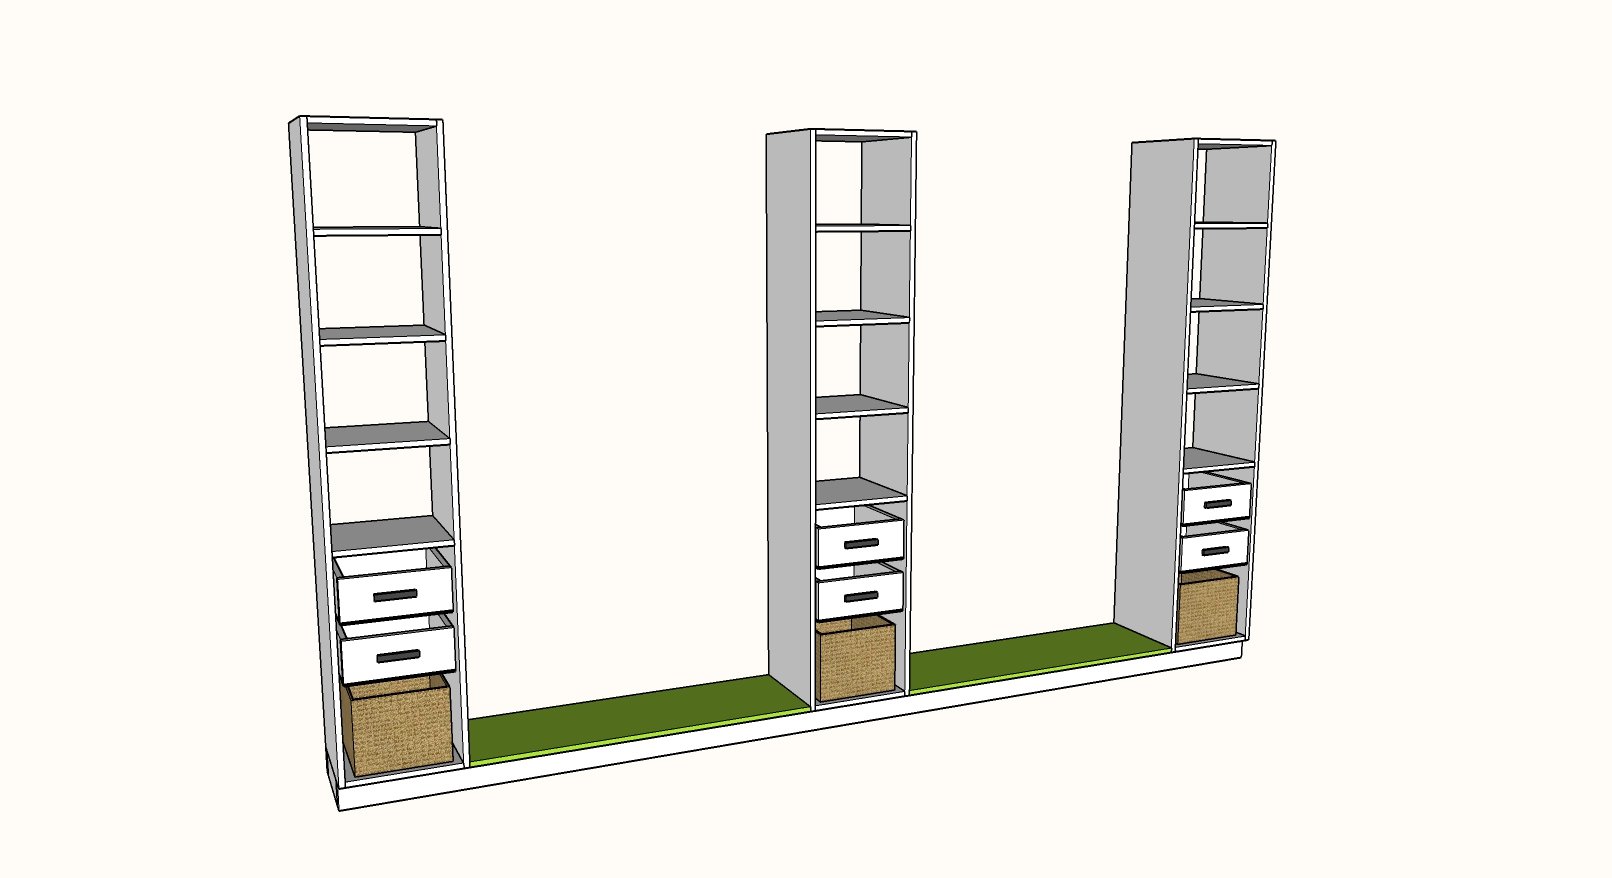
Add additional shelves as desired. As shown, there is a 12" space between the shelves.
For the drawer boxes, build the box first using the same fastener as you used for building the tower.
Attach bottom 1/4" plywood with 3/4" brad nails and glue.
Install the drawer boxes using the drawer slides.
TIP: You may wish to finish the towers at this point.
Step 3
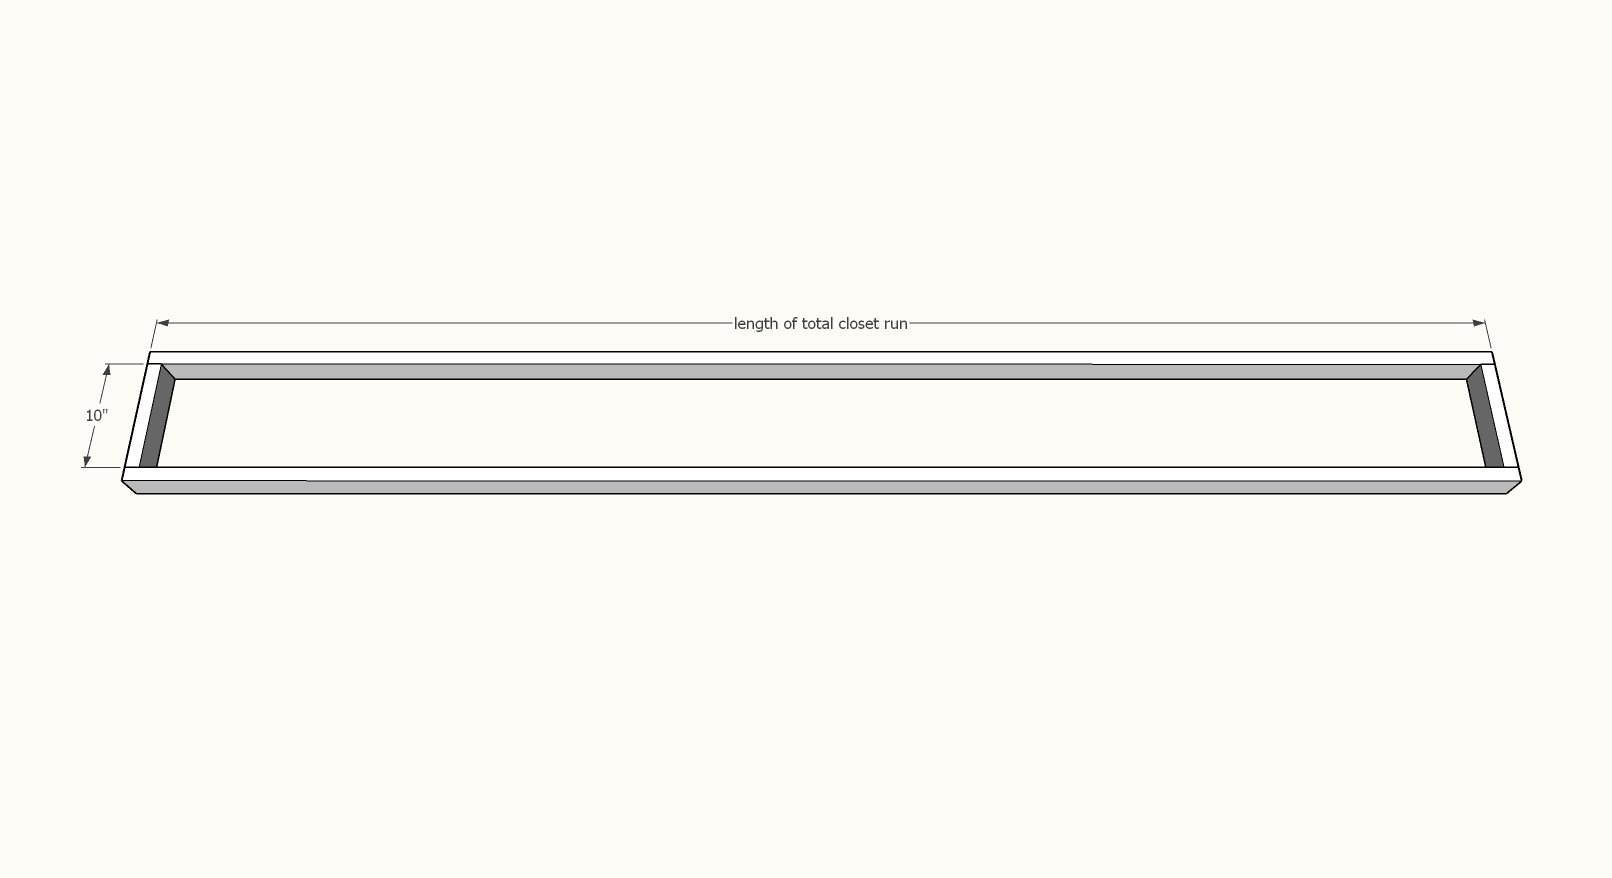
Cut two 2x4s to the entire desired length of your closet.
Attach with the 2-3/4" screws to the 10" long 2x4s.
NOTE: I recommend building the base slightly smaller front to back so that the closet can sit above your base moulding. If you have taller base moulding, consider using a 2x6 for the base frame to bring your closet up above the base moulding.
TIP: You may wish to finish the base at this point.
Step 4
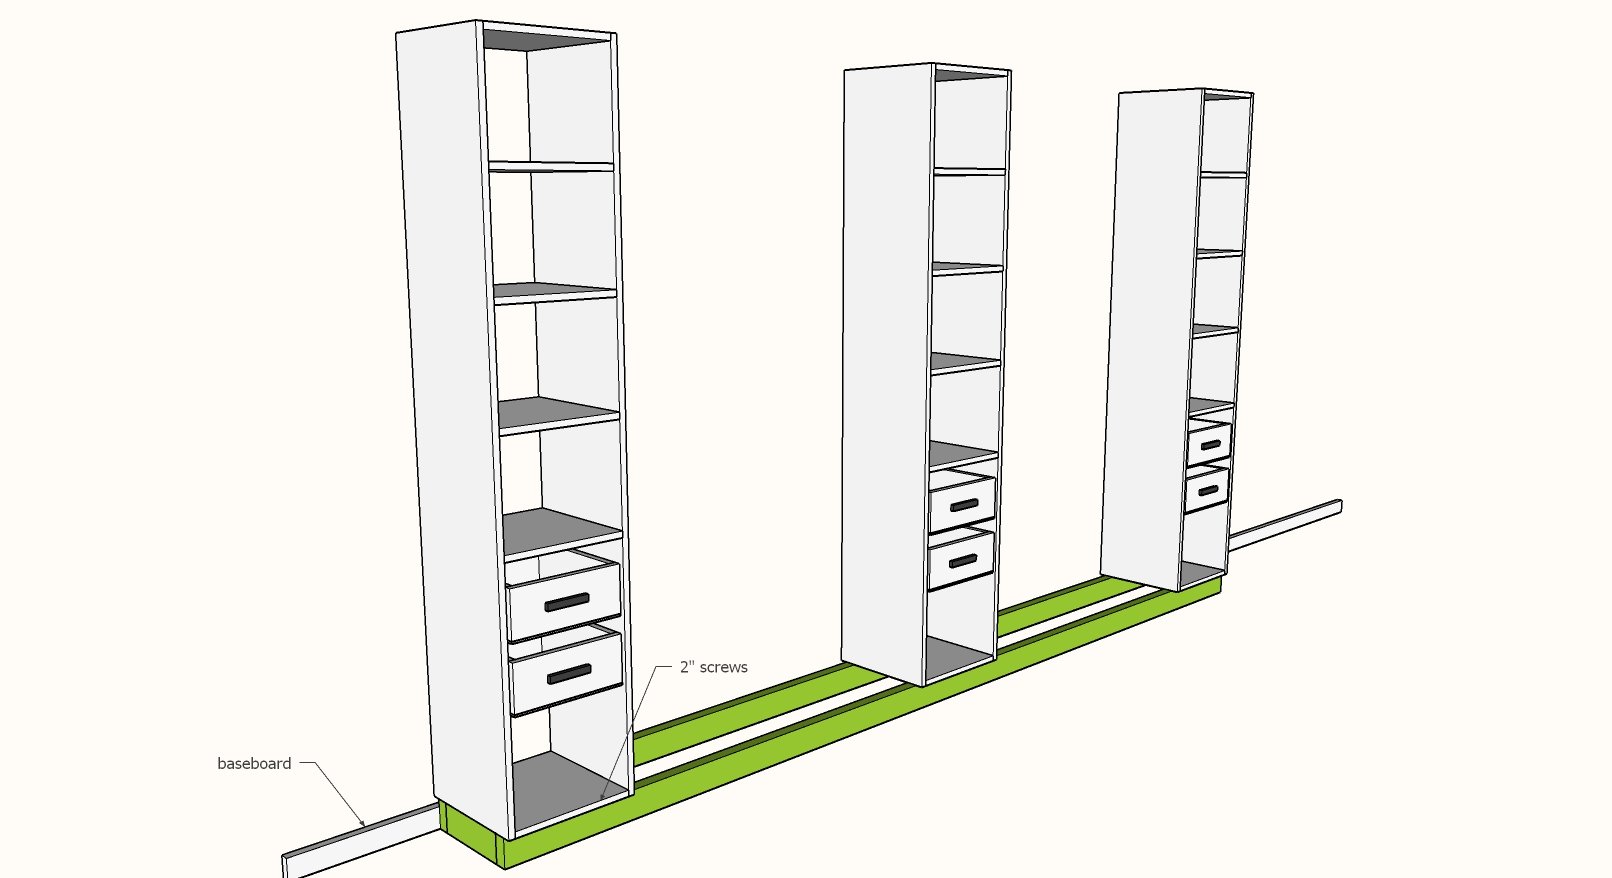
Place base in installation location.
Place the towers on the base, so the towers are flush to the back wall.
Screw towers to the bases.
Step 5
Cut plywood to fit in between towers.
TIP: You may wish to finish the shelves prior to installation.
Attach plywood shelves to fit on the bases.
Step 6
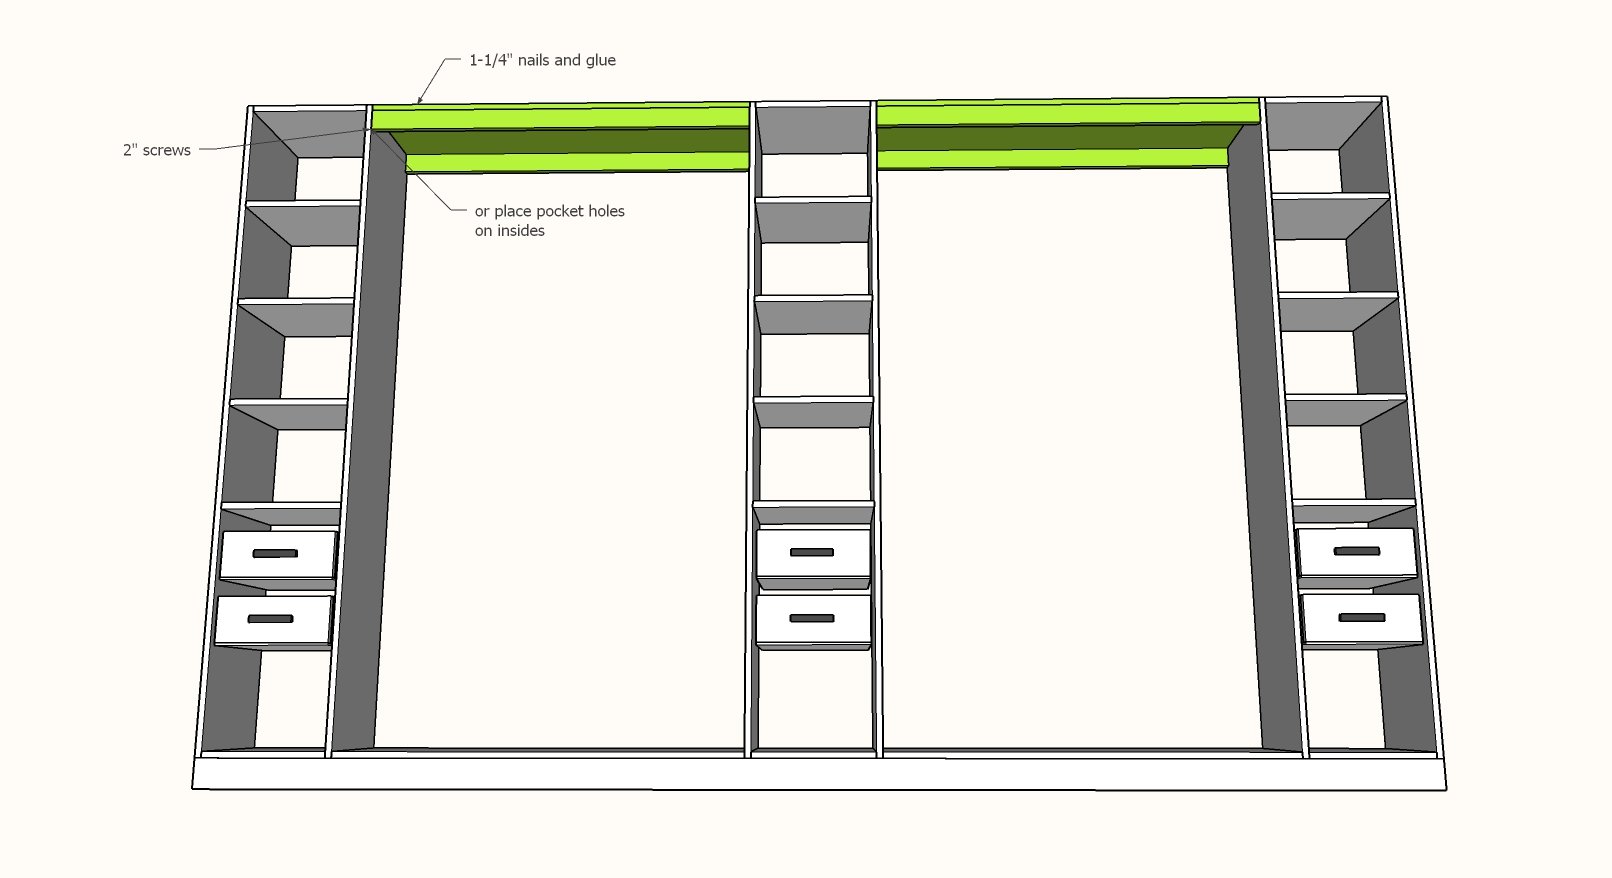
Cut the top shelf boards to width. Cut the supports from plywood or 1x3s.
NOTE: If using pocket holes in the supports drill pocket holes before attaching.
Attach shelf to the supports with glue and 1-1/4" brad nails.
Attach the top shelves to the towers.
Step 7

Install closet rods between towers.
For stained finish: it is recommend to use edge banding on the front of the plywood edges to finish.


Comments
Debbie Christianson (not verified)
Tue, 04/19/2011 - 01:13
WOW
LOVE it!!!
Kerri (not verified)
Tue, 04/19/2011 - 01:36
Love this!! Thanks so much
Love this!! Thanks so much for always sharing with us!
Trip-Mom
Tue, 04/19/2011 - 04:42
Awesome!
This looks great! I'm hoping future plans include a solution for wrapping around a corner. My walk-in master closet needs a refresh -- this would be perfect, but I would need to modify for the corners. :) Just an idea.... LOL
Amy @ this DIY life (not verified)
Tue, 04/19/2011 - 05:07
Speechless
I've said it before and I'll say it again...you're my hero. I'll definitely be blogging this finished project soon.
hwagon
Tue, 04/19/2011 - 05:15
Fabulous!
Very Nice!
IAMSNWFLK (not verified)
Tue, 04/19/2011 - 06:40
Awesome!
Great job! It couldn't have come at a better time. Closet space is so limited in our apartment and we'd been going in circles about buying a vintage wardrobe (armoire) or a closet system. Thanks for sharing
Anonymous Coward (not verified)
Tue, 04/19/2011 - 06:43
16" deep ??? Is that deep
16" deep ??? Is that deep enough to hang men's clothing? Or are you letting the sleeves and stuff hang out side the tower boundaries?
In reply to 16" deep ??? Is that deep by Anonymous Coward (not verified)
Ana White
Tue, 04/19/2011 - 09:38
Hangers are 16"
Hi our hangers are 16" deep, and we have such a tight space there, so couldn't go 24". If you wanted to go 24", simply rip your plywood into 24" widths instead of 16". The clothes sits flush in the closet with 16".
Kabarnes13
Thu, 04/07/2022 - 08:17
Doors on closet system
Hello, can you please elaborate on how to attach the doors. Just use soft close hinges and what is the easiest way to install the hinges with only these tools you have listed.
Thanks
Kelly
34me
Tue, 04/19/2011 - 07:05
Love it!
This is beautiful! And I bet you're so glad that it's done and you can use it! :)
mjalto
Tue, 04/19/2011 - 07:23
Great Job!
This is the perfect closet system. Love the plans and hope to do this soon in our new house (once it's done).
What color is the paint? I love that too.
ajcajj
Tue, 04/19/2011 - 09:41
I was also wondering about
I was also wondering about the 16". Is that enough or do I need to make it a little wider to fit in my husbands stuff? : ) Awesome plans!!
Beth in CT (not verified)
Tue, 04/19/2011 - 11:19
Cost of Wood
I was so surprised to see the cost of the plywood. You can't touch a sheet of 3/4" plywood for under $60 where I live. I need to find a better place to buy wood!
Florence (not verified)
Tue, 04/19/2011 - 13:58
Plans for a regular closet?
Dear Anna,
I was wondering if you had a plan to make this closet system smaller so that It will fit into a regular size closet. I would love to create one for my daughter... She has one of these small closet that opens with 2 doors.
Thanks a bunch,
:D
In reply to Plans for a regular closet? by Florence (not verified)
Ana White
Tue, 04/19/2011 - 14:24
How about this?
http://www.ana-white.com/2010/10/simple-closet-organizer.html
dan-k
Tue, 04/19/2011 - 15:52
possible solutiong for width issues
Instead of making the closet system wider, think about offsetting the bar more towards the front of the unit.
KristinaT (not verified)
Tue, 04/19/2011 - 17:56
I am so glad that you posted this!
I'm moving in a few months, and I'm pretty sure that my bedroom doesn't have a closet. I saw your other closet model, but it wasn't quite what I was looking for. THIS IS IT. I can't wait to move so that I can get going on this :)
CindyLynn
Tue, 04/19/2011 - 18:14
This is also on my list of
This is also on my list of "To Do's"!!! Its never ending...thanks to you! =)) Ummm, i know you've been busy but....any idea of when your going to add the hutch plans for the master bathroom??? Is that asking too much? If so sorry..Im a mother of 4 so I know all about so much to do so little time! Thanks you for all these great plans! Awesome!
Acorns and Oaks
Mon, 04/25/2011 - 15:38
Thank-you!!
Oh thank-you!!! We're redoing our bedroom (My husband is putting up drywall as I type!) and we're a bit stumped about the best way to put a closet in . . . this is a HUGE huge help! Perfect timing :)
isalu
Wed, 05/11/2011 - 19:30
Erratum
You have $131 as the total after your itemized project costs list, but it should be $231 of course.
These plans have been a great starting point for my custom closet project, which I've got all drawn up - just waiting for a not-nice day when I'll be glad to stay inside.
john mills (not verified)
Tue, 07/05/2011 - 02:36
master closet
You have some great items here thsnks so mutch for sharing.
Ok I found the plans for the cubbies now where are the plans on how you put the drawers in. I have one wall in a spare room for a closet like this on one wall and the cubbie hole plans on the other my wife will love this I'm sure
let me know where to find info please thanks John....
Mary Rich (not verified)
Fri, 07/08/2011 - 13:43
Master closet system
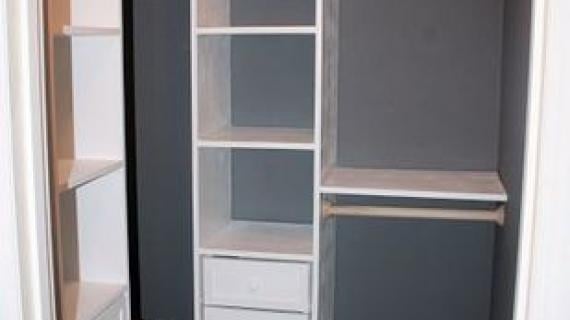
I like your plans for the master closet system. I have a large closet and need plans for a closet system that covers three walls. How can I address the two inside corners so that I don't have a lot of hidden space that would be hard to access?
Also, where can I find the plans for the shoe rack and drawers that you built for your closet?
Hope to hear from you soon.
Thanks,
Mary
mandmatthews
Tue, 07/19/2011 - 07:45
One more Depth question...
Ana I LOVE your site it's wonderful! I was wondering though why you recommend going from 16" deep (in a previous comment) to 24"? I didn't know if there was a reason for that big of a jump or not.
Thanks! Again you inspire me so much! Love the site!
Mandy
ashley04samantha
Sat, 07/30/2011 - 10:44
Brilliant!! My fiance and I
Brilliant!!
My fiance and I were debating on renting this small apartment (with great location and great price) when we get married, where the bedroom is only 10x10 and has one closet. He and I are both used to living in tight spaces, but I have a lot of stuff, and he hates clutter. So, I wanted to find a budget-friendly storage system to line against the wall as my personal closet (he'll take the smaller one =P) and I went to this site because I just KNEW you would have one.
This is so perfect! I can't wait to present the plan to him! Thanks =D
Lisa Merrill (not verified)
Sun, 08/21/2011 - 17:32
How soon can we expect the
How soon can we expect the plans for the drawers? We have the rest of it done...just waiting to finish the drawers! Can't wait!! Thank you!!
houquilter
Mon, 09/19/2011 - 10:51
More than what I was hoping for!
Thanks so much for putting this plan up! I've been shopping for a closet system and the prices & quality are not what I want to deal with. Definetly on my "to do" list.
I'm going to be installing this in my walk in closet and was wondering if the unit needed to be secured to the wall or if is freestanding, I can't tell.
Brandy (not verified)
Thu, 11/17/2011 - 12:29
weight of clothes?
What a great plan! We're so excited to get started on it. My only concern is do you think the bars will be strong enough to hold 'heavy' clothes packed in the closet? (suits, coats, etc) Any ideas or thoughts on the need to reinforce the rod pockets or do you think the 3/4 plywood will be plenty strong? Thanks!
jaywitty
Mon, 12/12/2011 - 08:22
Rod Pockets
Where can I purchase rod pockets for this build?
In reply to Rod Pockets by jaywitty
claydowling
Mon, 12/12/2011 - 11:29
Rod Pockets
Every home improvement and hardware store in the country. They're usually with the closet organizers. I have, within the last month, seen them at Lowes, Home Depot and Menards. The fact that they aren't with the other hardware can be confusing, but I was recently purchasing some storage for my shop.
JackieDoyle (not verified)
Thu, 02/23/2012 - 05:31
Thickness of MDF
Do you think this could be made with 1/2" MDF or do we need to use the 3/4"? We have some 1/2" around the house we wanted to use but aren't sure if that will be sturdy enough.
claydowling
Thu, 02/23/2012 - 05:57
Use of MDF
The 3/4" will definitely be stronger. But I would question the use of MDF at all. It's heavy and not particularly strong. It will cost more, but your life will be made easier by hunting down A1 plywood at a lumber yard. Easier to work with, more durable and a lot easier to move from the garage to the closet.
Andrea Czarnecki (not verified)
Wed, 03/07/2012 - 10:23
Kreg Jig
Do you necessarily need the Kreg Jig? If so, can I buy the less expensive system and still be able to do this project? I'm not getting a lot of support from my family to try this project so I don't want to make a huge investment right now.
claydowling
Wed, 03/07/2012 - 10:43
Kreg alternatives
Even the cheapest Kreg kit will make this easier. You can also use a doweling jig. It will be slightly more complicated (but not a lot), and very strong. That's how a professionally built one is typically put together.
You could probably also use special particle board screws and screw through the faces into the board, especially if you're using a better grade of plywood. Just pre-drill your holes with a countersink bit or ugly things result. That's how professionally built kitchen cabinets are constructed.
Gin (not verified)
Sat, 05/26/2012 - 20:51
shorter closet
This is exactly the kind of closet setup I would love to build, but I am not as lucky to have a 112" closet.
What I'm wondering is what length dowels did you put in for hanging clothes? I don't know if this is a dumb question, but I do need all the shoe/drawer storage you show and wonder if shortening the dowel length would be worth my time or too little space to fit it all within a 96" W closet.
I've never done a project like this, but I'm hoping to wrangle my Dad in to help me. He has a lot more experience on DIY than I do. lol
sswallow
Sat, 06/16/2012 - 09:18
Awesome!!!
I love this site! I can't seem to stop looking at everything! My master bedroom closet is going to look awesome now and I didn't have to spend 2500 bucks to do it!
Ana you are awesome!!
Mrs. J (not verified)
Sun, 07/15/2012 - 16:17
Drawers
Thank you for sharing your plans! Our daughter's entire room looks like the "before" picture of your little girl's closet! I'm hoping you can help me talk my husband into getting the project started. He is worried about the cost and time-
Considering we both work full time... how long realistically do you think it would take for us (er--him!) to put this together?
Is Home Depot the best place to purchase the supplies or is there an even more cost effective alternative?
Lastly, we hope to upgrade the flooring in our entire house sometime next year. How difficult would it be to move the unit out of the room (temporarily) once it is installed?
Thank you for your advice!
Mandi W. (not verified)
Tue, 09/25/2012 - 09:40
Shoe Cubbies
Hi Anna,
I love all of your projects! I'm looking to do a shoe cubbie tower (top and bottom the same as the middle section bottom of your plan). I don't see the dimensions for the shoe cubbie. Do you have these posted somewhere?
Thanks in advance.
Mili (not verified)
Tue, 10/16/2012 - 14:16
Genius
This site is wonderful. THank you for sharing :)
tracie (not verified)
Fri, 01/18/2013 - 11:09
Question: our closet is only
Question: our closet is only 5.5 feet wide, with a weird 24 " wide bathroom medicine cabinet jutting out into it. I was planning on the tower going around this cabinet. Would it still be structurally sound to do 2 towers together, I being 24 " wide and the other bring 16 inches wide, and then attaching the rods to the wall?
Thanks!
Dottie84
Fri, 03/29/2013 - 19:06
Drawer Slides
So, I wasn't thinking and I made my tower with 1x12's cause it's a smaller closet. Then, I went to buy drawer slides (I haven't cut or built the drawers yet). The smallest drawer slides HD sells are 12". Any ideas how to still make drawers that slide in my 1x12 shelf? Thanks!!
bilbong30
Mon, 12/09/2013 - 11:02
Stupid question
I noticed your cuts are 15 3/4 inch. However i notice the depth is 16". I don't see anything else anywhere on that other 1/4". Can you help me? I am looking at doing this with a 24" inch depth. Assuming I need to cut 23 3/4". Any help on where that extra 1/4" is that makes it 16">
In reply to Stupid question by bilbong30
Lady Goats
Mon, 12/09/2013 - 14:09
Definitely not a stupid question!
There are a few things that this could mean. I believe this plan was drawn up when Ana's site hadn't been transferred to it's current layout, and she had to add dimensions to all of the plans she had previously drawn up (sometimes they're not accurate - but she's human and it was a lot of work, so we'll get past that). Or, even though it's not in the plans, maybe she was taking 1/4" plywood backing into account? You're right to question it, but I believe that was just an error.
balloongal247
Thu, 03/06/2014 - 06:19
Long Hanging
Your plan says the center shelf in the hanging sections aren't crucial to the stability of the system, however I'm wondering if it would still be stable to do a single dowel at the top of the system (or perhaps under a shelf the same height as the top shelf of the units, as I'm short), and no center dowel or shelf to allow for smooth hanging of dresses and other long items. Would this still be stable? Does it need some kind of center to keep the whole organizer square? Or are the center shelves on the storage towers plenty?
Californiadream
Wed, 05/28/2014 - 07:25
Drawers and cubbies
Hi. Great site. Thanks for the great ideas. Did you ever post the plans for the drawers and cubbies that fit in the towers?
theallisonhouse
Thu, 09/04/2014 - 16:28
Toe kick for 4 1/2" moulding
What would be the best way to elevate this above 4 1/2" moulding?
77jozie
Wed, 08/26/2015 - 13:07
You're my hero!
I'm dying to make this, but hubs has doubts. I can't wait to see our closet quote. Maybe then he can be convinced.
My toddler son loves your videos. You're an inspiration and a great role model!
dmcknight123
Fri, 09/04/2015 - 07:18
Adding Faceframes - change depth?
I know this is several years old, hoping Ana or someone who's done this will chime in. And soon! Ha ha. I'm on my way to HDepot to get materials today.
My question is, if you were to add faceframes to the towers (made from 1x2's) would you reduce the depth of the rip cuts from 15.75" to something less, like 15.25" or even 15"?
Thanks,
David
pde00311
Fri, 09/04/2015 - 11:02
Depth
It was years since I built this, and I did the project according to the specs without adding a face frame, but I remember the width of the cuts being really important due to the hanging clothes. A standard dry cleaning hanger is approximately 16 inches (plus a little depending on whatever you put on the hanger), so at 15.75, you are going to have some clothes poking out in front (you can kind of see it on the photo of my project here: http://ana-white.com/2014/02/master-closet-system). If you want to add a face frame, you might be able to shorten your rip cut, but I wouldn't go below 15.75 in total width (especially if it is going to be flush against a back wall), and you need to still make sure the dowell is centered based on the total width. Hope this helps.
dmcknight123
Tue, 09/15/2015 - 06:27
Thanks! Wife decided against
Thanks! Wife decided against faceframes as the 1x16 pine boards from Lowes had great edges.
Pictures coming soon. I work slow. :)
LauraMcIntyre
Fri, 07/08/2016 - 18:39
Adhered to wall
How is this closet shelving adhered to the wall?