
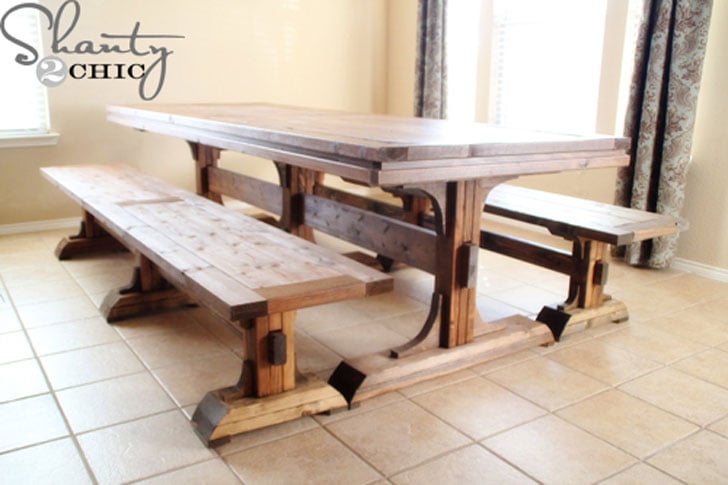

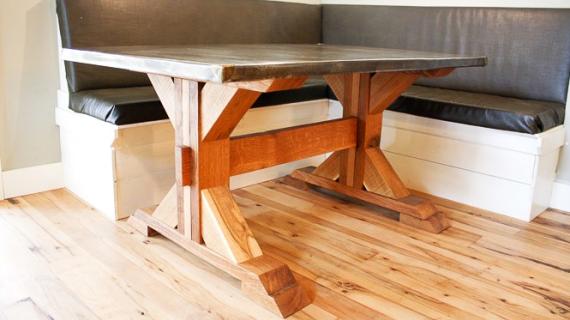
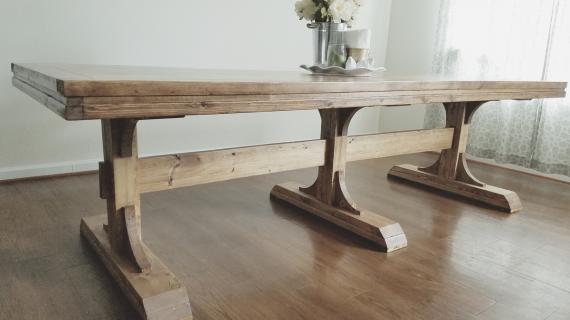
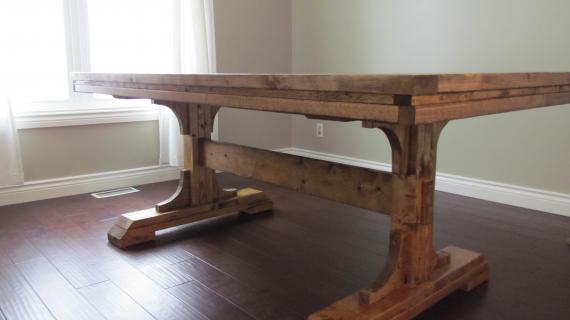
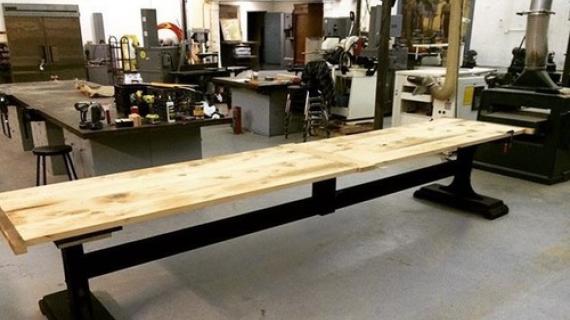
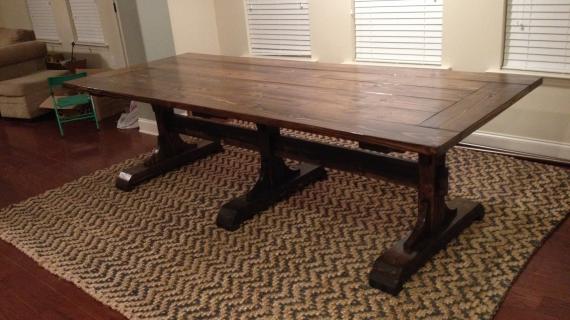
Free easy DIY plans to build a triple pedestal farmhouse table for $125. We love the open sides design for maximum leg room, and the beautiful pedestals. It's all made from off the shelf lumber. Step by step plans from Ana-white.com
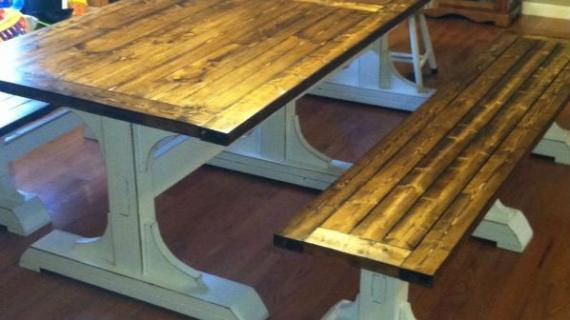
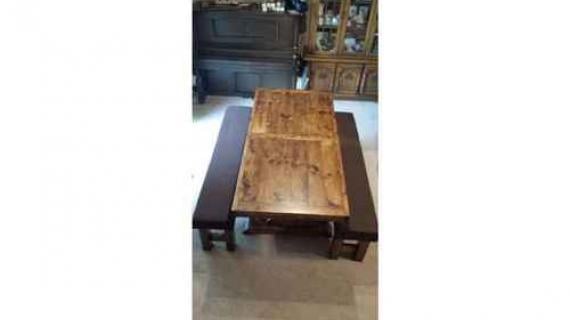
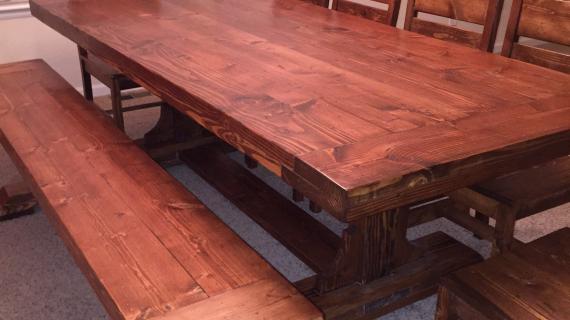
Build the matching bench with our free triple pedestal farmhouse table bench plans.

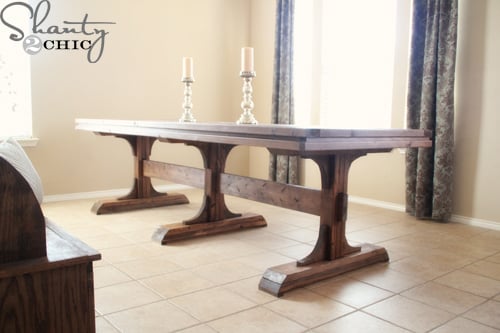
I collaborated with my DIY friend Ashley from Shanty2Chic for this plan.

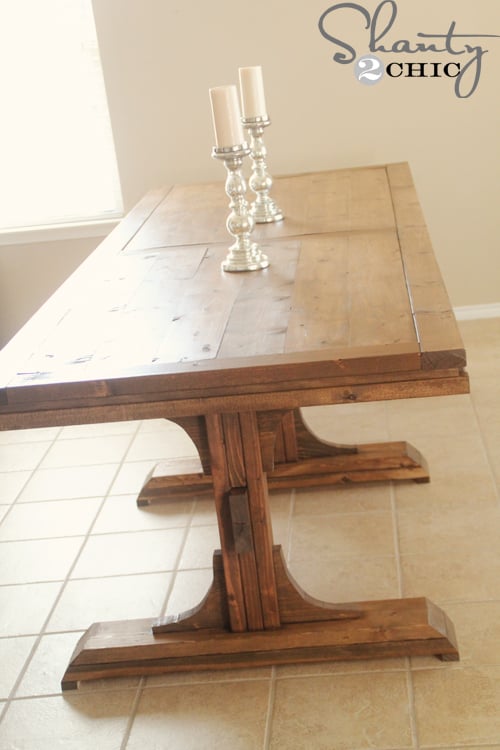
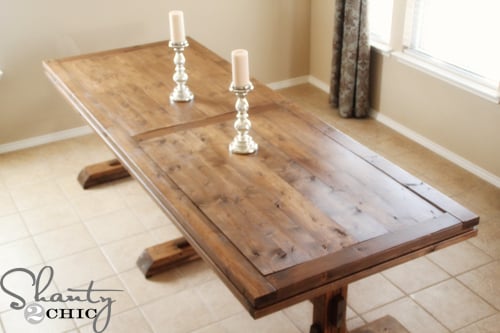
We changed up the top a little to really show off those beautiful solid wood boards!
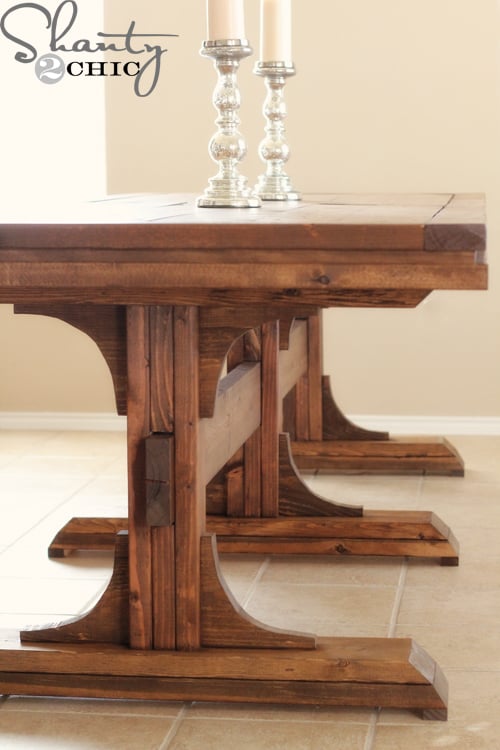
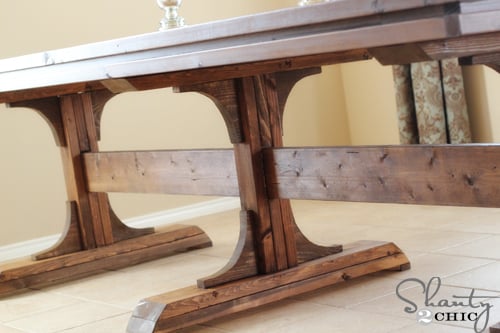
And got a little fancy with the legs to really make this table unique and full of character!

Here's from Ashley:
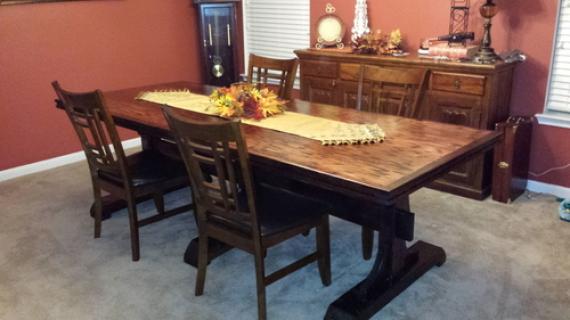
There is no way I could have a $1,000 (plus shipping and tax) dining table in our home with 2 boys and a toddler So, as always, I enlisted the help of our very sweet and talented friend, Ana White! She nailed it and after her awesome plans and my elbow grease, I now have a ridiculously gorgeous, expensive-looking, grand dining table and it only cost me $125! Who would have thought that 2x4's and pine boards could be so fancy!
Easy Modifications
It's easy to modify these plans!
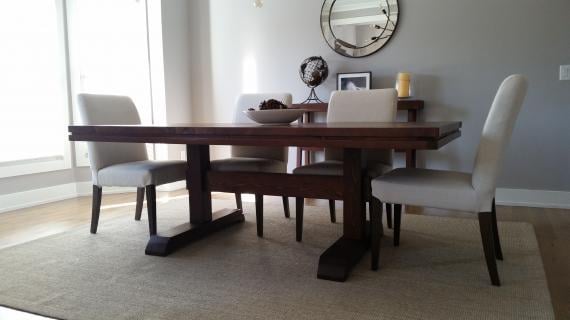
We love a smaller size with two bases.
We also love the angled 2x4 supports (instead of the curved pieces). This would be much easier to build but looks just as nice.

Preparation
- 1 - 2x8 @ 8 feet long
- 3 - 2x4 @ 8 feet long
- 2 - 2x4 @ 10 feet long
- 1 - 2x6 @ 8 feet long
- 3 - 2x6 @ 10 feet long
- 1 - 1x3 @ 8 feet long (more if not using pocket holes - see plan notes)
- 6 - 1x6 @ 8 feet long
- 2 - 1x2 @ 10 feet long*
- 1 - 1x2 @ 8 feet long
- 2 - 2x2 @ 10 feet long*
- 1 - 2x2 @ 8 feet long
- 2 1/2” and 3” self tapping wood screws
- 1 1/4” pocket hole screws
- Wood glue
*decorative does not have to a solid wood board all the way down, you can piece shorter boards together
LEGS
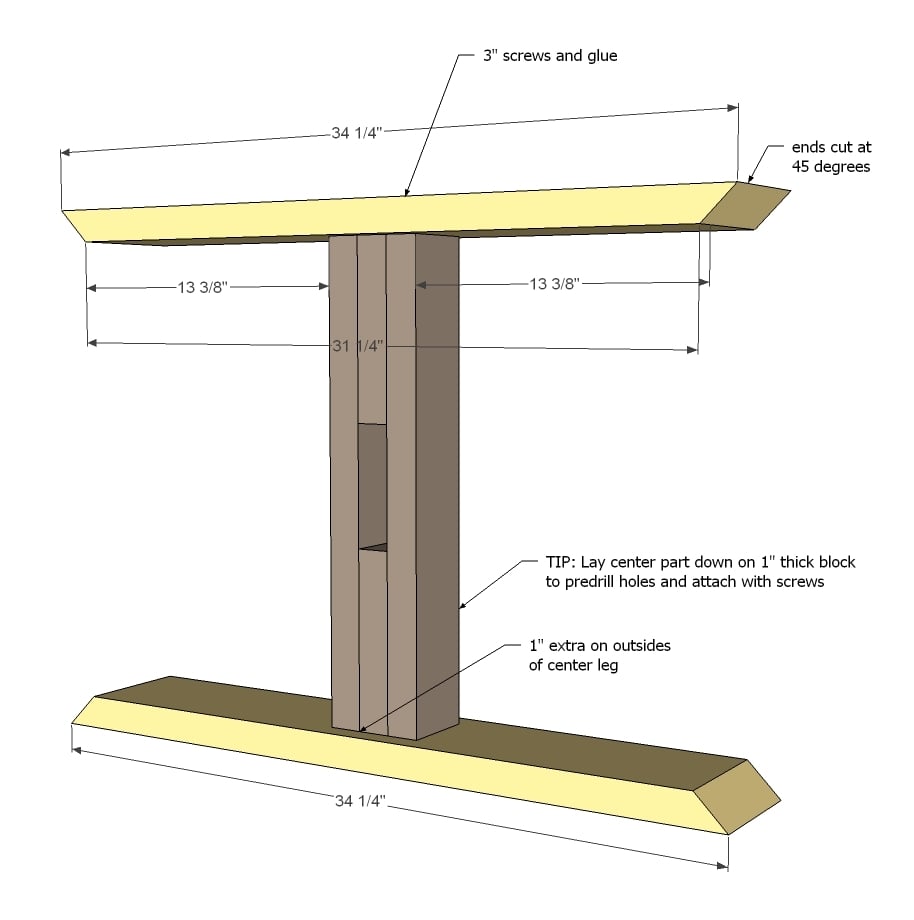
- 6 - 2x4 @ 21 3/4”
- 6 - 2x4 @ 8 1/8”
- 6 - 2x6 @ 34 1/4” (both ends beveled at 45 degrees, long point to long point, ends NOT parallel)
- 12 - 2x8 @ 7 1/4” (cut out in arch shape)
- 3 - 2x6 @ 36” (both ends beveled at 30 degrees off square, long point to long point, ends NOT parallel)
- 3 - 2x6 @ 36 1/2”
- 6 - 1x3 @ 5 1/2” (OR 1x6 @ 2 1/2”)
- 1 - 2x6 @ 90 1/2”
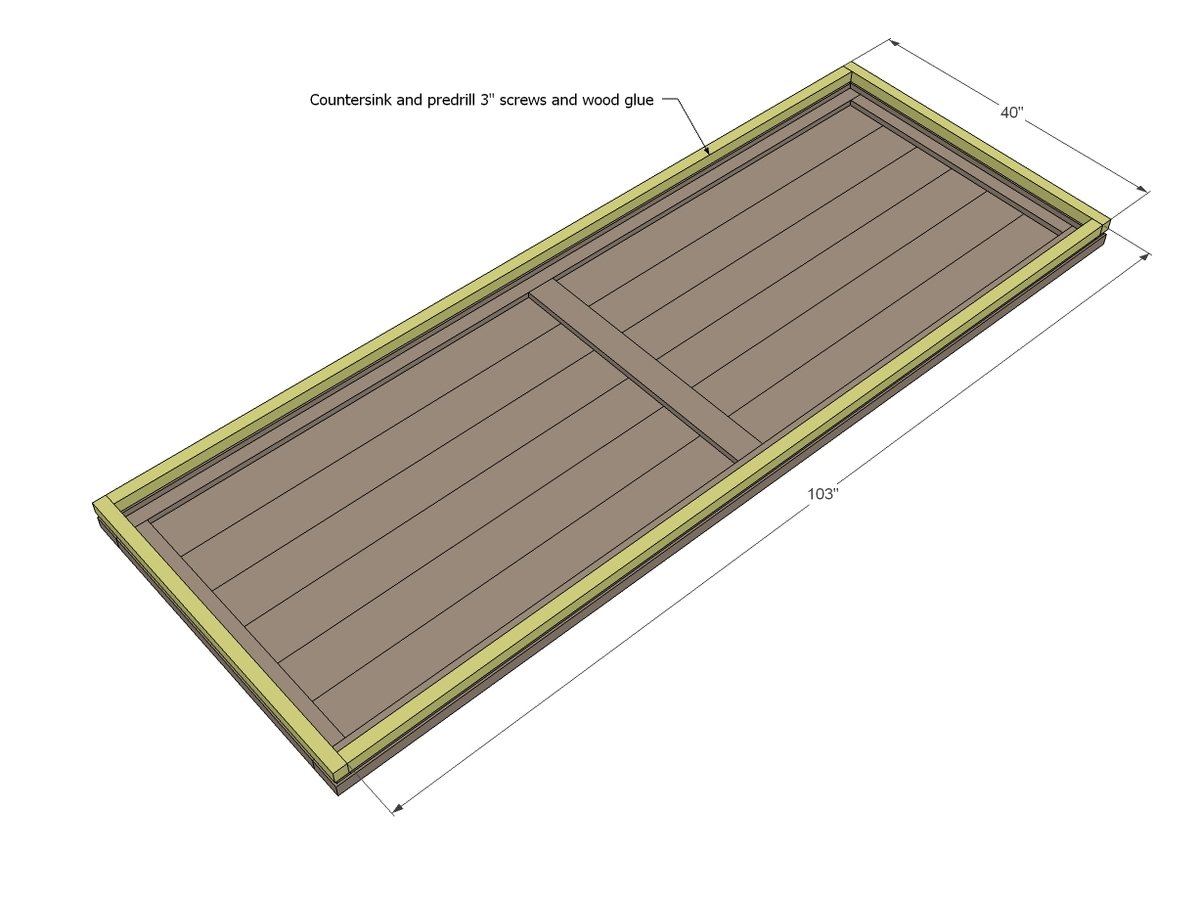
TABLETOP
- 12 - 1x6 @ 47 3/4”
- 2 - 2x4 @ 106”
- 3 - 2x4 @ 33”
- 2 - 1x2 @ 102 1/2”
- 2 - 1x2 @ 39 1/2”
- 2 - 2x2 @ 103”
- 2 - 2x2 @ 40”


Please read through the entire plan and all comments before beginning this project. It is also advisable to review the Getting Started Section. Take all necessary precautions to build safely and smartly. Work on a clean level surface, free of imperfections or debris. Always use straight boards. Check for square after each step. Always predrill holes before attaching with screws. Use glue with finish nails for a stronger hold. Wipe excess glue off bare wood for stained projects, as dried glue will not take stain. Be safe, have fun, and ask for help if you need it. Good luck!
Instructions
Step 1
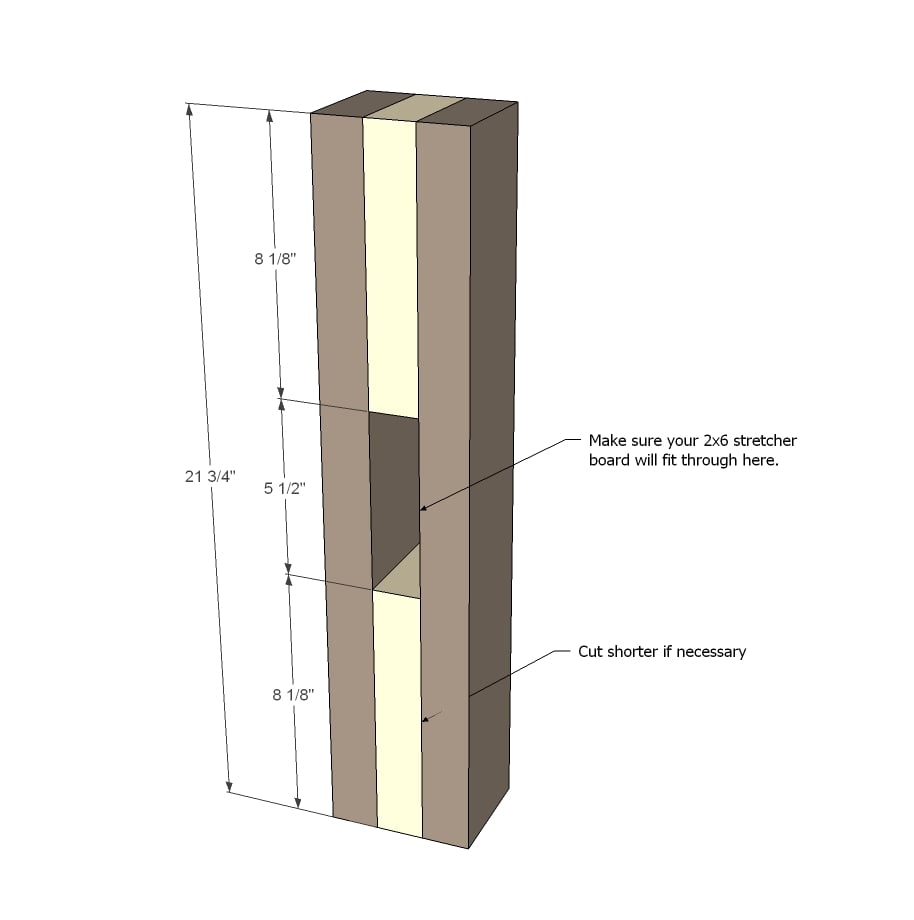
You'll need to make three of these. If you have a nailer, that will be the best way to go. Keep outside edges flush and use glue. TIP: Make sure your stretcher board fits in the middle opening.
Step 2
Next add the top and bottom.
Step 3
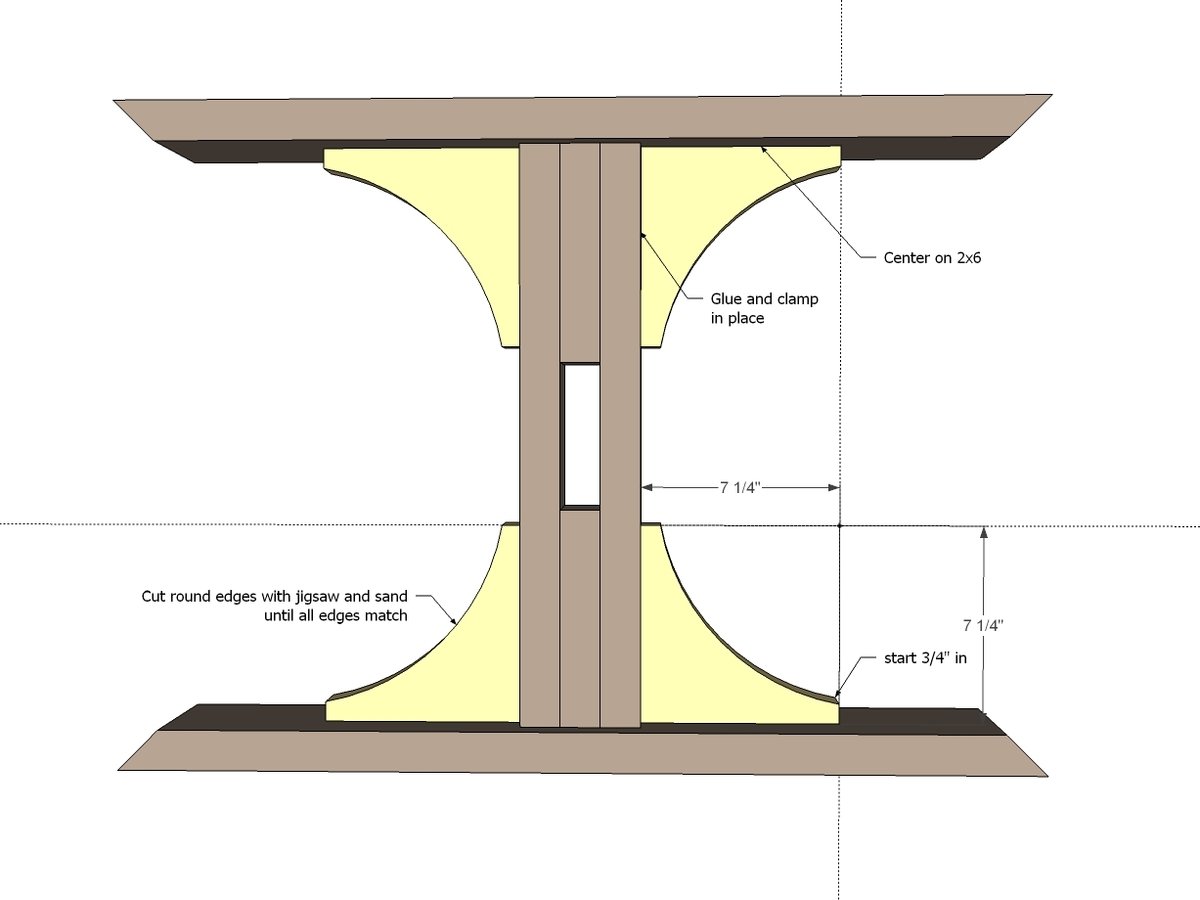
Now add the decorative pieces. You'll cut these with a jigsaw and sand smooth first before attaching.
Step 4
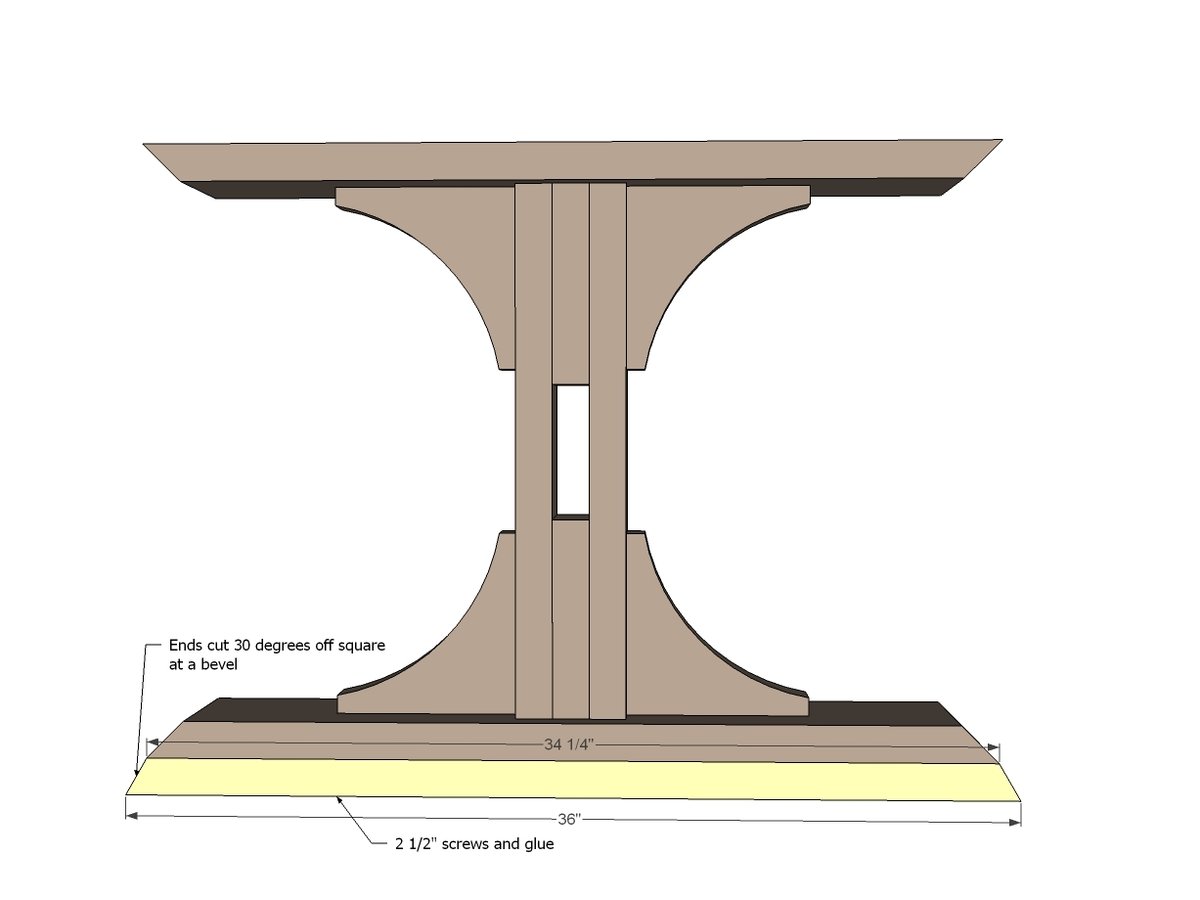
And then the base board.
Step 5
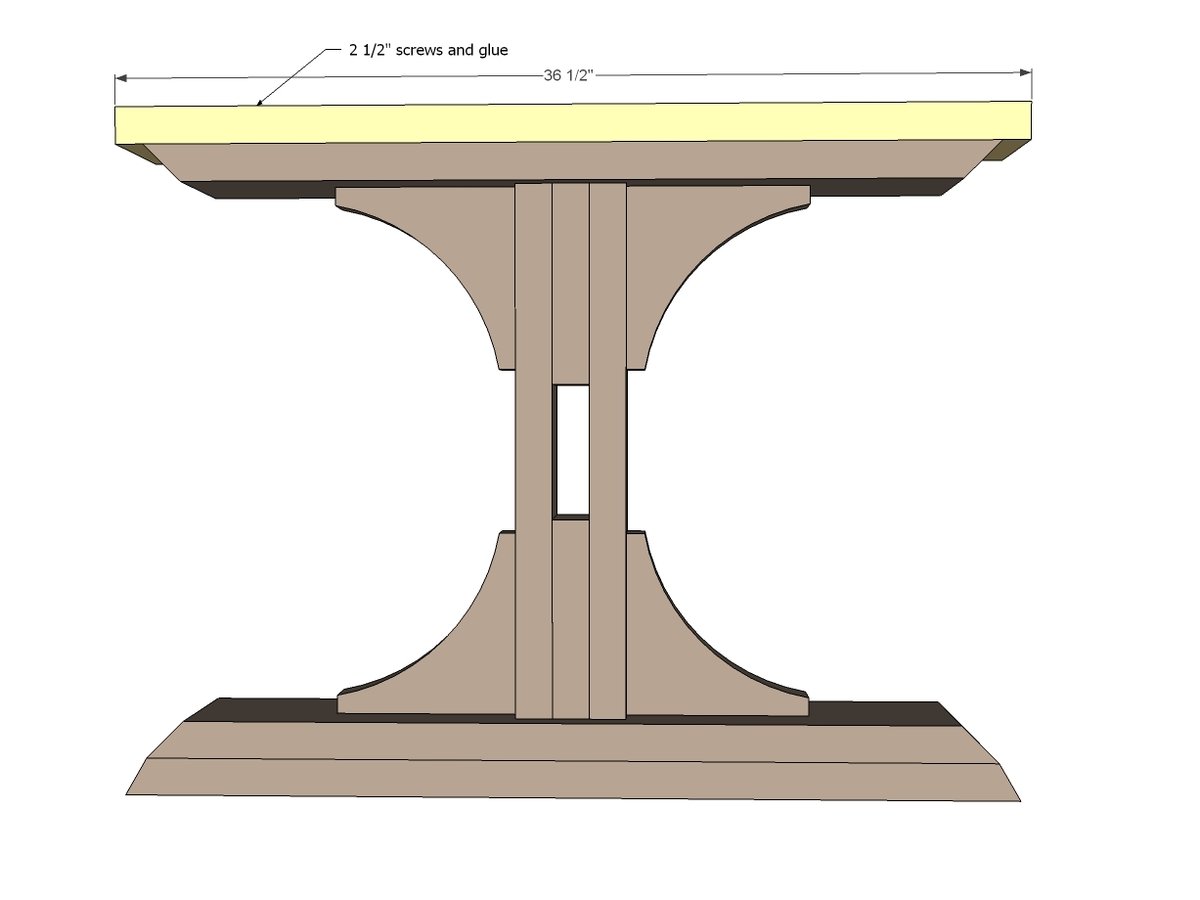
Attach board on top of leg pedestals with screws and glue.
Step 6
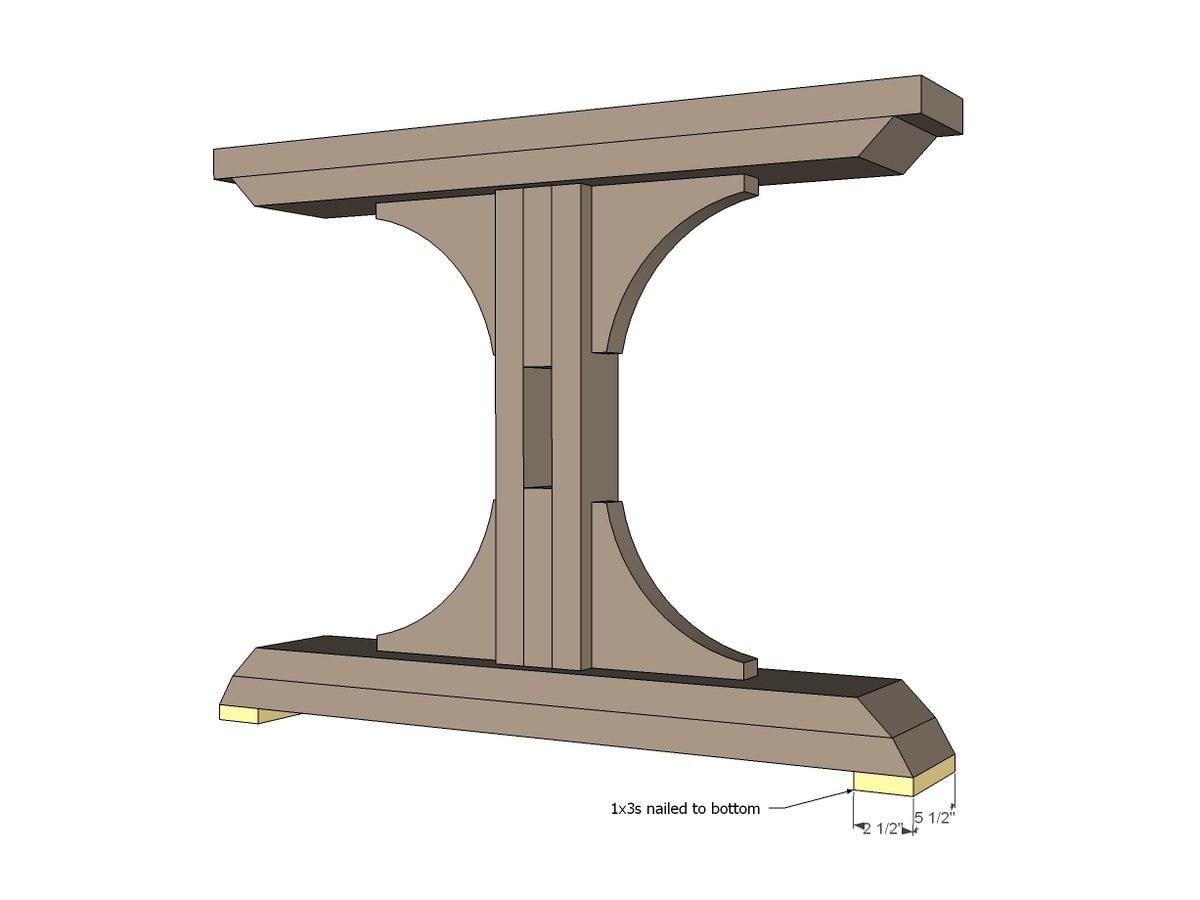
Adding feet will make your table sit on the six little feet - very handy if you have uneven floors. Then you can just shim the one foot not cooperating.
Step 7
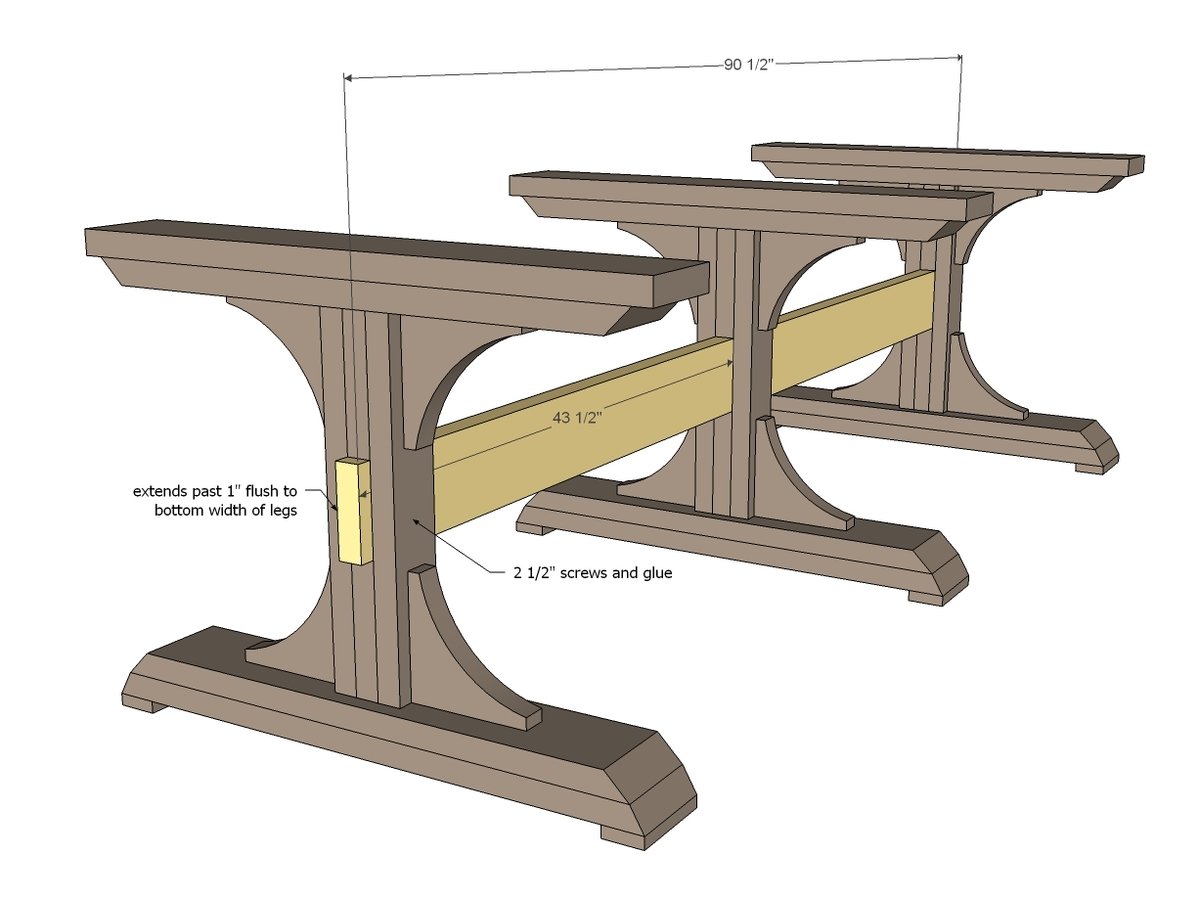
Now it gets fun! Put the stretcher in place.
Step 8
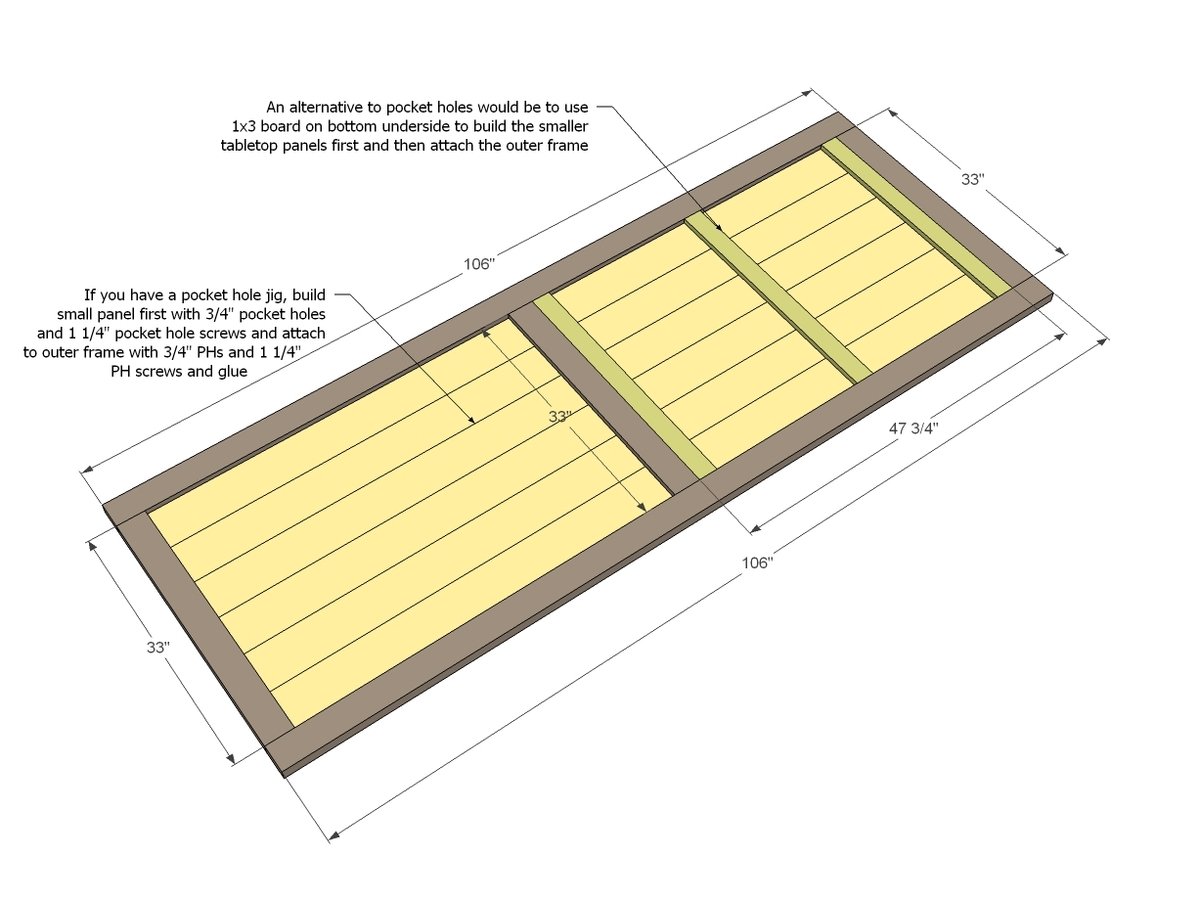
And now let's move on to the table top. I highly recommend a Kreg Jig here.
Step 9
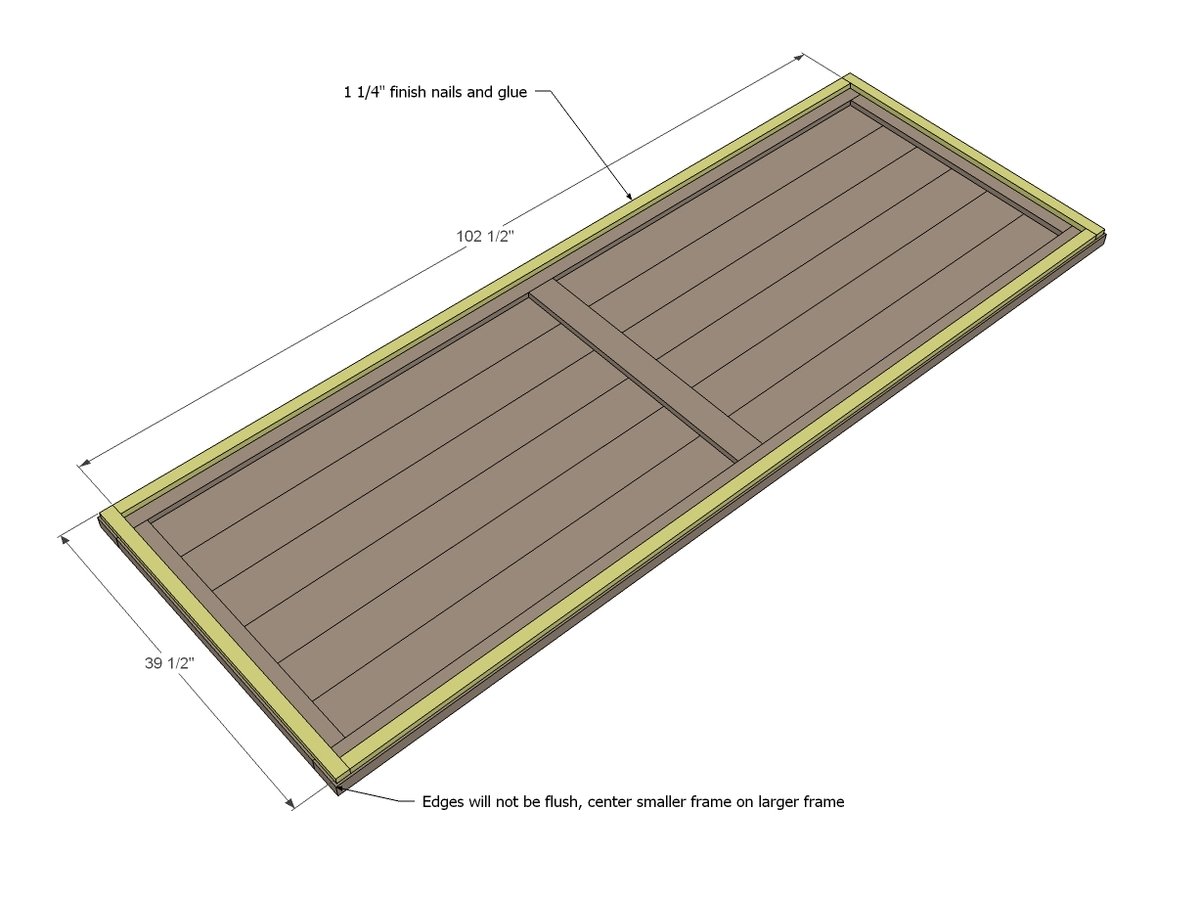
And the decorative aprons. Don't forget the glue here.
Step 10
Add the finishing touches here. Use glue and screws or nails. Predrill to avoid wood splitting.
Step 11

Now we can add the base!
It is always recommended to apply a test coat on a hidden area or scrap piece to ensure color evenness and adhesion. Use primer or wood conditioner as needed.


Comments
jaimej
Fri, 11/30/2012 - 13:37
wow
Wow - I love the feel of the original farmhouse table, but didn't like the legs as they seemed to be in the way - this is the perfect fix and so beautiful. I don't even have a first build under my belt yet, but I will definitely put this down on the list as one to tackle after a little experience!
dmcarwin
Fri, 11/30/2012 - 13:53
Amazing!
This is so beautiful! I really love it! Great job Ashley, and Ana you are truly inspired and talented, and I know you hear that a lot, but it is so true. As I have said before, I LOVE to build, because of your awesome plans! Thanks again!
leslieasmith84 (not verified)
Fri, 11/30/2012 - 14:24
Beautiful table. Exactly what
Beautiful table. Exactly what I am looking for in my nest dining room. Thanks for sharing.
jezsika0910 (not verified)
Fri, 11/30/2012 - 18:37
Awesome
Wow I love this table!!!!!!!! Really wondering how it was only 125.00???
bubbajoj
Wed, 12/27/2017 - 20:08
I bought the lumber and
I bought the lumber and hardware for this table and the benches today at a cost of $186. All I need to purchase yet is the stain and poly.
Wona (not verified)
Sat, 12/01/2012 - 04:04
Great Looking Table
I'm wondering if the wood is just regular pine or if it is something a little more expensive. I think most of our 2x4s here are of pine.
Jessica M (not verified)
Sat, 12/01/2012 - 06:04
Perfect
I Love it! would it be possible to make it shorter? Only two legs instead of three? I would love to make it for my kitchen table and 106" is too long.
Dorn (not verified)
Sat, 12/01/2012 - 07:12
chairs?
I would love to find some similar design chairs to match this table. Do you have or know of any plans for chairs.
kristen
Sat, 12/01/2012 - 07:15
Modifying the table
I love this plan also!! And who can beat the price tag??!! I'm seriously thinking about building this one (I've considered building almost all of Ana's plans when they come out, lol!). I would need to shorten it AND would want seating on the ends. After looking at the plans, I don't think either one would affect the structural integrity of the table for the people who were questioning that. Two legs will support this table just fine--especially with it shortened. And since the legs fully support the table top across its width, it shouldn't matter if you move them in a bit for seating on the end.
Stacye (not verified)
Sat, 12/01/2012 - 11:28
This is the one
I have been looking at farmhouse tables plans because I am on a tight budget and this is the one! Absolutley exquisite. I was wondering about chairs at the end because I want to reupholster some wingback chairs to put at the ends. Will it mess up the stability or layout of the table to move the end legs in to allow for chairs? Again, I am in awe and this is definitely the table of my dreams.
Katie Tice (not verified)
Sat, 12/01/2012 - 15:42
I also am wondering about
I also am wondering about making the table shorter to fit my kitchen. We would need a six-foot table instead of nine. And also a bench on one side, if you have plans for that? Thanks!
momofour09
Sat, 12/01/2012 - 18:54
Gorgeous!!
I LOVE this table! I finally talked my husband into building some things for the house and he agreed to tackle our first project together. Since our kids destroyed our table, that's the first on our list. I'm just wondering which tools are absolutely necessary and which are just for convenience/ease. I'm on a budget right now :/ but I MUST do this, it's fantastic and would fit right into my plans :)
risawest (not verified)
Fri, 12/07/2012 - 05:56
you could probably rent the
you could probably rent the tools you need... or make your cuts at a friends house that has tools... this is what we'll do
momofour09
Tue, 12/11/2012 - 09:11
Renting
That doesn't sound like a bad idea. It never really crosses my mind, but it's definitely an option. Thanks!
Alberto (not verified)
Sun, 12/02/2012 - 14:00
Bench plans??
I really hope that bench plans for the farmhouse table are being created. This table is awesome!
risawest (not verified)
Fri, 12/07/2012 - 05:56
i'm also hoping there is a
i'm also hoping there is a bench in the future and then I'll add some chairs to the other side... also will be making it shorter and bringing in the legs for seating on the ends.
i've been asking/begging my husband to build us a table as my christmas present... and just showed him this one and he likes it better than the another one that we were going to build. so excited!!! maybe we'll get this done early in the new year ;)
Sonny (not verified)
Tue, 12/11/2012 - 17:06
The Leg Arc's
Great job on the table. How exactly did you cut the ornamental arc's that you used? Any advice would be appreciated.
Amy B (not verified)
Wed, 01/09/2013 - 17:47
I bought lumber for this
I bought lumber for this table today, and I am so excited! 12 weeks until the baby comes, so we'll see how much I can get built with the bump in my way :)
Now I'm looking at the cut list again and wondering how in the world I'm supposed to get:
3 - 2x6 @ 36 1/2”,
3 - 2x6 @ 36” (both ends beveled at 30 degrees off square, long point to long point, ends NOT parallel)
AND
6 - 2x6 @ 34 1/4” (both ends beveled at 45 degrees, long point to long point, ends NOT parallel)
out of 3 - 2x6 @ 10 ft boards. Am I missing something? That looks like it would take 4 of the 2x6x10 boards. The other 2x6 board in the shopping list seems to be just long enough for the stringer and nothing else.
Samantha I (not verified)
Sun, 01/20/2013 - 06:52
extensions?
Is there any way to adjust the plans to add extensions to the ends?
loniwolfe
Tue, 01/29/2013 - 07:51
Chairs to match?
I love this table and bench! I was wondering, though, could there be chairs to match coming? :)
I love the look of a long table with a bench on one side and chairs on the other and at the heads. Also, chairs are easier for grandparents and attaching highchairs too :)
Thank you so much for all your hard work and thank you to everyone else who helps Ana come up with/build all these wonderful plans!
cabrlamo
Fri, 05/31/2013 - 10:50
pdf not working
I love this pedestal table even more than the farm house table. I get an error when trying to connect to the pdf. Can you check the link? We will be moving to a new house in about a month and would love to make this our newest piece of furniture!
AzAdventurer
Wed, 08/28/2013 - 13:13
How are the tabletops holding up?
Hi everyone,
I'm in the planning stages of my project. I was wondering how your tabletops are holding up?
I'm thinking of using hardwood for the tabletop, and modifying some of the dimensions to better fit my situation.
Any comments and suggestions would be appreciated.
freefromburdens
Fri, 10/18/2013 - 10:26
I plan on making this table,
I plan on making this table, but how do you make this cut: Beveled at 45 degrees. Also, can I use a jig saw and/or miter saw to make this cut??? Thx.
Veronica
deborabilal
Fri, 04/18/2014 - 00:40
Triple Pedestal Farmhouse
Triple Pedestal Farmhouse Table its looking very hard and good assets for home. I thing its also provide a good looking to our home.... we want to use Table which is take very less space to our home, and this is one of these...
LitzaKelMomma
Fri, 01/31/2014 - 16:50
Love this table!
We are currently looking at buying a home and this will be my first project once we get settled! I have always wanted a table I can entertain large groups with, that is still stylish and I have found it here. Thanks for posting! I was wondering though, I want to add a single person bench to each end so it will fit 12 people, do you have any tips on making that happen? Obviously I would like them to match the table and the long benches. Thanks. :)
francesca1
Sun, 04/06/2014 - 10:24
PDF
Hi,
I'm having trouble downloading the PDF version. Is it possible to send me a new link?
Thanks!!!
francesca1
Sun, 04/06/2014 - 10:24
PDF
Hi,
I'm having trouble downloading the PDF version. Is it possible to send me a new link?
Thanks!!!
radosevicha
Sun, 09/14/2014 - 13:34
1x6 to Frame
I am getting so frustrated, because I want to see the finished product, but cant figure out how to attach the 1x6s to the frame! Can anyone help? The pocket holes are too high up on the frame to attach to the low 1x6s. I didn't want to have to buy more wood to add the extra boards, but I don't know how else to attach them like the plan. Please help!
cloyd1980
Tue, 05/19/2015 - 13:49
Wood Movement
This table is amazing, but I am concerned about wood movement in the table top (expansion/contraction overtime). This design doesn't seem to allow for that to happen and I worried it will split. Any ideas?
ScottBuilds
Mon, 05/16/2016 - 16:25
I've got same concerns. I'm
I've got same concerns. I'm about to attempt to build something inspired by this. I love the simplicity of the trestle legs; no mortise / tenon issues, etc. Though I'm going to use decorative bolts to attach the stretcher so I can dis-assemble easily to get it into my house in pieces.
For the top, (using 5/4 - that is 1 1/4" red oak), I'm thinking of joining with either dowel or beadlock tool with glue of course, then using breadboards to try to control for movement. That will be a pain, but I've seen some best practice methods for doing this by using mortise and tenon for the ends where you only dowel pin and glue the center tenon. The others get pinned using a technique called drawbored. I've not done this before and I'm not great with mortise / tenon, so going to practice on cheap wood first.
If you do some searches for "drawbored mortise tenon" and "breadboard mortise tenon" you'll find videos and blogs, etc. Looks like a real hassle, but I don't want stuff splitting apart, especially because I'm going to try to use expansion slides in teh center; and tose have to e exactly parallel.
jiles95
Tue, 04/05/2016 - 14:10
table top
I could use some help with a more detailed plan of the table top. This will be my first table project. Not understanding the 1X's fitting with the 2X's. Can anyone help????
PEP12483
Wed, 10/12/2016 - 19:38
Triple Pedestal Farmhouse Table
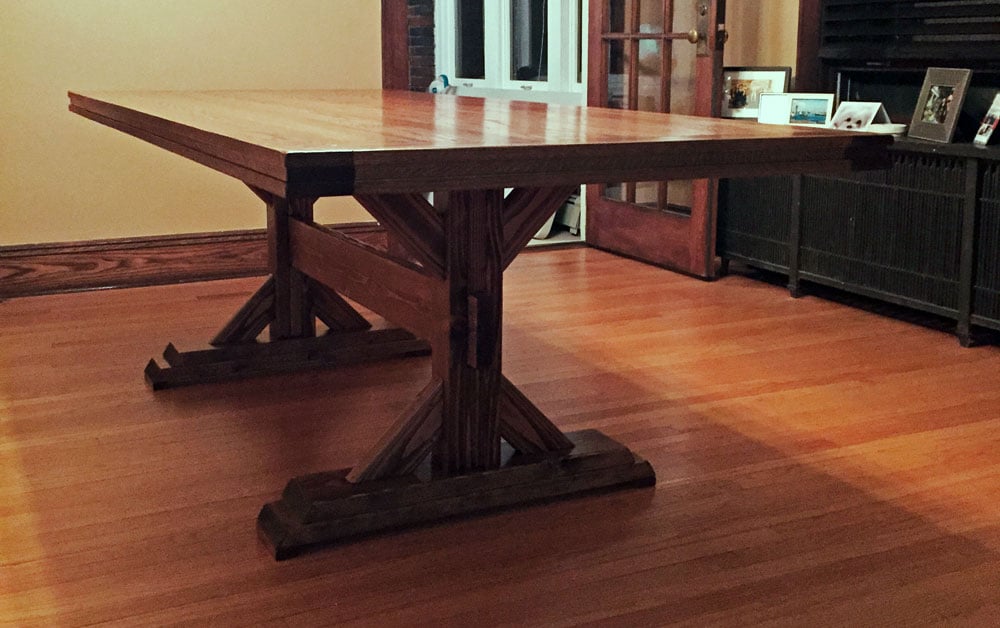
I combined the versions of the table I have read in the comments and built it out of oak. I turned out great after a rub-on poly finish and a good quality wax. I built it for my wife's Christmas present in 2014. Almost two years old and holding up great!
Nickascott
Wed, 11/02/2016 - 16:09
Inaccurate shopping list
This is a beautiful table and i cant wait to finish making it. That being said.....the shopping list for this plan is wrong. Im working on the legs right now and ive noticed that your shopping list is short a 2x6. After doing the math your shopping list provides about 456in of 2x6 but your cut list requires about 515in of 2x6. This is something you definitely want to update.
cmanmgm007
Mon, 07/31/2017 - 08:04
Concrete top
I was wondering if this base would hold the weight of a concrete top if I added 2x4s between the top of the legs
cmanmgm007
Wed, 03/21/2018 - 04:50
I am working on this table
I am working on this table for my diningroom, but i am using either, Maple, or Oak Plywood for the top, which would work better since i am using stock lumber for the legs (basic pine), the stain will be speical walnut from Minwax. any help would be great since i have a foster home and so many kiddos.
The Toxophilite
Mon, 12/14/2020 - 15:33
Shopping list error
Am I misunderstanding the instructions? It appears to me that the shopping list calls for 38ft of 2x6's (3@10ft and 1@ 8ft) but the cut list calls for 47ft of 2x6's. Seems like the shopping list should say 4 - 2x6's @ 10ft not 3.
The Toxophilite
Mon, 12/14/2020 - 15:34
Just saw the other comment…
Just saw the other comment about this. Sorry for repeat post
leisac7
Wed, 11/03/2021 - 13:57
Gorgeous TAble
Is there a video for this one anywhere?