
Build a panel bed with moulding - plans by Ana-White.com
Happy Friday!!!
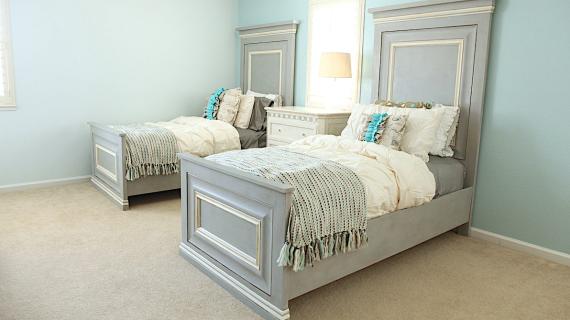
Remember back a few weeks ago - wait, it's been more than that (how time flies with a newborn!) when we DIYed this headboard fit for a queen out of leftover moulding?

Well, my good friend Whitney from Shanty2Chic wanted to build a similar bed but in a twin size. And she wanted the full bed - footboard and siderails and all ...
So you know what happens next ....

Whitney wanted the siderails high so under the bed could be used as storage - so no wasted space there too!
Here's from Whitney:
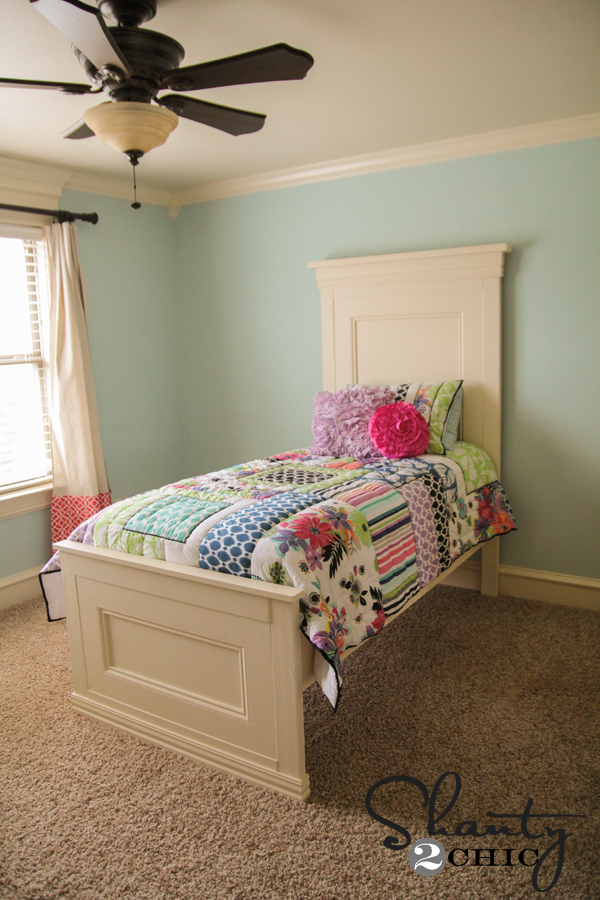
I LOVE everything about this sweet bed! When I saw Ana's original bed in a queen size, I knew we must do a twin as well! Although it is big and beautiful, it really is a very easy build! It's a perfect Kreg Jig project, and I have shared lot of tips on getting it all attached on my post. I spent just around $160 on the whole thing… Footboard and ALL! I think it looks like a million bucks though ;-) And, I have one very happy little girl…
Of course, you must go check out Whitney's post here for more details, building tips, and of course, more PHOTOS!!!
See you back here for the plans!
XO Ana + Fam
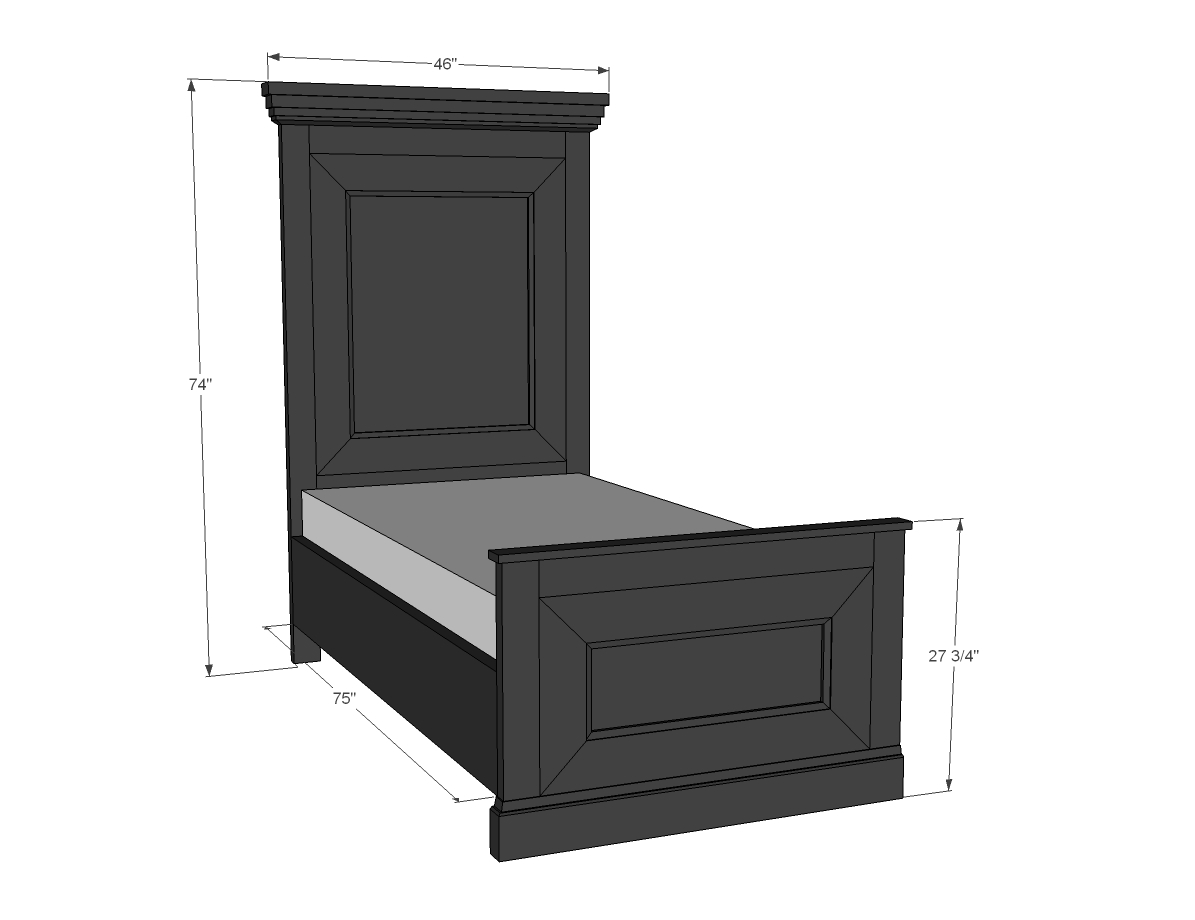
IMPORTANT: Due to the size of this headboard, it is recommended that you attach to a stud in the wall behind headboard to prevent forward tipping.
Preparation
5 - 2x4 @ 8 feet long
2 - 1x4 @ 10 feet long
1 - sheet 3/4" plywood or MDF
1 - 1x3 @ 4 feet long
2 - 1x boards for siderails, 75" long (can be 1x12, 1x10 etc)
5-1/4" base moulding
Crown moulding
HEADBOARD CUT LIST
2 - 2x4 @ 72-1/2"
1 - 2x4 @ 35"
2- 1x4 @ 35"
1 - 3/4" plywood 48" x 35"
1 - 2x4 @ 46"
Crown and moulding cut to fit
FOOTBOARD CUT LIST
1 - 1x3 @ 43"
2 - 1x4 @ 27"
2 - 1x4 @ 35"
1 - 3/4" plywood 35" x 25-1/4"
Mouldings (all 5-1/4" base moulding) cut to fit
SIDERAILS/CLEATS
2 - 1x boards (shown at 1x12 size)
2 - 2x4s @ 75"


Please read through the entire plan and all comments before beginning this project. It is also advisable to review the Getting Started Section. Take all necessary precautions to build safely and smartly. Work on a clean level surface, free of imperfections or debris. Always use straight boards. Check for square after each step. Always predrill holes before attaching with screws. Use glue with finish nails for a stronger hold. Wipe excess glue off bare wood for stained projects, as dried glue will not take stain. Be safe, have fun, and ask for help if you need it. Good luck!
Instructions
Step 1
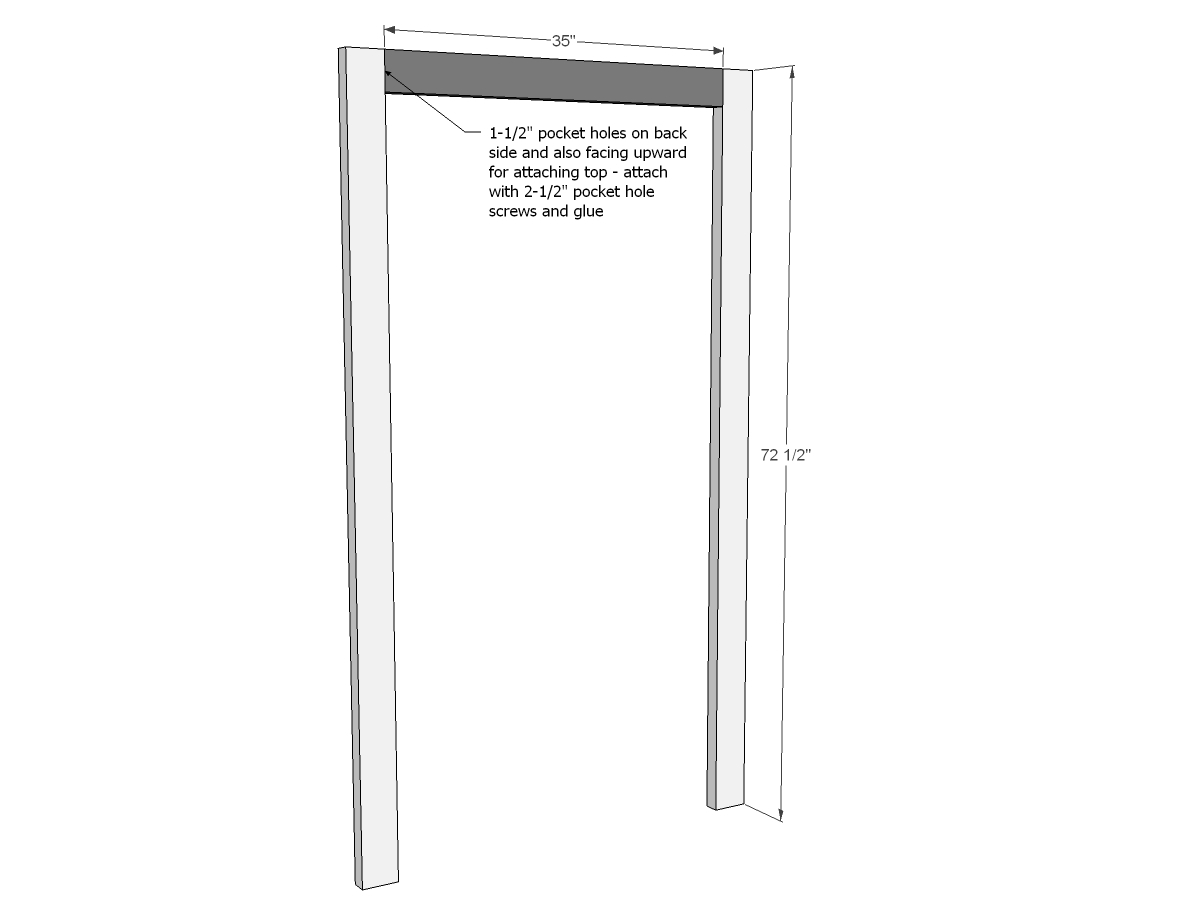
Start by attaching top to two legs.
Step 2
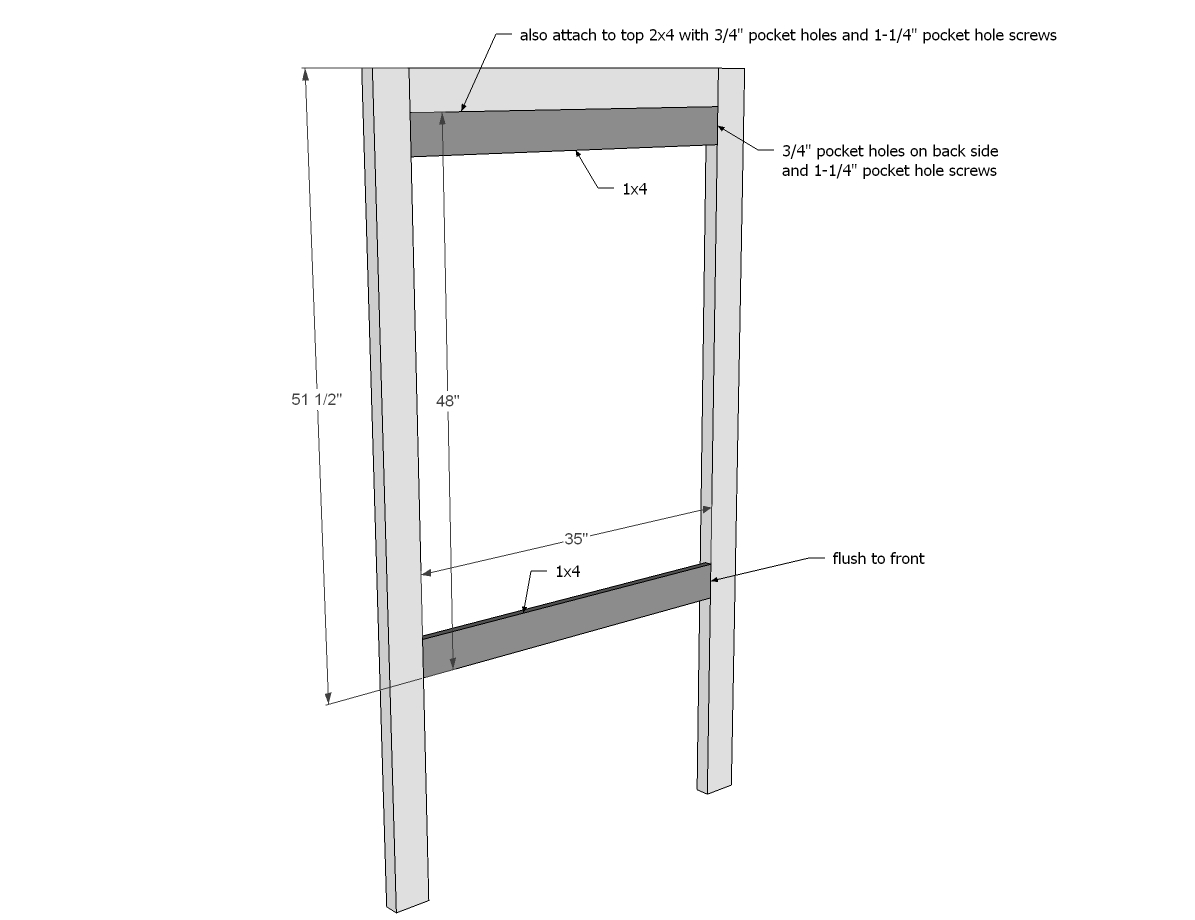
Then attach the two 1x4 boards, flush to front.
Step 3
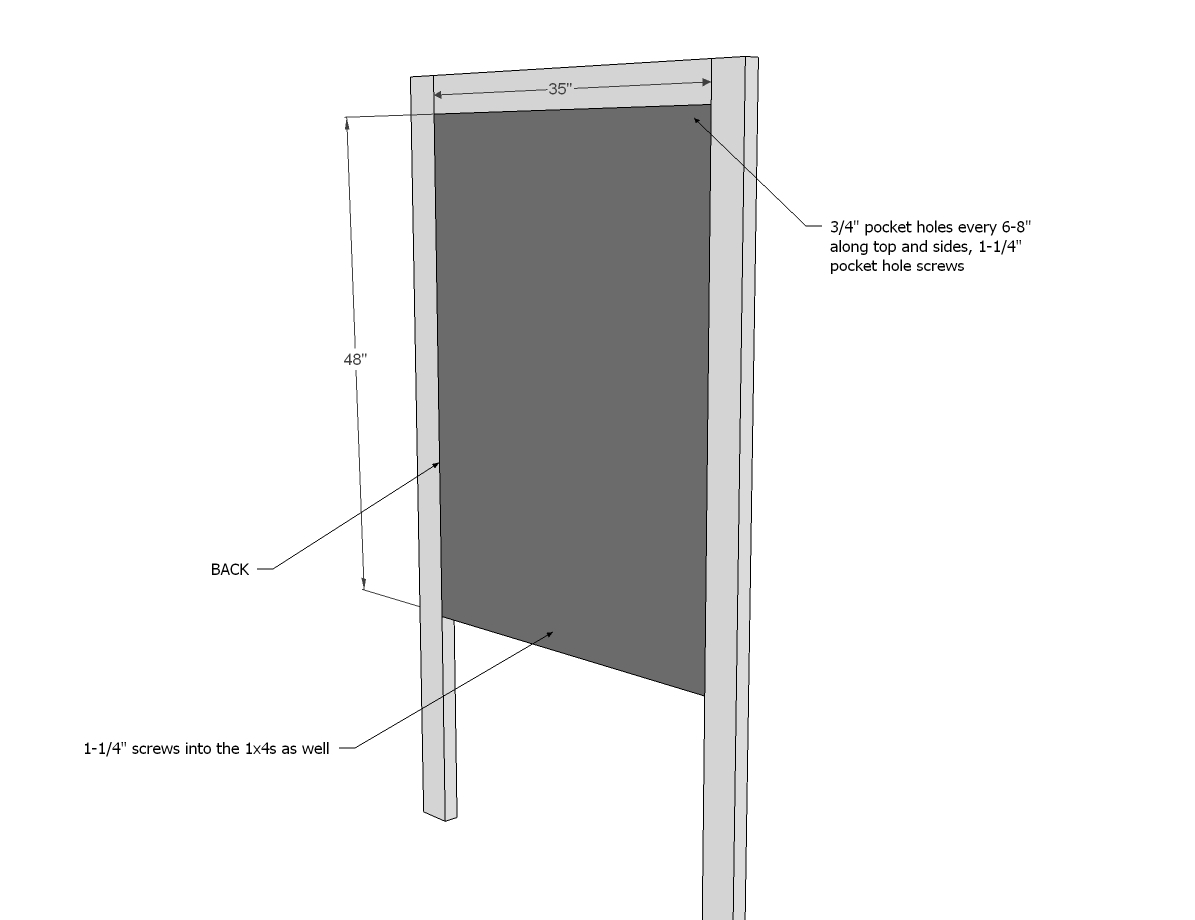
Now attach panel to legs and top, and also screw to 1x4 boards.
Step 4
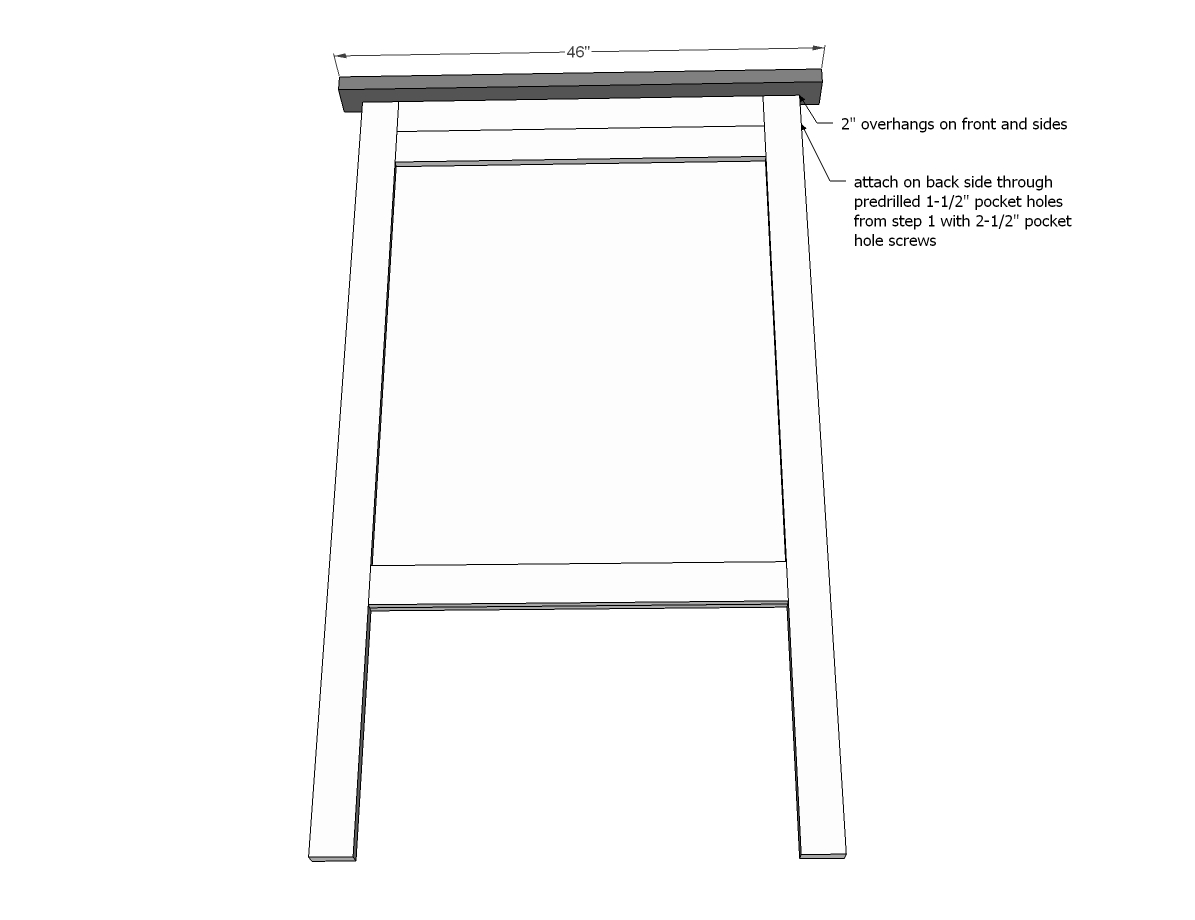
Next, attach header to top of headboard.
Step 5
Step 6
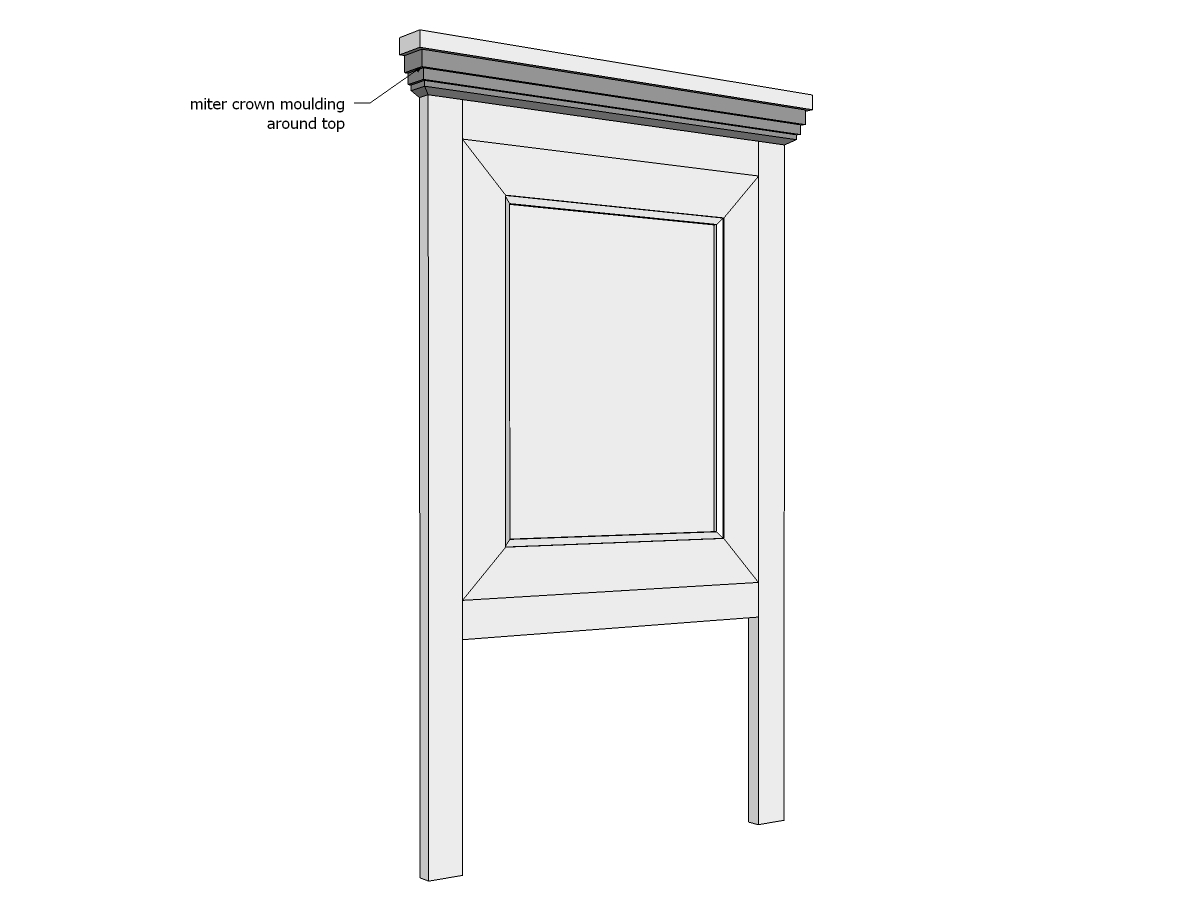
Add crown moulding around top of headboard.
Step 7
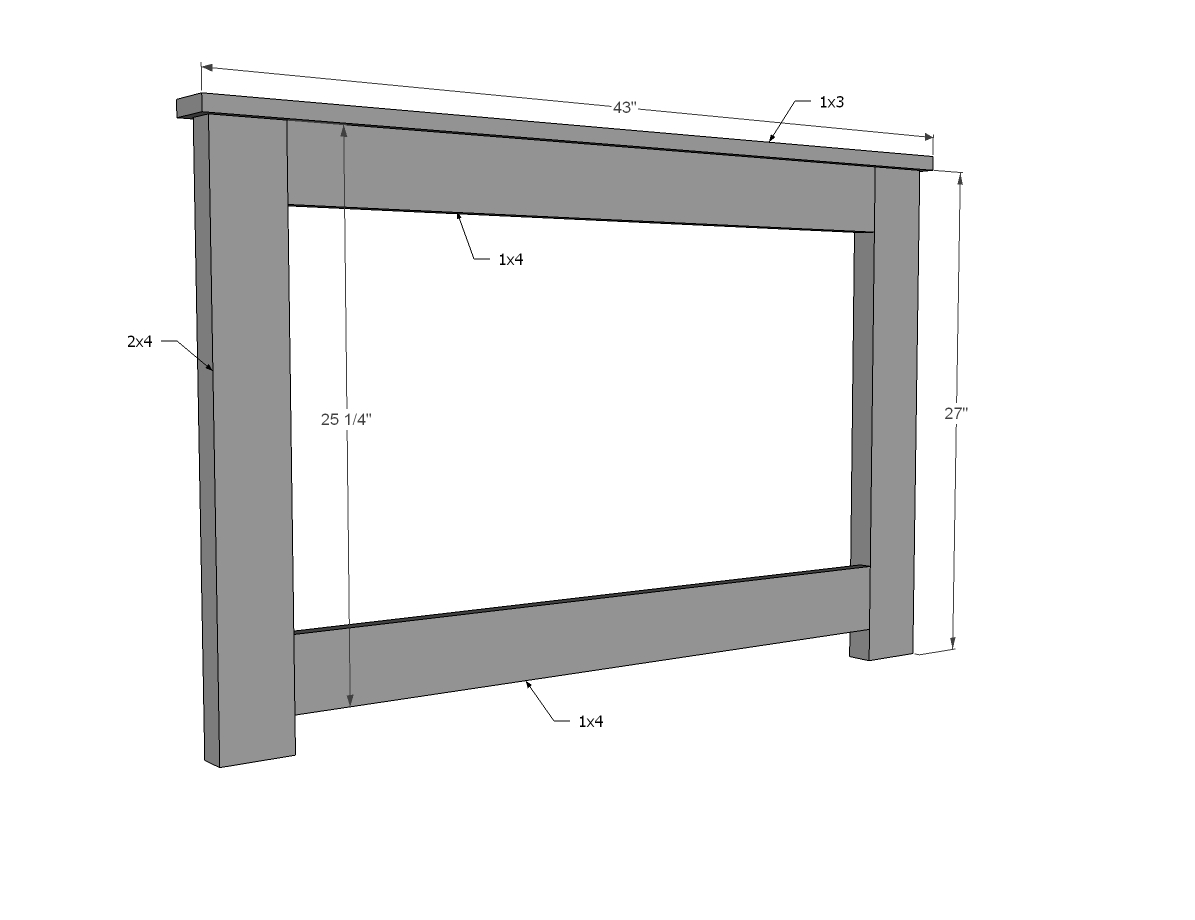
Build frame for footboard as shown above, using 3/4" pocket holes and 1-1/4" pocket hole screws.
Step 8
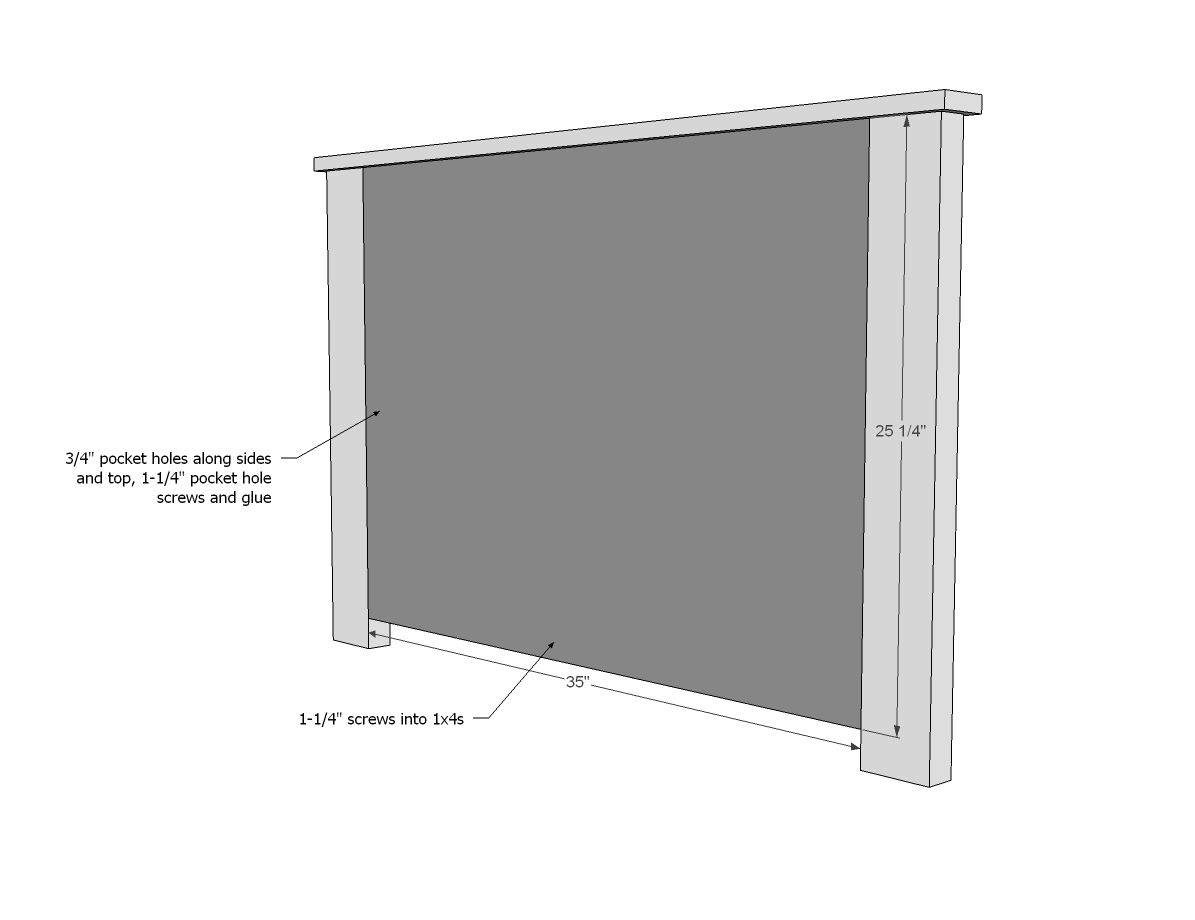
Attach panel to back.
Step 9
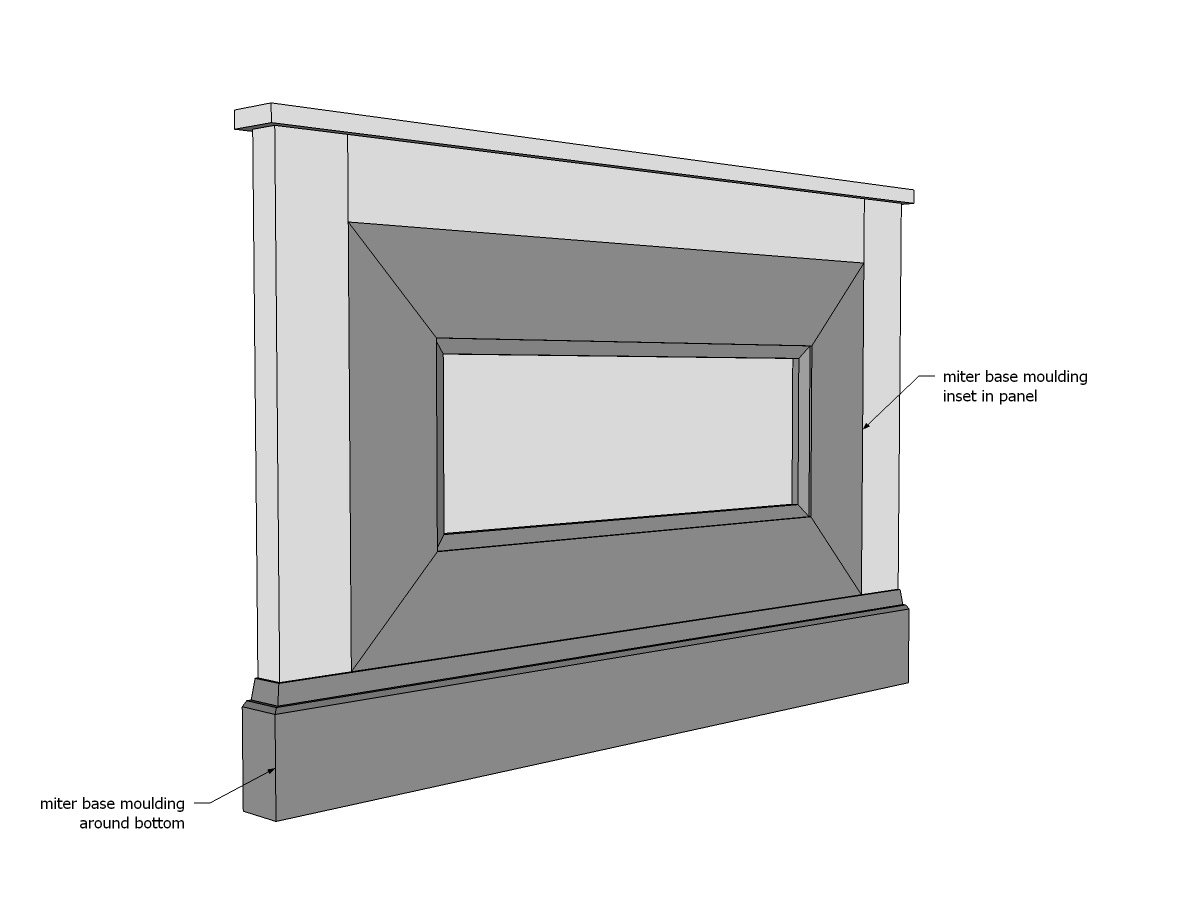
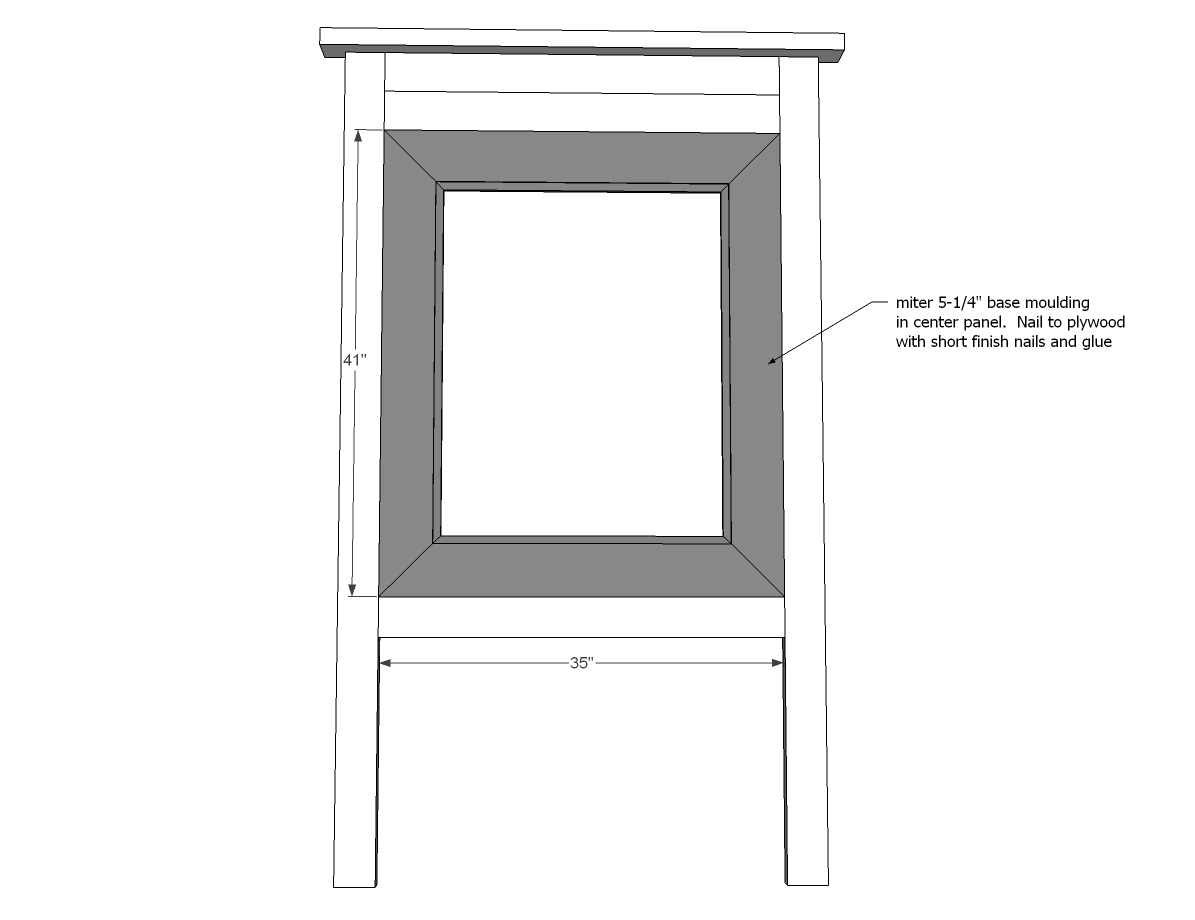
Apply moulding to base and inside panel. Nail and glue moulding to panel.
Step 10

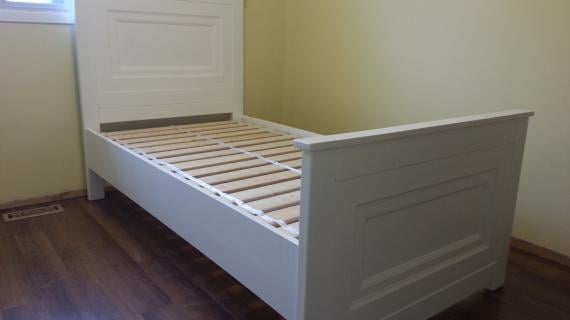
Attach cleats to inside of bed rails. The bed can be used with a box spring or wood slats (1x or 2x boards cut to width of inside (39") can be screwed to the cleats. The cleats can be screwed to the siderails at different heights depending on your mattress/box spring size.
IMPORTANT: Due to the size of this headboard, it is recommended that you attach to a stud in the wall behind headboard to prevent forward tipping.
It is always recommended to apply a test coat on a hidden area or scrap piece to ensure color evenness and adhesion. Use primer or wood conditioner as needed.