
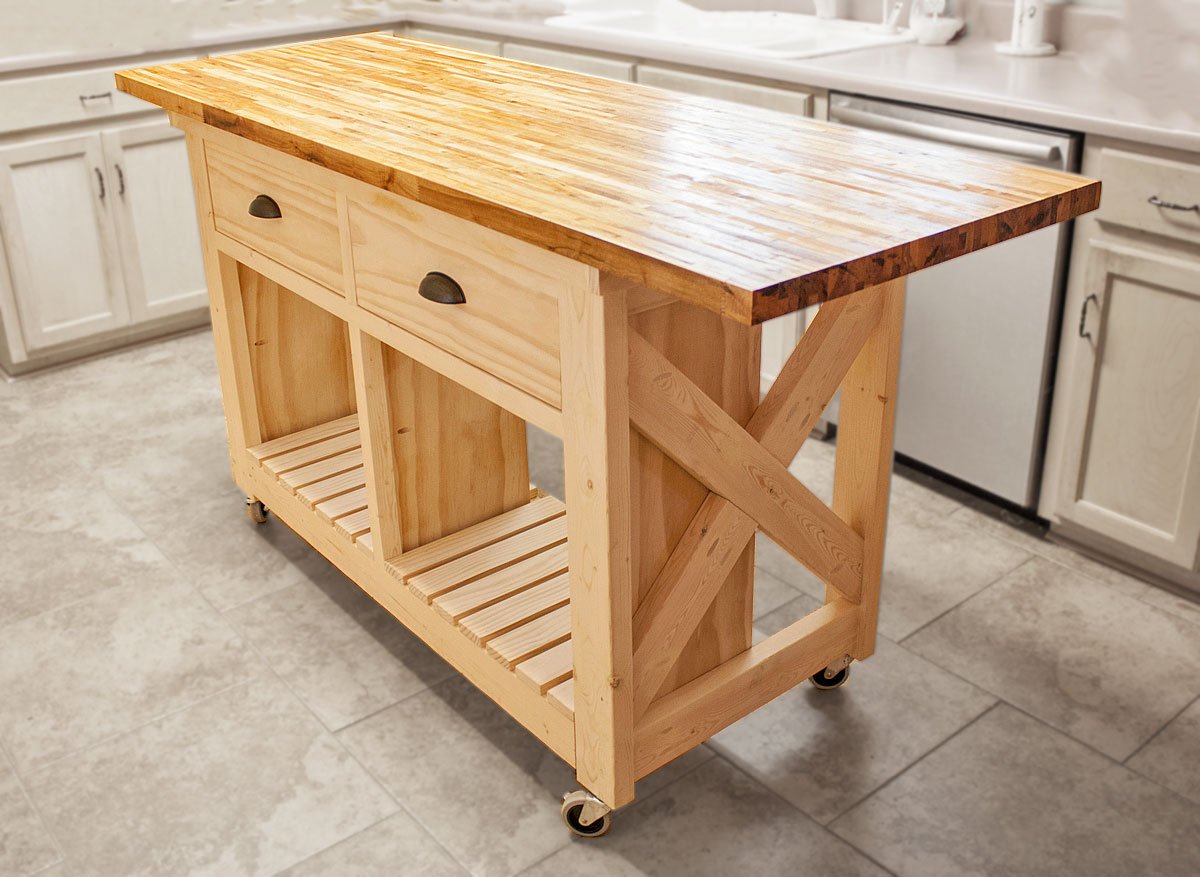

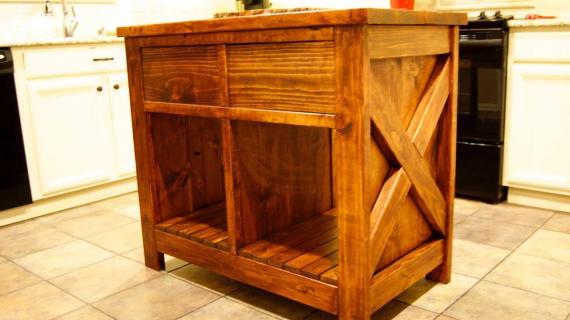
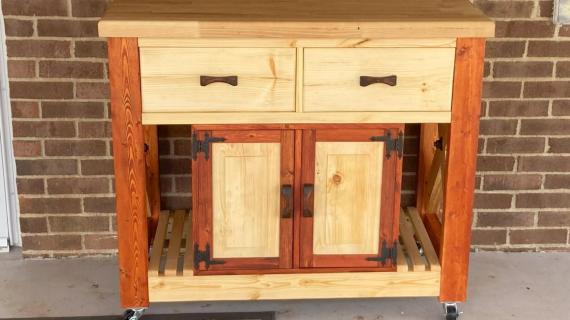
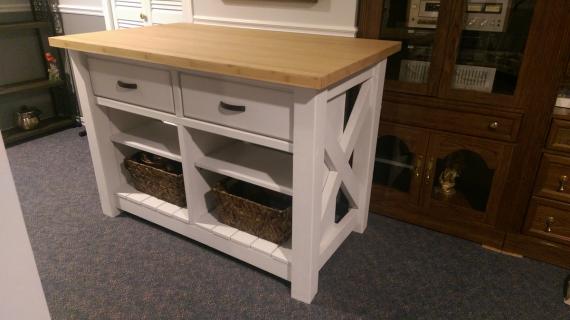
Free plans to build Rustic X Kitchen Island with drawers in - double width - plans from Ana-White.com
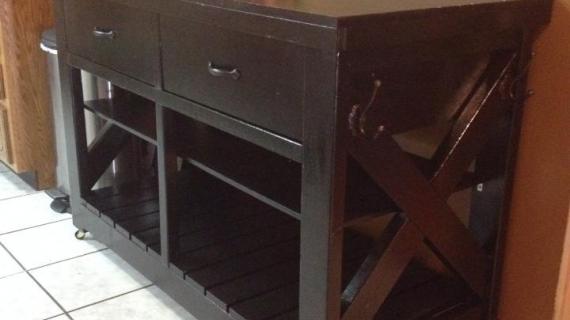
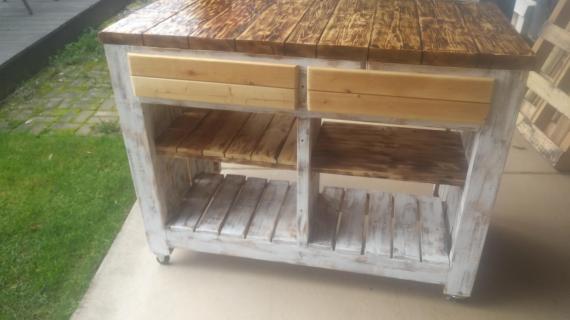
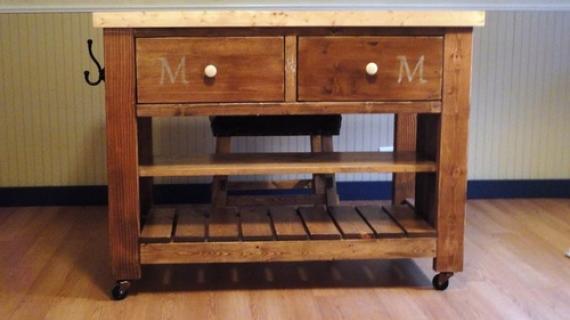
Reader submitted photo BHOPPY with oversized butcher block top.
The plans below without modifications use a standard top size.

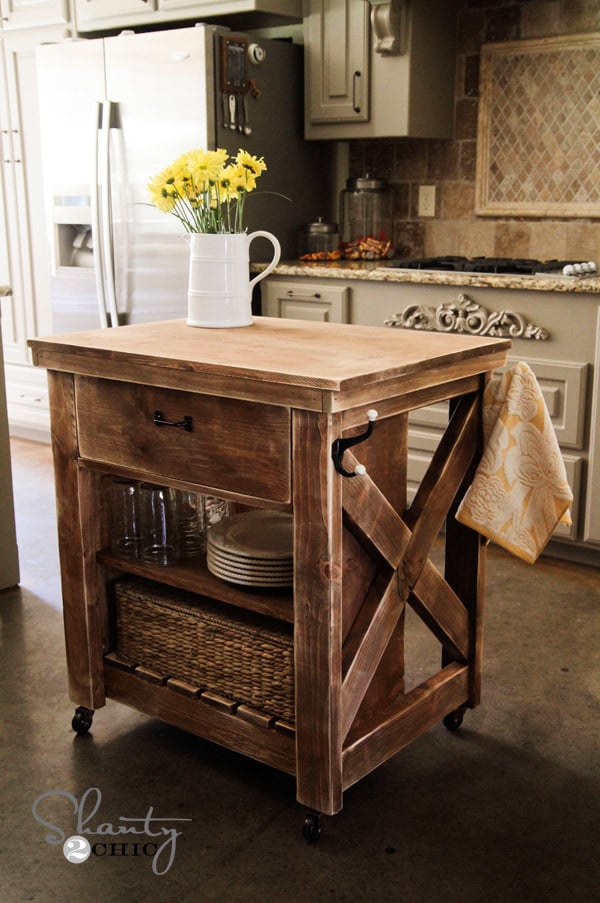
We also have plans for a smaller Rustic X Kitchen Island built with Shanty2Chic!
Preparation
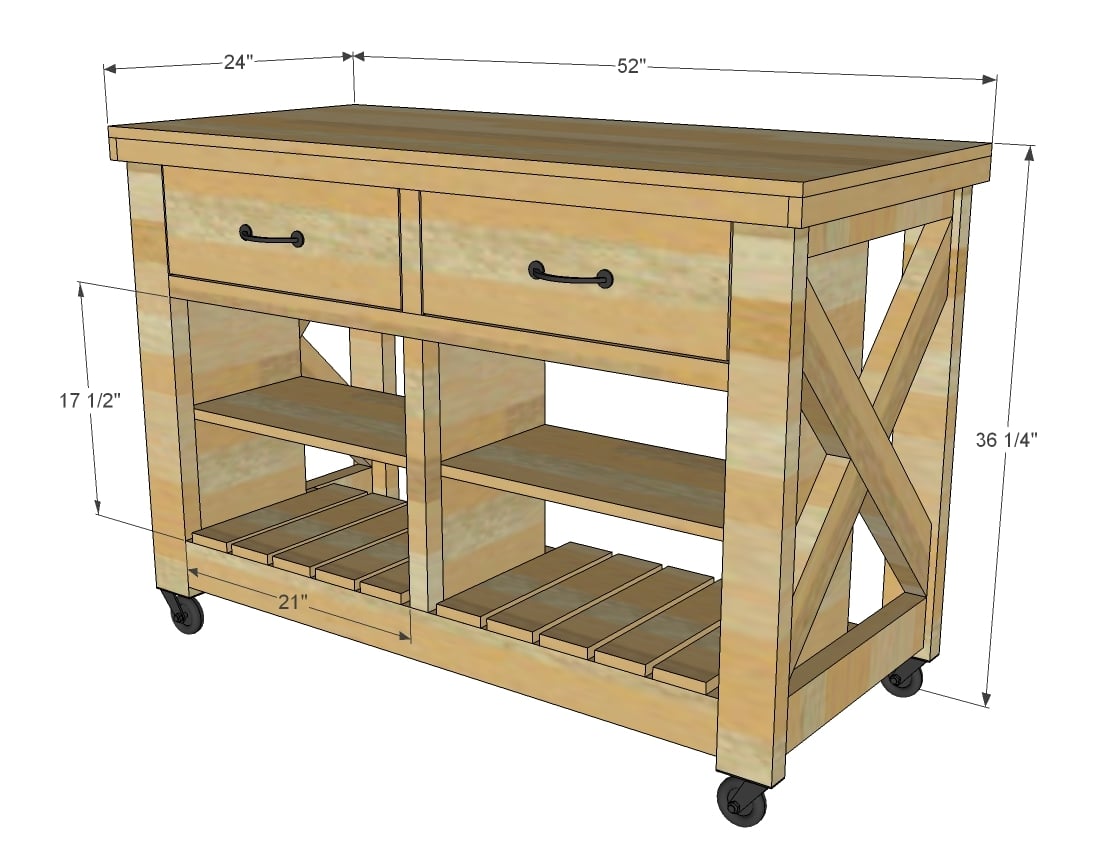
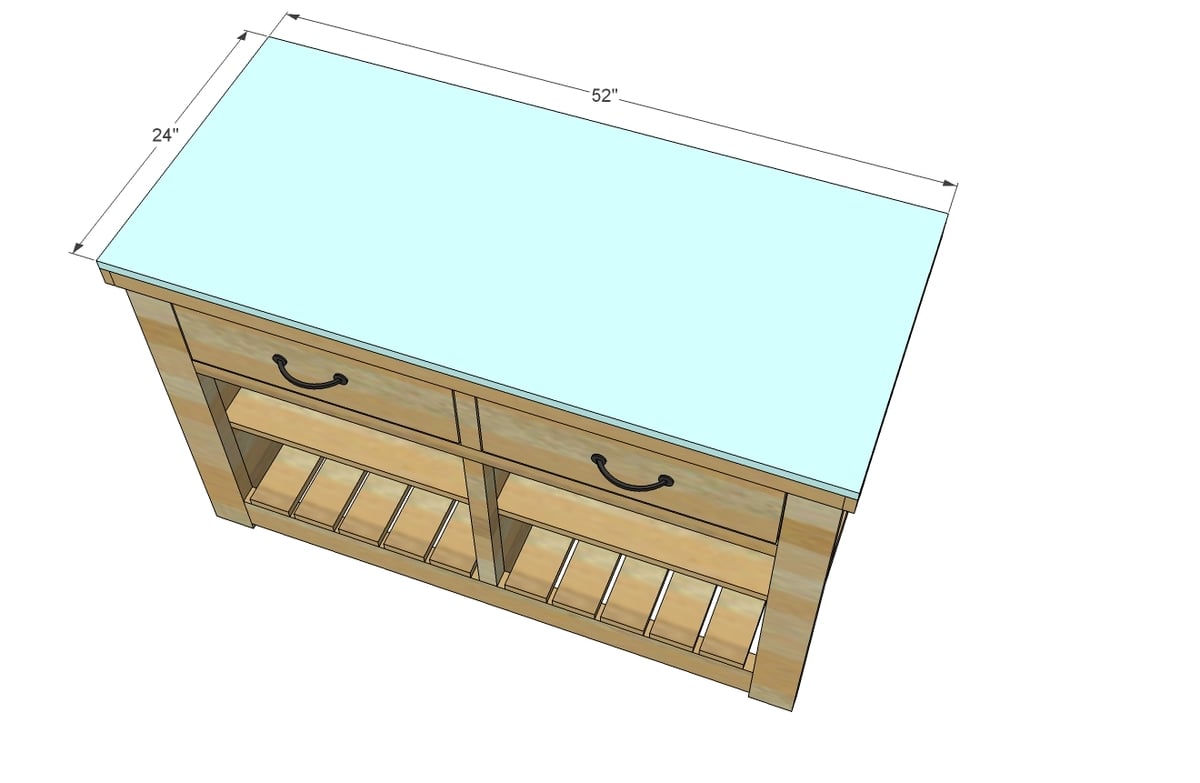
- 1 - 3/4" thick top 24" x 52" (recommend a premade project panel)
- 5 - 2x4 @ 8 feet long
- 3 - 2x2 @ 8 feet long
- 1 - 1x12 @ 8 feet long (cut the 31 1/2" long pieces from this board)
- 1 - 1x12 @ 4 feet long (cut the shelves from this board)
- 3 - 1x3 @ 8 feet long
- 3 - 1x2 @ 8 feet long
- 1 - 1x6 @ 10 feet long
- 1 - 1x8 @ 4 feet long
- 4' 1x10 board for the drawer stops
- 2 - 10"x18" 1/2" plywood pieces for drawer bottoms (can be scraps or purchase a 1/4" sheet)
- 4 caster wheels that can be mounted on bottom of 2x4
NOTE: Cut list and shopping list has been updated per reader comments on 9/18/2013
- 4 - 2x4 @ 32 1/4" (legs)
- 4 - 2x4 @ 19 1/2" (leg top/bottoms)
- 2 - 2x4 @ 27 5/8" (long point to long point, both ends cut parallel at 45 degrees)
- 4 - 2x4 @ 13 3/4" (longest point measurement, one end cut at 45 degrees)
- 1 - 2x4 @ 43 1/2" (front bottom apron)
- 1 - 2x4 @ 46 1/2" (middle bottom apron)
- 3 - 2x2 @ 43 1/2" (top aprons/bottom of drawer trim)
- 1 - 2x2 @ 7 1/2" (drawer center trim)
- 1 - 2x2 @ 17 1/2" (shelf area center trim)
- 3 - 1x12 @ 31 1/2" (shelf sides)
- 2 - 1x10 @ 22 1/8" (drawer area backs)
- 14 - 1x3 @ 14 1/4" (bottom shelf slats)
- 2 - 1x12 @ 22 1/8" (shelves)
- 4 - 2x2 @ 10 1/2" (drawer slides)
- 2 - 1x2 @ 24" (top trim sides)
- 2 - 1x2 @ 50 1/2" (top trim front/back)
- 1 - 3/4" thick top 24" x52"
DRAWERS - measure and cut to fit so there's an 1/8" gap on each side!!! Measurements given should be used as a guide only.
- 4 - 1x6 @ 11 1/4" (drawer sides)
- 4 - 1x6 @ 17 3/8" (drawer front and back)
- 2 - 1/2" plywood 9 3/4" x 17 3/8" (drawer bottoms)
- 4 - 1x2 @ 11 1/4" (drawer slide cleats)
- 2 - 1x8 @ 20 3/4" (drawer faces)
NOTE: Cut list and shopping list has been updated per reader comments on 9/18/2013


Please read through the entire plan and all comments before beginning this project. It is also advisable to review the Getting Started Section. Take all necessary precautions to build safely and smartly. Work on a clean level surface, free of imperfections or debris. Always use straight boards. Check for square after each step. Always predrill holes before attaching with screws. Use glue with finish nails for a stronger hold. Wipe excess glue off bare wood for stained projects, as dried glue will not take stain. Be safe, have fun, and ask for help if you need it. Good luck!
Instructions
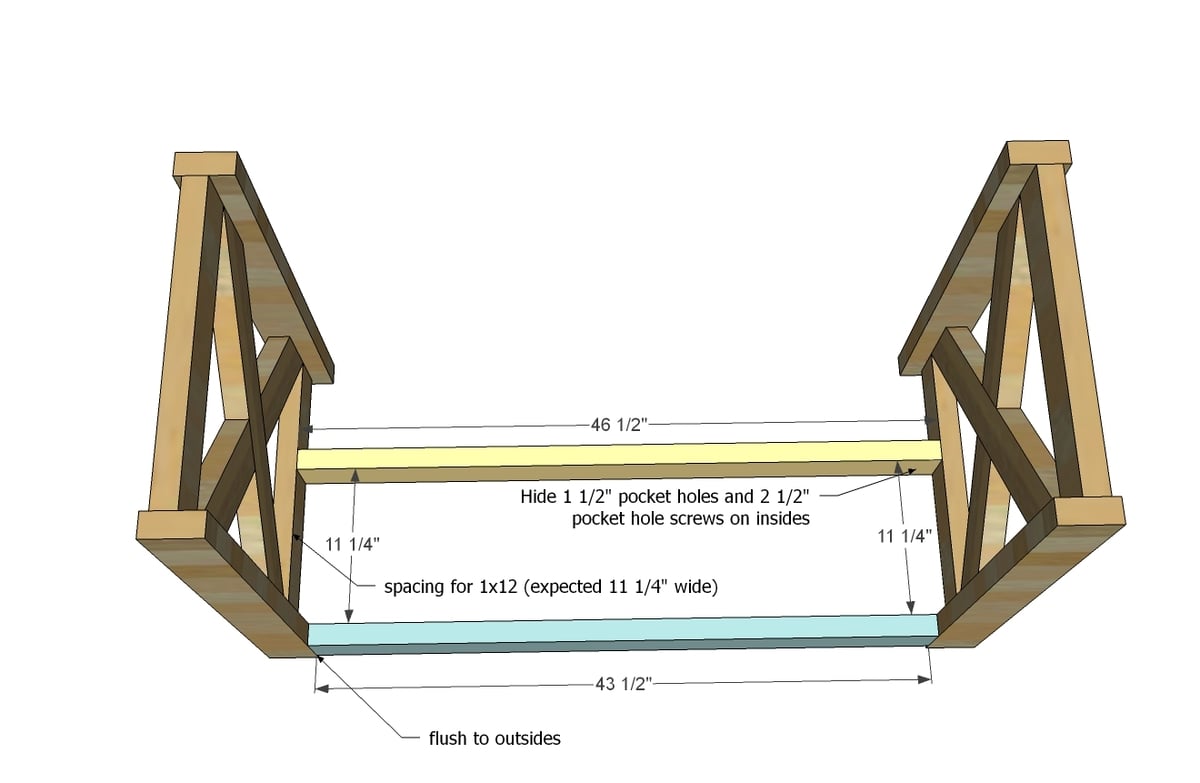
Step 1
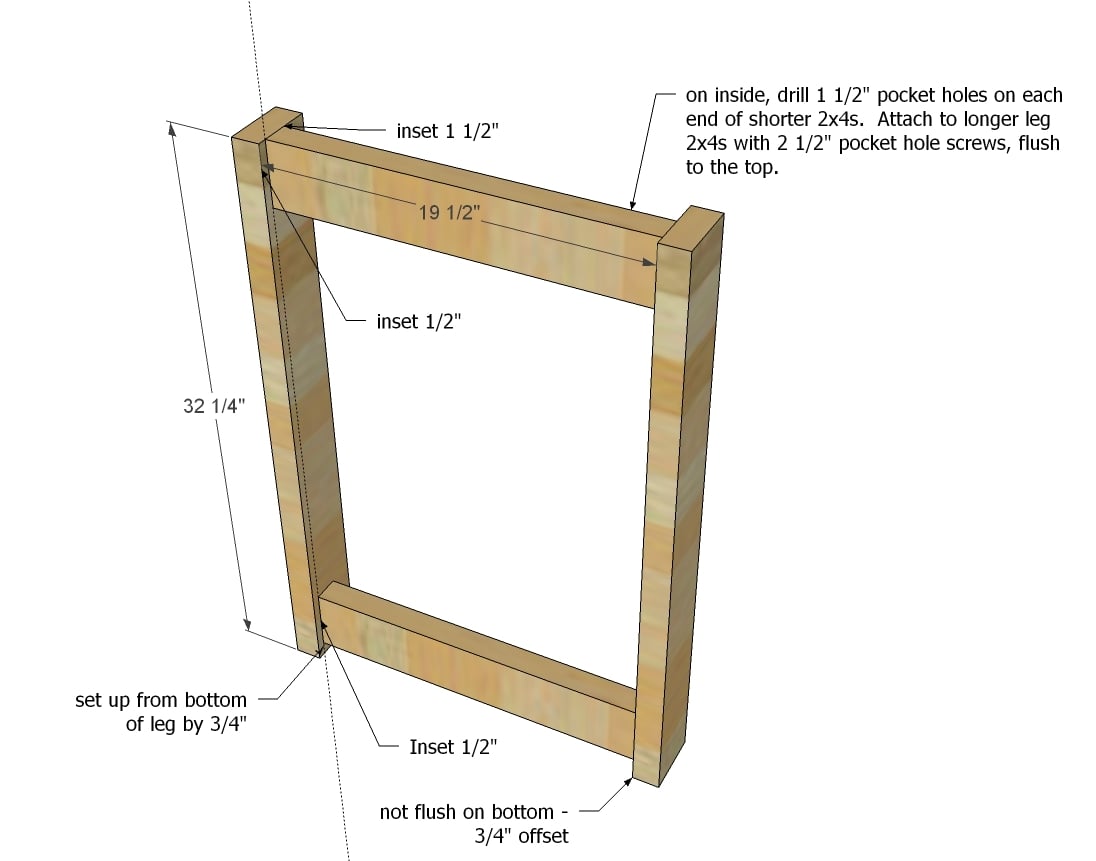
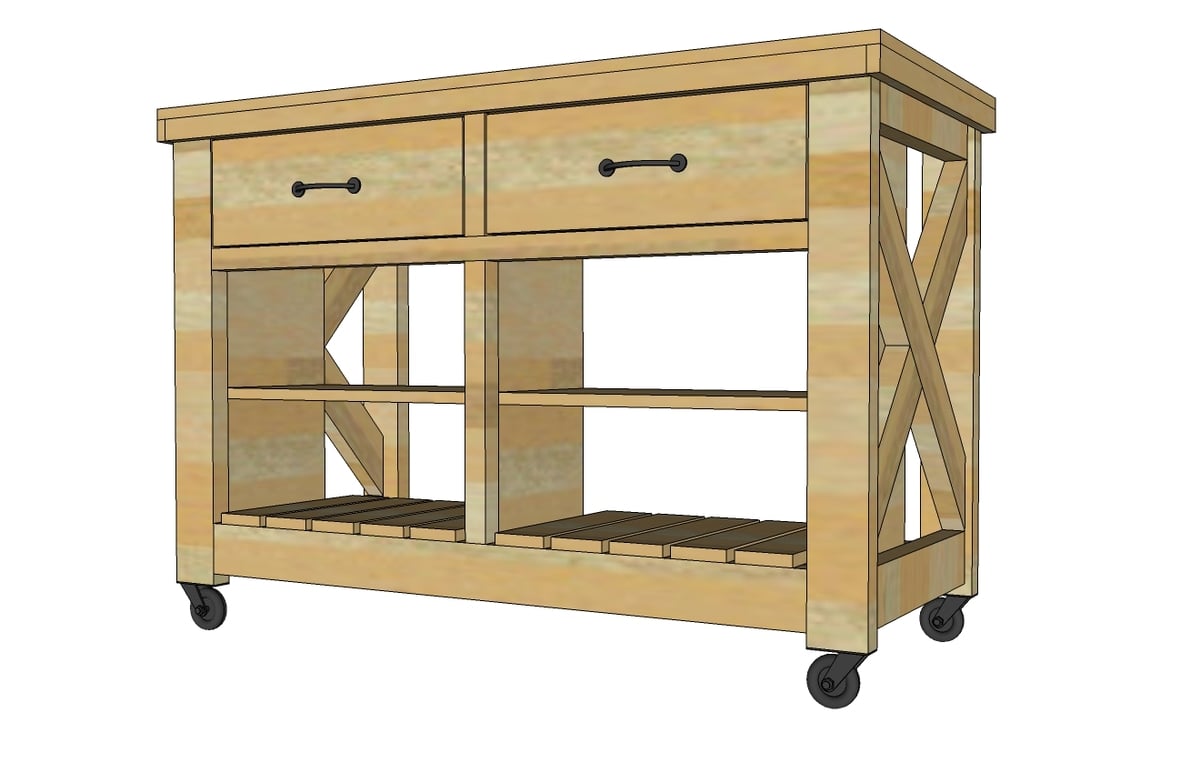
Start by building the two leg ends. Note that the outside and bottom are not flush.
TIP: Drill 3/4" pocket holes on insides of top 2x4s for attaching top in later steps.
Step 2

Attach the center Xs inside the leg/end apron frames. Remember to build two.
Step 3
Next, attach the two leg sets together with the bottom 2x4s. Note that the bottom boards are at the same height as the bottom 2x4s in the leg sets - set up 3/4" from bottom of actual legs.
Step 4
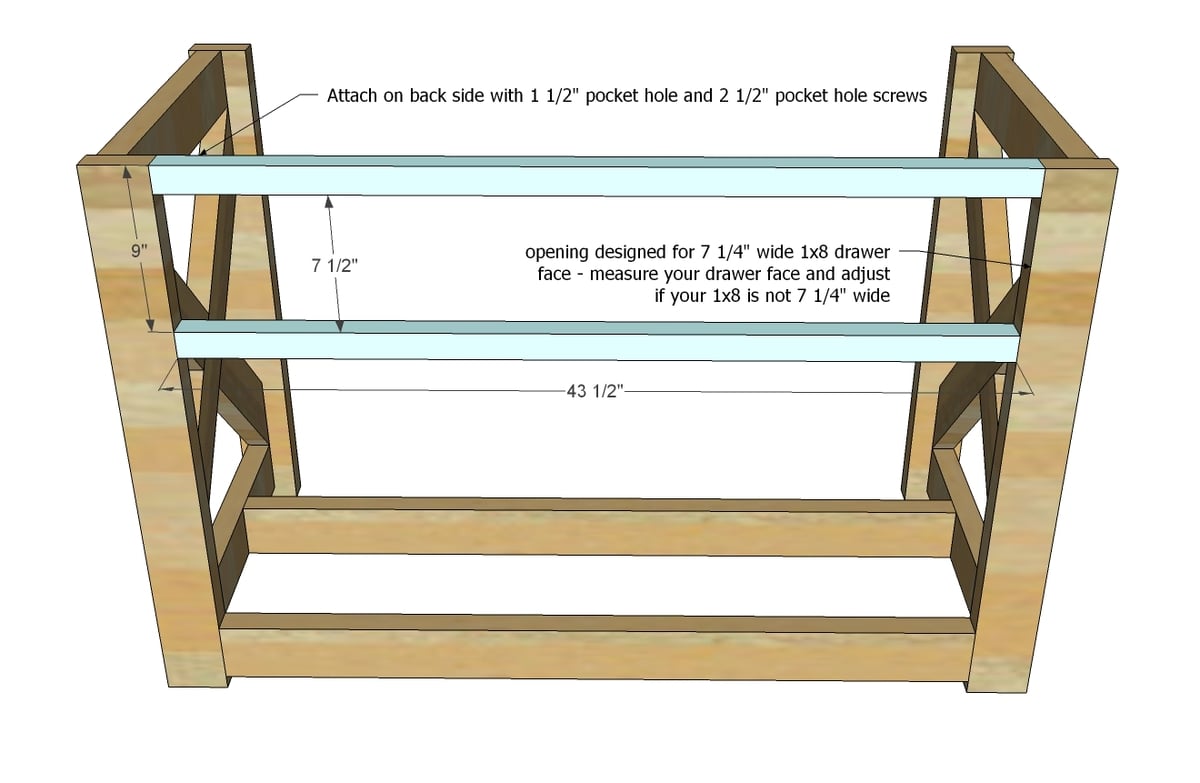
Attach the 2x2s to the top, leaving space between for the drawer. Also, I added a third 2x2 to the baci for extra support and to square things up now.
Step 5
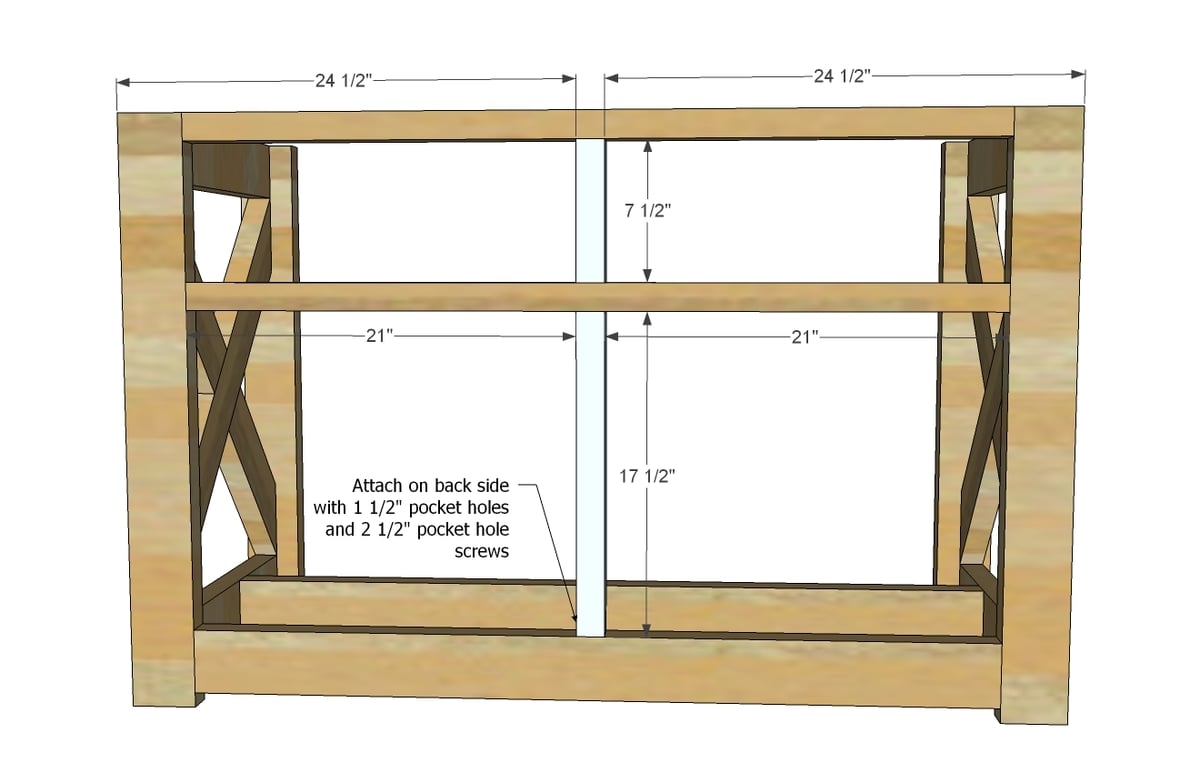
Step 6
Attach the drawer/shelf sides. Make sure the center partition is exactly centered all the way down and across - otherwise your drawers will slide cockeyed.
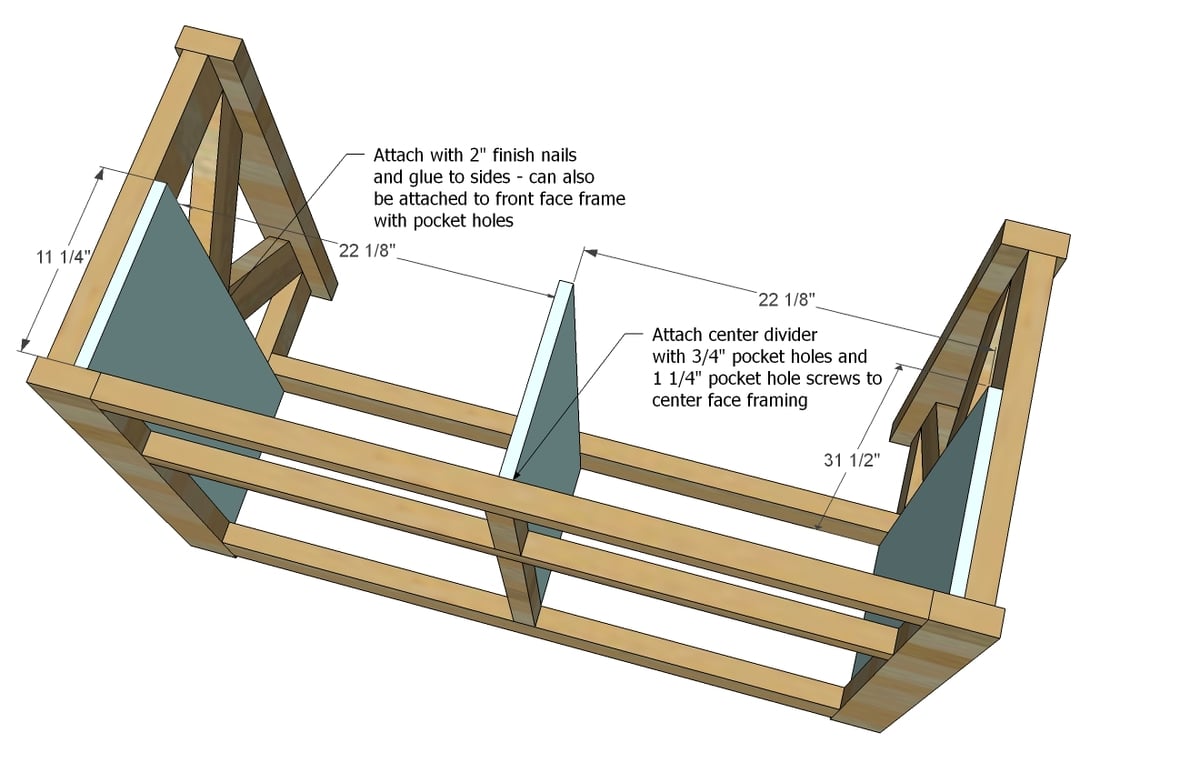
Step 7
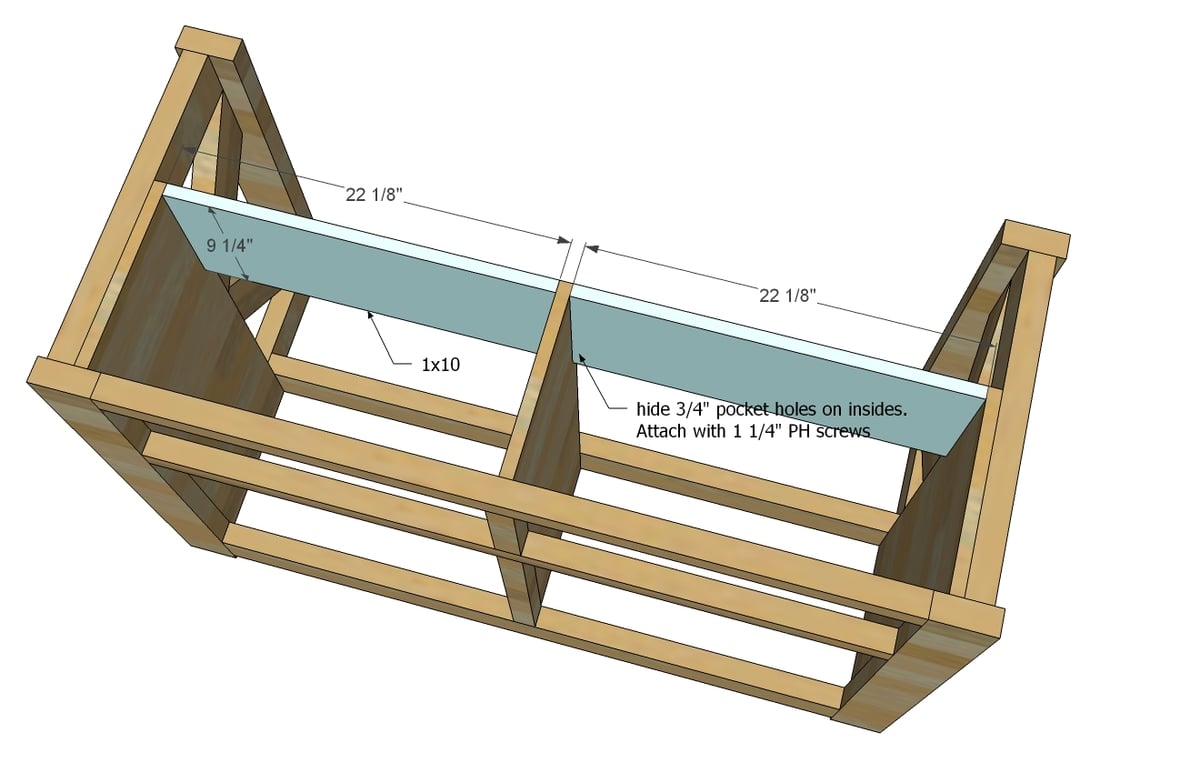
Attach the back boards to finish out the back of the drawer area.
Step 8

Attach shelf slats evenly spaced on bottom shelf area.
Step 9
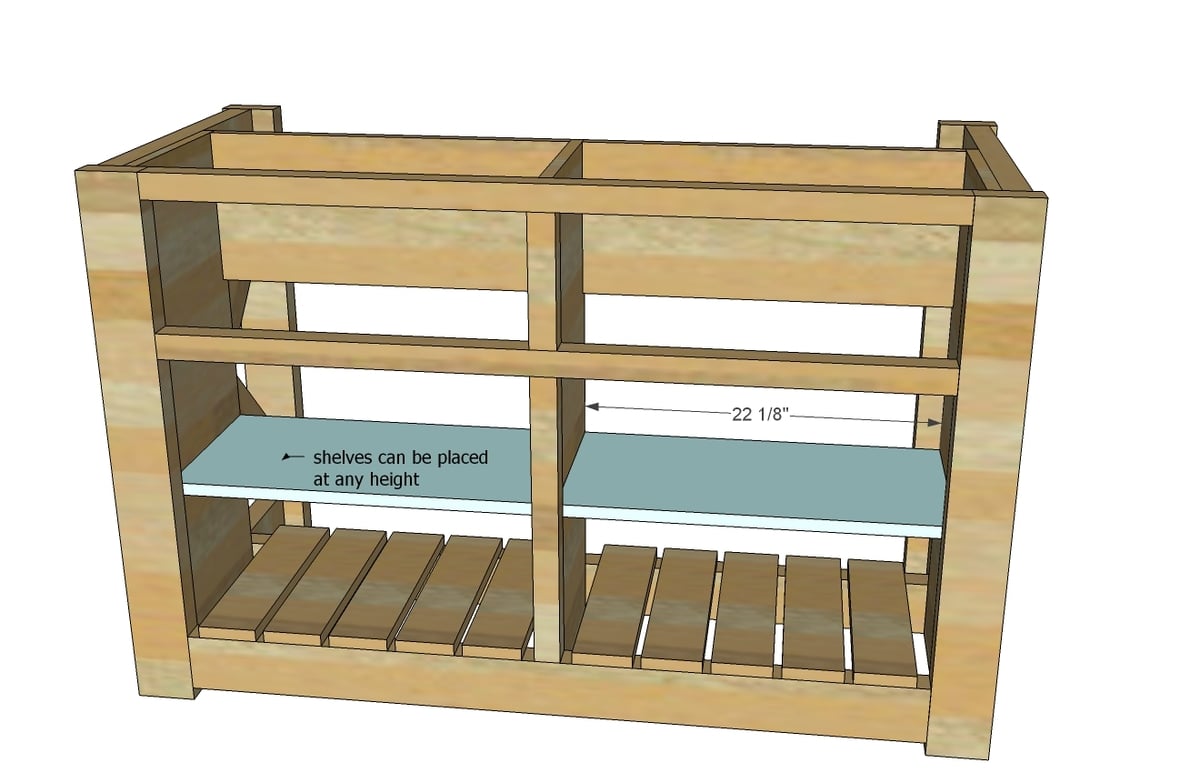
Then attach shelves - these can be made fixed by attaching with 3/4" pocket holes and 1 1/4" pocket hole screws. They can also be adjustable if you use shelf pins.
Step 10
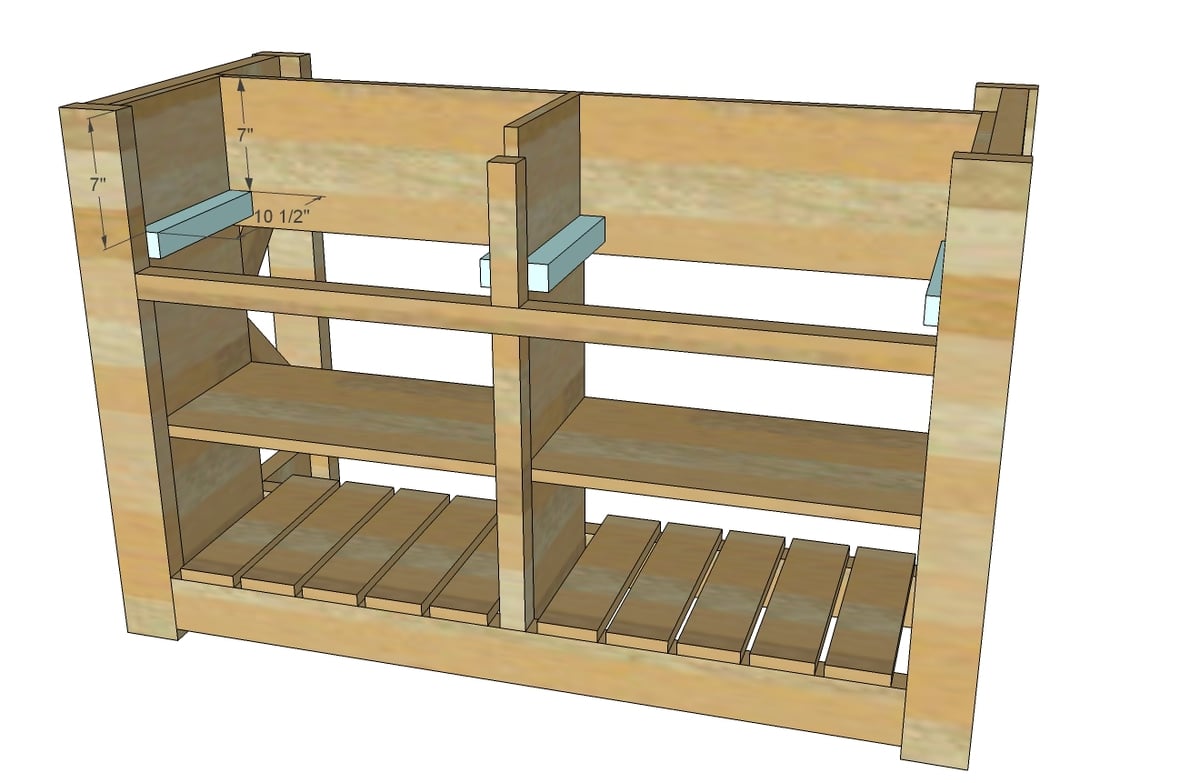
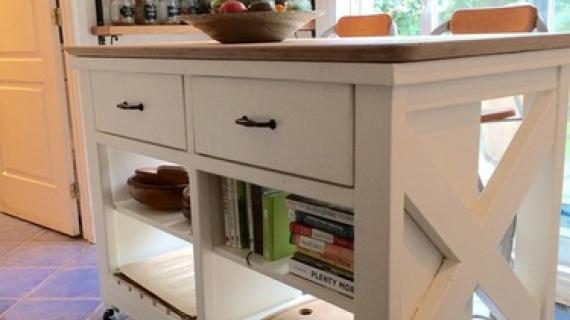
There's a few different ways to do the drawers, but since they are so shallow (less than 12") it's hard to find small drawer slides. The 2x2s act as cleats to hold the drawer in the opening. Apply candle wax to top to make the drawer slide easier.
Attach with just 2 2" screws for now - you may need to adjust to get the drawer to slide just right.
Step 11
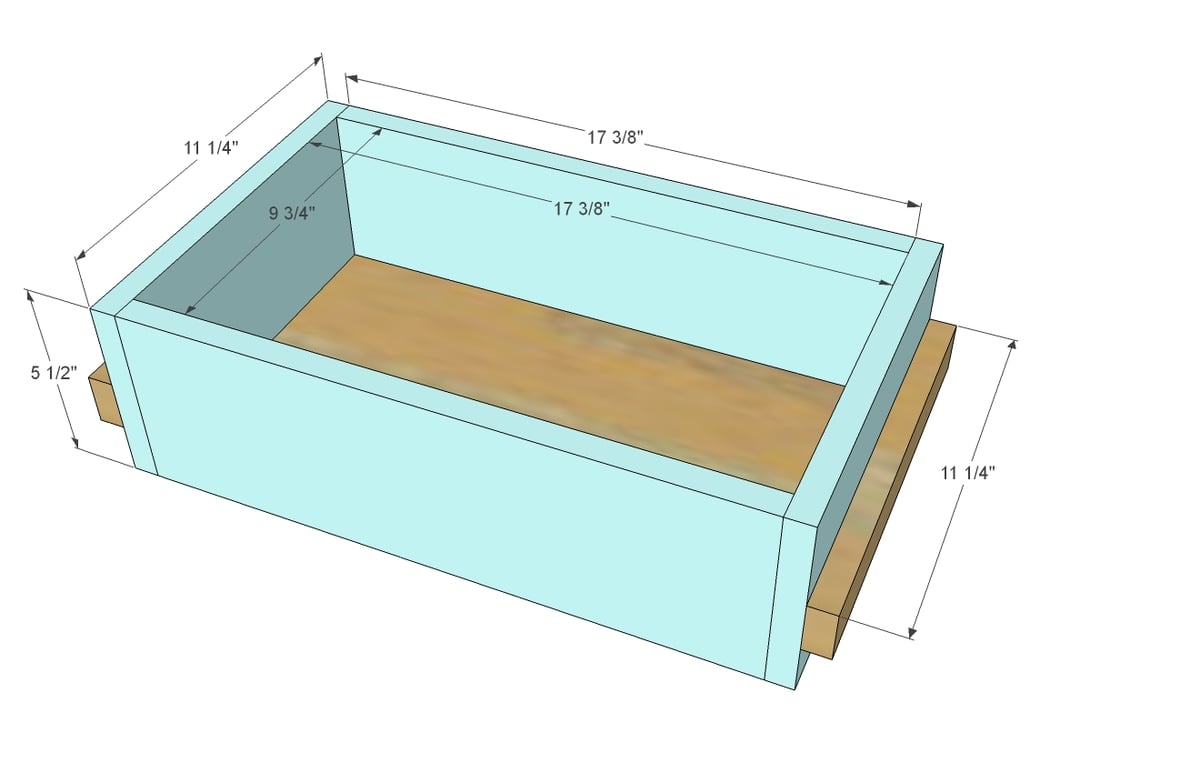
Build your drawers as shown above - but build to fit the opening. Measure between the 2x2s and subtract 1/4" (1/8" for each side) and make this the overall width of your drawer box (not including the 1x2 cleats)
If you use pocket holes to build the drawer, place on outsides of front and back - they will get hidden by drawer face.
Step 12

Adjust drawer until it slides easily. They should sit inset 3/4" to allow for the drawer face.
Step 13
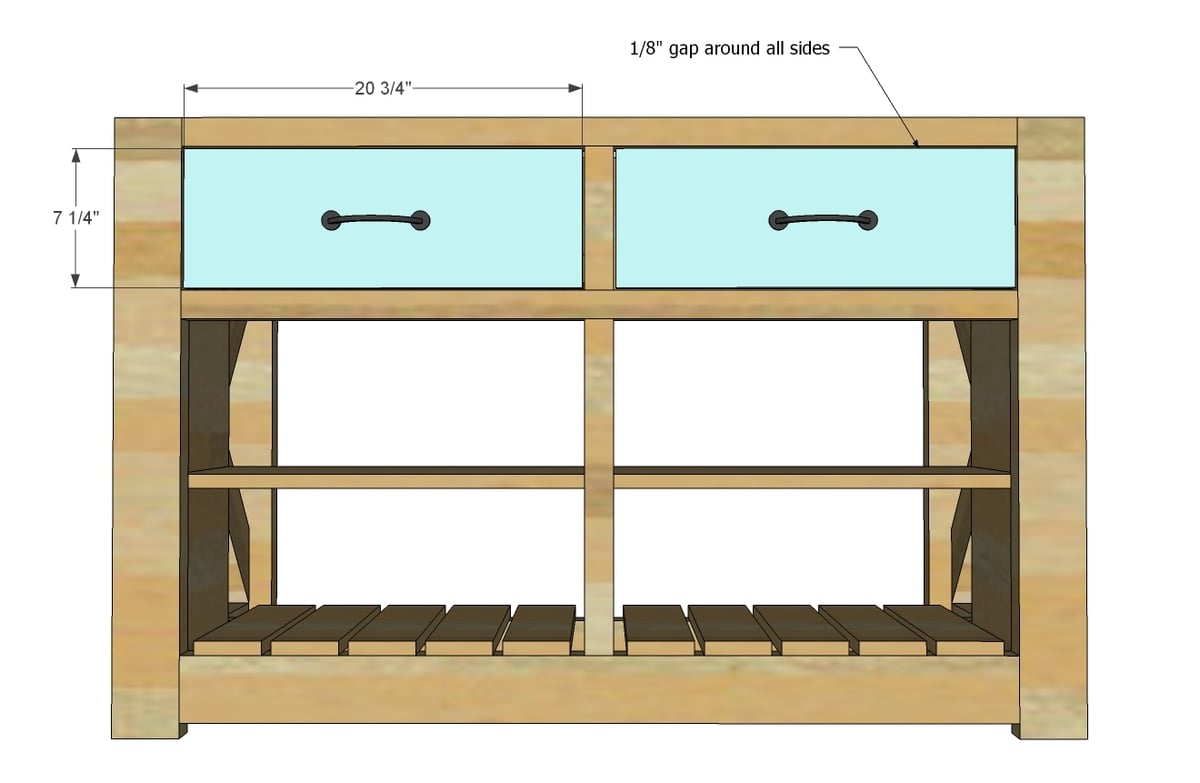
With the drawers installed,cut the 1x8 drawer faces to fit the openings, leaving an 1/8" gap around all sides. Attach to drawer boxes with 1 1/4" finish nails and wood glue.
Step 14

Frame out the top with 1x2s. These can be nailed and glued on.
Step 15
Attach top through the 2x2s on the underside of the top and through predrilled pocket holes. You can also carefuly drill holes through the 1x2 trim into the underside of the top.
Step 16
Attach caster wheels to base of legs.
It is always recommended to apply a test coat on a hidden area or scrap piece to ensure color evenness and adhesion. Use primer or wood conditioner as needed.


Comments
katie0910
Thu, 09/19/2013 - 14:58
Building this now!
Thank you so much for these great plans! I bought my wood today and I'm building it right now. I just wanted to point out that the shopping list is missing a 4' long 1x10 board for the drawer backs. Can't wait to upload a brag post of the finished product!
phillysuperfuzz
Sat, 01/18/2014 - 12:40
Tip on the drawers
I am building this now too.... almost finished! I just wanted to give a tip on the drawers. If you only use 2x2s for the bottom drawer slides, the drawers will tip forward as you pull them up. It would be best to put matching 2x2 cleats on top. That way, you can pull the drawer out and not have to hold it up.
Claulino
Sun, 02/08/2015 - 06:16
Praise
My congratulations , you are an amazing woman!
I loved this job , I'm starting this table hope I can leave it as beautiful as yours.
Thank you very much.
Claulino
Meus parabéns, você é uma mulher incrível!
Adorei este trabalho, já estou iniciando esse projeto espero que eu consiga deixa-lo tão bonito quanto o seu.
Muito obrigado.
Claulino
caliotto
Fri, 06/26/2015 - 22:04
Hi all.
Hi all.
I'm building this island this coming week but have to resize it to fit the granite I purchased for another island option. I wanted to stain it to match an oak table but can't afford oak for this whole project. Have decided to paint it white. Does anyone have any suggestions for the type of wood I should use that is easy to work with, finished nicely, and is sturdy enough to hold a piece of granite 18x48x2?
Thank you for your help!!
sumitbansal
Tue, 07/14/2015 - 07:44
Garbage Bin
Hello there,
I really like this Island and would like to try it out. This will be my first DIY project. Hope I will able to finish it .
.
Has anyone considered putting in Garbage bin pull out in this island?