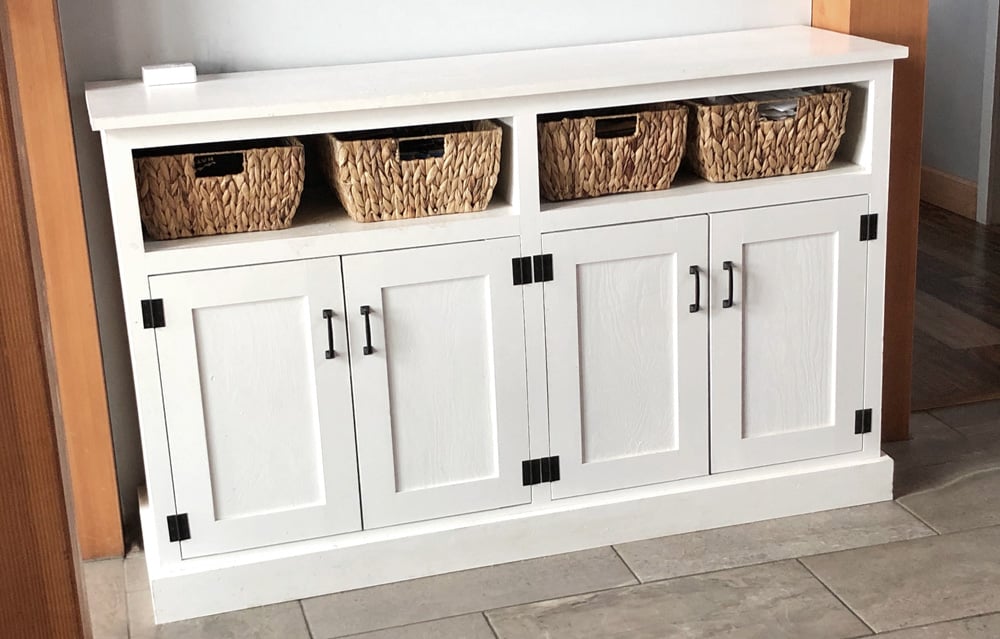
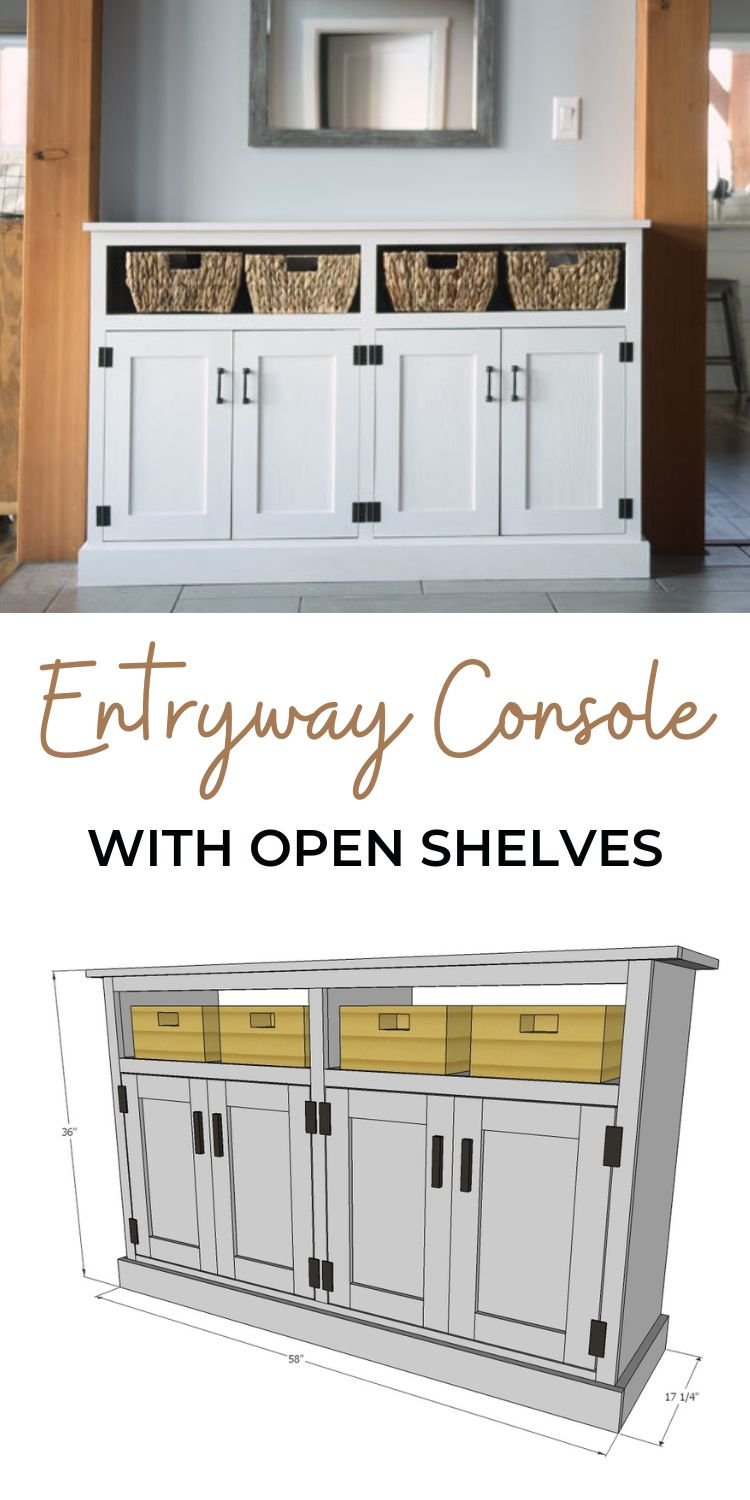
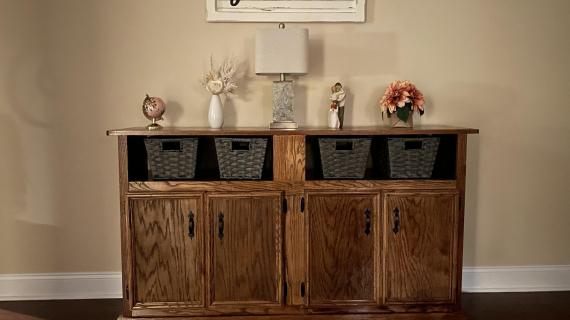
Wide Entryway Console with Open Shelves

white console table
Difficulty
Intermediate
| Print this plan

Build your own entryway console table with free plans from Ana-White.com

This entryway console features large shelves, open shelving space for baskets or bins, and a generous sized top.  The bottom is concealed, so you never have to clean underneath.  We love this also as a media console table, buffet in the dining room, or anywhere more storage and tabletop space is needed in a beautiful, simple design.

The free plans include step by step diagrams, shopping and cut list and video tutorial.

white console table

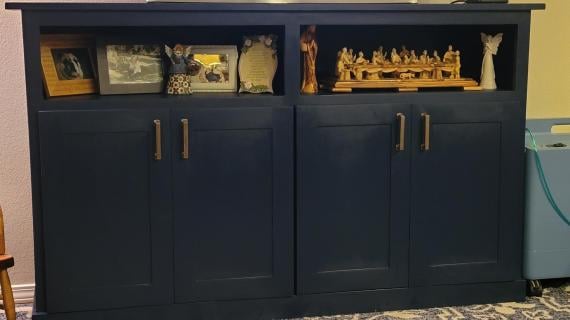
A console table in an entryway is a must.  Not only is it an essential dropzone for keys, mail, and more, an entryway console can ground a mirror (another entryway essential) and add beauty to your home's first interior impression.


Why We Built this Console Table

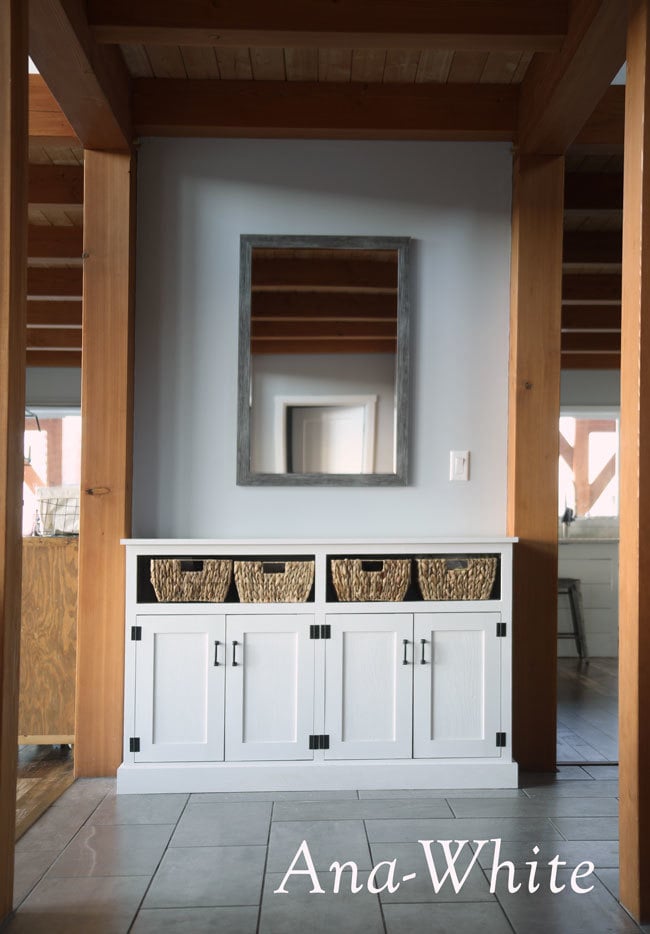
Our entryway in our new house had a big problem though -

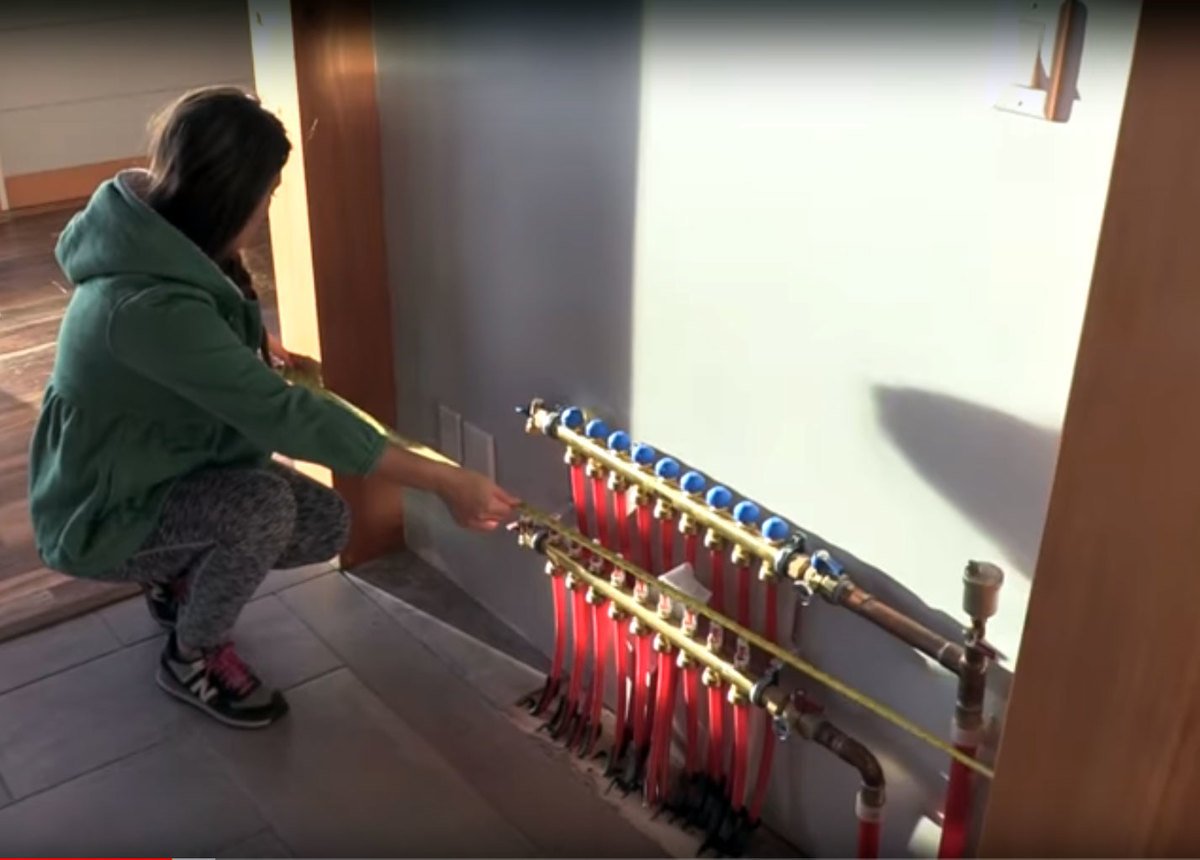
We needed to hide these radiant heat floor pipes too.

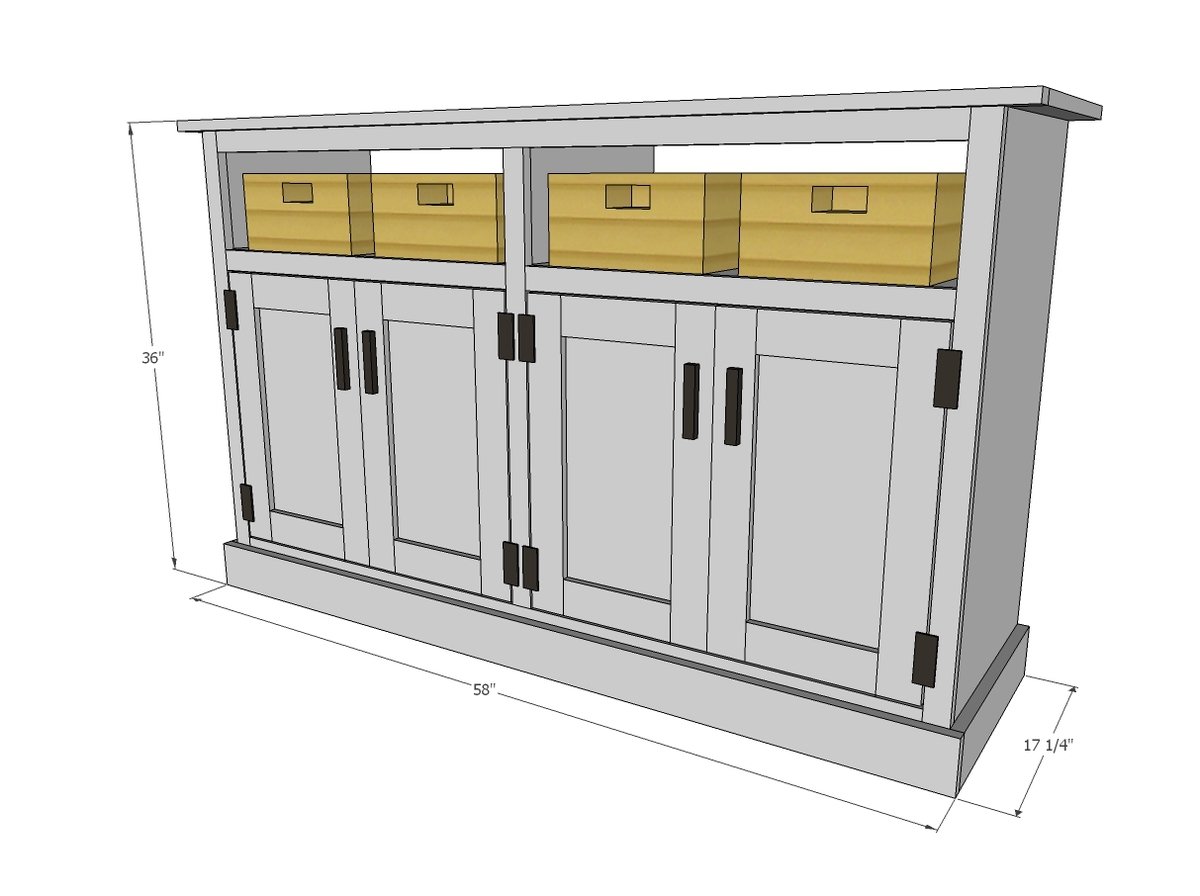
So I came up with this design for an entryway console -

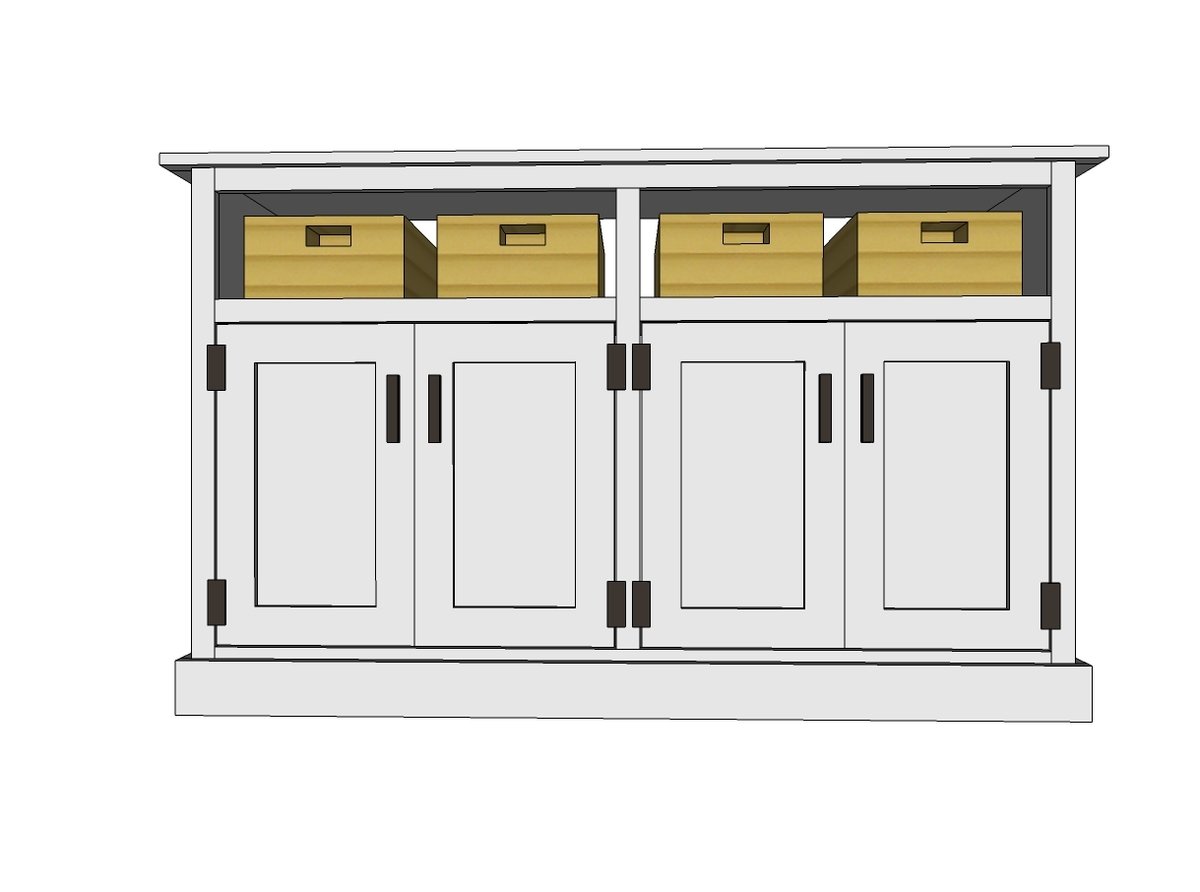
It's based off a console table plan I did a few years back -

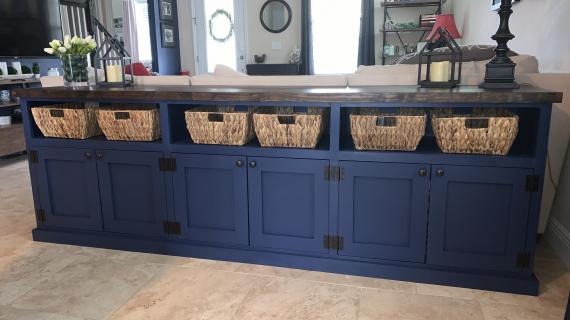
I just double the width to fit my space.  I hid the pipes behind the doors, but kept the basket storage to full depth.  There's still a good amount of storage behind the doors too, despite the pipes.

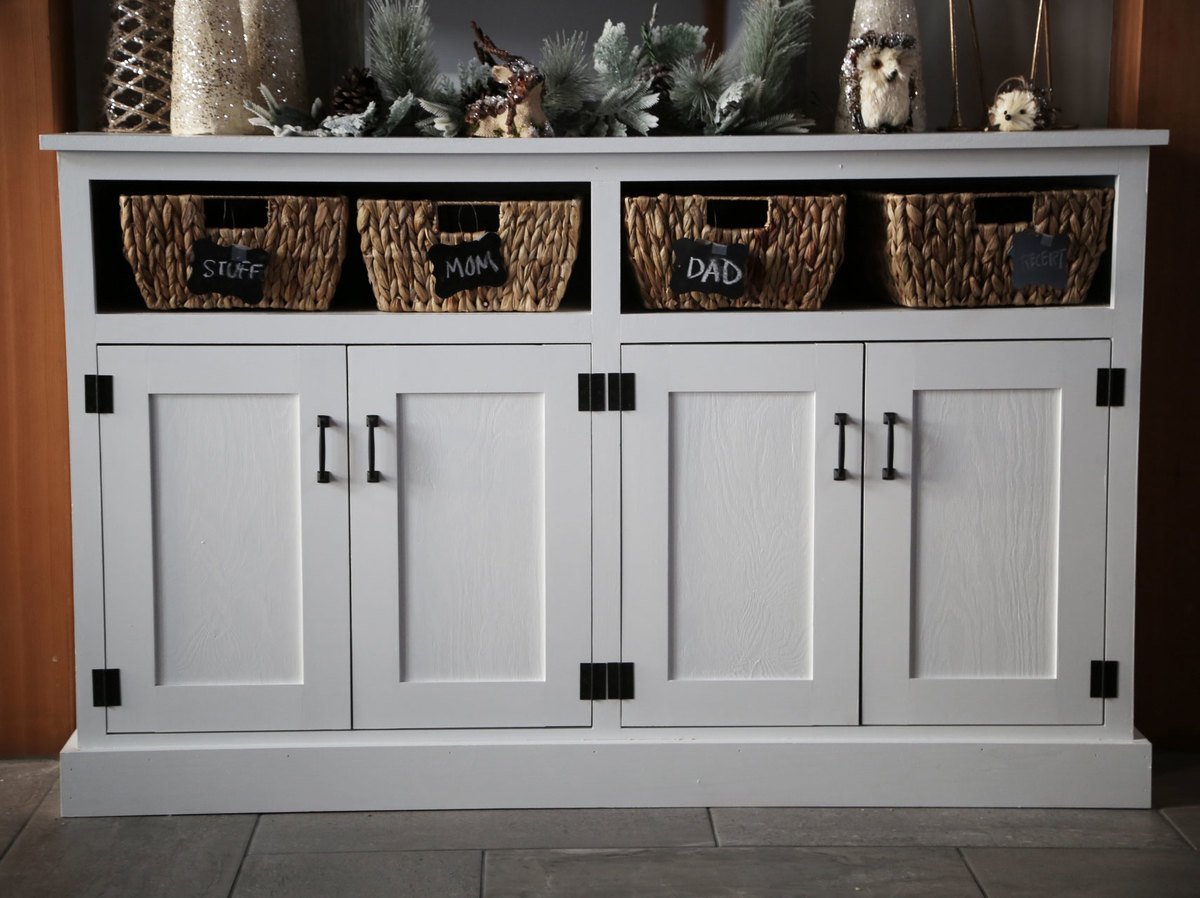
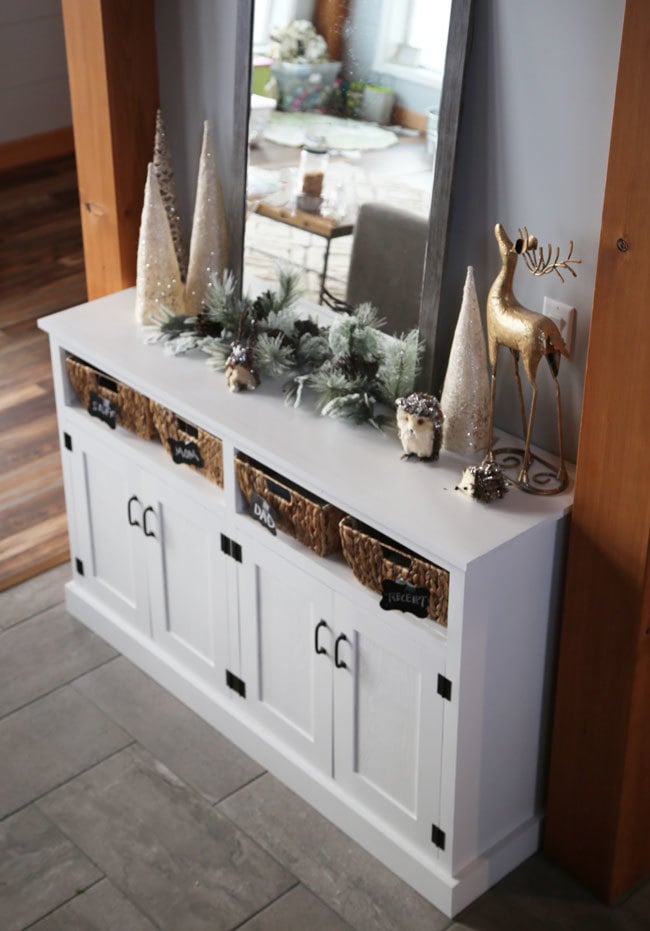
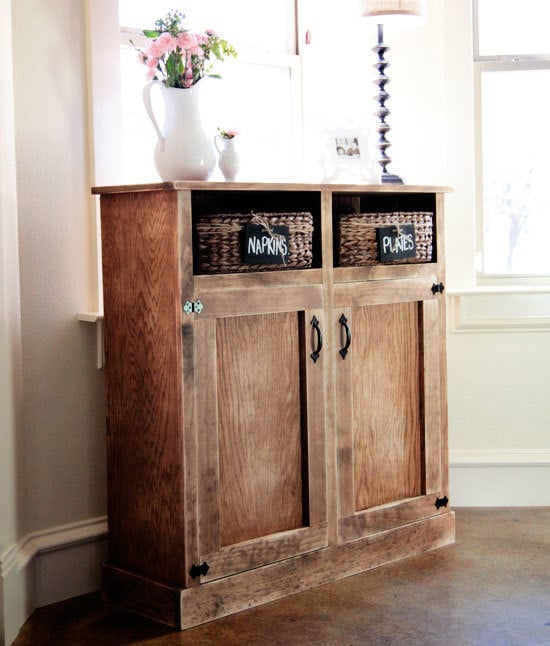
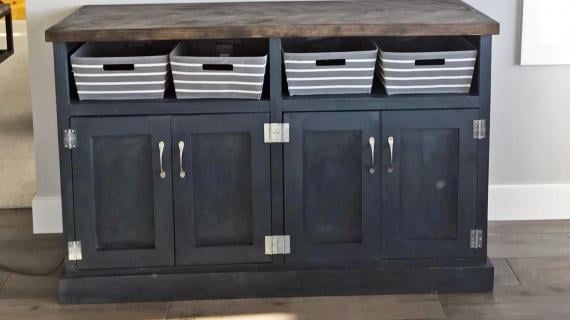
We love our new white console table!


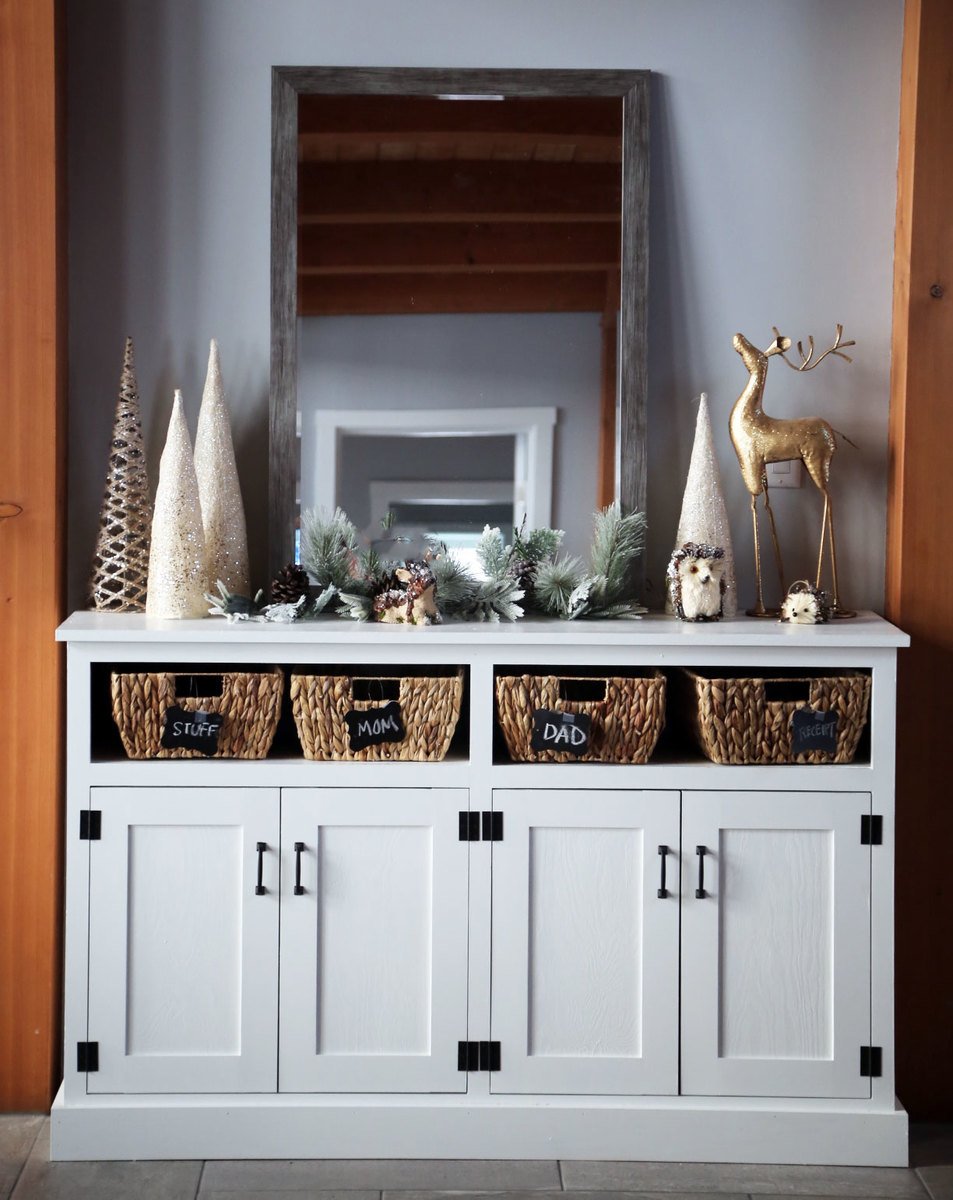
This piece is so perfect for our space.  The baskets (from Joanns) are perfect for mail, and the look is very adaptable for every type of decor or season.

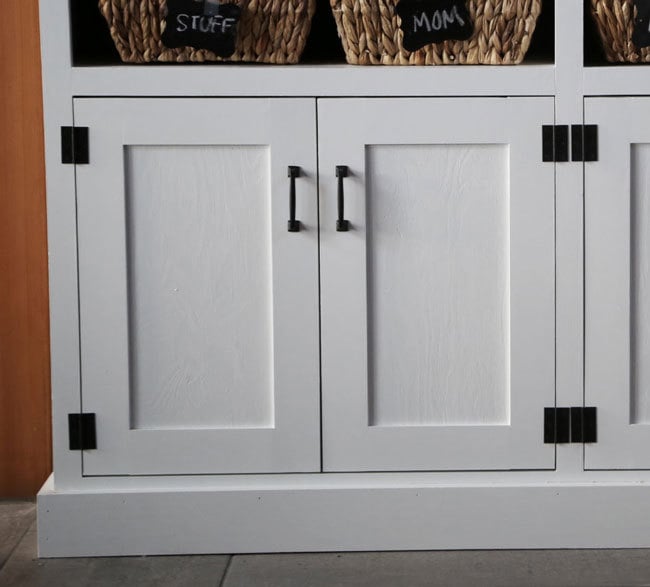
The hardware was a big deal.  I dry fit several different options and was very suprised when the Lombard Pulls by Liberty Hardware/Franklin Brass were the clear winner.
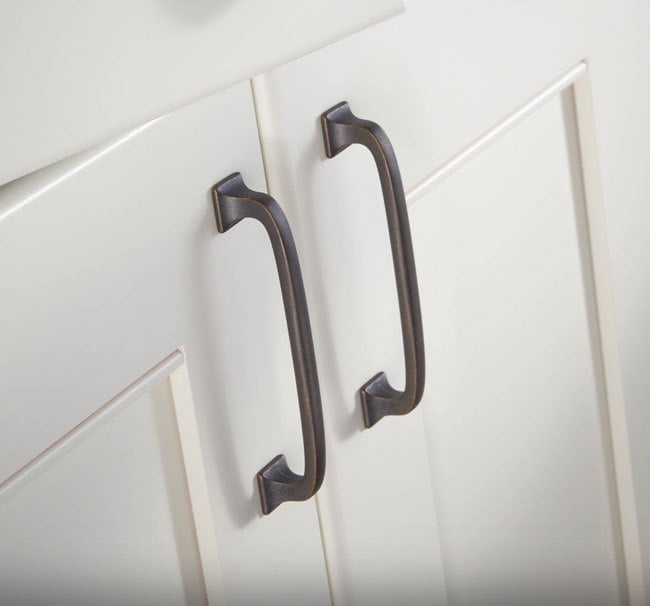
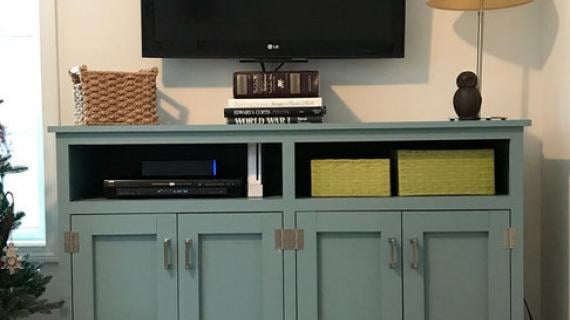
This was such a good project, one that will stay with our house for many many years.  I love that it could be used throughout the house too - entertainment center, baby changing table, hybrid dresser, dining room buffet, coffee bar just to name a few.


Watch - Building this Entryway Console Table

We featured this dropzone entryway console in a video a few weeks back - lots of build details, especially on the doors - do watch if you can.


Free Plans to Build Your Own Entryway Console with Cubbies

The free plans to build this entryway console follow.  Thank you for using our plans, please share a photo when you are done, we love seeing your work!


Pin For Later! 

Entryway Console with Open Shelves - Double Width

Dimensions
entryway console shelf dimensions
Counterheight, 16" deep, 5 feet wide. This is a large console table.

Preparation

Shopping List
  • 1 – 4’ x 8’ x 3/4”thick cabinet grade plywood sheet ripped into 15-3/4” wide strips (you can also use 4-1x12x8' boards instead for a narrower depth console table)
  • 4 – 1x2 @ 8 feet long 
  • 1 – 1x4 @ 8 feet long
  • 3 – 1x3 @ 8 feet long
  • 1- 4’x 8’ x 1/4” thick plywood (for the back)
  • 4 sets of hinges
  • 4 knobs/pulls
  • 4 magnetic clasps
  • 1-1/4” and 3/4” brad nails
  • 1-1/4” pocket hole screws
Cut List
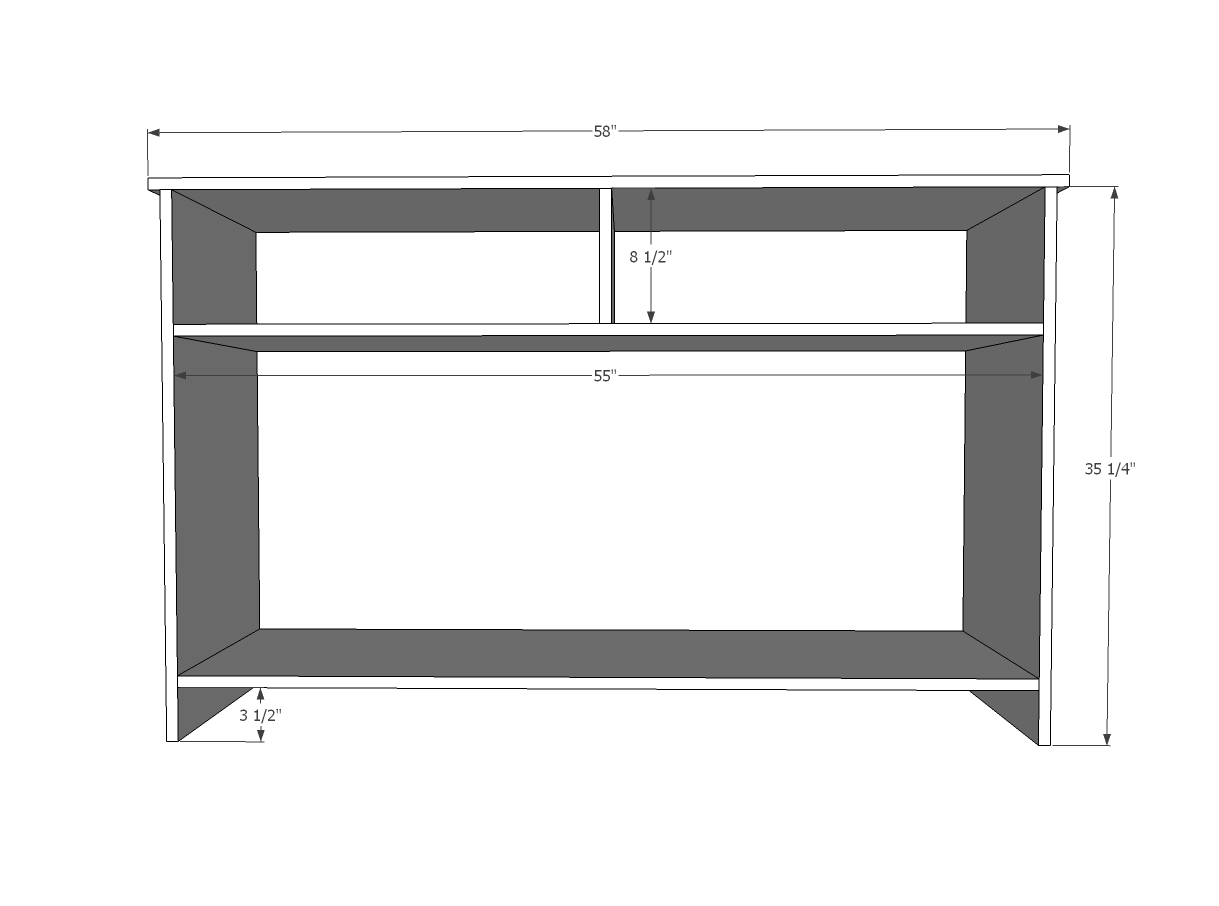
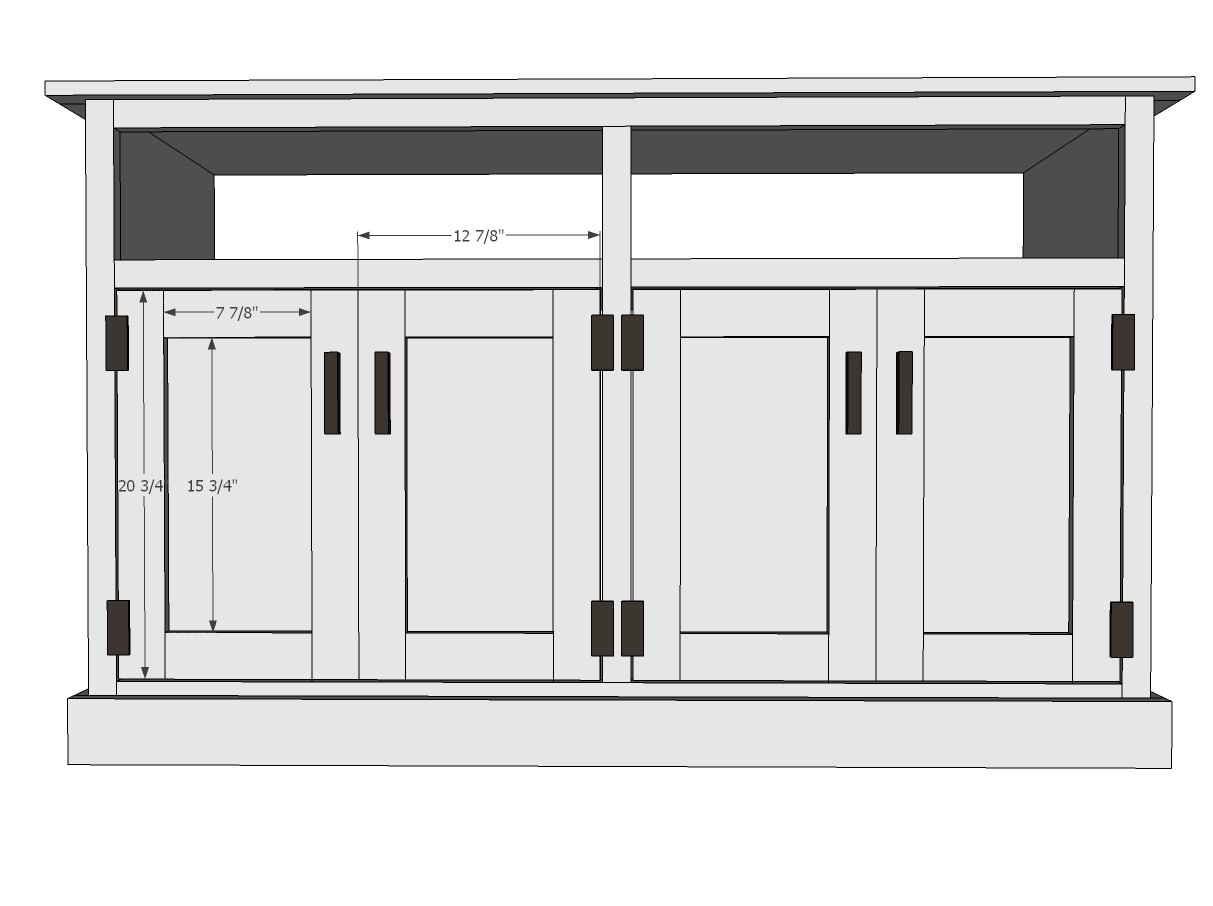
  • 1 – ¾” plywood @ 15-3/4” x 58” – top
  • 2 – ¾” plywood @ 15-3/4” x 55” – shelves
  • 2 – ¾” plywood @ 15-3/4” x 35-1/4” – sides
  • 1 – ¾” plywood @ 15-3/4” x 8-1/2” – divider
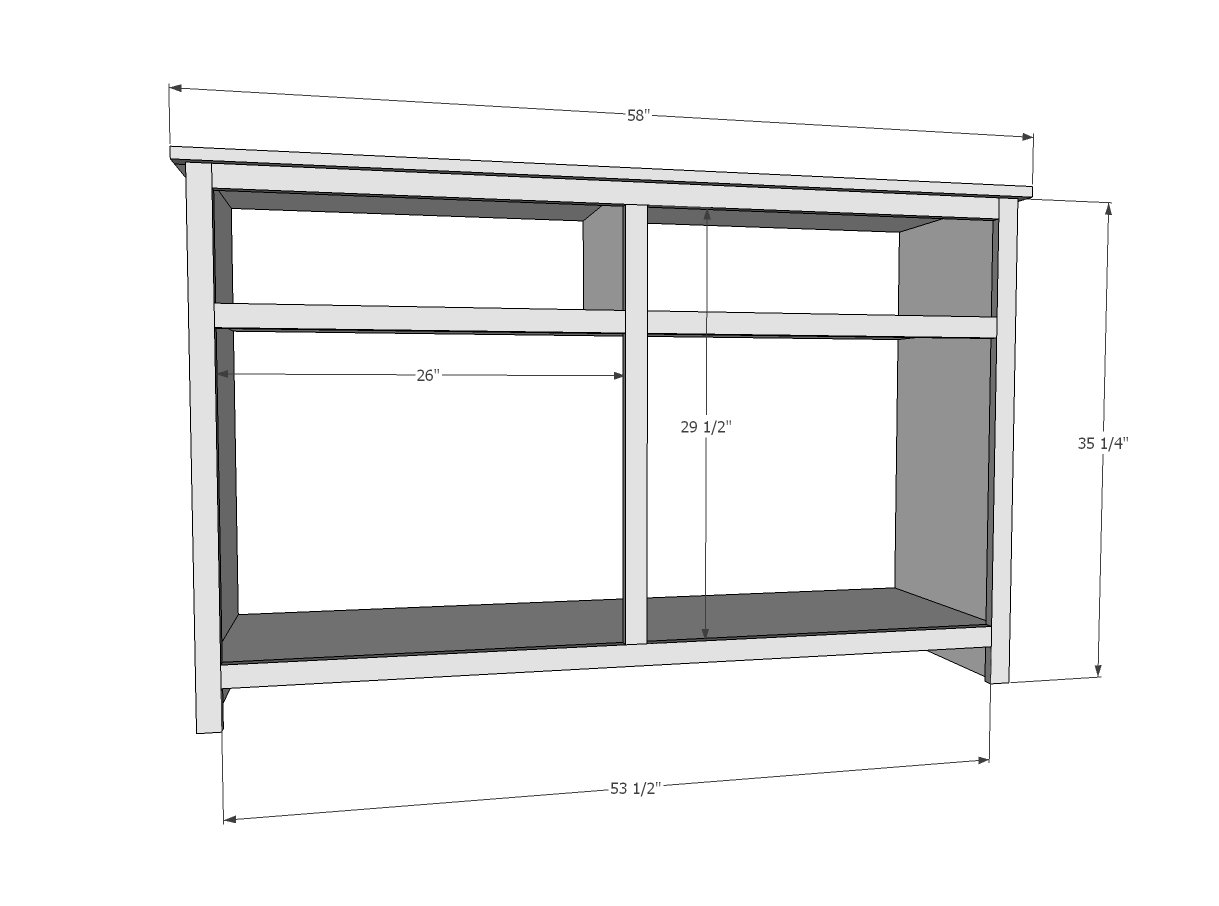
  • 1 – 1x2 @ 58” – face frame top
  • 2 – 1x2 @ 35-1/4” – face frame sides
  • 2 – 1x2 @ 53-1/2” – face frame stiles
  • 1 – 1x2 @ 29-1/2”- face frame center
  • 2 – 1x2 @ 26” – face frame shelves
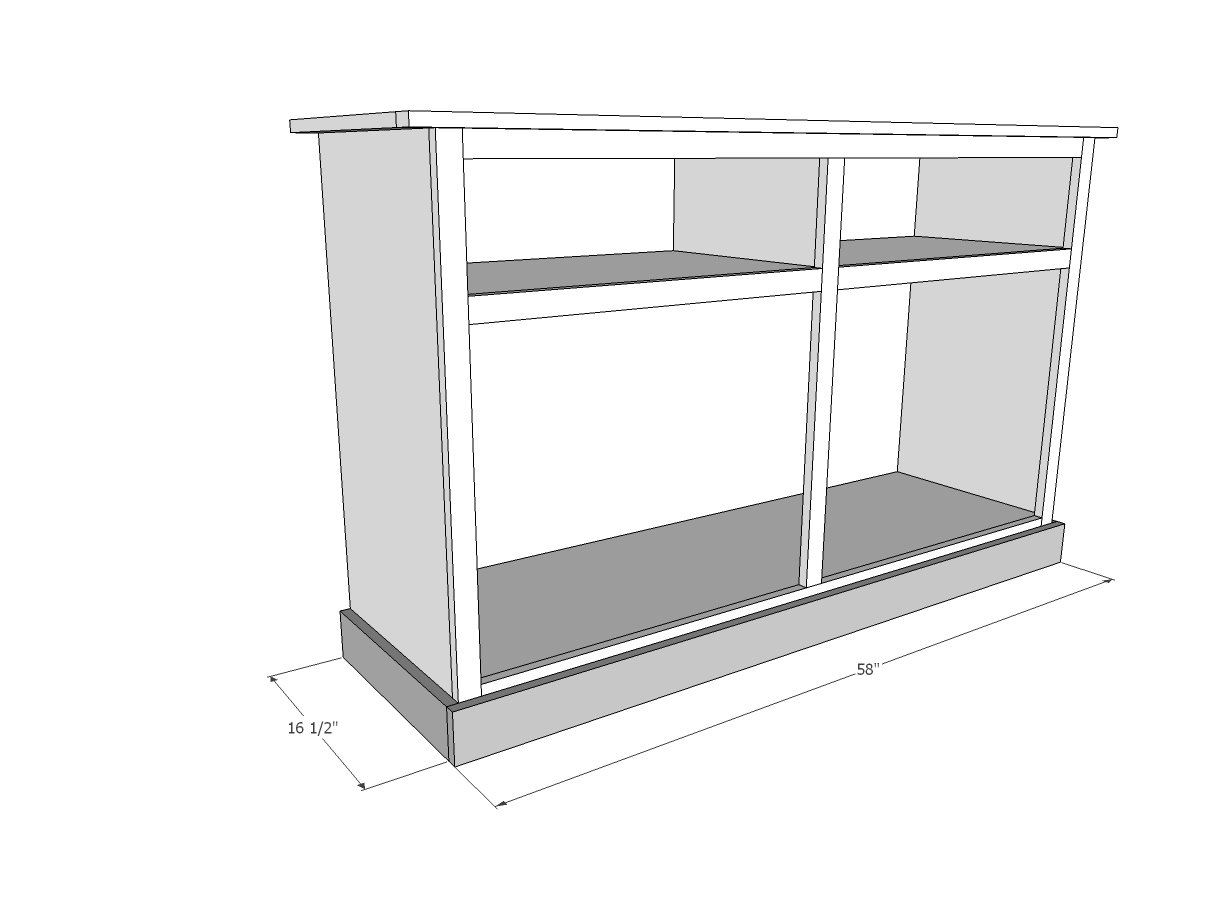
  • 1 – 1x4 @ 16-1/2” – base sides
  • 1 – 1x4 @ 58” – base front cut to fit
  • 8 – 1x3 @ 20-3/4” – door stiles
  • 8 – 1x3 @ 7-7/8 – door rails
  • 4 - ¼” plywood cut to fit approx. 8” x 15-3/4”
Tools
Tape Measure
Speed Square
Pencil
Safety Glasses
Hearing Protection
Kreg Jig
Drill
Circular Saw
Brad Nailer
Power Sander

Instructions

Step 1

Rip plywood on tablesaw or with circular saw into strips 15-3/4” wide by 8 feet long.  From these strips, cut out pieces for carcass.  Assemble the carcass using three ¾” pocket holes and 1-1/4” pocket hole screws per joint, for all joints except center divider.

For center divider, apply glue to both ends and position in center of upper shelf opening.  Use 1-1/4” brad nails to secure in place.

Step 2

Using ¾” pocket holes and 1-1/4” pocket hole screws, build face frame on flat level surface. Top face frame piece overhangs front and sides by ¾”.

Nail completed face frame to front of carcass with 1-1/4” brad nails and wood glue.

Additional shelves can be added, but need to be at least 1/2" less in width than the carcass to allow for the door backs to be added in last step.

Step 3

Measure and cut side base pieces.  Nail to sides with 1-1/4” brad nails.  Measure and cut front base piece.  Nail to front with 1-1/4” brad nails.

Step 4

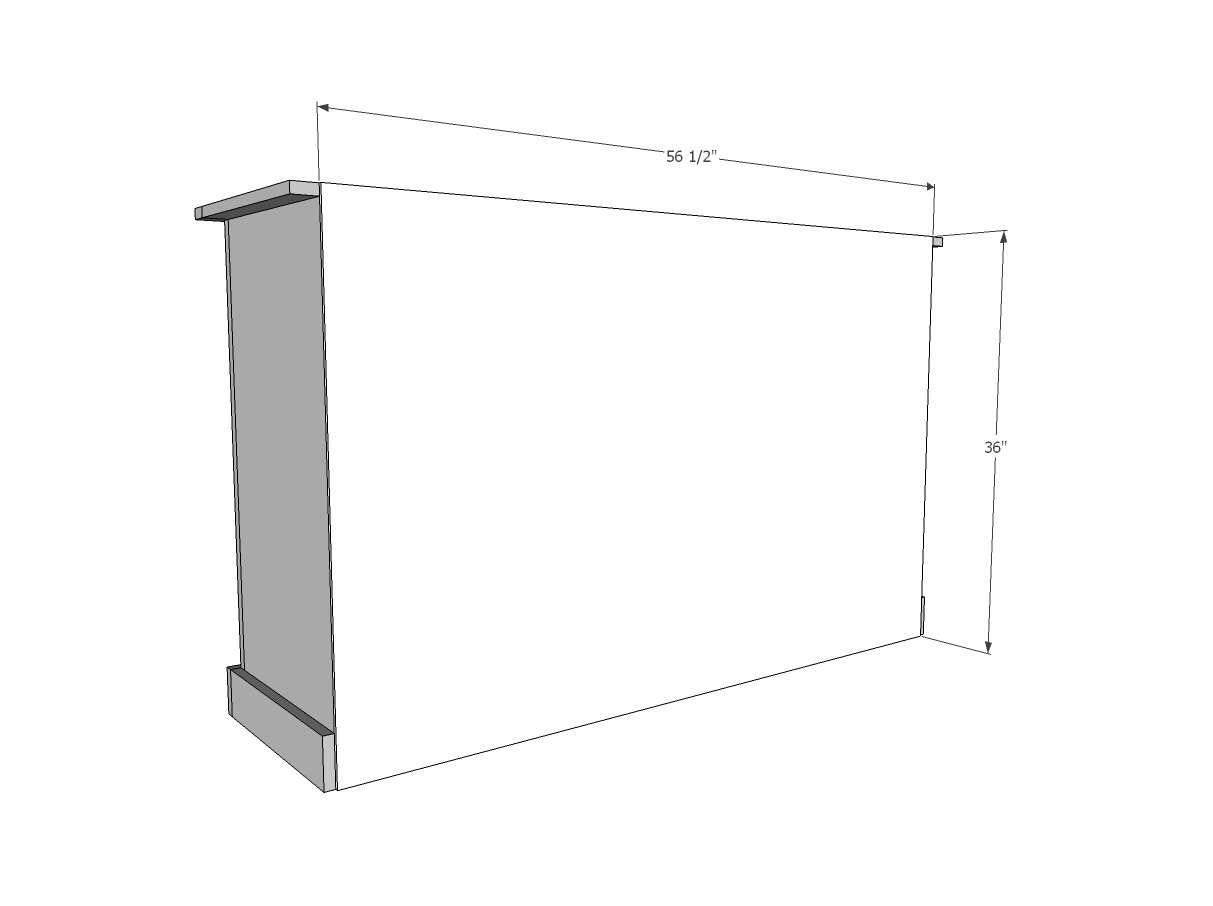
Cut back piece from ¼” plywood and nail to all edges on back of cabinet using glue and ¾” brad nails.

Step 5

Assemble door frame pieces using ¾” pocket holes and 1-1/4” pocket hole screws.  Cut plywood slightly larger than opening and nail to back with ¾” brad nails and wood glue.

Install doors with hinges.  Add knobs or pulls and magnetic clasps.

NOTE: Please watch the video as there is more details on steps for the doors in the video

Comments

LittlekelPA

Wed, 09/02/2020 - 06:28

Loved this cabinet; however, I needed something a little bit smaller for my space. Thanks so much for sharing the plans! I made mine half the size and only one door that was on the outside of the face frame not inset like yours. I think it looks pretty cute for my first cabinet. I even used the router table for the first time. :D

Alienz17

Mon, 05/24/2021 - 00:49

Just finished making this and absolutely love it!! Thank you so much for these plans.

cayenne

Sat, 01/14/2023 - 14:54

Hi Ana,
Can you tell me what size bit for my router do I need for the Entryway Console ? I'm just at the point of building the doors and you don't say in your video, what size bit for door's rails and stiles ?

Frequently Asked Questions

Wood Questions

What kind of wood should I use?
Most of our plans use standard construction lumber like pine or fir. It's affordable, easy to work with, and easy to find. It's also rapidly renewing and biodegradable, so a great eco friendly choice!

Can I use hardwoods instead?
Yes—just keep in mind they're heavier, cost more, and can be tougher on tools and harder to join together and finish. I recommend not tackling a hardwood project until after you have built several softwood projects.

What if my boards are warped?
Choose the straightest boards at the store. You can often work around slight warps by cutting them into shorter pieces.

What wood should I use for outdoor furniture?
Use red-toned or pressure-treated 2x lumber for framing, and cedar or cedar fence pickets for the decking. Outdoor furniture should be built like a deck—your local home center can help recommend the right wood for your climate.

Will my wood move or warp after I build?
Potentially, especially in humid climates. Let your wood acclimate indoors before building. Once acclimated and kept in a stable environment, movement should be minimal. Remember, most houses are built using framing lumber - it's all about keeping moisture down indoors.

Cutting Questions

Do I need a miter saw?
A miter saw is great, creating fast, safe, and precise cuts, even for beginners. But most plans can be built with a circular saw and a straight edge. If using a circular saw to cut, take time to practice, and get good at making cuts, before cutting your project boards.

How do I get clean cuts with a circular saw?
Clamp your board, measure twice, cut slow, and use a sharp blade. This takes practice, so spend some time making cuts. I go through becoming proficient at freehand cutting in my course, it is worth taking if you want to master this skill.

Will the store cut my wood?
Yes—most stores will do rough cuts to help you transport your materials home. But from store to store, the quality of cuts could greatly vary.

Joinery Questions

What screws should I use?
We recommend star-head self tapping screws for framing, most common sizes are 2-1/2", 1-3/4". Pre-drill if close to the edge or you find your wood is splitting.

Do I have to use pocket holes?
Pocket holes are the cheapest, easiest and fastest way to do some joints - like edge to edge or a hidden fastener joint. There are other methods, but these can be time consuming and expensive. We recommend using pocket holes as indicated in plans for best results.

How do I keep things square?
Use a speed square and measure diagonals after each step. Always clamp joints before screwing to keep them tight and flush.

Finishing Questions

Stain or paint before or after building?
A quick sand before and a full finish after gives the best results. Pre-finish if you're doing two-tone or detailed finishes.

What type of finish?
Use oil-based or water-based stain. For paint, cabinet-grade latex or enamel works great. High use surfaces on indoor projects should get a coat of polyurethane, I recommend a Helsman or Spar or other flexible poly that won't crack or peel with wood movement. For exterior projects, use a finish suitable for exterior fences.

How to get a smooth finish?
Start with a well sanded project. Sand between coats (220 grit), wipe clean, and apply light coats with a foam brush or roller.

Plan Questions

Can I change the size?
Many people do, and that's the great thing about building your own furniture! But do keep in mind going bigger might mean more supports are required, and often plans are optimized for minimal material waste.

Are these beginner-friendly?
Yes—plans are written with simple tools and clear steps in mind, with every effort to make plans as simple as possible.

Can I sell what I build?
Absolutely! Just don’t resell or repost the plans themselves.

General Questions

What tools do I really need?
A drill, circular saw, tape measure, square, and a few clamps will get you through most projects.

Do I need a workshop?
Nope! A driveway or small patio is plenty to get started, just make sure you have a level place to work. If you find you are building several projects a year, creating a small workbench is a great way to store tools and have a dedicated workspace.

What if I mess up?
Wood filler, sanding, or flipping boards goes a long way. Mistakes are part of the process!

What can I do to make my projects look more professional?
Start with straight boards, make accurate cuts, clamp all joints, and line up everything neatly. Sand thoroughly, use a neutral finish, and apply it in light coats for a clean look.

I've never built anything before. Where should I start?
Start with a few smaller softwood projects to get hands-on experience. Or if you're tackling a big project, buy a little extra lumber and practice your cuts and joints first. If possible, work with someone who has a bit of experience.

Care & Maintenance

How long will my furniture last?
With good joinery and regular care, your DIY furniture can last for decades. I have pieces in my own home that are over 20 years old and still going strong! One of the best parts about DIY furniture is that it’s easy to repaint, refinish, or repair—so your projects can grow and adapt with you.

How should I care for outdoor furniture?
Lightly pressure wash or hose it down once or twice a year. Tighten screws and reapply finish as needed to protect it—just like a deck or fence. A little upkeep goes a long way in extending the life of your furniture.

How about indoor furniture?
Regularly dust or wipe with a damp cloth. If it starts to look worn, a light sanding and touch-up paint or stain can refresh it in no time. DIY pieces are meant to be durable and fixable—so don’t be afraid to give them some love now and then.

Want to Build with Confidence?

Check out my ebook: 12 Skills to Build Your Own Furniture
It walks you through the core skills every builder needs—measuring, cutting, joinery, and finishing—so you can build beautiful furniture that lasts.

Still Have Questions?

Email us anytime at [email protected] and we’ll be happy to help!