
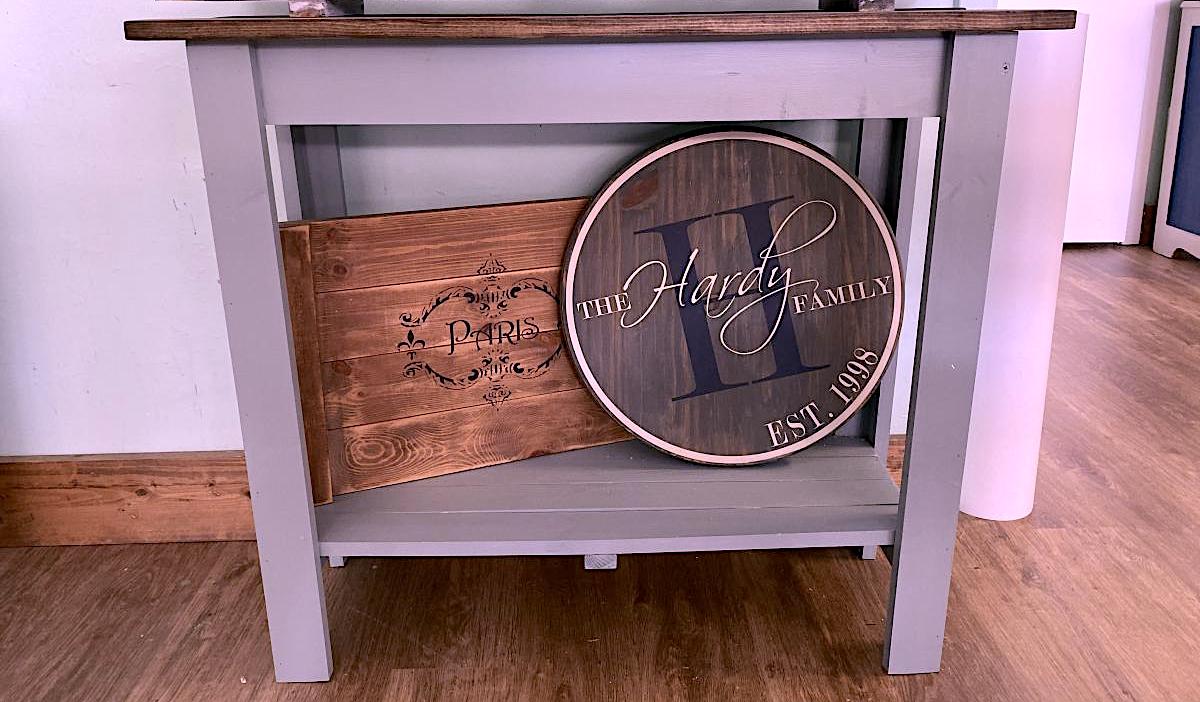

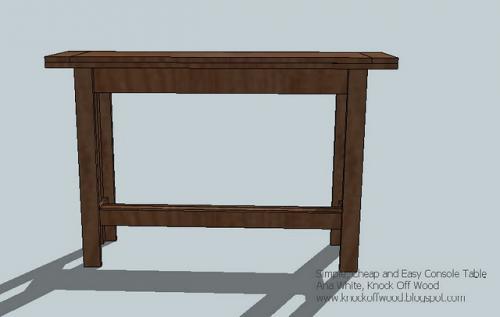
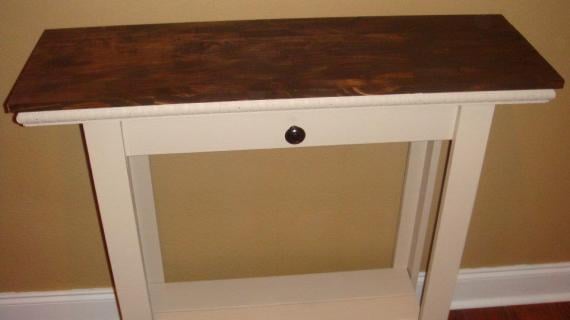
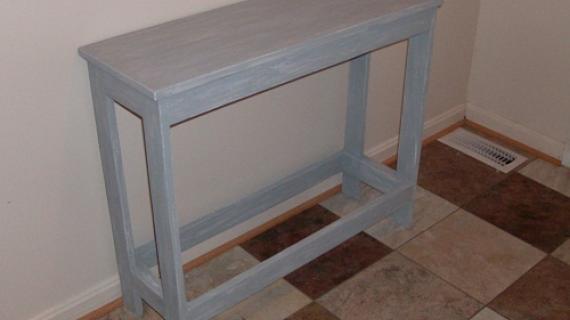
This simple console table is ideal for building with a nailer, if you have one. It uses mostly 1x boards, so will be lightweight and sturdy. Many of our readers have had success with this project.
Special thanks to one of our reader sharing their photo with us.
Preparation
- 3 - 1x3 boards, 8' length
- 2 - 1x2 boards, 8' length
- 2 - 1x4 boards, 8' length
- 1 - 1x12 board, 8' length
A) 4 - 1x3 @ 29 1/4" (Fronts and Backs of the Legs)


Instructions
Step 1
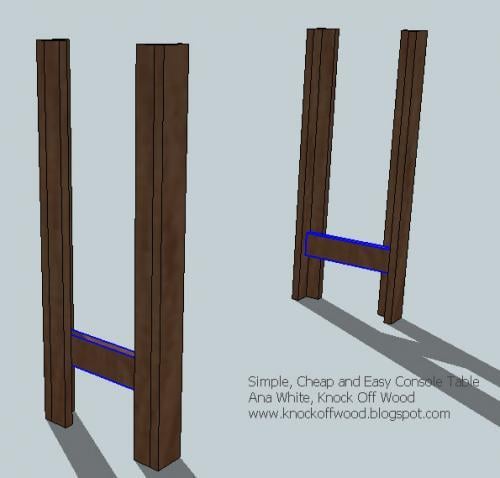
Construct your legs by nailing through the 1x3 legs into the edge of the 1x2 legs with 2" nails and glue. The legs will be positioned with the 1x3s to the front, 1x2s to the side, as shown in the diagram.
Step 2
Start by marking each of the legs 5" from the bottom of the board. This will be the bottom of the side support, C. Nail C to the legs, using 1 1/4" nails and glue, from the inside.
Step 3
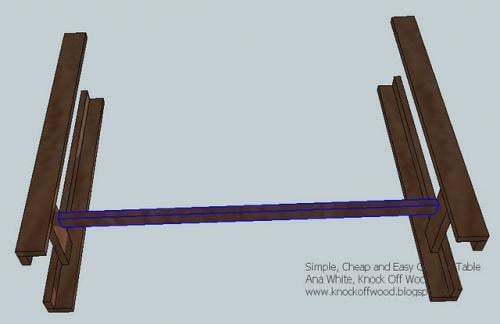
Now add the stretcher, D, centering D on the support, C, but keeping the top edges flush. D will lay flat, with the wide side up. This is demonstrated above. Use glue and 2" nails, nailing through the support, C, into the end of D.
Step 4
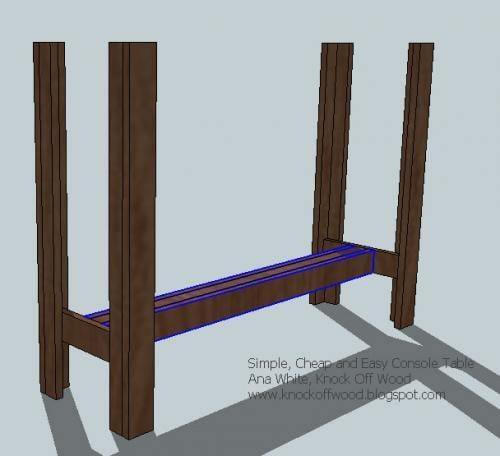
Add the side trim pieces, E. First, nail through the supports C into E, using 2" nails. Then nail down the length of the stretcher, taking care to keep the top edge of the stretcher (D) perfectly flush with the top edge of the stretcher support (E). Use glue and 2" nails.
Step 5
Step 6
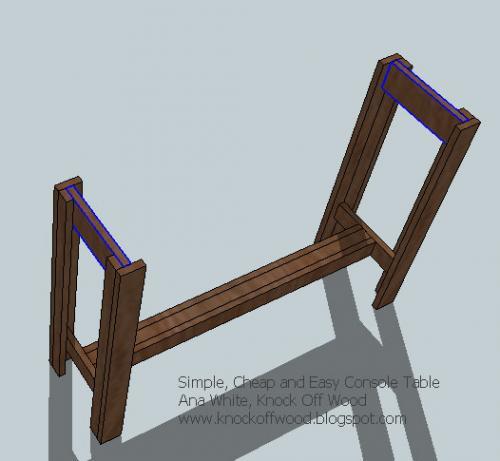
Do the same for the front and back apron pieces, G, as shown above. Nail through G into the legs using 1 1/4" nails and glue. Keep top edges flush. Take a minute to check for square
Step 7
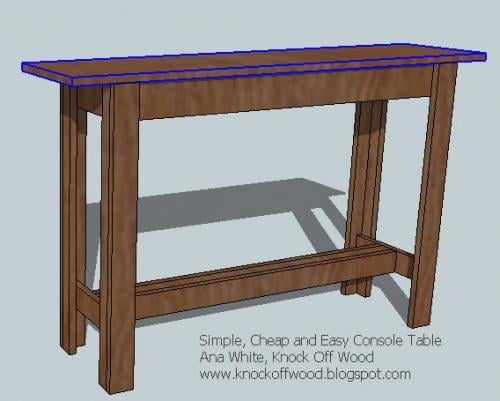
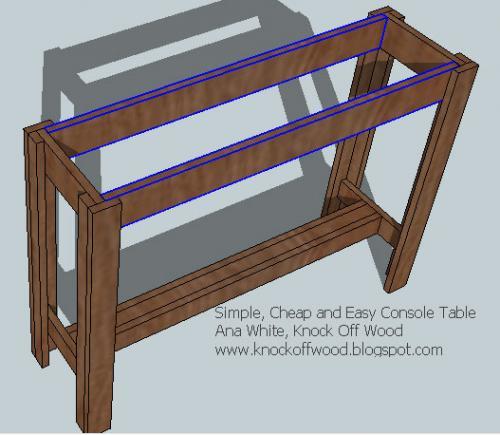
Now add the base top, piece H. Keep the front and back edges flush with the legs, but let the sides overhang 4" on either side. Nail into the legs and the apron using 2" nails and glue.
Step 8
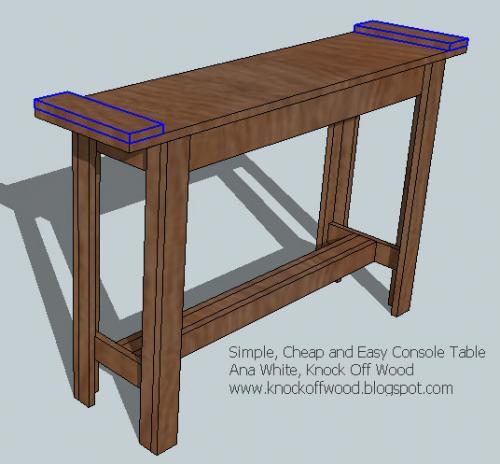
Use glue and 1 1/4" nails to attach the breadboard ends to the base top. Keep all outside edges flush.
Step 9
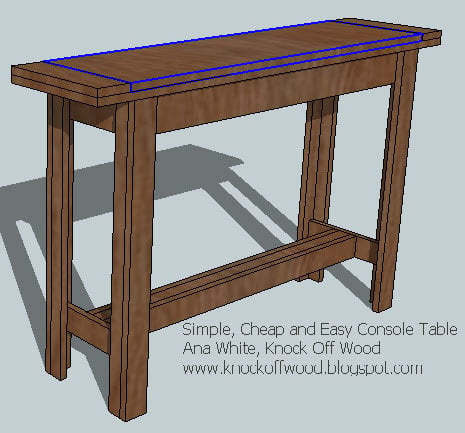
I recommend not cutting the final piece, J, unitl you have taken an exact measurement. Add the final piece, using glue and 1 1/4" nails.


Comments
mommybake (not verified)
Fri, 01/08/2010 - 06:04
WOW! I love your blog!! But
WOW! I love your blog!! But I have to admit - I am REALLY scared of the tools!! I don't suppose you live close to Boise, ID and you could come over and help?!? Keep blogging because I love it!! And I just found you today!! Thanks!!!
Jori Hodgson (not verified)
Wed, 01/20/2010 - 11:56
Hi Ana! Thanks so much for
Hi Ana! Thanks so much for sharing all of this extremely useful information. I plan on making one of your bookshelves once I finish this majorly huge craft table I came up with. Yikes..
Anyway...on this particular table, do you think it's sturdy and large enough to hold a 32" flat screen tv?
Ana White (not verified)
Wed, 01/20/2010 - 12:47
Jori, Yes, this will easily
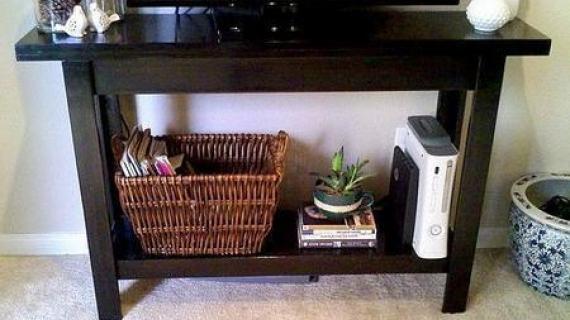
Jori, Yes, this will easily support a 32" flatscreen. In fact, check out the bragging board. Kelsey made this exact console table and I posted the photos with a TV on it! I think the TV was much bigger, too.
Just make sure you do a good job building it. Sounds like you know what you are doing!
Good luck!
Jori Hodgson (not verified)
Wed, 01/20/2010 - 22:23
You're right. That has got to
You're right. That has got to be bigger than a 32". Awesome! I'll be making this soon (or just whenever this other project is done).
The table I'm making now is an L shaped table that has bookshelves as the legs so I can have some storage. Sounds clever, but it's deemed itself to be pretty tricky. Mostly because my only workspace is my little apartment. Maybe I'll post a link to you once I'm finished :)
Take care.
Lee (not verified)
Thu, 01/21/2010 - 16:40
We made this table over the
We made this table over the weekend. Was a fun project to do with our two-year old son who loves tools. It's painted yellow and in our living room. Was so easy. We spent $90 (pine boards and cedar legs) including the paint and primer.
Crazy Girl Blond (not verified)
Sat, 01/23/2010 - 23:18
I would like to add the shelf
I would like to add the shelf to the bottom of this table like Kelsey did. What size board would that be and how would you modify the plan to include a shelf. Thanks for all the great plans and ideas!
Jo (not verified)
Sat, 02/06/2010 - 18:22
Hi Ana, I love your blog and
Hi Ana, I love your blog and today for the very first time, my husband and I built our first piece of furniture. We are so thrilled and thank you so much for plans! They were easy to follow and totally accurate!
We only made a slight mod which was to move the stretcher to the back. this allowed us to have space to hide our recycling center.
I would love to share with you pictures sometime.
THANKS!!!
Anonymous (not verified)
Fri, 02/19/2010 - 03:00
This was my first project,
This was my first project, and I used my brand new tools for it! (Never held a saw, nailgun or handsander in my life.) But Ana made me feel that I could do it, and I DID! This is a good first project, though I would also recommend the 'super easy bench' for a first attempt because it is something that a total newbie can get done in one day. Instant gratification! LOL-Thanks, ANA!
Carly (not verified)
Thu, 04/01/2010 - 02:59
Hi Ana...I've just finished
Hi Ana...
I've just finished building this console table. I didn't have a nail gun so I used a hammer, nails and muscle. I remember you mentioning that when you build your own furniture it has a story, well this one certainly does. I'm banging away (in my dining room) thinking how strong and sturdy it is and what a wonderful job I'm doing. I go to lift it up and I've nailed it to our hardwood floor!!! I used the wrong nails and the thing would not budge...talk about strong!!
Anyway, I'll post pics when I've finished painting but just wanted to say thank you all the way from Australia. I used to drool at the Pottery Barn website and think I would never be able to have anything as nice...now I drool on YOUR site and know I can have something just as nice...built by me! That's if I don't nail it to the floor lol.
Thanks again ;)
WAHOME (not verified)
Tue, 09/07/2010 - 14:31
I made this table yesterday
I made this table yesterday and everything was going smoothly until I got to the table top. My 1 x 12 actually measures 11.25, instead of 11.5 leaving it 1/4 inch short from fitting flush! :( I made another trip to a different hardware store today, and looked at all of the 1 x 12's and took my tape measure with me. They all measure 11.25!! What gives. I hate to purchase a laminate pine that is 18" wide and have to cut to down, they are much more expensive. I considered cutting two boards and making it work that way, with line right down the middle or maybe in thirds for very top. Anyone else have this problem. All of the other pieces fit perfectly!!
Maggie (not verified)
Mon, 09/27/2010 - 06:38
I have a set of legs from a
I have a set of legs from a busted dining room table that I'd love to use for this project, however, they've been turned, and I don't quite know what to do to make sure I get all the support I need to make this table.
Thoughts?
Marianne Wonnacott (not verified)
Wed, 10/06/2010 - 01:14
I had the exact same problem.
I had the exact same problem. Very frustrating because by the time you get to that stage, there's no fixing it. The cuts for C & F should be 9 3/4. I'm sure the 1X12 standard is 9 1/4. These plans should be modified to account for that.
Amy (not verified)
Tue, 10/26/2010 - 05:08
If you don't have a nailgun,
If you don't have a nailgun, can you use just a hammer and nails? Or would you need to use screws to make sure its supported well enough? I just plan to have this in my entry way with perhaps a small decorated item placed on top. Thanks for your help!
spiceylg (not verified)
Fri, 12/03/2010 - 03:36
Hi. I have yet to build
Hi. I have yet to build anything and this will be my first project. I was looking over the plans and still have a questions. What type of nails, are they finishing nails or regular nails w/a head? My assumption is the finishing nails to make it look better but then wonder about the strength of them?
Kenna (not verified)
Tue, 12/14/2010 - 19:36
My husband and I just spent
My husband and I just spent the evening making this table and the same thing happened. So frustrating because it's one of the last steps. He cut down some thin strips to fill in the difference but still very frustrating especially since it is a gift. I usually read through all the comments before building just in case... but didn't on this one. Just adding my experience to try and save somebody else the same problem.
We've built a couple of things from this site and have loved how easy everything comes together and have had fun doing it. Didn't want my first comment to be only negative!
Daryl (not verified)
Tue, 01/04/2011 - 09:56
Hi! I am excited to make this
Hi! I am excited to make this table. I want to be able to put two small cubes under the table - is it possible to move the stretched up higher than 5" off the floor? Could I do it like 20" off the ground or does that eliminate the purpose of a stretcher?
Guest (not verified)
Sat, 04/30/2011 - 13:04
Console Table
I followed your plans for this cut console table and ended up with out a table. 1x12s aren't 12 inches wide. My top isn't wide enough for the base. $30 of wood WASTED!
Guest (not verified)
Sat, 07/09/2011 - 12:34
1x12's
If you find your 1x12's arent 12" wide (please measure all pieces before starting to build) then adjust side supports C before fitting so that your table base is the same width as your table top pieces you will also have to adjust the length of your breadboard ends. In all wood working projects check and recheck your materials when you go to purchase them you can then make alterations to your project to suit before you spend your hard earned bucks.
Amy B (not verified)
Tue, 10/11/2011 - 22:03
Love it!
Just built this table for less than $40 in only about 3 hours!!! Thanks for the building plans Ana!!!
Guest (not verified)
Tue, 01/03/2012 - 20:43
Bottom Shelf???
Hi Ana,
I just want to say, first, you are fantastic and thank you for this site! I just finished making the rolling cubby bench for my son (I have never built a thing) and it came out beautifully. Now I am planning to build many of the things on your site.. Can you tell me how I can modify this console table to have a shelf on the bottom? That would be just perfect! Thanks!!!!
ZEHRA
Tue, 01/24/2012 - 13:30
Type of wood
Hi ana,
I love this simple console table plan but what type of wood would u recommend for this?
David (not verified)
Thu, 03/22/2012 - 04:12
Final pieces
Hello Ana !
Wanted to know why is the final pieces made out of 3 parts ?
Pauirdad
Mon, 11/17/2014 - 22:49
Done and Built!!!
I built this piece for the living room. This is my first full project with my new tools!!!!! Easy to build and easy to customize. Had to add a little height and and decrease the depth to fit. Also, I only used (1) 3/4" board for the top. Came out really well. Used spray on primer after sanding with 120 sandpaper and used Painters Touch Expresso with a foam roller for a smooth finish. Great job Anna on the plans. Easy to follow for the first build. Would love to attach a pic but don't know how here.
Side notes:
- Measurements on wood are not as they say. A 1"x4" board is shorter in width and not as thick. Make sure you measure as you build or adjust measurements before cutting.
- Nail gun is not needed but would love to have one since hammering the nails sucks!
- You can use any type of wood. I used the cheap stuff at Home Depot (new favorite store) and it came out great. Better wood probably would have sanded better and wouldn't be warped.
- This is a very sturdy table and unfortunately after making this table you will want to build more!!!!!
Swampworks
Thu, 05/11/2017 - 09:07
Dimensions Question
The plans call for the top to be made using a 1x12. A 1x12 is actually 11 1/4" wide. The legs are constructed using 1x3 and 1x2 boards with a spacer that is 10" long between them. Standard 1x3s are actually 3/4" thick. If you have 2 - 3/4 boards spaced apart 10", the total width will be 11 1/2" which is wider than the top. Am I missing something?
In reply to Dimensions Question by Swampworks
JoanneS
Thu, 05/11/2017 - 15:34
Dimensions
Hi Swampworks, it looks like the plan assumes the 1x12 on the shopping list is 11 1/2" (which I think they may be up in Alaska where Ana gets her wood). You can still make ths plan work by reducing the length of pieces C and F to 9 3/4" and piece I to 11 1/4".
OtherEricJ
Thu, 07/15/2021 - 19:32
Most sincere flattery of copying and riffing
I liked the first one that I built so much (changed the stringer to a shelf) that I made a second, trimmed down for a much smaller space. I shortened all of the lengths by 24" and then the legs a little (down to 24") and the stringer to 1x2 to reduce the visual weight.
https://twitter.com/otherEricJ/status/1415860829212315649