
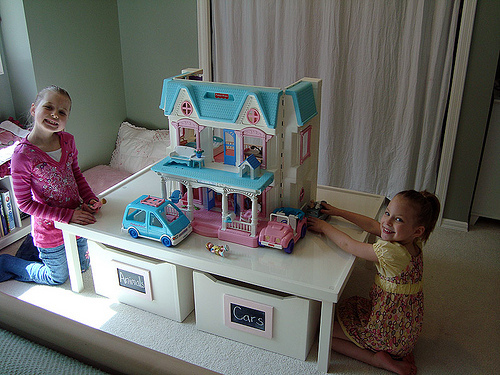

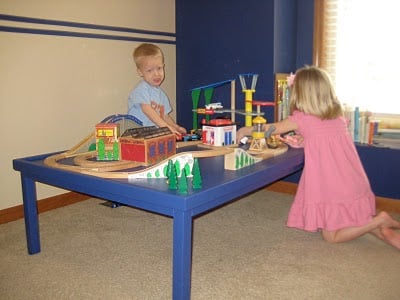
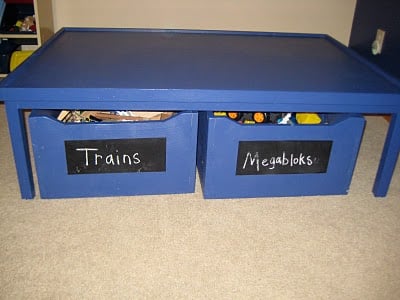
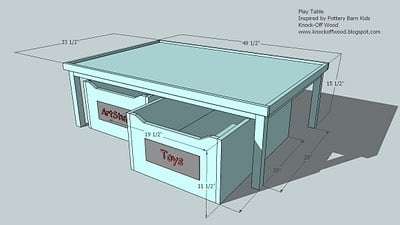
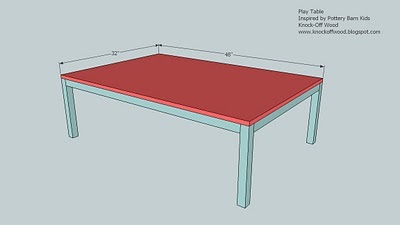
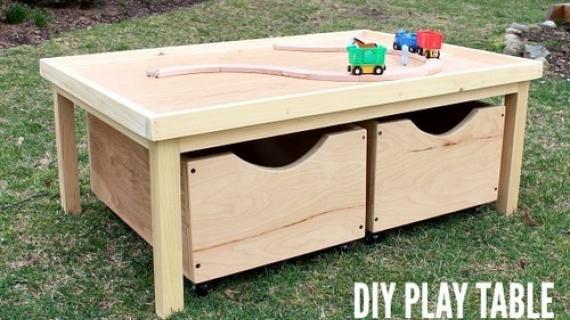
Small children have a way of taken over your coffee table with their toys. This play table when not in use rivals the beauty of a coffee table, but is at just the right height for play, and the carts hold all the toys! Special thanks to Jen for sharing her photos with us.
Preparation
Materials List for Playtable
3 – 2×2 Boards (8′ Long, measuring dimensionally 1 1/2″ x 1 1/2″)
4 - 1×2 Boards (8′ Long, measuring dimensionally 1 1/2″ x 3/4″)
1 – 4′ x 8′ 3/4″ Hardwood Plywood (for staining) or MDF (can be used if painting)
Materials List for Storage Carts
Plywood or MDF leftover from Playtable
10′ 1×12 Board (Measuring dimensionally 3/4″ x 11 1/2″)
8′ 1×12 Board (Measuring dimensionally 3/4″ x 11 1/2″)
8 Casters, at least 2 1/2″ overall, plate mounted (see photo below)
A) 4 – 2×2 @ 14 1/4″ (Legs)
B) 2 – 1×2 @ 30 1/2″ (Side Leg Support)
C) 2 – 2×2 @ 29″ (Side Apron)
D) 2 – 1×2 @ 45″ (Front and Back Apron)
E) 5 – 2×2 @ 30 1/2″ (Tabletop supports)
F) 1 – 32″ x48″ 3/4″ MDF (for paint) or hardwood plywood (for stain)
G) 2 – 1×2 @32″ (Top Rail, Front and Back)
H) 2 – 1×2@ 49 1/2″ (Top Rail, Sides)
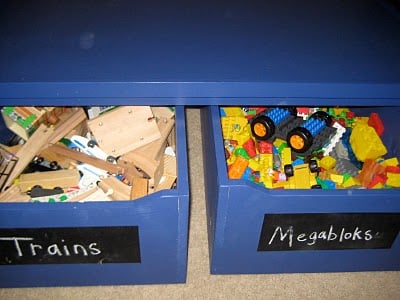
Storage Boxes
I) 2 – 28 1/2″ x 18″ 3/4″ MDF (for painting) or Hardwood Plywood (for staining)
J) 4 – 1×12 @ 18″ (Front and Back of Boxes)
K) 4 – 1×12 @ 30″ (Sides of Storage Boxes)


Start by cutting all your boards. Use 2″ nails and glue unless otherwise directed. To increase the strength of your table you can use glue and 2″ screws. If you are using screws, predrill your screw holes before fastening. Cross nail whenever possible (meaning nail from different directions into any possible neighboring boards).
Instructions
Step 1
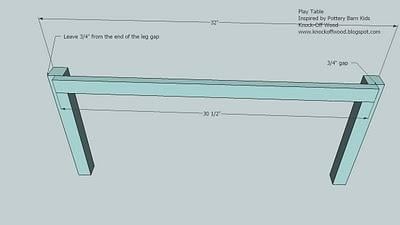
Fasten the legs, A, to the side leg support pieces, B, as shown above. Leave a 3/4″ gap on the ends of board B, as shown above.
Step 2
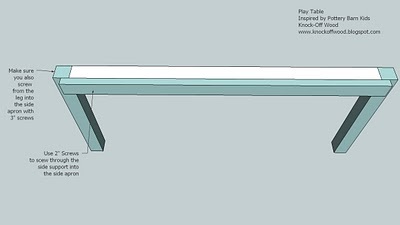
If step 3 is done correctly, piece B, the side apron, will fit perfectly as shown above. Make sure you screw from the leg support piece, B, and the legs into the side aprons, C.
Step 3

Add the front and back aprons, D, as shown above in red. Make sure you screw into the front and back aprons, D, from the legs,A, and also into the side leg support piece, B, as shown above.
Step 4
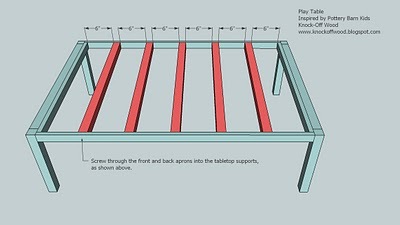
Evenly space the tabletop supports, E, and screw or nail into place, as shown above.
Step 5
Step 6

Add the side rails, G, to the side, leaving a 1/2″ gap on the top. This gap will keep toys on the table. Keep the side rails flush on the ends. Also add a few nails into the apron from the side rails.
Step 7
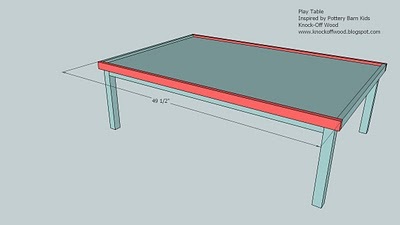
Fasten the front and back rails, H, to the table, using the guidelines in step 7.
Storage Carts
Step 8
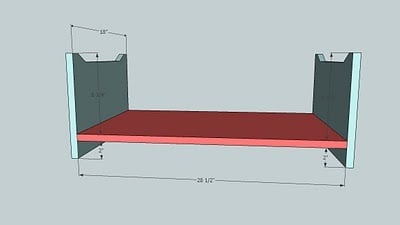
Fasten the front and back of the storage carts, J, to the bottom of the storage carts, I, as shown above. Leave a 2″ clearnace under the bottom of the storage cart (adjust the clearance to the height of the caster wheels).
Step 9
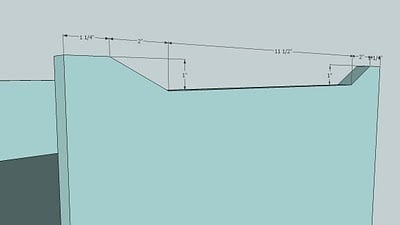
Cut the top of the fronts and backs of the storage carts, J, as shown above.
Step 10

Fasten the sides, K, of the storage carts to the bottom, I, and front and back pieces, J, as shown above.

Comments
Ana White (not verified)
Sat, 12/19/2009 - 22:10
My list is very long of all
My list is very long of all the projects that have been requested. Although this project was just requested today, it is not because I have not prioritized plans. I actually am building two of these tables and just happened to already have the plans! Happy Holidays, Ana
Jennifer Guire (not verified)
Sun, 12/20/2009 - 01:31
Thanks for all your plans! I
Thanks for all your plans! I plan to build a table when I get back home after Christmas. I will share then! Love your site!!
Ana White (not verified)
Sun, 12/27/2009 - 21:03
My husband built this table
My husband built this table for our nephew (I will be posting photos soon) and it is AWESOME! The drawers are huge.
HOWEVER - I will be modifying these plans so that you can build it from 1 piece of plywood and some 1x2s and 2x2s (saves you the 1x12s which can be spendy!) So check back! I will post these modifications with the photos.
Kylee (not verified)
Sat, 12/10/2011 - 08:03
Have you posted the
Have you posted the modifications you stated above?
Its So Very Cheri (not verified)
Tue, 01/19/2010 - 04:18
I am doing my post about you
I am doing my post about you and adding in a lot of pictures and links to your blog. I saw this and I am building my own crates this week. Already have the wood cut and ready to go. They are going to go under the tables I did on Kari's today.
Cheri
Catherine Hans… (not verified)
Thu, 01/21/2010 - 16:41
I have just spent way too
I have just spent way too much time going through your blog. I LOVE building furniture and I love all your plans. I just had to comment here because this table was one of the first things I was inspired by myself. My kids have loved this table so much and when they are too old to use it anymore I plan to put a piece of glass on the top and turn it into an awesome coffee table! I will have to find a photo to send you.. All the very best. You do great work and I sincerely hope you get your own TV show! You deserve it!
Stephanie Saunders (not verified)
Tue, 02/09/2010 - 15:07
I already have the Land of
I already have the Land of Nod table (man, if I would have known I could BUILD it, I would have saved tons!!), and the corners aren't so harsh. Can you sand down MDF corners to make them a little less dangerous to uncoordinated toddlers? I want to build the carts. I've never worked with MDF, so I thought I'd check with you first.
Jennifer (not verified)
Tue, 04/06/2010 - 13:46
Hi Stephanie!Having worked
Hi Stephanie!
Having worked with MDF on two projects so far, you CAN sand down the pointed corners just like any other wood. 120 grit sandpaper works perfectly.
undermentals (not verified)
Wed, 08/11/2010 - 14:14
Ana,Thanks for these plans.
Ana,
Thanks for these plans. I've seen the table in the catalog and thought it would be perfect for my son who loves to build models.
I'm in the middle of the build but I'm having problems. The narrow part of the 1X2s that abut each leg are just too slight to support a screw or nail. The 1X2s have splintered and cracked in each corner. It helped to add a 2X4 triangle as bracing to each corner,giving a wider nailing/screwing surface, but it became a difficult project as a result, and requires a partner to hold it while you attach it. And when I attempted to attach the MDF top to the frame it couldn't handle the stress - the frame buckled and I had to essentially start from scratch.
In reply to Ana,Thanks for these plans. by undermentals (not verified)
Lisatannerrd
Thu, 12/19/2013 - 22:34
legs are not supported enough
I know my kids are going to be climbing all over this thing. I need it to be strong and not wobble a bit if all my hard work is going to last. So, my solution was to attach some upcycled 2x6 about an inch from the bottom between the legs on the short ends w/pocket hole screws. I also replaced the long 1x2 aprons with 1x4's and cut the legs longer to accommodate those cute storage boxes.
Kati (not verified)
Wed, 09/01/2010 - 15:39
undermentals have you tried
undermentals have you tried predrilling first?
TripletDad (not verified)
Sat, 11/20/2010 - 16:04
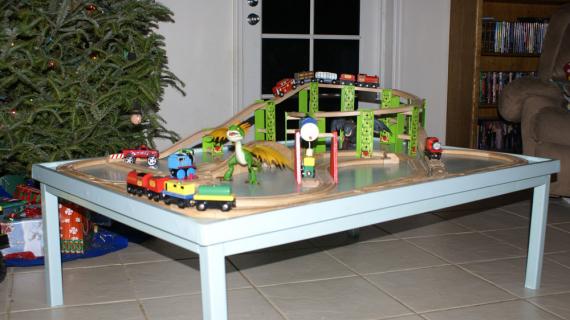
I made this table for our 2
I made this table for our 2 yr old triplets who are obsessed with Thomas the Train. Overall, I thought the plans were good and the table looks great. I found that the legs don't support the weight of the table all that well. The table was a bit shaky and I knew our kids would be leaning on the table and even trying to climb on it. So I was worried it would collapse. To stiffen it up, I added some plywood panels to the rear and sides, which made it very solid. I left the front side open to leave room for the storage bins to be stored. I also raise the height of the table to about 20 inches. I thought the plans left the table a bit too low for our trips. But good plans and thanks for providing this. I think part of the process is taking plans and tweaking them to adjust your individual needs. Thanks again!
Stacy (not verified)
Tue, 12/21/2010 - 10:45
Just perfect for our new play
Just perfect for our new play room!!
grandpa Roger (not verified)
Tue, 02/01/2011 - 09:14
I just finished building the
I just finished building the table - but haven't painted it yet. I used finish grade plywood so the total cost was substantial - about $150 in total. Here are a couple of suggestions. The left over plywood could be used in lieu of the 1 x 12's for the drawers. Save about $26 and is straighter so it makes better fits for the drawers. Also, I found that the legs were wobbly and needed reinforcement, there just isn't enough adjoining wood to create a good joint. I took a scrap piece of 2x4 and created corner braces - worked well and is very stable now. Finally, rather than use the 1x2's to trim off the table, I used 1x4's, and I mitered the corners, which covered all the frame parts and give it a nicer final appearance.
river4250
Sat, 05/07/2011 - 17:18
Working on the playtable
I am currently in the middle of building the playtable, and I've had some trouble with the frame as well. It's very difficult to get everything square and straight and screwed in without splitting a board, and I can't seem to keep the legs straight. Right now I've resorted to adding a bottom frame around three of the sides to help stabilize it, which is helping a lot. I'm not sure what I'm doing wrong or if I just don't have the skill level to build this the way it's meant to be yet. (I've only completed a few projects so far, although I'm having some trouble posting brag blogs for them.) Anyway, I think it will still turn out beautiful and will hopefully have better luck with the brag blogs in the future so I can post a pic. I've completed a twin fancy farmhouse bed with a few modifications, a bench, a small wall mounted bookcase, and just finished the taller standing flat bookcase. They all turned out absolutely perfect!
Thank you Ana, for giving women like me, who've never picked up a saw before, the inspiration and courage to make such beautiful things for our homes, and for giving us a little boost in the self esteem department. I feel so much pride looking at the things I've built, and it's because of you. Thank you so much!
Tsu Dho Nimh
Sun, 05/08/2011 - 06:42
1 - make sure your cuts are
1 - make sure your cuts are absolutely square and straight, and that the boards are also straight.
2 - pre-drill the holes for the screws to prevent splitting,
3 - use clamps to hold legs in position for drilling and screwing.
Kelli S. (not verified)
Sat, 08/06/2011 - 17:41
How much did it cost to make
How much did it cost to make this, vs. the set from P.Barn?
Jamie B (not verified)
Fri, 11/16/2012 - 06:51
pottery barn activity table PDF
I love this table and plan on making it this weekend for my son's Christmas present! However, I cannot seem to get the PDF version downloaded and the printed version from online does not show the measurements on the pictures. I have a MAC so not sure if this is why.