


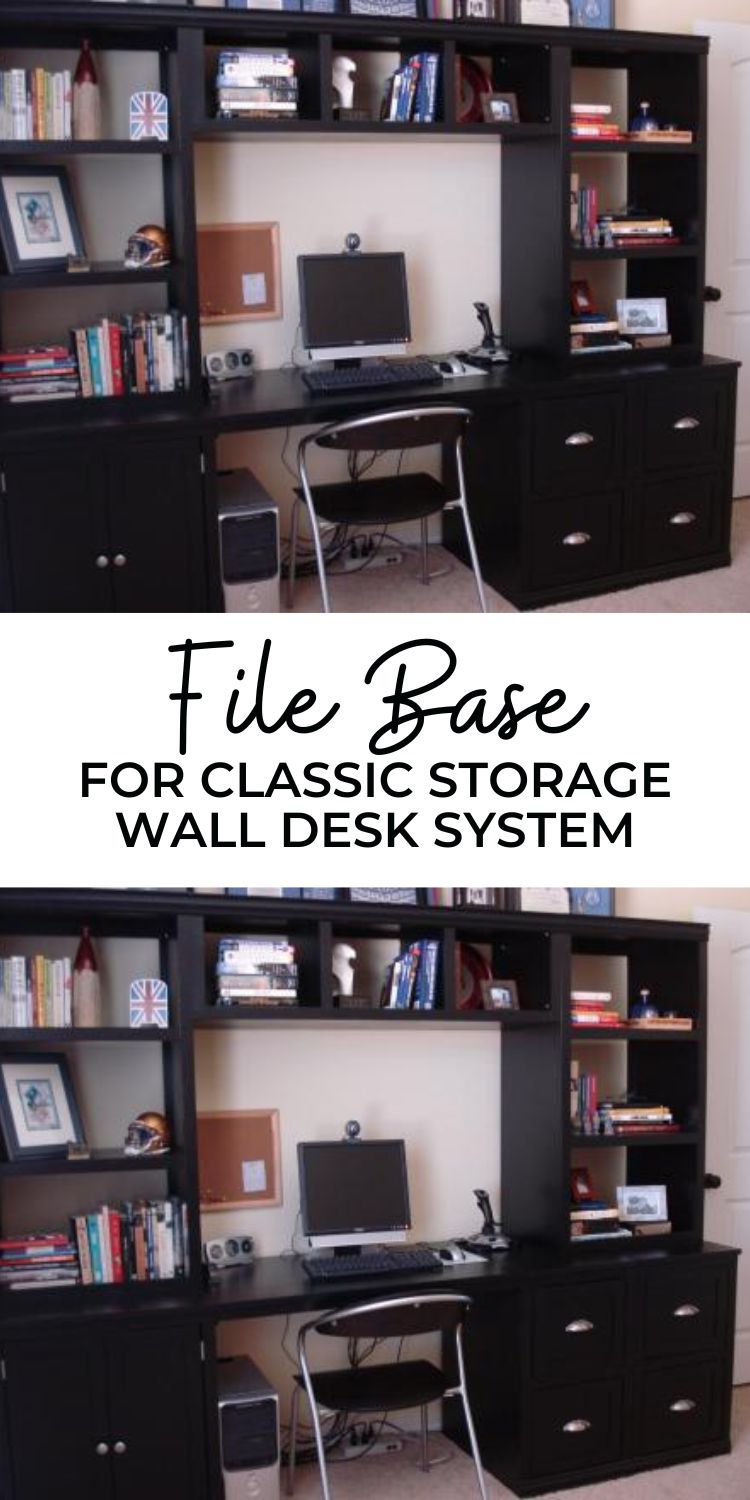
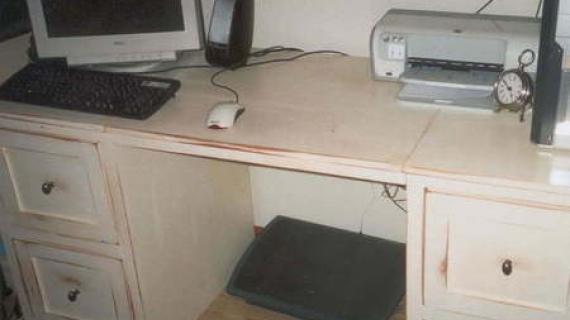
These plans coupled with a few more, and you can create an entire office wall system! This simple plan features two drawers that can be used as a file system, optional base and edge moulding, and a deep countertop space. Drawers use metal drawer guides.
Pin For Later!
Preparation
1 – Sheet of 3/4″ A1 Plywood or MDF, made into 1×24 boards
Cut List for the Box


To convert the file cabinet drawers to hanging file cabinets, you can purchase these rails for about $1.50 each. These will slip right over the drawer sides and voila – you’ve got a hanging file system! General Instructions. Cut your 3/4″ Plywood or MDF into strips 23 1/2″ wide by 8′ long. These strips become 1×24 boards. Position your cuts to get the most out of each board. Work on a clean level surface. You can fasten with nails or screws, depending on your tools and the use of this piece. Screws will hold better, nails are easier. My general rule is screw anything that will be “used” like chairs and benches, and nail sedentary pieces like bookcases and hutches. I will leave this up to you. If you are screwing, make sure you predrill and countersink your screws. If you are using MDF, avoid fastening within 1″ of the edge of the MDF. Do not use wood screws on MDF. Wood screws do not have a straight shaft and will split your MDF. I have had luck with drywall screws (after all, drywall is very similar to MDF). Make sure you predrill the entire distance of the screws. It’s going to screeech, so wear hearing protection. And glue, glue, glue. My favorite option is to screw the “box” together, and then use finish nails to add the frame. That way the frame does not have blemishes, but the piece is built sturdy. Make sure you take a square of the project after each step. Measure and mark out any joints before fastening. Be safe, have fun.
Instructions
Step 1
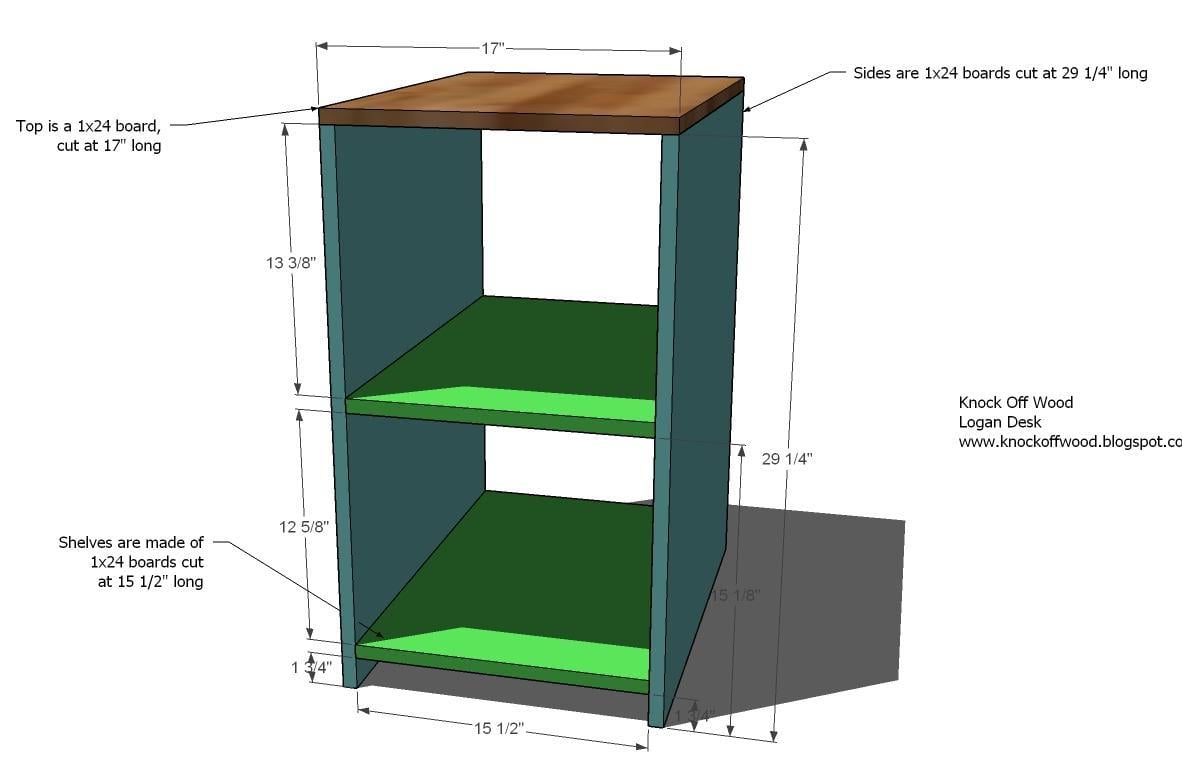
Build the Box. Start by fastening with glue and 2″ fastenerns the shelves to the sides. Then add the top. Check for square and use the measurements above to guide you.
Step 2
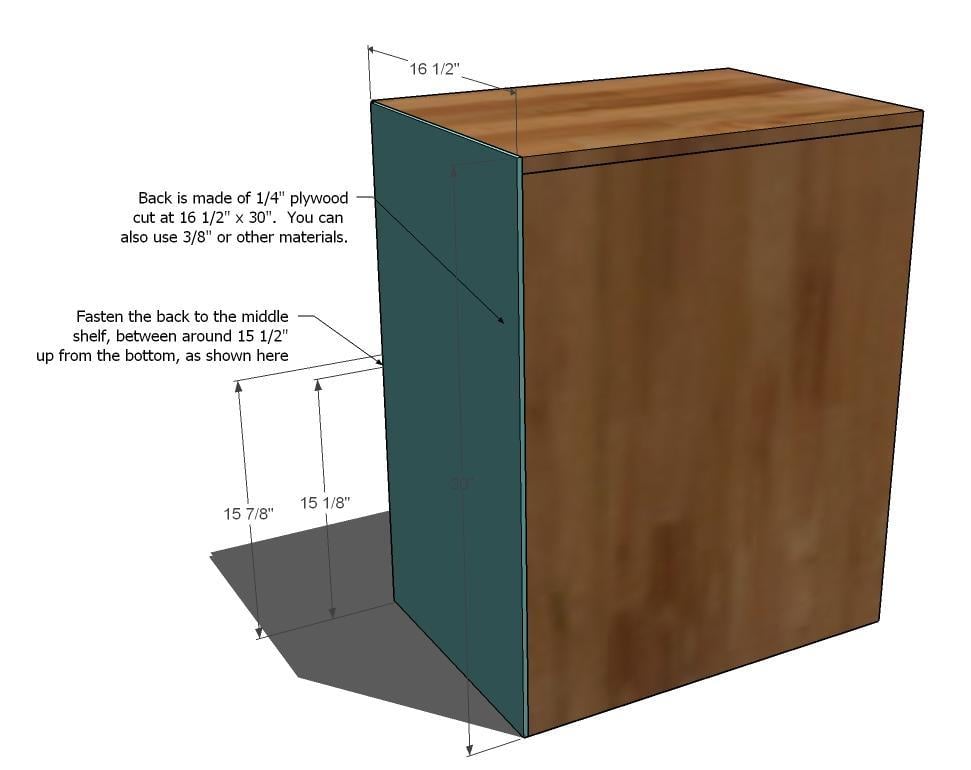
Plywood the Back. Add the plywood to the back. Just a note, most furniture stores use cardboard, yes, cardboard for the back of their furniture.
Step 3
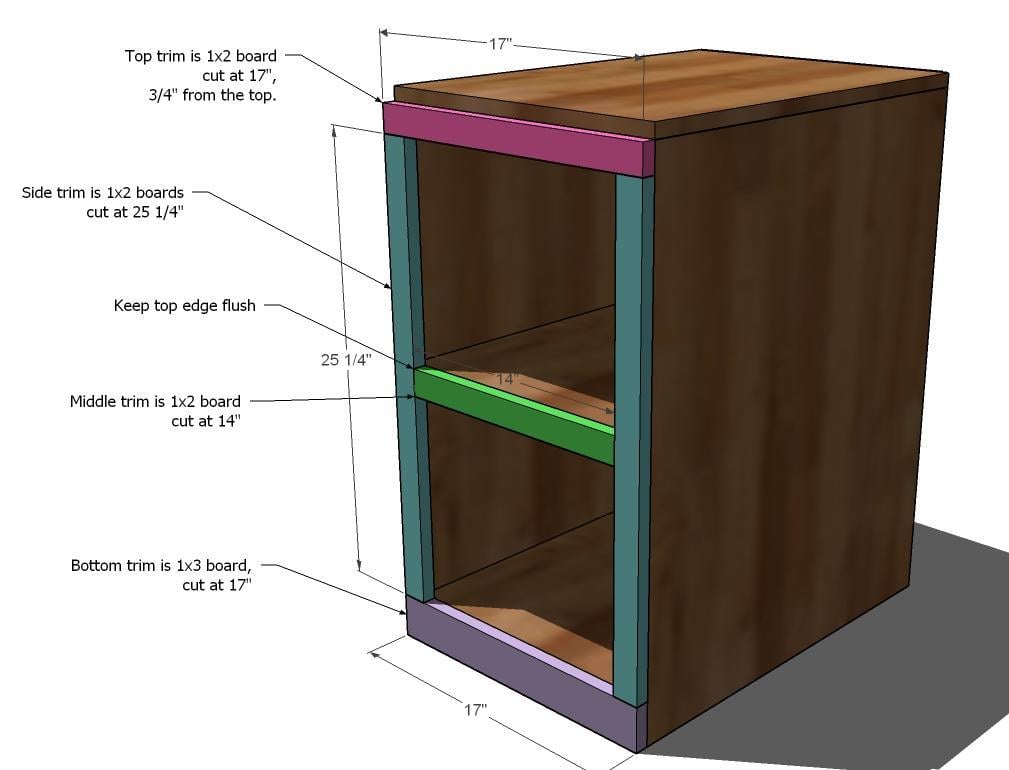
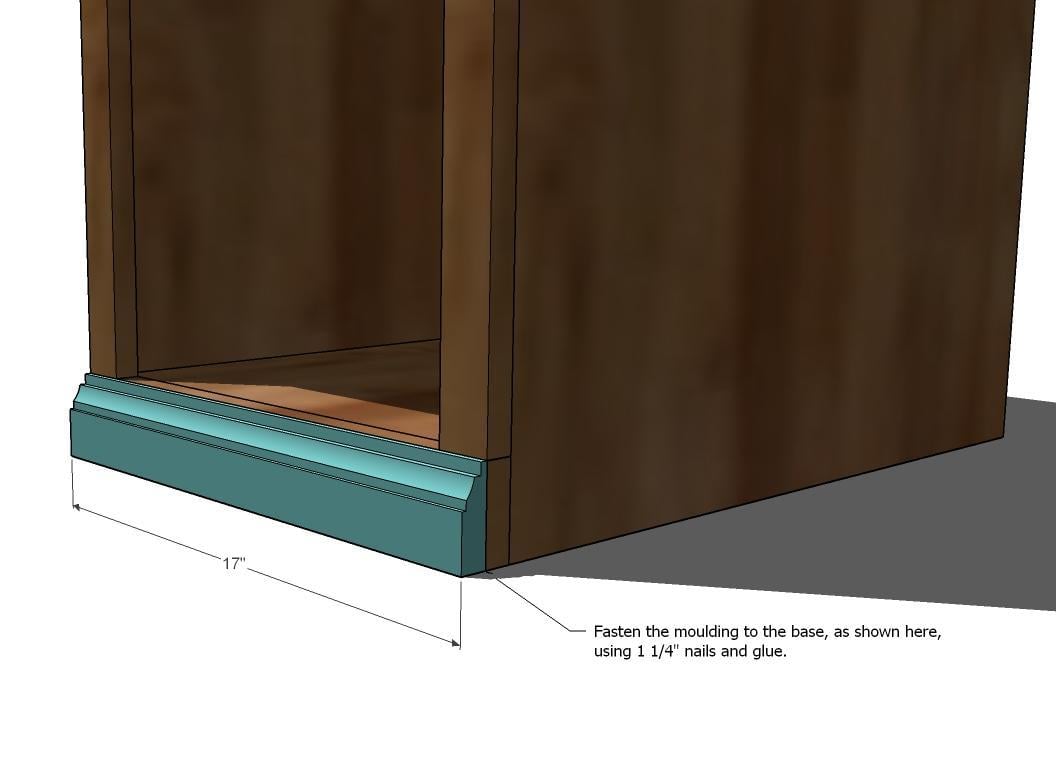
Face Frame. Start at the bottom and fasten the bottom, the 1×3, first. Then the sides, then the top, and then the shelf trim. Leave 3/4″ space at the top of the top trim.
Step 4
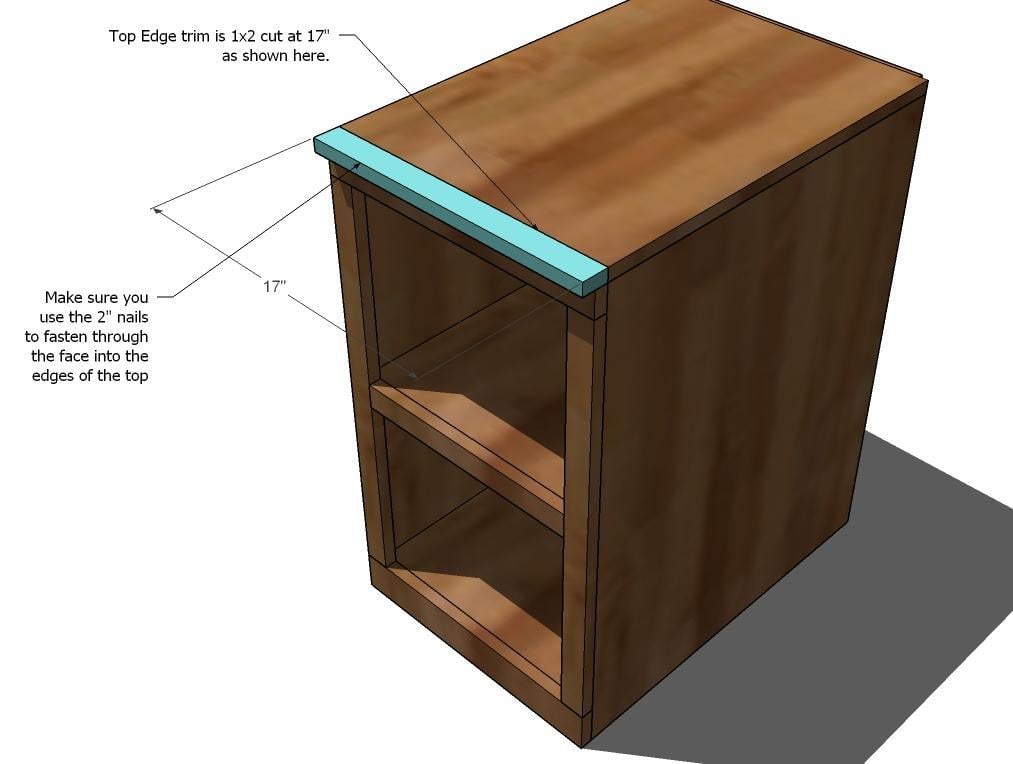
Top Trim. Finish the top trim, as shown above. Make sure you nail through the face of the top trim into the top of the cabinet, as well as into the top trim piece from the previous step.
Step 5
Step 6
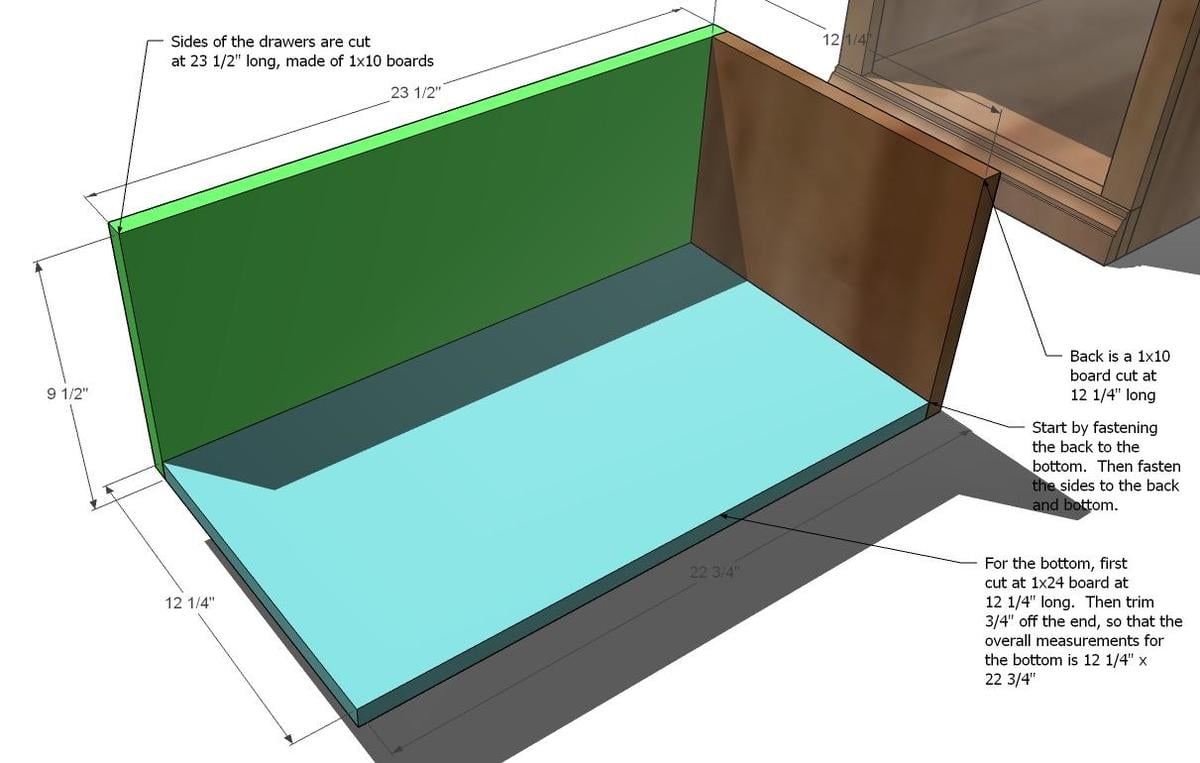
Drawers. Build the drawers by first creating the bottom. Cut the bottom from a 1×24, cut at 12 1/4″ long. Then cut 3/4″ off the 12 1/4″ end, creating a bottom measuring 12 1/4″ x 22 3/4″. Then fasten the back to the bottom. Then the sides. Check for square. Use the undermount drawer slides to attach the faceless drawer into the drawer opening. The drawer will sit flush with the back of the cabinet.
Step 7
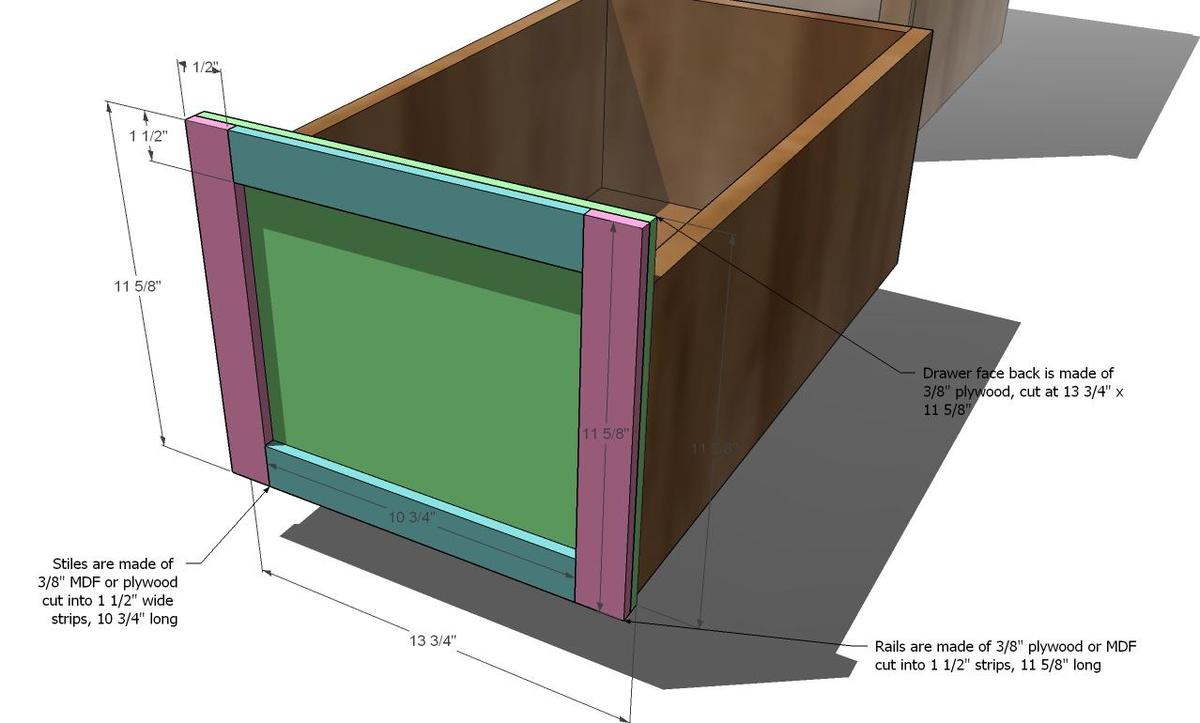
Drawer Face. Build your drawer face by fastening the rails and stiles to the back piece using glue and clamps. You may also wish to use brad nails 5/8″ long, or screws. If you cannot find stock in the correct species 3/8″ thick, you can use 1/4″ thick, but you will need to add rails and stiles to the fronts and backs of your center plywood to obtain the total 3/4″ thickness.
With the drawer inserted into the cabinet, arrange the face on the drawer so that there is an even gap around all sides of the drawer face. Then fasten the face the sides and bottom of the drawer.

Comments
Caitlin (not verified)
Fri, 02/12/2010 - 07:22
Thank you for this! I want
Thank you for this! I want to build this system, but I think I should start with something simpler first! ;)
Jennifer (not verified)
Fri, 02/12/2010 - 07:38
I just wanted to tell you how
I just wanted to tell you how much I appreciate your blog and your plans and the time you put into all your plans. Because of you and your amazing detailed plans, I now have the opportunity to fully furnish a show house with nothing but the furniture I create. I have a master bed room and bath, a boys room and a girls room with a toddler bed and a twin bed for each, a living room, dining room, play room and media room.
I cannot tell you how excited I am to have this opportunity and it is all because of you!
Everything will need to be completed by May, so I'll be sending you lots of photos :) Thank you again!!
ANDY, JEN & KIDDIES (not verified)
Fri, 02/12/2010 - 08:38
Yea! Thank you so much! I
Yea! Thank you so much! I can't wait to build this!
Remo (not verified)
Fri, 02/12/2010 - 11:29
Great stuff and excellent
Great stuff and excellent tips. Thx!
Braden and Melanie (not verified)
Fri, 02/12/2010 - 11:43
I squealed in my head when I
I squealed in my head when I saw you made these plans (my little boy is sleeping or it probably would have been out loud). I cannot express how excited I am about building this. I am new to building so I am waiting for my SIL to come show me the ropes! I have showed your blog to so many people and they all LOVE everything. I think all of our houses will be furnished the same because it will all be things from your blog. haha! Thanks so much! The Logan collections is seriously been on my wish list for so long. I was about to buy a piece I was settling for when you posted it! I am squealing in my head right now!
Nancy @ Live l… (not verified)
Fri, 02/12/2010 - 11:55
Ever since I found you, my
Ever since I found you, my mouth has been hanging open in shock as I read each plan-it reads like a wonderful book! I have not attempted anything -yet-but was wondering how you would do the wall grid at http://www.pbteen.com/gift/thm/thmguy/thmguypch/
My so likes it and I thought I could start simple! I would facebook you-but my kids are not a fan of me on facebook!Thanks!
~Nancy
Alisa D (not verified)
Fri, 02/12/2010 - 12:59
Love your site!! Thanks for
Love your site!! Thanks for all your ideas and inspiration. You have made me believe that my husband and I really can build some furniture of our own!! (my husband had suggested we could, but I didn't believe him! ha ha!) Have you considered doing plans for the bedford collection from pottery barn? We love that set and would like to duplicate it and would love any help. Thanks so much!
Tori and Chad (not verified)
Fri, 02/12/2010 - 14:46
I've never commented before
I've never commented before because I haven't built anything yet. Actually, I think I only found you about two weeks ago but as soon as the weather warms up - I'm pretty much planning on builidng... um, everything.
Katie (not verified)
Fri, 06/25/2010 - 19:37
I am so excited to start
I am so excited to start building, and this system is one I'd like to do (won't be my first, though!). My sister has already built some things after I showed her this site. Anyway, I was wondering if there were plans for the CPU base side for the desk? I can't seem to find them. Thanks!
Claudia (not verified)
Thu, 08/26/2010 - 11:44
Hi Ana, First of all: thank
Hi Ana,
First of all: thank you for all the wonderful plans ! They are very easy to read and understand. I have a question for you: in all your plans containing drawers, you don't use hardware. So how do they slide in and out ? Again, thank you !
ana (not verified)
Sun, 08/29/2010 - 18:50
Claudia, if a drawer is short
Claudia, if a drawer is short or low use, I don't use hardware. But if it's a deep or large drawer, or a drawer that get's used all the time, I do use hardware. Just remember that drawer slides usually need 1/2" clearance and are easy to install.
Melissa (not verified)
Tue, 10/12/2010 - 17:08
I've been working on this
I've been working on this project and am hoping someone who has already finished the project can help with a question. Should "Cut List for the Box," item D read "1 – 1/4″ Plywood @ 17″ x 30″ (Back)" being 17" instead of 16 1/2"? 16 1/2" is too small to meet the side edges since the top is 17". The other plans I've looked at of Ana's meet "flush" with the edges of the project, although some professional furniture doesn't have the plywood meet flush.
Melissa (not verified)
Tue, 10/12/2010 - 17:36
Oops! *Blush* To answer my
Oops! *Blush* To answer my own question, it's not supposed to be flush, as seen at top right in an angle shown later in the instructions:
http://4.bp.blogspot.com/_LodZ9etRvTw/S3TWZtMLnJI/AAAAAAAAD3E/NovK6hAUr…
Melissa (not verified)
Thu, 10/14/2010 - 07:03
I just got one of the
I just got one of the cabinets built, minus the drawers (there's still a lot of finishing work to do, though) and have a couple tips for others using this plan:
1) The middle shelf trim is listed as 15 1/2" in the cut list for the trim, and 14" in the illustration. The illustration's measurement was correct for me.
2) You'll need more than one 1 x 2 x 8' for the project (one is about 2 1/2" too short). If you're making two filing cabinets, three will be more than enough.
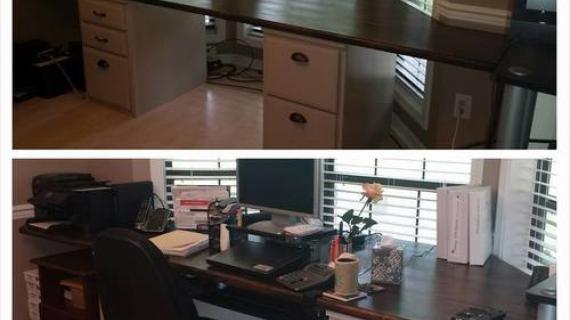
This looks nice as a cabinet, without the drawers, for anyone who might want a desk with open shelving (although the shelves are deep). I'm building the desk without the drawers, but will add them eventually.
Have fun--it's a great plan (thanks, Ana!)! :)
Meg (not verified)
Wed, 02/09/2011 - 03:09
On the face of the drawer,
On the face of the drawer, can you use 1x 2 or 1 x 3 instead of ripping plywood?
Jenny Anne
Mon, 03/14/2011 - 18:09
next project
I just finished a loft bed (my second project) and I think this will be my next one. I have to figure out how to modify it a lot, though, for the little space I want to put a desk.
Jodieth
Sun, 10/02/2011 - 16:14
Similar to what I want
Anna,
Thank you so much for your website and all the people that are members!
This project is similar to what I want to do for sewing room. I would like craft table coming out of it in-between from computer desk. When cutting out or crafting I could sit my machines down on floor. I am 5'9" and can not find any thing tall enough to work on.
Guest (not verified)
Tue, 12/20/2011 - 22:47
Where are the plans for the entire
Ana- Love the site, thanks for all the help! At the beginning you say "These plans coupled with a few more, and you can create an entire office wall system." What/Where are the other plans? I would love to make this for our office. Thanks!
brianmoran12
Fri, 07/03/2015 - 05:49
Undermount Drawer Slides
Does anyone have a recommended set of Undermount Drawer Slides?
The $8 set at HomeDepot (Liberty Hardware) seems very flimsy. Rockler has some $35 Tandem Blumotion Drawer Slides that would more than double the cost of the project.
Is there a middle option? Do the cheap ones work fine?
Any tips for installing these slides? The directions for the cheap slides say I need 1/4 inch space/clearance on the bottom and 5/8 on the top. There needs to be 1/2 clearance on each side of the drawer. These plans look to be more than accommodating for that space.
Thank you in advance for your tips and suggestions. These plans look great and the pics that you have shared have inspired me to take this on!
procrastinator
Sun, 02/20/2022 - 12:56
Hi, I am in he process of…
Hi, I am in he process of building these bases, and have a question about the undermount slides. The total width of the drawer is 13 3/4" and the frame opening is 14. Typical undermount require more than 1/4" from what I can tell. Should two center mount style slides be used instead?