
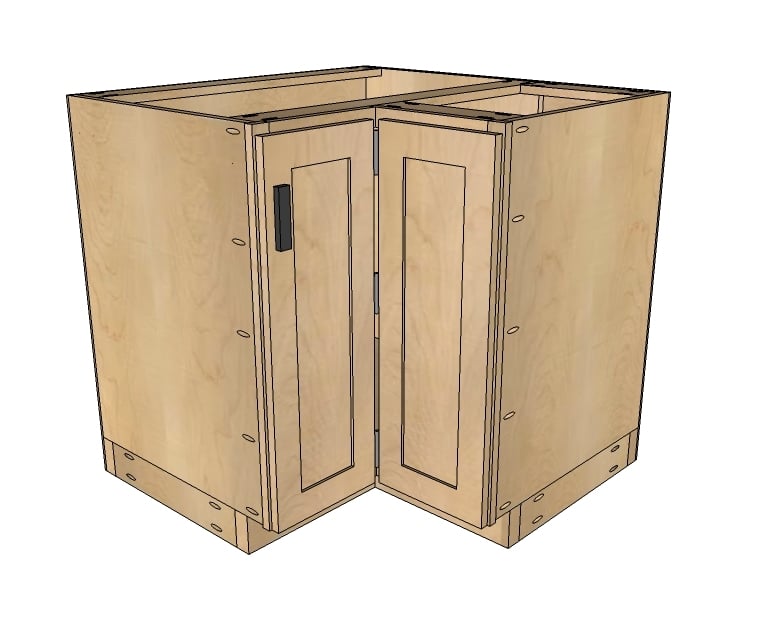

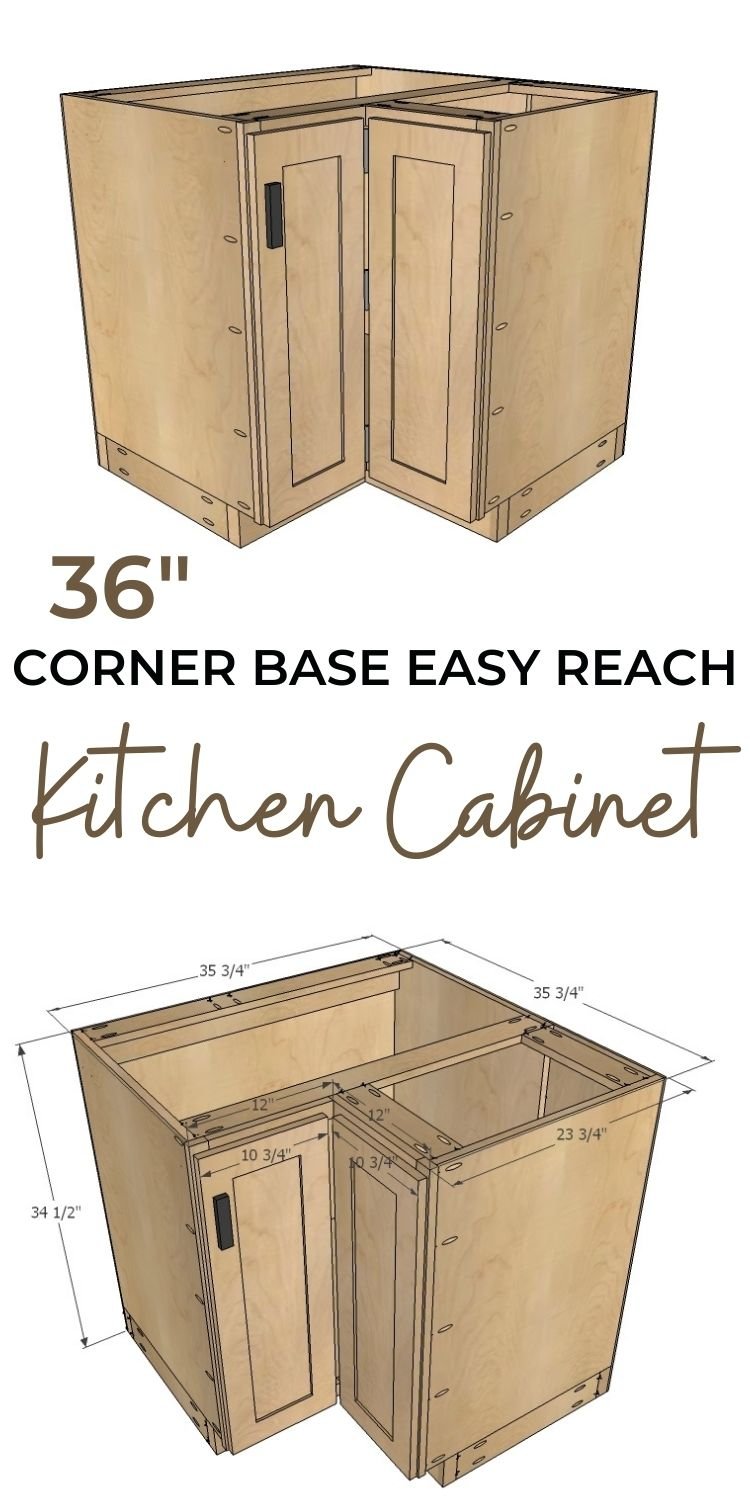
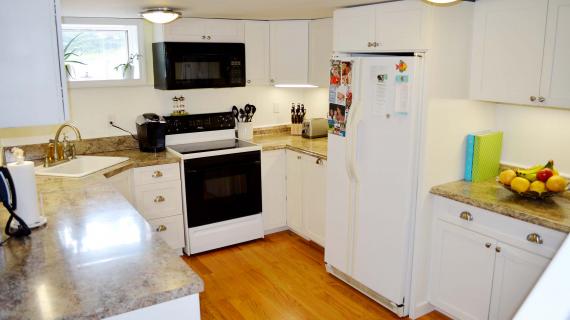
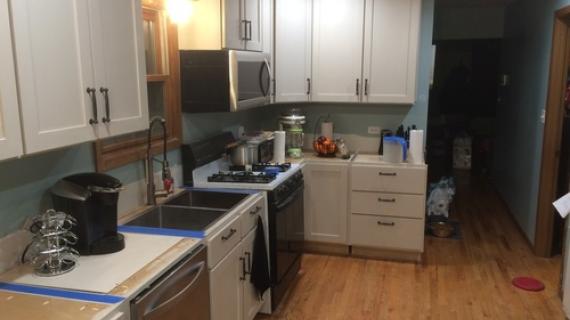
How to build a Easy Reach Corner Base Cabinet for kitchen cabinets. This plan is simple and economical to build. Free step by step plans including cut list, shopping list and detailed diagrams and instructions.
With all the kitchen plans - and most all of my plans for the matter - I like to have the main box boards ripped down to a standard size board, and go from there. Be it a 1x12 or 1x16 or 1x24 - yes, that's not really a board size - by using standard width boards in plans, you can:
- Maximize materials use. There are no odd looking scraps with circular saw cuts and possibly square edges laying in your scrap pile. Instead, you are left with standard width boards that you can build more cabinets or furniture with. Bonus: a standard practice is to rip plywood into 12, 16 or 24 widths for the least amount of waste.
- Simplify cutting. Anyone that's every cut random sized rectangles out of plywood knows this is easier said than done. If you can't cut all the way through with a circular saw or tablesaw, you have to cut beyond the cut or finish the cut with a jigsaw or handsaw. And then you are working with a piece of plywood with a piece cut out of it. By ripping into widths to start out, all you have to do when you build is make straight cross cuts.
- Better cuts. By making full length rips and cross cuts, you are always making long straight cuts which tend to be more accurate than following along a chalk line. And a good cut is very important in making square cabinets - especially when they all line up in a row!
- Easier to handle/transport. Well, I'll admit it. Picking up a sheet of 3/4" plywood is heavy. And trying to fit it in my car is impossible. Having the nice guy - or gal - at the hardware store rip it into 16" widths first just makes everything easier.
Pin for Later!
Good luck building! We've got tons more plans to add to the collection, if there's something you'd like to see a plan for, make sure you holler!
Preparation
1 - sheet 3/4" plywood ripped into 22 3/4" widths, 8 feet long (we'll be calling these 1x24s in this plan) PS - Save the scrap in the center! 1 - 1x2 @ 8 feet long 1 - 1x4 @ 8 feet long (for the supports) 2 - 2x4 @ 8 feet long 1 - sheet 1/4" plywood
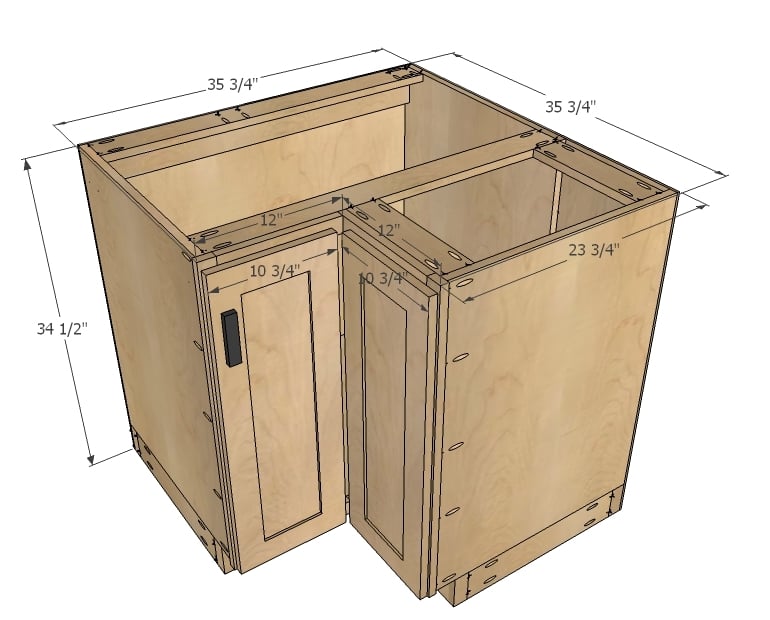
Box 3 - 1x24 @ 31" 1 - 1x24 @ 33 3/4" (make another for shelves) 1 - 1x24 @ 11 3/4" 2 - 1x4 (or scrap plywood) @ 33 3/4" 2 - 1x4 (or scrap plywood) @ 11 3/4" 2 - 1/4" plywood @ 35 1/4" x 34 1/2" Face Frame 2 - 1x2 @ 31" 2 - 1x2 @ 10 1/2" 2 - 1x2 @ 11 1/4" Base 2 - 2x4 @ 35 1/4" 4 - 2x4 @ 17 1/2" 2 - 2x4 @ 14 3/4" Doors 2 - 3/4" thick x 10 3/4" x 30 1/4"


Please read through the entire plan and all comments before beginning this project. It is also advisable to review the Getting Started Section. Take all necessary precautions to build safely and smartly. Work on a clean level surface, free of imperfections or debris. Always use straight boards. Check for square after each step. Always predrill holes before attaching with screws. Use glue with finish nails for a stronger hold. Wipe excess glue off bare wood for stained projects, as dried glue will not take stain. Be safe, have fun, and ask for help if you need it. Good luck!
Instructions
Step 1
The main thing to remember in this plan is to drill all your pocket holes first. And if you are attaching face frames with pocket holes, drill them before assembly. One of our very bright readers suggested drilling pocket holes for face frame attachments on the outsides because they will be covered up anyway and the inside will be completely finished. Great stuff!
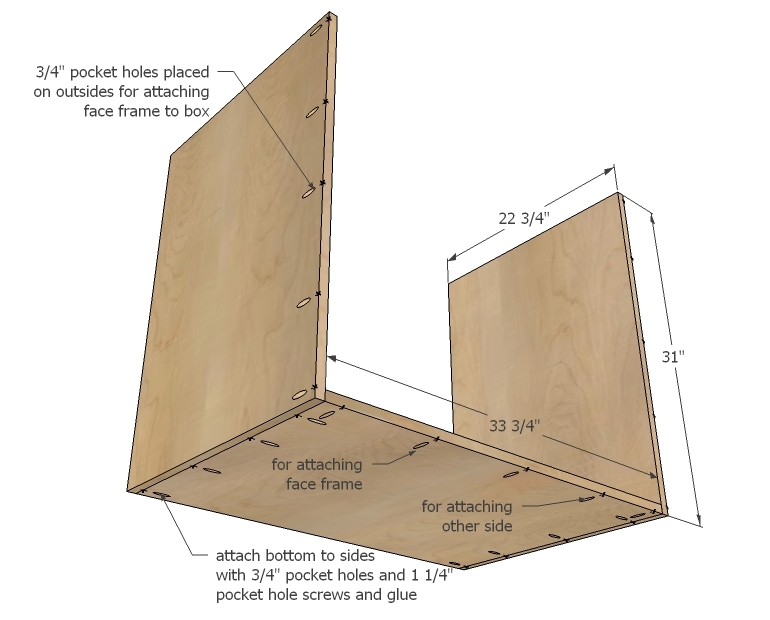
Attach bottom to sides with glue and 1 1/4" pocket hole screws.
Step 2
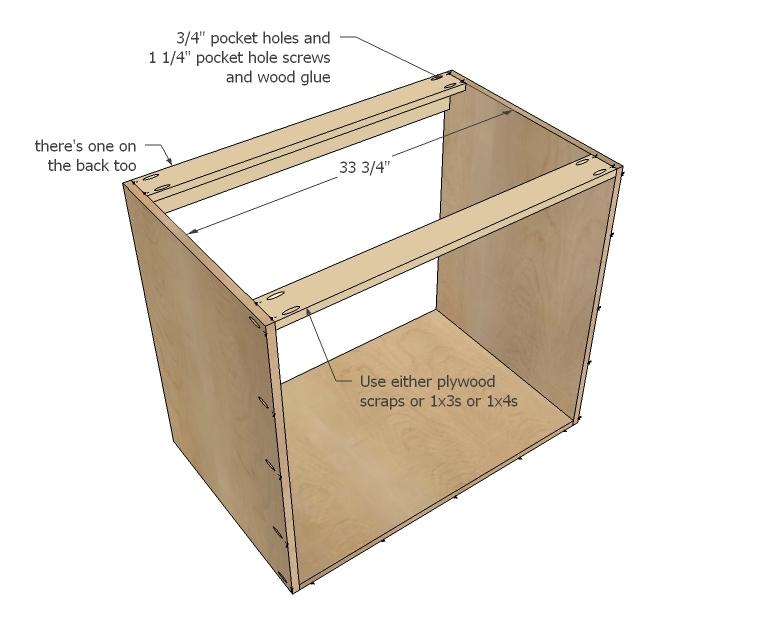
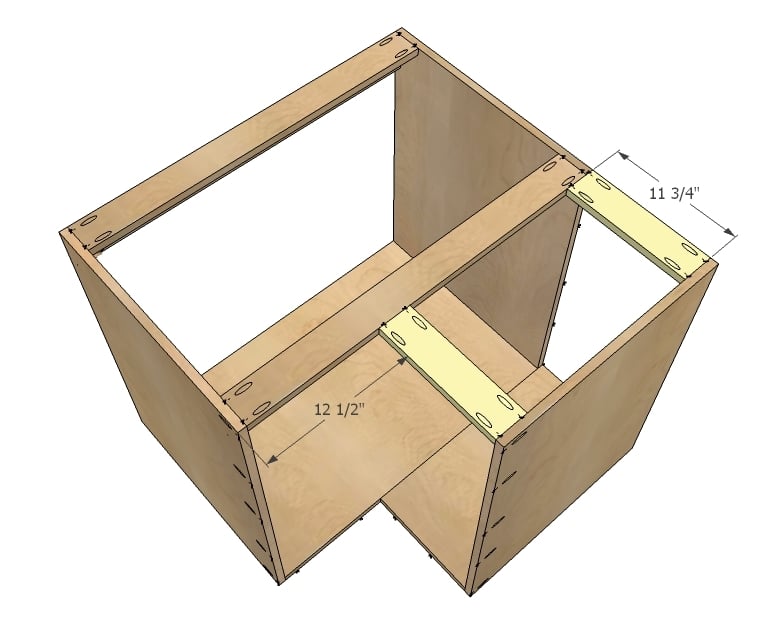
Once you get the main box built, it's time to add some supports. These could be the 1x4s or the scrap strip of plywood leftover from ripping into 1x24 strips.
Step 3
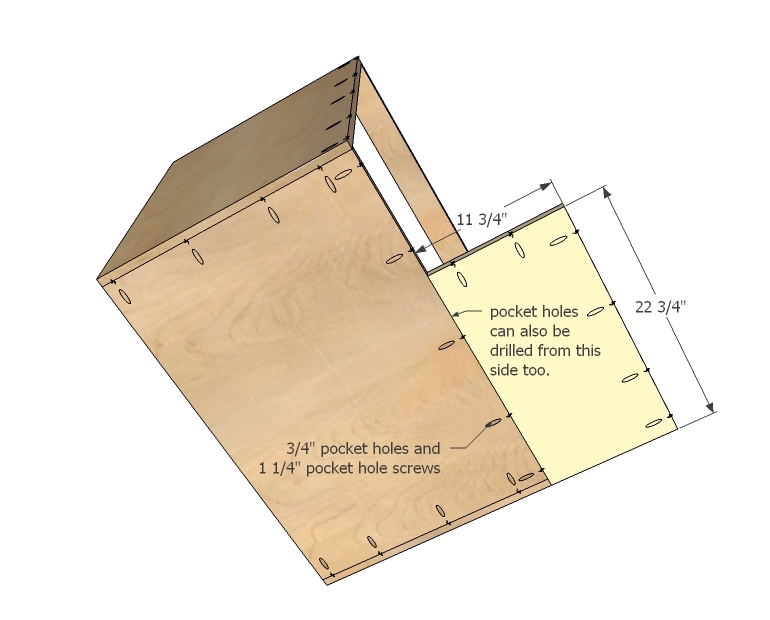
Now it's time to add the bottom for the adjoining side. You will need to use 1 1/4" pocket hole screws and 3/4" pocket holes to attach.
Make sure you predrill pocket holes for attaching face frame and side.
This seam will be fully supported by the base in later steps.
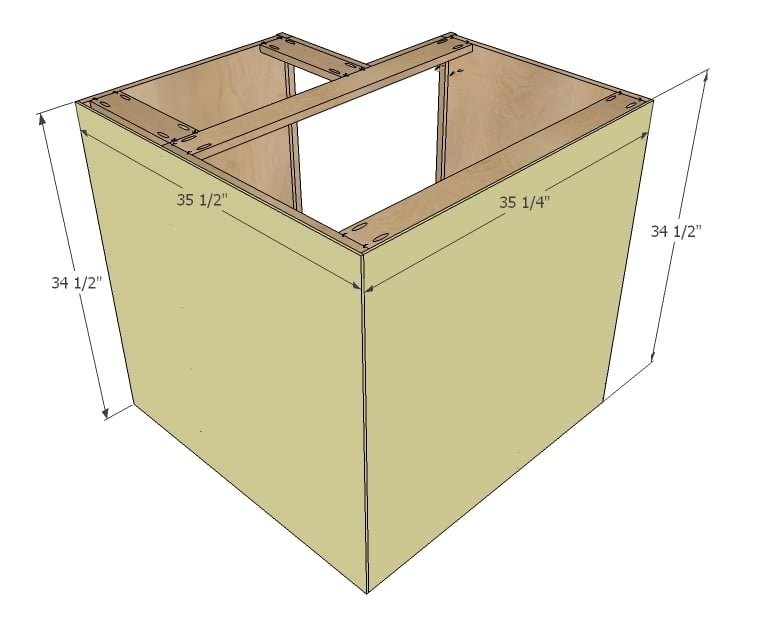
Step 4
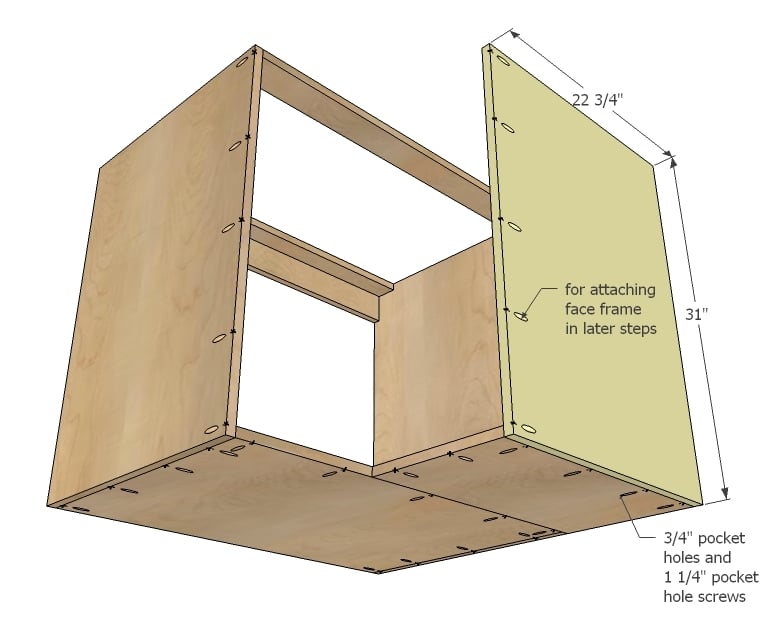
Now attach the side.
Step 5
Step 6
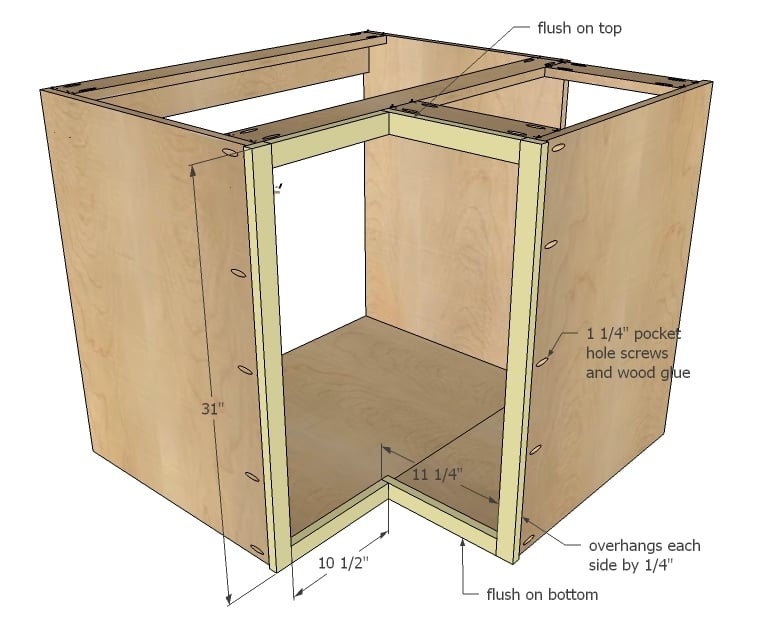
Build the face frame first, and then attach. Remember the sides overhang by 1/4" to give you some "wiggle" room when installing the cabinets.
Step 7
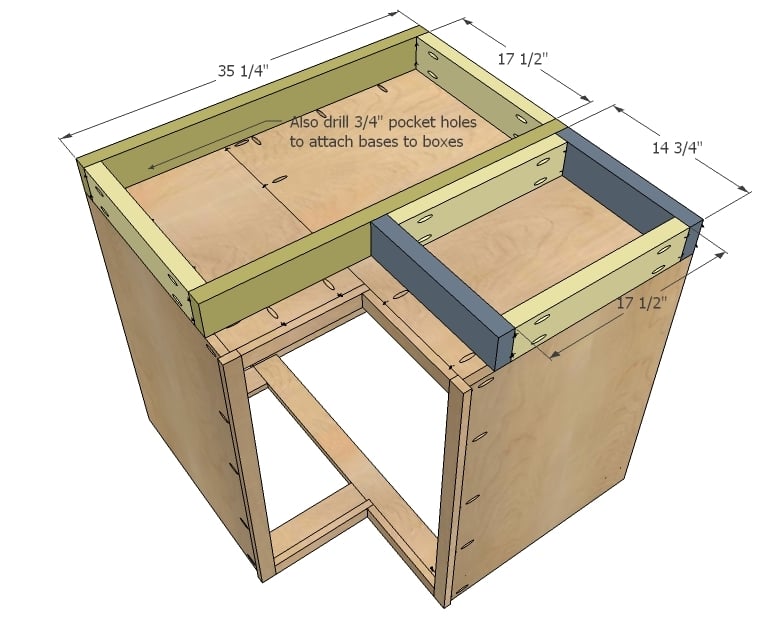
Build bases seperately also, drilling holes for attaching to bottom of cabinet. Attach in place.
Step 8
Plywood the backs, attaching with glue and 1 1/4" finish nails and 3/4" finish nails when you nail into 3/4" thick boards.
Step 9
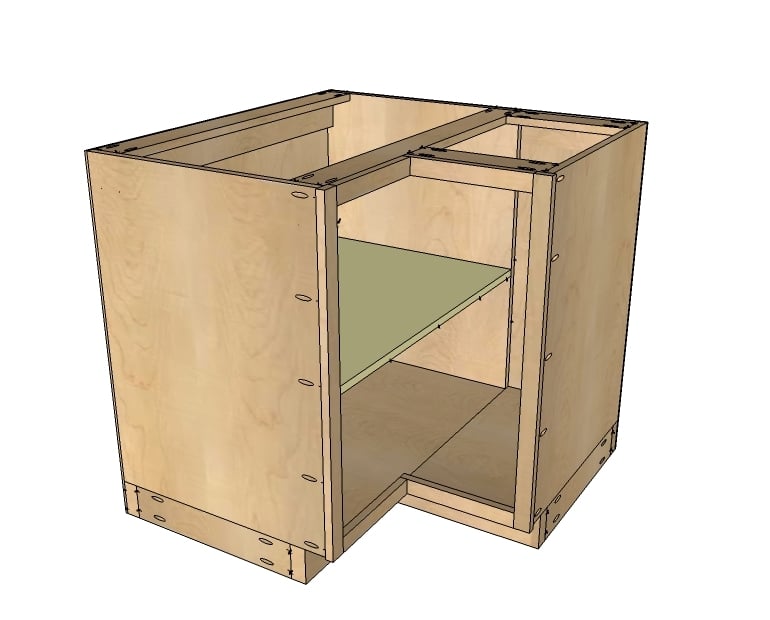
There's different ways you can do shelves, but I personally loved this way. Maybe because we always have a 50lb bag of rice to find a home for? I recommend fixing the shelf in place with screws rather than shelf pins just due to the size of it.
I saw IKEA cabinets that stagger straight shelves so they overlap only in the conres and thought that was a neat and simple solution as well. Gives you some tall, some short storage too.
Step 10
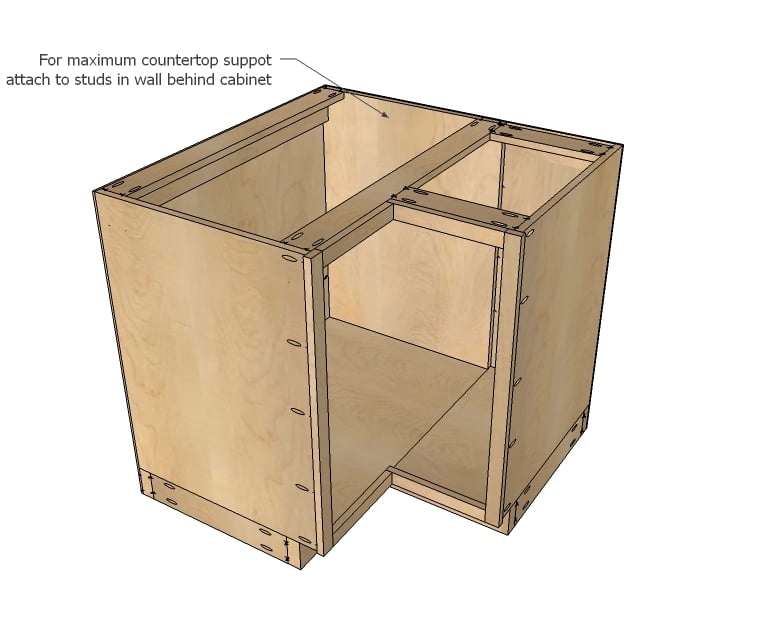
When you go to install the cabinets in your kitchen, I recommend attaching backs to walls to support heavier countertops.
Step 11
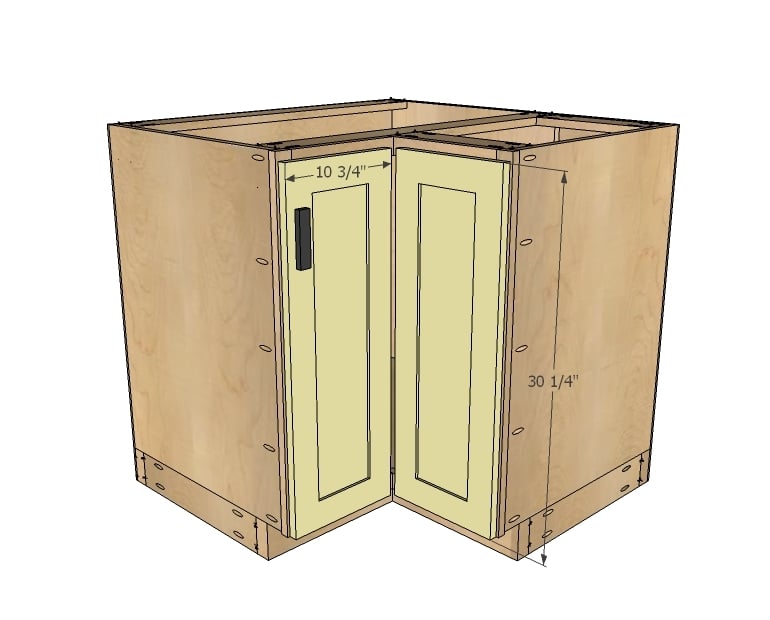
These doors are sized for full overlay face frame cabinets. The gap between cabinets is sized for narrow profile hinges, 3/4" x 3" - see next diagram
Step 12
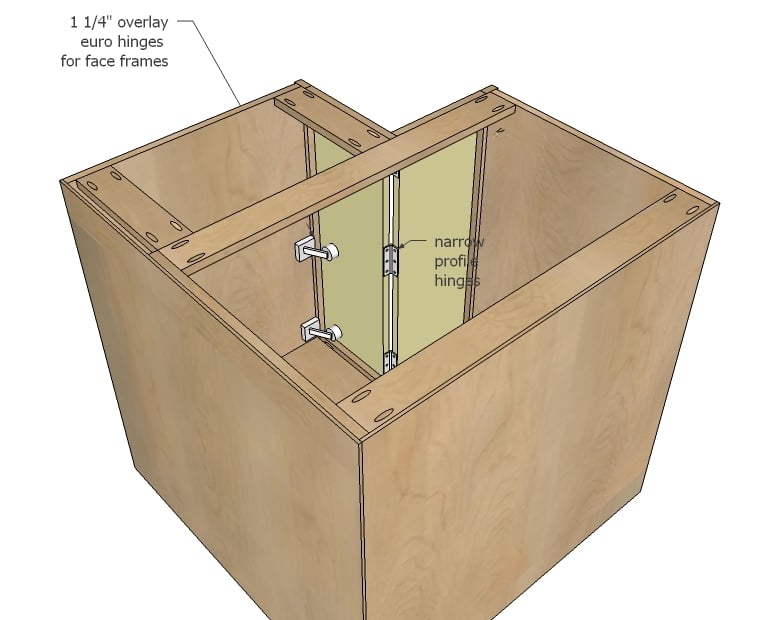
There are other hinges types, this is the most basic installation. If you choose a different hinge type, you may need to adjust your door widths for the best fit. My recommendation is to take any scrap 3/4" plywood - that is if you have any! - and cut door slabs and fit until you are happy before making doors.
Step 13
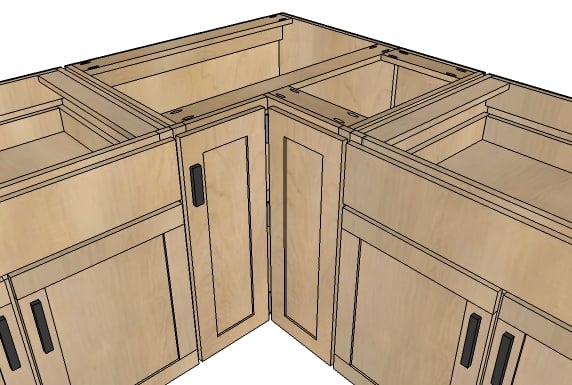
And this one is just to show how the cabinets line up with other models. Gaps between doors and drawers is in totally 1/2" everywhere.
It is always recommended to apply a test coat on a hidden area or scrap piece to ensure color evenness and adhesion. Use primer or wood conditioner as needed.


Comments
annalea
Fri, 01/20/2012 - 00:20
Beautiful!
These look almost exactly like the Ikea cabinets I've been eyeing . . . but I can make these with Purebond. Hooray! I think the only mod I'd make is to have an angled door (if I could make my countertops work with that . . . it might take some doing).
Thank you so much!
Now, if there was only an "Add to my To-Do List" link at the top of each post, so when I come to the site to add a plan to my To-Do List (after reading the post in my reader), I don't have to scroll and scroll, miss the end, scroll and scroll, miss the end coming back up, and then finally find it. lol
Guest (not verified)
Fri, 01/20/2012 - 04:53
I love how you maximized the
I love how you maximized the materials!
Kathy Webster-Link (not verified)
Fri, 01/20/2012 - 07:40
Ana White you are an amazing woman!
We are getting ready to really dig in to remodeling our kitchen. It's been a slow work in progress for a while because of the cost of kitchen cabinets. I think we can follow these plans well enough to build our own! Now just need to talk the hubster into buying that Kreg Jig I keep looking at at my local home store! Thanks so much.
dhendy13
Fri, 01/20/2012 - 09:35
Lazy Susan
Anna, your a wizard at this.... but I just a thought.
I had a cabinet just like this at my last home. My builder had a great Idea to put in a round 2 tiered rotating shelving unit. (Lazy Susan @ Rockler $42.00) This saved alot of akward reaching and stress on the back getting out the various baking ingredient containers, electrical appliances....etc. This also gave us a place to put the larger baking sheets, giant cutting board and....
you get my drift. The only down sided was losing that last little bit of space in the back corner.
Good luck!
tracysmith
Fri, 01/20/2012 - 12:48
Yay!!!
I get so excited when I see your plans for the cabinets - my husband and I were going to try our hand at them and I've been so nervous about doing it because I didn't know how they would go together, if they would be strong enough, etc.
Then, when I saw your cabinets I got excited again because you break it down for me to understand and I now realize I could build a whole house full of cabinets if I really want to!
Thank you so much for allowing us to ride along with you on your journey and teach us along your way! As I've said before, you are a ROCK STAR!!!!!
Ginna (not verified)
Sat, 01/21/2012 - 14:13
Blind corner hardware
Hi Ana,
Another option (I did this in my last kitchen), is to use a blind corner pullout.
http://www.leevalley.com/en/hardware/page.aspx?p=43657&cat=3,43722,4372…
That way, you gain access to the whole area, and the other half can be used for drawers etc. Not cheap, of course, especially when you are DIYing. But I do find things get "lost" in corner cabinets.
I suspect someone could come up with a clever, cheaper solution.
Calmly
Fri, 01/27/2012 - 09:35
Cabinets
I love your work. I would like to take the challenge of building myself some kitchen cabinets, but I have never done this type of work. You make it seem so easy. What skill level do I have to be in order to tackle such a job.? Also would you be able to give me some pointers as I take this challenge?
Reys (not verified)
Sat, 01/28/2012 - 02:23
What a great tutorial. I'm
What a great tutorial. I'm looking forward to some project for beginners woodworkers and this was one of the best I found. In details, I must be easy to understand. Thanks a lot for sharing.
Calmly
Sun, 01/29/2012 - 16:17
Material research
Hi Ana, I was off today seeking price quotes for tools and wood. Since I live in the Virgin islands, we do not have the ply wood you used. The one I saw was untreated Baboon ply. Will this work for cabinets? Also we do not have the Kreg Jig. What should I do about that? The set I saw does not have haft the things sew in the Kreg jig set. Help!! I need all the help I can get.
katieevans140@… (not verified)
Thu, 03/01/2012 - 17:16
Kreg Jig
Order a Kreg Jig online!!! You won't be disappointed!!!
katieevans140@… (not verified)
Thu, 03/01/2012 - 17:14
Question for Ana - Corner Sinks
Ana,
I'm thinking about gutting my kitchen and starting over now that you have ssssssooooooo kindly posted cabinet plans! Do you have any thoughts on how I could use the corner cabinet as a sink base? For example, I would like to used Blue's CorStone Double Basin Acrylic Topmount Kitchen Sink (Item # 193388, Model # 31300). Any idea how to change the plan to accomodate a double basin sink? My thought is it would be a good use of the corner since it can be tough to get inside a cabinet. Instead the plumbing can go in there.
Any input you can give me would be greatly appreciated!
Thanks,
Katie
JessicaR (not verified)
Mon, 08/20/2012 - 09:40
I recall reading somewhere
I recall reading somewhere that Ana is building these cabinets strong enough to withstand pouring a cement countertop directly onto the cabinets (as opposed to just bringing one in and placing it on top) so I would think that it should be strong enough to hold a sink. I'd suggest contacting your sink manufacturer for installation requirements. I'd also suggest maybe making the front flat. We had a corner sink in the house I grew up in and a "flat" front made it easier to access than if it was in a normal corner.
Mary Graves (not verified)
Sun, 03/18/2012 - 14:42
A Big Thank You For These Cabinet Plans!
I am going to attempt this project tomorrow with my mom. I purchased solid hardwood kitchen cabinets used off Craigslist and the kitchen they came out of had NO corner cabinets at all (base or wall). So we decided to build one to match the other cabinets. I found your plans through a search and I'm very excited to use them. They seem pretty simplified and should help us get this thing done right! I'll post once I've finished with pictures! :-)
richard (not verified)
Sat, 03/31/2012 - 00:40
base corner cabinet
This is just what I was looking for,,do you have any other plans such as for a lazy Susan.
helpful links I am trying to match existing cabinets and building additional ones for the additional room next to kitchen.
DIYrookie (not verified)
Sun, 07/01/2012 - 14:36
Thank You
We started with the 36" sink base (very easy) and then we built this one (even easier on the second try). Then we proceeded to build the rest of the cabinets for our kitchen and bathroom using the ideas we learned building these. THANK YOU KREG, for building a jig that a monkey could use.
Sherri Austin (not verified)
Wed, 10/24/2012 - 07:16
corner kitchen cabinet
Am I missing something here? Are there plans to build the door?
Jeff (not verified)
Thu, 01/10/2013 - 22:30
Corner Cabinet
Hi Ana,
Thanks for showing me how to make a corner cabinet. I just finished it a few hours ago and my wife says it's beautiful. The advice to have the lumber store cut the wood for me worked out perfectly. Having the plans in the 3D warehouse was an added benefit as I have used SketchIt for years. A small correction, The material list says one 1x4x8 but it is not long enough to cut all the pieces for the face frame. However, I could not have done any of this w/o all your excellent documentation. I can't wait to start on the next cabinet. Thank you again.
TamWow
Mon, 06/14/2021 - 05:25
36 x 36 EZ reach corner kitchen cabinet
This was my first cabinet building experience.
The plans were really great and everything worked out except for one thing: my house didn’t have an exterior door wide enough to fit the cabinet through. So I had to remove the base and cut the 1/4 inch plywood which was very easy to repair.
I learned so much from this cabinet making experience and I was able to custom build an oddly shaped EZ reach corner cabinet for the other corner of my kitchen.
Who knew making cabinets would be so satisfying?!