


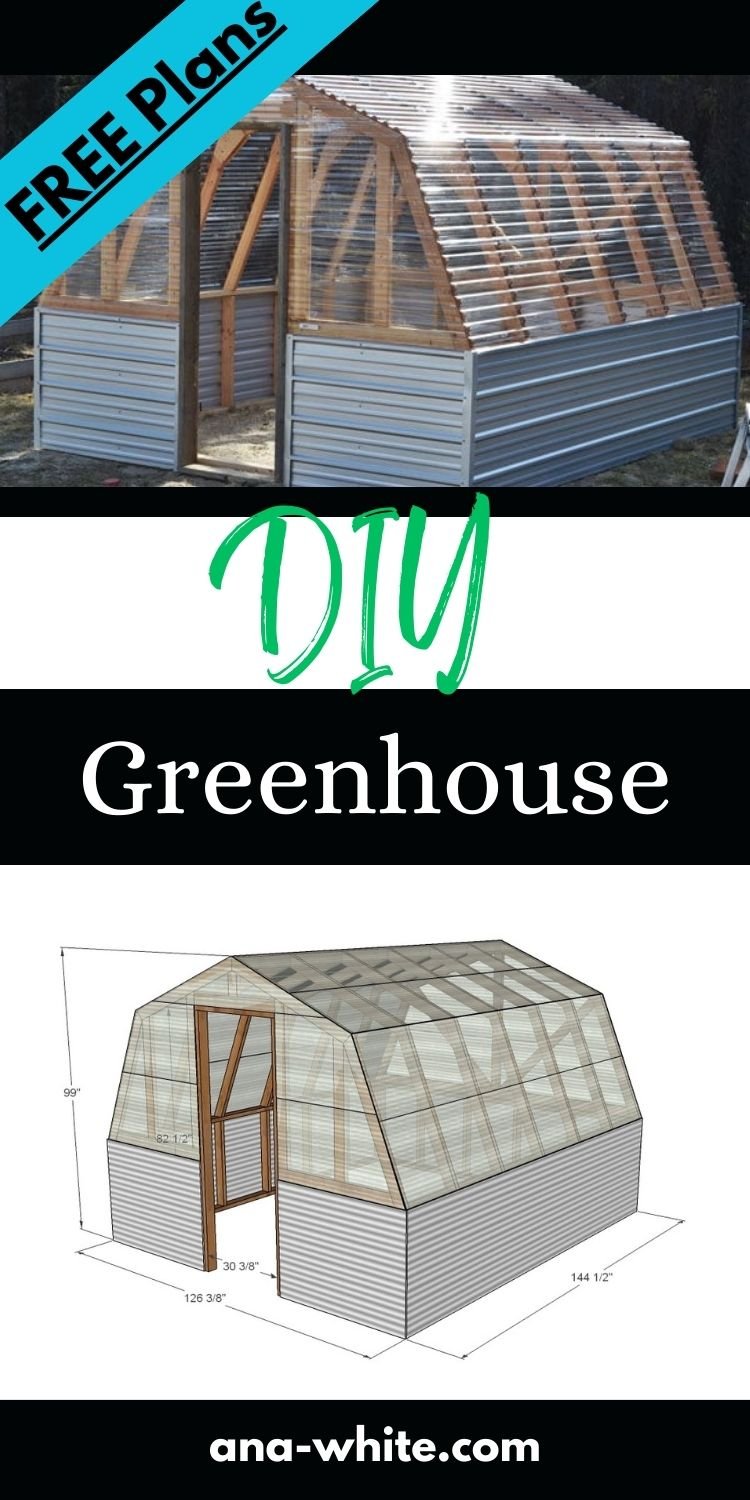
DIY Greenhouse plans - build your own DIY greenhouse, free step by step plans by ANA-WHITE.com
Building your own greenhouse is something you can tackle and save a ton. We built this greenhouse about six years ago, and it still looks brand new and is as sturdy as ever. We are happy to share our plans with you - see below.
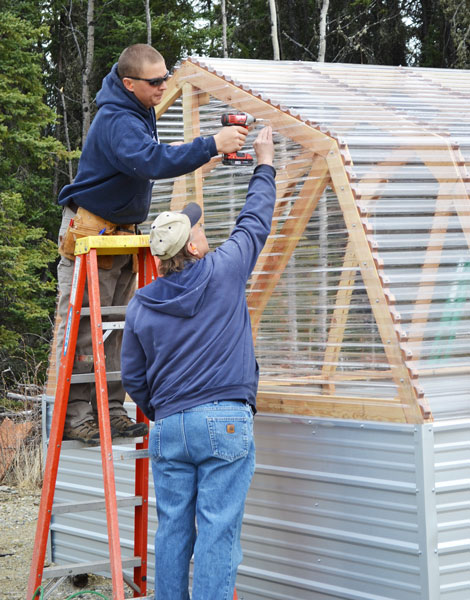
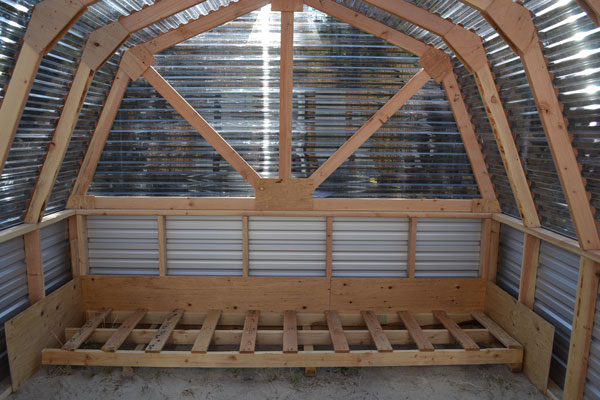
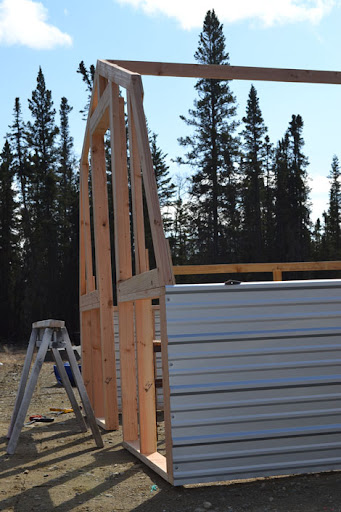
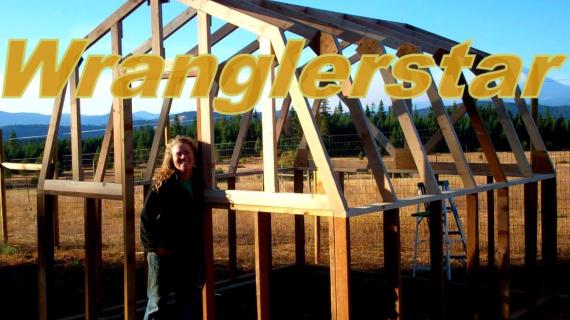
Here's some photos of the build -
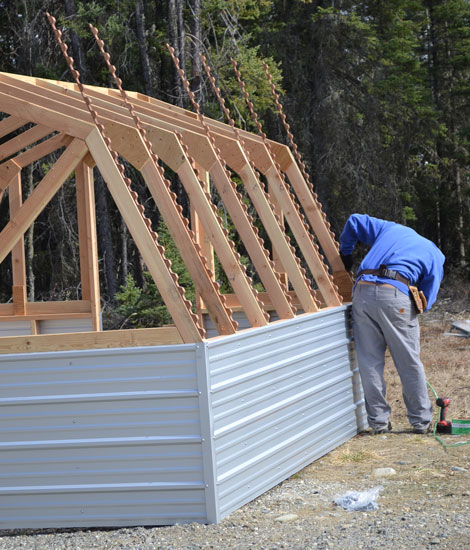
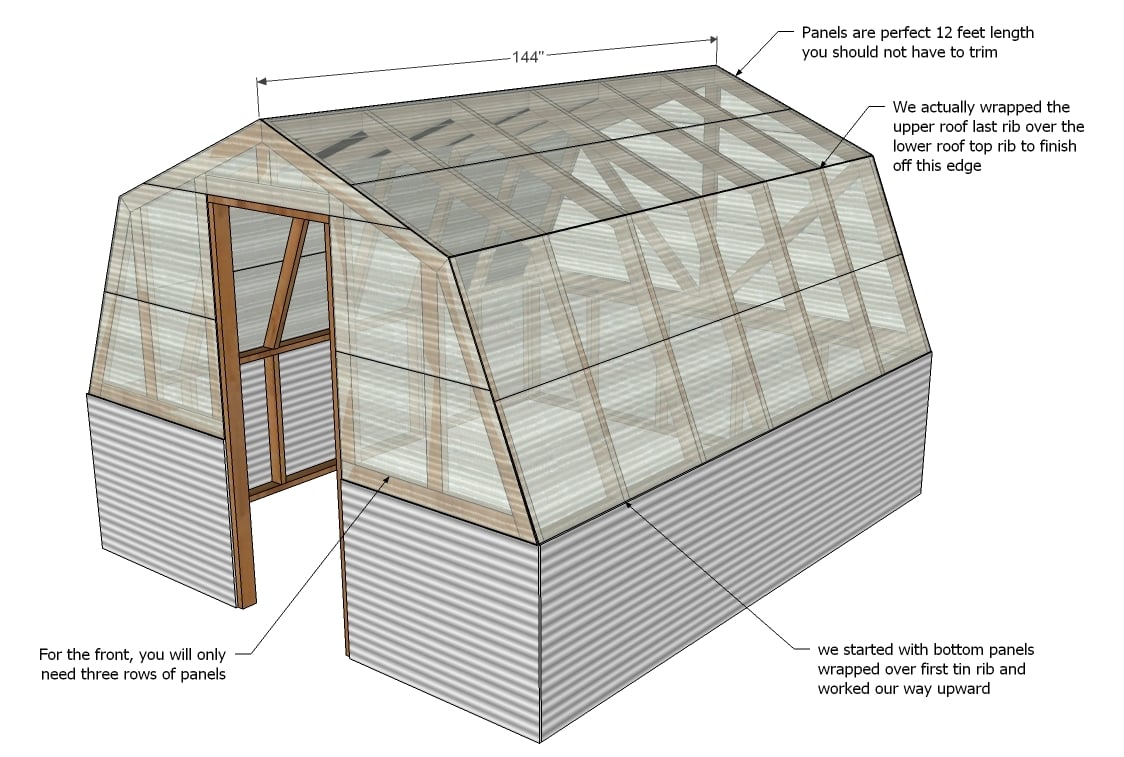
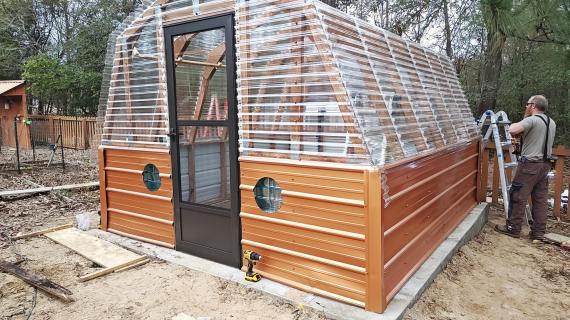
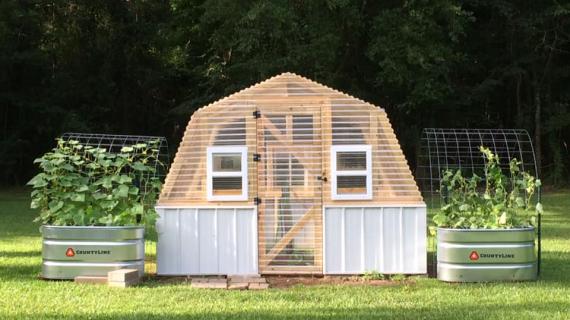
Near completion of the framing stage. We used 12' long pieces of corrugated metal roofing for the side walls.
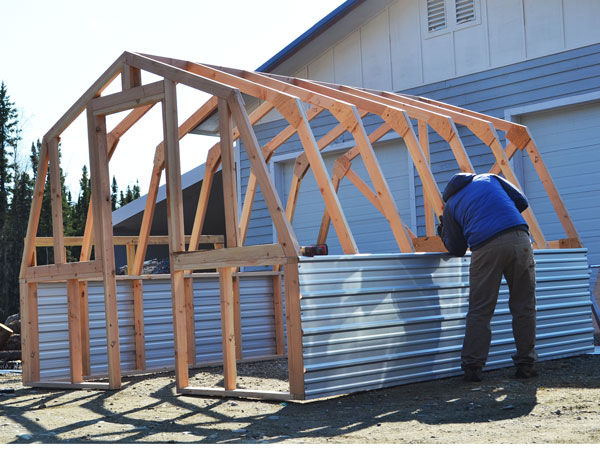
We ran the corrugated roofing horizontal. This was very easy to install and we have had zero issues with this design.
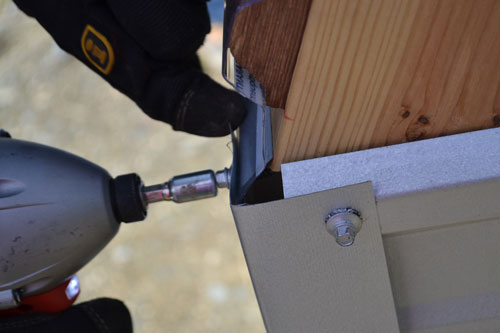
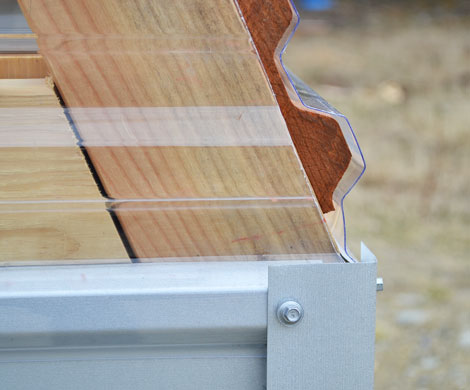
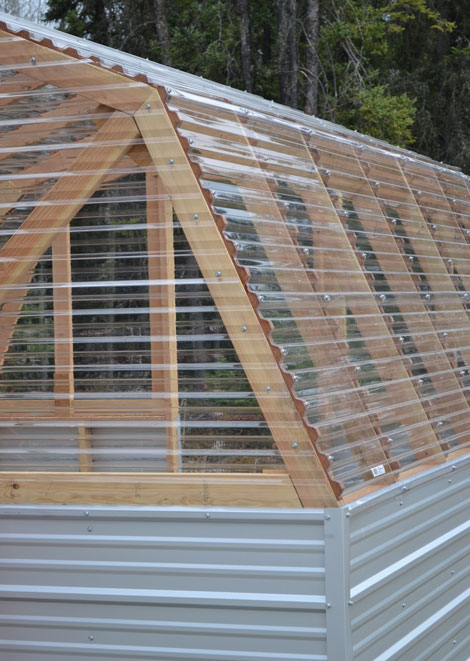
We also trimmed the corners out with metal flashing to make everything look nice and finished.
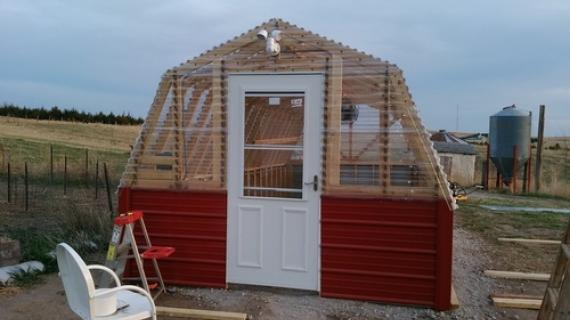
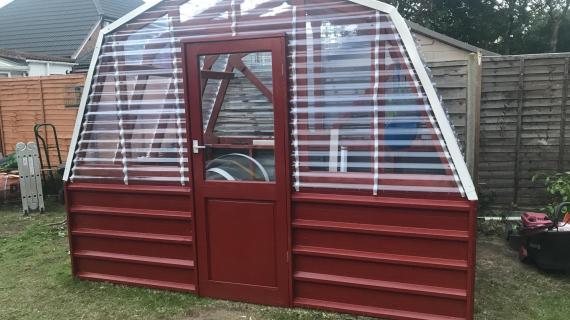
The greenhouse plastic wrapped right over the corrugated metal - like it was meant to be!
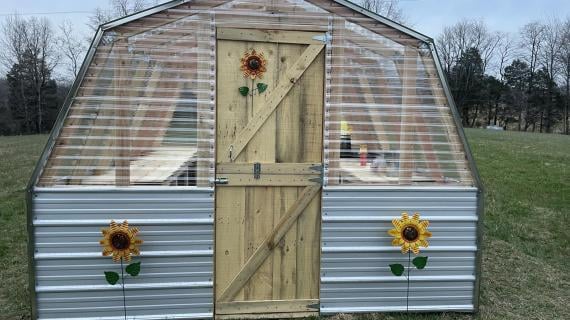
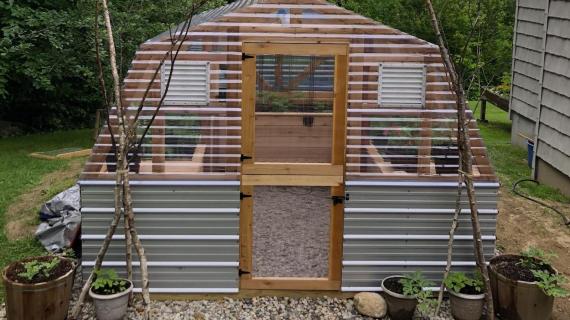
The only part that was slightly tricky was the ends - but really no big deal to add the greenhouse plastic panels.
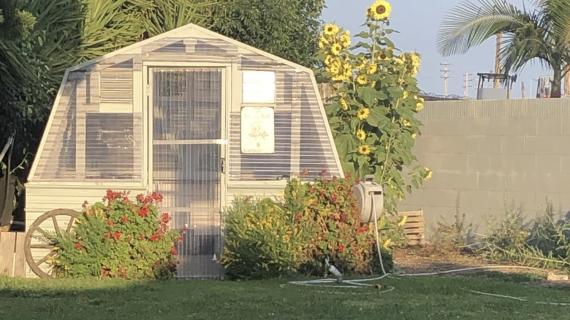
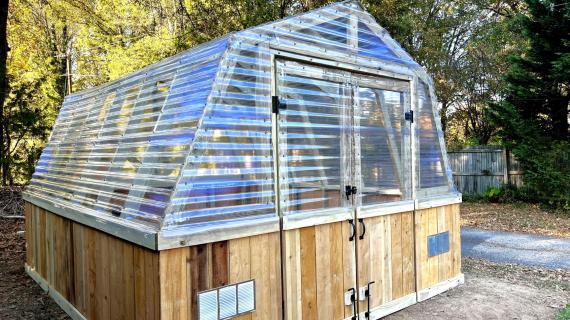
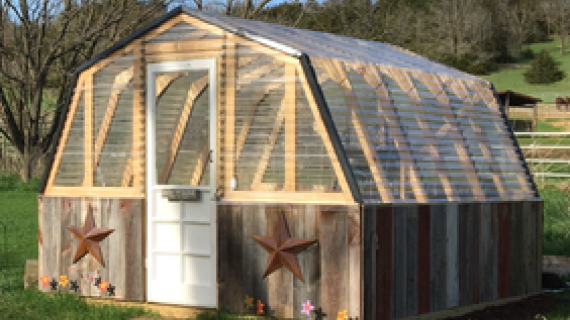
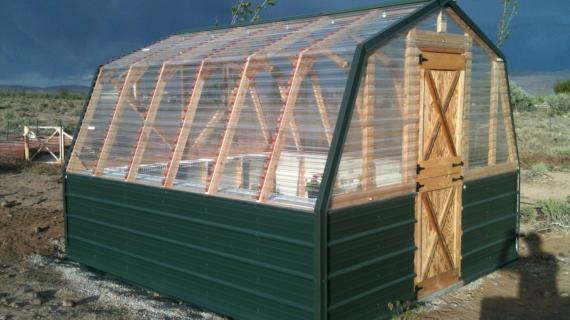
Our DIY greenhouse turned out great and we are so excited to share the plans with you.
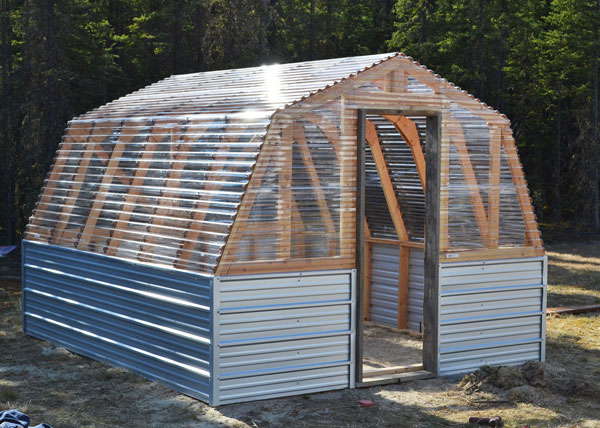

Please post a pic or share if you build!
Pin For Later!
Preparation
- 3 - 2x4 @ 10 feet long - use on back wall
- 5 - 2x4 @ 12 feet long - use on sides/ridgepole DO NOT CUT
- 32 - 2x4 @ 8 feet long
- 11 - 12 foot x 26" standard corrugated plastic greenhouse panels
- 1 - 8 foot long x 26" wide standard corrugated plastic greenhouse panel (use on door side)
- 3 - 12 foot long tin panels (use on sides and back)
- 1 - 8 foot long tin panel (use on front)
- Tin screws
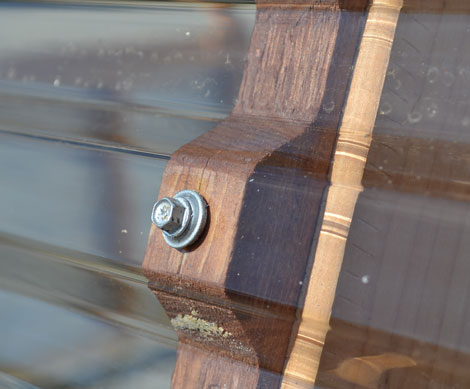
- 28 - 4' long ribbing strips
- L flashing (optional for the corners)
- You'll need either metal gussets for the trusses or to cut plywood ones from 1/2" plywood
Cut list is in plan at each step


Instructions
Step 1
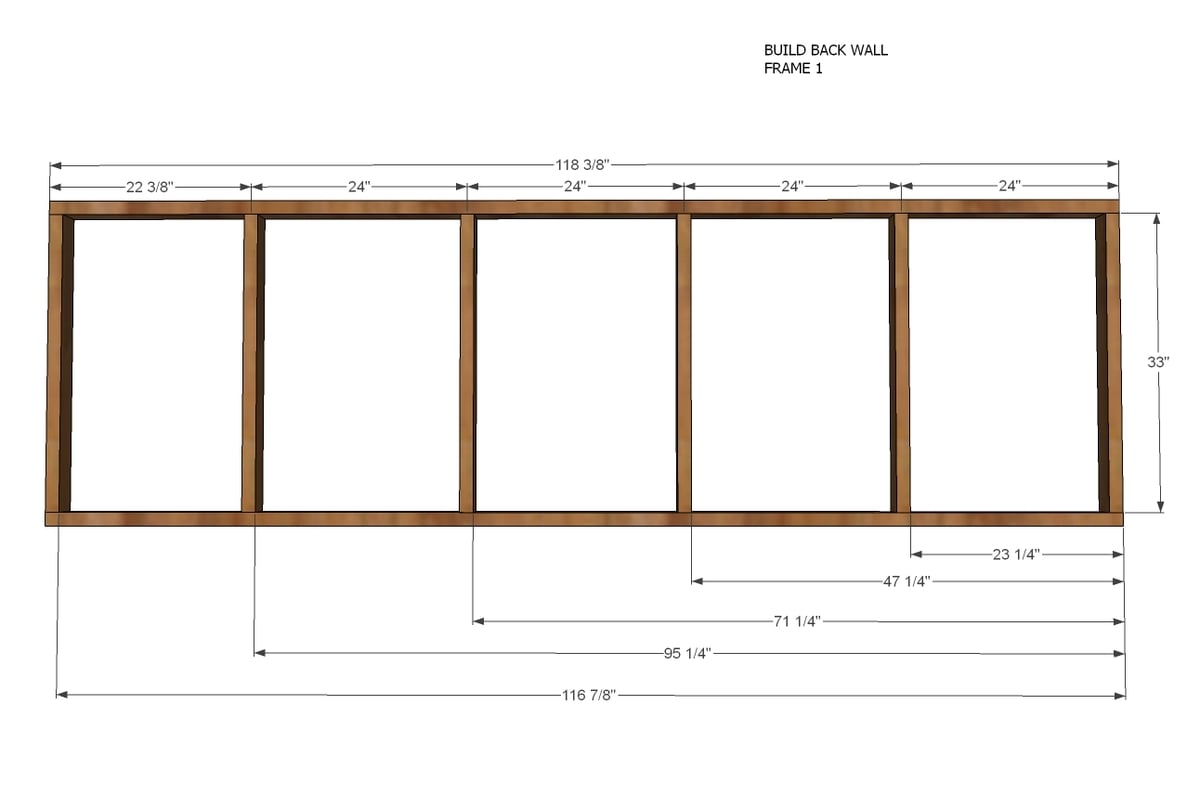
Back wall framing. Cut 2x4s as listed below. Screw together with 3" screws or nail together.
- 2 – 2x4 @ 118 3/8”
- 6 – 2X4 @ 32”
Step 2
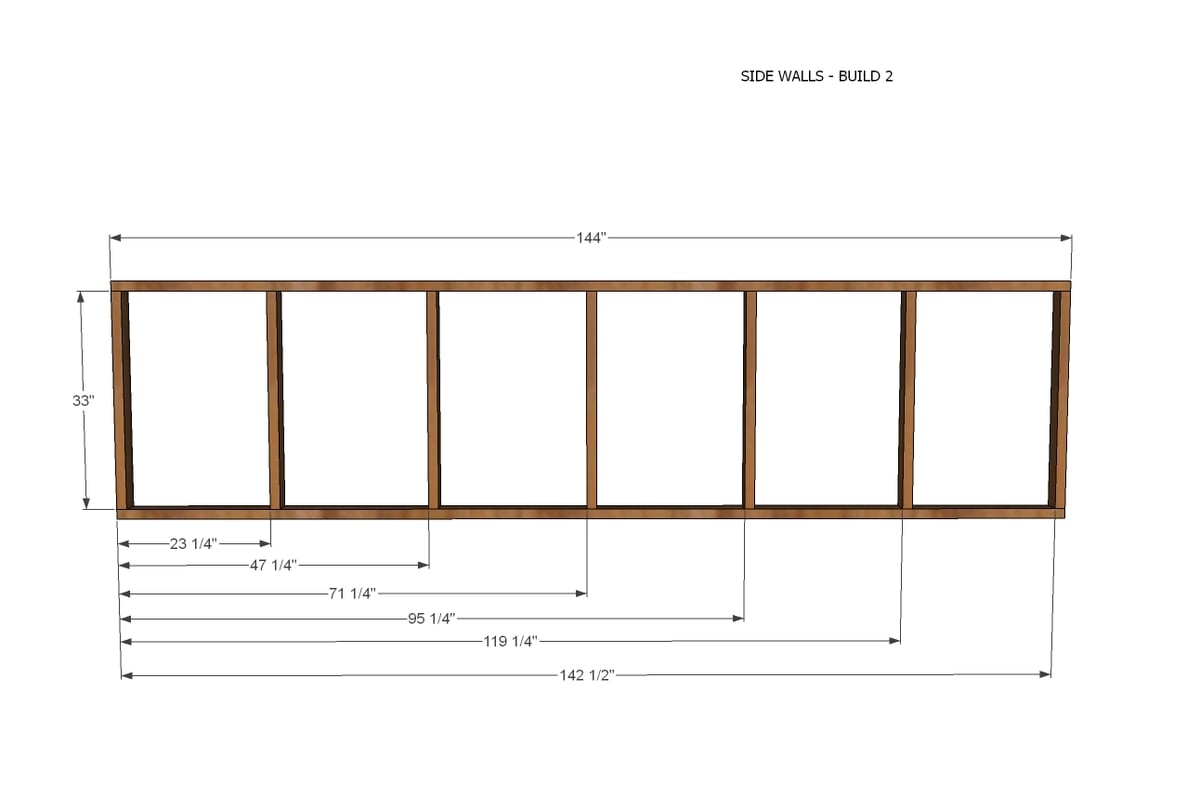
Side Wall Framing - Build TWO
- 4 – 2X4 @ 144”
- 14 – 2X4 @ 32”
Step 3
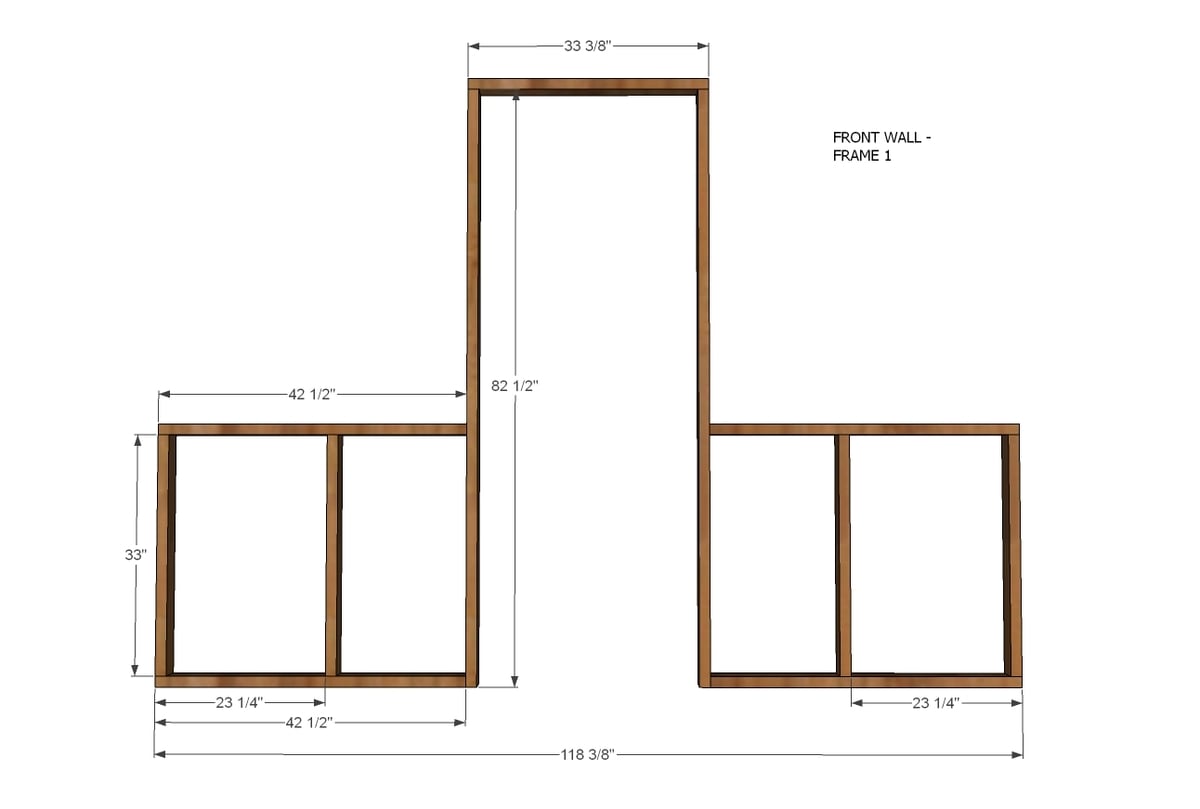
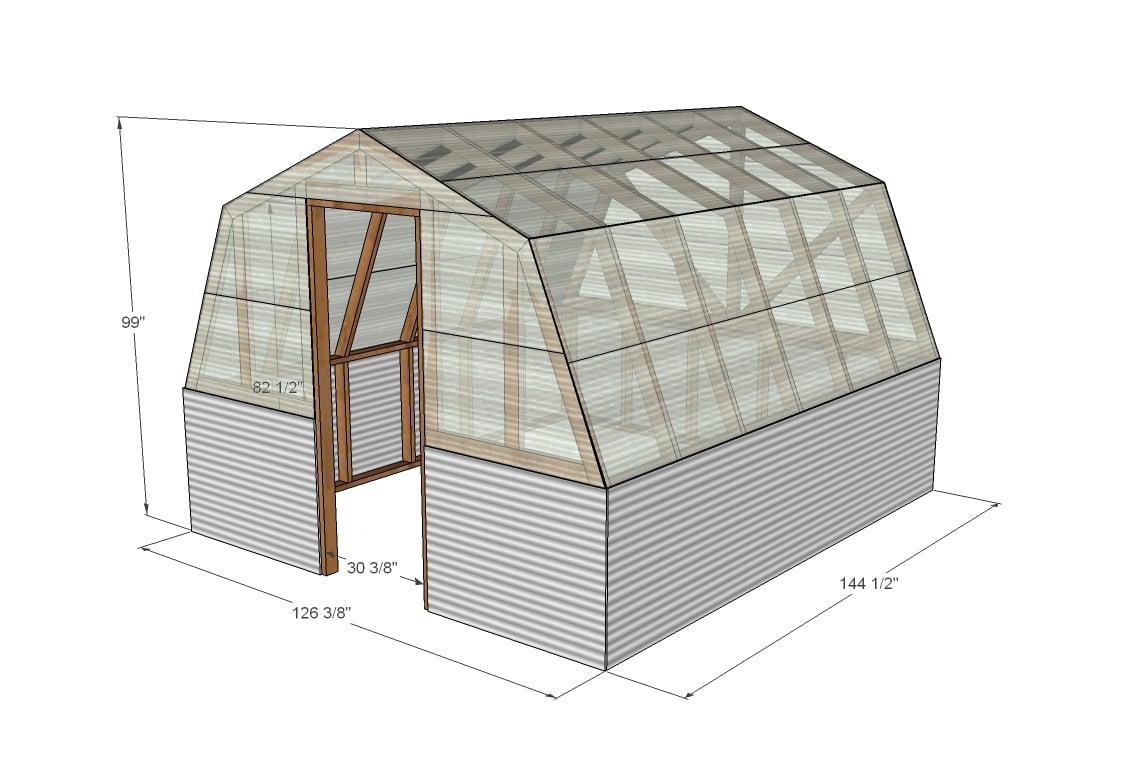
Front Wall Framing
- 4 – 2X4 @ 32”
- 4 – 2X4 @ 42 ½”
- 2 – 2X4 @ 81 ½”
- 1 – 2X4 @ 33 3/8”
Build the front walls as shown.
Step 4
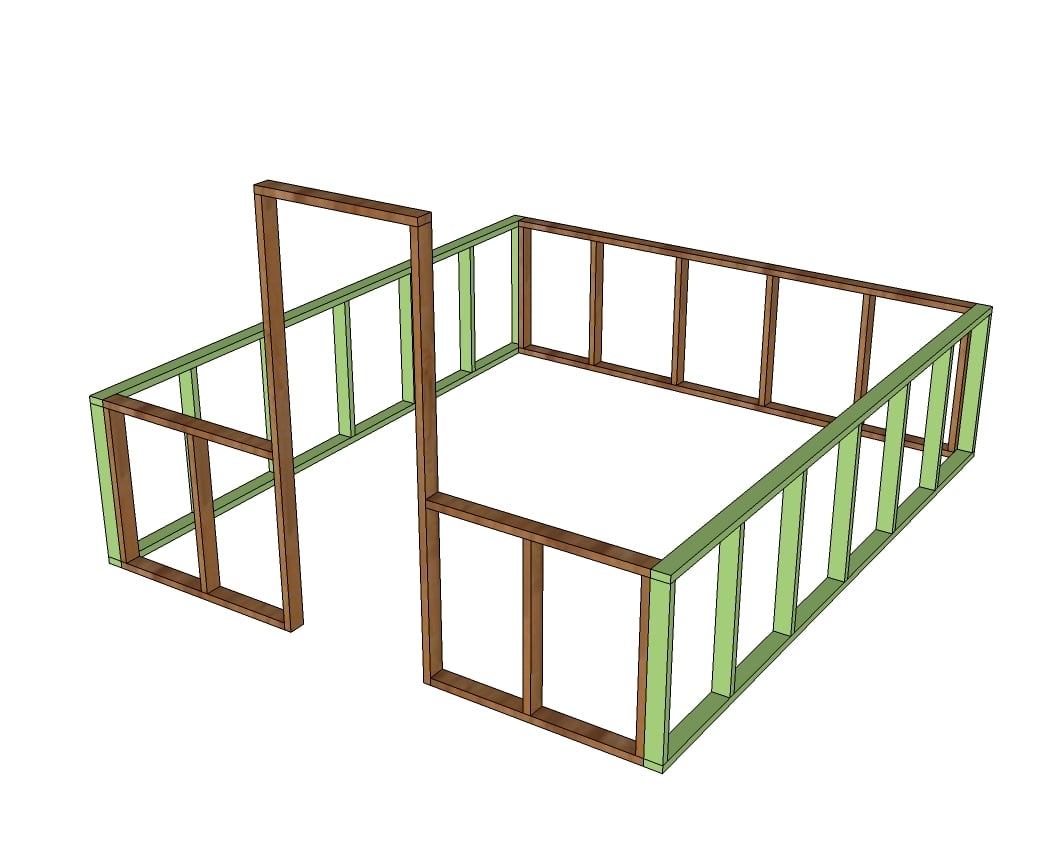
Attach the four walls together with 3" screws at corners.
Step 5
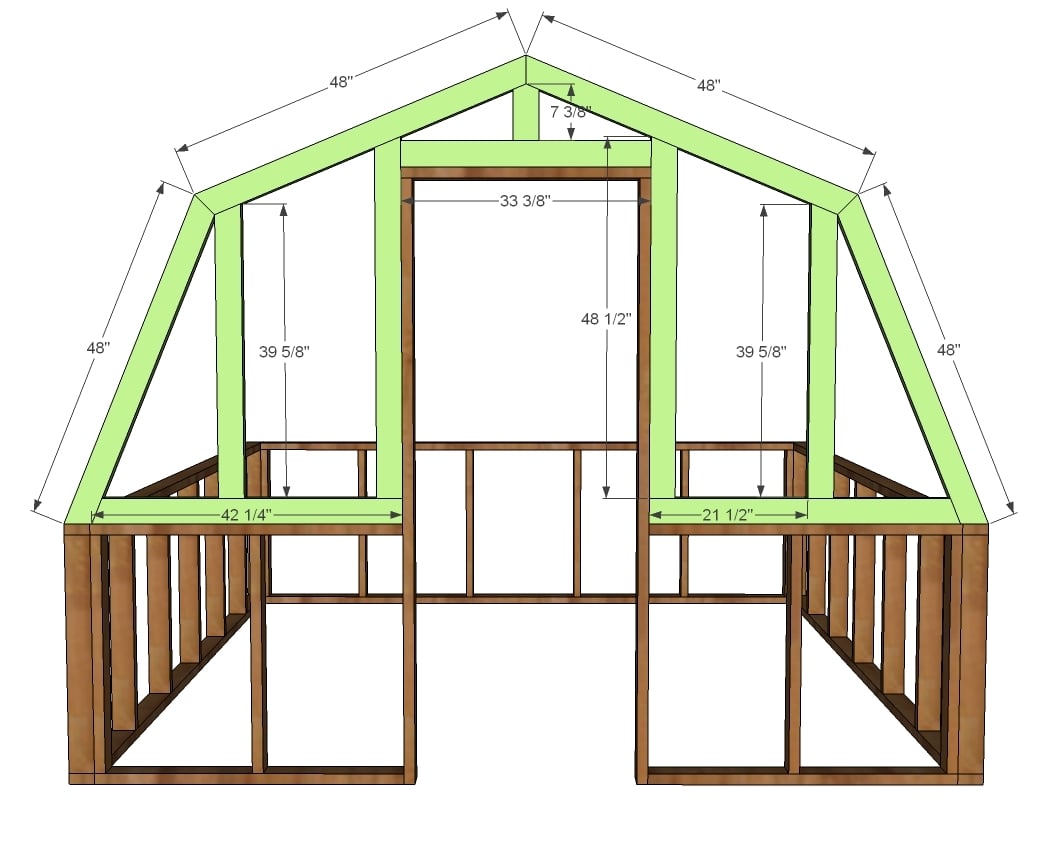
Step 6
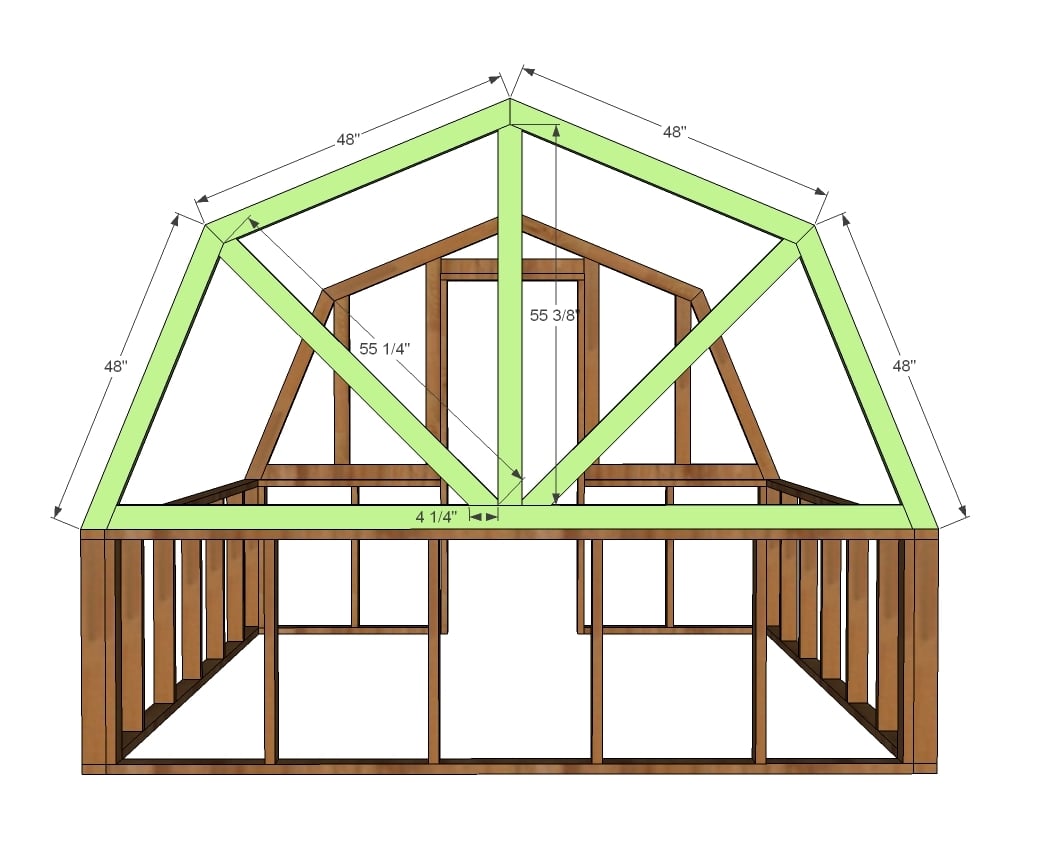
- 4 – 2X4 @ 48” (BOTH ENDS CUT AT 22 ½ DEGREES, ENDS NOT PARALLEL)
- 1 – 2X4 @ 117 7/8” (BOTH ENDS CUT AT 22 1/2" DEGREES, ENDS NOT PARALLEL)
- 1 – 2X4 @ 55 3/8 (TOP CUT TO DOGEARED POINT, 22 ½ DEGREES)
- 2 – 2X4 @ 55 ¼” (TOP CUT TO DOGREARED POINT, BOTTOM CUT 45 DEGREES OFF SQUARE, END CLIPPED)
The back truss is built same as front. See next step for close up of the center cuts
Step 7
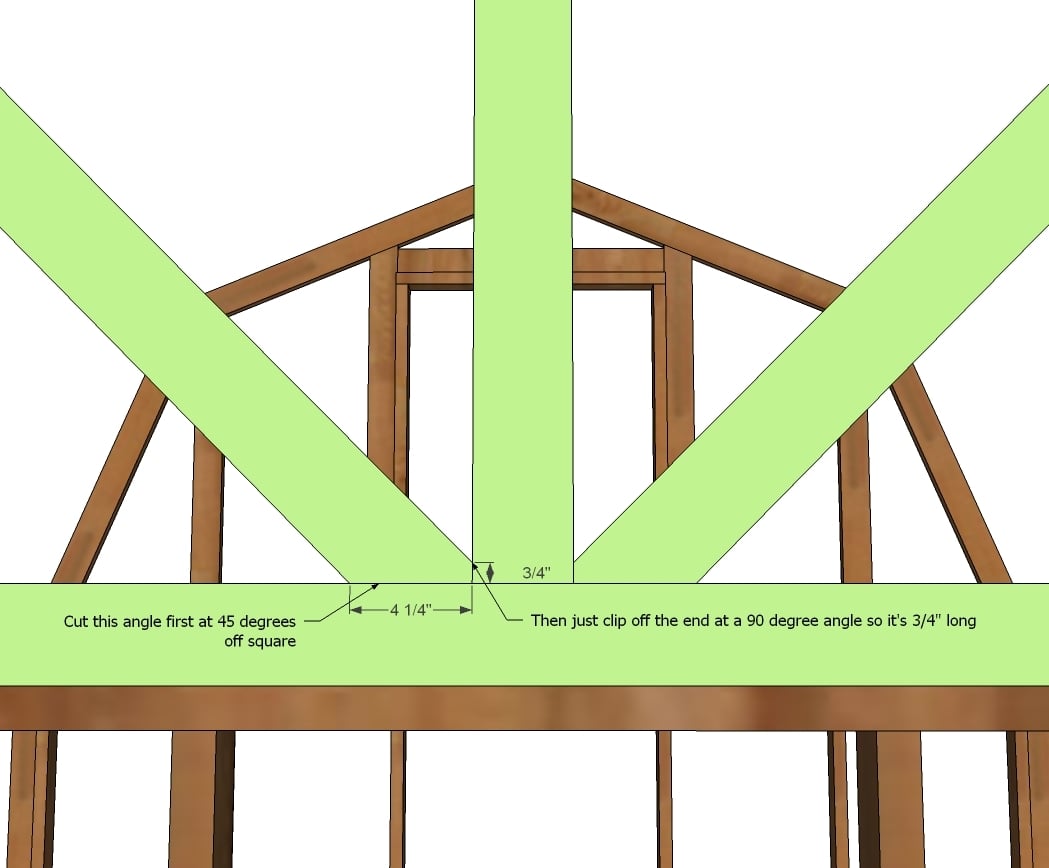
This board was a little tricky to cut - practice first!
Step 8
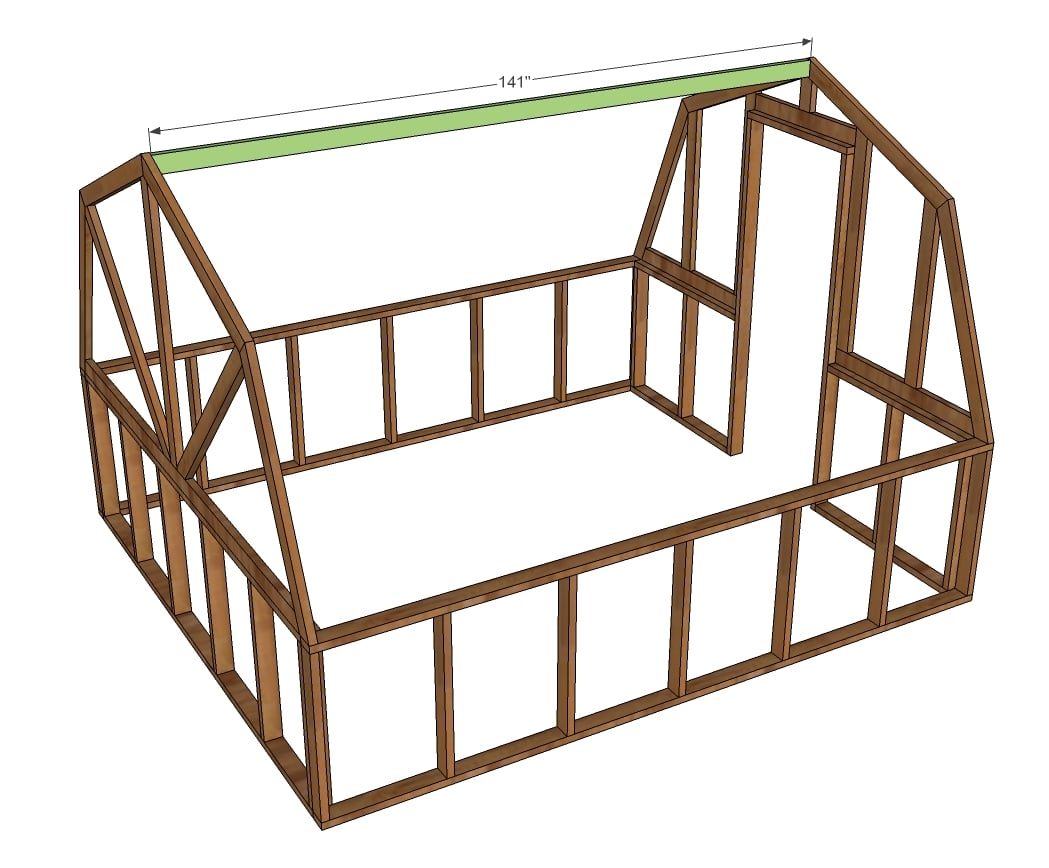
1 – 2X4 @ 141”
NOTE: If you use gussets - we used 1/2" plywood - this will affect your ridgepole length.
Step 9
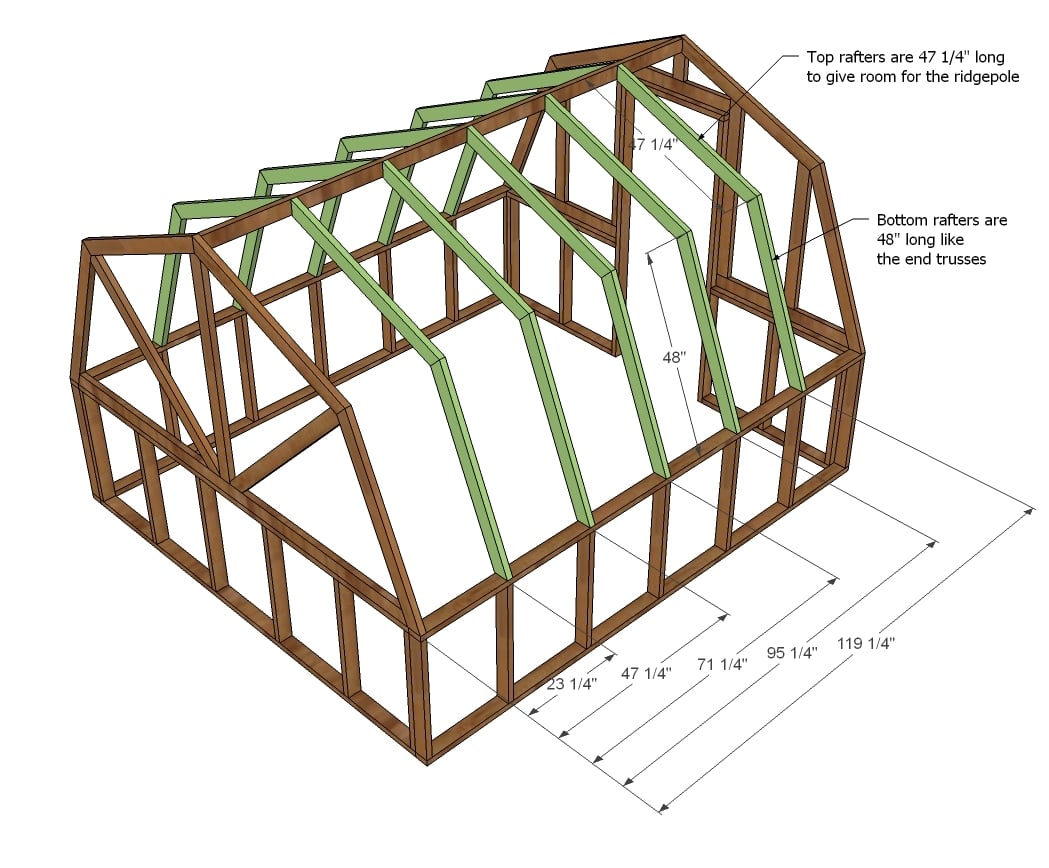
- 10 2X4 @ 48” (BOTH ENDS CUT AT 22 ½ DEGREES ENDS NOT PARALLEL)
- 10 2X4 @ 47 1/4” (BOTH ENDS CUT AT 22 ½ DEGREES ENDS NOT PARALLEL) - shorter rafters go up to meet the ridgepole. I marked all shorter rafters to avoid confusion.
For the common rafters of this barn style greenhouse, we ended up using plywood gussets to save money. After cutting quite a few, I figured out how to cut gussets the super quick and easy way - got gusset cutting down to less than a minute each.
We put gussets on both sides of each rafter joint with glue and screws. We made all of the small trusses first on the ground, then it was just a matter of stacking them on the ridgepole and attaching to the studs. We used 8 screws per gusset. Common rafters are installed flush to top of ridgepole and flush to outside of side walls. We had to "toenail" the screws in - meaning they are screwed in at an angle. We used glue and 3" screws from both sides.
Step 10
The plan will get you through the framing.
At this point, you could use plastic paper, lexan glass panels, you name it to seal the frame in.
We used the corrugated plastic panels detailed earlier for installation. IMPORTANT: If you do not use panels you will need some sort of lateral support to keep the greenhouse from swaying side to side. Try 12 foot long 2x4s.
It is always recommended to apply a test coat on a hidden area or scrap piece to ensure color evenness and adhesion. Use primer or wood conditioner as needed.


Comments
whitney_smith
Thu, 05/17/2012 - 11:57
Amazing!
My sister and I were just talking about greenhouses. I have always had a little dream of having one (gardening was my first hobby love). It looks great!
Rory (not verified)
Thu, 05/17/2012 - 12:37
Cost?
Love this! Just wondering about what it costs to build? Couldn't find it in the description.
In reply to Cost? by Rory (not verified)
chilkat
Tue, 06/15/2021 - 09:16
Did you find out a cost?
Did you find out a cost?
Cindy from Indiana (not verified)
Thu, 05/17/2012 - 12:51
Oh, I love this!
This project is awesome! I've been planning out how to arrange our yard - this is going to have to go into the plan. Love it!
viola
Thu, 05/17/2012 - 12:52
greenhouse envy
Ana I am so glad to see the greenhouse finished. What a wonderful Mother's Day gift that was. Thank you for sharing the plans with us. Wishing you and your family lots of joy in your gardening adventures...Vi
In reply to greenhouse envy by viola
birdsandsoap
Thu, 05/17/2012 - 13:33
ditto!
ditto!
jaimecostiglio
Thu, 05/17/2012 - 13:01
Clearly beautiful
Thanks Ana for the apron shout out, perfect for gardening in the greenhouse! Your advice proved perfect (and my husband wrong!) as we got both giant wall pieces in and upstairs no problem, just finishing up and I'll send you pics tomorrow.
hammertime
Thu, 05/17/2012 - 13:05
Wow
Ana, you floor me anew.
BookladyDavina (not verified)
Thu, 05/17/2012 - 15:47
well done
Very nice job on this. Will be looking at this as a possible basis for the one we need to build, though it will have to wait til next year (this year I'm more concerned about the master suite renovations we're in the middle of.. the old man who built our house ages ago didn't understand the difference between dry wall and and the waterproof greenboard.. so we've had to gut and redo all the bathrooms one at a time. we decided to take the necessity and turn it into an excuse to redo the master suite the way we want, but doing it ourselves, on the weeks hubby's home from the slope, seems to be taking forever.. and there was a lot i can't/couldn't help with for health reasons.. but it's getting there..)
Meanwhile, I have 2 lovely bay windows that I use as an indoor mini-greenhouse.. keep my tomatoes and peppers in those and they do wonderful.. I'm in Palmer, AK and I have to literally kill them off or they would keep producing all winter. had one that got left in the bedroom all winter and ignored.. it has come back and is covered in new bell peppers. it's crazy :)
redhead_61
Thu, 05/17/2012 - 16:09
So Exciting
I of course would have no idea of how to do this on my own. Yet another reason you are loved by us all. I will totally be building one of these instead of buying when I get my spot of land!
Emily Frazier
Thu, 05/17/2012 - 19:15
Nice to get what you really want on mothers day
Isnt it really nice to get what you want for mothers day. Ana I am so glad you finally got your greenhouse. I got a stanless steel laser miter saw. Now I can build almost anything, got my Kreg Jig for Valentines. Cant wait for my birthday next month. I am thinking air compressor. Keep bringing these wonder projects. I talk you up to everyone I know. Send them to you sight. Thanks for being an inspiration to all the women that think the could not come out of their comfort zone and create.
Thanks,
Emily
Maria R (not verified)
Fri, 05/18/2012 - 07:23
Whoa! This is incredible!!! I
Whoa! This is incredible!!! I can't even tell you how much I had space for this in my current yard. It is my dream to have a greenhouse. Eventually!
Sally_Oh (not verified)
Fri, 05/18/2012 - 10:00
Winterize?
What will you need to do in winter, if anything? Thank you!
Ana White
Fri, 05/18/2012 - 10:54
Thank you everyone for your
Thank you everyone for your wonderful comments! This was actually a very easy project! We ourselves couldn't believe how fast it came together.
We asked locally what people do for venting and most people said on a small greenhouse, having the door open provides enough ventilation. But if we find we need more, we can always add vents.
At this point, we are just looking for a greenhouse to grow tomatoes and cucumbers and herbs and peppers - just extending our growing season a little on each side. But we would at some point like to consider a true arctic greenhouse and I love the suggestions of creating thermal mass. Really got me thinking! Thanks for the input, we really appreciate it!
We designed this plan so it's exactly 48" on the sides. Anyone like to see this as a shed too???? I'd love to modify the plans!
Thanks again for reading and commenting!
dananryan
Fri, 05/18/2012 - 21:41
Your read my mind!
I was just thinking how great this would be as a shed. I would love to build a space where I can store my tools and "play" with them too. Thanks Ana!
Bryanna Djibril (not verified)
Wed, 07/11/2012 - 10:26
Shed
Ana,
You are, as always, impressive! I would LOVE to see this as a shed! We really need one and my husband loves this design.
Thank you!
Bryanna
Randy from Bla… (not verified)
Tue, 12/11/2012 - 17:13
Yes, would like to see this as a shed
I'm searching your newly found site now (found by googling loft bed) for a shed, and saw this.
I am curious how the clear corrugated siding is holding up (did you only build this in May 2012?).
In reply to Thank you everyone for your by Ana White
darkjuan
Thu, 08/08/2013 - 06:45
Greenhouse transformed to shed
I would really like to have this plan "converted" to a shed. Maybe with double doors (50+ inches on the opening) so I can drive the mower (48" cutting width) with ease.
Thank you for all the plans and ideas that you and your family are sharing with us all.
Kosodate Farm (not verified)
Fri, 05/18/2012 - 14:27
Plans for a smaller footprint, please?
Hi Ana,
I'd like to see this greenhouse with a smaller footprint . Any outbuilding over 100 sq. ft. would require a permit in my city.
Thanks for the plans! This the the perfect fall work party project!
In reply to Plans for a smaller footprint, please? by Kosodate Farm (not verified)
Ana White
Sat, 05/19/2012 - 12:36
Hi! The easiest way to do a
Hi! The easiest way to do a smaller footprint is to just make it 8 feet long instead of 12! Then you just buy 8 foot sheets of tin and greenhouse plastic, make the side walls 8 feet long instead of 12, and drop 2 sets of common rafters. Super easy mod and would get you just under 100 square feet :)
Kosodate Farm (not verified)
Fri, 05/18/2012 - 14:29
Will the gambrel roof hold ut to the snow?
Hi,
I'm just wondering how the roof will hold up under the weight of snow.
Thanks Ana!
In reply to Will the gambrel roof hold ut to the snow? by Kosodate Farm (not verified)
Ana White
Sat, 05/19/2012 - 12:34
The roof is very strong. The
The roof is very strong. The Ram was standing on it yesterday to put the ridge cap up and there's no give.
Sue_McL
Fri, 05/18/2012 - 17:52
Aquaponics?
This looks about just the right size for my greenhouse!
I'll be curious to see what you do for winterizing it. Maybe use bubble wrap in "ceiling?"
Looks like it would support the snow load and I am thinking about heating with a fish tank -- about 500 gallons of warm water should be able to keep the veggies growing... and allow me to harvest fish too!
Thanks Ana!!!
Kosodate Farm (not verified)
Sat, 05/19/2012 - 07:43
How did you move it from the driveway?
Hi Ana,
Is the greenhouse light enough to relocate from where it is built? Can you recommend the best way to move it? thanks!
In reply to How did you move it from the driveway? by Kosodate Farm (not verified)
Ana White
Sat, 05/19/2012 - 12:31
Hi! The greenhouse isn't
Hi! The greenhouse isn't that heavy - we moved it by putting it on a trailer and then taking it off with just my husband and father-in-law. The best option is to build your trusses and walls on a flat level surface, and then assemble and add the tin and greenhouse panels in place.
baklund
Sat, 05/19/2012 - 15:43
I would love to see this as a
I would love to see this as a shed. We don't have a garage and need to build a bigger shed to store the snowblower, bikes, tools, etc.
llconcloud9 (not verified)
Sun, 05/20/2012 - 19:33
I love this idea! And the
I love this idea! And the step by step plans are wonderful! Can you give me a guesstimate of the cost to build this they way you built it?
nan harp (not verified)
Sun, 05/20/2012 - 19:39
cost and time involved
About how long timewise was the project? What was the rough cost of materials?
nan harp (not verified)
Sun, 05/20/2012 - 19:43
cost and time involved
About how long timewise was the project? What was the rough cost of materials?
nan harp (not verified)
Sun, 05/20/2012 - 19:45
cost and time involved
About how long timewise was the project? What was the rough cost of materials?
Ron Ortoli (not verified)
Sun, 05/20/2012 - 19:46
Thanks
This looks easy to build, we like the basic structure, but may use corrigated plastic panels on the sides as we live in a cold area of vermont.
Thanks
Carol H. (not verified)
Wed, 05/23/2012 - 20:17
Would love a shed plan
Hi Ana: I too would love to see this plan as a shed but a bit smaller.
I also wondered about the venting. I don't think that it could be used during the hot summer months around my parts. Then again there is such a product as shade cloth.
Dianna (not verified)
Thu, 05/24/2012 - 00:54
What is the cost?
I'm in Alaska too and I was wondering what it cost to build this. I also want to be able to grow stuff like tomatoes, peppers and herbs. We have done cold frames made out of pallets but I would like to build a greenhouse.
stcurry
Thu, 05/24/2012 - 19:30
You read my Mind
As I was reading the plans I was trying to figure out how to make it a shed. I would love to see the plans.
Thanks Ana for all you do. I started building a few weeks ago and dont want to stop.
Aida Nieves (not verified)
Fri, 05/25/2012 - 11:41
Love this , just emailed it
Love this , just emailed it to my hubby in hopes that he gets inspired to build this for me as i love to garden and this is perfect ... thanks for sharing .
Darlene (not verified)
Fri, 06/15/2012 - 21:45
roof on your greenhouse
I noticed that you placed the clear roofing side ways on the greenhouse instead of placing it vertical so that the rain and snow would run off faster. Did you have any problems during this last winter in Alaska with the snow load? I built a similar shed last year and the roof was strong enough for all the snow this year. Here are the plans, http://www.mybackyardplans.com/gambrelstorageshed.php
Thanks
Darlene
Greg (not verified)
Wed, 06/20/2012 - 06:50
Agree on the roof panels - it will be a problem
I agree with Darlene. The ribbed panels need to be vertical to shed water. With your horizontal panels the water will run to the ends and then soak into the wood framing. I would expect the wood at the front and back of your greenhouse will begin to rot sooner rather than later.
HILDA (not verified)
Mon, 07/02/2012 - 17:54
Love this greenhouse
I am new (just today) and have seen some of your plans. I am awed!!! But when I saw this... OMG... I was in love. I have been wanting a greenhouse for quite a while now and this is actually something attainable for me. Thank you so much for all your sharing and keep up your wonderful work.
exuma_momma
Sun, 07/29/2012 - 18:12
Bigger shed
I would LOVE to see this as a shed. How hard would it be to make it two doors wide and a bit longer? This looks like just the shed we need for all our gear for our trips :) always an Ana Fan!!!!!
Craig C. (not verified)
Fri, 08/03/2012 - 08:48
notched supports?
Ana
Where did you get the ribbing strips for the corrugated? I would like to build your shed / greenhouse and send you pics! I already have the space and we are leveling now!
Kim from Texas (not verified)
Sat, 08/25/2012 - 17:08
Great Greenhouse!
Well now, that's about the cutest lil greenhouse I ever did see! My husband and I were inpsired. We bought the materials and we'll be constructing the "lil cutie" next week. I read the post about the horizontal placement of sheeting along with the one on venting. Snow is not an issue in our part of Texas but we do have lots of rain. We are using environmentally recommended treated lumber for the entire project. I will take notice and comment how it holds up over time. (I do not think it'll be a problem) We will, however, need some sort of venting for mid summer as it's disgustingly hot down here. However, we thought the plan was laid out perfectly fine for our needs. We will figure out the venting problem next summer. I'll let you know how it works for our weather and I'll post a link to your site onto our site along with pics after it all said and done. Thanks again!! The Reshards
In reply to Great Greenhouse! by Kim from Texas (not verified)
FernDawg
Mon, 10/14/2013 - 13:03
do not attach the corrugated sheets horizontally
Seriously...the Gambrel framing is great however Ana got it all wrong with the corrugated polycarbonate (not corrugated glass as she stated). Rain or snow it will rot the wood eventually because water will leak in. Also she should have used foam gaskets/inserts instead of wood. Wood will rot.
Here's a link for Lexan Corrugated Polycarbonate panel installation
http://www.hobby-greenhouse.com/lexan.htm
Actually the metal side walls should be vertical as well.
Vi Wood (not verified)
Fri, 09/07/2012 - 09:19
Greenhouse
Ana,
Can't thank you enough for the plans, we've been looking for some plans for a long time now.
However I will build the greenhouse double length, I need a larger greenhouse and will make the pitch on the roof steeper.
A vent is a must and if I need heat then I will build one of this solar panel: http://blog.hemmings.com/index.php/2007/04/26/almost-free-garage-heat-j…
Good luck planting your dream garden.
Liv (not verified)
Sat, 09/08/2012 - 19:01
This is amazing! Thank you so
This is amazing! Thank you so much for sharing the plans and sharing the knowledge to the community out here! We appreciate it. I know what you mean about putting things off until you decide "why not RIGHT NOW?" That's how I've finally started getting things done!
I miss Alaska like crazy; I love living vicariously through other people's blogs!
♥
Liv
Heidi from the… (not verified)
Sat, 10/06/2012 - 15:53
Love it!
Hubby and I want to have a green house really bad and this just might fit the bill.
Wondering if you secured it to the ground? We get wind storms and I know that it blew away one of those metal kit garden sheds you can buy.
NormaJean Mahar (not verified)
Sun, 10/07/2012 - 10:38
Barn Greenhouse
I really like the looks of this greenhouse. It also looks easy to build. What I have a question about is, shouldn't the plastic greenhouse panels be turned the other way for people who live in the Northern climates where there is sometimes 1-3 ft. of snow? Othen that I really love this idea.
Guest named Gary (not verified)
Sat, 10/13/2012 - 07:10
corrugated polycarbonate
Nice page however it's unfortunate you attached the corrugated polycarbonate horizontally which is not recommended by Sabic, Sun Tuff etc. The panel should be
installed with the hills and valleys aligned vertically. This allows snow ( I would imagine in Alaska you get plenty of snow) to slide off the roof and looks a lot better. See greenhouses at hobby-greenhouse.com to see what I mean they use Lexan Corrugated I purchased on a few years back.
Jack and Pams Place (not verified)
Fri, 12/07/2012 - 05:15
Longer rather than shorter
Hi there, I am semi retired and my wife and I are looking to open a small Business on our 30 acres. We both love gardening and making candles, birdhouses and such. I am curious about the greenhouse plans I found of yours while searching. I see people asking about a smaller version but what if I make it say, 20 ft long? Just adjust the measurements as I would with the shorter version I would think. I would like to attach a shed, store to it and it looks like if I build the trusses closer together it would take the winter snow. I may just make the outside walls higher for the head room and butt the greenhouse to it. Any thoughts? Am I on the right track with it? Thanks in advance, Jack and Pam
teresa hansen (not verified)
Sat, 12/08/2012 - 08:28
green house ???
hey ana the green house looks great i just have a few questions 1. Im relatively new at this and my husband and sons and ok me we built this beautiful green house frame out of angle iron and outside out of plexiglass we snagged a deal at the local restore from habitat for humanity but the plexiglass is not durable on the outside so we r going to have to replace it with that corrugated stuff you have on yours,Im curious if it islong lasting in the conditions up there in alaska and we were thinking of angling it the other way so as to allow the snow here in utah to fall off the roof but still not sure give me your best synopsis please. 2. also the heating and cooling we only need it for maybe a 6-8 weeks prior to planting so the best possible economical outcome that you have found woud be most helpful. excited spring planter Teresa!
Indrek (not verified)
Thu, 01/10/2013 - 15:05
Alternative
Your SketchUp skills (and building skills) are impressive! I've made an easier alternative http://www.diywoodbuildings.com/diy-projects/diy-greenhouse